
Search results for "Enormous functionality" in Home Design Ideas
 TOC design & construction inc.
DESIGNED BY TOC design
CONSTRUCTION BY TOC design & Construction inc.
PHOTOS BY : Tania Scardellato
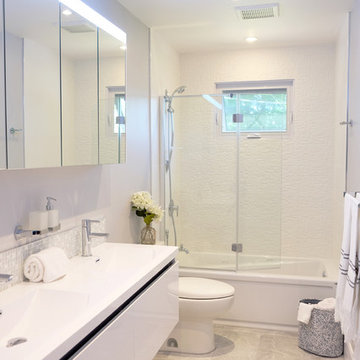
I was fortunate to have a young family approach me in desperate need to renovate there only 3 piece bathroom. This space was In dire need of a remodel, with old brown wall to wall tiles and a dated bulky yellow brown single sink vanity.
Storage was a must, lighting a necessity, and proper accessibility to the shower bath area.
We had a tight budget to respect, but a full gut of this bathroom was required. And a good thing too, once we started doing the demolition we noticed that mildew and rotting floors and walls had accumulated throughout the years. Doing it right the first time is no joke when dealing with water and electrical issues.
We discarded all reminisce of old and built from scratch, new walls, new plumbing, new electrical ,new insulation and a new window, a new fan that actually exhausted outside ( I say this laughing as you would be amazed at how many fans are installed but don’t exhaust outside, and you the client would never know unless you go inside the attic space.
Once all the hard stuff was done, the rest is just a matter of smart design. If you have a small bathroom here are some tips to guide you.
10 tips for making a small bathroom feel larger
Is your tiny bathroom cramping your functionality and style, leaving you longing for the enormous bathrooms gracing the pages of design magazines? Even if your bathroom is a fraction of the size, all it takes is some design savvy to make the most of the space you have. Consider these 10 smart tips that will help your bathroom look, feel and function like those larger contenders.
1-Get creative with corners
Space is at a premium in small bathrooms, so it's important to maximize every inch. Corners, for example, provide extra space for shelving, storage units and even hooks. Get creative and install unique design solutions that are not only functional, but also eye-catching. If you love the airiness of floating cabinets, add baskets or decorative boxes under for extra storage. If you are installing floating cabinets insure that they are installed securely to studs or plywood at wall.
2- Let solid colors shine
Busy patterns have a shrinking effect and make small bathrooms seem even smaller. Conversely, light natural hues make a space feel more open. If you're itching to get creative with design, experiment with textures but keep overpowering patterns to a minimum. Tone on tone is the best to achieve this.
3 - Maximize your bathtub
A bathtub takes up a significant portion of the room, but modern, compact options with curved basins, can make the tub feel larger when in use, all while conserving space.
4 - Select a smaller faucet
A faucet is jewelry for the bathroom. And just as accessories can overpower an outfit, a big bulky faucet isn't flattering in a small bath. Single-handle designs conserve counter space, while a wall-mount installation frees it up all together and can create quite the wow-factor, if the budget can accommodate the required changes to plumbing behind the wall.
5 - Make vanity storage simple
If you're in a storage war with your small bathroom, you're not alone in the battle. Toiletries and personal supplies without a place to call home only add clutter and chaos. Store smart with a space-saving vanity, the dual sink vanity shown here, looks quite simple, but in reality it has 4 sets of full extension drawers, and the vanity tower adds extra storage without overpowering the use of space.
6 - Show off the shower
Shower curtains may be pretty, but they interrupt the visual flow of a bathing space and make it feel significantly smaller. In bathrooms with small footprints, opt for a clear glass sliding shower door that doesn't require the clearance of one with a hinged design. Or as shown in this design and for fraction less expensive a half hinged panel installed on a fixed tempered glass panel. If you're embarking on a big remodel, create the illusion of more space by using same tile in the shower that's used throughout; instead of seeing them as two separate zones, the eye will read them as one.
7 - Discover the treasure of hidden storage
Work with a contractor, and you just might find some serious storage potential hidden behind your walls. Whether it's utilizing space between the studs for shallow shelving or a creating a small linen closet by annexing space from an adjacent room, even small additions can make a big difference.
8 - Focal Point
Tile is a beautiful, durable addition to any bathroom. For dainty spaces, consider installing tile at a diagonal to accentuate the focal point or as in this bathroom I used an oversized textured pattern to bring depth to the space at the window wall.
9 - Choose the right lights
Strategically install light to reflect and brighten a small bathroom to make it appear larger. Recessed lighting is an affordable solution for tiny rooms, offering ample light while taking up little space. Wall sconces alongside a mirror also reflect off the walls and make a room feel bright and airy. I always recommend going with LED lighting at 2800 to 3000K.
10 – Accessorize
This is your time to shine in your decorating skills, have fun with your towels, you can change the color scheme daily just by adding pops of color in your accessories, make sure to get items that serve a dual purpose, like baskets, boxes they can always be used as hampers, storing of towels and even a nice display for your guest.
 TOC design & construction inc.
DESIGNED BY TOC design
CONSTRUCTION BY TOC design & Construction inc.
PHOTOS BY : Tania Scardellato
I was fortunate to have a young family approach me in desperate need to renovate there only 3 piece bathroom. This space was In dire need of a remodel, with old brown wall to wall tiles and a dated bulky yellow brown single sink vanity.
Storage was a must, lighting a necessity, and proper accessibility to the shower bath area.
We had a tight budget to respect, but a full gut of this bathroom was required. And a good thing too, once we started doing the demolition we noticed that mildew and rotting floors and walls had accumulated throughout the years. Doing it right the first time is no joke when dealing with water and electrical issues.
We discarded all reminisce of old and built from scratch, new walls, new plumbing, new electrical ,new insulation and a new window, a new fan that actually exhausted outside ( I say this laughing as you would be amazed at how many fans are installed but don’t exhaust outside, and you the client would never know unless you go inside the attic space.
Once all the hard stuff was done, the rest is just a matter of smart design. If you have a small bathroom here are some tips to guide you.
10 tips for making a small bathroom feel larger
Is your tiny bathroom cramping your functionality and style, leaving you longing for the enormous bathrooms gracing the pages of design magazines? Even if your bathroom is a fraction of the size, all it takes is some design savvy to make the most of the space you have. Consider these 10 smart tips that will help your bathroom look, feel and function like those larger contenders.
1-Get creative with corners
Space is at a premium in small bathrooms, so it's important to maximize every inch. Corners, for example, provide extra space for shelving, storage units and even hooks. Get creative and install unique design solutions that are not only functional, but also eye-catching. If you love the airiness of floating cabinets, add baskets or decorative boxes under for extra storage. If you are installing floating cabinets insure that they are installed securely to studs or plywood at wall.
2- Let solid colors shine
Busy patterns have a shrinking effect and make small bathrooms seem even smaller. Conversely, light natural hues make a space feel more open. If you're itching to get creative with design, experiment with textures but keep overpowering patterns to a minimum. Tone on tone is the best to achieve this.
3 - Maximize your bathtub
A bathtub takes up a significant portion of the room, but modern, compact options with curved basins, can make the tub feel larger when in use, all while conserving space.
4 - Select a smaller faucet
A faucet is jewelry for the bathroom. And just as accessories can overpower an outfit, a big bulky faucet isn't flattering in a small bath. Single-handle designs conserve counter space, while a wall-mount installation frees it up all together and can create quite the wow-factor, if the budget can accommodate the required changes to plumbing behind the wall.
5 - Make vanity storage simple
If you're in a storage war with your small bathroom, you're not alone in the battle. Toiletries and personal supplies without a place to call home only add clutter and chaos. Store smart with a space-saving vanity, the dual sink vanity shown here, looks quite simple, but in reality it has 4 sets of full extension drawers, and the vanity tower adds extra storage without overpowering the use of space.
6 - Show off the shower
Shower curtains may be pretty, but they interrupt the visual flow of a bathing space and make it feel significantly smaller. In bathrooms with small footprints, opt for a clear glass sliding shower door that doesn't require the clearance of one with a hinged design. Or as shown in this design and for fraction less expensive a half hinged panel installed on a fixed tempered glass panel. If you're embarking on a big remodel, create the illusion of more space by using same tile in the shower that's used throughout; instead of seeing them as two separate zones, the eye will read them as one.
7 - Discover the treasure of hidden storage
Work with a contractor, and you just might find some serious storage potential hidden behind your walls. Whether it's utilizing space between the studs for shallow shelving or a creating a small linen closet by annexing space from an adjacent room, even small additions can make a big difference.
8 - Focal Point
Tile is a beautiful, durable addition to any bathroom. For dainty spaces, consider installing tile at a diagonal to accentuate the focal point or as in this bathroom I used an oversized textured pattern to bring depth to the space at the window wall.
9 - Choose the right lights
Strategically install light to reflect and brighten a small bathroom to make it appear larger. Recessed lighting is an affordable solution for tiny rooms, offering ample light while taking up little space. Wall sconces alongside a mirror also reflect off the walls and make a room feel bright and airy. I always recommend going with LED lighting at 2800 to 3000K.
10 – Accessorize
This is your time to shine in your decorating skills, have fun with your towels, you can change the color scheme daily just by adding pops of color in your accessories, make sure to get items that serve a dual purpose, like baskets, boxes they can always be used as hampers, storing of towels and even a nice display for your guest.
 TOC design & construction inc.
DESIGNED BY TOC design
CONSTRUCTION BY TOC design & Construction inc.
PHOTOS BY : Tania Scardellato
I was fortunate to have a young family approach me in desperate need to renovate there only 3 piece bathroom. This space was In dire need of a remodel, with old brown wall to wall tiles and a dated bulky yellow brown single sink vanity.
Storage was a must, lighting a necessity, and proper accessibility to the shower bath area.
We had a tight budget to respect, but a full gut of this bathroom was required. And a good thing too, once we started doing the demolition we noticed that mildew and rotting floors and walls had accumulated throughout the years. Doing it right the first time is no joke when dealing with water and electrical issues.
We discarded all reminisce of old and built from scratch, new walls, new plumbing, new electrical ,new insulation and a new window, a new fan that actually exhausted outside ( I say this laughing as you would be amazed at how many fans are installed but don’t exhaust outside, and you the client would never know unless you go inside the attic space.
Once all the hard stuff was done, the rest is just a matter of smart design. If you have a small bathroom here are some tips to guide you.
10 tips for making a small bathroom feel larger
Is your tiny bathroom cramping your functionality and style, leaving you longing for the enormous bathrooms gracing the pages of design magazines? Even if your bathroom is a fraction of the size, all it takes is some design savvy to make the most of the space you have. Consider these 10 smart tips that will help your bathroom look, feel and function like those larger contenders.
1-Get creative with corners
Space is at a premium in small bathrooms, so it's important to maximize every inch. Corners, for example, provide extra space for shelving, storage units and even hooks. Get creative and install unique design solutions that are not only functional, but also eye-catching. If you love the airiness of floating cabinets, add baskets or decorative boxes under for extra storage. If you are installing floating cabinets insure that they are installed securely to studs or plywood at wall.
2- Let solid colors shine
Busy patterns have a shrinking effect and make small bathrooms seem even smaller. Conversely, light natural hues make a space feel more open. If you're itching to get creative with design, experiment with textures but keep overpowering patterns to a minimum. Tone on tone is the best to achieve this.
3 - Maximize your bathtub
A bathtub takes up a significant portion of the room, but modern, compact options with curved basins, can make the tub feel larger when in use, all while conserving space.
4 - Select a smaller faucet
A faucet is jewelry for the bathroom. And just as accessories can overpower an outfit, a big bulky faucet isn't flattering in a small bath. Single-handle designs conserve counter space, while a wall-mount installation frees it up all together and can create quite the wow-factor, if the budget can accommodate the required changes to plumbing behind the wall.
5 - Make vanity storage simple
If you're in a storage war with your small bathroom, you're not alone in the battle. Toiletries and personal supplies without a place to call home only add clutter and chaos. Store smart with a space-saving vanity, the dual sink vanity shown here, looks quite simple, but in reality it has 4 sets of full extension drawers, and the vanity tower adds extra storage without overpowering the use of space.
6 - Show off the shower
Shower curtains may be pretty, but they interrupt the visual flow of a bathing space and make it feel significantly smaller. In bathrooms with small footprints, opt for a clear glass sliding shower door that doesn't require the clearance of one with a hinged design. Or as shown in this design and for fraction less expensive a half hinged panel installed on a fixed tempered glass panel. If you're embarking on a big remodel, create the illusion of more space by using same tile in the shower that's used throughout; instead of seeing them as two separate zones, the eye will read them as one.
7 - Discover the treasure of hidden storage
Work with a contractor, and you just might find some serious storage potential hidden behind your walls. Whether it's utilizing space between the studs for shallow shelving or a creating a small linen closet by annexing space from an adjacent room, even small additions can make a big difference.
8 - Focal Point
Tile is a beautiful, durable addition to any bathroom. For dainty spaces, consider installing tile at a diagonal to accentuate the focal point or as in this bathroom I used an oversized textured pattern to bring depth to the space at the window wall.
9 - Choose the right lights
Strategically install light to reflect and brighten a small bathroom to make it appear larger. Recessed lighting is an affordable solution for tiny rooms, offering ample light while taking up little space. Wall sconces alongside a mirror also reflect off the walls and make a room feel bright and airy. I always recommend going with LED lighting at 2800 to 3000K.
10 – Accessorize
This is your time to shine in your decorating skills, have fun with your towels, you can change the color scheme daily just by adding pops of color in your accessories, make sure to get items that serve a dual purpose, like baskets, boxes they can always be used as hampers, storing of towels and even a nice display for your guest.
Find the right local pro for your project
 TOC design & construction inc.
DESIGNED BY TOC design
CONSTRUCTION BY TOC design & Construction inc.
PHOTOS BY : Tania Scardellato
I was fortunate to have a young family approach me in desperate need to renovate there only 3 piece bathroom. This space was In dire need of a remodel, with old brown wall to wall tiles and a dated bulky yellow brown single sink vanity.
Storage was a must, lighting a necessity, and proper accessibility to the shower bath area.
We had a tight budget to respect, but a full gut of this bathroom was required. And a good thing too, once we started doing the demolition we noticed that mildew and rotting floors and walls had accumulated throughout the years. Doing it right the first time is no joke when dealing with water and electrical issues.
We discarded all reminisce of old and built from scratch, new walls, new plumbing, new electrical ,new insulation and a new window, a new fan that actually exhausted outside ( I say this laughing as you would be amazed at how many fans are installed but don’t exhaust outside, and you the client would never know unless you go inside the attic space.
Once all the hard stuff was done, the rest is just a matter of smart design. If you have a small bathroom here are some tips to guide you.
10 tips for making a small bathroom feel larger
Is your tiny bathroom cramping your functionality and style, leaving you longing for the enormous bathrooms gracing the pages of design magazines? Even if your bathroom is a fraction of the size, all it takes is some design savvy to make the most of the space you have. Consider these 10 smart tips that will help your bathroom look, feel and function like those larger contenders.
1-Get creative with corners
Space is at a premium in small bathrooms, so it's important to maximize every inch. Corners, for example, provide extra space for shelving, storage units and even hooks. Get creative and install unique design solutions that are not only functional, but also eye-catching. If you love the airiness of floating cabinets, add baskets or decorative boxes under for extra storage. If you are installing floating cabinets insure that they are installed securely to studs or plywood at wall.
2- Let solid colors shine
Busy patterns have a shrinking effect and make small bathrooms seem even smaller. Conversely, light natural hues make a space feel more open. If you're itching to get creative with design, experiment with textures but keep overpowering patterns to a minimum. Tone on tone is the best to achieve this.
3 - Maximize your bathtub
A bathtub takes up a significant portion of the room, but modern, compact options with curved basins, can make the tub feel larger when in use, all while conserving space.
4 - Select a smaller faucet
A faucet is jewelry for the bathroom. And just as accessories can overpower an outfit, a big bulky faucet isn't flattering in a small bath. Single-handle designs conserve counter space, while a wall-mount installation frees it up all together and can create quite the wow-factor, if the budget can accommodate the required changes to plumbing behind the wall.
5 - Make vanity storage simple
If you're in a storage war with your small bathroom, you're not alone in the battle. Toiletries and personal supplies without a place to call home only add clutter and chaos. Store smart with a space-saving vanity, the dual sink vanity shown here, looks quite simple, but in reality it has 4 sets of full extension drawers, and the vanity tower adds extra storage without overpowering the use of space.
6 - Show off the shower
Shower curtains may be pretty, but they interrupt the visual flow of a bathing space and make it feel significantly smaller. In bathrooms with small footprints, opt for a clear glass sliding shower door that doesn't require the clearance of one with a hinged design. Or as shown in this design and for fraction less expensive a half hinged panel installed on a fixed tempered glass panel. If you're embarking on a big remodel, create the illusion of more space by using same tile in the shower that's used throughout; instead of seeing them as two separate zones, the eye will read them as one.
7 - Discover the treasure of hidden storage
Work with a contractor, and you just might find some serious storage potential hidden behind your walls. Whether it's utilizing space between the studs for shallow shelving or a creating a small linen closet by annexing space from an adjacent room, even small additions can make a big difference.
8 - Focal Point
Tile is a beautiful, durable addition to any bathroom. For dainty spaces, consider installing tile at a diagonal to accentuate the focal point or as in this bathroom I used an oversized textured pattern to bring depth to the space at the window wall.
9 - Choose the right lights
Strategically install light to reflect and brighten a small bathroom to make it appear larger. Recessed lighting is an affordable solution for tiny rooms, offering ample light while taking up little space. Wall sconces alongside a mirror also reflect off the walls and make a room feel bright and airy. I always recommend going with LED lighting at 2800 to 3000K.
10 – Accessorize
This is your time to shine in your decorating skills, have fun with your towels, you can change the color scheme daily just by adding pops of color in your accessories, make sure to get items that serve a dual purpose, like baskets, boxes they can always be used as hampers, storing of towels and even a nice display for your guest.
 TOC design & construction inc.
DESIGNED BY TOC design
CONSTRUCTION BY TOC design & Construction inc.
PHOTOS BY : Tania Scardellato
I was fortunate to have a young family approach me in desperate need to renovate there only 3 piece bathroom. This space was In dire need of a remodel, with old brown wall to wall tiles and a dated bulky yellow brown single sink vanity.
Storage was a must, lighting a necessity, and proper accessibility to the shower bath area.
We had a tight budget to respect, but a full gut of this bathroom was required. And a good thing too, once we started doing the demolition we noticed that mildew and rotting floors and walls had accumulated throughout the years. Doing it right the first time is no joke when dealing with water and electrical issues.
We discarded all reminisce of old and built from scratch, new walls, new plumbing, new electrical ,new insulation and a new window, a new fan that actually exhausted outside ( I say this laughing as you would be amazed at how many fans are installed but don’t exhaust outside, and you the client would never know unless you go inside the attic space.
Once all the hard stuff was done, the rest is just a matter of smart design. If you have a small bathroom here are some tips to guide you.
10 tips for making a small bathroom feel larger
Is your tiny bathroom cramping your functionality and style, leaving you longing for the enormous bathrooms gracing the pages of design magazines? Even if your bathroom is a fraction of the size, all it takes is some design savvy to make the most of the space you have. Consider these 10 smart tips that will help your bathroom look, feel and function like those larger contenders.
1-Get creative with corners
Space is at a premium in small bathrooms, so it's important to maximize every inch. Corners, for example, provide extra space for shelving, storage units and even hooks. Get creative and install unique design solutions that are not only functional, but also eye-catching. If you love the airiness of floating cabinets, add baskets or decorative boxes under for extra storage. If you are installing floating cabinets insure that they are installed securely to studs or plywood at wall.
2- Let solid colors shine
Busy patterns have a shrinking effect and make small bathrooms seem even smaller. Conversely, light natural hues make a space feel more open. If you're itching to get creative with design, experiment with textures but keep overpowering patterns to a minimum. Tone on tone is the best to achieve this.
3 - Maximize your bathtub
A bathtub takes up a significant portion of the room, but modern, compact options with curved basins, can make the tub feel larger when in use, all while conserving space.
4 - Select a smaller faucet
A faucet is jewelry for the bathroom. And just as accessories can overpower an outfit, a big bulky faucet isn't flattering in a small bath. Single-handle designs conserve counter space, while a wall-mount installation frees it up all together and can create quite the wow-factor, if the budget can accommodate the required changes to plumbing behind the wall.
5 - Make vanity storage simple
If you're in a storage war with your small bathroom, you're not alone in the battle. Toiletries and personal supplies without a place to call home only add clutter and chaos. Store smart with a space-saving vanity, the dual sink vanity shown here, looks quite simple, but in reality it has 4 sets of full extension drawers, and the vanity tower adds extra storage without overpowering the use of space.
6 - Show off the shower
Shower curtains may be pretty, but they interrupt the visual flow of a bathing space and make it feel significantly smaller. In bathrooms with small footprints, opt for a clear glass sliding shower door that doesn't require the clearance of one with a hinged design. Or as shown in this design and for fraction less expensive a half hinged panel installed on a fixed tempered glass panel. If you're embarking on a big remodel, create the illusion of more space by using same tile in the shower that's used throughout; instead of seeing them as two separate zones, the eye will read them as one.
7 - Discover the treasure of hidden storage
Work with a contractor, and you just might find some serious storage potential hidden behind your walls. Whether it's utilizing space between the studs for shallow shelving or a creating a small linen closet by annexing space from an adjacent room, even small additions can make a big difference.
8 - Focal Point
Tile is a beautiful, durable addition to any bathroom. For dainty spaces, consider installing tile at a diagonal to accentuate the focal point or as in this bathroom I used an oversized textured pattern to bring depth to the space at the window wall.
9 - Choose the right lights
Strategically install light to reflect and brighten a small bathroom to make it appear larger. Recessed lighting is an affordable solution for tiny rooms, offering ample light while taking up little space. Wall sconces alongside a mirror also reflect off the walls and make a room feel bright and airy. I always recommend going with LED lighting at 2800 to 3000K.
10 – Accessorize
This is your time to shine in your decorating skills, have fun with your towels, you can change the color scheme daily just by adding pops of color in your accessories, make sure to get items that serve a dual purpose, like baskets, boxes they can always be used as hampers, storing of towels and even a nice display for your guest.
 BLDG Workshop Inc.
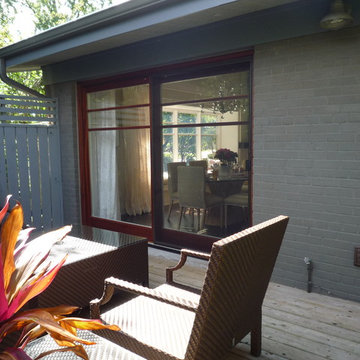
An enormous sliding door was set into the dining room area to give increased light to the interior space while allowing it to function seamlessly with a sideyard deck and grilling area.
 SINKOLOGY
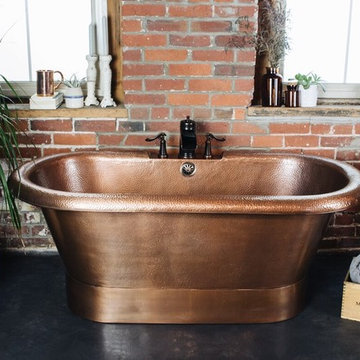
The Thales 60" Copper Freestanding Bathtub With Overflow from Sinkology is thoughtfully designed to be the most affordable and functional copper tub available. This freestanding bathtub is handmade from 14-gauge pure solid copper and is carefully coated with a durable finish that ensure you bathtub looks beautiful for a lifetime. Every copper bathtub is deliberately hand-hammered and carefully finish by skilled craftsman. Each tub is also inspected and tested multiple times to guarantee every Sinkology bathtub meets our standards. The Thales freestanding tub was created to fit smaller spaces, yet make an enormous design statement in any bathroom. Also included is a pre-drilled overflow hole and drain hole that is conveniently located off to the side of the bath tub. The Thales copper tub is protected by a lifetime warranty.
Sponsored
Sunbury, OH

J.Holderby - Renovations
Franklin County's Leading General Contractors - 2X Best of Houzz!
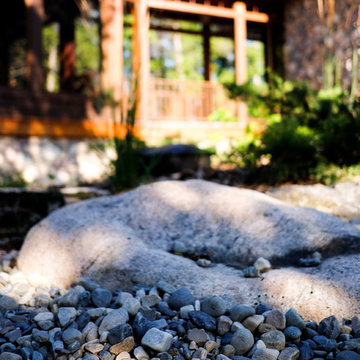
 Land Art
New garden complete. Pea gravel path leads users through a native plant garden with the essence of a geological feature. The grassland provides year-round interest, attracts birds and pollinators, and functions as a drainage solution, efficiently diverting enormous amounts of runoff away from the home where it had previously pooled after rain showers and spring snowmelts.
Photo by Jess Ray Photography
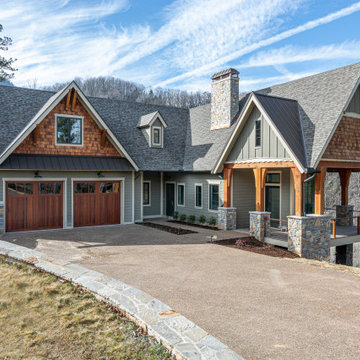
 STRATTON DESIGN GROUP
Craftsman for today’s living with open kitchen, dining room and great room for this home in the North Carolina Blue Ridge Mountains. Working very closely with the homeowners for the optimal use of space and functionality, SDG also designed this home to impress with massive windows, clean architectural detailing and an enormous kitchen that checks all boxes of luxury living.
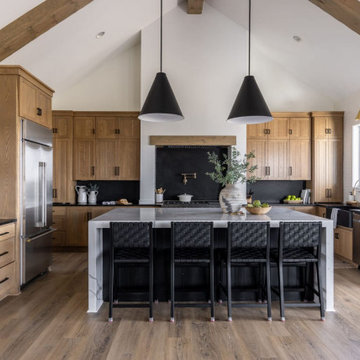
 Evergreen Remodeling & Construction
The owners wanted a modern country house, but with a touch of distinction. They had been living with the original construction finishes for ten years and were ready for something special, something that felt personalized and intentional. They had spent months searching for inspiration, and when we sat down together, one thing was clear: they wanted warmth, natural materials, and a level of craftsmanship that could be seen and felt.
The kitchen became the heart of the transformation. Custom white oak cabinets with vertical grain and black hardware set the tone: natural, organic, and sophisticated. We designed them to reach the ceiling, maximizing storage space and creating striking vertical lines. The black soapstone countertops and backsplash contrast with the warmth of the wood, while the enormous island with its polished stone countertop became the family’s new gathering place.
Regarding the vaulted ceiling with exposed beams, we opened it up during the demolition and found a beautiful existing structure that had been hidden behind drywall. Instead of covering it up again, we celebrated it with those robust wooden beams that anchor the entire space.
The brass accessories and sconces provide the necessary warmth and glamour without being overwhelming. These are the details that elevate the rustic style to something more refined.
But what truly stands out is the master bathroom. The symmetrical layout with matching white oak vanities flanking an arched doorway leading to the shower is pure architectural drama. Through that arch, you glimpse the white-tiled bathroom: a spa-like sanctuary with a freestanding bathtub and walk-in shower that makes you feel miles away from the stresses of daily life.
The herringbone brick-patterned tile floor adds texture and earthy tones to the space, while the open shelving of the vanities provides light and accessibility. And those brass faucets and ceramic sconces? Perfection.
At Evergreen, we believe that what good design should achieve is making you want to be at home. We create the difference between house and home.
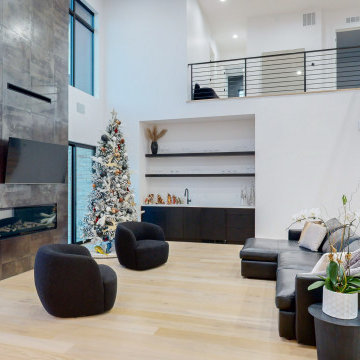
 F9 Productions Inc.
This bright, modern living space highlights stunning architectural balance between openness and precision. The double-height ceiling and expansive loft railing draw the eye upward, while the floating staircase and black metal details introduce a sleek, sculptural rhythm to the space. Warm white oak floors and minimalist finishes keep the interior grounded and inviting. Along the back wall, a built-in wet bar with open shelving and matte black cabinetry provides both function and contrast—serving as a refined extension of the kitchen and a perfect spot for entertaining.
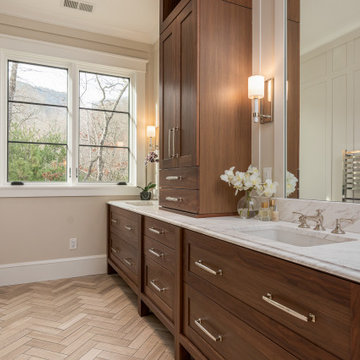 STRATTON DESIGN GROUP
Craftsman for today’s living with open kitchen, dining room and great room for this home in the North Carolina Blue Ridge Mountains. Working very closely with the homeowners for the optimal use of space and functionality, SDG also designed this home to impress with massive windows, clean architectural detailing and an enormous kitchen that checks all boxes of luxury living.
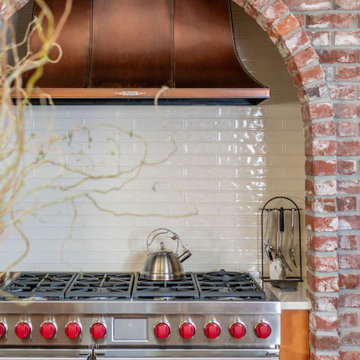
 Amy Troute Inspired Interior Design
We kept the functional layout of the kitchen, enormous skylights, character brick and custom copper range hood, but refaced cabinetry and replaced countertops, backsplash, paint and fixtures. Inspired by the ruddy tones in the brick, the new surfaces compliment and refresh the heart of this home.
Photography by Kayla McKenzie Photography


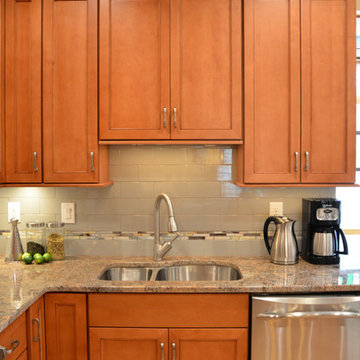
 Skill Construction & Design, LLC
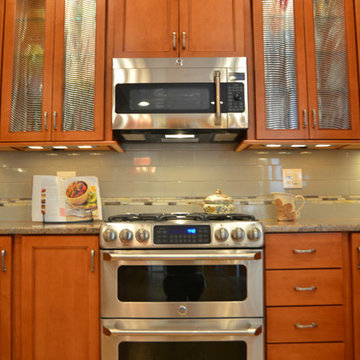
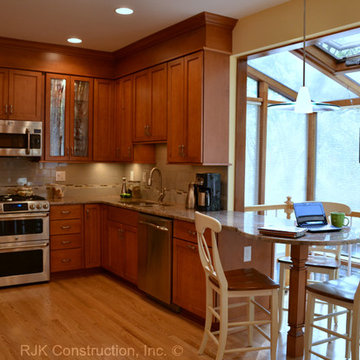
This kitchen remodel is truly one of a character. The warmth of these cabinets from New River, the sleek back-splash pattern, and the enormous amount of light coming in from a clerestory window, make this kitchen scream inviting.
Before this kitchen was somewhat dark, and did not reflect the personalities of our homeowners. They invited us into their homes, and together we created this gorgeous new kitchen.
Our homeowners frequently found themselves sitting in the balcony area of this kitchen, so together we came up with a design that incorporated this area into the kitchen. With Coffee or tea within an arm’s length, who wouldn’t want to spend the morning watching the sun rise right in this little area?
We wanted to create the look of “cabinetry to ceiling” but were unable to move the soffits in this kitchen. Our solution? Custom Cabinetry trim to create this illusion. We think it turned out beautifully!
We also wanted to work together to open up the kitchen into the formal dining space, but didn’t want to remove too many walls or sacrifice cabinetry storage. We created a pass through above standard counter top height with it’s own bar top between these two rooms. Now food, drinks, and conversation can easily pass through these areas.
Two recessed lights built into the cabinets add visual interest, and functional lighting in our new pass through area.
The products that you find in this kitchen are contributors of the warm feeling you get when you walk into this kitchen. The cabinetry is from New River, made in Roanoke, VA. The wood species is Maple, and the door style is “Somerset.” The finish called “choral” adds warmth with it’s reddish undertone.
On of our favorite features in this kitchen is the glass inserts in the cabinetry above and adjacent to the new gas stove from GE. Glass detail in cabinetry always breaks up the cabinets by adding a place for the eye to immediately go to. These are unique as they are a wavy textured glass that allow you to get a peek inside of the cabinets, but are not fully transparent.
http://www.designsbyskill.com/
http://www.rjkconstructioninc.com/
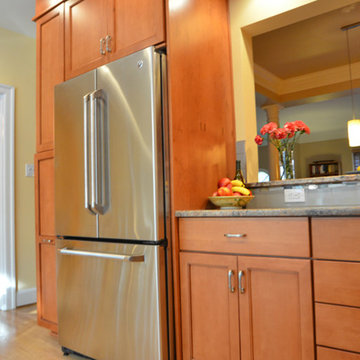 Skill Construction & Design, LLC
This kitchen remodel is truly one of a character. The warmth of these cabinets from New River, the sleek back-splash pattern, and the enormous amount of light coming in from a clerestory window, make this kitchen scream inviting.
Before this kitchen was somewhat dark, and did not reflect the personalities of our homeowners. They invited us into their homes, and together we created this gorgeous new kitchen.
Our homeowners frequently found themselves sitting in the balcony area of this kitchen, so together we came up with a design that incorporated this area into the kitchen. With Coffee or tea within an arm’s length, who wouldn’t want to spend the morning watching the sun rise right in this little area?
We wanted to create the look of “cabinetry to ceiling” but were unable to move the soffits in this kitchen. Our solution? Custom Cabinetry trim to create this illusion. We think it turned out beautifully!
We also wanted to work together to open up the kitchen into the formal dining space, but didn’t want to remove too many walls or sacrifice cabinetry storage. We created a pass through above standard counter top height with it’s own bar top between these two rooms. Now food, drinks, and conversation can easily pass through these areas.
Two recessed lights built into the cabinets add visual interest, and functional lighting in our new pass through area.
The products that you find in this kitchen are contributors of the warm feeling you get when you walk into this kitchen. The cabinetry is from New River, made in Roanoke, VA. The wood species is Maple, and the door style is “Somerset.” The finish called “choral” adds warmth with it’s reddish undertone.
On of our favorite features in this kitchen is the glass inserts in the cabinetry above and adjacent to the new gas stove from GE. Glass detail in cabinetry always breaks up the cabinets by adding a place for the eye to immediately go to. These are unique as they are a wavy textured glass that allow you to get a peek inside of the cabinets, but are not fully transparent.
http://www.designsbyskill.com/
http://www.rjkconstructioninc.com/
 Skill Construction & Design, LLC
This kitchen remodel is truly one of a character. The warmth of these cabinets from New River, the sleek back-splash pattern, and the enormous amount of light coming in from a clerestory window, make this kitchen scream inviting.
Before this kitchen was somewhat dark, and did not reflect the personalities of our homeowners. They invited us into their homes, and together we created this gorgeous new kitchen.
Our homeowners frequently found themselves sitting in the balcony area of this kitchen, so together we came up with a design that incorporated this area into the kitchen. With Coffee or tea within an arm’s length, who wouldn’t want to spend the morning watching the sun rise right in this little area?
We wanted to create the look of “cabinetry to ceiling” but were unable to move the soffits in this kitchen. Our solution? Custom Cabinetry trim to create this illusion. We think it turned out beautifully!
We also wanted to work together to open up the kitchen into the formal dining space, but didn’t want to remove too many walls or sacrifice cabinetry storage. We created a pass through above standard counter top height with it’s own bar top between these two rooms. Now food, drinks, and conversation can easily pass through these areas.
Two recessed lights built into the cabinets add visual interest, and functional lighting in our new pass through area.
The products that you find in this kitchen are contributors of the warm feeling you get when you walk into this kitchen. The cabinetry is from New River, made in Roanoke, VA. The wood species is Maple, and the door style is “Somerset.” The finish called “choral” adds warmth with it’s reddish undertone.
On of our favorite features in this kitchen is the glass inserts in the cabinetry above and adjacent to the new gas stove from GE. Glass detail in cabinetry always breaks up the cabinets by adding a place for the eye to immediately go to. These are unique as they are a wavy textured glass that allow you to get a peek inside of the cabinets, but are not fully transparent.
http://www.designsbyskill.com/
http://www.rjkconstructioninc.com/
 Skill Construction & Design, LLC
This kitchen remodel is truly one of a character. The warmth of these cabinets from New River, the sleek back-splash pattern, and the enormous amount of light coming in from a clerestory window, make this kitchen scream inviting.
Before this kitchen was somewhat dark, and did not reflect the personalities of our homeowners. They invited us into their homes, and together we created this gorgeous new kitchen.
Our homeowners frequently found themselves sitting in the balcony area of this kitchen, so together we came up with a design that incorporated this area into the kitchen. With Coffee or tea within an arm’s length, who wouldn’t want to spend the morning watching the sun rise right in this little area?
We wanted to create the look of “cabinetry to ceiling” but were unable to move the soffits in this kitchen. Our solution? Custom Cabinetry trim to create this illusion. We think it turned out beautifully!
We also wanted to work together to open up the kitchen into the formal dining space, but didn’t want to remove too many walls or sacrifice cabinetry storage. We created a pass through above standard counter top height with it’s own bar top between these two rooms. Now food, drinks, and conversation can easily pass through these areas.
Two recessed lights built into the cabinets add visual interest, and functional lighting in our new pass through area.
The products that you find in this kitchen are contributors of the warm feeling you get when you walk into this kitchen. The cabinetry is from New River, made in Roanoke, VA. The wood species is Maple, and the door style is “Somerset.” The finish called “choral” adds warmth with it’s reddish undertone.
On of our favorite features in this kitchen is the glass inserts in the cabinetry above and adjacent to the new gas stove from GE. Glass detail in cabinetry always breaks up the cabinets by adding a place for the eye to immediately go to. These are unique as they are a wavy textured glass that allow you to get a peek inside of the cabinets, but are not fully transparent.
http://www.designsbyskill.com/
http://www.rjkconstructioninc.com/
Sponsored
Columbus, OH

Structural Remodeling
Franklin County's Heavy Timber Specialists | Best of Houzz 2020!
 F9 Productions Inc.
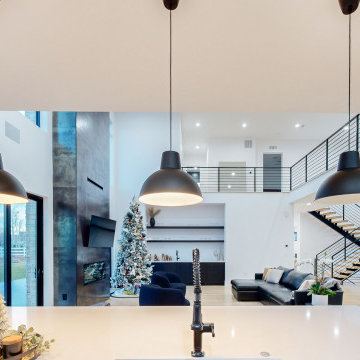
This bright, modern living space highlights stunning architectural balance between openness and precision. The double-height ceiling and expansive loft railing draw the eye upward, while the floating staircase and black metal details introduce a sleek, sculptural rhythm to the space. Warm white oak floors and minimalist finishes keep the interior grounded and inviting. Along the back wall, a built-in wet bar with open shelving and matte black cabinetry provides both function and contrast—serving as a refined extension of the kitchen and a perfect spot for entertaining.
 Amy Troute Inspired Interior Design
There’s nothing quite like a cozy cottage to call home. Especially when you can get creative, renovating key spaces to balance modern convenience and vintage charm. We collaborated with the talented homeowners to bring their vision to life an the results speak for themselves. A gourmet kitchen fits seamlessly in the original home’s footprint and not one, but two thoughtfully re-designed bathrooms bring a slice of luxury and function to this sweet little home. The modern-meets-classic kitchen tiles started it all, setting the tone for the entire renovation. Gourmet appliances and custom cabinetry maximized function and storage and new lighting was a perfect finishing touch. We completely re-worked the home’s “master” bath (you should see the “before!”), adding a spacious frameless glass shower. In the basement, the new bathroom is every bit the retreat the homeowner dreamed of, with the freestanding composite tub, an enormous vanity and a hidden stackable washer and dryer. The decommissioned fireplace is oh-so decorative, showing off with new Ann Sacks marble mosaic tile. The transformation is impressive, and it’s so rewarding to see this lovely couple and sweet pup happy in their adorable home! Furniture staging for photography provided by Crush Staging, Portland. Photography by Cody Wheeler.
 Advance Design Studio, Ltd.
Scott and Janet of Elgin have had four design to build renovations with Advance Design over the last decade. We got the chance to sit down and talk with Janet about her experience working with Advance Design on so many different areas of her home. Starting with her kitchen in 2009, Janet proclaimed, “The reason we kept coming back is because our first [renovation] went so extremely well, exceeding all of my expectations.”
Since their kitchen renovation with Advance Design ten years ago, Scott and Janet have also worked with Advance to remodel their master bedroom, their power room, a wet bar, and most recently their master bath. Having renovated practically every major room in the house with the team, we asked Janet what made her experience with Advance Design so special. “We went with Advance Design because we trusted them so much more, their experience, and everything that they brought. We were confident they were giving us what we wanted for the money we were spending.”
For their most recent renovation, Scott and Janet clearly knew what to expect going into their master bath renovation. They were familiar with Advance’s step by step design process that epitomizes the “Common Sense Remodeling” philosophy applied in every project Advance creates. After once again experiencing the careful budgeting analysis, the pointed design meetings, and the clear documentation that leads up the a thoroughly managed installation, Janet’s simple summary of their experience is this; “The word I would use to describe the process is – collaboration!”
Working closely with Advance Design kitchen designer Michelle Lecinski, together they were able to develop a new master bath design that not only worked with their investment goal, but also made sense for their lifestyle. “Oh Michelle, my designer! I connected with her immediately. She spent time getting to know us, our lifestyle, even the setting of our house.” The threesome had a great experience designing and producing yet another successful project together.
When it came to their new project plans, Scott and Janet were interested in creating a relaxing “spa-like” experience in their master bath. One of the many ideas Michelle introduced during the design process was installing a Kohler Alteo series showerhead for a rain-like shower experience. This designer showerhead, mixed with the warm ambiance of the lighting and pebble accent running throughout the shower make for what Janet calls a “luxury spa essence”. From the oversized glass sliding door to the recessed niche for accessories, each special detail was considered and implemented intentionally so as to create the maximumly optimized use of the compact space. Not only was this transformation one of beauty and luxury, but special attention was given to every way possible to provide additional storage to maximize the functionality of the bath area as a whole.
Once design was complete and the bath construction project began in their home, making sure everything happened efficiently and on schedule became new priority number one. “Having a project manager made an enormous difference,” Janet said, “It was so worth it to hire professionals that knew exactly what they were doing. Even after all of these years, I wouldn’t change a thing.”
“It was a pleasure working together with Janet and Scott to create this beautiful space that will enhance their lives for many years,” says Michelle. “It is so much fun to get to do this job every day, I love that I can have this sort of impact on their lives by doing something for them [Janet & Scott] that comes so naturally to me!”
After reviewing the long-term relationship with clients like Scott and Janet, owner Todd Jurs had this to say, “Clients returning and asking us to transform that next area of their home really warms my heart. It reaffirms that every decision to please clients no matter what is always the right choice, and that our honesty and integrity along with the immense collective talent of this team is recognized and appreciated by those who continue to return to us year after year.” He continued to say, “I always say how blessed we truly are to be able to do what we do, and experiences like this one put a smile on my face every time.”
9