
Search results for "Established schedule" in Home Design Ideas


 FormLA Landscaping
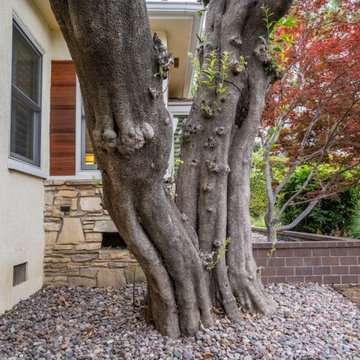
Ember resistant gravel replaced combustible organic mulch at the base of this well established tree. This helps protect both the tree and the home from ignition. Well established, the tree's annual trimming schedule, which includes clipping off these small shoots and keeping limbs from touching the roof and eves met insurance and LA County Fire Department standards.
Find the right local pro for your project
 Ultimate Outdoor Design
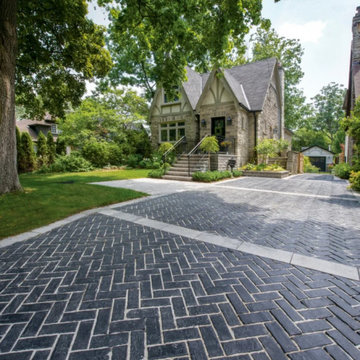
Some materials speak with quiet authority. Copthorne® delivers that presence with deep color, vintage texture, and the unmistakable elegance of authentic clay brick. It is the kind of surface that instantly feels established, like it belongs to the history of the home itself.
Unilock Copthorne® is inspired by the timeless charm of European street pavers. Made with Ultima™ concrete technology, it offers the strength to withstand the rigors of driveway use while preserving the warmth of traditional brick. Its refined finish and tight joints make it ideal for driveways, borders, and herringbone layouts that demand both style and structure.
Now picture arriving home and driving over a pattern that feels both historic and intentional. Each paver adds rhythm to the approach. The contrast of dark stone with crisp joint lines creates an architectural elegance that frames the entire home.
This is not just a driveway. It is a statement of timeless taste and architectural continuity.
Let’s explore how this material can bring your outdoor story to life.
Schedule your consultation today: 516-522-8249

 Talon Construction Inc.
Designing and building a kitchen addition is a complex process that involves multiple steps and considerations. Here is a general outline to help you get started on your kitchen addition project:
Define Your Goals and Budget:
• Determine the purpose of the kitchen addition. Is it for more cooking space, a dining area, or a combination of both?
• Establish a realistic budget for your project. Consider all costs, including construction, permits, materials, and furnishings.
Hire a Design Professional:
• Seek the services of a design build company who specializes in kitchen additions.
• Discuss your vision, needs, and budget with the design professional to create a design concept.
Site Evaluation:
• Assess the existing space and structural condition of your home to ensure it can support the addition.
• Consider factors like zoning regulations, setbacks, and building codes.
Design Development:
• Collaborate with your design professional to refine the concept, including the layout, size, and architectural style.
• Choose materials, finishes, and fixtures that fit your design and budget.
Obtain Permits:
• Consult with your local design build contractor to determine the necessary permits and approvals.
• Prepare and submit all required documents, including architectural drawings and engineering plans.
Create Construction Documents:
• Work with your design build professional to develop detailed construction drawings and specifications.
• These documents will serve as a guide for contractors during construction.
Hire a design build contractor:
• Check references, credentials, and licenses before selecting a contractor.
• Sign a detailed contract that outlines the scope of work, timeline, and payment schedule.
Construction Phase:
• Demolition: If needed, remove any existing structures or walls.
• Foundation: Construct the foundation for the addition.
• Framing: Build the structural framework of the addition.
• Plumbing, Electrical, and HVAC: Install or update utilities as required.
• Insulation: Ensure proper insulation for energy efficiency.
• Drywall and Finish Work: Complete the walls and ceilings.
• Flooring and Cabinetry: Install flooring and kitchen cabinets.
• Appliances and Fixtures: Add appliances, plumbing fixtures, and lighting.
• Paint and Finish: Apply paint and finishes to achieve the desired look.
• Final Inspection: Schedule inspections to ensure compliance with building codes.
Final Inspections and Approvals:
• Arrange for final inspections to ensure the addition meets all safety and code requirements.
• Obtain any necessary certificates of occupancy or compliance.
Move In and Enjoy:
• Once all inspections and approvals are received, you can move into your new kitchen addition and start enjoying it.
Remember that every kitchen addition project is unique, so adapt this outline to your specific needs and circumstances. Consulting with professionals and obtaining the required permits and inspections is crucial to a successful and safe project.
 Colorworks Landscaping, L.L.C.
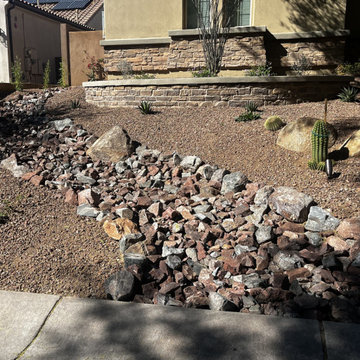
A complete desert landscape renovation — from demo through final planting — designed to honor the Sonoran Desert character of the property while adding structure, drama, and year-round visual interest.
The scope opened with full site demolition: removal of approximately 20 existing plants, regrading for a new curved pony wall and mounded terrain, and excavation for a new river run. Existing granite was preserved and redistributed rather than removed, reducing waste and maintaining the site's established material palette.
Hardscape & Structure
A 20-linear-foot curved retention wall built from standard block with a stucco cap defines a planting border along the property edge. The facing side is clad in 45 square feet of stone veneer matched precisely to the home's exterior — a detail that ties the landscape directly to the architecture. Five 500-pound surface boulders are placed throughout the mounded areas, grounding the composition with natural scale and weight.
River Run & Materials
Three tons of 3"x6" rip rap create a dry river run that flows through the redesigned grade, channeling storm water naturally while adding texture and movement. Three tons of fill dirt support the contouring and mounding work, and approximately 17 tons of the site's original granite was respread across the finished landscape.
Planting Design
The plant palette is entirely desert-adapted. Twenty-six five-gallon desert shrubs and ground covers layer the mounded areas. Sixteen five-gallon cacti and succulents — including Mexican Fence Post, Gopher Plant, assorted agaves, Argentine Giants, and Golden Barrels — provide sculptural structure. A six-foot bare root ocotillo serves as a dramatic vertical accent.
Irrigation
A new two-zone drip irrigation system — including a Febco backflow preventer, pressure regulator, timer, valve box, and poly line with emitters — was installed to maintain separate watering schedules for the plant and cactus zones.
Lighting
Five commercial-grade antique brass landscape spotlights were integrated throughout the space, wired with 500 feet of cable tied into the home's existing transformer. The result is a fully illuminated evening landscape that highlights boulder groupings, the river run, and key specimen plants.
 Talon Construction Inc.
Designing and building a kitchen addition is a complex process that involves multiple steps and considerations. Here is a general outline to help you get started on your kitchen addition project:
Define Your Goals and Budget:
• Determine the purpose of the kitchen addition. Is it for more cooking space, a dining area, or a combination of both?
• Establish a realistic budget for your project. Consider all costs, including construction, permits, materials, and furnishings.
Hire a Design Professional:
• Seek the services of a design build company who specializes in kitchen additions.
• Discuss your vision, needs, and budget with the design professional to create a design concept.
Site Evaluation:
• Assess the existing space and structural condition of your home to ensure it can support the addition.
• Consider factors like zoning regulations, setbacks, and building codes.
Design Development:
• Collaborate with your design professional to refine the concept, including the layout, size, and architectural style.
• Choose materials, finishes, and fixtures that fit your design and budget.
Obtain Permits:
• Consult with your local design build contractor to determine the necessary permits and approvals.
• Prepare and submit all required documents, including architectural drawings and engineering plans.
Create Construction Documents:
• Work with your design build professional to develop detailed construction drawings and specifications.
• These documents will serve as a guide for contractors during construction.
Hire a design build contractor:
• Check references, credentials, and licenses before selecting a contractor.
• Sign a detailed contract that outlines the scope of work, timeline, and payment schedule.
Construction Phase:
• Demolition: If needed, remove any existing structures or walls.
• Foundation: Construct the foundation for the addition.
• Framing: Build the structural framework of the addition.
• Plumbing, Electrical, and HVAC: Install or update utilities as required.
• Insulation: Ensure proper insulation for energy efficiency.
• Drywall and Finish Work: Complete the walls and ceilings.
• Flooring and Cabinetry: Install flooring and kitchen cabinets.
• Appliances and Fixtures: Add appliances, plumbing fixtures, and lighting.
• Paint and Finish: Apply paint and finishes to achieve the desired look.
• Final Inspection: Schedule inspections to ensure compliance with building codes.
Final Inspections and Approvals:
• Arrange for final inspections to ensure the addition meets all safety and code requirements.
• Obtain any necessary certificates of occupancy or compliance.
Move In and Enjoy:
• Once all inspections and approvals are received, you can move into your new kitchen addition and start enjoying it.
Remember that every kitchen addition project is unique, so adapt this outline to your specific needs and circumstances. Consulting with professionals and obtaining the required permits and inspections is crucial to a successful and safe project.
 Colorworks Landscaping, L.L.C.
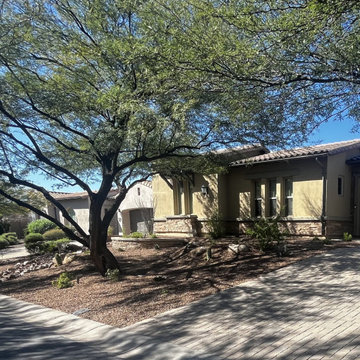
A complete desert landscape renovation — from demo through final planting — designed to honor the Sonoran Desert character of the property while adding structure, drama, and year-round visual interest.
The scope opened with full site demolition: removal of approximately 20 existing plants, regrading for a new curved pony wall and mounded terrain, and excavation for a new river run. Existing granite was preserved and redistributed rather than removed, reducing waste and maintaining the site's established material palette.
Hardscape & Structure
A 20-linear-foot curved retention wall built from standard block with a stucco cap defines a planting border along the property edge. The facing side is clad in 45 square feet of stone veneer matched precisely to the home's exterior — a detail that ties the landscape directly to the architecture. Five 500-pound surface boulders are placed throughout the mounded areas, grounding the composition with natural scale and weight.
River Run & Materials
Three tons of 3"x6" rip rap create a dry river run that flows through the redesigned grade, channeling storm water naturally while adding texture and movement. Three tons of fill dirt support the contouring and mounding work, and approximately 17 tons of the site's original granite was respread across the finished landscape.
Planting Design
The plant palette is entirely desert-adapted. Twenty-six five-gallon desert shrubs and ground covers layer the mounded areas. Sixteen five-gallon cacti and succulents — including Mexican Fence Post, Gopher Plant, assorted agaves, Argentine Giants, and Golden Barrels — provide sculptural structure. A six-foot bare root ocotillo serves as a dramatic vertical accent.
Irrigation
A new two-zone drip irrigation system — including a Febco backflow preventer, pressure regulator, timer, valve box, and poly line with emitters — was installed to maintain separate watering schedules for the plant and cactus zones.
Lighting
Five commercial-grade antique brass landscape spotlights were integrated throughout the space, wired with 500 feet of cable tied into the home's existing transformer. The result is a fully illuminated evening landscape that highlights boulder groupings, the river run, and key specimen plants.
7