
Search results for "Established schedule" in Home Design Ideas
 Klopf Architecture
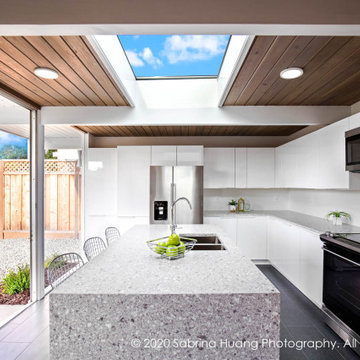
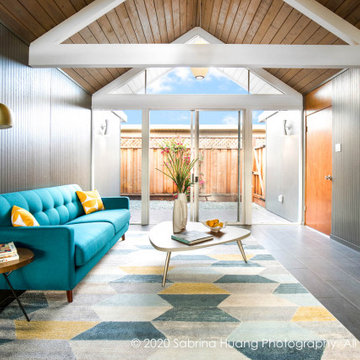
Joseph Eichler developed his moderately priced houses for the mass-market starting in 1949. His homes were designed using affordable materials and simple construction techniques. Nearly 70 years later these homes are in need of updating and remodeling an Eichler home today can become an imposing and costly project if you’re not careful. For this project the clients, who had undergone several previous house renovations, were determined to stick with an established budget from the beginning. Klopf Architecture helped them modernize their Eichler with a premium appearance on a reasonable budget.
The clients challenged the Klopf team to create a design that had a high-end feel and nicely done while adhering to their budget. That meant not all of the initial project scope could be built. Like many other Eichler homes, the original floor plan did not meet the family’s needs leaving them feeling disconnected from one room to another. While an early goal was to expand the house into a carport and create a larger garage, it did not survive the contractor pricing phase of the project.
The goals that did survive through to the end of the project included blurring some of the boundaries and opening up some of the spaces, making them more functional and creating a smoother flow in the house. The Klopf team joined the former separate kitchen and formal living room into one large space and shift the dining room where it is now connected to the kitchen. Klopf swapped the family room to the front alongside the living room, so the spaces feel more cohesive and are now better suited for family activities. The functional layout of the master bathroom was changed to include a large, curbless shower.
Installing a complete IKEA kitchen including cabinets, countertops, appliances, light fixtures, and furnishings was key to staying within budget. Bath fixtures in this house are also exclusively IKEA. Klopf Architecture has designed many homes using IKEA products, which are quite compatible offering an affordable, contemporary take on Eichler homes. The clients saved additional money from the simplicity and availability of IKEA products and by orchestrating the orders and purchases themselves. Following each construction meeting, the clients would make a run to IKEA and purchase items, pick up needed spare parts, and bring them back right away to stay ahead of the contractor’s schedule and minimize the chance of delays and bottlenecks.
Klopf balanced material selections by retaining some of the original woodwork and simply refinishing the mahogany paneling. They were able to retain the original windows and sliding doors which were still in good shape, avoiding some of the most costly replacement expenses. Additionally interior doors were simply refinished and the exterior siding cleaned up and repainted. Formerly dark interiors are now illuminated with new slimmer semi-recessed lighting eliminating the need for costly roof work.
Attention to design details allowed the Klopf team to ensure the house ended up with a high quality feel. Key visual elements were strictly aligned and Klopf worked with the clients to select a unified materials palette throughout the spaces so the house flows seamlessly together. Aligning the tile layout with the trusses and keeping it level with the concrete slab outside allowed them to achieve a level of quality that may otherwise be missed.
The clients were able to keep their budget on track by determining clear goals and making critical decisions upfront, choosing materials and furnishings wisely, working with the right design and construction teams in place and to a large part, their willingness to participate throughout the process. In the end the clients were much happier with their reconfigured Eichler home and Klopf Architecture managed to keep their remodeling costs to about $325/sf – a good amount below the average Bay Area Eichler remodel.
Project Team: John Klopf, Angela Todorova, Sherry Tan
Contractor: Keycon Construction
Structural Engineer: Sezen & Moon
Photography: Sabrina Huang
Year Completed: 2020
 SUPERIOR CHIMNEY SERVICES CORPORATION
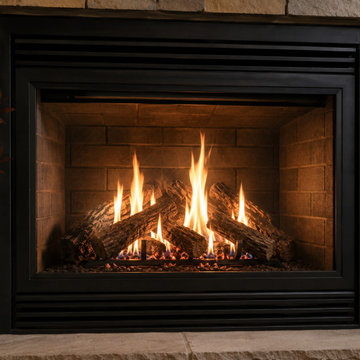
Standard annual or mechanical Chimney cleaning for gas and wood burning fireplaces typically works to remove any type of buildup as well as checking for the structural integrity of the chimney. Maintaining an annual chimney cleaning will meet the national safety standard set by the NFPA, CSIA, IRC and NCSG, helping homeowners avoid chimney fires and blockages.
Why does safety matter? Did you know that there was a chimney fire in Marengo in January? Or a chimney fire at a Peotone home at the end of March? Or a log cabin fire caused by the chimney in June? That’s just a few that happened in the past 7 months.
Why Does a Chimney Cleaning Matter?
Chimney sweeps also known as chimney cleanings, fireplace cleanings, or fireplace sweeps. Regardless of what you call it, it still means the same thing.
Chimney cleaning for gas and wood burning fireplaces serve 3 key purposes:
confirming structural integrity
removing flammable deposits and
obstruction-free assurance.
Homeowners with gas or wood burning fireplaces benefit from each of these safeguards.
The National Fire Protection Association addresses this directly through NFPA 211, a widely recognized fire safety code. The standard states that chimneys, fireplaces, and vents require inspection at least once a year for soundness, free from deposits, and correct clearances, with cleaning, maintenance, and repairs to be done whenever needed.
This annual requirement applies equally to gas and wood burning fireplaces. Organizations including the Chimney Safety Institute of America, the National Chimney Sweep Guild, International Residential code and the National Fire Protection Association each reference this standard as the requirement for home fire safety.
Free 14-Point Certified Written Inspection
Every chimney sweep completed through Superior Chimney includes a complimentary 14-point certified written inspection along with photo documentation delivered to you by email. This documentation gives homeowners a clear visual record of their chimney system.
The written report covers the condition of the flue liner, smoke chamber, smoke shelf, damper, firebox, chimney crown, and chimney cap, among other components examined during a standard visit. Photo documentation captures each area so homeowners can review the findings independently of the technician’s verbal summary. Written inspection reports allow families to track the condition of their fireplace chimney system over time.
Chimney Cleaning and Structural Integrity
A CSIA Certified Chimney Sweep technician, such as Superior Chimney technicians, visually examines the chimney from the top opening to the firebox below, gaining a full evaluation of the interior.
When chimney rods and brushes pass through the chimney system, loose pieces of fire clay tile, damaged tile joints, or crumbling brick sometimes fall down into the fireplace. This debris can mean there is an integrity problem. By knowing this is a problem, will protect families and their homes. Now it’s time to take care of it and call in a certified chimney technician.
Fireplace Cleaning and Creosote Removal
Creosote, is the technical name for soot. Soot forms as a natural byproduct of burning wood. Smoke traveling upward through the chimney and leaves deposits of creosote along the interior walls. With every fire, a little more gets built up.
The issue with creosote is that it is highly flammable and is the leading cause of chimney fires nationwide. Removing the buildup through regular chimney cleanings keeps a fireplace serviceable for continuous use throughout the spring, fall and winter seasons.
Standard and mechanical chimney cleanings pay close attention to the flue liner, smoke chamber, smoke shelf, damper, and firebox in a single service visit. Superior Chimney performs each fireplace chimney inspection using a no-mess process that protects the home during service. This keeps soot contained within specialized equipment rather than the living room.
An Obstruction Free Chimney
Several conditions create blockages within a chimney system. Bird, squirrel, bat and raccoon nesting material, feces, and debris frequently accumulate inside an unprotected flue, especially during spring and summer months when the fireplace sits unused.
Excessive creosote accumulation or a collapsed chimney liner can restrict proper airflow. Homeowners that address obstructions with a chimney inspection will be able to maintain proper draft and ventilation with their gas or wood burning fireplace. This will reduce the risk of smoke backing into the home.
Gas Chimney Cleaning Compared to Wood burning Chimney Cleaning
Gas and wood burning fireplaces share the same annual chimney inspection requirement. Whether you are burning wood, gas or a “pile of shirts” there is still heat and flame that requires worthy firewalls to protect the home from heat transfer. Fire worthiness and checking the firewall integrity is priority.
Wood burning fireplaces generate creosote that builds along the flue liner with every fire. Gas fireplace systems accumulate lighter deposits along with potential venting obstructions, since gas appliances rely heavily on venting for safe combustion byproduct release. Each system accumulates different residues that need attention.
A CSIA Certified Chimney Sweep technician from Superior Chimney adjusts the specific cleaning approach based on fuel type. However, the same core safety elements apply: structural integrity, deposit removal, and clear airflow.
What Happens During a Chimney Cleaning?
A typical chimney inspection begins with a walkthrough of the fireplace and the chimney on top of the roof, allowing the technician to record any visible concerns the homeowner reported in advance as well as any new findings.
The certified technician then covers the immediate hearth area with protective material before setting up specialized equipment designed to contain creosote throughout the cleaning and inspection.
Chimney rods and brushes pass through the flue liner to loosen and remove creosote deposits along the smoke chamber, smoke shelf, and damper. The certified technician inspects each section closely for loose or crumbling firewall, cracked joints, or other signs of weak structural damage.
A final walkthrough of the firebox and chimney completes the visual inspection. Photo documentation captures each component, and the certified written report is sent to the homeowner by email. This consistent process gives homeowners the documentation they need to compare year to year.
Chimney Cleaning Safety Standards
The table below summarizes the organizations that set national chimney safety standards, along with their specific requirements for fireplace chimney sweeps.
NFPA211
National Fire Protection Association
Annual inspection for soundness, deposit buildup, and correct clearances; cleaning and repairs completed as needed
CSIA
Chimney Safety Institute of America
Certifies technicians through testing on chimney and venting system knowledge
NCSG
National Chimney Sweep Guild
Establishes trade standards and best practices for chimney sweep professionals
How Often Should You Schedule a Chimney Cleaning and Inspection?
CSIA recommends scheduling chimney cleaning and inspection annually by CSIA Certified Chimney Sweeps. This recommendation applies to gas and wood burning fireplaces, regardless of how frequently a household uses the fireplace and especially in freeze/thaw geographic areas.
Regular chimney sweeps save lives, since a clean fireplace chimney rarely catches fire. CSIA encourages homeowners to rely on Certified Chimney Sweeps, as these technicians undergo regular testing on the complexities of chimney and venting systems throughout their careers.
Frequently Asked Questions
What is included in a chimney sweep? A chimney sweep includes the flue liner, smoke chamber, smoke shelf, damper, and firebox, removing creosote while checking for obstructions and structural concerns throughout the chimney system (NOT the ashpit).
How often should gas and wood burning fireplaces receive chimney sweeps? CSIA, NFPA, IRC and NCSG guidelines each call for chimney sweeps at least once a year for gas and wood burning fireplace systems.
Why does creosote removal matter for fireplace safety? Creosote is highly flammable and builds along the interior walls of a fireplace chimney with every fire, creating conditions that lead directly to chimney fires when left in place over time. Creosote is unburned particles from the combustion chamber.
Who should perform a fireplace chimney sweep? CSIA Certified Chimney Sweep technicians complete fireplace chimney sweeps after passing regular testing on chimney and venting system knowledge, meeting the certification standard recognized across the industry.
Does a fireplace chimney sweep remove animal nests and debris? No, a fireplace chimney sweep addresses soot and creosote, while significant nesting material, feces, or collapsed liner debris often calls for dedicated obstruction removal alongside the standard service.
What does the free 14-point inspection include? The complimentary 14-point certified written inspection documents the flue liner, smoke chamber, smoke shelf, damper, firebox, crown, and cap through photo evidence delivered directly by email for homeowner records.
Choose Superior Chimney for Your Certified Chimney Inspection
All service technicians completing chimney sweeps through Superior Chimney hold National Certification through the Chimney Safety Institute of America (CSIA), reflecting the training standard recommended by fire safety organizations nationwide.
Scheduling regular chimney sweeps to clean gas and wood burning fireplace systems protects a home from fire risk, preserves the structural integrity of the chimney, and keeps airflow clear for proper, continuous use throughout the year. Contact us today to schedule a chimney inspection at 877-244-6349.
 Progressive Design Build
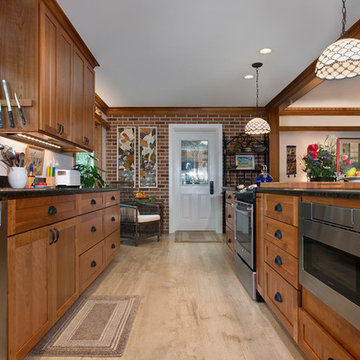
When a Historic District home was renovated in Fort Myers, a dream kitchen was created: open plan enough for gathering, with clearly delineated areas for cooking, reading and entertaining.
Challenge
Bill and Alison’s existing kitchen was small and dysfunctional. Each room seemed independent, and there was no flow through the house. The house felt small, with one entry and exit point.
As a planning consultant, Bill was no stranger to construction. He was a general contractor himself and had built several custom homes in years past. As a gardening enthusiast and professional educator, Alison also had an eye for design. They started with design, layout and planning on their own, but soon realized they needed help. After interviewing several contractors who seemed overwhelmed and unenthused by their project, they reached out to Progressive Design Build.
Solution
Mike was not only enthused about the project, but he established trust with Bill and Alison. Within a few short weeks he was hired to begin the planning phase, conducting thorough research on the project, meeting key subcontractors and establishing a realistic budget.
When the project began, internal walls were removed to open up the kitchen/dining areas and an island was built, giving the space an open and modern functionality. The eating area was enlarged, and a visual connection to the outside was established using Marvin insulated glass windows with Low E coatings—which rejects solar heat gain without reducing visible light passing through the glass.
In order to allow for the open concept layout that Bill and Alison desired, we built new structural beams to transfer the live load. The sliding patio doors opened onto a small terrace with a wrought iron handrail creating access to the private courtyard and garden area.
Finishing details included custom cherry cabinets and wood trimming, 16” x 32” natural stone flooring, granite countertops and historically correct plaster finishes.
Result
The project was completed within budget and two weeks ahead of schedule.
“That planning phase was the best money we spent on the project,” exclaimed Bill. “It was incredibly gratifying being able to watch the subcontractors and suppliers come and go with shared leadership and attention to details.”
Find the right local pro for your project
 Klopf Architecture
Joseph Eichler developed his moderately priced houses for the mass-market starting in 1949. His homes were designed using affordable materials and simple construction techniques. Nearly 70 years later these homes are in need of updating and remodeling an Eichler home today can become an imposing and costly project if you’re not careful. For this project the clients, who had undergone several previous house renovations, were determined to stick with an established budget from the beginning. Klopf Architecture helped them modernize their Eichler with a premium appearance on a reasonable budget.
The clients challenged the Klopf team to create a design that had a high-end feel and nicely done while adhering to their budget. That meant not all of the initial project scope could be built. Like many other Eichler homes, the original floor plan did not meet the family’s needs leaving them feeling disconnected from one room to another. While an early goal was to expand the house into a carport and create a larger garage, it did not survive the contractor pricing phase of the project.
The goals that did survive through to the end of the project included blurring some of the boundaries and opening up some of the spaces, making them more functional and creating a smoother flow in the house. The Klopf team joined the former separate kitchen and formal living room into one large space and shift the dining room where it is now connected to the kitchen. Klopf swapped the family room to the front alongside the living room, so the spaces feel more cohesive and are now better suited for family activities. The functional layout of the master bathroom was changed to include a large, curbless shower.
Installing a complete IKEA kitchen including cabinets, countertops, appliances, light fixtures, and furnishings was key to staying within budget. Bath fixtures in this house are also exclusively IKEA. Klopf Architecture has designed many homes using IKEA products, which are quite compatible offering an affordable, contemporary take on Eichler homes. The clients saved additional money from the simplicity and availability of IKEA products and by orchestrating the orders and purchases themselves. Following each construction meeting, the clients would make a run to IKEA and purchase items, pick up needed spare parts, and bring them back right away to stay ahead of the contractor’s schedule and minimize the chance of delays and bottlenecks.
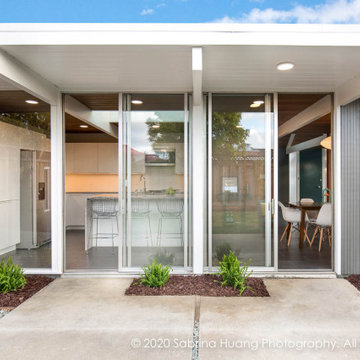
Klopf balanced material selections by retaining some of the original woodwork and simply refinishing the mahogany paneling. They were able to retain the original windows and sliding doors which were still in good shape, avoiding some of the most costly replacement expenses. Additionally interior doors were simply refinished and the exterior siding cleaned up and repainted. Formerly dark interiors are now illuminated with new slimmer semi-recessed lighting eliminating the need for costly roof work.
Attention to design details allowed the Klopf team to ensure the house ended up with a high quality feel. Key visual elements were strictly aligned and Klopf worked with the clients to select a unified materials palette throughout the spaces so the house flows seamlessly together. Aligning the tile layout with the trusses and keeping it level with the concrete slab outside allowed them to achieve a level of quality that may otherwise be missed.
The clients were able to keep their budget on track by determining clear goals and making critical decisions upfront, choosing materials and furnishings wisely, working with the right design and construction teams in place and to a large part, their willingness to participate throughout the process. In the end the clients were much happier with their reconfigured Eichler home and Klopf Architecture managed to keep their remodeling costs to about $325/sf – a good amount below the average Bay Area Eichler remodel.
Project Team: John Klopf, Angela Todorova, Sherry Tan
Contractor: Keycon Construction
Structural Engineer: Sezen & Moon
Photography: Sabrina Huang
Year Completed: 2020
 Klopf Architecture
Joseph Eichler developed his moderately priced houses for the mass-market starting in 1949. His homes were designed using affordable materials and simple construction techniques. Nearly 70 years later these homes are in need of updating and remodeling an Eichler home today can become an imposing and costly project if you’re not careful. For this project the clients, who had undergone several previous house renovations, were determined to stick with an established budget from the beginning. Klopf Architecture helped them modernize their Eichler with a premium appearance on a reasonable budget.
The clients challenged the Klopf team to create a design that had a high-end feel and nicely done while adhering to their budget. That meant not all of the initial project scope could be built. Like many other Eichler homes, the original floor plan did not meet the family’s needs leaving them feeling disconnected from one room to another. While an early goal was to expand the house into a carport and create a larger garage, it did not survive the contractor pricing phase of the project.
The goals that did survive through to the end of the project included blurring some of the boundaries and opening up some of the spaces, making them more functional and creating a smoother flow in the house. The Klopf team joined the former separate kitchen and formal living room into one large space and shift the dining room where it is now connected to the kitchen. Klopf swapped the family room to the front alongside the living room, so the spaces feel more cohesive and are now better suited for family activities. The functional layout of the master bathroom was changed to include a large, curbless shower.
Installing a complete IKEA kitchen including cabinets, countertops, appliances, light fixtures, and furnishings was key to staying within budget. Bath fixtures in this house are also exclusively IKEA. Klopf Architecture has designed many homes using IKEA products, which are quite compatible offering an affordable, contemporary take on Eichler homes. The clients saved additional money from the simplicity and availability of IKEA products and by orchestrating the orders and purchases themselves. Following each construction meeting, the clients would make a run to IKEA and purchase items, pick up needed spare parts, and bring them back right away to stay ahead of the contractor’s schedule and minimize the chance of delays and bottlenecks.
Klopf balanced material selections by retaining some of the original woodwork and simply refinishing the mahogany paneling. They were able to retain the original windows and sliding doors which were still in good shape, avoiding some of the most costly replacement expenses. Additionally interior doors were simply refinished and the exterior siding cleaned up and repainted. Formerly dark interiors are now illuminated with new slimmer semi-recessed lighting eliminating the need for costly roof work.
Attention to design details allowed the Klopf team to ensure the house ended up with a high quality feel. Key visual elements were strictly aligned and Klopf worked with the clients to select a unified materials palette throughout the spaces so the house flows seamlessly together. Aligning the tile layout with the trusses and keeping it level with the concrete slab outside allowed them to achieve a level of quality that may otherwise be missed.
The clients were able to keep their budget on track by determining clear goals and making critical decisions upfront, choosing materials and furnishings wisely, working with the right design and construction teams in place and to a large part, their willingness to participate throughout the process. In the end the clients were much happier with their reconfigured Eichler home and Klopf Architecture managed to keep their remodeling costs to about $325/sf – a good amount below the average Bay Area Eichler remodel.
Project Team: John Klopf, Angela Todorova, Sherry Tan
Contractor: Keycon Construction
Structural Engineer: Sezen & Moon
Photography: Sabrina Huang
Year Completed: 2020
 Total System Service
As a manager of a building or property, you quickly learn the art of mediation. One minute you may be working with a vendor to keep the building’s operating system running efficient and smooth; the next moment you may be calming a tenant down after finding the change in the system disrupted his office’s workflow. Give and take; it’s the only way to make sure every day runs perfectly.
Overall, you have two goals to strive for in everything you do.
1. Keep the building running properly, upgrading systems as appropriate, and striving to do all you can on a pre-established budget.
2. Keep the building occupants happy, with as little disruption as possible.
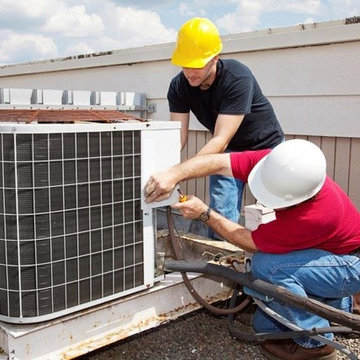
While some changes are minor, barely registering on a building occupant’s mind, with HVAC challenges, that’s rarely the case. If a HVAC contractor is replacing an air handler, for instance, and disconnects one and moves to the next unit, it may cause major disruptions to sensitive areas of a building. And if the occupant wasn’t prepared for the disruption, you can have a mighty unhappy customer on your hand.
Anytime you are working on HVAC projects throughout your building, there are strategies you can put into place to keep things running smooth.
Communicate with occupants
Communication is key to any good relationship, and as a property manager, this rule is a great place to start. If you will be working with the HVAC equipment, block out the timeframe for work to be done, and understand the potential consequences of the process. Then communicate this process with every point of contact you have throughout the building. The more detail you can provide, the less surprises you’ll have throughout the process. You can also work with your building’s occupants before the process begins, finding out if there are better timeframes than others.
Establish a realistic schedule
As a property manager, its easy to provide your expectations for the HVAC project at hand, and request that the proposal be written in such a way that work is completed on your timeframe. Unfortunately, many contractors want your business and will agree to anything upfront in order to win the bid, knowing full well the work will take longer than specified. Instead of projecting your timeframes into the proposal process, ask for HVAC project bids to establish realistic schedules of how long the process will take, and what areas of your property will be most effected throughout the schedule. This will help you avoid crises between you and the contractor, and you and your tenants.
Plan for the whole system
If one small piece of your HVAC system is weak, its easy to fix that one small piece. But how will that impact your overall system? Will it cause weak spots in different parts of the building – maybe a corner office will have reduced air flow, and therefore be colder in the winter and warmer in the summer? When retrofitting new pieces with older existing systems, its easy to reduce the efficiency of your entire system. Before agreeing to certain repairs, make sure you understand how it will impact your entire system overall. An easy way of handling this problem is by working with the same HVAC contractor again and again, He will understand your system’s potential, and know when to make repairs, and when to replace.
Have points of contact available for immediate assistance
In many cases, problems arise because connections can’t be made. Can the HVAC contractor get a hold or you or another person that can make decisions at a moments notice if a problem arises? Do you have access to decision makers throughout the building that may be impacted by this change? Many projects have been put on hold simply because a person in authority can’t be found to give the go-ahead to move forward. If you have access to these people during the time of the project, you’ll be able to complete the project in record time.
Test
Finally, if you can test things in stages, or test when the potential for problems is the smallest, you reduce the chances of bigger emergency issues falling into your lap. If you’ll be installing a new terminal unit, can you make the switch on a Saturday morning when the building is largely unoccupied? If you’re replacing a large system, can you replace and test in phases so the entire project isn’t released at once?
Most issues can be avoided with just a little strategy from the beginning. If you’ve never had a HVAC maintenance team to help you stay on track with your building’s heating and cooling, now may be the time to find out how easy a team approach makes the process.
 Advance Design Studio, Ltd.
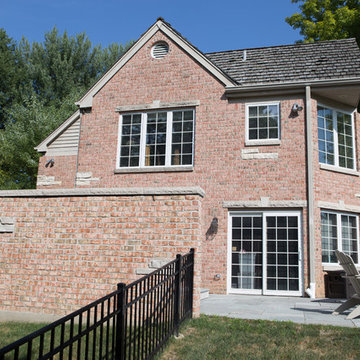
Willie & Leslie of Barrington Hills loved the location of their home. Its breathtaking views overlooked a wooded backyard and a captivating lake. They didn’t want to move, but they needed more space. But the house was missing that big family room where everyone could gather, relax and converse, and the house was completely cut off visually from the beautiful outdoor view right outside!
They knew what they wanted meant building an addition to their home. They began searching the internet and came across Advance Design Studio, and after browsing through project after project and reading one outstanding client review after another, they were sold on Advance Design. Additionally, they loved Advance Design’s “Common Sense Remodeling” process and felt confident that it would allow the Design/Build company to easily coordinate the multiple projects they wanted to complete all at one time. Willie and Leslie immediately set up a meeting with Owner Todd Jurs and Project Designer Claudia Pop. When the meeting ended, they were sure that Advance Design were the right people and the right approach for their project.
"Establishing a direction and a budget is always key in project of this size," Todd said. "This house was screaming for a family room and it didn't have one. Ultimately, it's about working together towards the same goal of a beautiful functional addition."
The project consisted of a significant family room addition with an extraordinary vaulted ceiling and floor to ceiling fireplace, a guest suite renovation with a luxury bath, a garage addition, and an adjoining outdoor patio renovation complete with a fantastic built in grilling station. The main goal was to add comfort and space to the existing home that would last their lifetime, and finally allow them to capture the amazing view of the backyard and lake that they never could really enjoy previously.
Willie, Leslie and Claudia paid special attention to designing the space to make sure that the footprint of the room did not interfere with the views. Floor to ceiling Pella windows were incorporated into a spectacular window wall to provide plenty of natural light.
Vaulted ceilings gave the room a bigger feel and the stunning floor to ceiling masonry fireplace was designed giving the room a rustic, comfortable feel of a Colorado Lodge. Barnwood doors and exposed wooden beams accentuate the crackling fireplace and family gathering space. An oversized statement chandelier bathes the space in soft light once the sun sets and compliments the exposed wood and fireplace perfectly.
“It simple elegant and beautiful,” Designer Claudia Pop said. “It is a great family room that captures the views perfectly. They love the fireplace, the barndoors and the openness of the space we designed for the whole family now to enjoy.”
And when warm weather beckons, the outdoor patio is a terrific place to spend an evening. The family now enjoys fall nights in front of their outdoor fireplace overlooking the quiet lake. Dekton Trillium Quartz counters tops adorn an amazing grilling bar. Nearly indestructible, they are the only manufactured stone product designed exclusively to withstand high heat in summer and extreme cold temperatures in winter.
The guest bath renovation makes Willie and Leslie’s friends and family feel like they are staying at a 5-star hotel. Carlisle colored Maple cabinets from Medallion make a roomy dual vanity more than adequate with plenty of space to get ready for the day after a peaceful night’s sleep. Cambria Quartz countertops are durable and elegant, while contrasting the neutral cabinets flawlessly. Heated flooring from Warmly Yours is the cherry on top for this cozy guest bath.
All the projects turned out better than they even imagined. Willie and Leslie now have a spacious family room with even better views of the lake and woods, a much larger garage, a fantastic relaxing outdoor patio, and a guest bath that makes it almost impossible to get the guest to leave after their stay.
Are you thinking about a remodeling project? Talk to the experts at Advance Design about the renovation of your dreams. Now is the perfect time to renovate. Check out other amazing projects here. With “Common Sense Remodeling”, the process of renovating your home has never been easier. Contact us today at 847-836-2600 or schedule an appointment to talk with us about your kitchen remodeling project, or any other home renovation you are planning. Our talented team can help you design and build the new space you’ve been dreaming about.
 Progressive Design Build
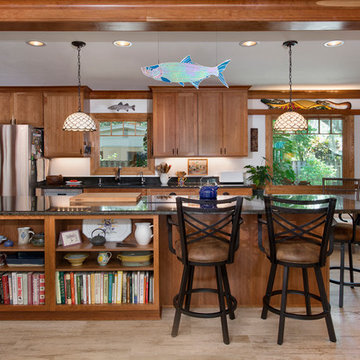
When a Historic District home was renovated in Fort Myers, a dream kitchen was created: open plan enough for gathering, with clearly delineated areas for cooking, reading and entertaining.
Challenge
Bill and Alison’s existing kitchen was small and dysfunctional. Each room seemed independent, and there was no flow through the house. The house felt small, with one entry and exit point.
As a planning consultant, Bill was no stranger to construction. He was a general contractor himself and had built several custom homes in years past. As a gardening enthusiast and professional educator, Alison also had an eye for design. They started with design, layout and planning on their own, but soon realized they needed help. After interviewing several contractors who seemed overwhelmed and unenthused by their project, they reached out to Progressive Design Build.
Solution
Mike was not only enthused about the project, but he established trust with Bill and Alison. Within a few short weeks he was hired to begin the planning phase, conducting thorough research on the project, meeting key subcontractors and establishing a realistic budget.
When the project began, internal walls were removed to open up the kitchen/dining areas and an island was built, giving the space an open and modern functionality. The eating area was enlarged, and a visual connection to the outside was established using Marvin insulated glass windows with Low E coatings—which rejects solar heat gain without reducing visible light passing through the glass.
In order to allow for the open concept layout that Bill and Alison desired, we built new structural beams to transfer the live load. The sliding patio doors opened onto a small terrace with a wrought iron handrail creating access to the private courtyard and garden area.
Finishing details included custom cherry cabinets and wood trimming, 16” x 32” natural stone flooring, granite countertops and historically correct plaster finishes.
Result
The project was completed within budget and two weeks ahead of schedule.
“That planning phase was the best money we spent on the project,” exclaimed Bill. “It was incredibly gratifying being able to watch the subcontractors and suppliers come and go with shared leadership and attention to details.”

 Talon Construction Inc.
Designing and building a kitchen addition is a complex process that involves multiple steps and considerations. Here is a general outline to help you get started on your kitchen addition project:
Define Your Goals and Budget:
• Determine the purpose of the kitchen addition. Is it for more cooking space, a dining area, or a combination of both?
• Establish a realistic budget for your project. Consider all costs, including construction, permits, materials, and furnishings.
Hire a Design Professional:
• Seek the services of a design build company who specializes in kitchen additions.
• Discuss your vision, needs, and budget with the design professional to create a design concept.
Site Evaluation:
• Assess the existing space and structural condition of your home to ensure it can support the addition.
• Consider factors like zoning regulations, setbacks, and building codes.
Design Development:
• Collaborate with your design professional to refine the concept, including the layout, size, and architectural style.
• Choose materials, finishes, and fixtures that fit your design and budget.
Obtain Permits:
• Consult with your local design build contractor to determine the necessary permits and approvals.
• Prepare and submit all required documents, including architectural drawings and engineering plans.
Create Construction Documents:
• Work with your design build professional to develop detailed construction drawings and specifications.
• These documents will serve as a guide for contractors during construction.
Hire a design build contractor:
• Check references, credentials, and licenses before selecting a contractor.
• Sign a detailed contract that outlines the scope of work, timeline, and payment schedule.
Construction Phase:
• Demolition: If needed, remove any existing structures or walls.
• Foundation: Construct the foundation for the addition.
• Framing: Build the structural framework of the addition.
• Plumbing, Electrical, and HVAC: Install or update utilities as required.
• Insulation: Ensure proper insulation for energy efficiency.
• Drywall and Finish Work: Complete the walls and ceilings.
• Flooring and Cabinetry: Install flooring and kitchen cabinets.
• Appliances and Fixtures: Add appliances, plumbing fixtures, and lighting.
• Paint and Finish: Apply paint and finishes to achieve the desired look.
• Final Inspection: Schedule inspections to ensure compliance with building codes.
Final Inspections and Approvals:
• Arrange for final inspections to ensure the addition meets all safety and code requirements.
• Obtain any necessary certificates of occupancy or compliance.
Move In and Enjoy:
• Once all inspections and approvals are received, you can move into your new kitchen addition and start enjoying it.
Remember that every kitchen addition project is unique, so adapt this outline to your specific needs and circumstances. Consulting with professionals and obtaining the required permits and inspections is crucial to a successful and safe project.
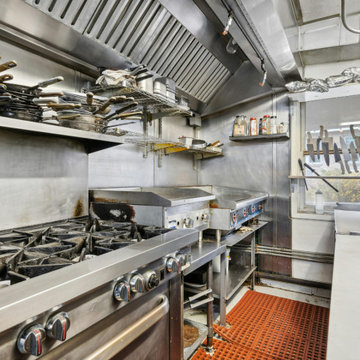
 SabaRehman Abdulrehman
Phoenix's food scene is vibrant and thriving, but also one of the most closely watched in the country. Health inspectors in Maricopa County are strict, and customers expect spotless dining spaces.
To stay competitive, restaurant owners and food vendors must stay on top of evolving health codes, sanitation protocols, and food safety benchmarks. That starts with a firm grip on restaurant cleaning safety standards. Ignoring sanitation rules risks more than bad reviews. It invites citations, customer complaints, and operational shutdowns.
Whether you're operating a food truck or a restaurant, following these Phoenix cleaning standards helps you stay compliant, pass health inspections, and build customer trust.
Importance of a Clean Phoenix Restaurant that Follows Food Health and Safety Standards
The restaurant industry in Phoenix operates under strict oversight. The Maricopa County Environmental Services Department conducts regular inspections, and violations can result in fines or closures. In this climate, restaurant cleaning is not just a hygiene standard. It is a business-critical measure.
Proper food handling and establishment cleaning protocols reduce the risk of foodborne illnesses, control pests, protect equipment, and keep your staff safe. Inconsistent practices, on the other hand, can quickly become liabilities.
Start With the Food Code
Phoenix food vendors must comply with the 2017 FDA Food Code as adopted by Maricopa County. This includes rules on:
- Sanitizing food-contact surfaces after each use
- Maintaining proper water temperatures for dishwashing
- Cleaning restrooms frequently and keeping them stocked
- Storing cleaning chemicals away from prep areas
- Daily: Wipe prep tables, mop floors, clean grills, sanitize cutting boards
- Weekly: Deep clean kitchen hoods, polish cooking equipment, disinfect drains
- Monthly: Check pest control measures, clean freezer coils, and inspect HVAC filters
- Using the right sanitizers and PPE
- Logging cleaning times and who performed the task
- Identifying signs of mold, grease buildup, or rodent activity
- Conducting thorough surface cleaning to ensure all food-contact surfaces are sanitized regularly
- Food-safe and non-corrosive
- Effective against norovirus, salmonella, and E. coli
- Clearly labeled and stored in original containers
- Seal gaps around doors and pipes
- Store dry goods in sealed, elevated containers
- Keep outdoor waste bins locked and distanced from entry points
- Record cleaning completion in real time
- Alert managers when tasks are missed
- Keep a historical record for inspections
- Is certified and understands the Arizona food codes
- Provides documented service reports
- Offers customized cleaning plans
- Offers flexible scheduling around your operating hours
- Cross-contamination prevention: Regularly clean food prep surfaces and tools, and use separate equipment for raw meats, vegetables, and ready-to-eat foods. Proper cleaning prevents any contact with food that could lead to cross-contamination and affects food quality.
- Temperature monitoring: While not directly related to cleaning, maintaining proper food temperature is essential. Hot foods should be stored above 140°F, and cold foods below 40°F. Regularly monitor temperatures and clean temperature gauges to ensure accuracy.
- Proper storage: Use clean storage containers and shelving for food storage, keeping items off the floor. Ensure all food is sealed and labeled to avoid contamination risks and comply with food safety standards.
 Talon Construction Inc.
Designing and building a kitchen addition is a complex process that involves multiple steps and considerations. Here is a general outline to help you get started on your kitchen addition project:
Define Your Goals and Budget:
• Determine the purpose of the kitchen addition. Is it for more cooking space, a dining area, or a combination of both?
• Establish a realistic budget for your project. Consider all costs, including construction, permits, materials, and furnishings.
Hire a Design Professional:
• Seek the services of a design build company who specializes in kitchen additions.
• Discuss your vision, needs, and budget with the design professional to create a design concept.
Site Evaluation:
• Assess the existing space and structural condition of your home to ensure it can support the addition.
• Consider factors like zoning regulations, setbacks, and building codes.
Design Development:
• Collaborate with your design professional to refine the concept, including the layout, size, and architectural style.
• Choose materials, finishes, and fixtures that fit your design and budget.
Obtain Permits:
• Consult with your local design build contractor to determine the necessary permits and approvals.
• Prepare and submit all required documents, including architectural drawings and engineering plans.
Create Construction Documents:
• Work with your design build professional to develop detailed construction drawings and specifications.
• These documents will serve as a guide for contractors during construction.
Hire a design build contractor:
• Check references, credentials, and licenses before selecting a contractor.
• Sign a detailed contract that outlines the scope of work, timeline, and payment schedule.
Construction Phase:
• Demolition: If needed, remove any existing structures or walls.
• Foundation: Construct the foundation for the addition.
• Framing: Build the structural framework of the addition.
• Plumbing, Electrical, and HVAC: Install or update utilities as required.
• Insulation: Ensure proper insulation for energy efficiency.
• Drywall and Finish Work: Complete the walls and ceilings.
• Flooring and Cabinetry: Install flooring and kitchen cabinets.
• Appliances and Fixtures: Add appliances, plumbing fixtures, and lighting.
• Paint and Finish: Apply paint and finishes to achieve the desired look.
• Final Inspection: Schedule inspections to ensure compliance with building codes.
Final Inspections and Approvals:
• Arrange for final inspections to ensure the addition meets all safety and code requirements.
• Obtain any necessary certificates of occupancy or compliance.
Move In and Enjoy:
• Once all inspections and approvals are received, you can move into your new kitchen addition and start enjoying it.
Remember that every kitchen addition project is unique, so adapt this outline to your specific needs and circumstances. Consulting with professionals and obtaining the required permits and inspections is crucial to a successful and safe project.
 Talon Construction Inc.
Designing and building a kitchen addition is a complex process that involves multiple steps and considerations. Here is a general outline to help you get started on your kitchen addition project:
Define Your Goals and Budget:
• Determine the purpose of the kitchen addition. Is it for more cooking space, a dining area, or a combination of both?
• Establish a realistic budget for your project. Consider all costs, including construction, permits, materials, and furnishings.
Hire a Design Professional:
• Seek the services of a design build company who specializes in kitchen additions.
• Discuss your vision, needs, and budget with the design professional to create a design concept.
Site Evaluation:
• Assess the existing space and structural condition of your home to ensure it can support the addition.
• Consider factors like zoning regulations, setbacks, and building codes.
Design Development:
• Collaborate with your design professional to refine the concept, including the layout, size, and architectural style.
• Choose materials, finishes, and fixtures that fit your design and budget.
Obtain Permits:
• Consult with your local design build contractor to determine the necessary permits and approvals.
• Prepare and submit all required documents, including architectural drawings and engineering plans.
Create Construction Documents:
• Work with your design build professional to develop detailed construction drawings and specifications.
• These documents will serve as a guide for contractors during construction.
Hire a design build contractor:
• Check references, credentials, and licenses before selecting a contractor.
• Sign a detailed contract that outlines the scope of work, timeline, and payment schedule.
Construction Phase:
• Demolition: If needed, remove any existing structures or walls.
• Foundation: Construct the foundation for the addition.
• Framing: Build the structural framework of the addition.
• Plumbing, Electrical, and HVAC: Install or update utilities as required.
• Insulation: Ensure proper insulation for energy efficiency.
• Drywall and Finish Work: Complete the walls and ceilings.
• Flooring and Cabinetry: Install flooring and kitchen cabinets.
• Appliances and Fixtures: Add appliances, plumbing fixtures, and lighting.
• Paint and Finish: Apply paint and finishes to achieve the desired look.
• Final Inspection: Schedule inspections to ensure compliance with building codes.
Final Inspections and Approvals:
• Arrange for final inspections to ensure the addition meets all safety and code requirements.
• Obtain any necessary certificates of occupancy or compliance.
Move In and Enjoy:
• Once all inspections and approvals are received, you can move into your new kitchen addition and start enjoying it.
Remember that every kitchen addition project is unique, so adapt this outline to your specific needs and circumstances. Consulting with professionals and obtaining the required permits and inspections is crucial to a successful and safe project.

 Southern Perfection Painting Inc.
This month we are answering some frequently asked questions!
So let's break it down.
What is a Paint Contractor?
Professional painting contractors are professional painters who work for a company to paint your commercial property or are hired directly by a homeowner.
How Do I Know They're Good?
Reviews, references, and past projects are a great place to start. Yelp and Google reviews are great sites to see this information.
What Makes Them Worth Hiring?
Most contractors are equipped to do any paint job, from a single room to a whole house. They have years of experience with all types of products, surfaces, and environments. They have access to any type of equipment or supplies they might need. They can complete a job quickly and with the highest quality.
If you'd like an established paint contractor then go to www.soperfectpaint.com today! (link in bio.) SPPI started business in January 1984 and has been in business for over 37 years. We will schedule a free consultation and estimate with you right away!
#paintcontractor #paint #painting #exteriorpainting #interiordesign #residentialpainting #commercialpainting #paintlife #interiorpainting #painter #paintingcontractor #paintersofinstagram #professionalpainter #contractors #homedecor #motivational #inspirational #successful #motivationalquotes #entrepreneurship #entrepreneurs #entrepreneurlife #businessman #businessowner #startuplife #success #businesswoman #quoteoftheday #successquotes #startup
 Colorworks Landscaping, L.L.C.
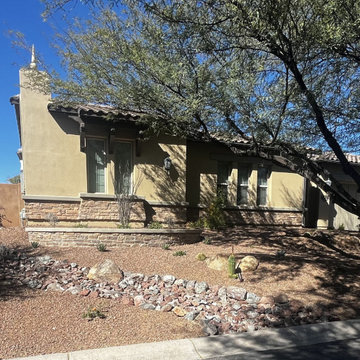
A complete desert landscape renovation — from demo through final planting — designed to honor the Sonoran Desert character of the property while adding structure, drama, and year-round visual interest.
The scope opened with full site demolition: removal of approximately 20 existing plants, regrading for a new curved pony wall and mounded terrain, and excavation for a new river run. Existing granite was preserved and redistributed rather than removed, reducing waste and maintaining the site's established material palette.
Hardscape & Structure
A 20-linear-foot curved retention wall built from standard block with a stucco cap defines a planting border along the property edge. The facing side is clad in 45 square feet of stone veneer matched precisely to the home's exterior — a detail that ties the landscape directly to the architecture. Five 500-pound surface boulders are placed throughout the mounded areas, grounding the composition with natural scale and weight.
River Run & Materials
Three tons of 3"x6" rip rap create a dry river run that flows through the redesigned grade, channeling storm water naturally while adding texture and movement. Three tons of fill dirt support the contouring and mounding work, and approximately 17 tons of the site's original granite was respread across the finished landscape.
Planting Design
The plant palette is entirely desert-adapted. Twenty-six five-gallon desert shrubs and ground covers layer the mounded areas. Sixteen five-gallon cacti and succulents — including Mexican Fence Post, Gopher Plant, assorted agaves, Argentine Giants, and Golden Barrels — provide sculptural structure. A six-foot bare root ocotillo serves as a dramatic vertical accent.
Irrigation
A new two-zone drip irrigation system — including a Febco backflow preventer, pressure regulator, timer, valve box, and poly line with emitters — was installed to maintain separate watering schedules for the plant and cactus zones.
Lighting
Five commercial-grade antique brass landscape spotlights were integrated throughout the space, wired with 500 feet of cable tied into the home's existing transformer. The result is a fully illuminated evening landscape that highlights boulder groupings, the river run, and key specimen plants.
 Progressive Design Build
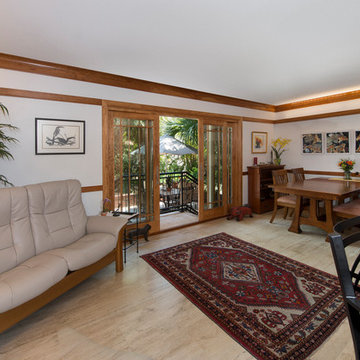
When a Historic District home was renovated in Fort Myers, a dream kitchen was created: open plan enough for gathering, with clearly delineated areas for cooking, reading and entertaining.
Challenge
Bill and Alison’s existing kitchen was small and dysfunctional. Each room seemed independent, and there was no flow through the house. The house felt small, with one entry and exit point.
As a planning consultant, Bill was no stranger to construction. He was a general contractor himself and had built several custom homes in years past. As a gardening enthusiast and professional educator, Alison also had an eye for design. They started with design, layout and planning on their own, but soon realized they needed help. After interviewing several contractors who seemed overwhelmed and unenthused by their project, they reached out to Progressive Design Build.
Solution
Mike was not only enthused about the project, but he established trust with Bill and Alison. Within a few short weeks he was hired to begin the planning phase, conducting thorough research on the project, meeting key subcontractors and establishing a realistic budget.
When the project began, internal walls were removed to open up the kitchen/dining areas and an island was built, giving the space an open and modern functionality. The eating area was enlarged, and a visual connection to the outside was established using Marvin insulated glass windows with Low E coatings—which rejects solar heat gain without reducing visible light passing through the glass.
In order to allow for the open concept layout that Bill and Alison desired, we built new structural beams to transfer the live load. The sliding patio doors opened onto a small terrace with a wrought iron handrail creating access to the private courtyard and garden area.
Finishing details included custom cherry cabinets and wood trimming, 16” x 32” natural stone flooring, granite countertops and historically correct plaster finishes.
Result
The project was completed within budget and two weeks ahead of schedule.
“That planning phase was the best money we spent on the project,” exclaimed Bill. “It was incredibly gratifying being able to watch the subcontractors and suppliers come and go with shared leadership and attention to details.”
 Talon Construction Inc.
Designing and building a kitchen addition is a complex process that involves multiple steps and considerations. Here is a general outline to help you get started on your kitchen addition project:
Define Your Goals and Budget:
• Determine the purpose of the kitchen addition. Is it for more cooking space, a dining area, or a combination of both?
• Establish a realistic budget for your project. Consider all costs, including construction, permits, materials, and furnishings.
Hire a Design Professional:
• Seek the services of a design build company who specializes in kitchen additions.
• Discuss your vision, needs, and budget with the design professional to create a design concept.
Site Evaluation:
• Assess the existing space and structural condition of your home to ensure it can support the addition.
• Consider factors like zoning regulations, setbacks, and building codes.
Design Development:
• Collaborate with your design professional to refine the concept, including the layout, size, and architectural style.
• Choose materials, finishes, and fixtures that fit your design and budget.
Obtain Permits:
• Consult with your local design build contractor to determine the necessary permits and approvals.
• Prepare and submit all required documents, including architectural drawings and engineering plans.
Create Construction Documents:
• Work with your design build professional to develop detailed construction drawings and specifications.
• These documents will serve as a guide for contractors during construction.
Hire a design build contractor:
• Check references, credentials, and licenses before selecting a contractor.
• Sign a detailed contract that outlines the scope of work, timeline, and payment schedule.
Construction Phase:
• Demolition: If needed, remove any existing structures or walls.
• Foundation: Construct the foundation for the addition.
• Framing: Build the structural framework of the addition.
• Plumbing, Electrical, and HVAC: Install or update utilities as required.
• Insulation: Ensure proper insulation for energy efficiency.
• Drywall and Finish Work: Complete the walls and ceilings.
• Flooring and Cabinetry: Install flooring and kitchen cabinets.
• Appliances and Fixtures: Add appliances, plumbing fixtures, and lighting.
• Paint and Finish: Apply paint and finishes to achieve the desired look.
• Final Inspection: Schedule inspections to ensure compliance with building codes.
Final Inspections and Approvals:
• Arrange for final inspections to ensure the addition meets all safety and code requirements.
• Obtain any necessary certificates of occupancy or compliance.
Move In and Enjoy:
• Once all inspections and approvals are received, you can move into your new kitchen addition and start enjoying it.
Remember that every kitchen addition project is unique, so adapt this outline to your specific needs and circumstances. Consulting with professionals and obtaining the required permits and inspections is crucial to a successful and safe project.
 Progressive Design Build
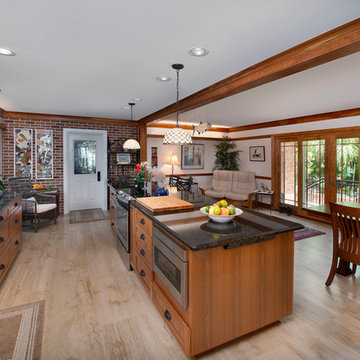
When a Historic District home was renovated in Fort Myers, a dream kitchen was created: open plan enough for gathering, with clearly delineated areas for cooking, reading and entertaining.
Challenge
Bill and Alison’s existing kitchen was small and dysfunctional. Each room seemed independent, and there was no flow through the house. The house felt small, with one entry and exit point.
As a planning consultant, Bill was no stranger to construction. He was a general contractor himself and had built several custom homes in years past. As a gardening enthusiast and professional educator, Alison also had an eye for design. They started with design, layout and planning on their own, but soon realized they needed help. After interviewing several contractors who seemed overwhelmed and unenthused by their project, they reached out to Progressive Design Build.
Solution
Mike was not only enthused about the project, but he established trust with Bill and Alison. Within a few short weeks he was hired to begin the planning phase, conducting thorough research on the project, meeting key subcontractors and establishing a realistic budget.
When the project began, internal walls were removed to open up the kitchen/dining areas and an island was built, giving the space an open and modern functionality. The eating area was enlarged, and a visual connection to the outside was established using Marvin insulated glass windows with Low E coatings—which rejects solar heat gain without reducing visible light passing through the glass.
In order to allow for the open concept layout that Bill and Alison desired, we built new structural beams to transfer the live load. The sliding patio doors opened onto a small terrace with a wrought iron handrail creating access to the private courtyard and garden area.
Finishing details included custom cherry cabinets and wood trimming, 16” x 32” natural stone flooring, granite countertops and historically correct plaster finishes.
Result
The project was completed within budget and two weeks ahead of schedule.
“That planning phase was the best money we spent on the project,” exclaimed Bill. “It was incredibly gratifying being able to watch the subcontractors and suppliers come and go with shared leadership and attention to details.”

 Five Star Tree Care
Owning a property with beautiful trees is a blessing, especially when those trees are more than a decade old. Established trees are often a selling point due to their aesthetic appeal and natural environmental benefits. Not only will trees create a sense of serenity, but they will also offer privacy for your family in the form of green foliage. Trees can do a lot for your property, but it is really important to invest in tree care to ensure that they thrive. Hiring the professionals here at Five Star Tree Services will keep your trees healthy and well pruned, and here are a few reasons why.
Professional Tree Care Advantages
There are various species of trees all of which need specialized care. Some may thrive in full sun while others need partial or full shade. Moisture needs will vary from season to season in addition to species to species. Even the age of a tree can dictate the type of care it needs to thrive. Professional tree care services are able to properly care for your trees in a way that ensures they get the best care possible. Tree care specialists are trained in the care of hundreds if not thousands of tree species which gives them the knowledge to offer customized services for every yard.
Professional Tree Care Equipment
A professional tree service will also have all of the right tools needed to get the job done. Equipping your shed for proper tree care can get expensive, and chances are you won’t have the right skills required to operate all of the equipment needed for professional tree care. Hiring the professionals will ensure that the right tools and the right knowledge is used to care for the trees on your property.
Consistent Maintenance
As we already mentioned, different types of trees need different care. They also need their care to be administered on a regular basis. Homeowners no matter how well-meaning can become lax on regular maintenance, but with a professional service, you never have to worry. Tree care services can come out on a set schedule to prune, water, feed, and care for your trees. This will ensure they are always healthy and will better enable you to spot problems that develop before they are too serious to treat. Your trees will also get trimmed properly and on schedule which will add to the overall aesthetic appeal of your yard.
Neat Yard
Keeping your yard neat and tidy is very important. It will help reduce the chance of pests hanging out on your property and increase the curb appeal of your home. Working with a professional company gives you years worth of experience that will come into play when landscaping and shaping the look of your yard.
Safe Tree Care
Trimming a tree and other tree care can be dangerous if you don’t know what you are doing. Not only can you get hurt in a fall, but improper tool operation can also result in injuries. A professional tree care company will have the training and the safety equipment needed to minimize the risks while caring for the trees on your property. If you are in need of Tree Care in Toronto, a specialist here at Five Star Tree Services can help. Give us a call at (416) 990-3355 to find out more today.
 Lola Cwikowski Studio
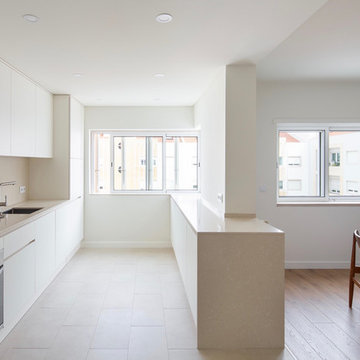
In the residential periphery of Lisbon, two physicians are establishing a home to grow their family. The original interior was conscientiously updated to serve as a pristine haven for the pair of professionals with busy schedules. Neutral walls, left bare to the interplay between light and shadow, are humanized by a verdant leitmotif inspired by their love of outdoor travel. Custom furniture from local craftsmen features simple volumes in wood and white tones that evoke a sense of both the natural and the minimal. Robust yet luxurious, child- and pet-friendly materials dress the interior.
The kitchen and dining room were united into one open entertaining space at the heart of the home. Composite countertops chosen to match the existing stone window sills allot ample workspace and serve as a buffet for the adjacent dining room. There, a custom-crafted table and floating shelf provide a neutral canvas for soirées, while mid-century chairs and a dry floral arrangement by a local ikebana artist add a spray of color. The kitchen entrance was transformed into a virescent, multi-purpose pantry corridor, complete with integrated refrigerator and freezer.
A corner niche in the foyer features the ceramic sculpture Gato Assanhado (Hissing Cat) by Bordallo Pinheiro, and a bespoke mirror reflects upon double doors to a living room configured for both work and relaxation; a tailored desk and drawer unit support the former, an ample couch and welcoming armchairs the latter. A vintage wooden sideboard and finishing touches from Portuguese flea markets imbue the space with local soul.
PHOTOGRAPHY: © ALEXANDER BOGORODSKIY
 Grade A Millwork & Renovations
Here's what our client had to say about this project which is taken from our review page:
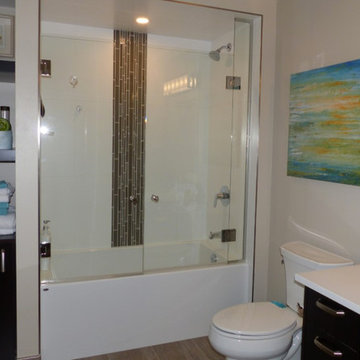
We have hired Grade A Millwork to renovate our family room, ensuite and main bathrooms. In setting up the original contract, our needs were listened to and a realistic work schedule was established. In each of our 3 projects, the workmanship was excellent, with attention to detail and delivered in a timely manner. The level of knowledge of all of the team members was especially evident when challenged to problem solve unforeseen issues in the renovations. All of our questions were also answered in a timely and professional manner. All three project were completed within the budget. We highly recommend Grade A Millwork.
4