
Search results for "Excessive stage" in Home Design Ideas

 Stage Coach Services LLC dba "The Stage Coach"
After staging, the master feels refreshed and a bit more luxurious. Most of the excess and dated furniture was removed, creating a sense of calm while at the same time updating the space. Clean white drapes replaced the dark blue drapes, making the room less blue. We used the existing bedding by flipping it over to the solid reverse side. To save money, the bedskirt was made from the drapes we removed.

 Rain Garden Nursery LandscapeMakeoverDesignStaging
Scott & Catherine Buley, HTT&T, High Tech Turf & Trees, LandscapeMakeover.biz, Rain Garden Nursery
Photo of an eclectic landscaping in Portland.
Photo of an eclectic landscaping in Portland.
 Rain Garden Nursery LandscapeMakeoverDesignStaging
Catherine & Scott Buley, High Tech Turf & Trees, Landscape Makeover.Biz, & Rain Garden Nursery. The traveling sprinkler can follow in excess of 100 feet of hose and irrigate this huge lawn in one setting.
Find the right local pro for your project
 Elite Construction and Remodel Corp
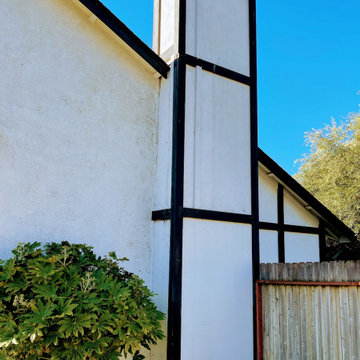
During our beginning stages for a standard chimney repair, we came across a bigger issue. We found poor roof flashing conducted by a roofer. Screws were used to secure roofing and flashing down around the chimney, this has damaged the home. This roof flashing system collected an excess of water and has caused dry rot down the chimney and wall next to the chimney. The chimney exterior wall needed to be cut out and replaced with new siding in all directions and replaced. We then installed new step flashing, and cricket to divert water and debris. Now, this chimney and roof, and siding are secure, safe, and will last for many more years.
 Elite Construction and Remodel Corp
During our beginning stages for a standard chimney repair, we came across a bigger issue. We found poor roof flashing conducted by a roofer. Screws were used to secure roofing and flashing down around the chimney, this has damaged the home. This roof flashing system collected an excess of water and has caused dry rot down the chimney and wall next to the chimney. The chimney exterior wall needed to be cut out and replaced with new siding in all directions and replaced. We then installed new step flashing, and cricket to divert water and debris. Now, this chimney and roof, and siding are secure, safe, and will last for many more years.
 Rain Garden Nursery LandscapeMakeoverDesignStaging
Scott & Catherine Buley, HTT&T, High Tech Turf & Trees, Rain Garden Nursery, LandscapeMakeover.biz. AFTER PHOTO, of the same area. The area of the gravel piles has been re-graded, and dropped 2+ feet. The otherwise steep bed on the right was shored up with large boulders, and rock garden plantings with trees atop it all. Drainage runs around the end of the building into expansive new seeded lawn. Ground for lawn here is leveled and drainage installed to protect home and its shrub bed from excessive drainage. All blended and transitioned from driveway, entry and banked shrub beds into a welcoming graded lawn that expands dramatically.

 Konnie Kretlow
This room was very dark and cluttered. I advised the homeowners to prepack/ store some personal items and excess furniture.
Living room - coastal living room idea in Jacksonville
Living room - coastal living room idea in Jacksonville

 AccentPositives Home Staging
after AccentPositives Home Staging. Removed excess furniture. Worked with homeowner's bed.
Photo by Jared Tafua Platinum HD
Inspiration for a transitional kids' room remodel in Los Angeles
Inspiration for a transitional kids' room remodel in Los Angeles



 Total System Service
As a manager of a building or property, you quickly learn the art of mediation. One minute you may be working with a vendor to keep the building’s operating system running efficient and smooth; the next moment you may be calming a tenant down after finding the change in the system disrupted his office’s workflow. Give and take; it’s the only way to make sure every day runs perfectly.
Overall, you have two goals to strive for in everything you do.
1. Keep the building running properly, upgrading systems as appropriate, and striving to do all you can on a pre-established budget.
2. Keep the building occupants happy, with as little disruption as possible.
While some changes are minor, barely registering on a building occupant’s mind, with HVAC challenges, that’s rarely the case. If a HVAC contractor is replacing an air handler, for instance, and disconnects one and moves to the next unit, it may cause major disruptions to sensitive areas of a building. And if the occupant wasn’t prepared for the disruption, you can have a mighty unhappy customer on your hand.
Anytime you are working on HVAC projects throughout your building, there are strategies you can put into place to keep things running smooth.
Communicate with occupants
Communication is key to any good relationship, and as a property manager, this rule is a great place to start. If you will be working with the HVAC equipment, block out the timeframe for work to be done, and understand the potential consequences of the process. Then communicate this process with every point of contact you have throughout the building. The more detail you can provide, the less surprises you’ll have throughout the process. You can also work with your building’s occupants before the process begins, finding out if there are better timeframes than others.
Establish a realistic schedule
As a property manager, its easy to provide your expectations for the HVAC project at hand, and request that the proposal be written in such a way that work is completed on your timeframe. Unfortunately, many contractors want your business and will agree to anything upfront in order to win the bid, knowing full well the work will take longer than specified. Instead of projecting your timeframes into the proposal process, ask for HVAC project bids to establish realistic schedules of how long the process will take, and what areas of your property will be most effected throughout the schedule. This will help you avoid crises between you and the contractor, and you and your tenants.
Plan for the whole system
If one small piece of your HVAC system is weak, its easy to fix that one small piece. But how will that impact your overall system? Will it cause weak spots in different parts of the building – maybe a corner office will have reduced air flow, and therefore be colder in the winter and warmer in the summer? When retrofitting new pieces with older existing systems, its easy to reduce the efficiency of your entire system. Before agreeing to certain repairs, make sure you understand how it will impact your entire system overall. An easy way of handling this problem is by working with the same HVAC contractor again and again, He will understand your system’s potential, and know when to make repairs, and when to replace.
Have points of contact available for immediate assistance
In many cases, problems arise because connections can’t be made. Can the HVAC contractor get a hold or you or another person that can make decisions at a moments notice if a problem arises? Do you have access to decision makers throughout the building that may be impacted by this change? Many projects have been put on hold simply because a person in authority can’t be found to give the go-ahead to move forward. If you have access to these people during the time of the project, you’ll be able to complete the project in record time.
Test
Finally, if you can test things in stages, or test when the potential for problems is the smallest, you reduce the chances of bigger emergency issues falling into your lap. If you’ll be installing a new terminal unit, can you make the switch on a Saturday morning when the building is largely unoccupied? If you’re replacing a large system, can you replace and test in phases so the entire project isn’t released at once?
Most issues can be avoided with just a little strategy from the beginning. If you’ve never had a HVAC maintenance team to help you stay on track with your building’s heating and cooling, now may be the time to find out how easy a team approach makes the process.

 The Painted Door
The open kitchen is the heart of this home. By removing some unused and excess décor, the remaining urns really allow the bright kitchen to re-take center stage

 Home Staging Texas
High ceilings, light and bright large Formal Dining room with access to outdoor patio dining area with an ocean view. Room for extra large dining room. Space was decluttered of excess furnishings, china, occasional tables and outdated dining table and chairs were replaced with updated style.
Photos by Virtuance
 Elite Construction and Remodel Corp
During our beginning stages for a standard chimney repair, we came across a bigger issue. We found poor roof flashing conducted by a roofer. Screws were used to secure roofing and flashing down around the chimney, this has damaged the home. This roof flashing system collected an excess of water and has caused dry rot down the chimney and wall next to the chimney. The chimney exterior wall needed to be cut out and replaced with new siding in all directions and replaced. We then installed new step flashing, and cricket to divert water and debris. Now, this chimney and roof, and siding are secure, safe, and will last for many more years.

 Costello & Co Construction
This Venetian plaster fireplace remodel in Bloomfield Hills, Michigan was designed to create a refined architectural focal point rooted in texture, simplicity, and timeless design. By combining clean lines with hand-applied finishes, this project transforms a traditional fireplace into a seamless, modern feature that enhances the entire living space.
The defining element of this fireplace renovation is the Venetian plaster finish. Applied by hand, the plaster creates a soft, dimensional surface with subtle movement and depth that shifts with natural light throughout the day. Unlike traditional stone or tile surrounds, Venetian plaster offers a more organic and elevated aesthetic—making it a popular choice for high-end fireplace remodels in Bloomfield Hills and throughout Oakland County.
The fireplace was reimagined with a simplified form and intentional proportions, allowing the material itself to take center stage. The seamless transitions between the surround and wall create a monolithic look, helping the fireplace feel fully integrated into the architecture of the home rather than added onto it.
An extended hearth adds both functionality and balance, grounding the design while maintaining a clean, minimal profile. Every detail—from the edges and returns to the finish consistency—was carefully executed to ensure a cohesive and polished result.
As a design-build remodeling firm serving Bloomfield Hills, Michigan and the surrounding Metro Detroit area, Costello & Co focuses on creating spaces that balance craftsmanship, materiality, and thoughtful design. This Venetian plaster fireplace highlights how a restrained, intentional approach can create a powerful visual impact without excess.
Whether you’re planning a fireplace remodel in Bloomfield Hills, MI or exploring Venetian plaster finishes for a custom feature wall, this project demonstrates how texture and simplicity can come together to create a timeless and elevated space.
 Rain Garden Nursery LandscapeMakeoverDesignStaging
Scott Buley, High Tech Turf & Trees, Rain Garden Nursery, LandscapeMakeover.biz. Area above Rain Garden just beginning to grow in. Note the Heritage River Birch were less than 1" in caliper (trunk diameter) when installed bare-root. In less than 2 years they will be in excess of 2+ inches, with attractive multicolored exfoliating bark.

 3D Design Edge
This transitional staging project was so much fun. For starters we generated a workable plan to get the client top dollar for their listing. Our clients decided to trust the process and moved forward with all of our staging suggestions per the written plan we generated for them. The successful Staging Resulted in a first showing offer, above asking! To get started we removed excess furniture and any items that might detract from the desired staging direction. The clients received full asking with a standard close date and all parties involved were very pleased with the outcome.
 Tile Doctor Ltd
I was recently contacted by a client who lives in the small coastal town of Bridlington, East Yorkshire. Bridlington has a small sea fishing port known for its great shellfish.
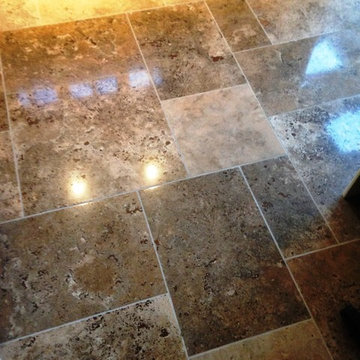
My client had a Limestone floor that was really in need of a fresh up: over the years the tiles had become dull and worn-looking, and she was keen to restore a nice shine to the surface. I was on hand to treat the floor to a much needed clean, polish and seal.
My first job was to strip off the old sealer. I did this using a coarse diamond burnishing pad fitted to a rotary machine. The floor was then given a thorough rinse with clean water to clear off any dirt and excess sealer. Following this, the excess water was quickly soaked up with a wet-dry vac machine to make sure there was no leftover moisture, as this could have potentially affected the performance of the new sealer (which I would apply at a later stage).
To polish the floor I continued with the system of burnishing pads, starting first with a medium burnishing pad, followed by the fine and very fine pads to achieve the desired effect. The result was a very nice overall sheen.
After cleaning and polishing, the only task remaining was to provide the floor with a durable seal. I did this using Tile Doctor Ultra Seal, which is a premium, natural-look penetrating sealer that is specially designed to provide maximum stain protection from within. This particular product is suitable for use on a range of different natural stone floors, including Limestone, Slate, Granite, Marble and Travertine.
Overall, my client was very happy with the results. As you can see from the photographs, the clean, polish and seal made a marked difference on the condition of the floor, turning the tiles from dull and lifeless to full of character and colour once again.

 Total Home
By removing all of the excess items, we have been able to showcase this space as a vibrant, fun and youthful functional room.
Example of a mid-sized trendy light wood floor bedroom design in Ottawa with green walls
Example of a mid-sized trendy light wood floor bedroom design in Ottawa with green walls
 Tile Doctor Ltd
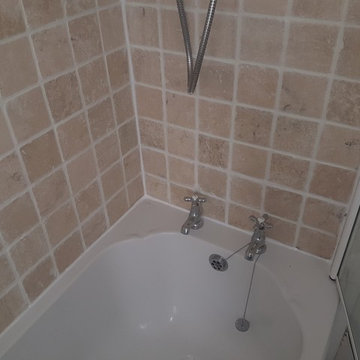
Here’s a quick example of an interesting tiled shower cubicle at a property in Edinburgh that was well overdue for a refresh, including deep cleaning and recolouring do the grout lines that had become stained and mouldy. This is a problem that the majority of property owners experience due to the simple fact that shower cubicles come into contact with damaging acid-based shampoos and soaps on a daily basis.
The short-term solution for this is to wash the shower cubicle down with water after each use, however busy people do not always remember to do so! The prognosis is bad discolouration, mould growth and staining if the problem if proper care isn’t taken. In this case, the problem had worsened to the point that the property owner decided to contact Tile a Doctor to provide a thorough refresh of the tiles.
Our process for refreshing shower cubicles in a similar state to this one is simple, but highly effective. I started by mixing a strong solution of our high alkaline cleaner, known as Tile Doctor Pro Clean (diluted to an appropriate level with water), before applying it directly to the tile and grout.
Next, I worked it in using specialised handheld grout brushes , with the alkaline in the Pro Clean neutralising the acidic staining and mould growth had leaving the area clean and fresh. Pro Clean is suitable for use on all kinds of natural stone, and on both verticals and horizontal surfaces. Once satisfied the grout had been cleaned to the best of my abilities, I quickly dried the entire area using a heat gun.
To restore the appearance of the installation back to it’s optimal appearance I chose to recolour the grout lines with our Light Grey grout colourant, which matched in very nicely. This is just one of ten different colours of grout colourant we offer. The colourant was left to dry for a short period before I cleaned off any excess. The final stage of the refresh involved stripping off the old discoloured silicone from around the bath and replacing it with fresh silicone.
The customer was very impressed by the speed and efficiency of the refresh. With the work completed to a high standard in just a few hours, she now has one less problem to worry about – and a very smart looking shower cubicle! Another satisfied customer.
Thomas Wilson
Edinburgh Tile Doctor
 Tile Doctor Ltd
Earlier this year I was invited over to a property in the village of Silfield near Wymondham in Norfolk to inspect a Limestone tiled floor. Now I don’t usually quote my clients, but this is how the owner of the property had described the floor in the enquiry I received from Tile Doctor.
“Grout Black, where tiles have divots, dirt is encased,
plus no shine to floor, sealant non-existent.”
The problems listed were quite comprehensive and having had chance to survey the floor we found them to be quite accurate and really could not disagree with her comments! The Limestone tiles had been laid throughout the Kitchen diner and it was clear the sealer had worn off completely allowing dirt to become ingrained in the Limestone tiles and especially the grout which had turned black.
I understood from the owner that the grout lines should have been a pale cream colour rather than the black it was now, additionally the natural pitting in the Limestone was full of the same black contaminants. I ran a quick water test on the tiles to see if there was a seal present and it confirmed that if there had ever been one it was now completely compromised. The lack of sealer had allowed all liquid spills and dirt to soak straight into the tile making it dirty and exceedingly difficult to clean.
A large birthday celebration party had been planned and our client was desperate for the floor to be brought back to life beforehand. Although I couldn’t start immediately due to other commitments, it was able to return in time to get the floor clean for the party.
Our first job was to tackle the severe soiling trapped in the pits and grout lines. To do this a very strong dilution (2:1 ratio) of Tile Doctor Pro-Clean was applied to the floor and left to soak into the tile and grout for about 10 minutes. Then is was scrubbed into the tiles with help from a rotary buffer fitted with a soft/medium long-bristled nylon brush. The resulting slurry was then power rinsed with 60-degree hot water and extracted with our 400psi machine which jetted out all the black, oily contaminants from the grout and pits.
The floor was speed dried with the assistance of a large air mover. Once dry to the touch our attention was turned to filling the now exposed pitts in the Limestone tiles and two cracks with an appropriately coloured fast cure epoxy compound. Having allowed the filler time to reach full hardness, we ground down the excess material with 100 and 200 grit hand burnishing blocks in preparation for the next stage.
We find the best way to renovate the appearance of stone is to use a process called burnishing which hones the stone and beings up the polish. For this you need a set of 17-inch diamond encrusted burnishing pads. The pads fit the rotary buffer and are applied to the floor in sequence from 400, 800 and then 1500 grit using water to lubricate the process. The waster turns into a slurry as you work, and this is then rinsed off the floor with water after each pad and extracted using a wet vacuum. The floor was then left to dry thoroughly overnight with the assistance of our large capacity dehumidifier.
Returning the following day, we thoroughly vacuumed the floor to remove any remaining powder and grit left from the previous day’s wet work before spray burnishing the surface with a Tile Doctor 3000-grit diamond pad. This last pad really beings up the polished appearance of the Limestone and gave the tiles a deep and rich shine.
This last pad is applied without water and so leaves the floor dry and ready to for a new sealer to be applied. Our sealer of choice was Tile Doctor Ultra Seal, it’s a premium penetrating sealer that soaks into the pores of the stone protecting it from within. Ultra-Seal doesn’t alter the natural appearance of the stone giving it undetectable protection from staining. Having allowed the sealed floor to dry with the assistance of our air mover, the whole area was buffed using a white buffing pad and a small amount of finely sprayed water to remove any light smearing before vacuuming once again to finish.
My client was delighted with the result and left the following feedback for us:
“Totally renewed two flooring areas in our house to what looks like a recently laid floor. I have already had so many compliments without even telling people it had been professionally cleaned! Nick and Sue are always very easy to have about, inconspicuous and hard working. Absolutely delighted with the outcome and would recommend without hesitation. Thank you so much!”
For aftercare cleaning I recommended Tile Doctor Stone Soap, its designed for cleaning polished stone floors and will help build-up the patina. It’s a neutral pH product so won’t prematurely erode the sealer like many tile cleaning products you find in supermarkets which are really sold for cleaning glazed ceramic tiles not sealed natural stone.
Nick White
Norfolk Tile Doctor
2