
Search results for "Extra potential" in Home Design Ideas
 Spruce Homes
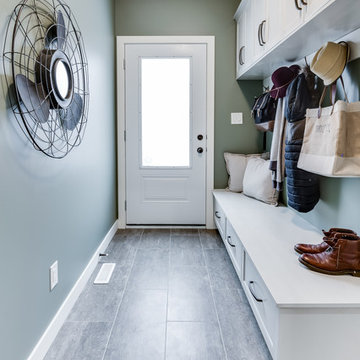
The Burke was one of the most fun projects that we have had a chance to work on together! The functionality of the boot room and large master en-suite will forever be staples in our future builds moving forward. This floor plan is named after our very first niece, Rylin Burke. Much like this home, Rylin's life is full of colour and pzazz!
Features of this home include:
3 bedrooms / 2.5 bathrooms
1460 square feet
Legal suite potential
Double detached garage
Front landscaping
Master en-suite
Master walk-in closet
Custom kitchen w/ eat up breakfast nook
Quartz countertops
Beautiful wine nook in dining area
Large boot room w/ lots of storage

 Colonial Reproductions, Inc.
This foyer entryway leads to an arbor gate that opens onto a fabulous pool, patio and pool house. Greg Premru Photography
Foyer - mid-sized coastal medium tone wood floor foyer idea in Boston with white walls and a green front door
Foyer - mid-sized coastal medium tone wood floor foyer idea in Boston with white walls and a green front door

Find the right local pro for your project
 Woodland Construction Group LLC
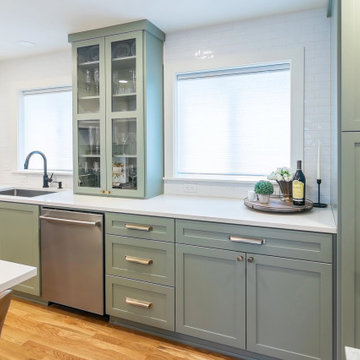
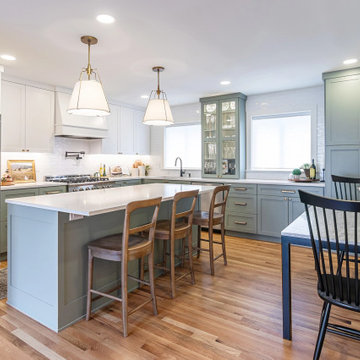
The Murray small kitchen remodel demonstrated the immense potential of a small kitchen makeover. We started by stripping everything to the studs, enabling us to redesign the layout and make adjustments to the kitchen's overall flow.
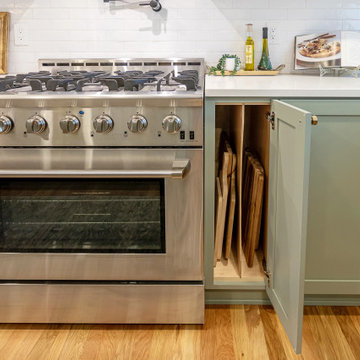
In the design layout, we closed off a doorway to allow more wall space for additional full custom cabinetry and appliances, enhancing the kitchen's functionality. We extended the counters and repositioned the refrigerator to improve the workspace and flow.
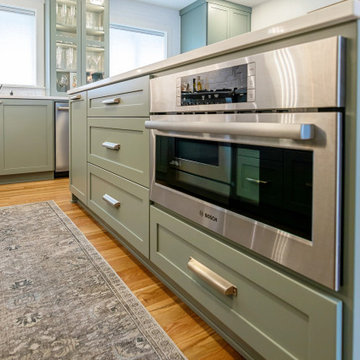
The new island, highlighted with pendant lighting and set on stylish hardwood flooring, became the focal point, providing extra counter space and a gathering spot. Additional features like under-cabinet lighting, a touch-activated faucet, and a custom hood boosted the kitchen's overall appeal and practicality.
Modern elements like the integrated speed oven in the island cabinetry, and the new hardwood flooring throughout, completed the transformation. The Murray kitchen remodel project successfully combined style and function, transforming a modest kitchen into a warm, inviting, and efficient space.
 Woodland Construction Group LLC
The Murray small kitchen remodel demonstrated the immense potential of a small kitchen makeover. We started by stripping everything to the studs, enabling us to redesign the layout and make adjustments to the kitchen's overall flow.
In the design layout, we closed off a doorway to allow more wall space for additional full custom cabinetry and appliances, enhancing the kitchen's functionality. We extended the counters and repositioned the refrigerator to improve the workspace and flow.
The new island, highlighted with pendant lighting and set on stylish hardwood flooring, became the focal point, providing extra counter space and a gathering spot. Additional features like under-cabinet lighting, a touch-activated faucet, and a custom hood boosted the kitchen's overall appeal and practicality.
Modern elements like the integrated speed oven in the island cabinetry, and the new hardwood flooring throughout, completed the transformation. The Murray kitchen remodel project successfully combined style and function, transforming a modest kitchen into a warm, inviting, and efficient space.

 TOC design & construction inc.
DESIGNED BY TOC design
CONSTRUCTION BY TOC design & Construction inc.
PHOTOS BY : Tania Scardellato
I was fortunate to have a young family approach me in desperate need to renovate there only 3 piece bathroom. This space was In dire need of a remodel, with old brown wall to wall tiles and a dated bulky yellow brown single sink vanity.
Storage was a must, lighting a necessity, and proper accessibility to the shower bath area.
We had a tight budget to respect, but a full gut of this bathroom was required. And a good thing too, once we started doing the demolition we noticed that mildew and rotting floors and walls had accumulated throughout the years. Doing it right the first time is no joke when dealing with water and electrical issues.
We discarded all reminisce of old and built from scratch, new walls, new plumbing, new electrical ,new insulation and a new window, a new fan that actually exhausted outside ( I say this laughing as you would be amazed at how many fans are installed but don’t exhaust outside, and you the client would never know unless you go inside the attic space.
Once all the hard stuff was done, the rest is just a matter of smart design. If you have a small bathroom here are some tips to guide you.
10 tips for making a small bathroom feel larger
Is your tiny bathroom cramping your functionality and style, leaving you longing for the enormous bathrooms gracing the pages of design magazines? Even if your bathroom is a fraction of the size, all it takes is some design savvy to make the most of the space you have. Consider these 10 smart tips that will help your bathroom look, feel and function like those larger contenders.
1-Get creative with corners
Space is at a premium in small bathrooms, so it's important to maximize every inch. Corners, for example, provide extra space for shelving, storage units and even hooks. Get creative and install unique design solutions that are not only functional, but also eye-catching. If you love the airiness of floating cabinets, add baskets or decorative boxes under for extra storage. If you are installing floating cabinets insure that they are installed securely to studs or plywood at wall.
2- Let solid colors shine
Busy patterns have a shrinking effect and make small bathrooms seem even smaller. Conversely, light natural hues make a space feel more open. If you're itching to get creative with design, experiment with textures but keep overpowering patterns to a minimum. Tone on tone is the best to achieve this.
3 - Maximize your bathtub
A bathtub takes up a significant portion of the room, but modern, compact options with curved basins, can make the tub feel larger when in use, all while conserving space.
4 - Select a smaller faucet
A faucet is jewelry for the bathroom. And just as accessories can overpower an outfit, a big bulky faucet isn't flattering in a small bath. Single-handle designs conserve counter space, while a wall-mount installation frees it up all together and can create quite the wow-factor, if the budget can accommodate the required changes to plumbing behind the wall.
5 - Make vanity storage simple
If you're in a storage war with your small bathroom, you're not alone in the battle. Toiletries and personal supplies without a place to call home only add clutter and chaos. Store smart with a space-saving vanity, the dual sink vanity shown here, looks quite simple, but in reality it has 4 sets of full extension drawers, and the vanity tower adds extra storage without overpowering the use of space.
6 - Show off the shower
Shower curtains may be pretty, but they interrupt the visual flow of a bathing space and make it feel significantly smaller. In bathrooms with small footprints, opt for a clear glass sliding shower door that doesn't require the clearance of one with a hinged design. Or as shown in this design and for fraction less expensive a half hinged panel installed on a fixed tempered glass panel. If you're embarking on a big remodel, create the illusion of more space by using same tile in the shower that's used throughout; instead of seeing them as two separate zones, the eye will read them as one.
7 - Discover the treasure of hidden storage
Work with a contractor, and you just might find some serious storage potential hidden behind your walls. Whether it's utilizing space between the studs for shallow shelving or a creating a small linen closet by annexing space from an adjacent room, even small additions can make a big difference.
8 - Focal Point
Tile is a beautiful, durable addition to any bathroom. For dainty spaces, consider installing tile at a diagonal to accentuate the focal point or as in this bathroom I used an oversized textured pattern to bring depth to the space at the window wall.
9 - Choose the right lights
Strategically install light to reflect and brighten a small bathroom to make it appear larger. Recessed lighting is an affordable solution for tiny rooms, offering ample light while taking up little space. Wall sconces alongside a mirror also reflect off the walls and make a room feel bright and airy. I always recommend going with LED lighting at 2800 to 3000K.
10 – Accessorize
This is your time to shine in your decorating skills, have fun with your towels, you can change the color scheme daily just by adding pops of color in your accessories, make sure to get items that serve a dual purpose, like baskets, boxes they can always be used as hampers, storing of towels and even a nice display for your guest.




 Betz Pools Limited
The pool is complete with all the luxury extras, a generous 11’ x 20’ tanning shelf, an 8’ circular island spa, an automatic in-floor cleaning system, a diving board for the kids, plus two deep end swim out benches to facilitate repeat diving. The pool’s classic cathedral ends are accented with topiary urns to add dimension and texture.

 Adaptiv DC
THEME The main theme for this room is an active, physical and personalized experience for a growing boy. This was achieved with the use of bold colors, creative inclusion of personal favorites and the use of industrial materials. FOCUS The main focus of the room is the 12 foot long x 4 foot high elevated bed. The bed is the focal point of the room and leaves ample space for activity within the room beneath. A secondary focus of the room is the desk, positioned in a private corner of the room outfitted with custom lighting and suspended desktop designed to support growing technical needs and school assignments. STORAGE A large floor armoire was built at the far die of the room between the bed and wall.. The armoire was built with 8 separate storage units that are approximately 12”x24” by 8” deep. These enclosed storage spaces are convenient for anything a growing boy may need to put away and convenient enough to make cleaning up easy for him. The floor is built to support the chair and desk built into the far corner of the room. GROWTH The room was designed for active ages 8 to 18. There are three ways to enter the bed, climb the knotted rope, custom rock wall, or pipe monkey bars up the wall and along the ceiling. The ladder was included only for parents. While these are the intended ways to enter the bed, they are also a convenient safety system to prevent younger siblings from getting into his private things. SAFETY This room was designed for an older child but safety is still a critical element and every detail in the room was reviewed for safety. The raised bed includes extra long and higher side boards ensuring that any rolling in bed is kept safe. The decking was sanded and edges cleaned to prevent any potential splintering. Power outlets are covered using exterior industrial outlets for the switches and plugs, which also looks really cool.
 Woodland Construction Group LLC
The Murray small kitchen remodel demonstrated the immense potential of a small kitchen makeover. We started by stripping everything to the studs, enabling us to redesign the layout and make adjustments to the kitchen's overall flow.
In the design layout, we closed off a doorway to allow more wall space for additional full custom cabinetry and appliances, enhancing the kitchen's functionality. We extended the counters and repositioned the refrigerator to improve the workspace and flow.
The new island, highlighted with pendant lighting and set on stylish hardwood flooring, became the focal point, providing extra counter space and a gathering spot. Additional features like under-cabinet lighting, a touch-activated faucet, and a custom hood boosted the kitchen's overall appeal and practicality.
Modern elements like the integrated speed oven in the island cabinetry, and the new hardwood flooring throughout, completed the transformation. The Murray kitchen remodel project successfully combined style and function, transforming a modest kitchen into a warm, inviting, and efficient space.
 Woodland Construction Group LLC
The Murray small kitchen remodel demonstrated the immense potential of a small kitchen makeover. We started by stripping everything to the studs, enabling us to redesign the layout and make adjustments to the kitchen's overall flow.
In the design layout, we closed off a doorway to allow more wall space for additional full custom cabinetry and appliances, enhancing the kitchen's functionality. We extended the counters and repositioned the refrigerator to improve the workspace and flow.
The new island, highlighted with pendant lighting and set on stylish hardwood flooring, became the focal point, providing extra counter space and a gathering spot. Additional features like under-cabinet lighting, a touch-activated faucet, and a custom hood boosted the kitchen's overall appeal and practicality.
Modern elements like the integrated speed oven in the island cabinetry, and the new hardwood flooring throughout, completed the transformation. The Murray kitchen remodel project successfully combined style and function, transforming a modest kitchen into a warm, inviting, and efficient space.
 Windy City Painters
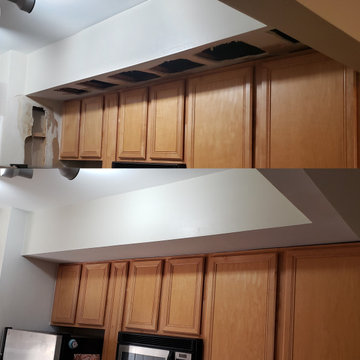
 response to water damage in a kitchen:
Assessment and Inspection:
Windy City Painters initiates the process by conducting a thorough assessment of the water damage in the kitchen. This involves inspecting the soffit above the kitchen cabinets and the side wall to identify the areas that require repair. The severity of the damage is carefully evaluated to determine the scope of the restoration.
Insulation Replacement:
In cases where water has damaged insulation, Windy City Painters removes and replaces the affected insulation to ensure proper restoration of the affected areas. This step is crucial for preventing future issues related to moisture and maintaining the integrity of the space.
Drywall Replacement:
Damaged drywall is carefully removed and replaced during the repair process. This includes removing sections of drywall that have been compromised by water, ensuring that the new drywall seamlessly integrates with the existing structure.
Sealing Water Spots with Oil-Based Primer:
To prevent any potential water stains from bleeding through the new paint, Windy City Painters applies an oil-based primer to seal water spots. This step not only ensures a smooth and uniform finish but also provides additional protection against future water damage.
Cleaning and Restoration:
After completing the repair work, Chicago painter takes the extra step of cleaning the entire area to ensure a neat and polished final result. This includes removing any debris or dust generated during the repair process, leaving the kitchen in a clean and presentable condition.
Efficient Completion by Skilled Painter:
Windy City Painters prides itself on efficiency, and the entire drywall repair job is completed within one day by a skilled painter. This quick turnaround minimizes disruptions to the homeowner's routine and allows for a prompt return to normalcy.
Scheduling and Estimates:
Customers looking to schedule an appointment or obtain an online estimate can easily do so by visiting the official website at www.windypainters.com. The user-friendly platform facilitates convenient scheduling and access to estimates.
Customer Assurance and Reviews:
Windy City Painters emphasizes customer satisfaction and provides the highest quality service. Potential customers are encouraged to check the company's 5-star reviews on Yelp ( https://www.yelp.com/biz/windy-city-painters-chicago-2) and Google, offering a glimpse into the positive experiences of previous clients.
Windy City Painters offers a comprehensive and efficient drywall repair service, addressing water damage in kitchens with expertise, professionalism, and a commitment to customer satisfaction.


Sponsored
Delaware, OH

Buckeye Basements, Inc.
Central Ohio's Basement Finishing ExpertsBest Of Houzz '13-'21
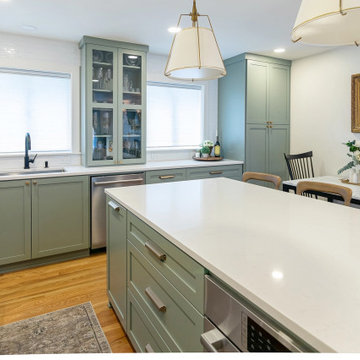 Woodland Construction Group LLC
The Murray small kitchen remodel demonstrated the immense potential of a small kitchen makeover. We started by stripping everything to the studs, enabling us to redesign the layout and make adjustments to the kitchen's overall flow.
In the design layout, we closed off a doorway to allow more wall space for additional full custom cabinetry and appliances, enhancing the kitchen's functionality. We extended the counters and repositioned the refrigerator to improve the workspace and flow.
The new island, highlighted with pendant lighting and set on stylish hardwood flooring, became the focal point, providing extra counter space and a gathering spot. Additional features like under-cabinet lighting, a touch-activated faucet, and a custom hood boosted the kitchen's overall appeal and practicality.
Modern elements like the integrated speed oven in the island cabinetry, and the new hardwood flooring throughout, completed the transformation. The Murray kitchen remodel project successfully combined style and function, transforming a modest kitchen into a warm, inviting, and efficient space.
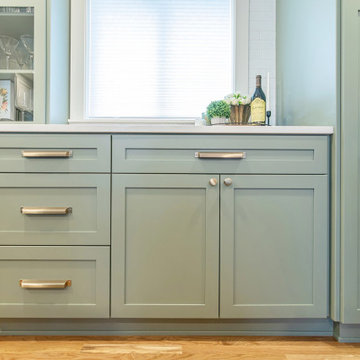 Woodland Construction Group LLC
The Murray small kitchen remodel demonstrated the immense potential of a small kitchen makeover. We started by stripping everything to the studs, enabling us to redesign the layout and make adjustments to the kitchen's overall flow.
In the design layout, we closed off a doorway to allow more wall space for additional full custom cabinetry and appliances, enhancing the kitchen's functionality. We extended the counters and repositioned the refrigerator to improve the workspace and flow.
The new island, highlighted with pendant lighting and set on stylish hardwood flooring, became the focal point, providing extra counter space and a gathering spot. Additional features like under-cabinet lighting, a touch-activated faucet, and a custom hood boosted the kitchen's overall appeal and practicality.
Modern elements like the integrated speed oven in the island cabinetry, and the new hardwood flooring throughout, completed the transformation. The Murray kitchen remodel project successfully combined style and function, transforming a modest kitchen into a warm, inviting, and efficient space.

 Alair Homes Houston
A clean, transitional home design. This home focuses on ample and open living spaces for the family, as well as impressive areas for hosting family and friends. The quality of materials chosen, combined with simple and understated lines throughout, creates a perfect canvas for this family’s life. Contrasting whites, blacks, and greys create a dramatic backdrop for an active and loving lifestyle.
 Adaptiv DC
THEME The main theme for this room is an active, physical and personalized experience for a growing boy. This was achieved with the use of bold colors, creative inclusion of personal favorites and the use of industrial materials. FOCUS The main focus of the room is the 12 foot long x 4 foot high elevated bed. The bed is the focal point of the room and leaves ample space for activity within the room beneath. A secondary focus of the room is the desk, positioned in a private corner of the room outfitted with custom lighting and suspended desktop designed to support growing technical needs and school assignments. STORAGE A large floor armoire was built at the far die of the room between the bed and wall.. The armoire was built with 8 separate storage units that are approximately 12”x24” by 8” deep. These enclosed storage spaces are convenient for anything a growing boy may need to put away and convenient enough to make cleaning up easy for him. The floor is built to support the chair and desk built into the far corner of the room. GROWTH The room was designed for active ages 8 to 18. There are three ways to enter the bed, climb the knotted rope, custom rock wall, or pipe monkey bars up the wall and along the ceiling. The ladder was included only for parents. While these are the intended ways to enter the bed, they are also a convenient safety system to prevent younger siblings from getting into his private things. SAFETY This room was designed for an older child but safety is still a critical element and every detail in the room was reviewed for safety. The raised bed includes extra long and higher side boards ensuring that any rolling in bed is kept safe. The decking was sanded and edges cleaned to prevent any potential splintering. Power outlets are covered using exterior industrial outlets for the switches and plugs, which also looks really cool.
Sponsored
Westerville, OH

Custom Home Works
Franklin County's Award-Winning Design, Build and Remodeling Expert
 Adaptiv DC
THEME The main theme for this room is an active, physical and personalized experience for a growing boy. This was achieved with the use of bold colors, creative inclusion of personal favorites and the use of industrial materials. FOCUS The main focus of the room is the 12 foot long x 4 foot high elevated bed. The bed is the focal point of the room and leaves ample space for activity within the room beneath. A secondary focus of the room is the desk, positioned in a private corner of the room outfitted with custom lighting and suspended desktop designed to support growing technical needs and school assignments. STORAGE A large floor armoire was built at the far die of the room between the bed and wall.. The armoire was built with 8 separate storage units that are approximately 12”x24” by 8” deep. These enclosed storage spaces are convenient for anything a growing boy may need to put away and convenient enough to make cleaning up easy for him. The floor is built to support the chair and desk built into the far corner of the room. GROWTH The room was designed for active ages 8 to 18. There are three ways to enter the bed, climb the knotted rope, custom rock wall, or pipe monkey bars up the wall and along the ceiling. The ladder was included only for parents. While these are the intended ways to enter the bed, they are also a convenient safety system to prevent younger siblings from getting into his private things. SAFETY This room was designed for an older child but safety is still a critical element and every detail in the room was reviewed for safety. The raised bed includes extra long and higher side boards ensuring that any rolling in bed is kept safe. The decking was sanded and edges cleaned to prevent any potential splintering. Power outlets are covered using exterior industrial outlets for the switches and plugs, which also looks really cool.
 Adaptiv DC
THEME The main theme for this room is an active, physical and personalized experience for a growing boy. This was achieved with the use of bold colors, creative inclusion of personal favorites and the use of industrial materials. FOCUS The main focus of the room is the 12 foot long x 4 foot high elevated bed. The bed is the focal point of the room and leaves ample space for activity within the room beneath. A secondary focus of the room is the desk, positioned in a private corner of the room outfitted with custom lighting and suspended desktop designed to support growing technical needs and school assignments. STORAGE A large floor armoire was built at the far die of the room between the bed and wall.. The armoire was built with 8 separate storage units that are approximately 12”x24” by 8” deep. These enclosed storage spaces are convenient for anything a growing boy may need to put away and convenient enough to make cleaning up easy for him. The floor is built to support the chair and desk built into the far corner of the room. GROWTH The room was designed for active ages 8 to 18. There are three ways to enter the bed, climb the knotted rope, custom rock wall, or pipe monkey bars up the wall and along the ceiling. The ladder was included only for parents. While these are the intended ways to enter the bed, they are also a convenient safety system to prevent younger siblings from getting into his private things. SAFETY This room was designed for an older child but safety is still a critical element and every detail in the room was reviewed for safety. The raised bed includes extra long and higher side boards ensuring that any rolling in bed is kept safe. The decking was sanded and edges cleaned to prevent any potential splintering. Power outlets are covered using exterior industrial outlets for the switches and plugs, which also looks really cool.
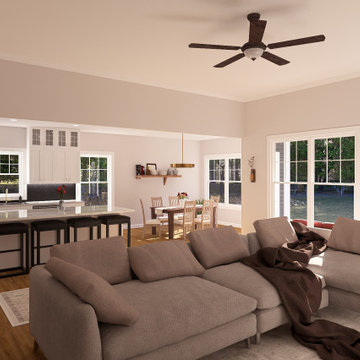
 W.L. Martin Home Designs
Smart Space, Warm Design: A Family-Focused 4-Bedroom Home
Home Plan #24378 delivers an efficient and comfortable single-story layout ideal for developers or homeowners who appreciate modern features without excess square footage. With 2,107 square feet of thoughtfully arranged space, this 4-bedroom, 3.5-bathroom plan offers an ideal footprint for a wide range of lot sizes in suburban or semi-rural settings.
Open Concept with Everyday Functionality
At the heart of this home is a large open-concept living room that connects seamlessly to the kitchen and rear dining area. The kitchen features a central island with bar seating, perfect for casual meals, homework sessions, or entertaining. With clear sightlines from the kitchen into the living room and dining area, this space is designed to keep families connected.
Well-Planned Bedroom Layout for Privacy and Comfort
The primary suite is tucked away for privacy and features a large en-suite bathroom with a walk-in shower, double vanity, and a spacious walk-in closet. One of the secondary bedrooms includes a private full bathroom, making it a great option for guests or an older child. The remaining two bedrooms share a third full bath, complete with double sinks to simplify busy mornings.
Convenient Extras
A half bathroom is located off the main hallway near the entrance foyer — an ideal placement for guests and day-to-day use. The home also includes a generously sized front porch that not only enhances the curb appeal but also provides a comfortable outdoor space for relaxing or welcoming guests.
Attached Garage and Storage Potential
The attached two-car garage provides plenty of room for vehicles, tools, and extra storage. With direct access into the home, it adds everyday convenience and functionality.
Perfect for Modern Families or Efficient Developments
Plan #24378 strikes the right balance between open living spaces and private retreats. With its compact, efficient layout and flexible bedroom arrangements, it’s an excellent fit for families, multi-generational living, or developers seeking to offer high-demand floor plans in neighborhoods across North America.
68