
Search results for "Extraction process" in Home Design Ideas


 Tile Doctor Ltd
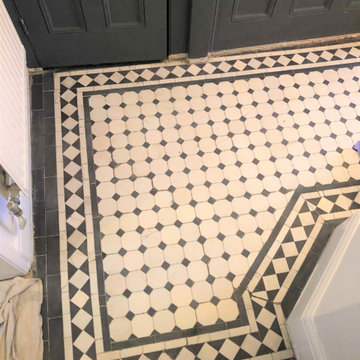
The owners of this Edwardian property in Finchley had purchased it a couple of years prior and since then had slowly been renovating it to restore its original character. The project was almost complete and now attention had turned to the tiled floor. The tiles were in quite a state and I was asked to work our Tile Doctor magic and bring it back to its original condition.
When they moved in the hallway had been covered with carpet which gave the tiles underneath some protection. Unfortunately, however the carpet has been secured with carpet grippers that had been glued to the tiles around the edges. There were also paint splashes on the surface that would need dealing with. On top of that the floor had a few missing tiles that had been back filled by cement to provide a level base for the carpet, the client wanted like them replaced if possible.
After surveying the floor, I explained what could be done and ever completed a small test clean to demonstrate how the tiles would look once deep cleaned. I was confident on being able to source very similar reclaimed tiles so replacing the missing should not be a problem. The client was very happy with the initial test result and my quotation so booked me in to restore the floor.
On my return I started by applying Tile Doctor Remove and Go to soften up the glue which allowed it to be carefully peeled off the tiles with scrappers. Once all the carpet adhesive was gone, I worked a strong dilution of Tile Doctor Remove and Go into the tiles using a black pad to work the cleaning solution deeper into the tiles. A wet vacuum was used to remove the slurry created, and I followed this by giving the tiles an extra clean using a 200-grit diamond burnishing pad lubricated with water.
The last step in the cleaning process was to give the floor an acid rinse using Tile Doctor Grout Clean-up, I did this for several reasons, first it removes old grout smears from the surface of the tile and second it neutralised any efflorescent salts lying dormant in the floor. This can be quite a problem for old floors which don’t have the benefit of a protective damp proof membrane under the floor. The floor was given a final rinse with water which was again extracted with a wet vacuum.
I then set about lifting all the loose tiles (approximately ten) and carefully removing the concrete infills. I had previously managed to source replacements for these holes from original features. Unfortunately, they didn’t sell the correct sized octagon tiles, so I had bought 150mm square tiles and then needed to cut them on site to get the right size.
After cutting and fixing the tiles I fixed them in place and regrouted the rest of the floor.
I then left the floor to dry out overnight and returned in the morning. Before applying a sealer, I took several moisture readings with the damp meter to make sure the tiles were dry enough to take the sealer.
I was able to confirm the floor was dry, so went ahead and applied three coats of Tile Doctor Colour Grow sealant. Colour Grow is an impregnating sealer that is fully breathable sealer which is important when it comes to old floors like these that don’t have a damp proof membrane installed.
My client was very happy with the renovated floor and for aftercare I left them with a bottle of Tile Doctor Neutral Tile Cleaner and gave advice on how best to clean the floor going forward.
Andrew Newstead
North London Tile Doctor

 Melissa Hill Home Design
We were so delighted to be able to bring to life our fresh take and new renovation on a picturesque bathroom. A scene of symmetry, quite pleasing to the eye, the counter and sink area was cultivated to be a clean space, with hidden storage on the side of each elongated mirror, and a center section with seating for getting ready each day. It is highlighted by the shiny silver elements of the hardware and sink fixtures that enhance the sleek lines and look of this vanity area. Lit by a thin elegant sconce and decorated in a pathway of stunning tile mosaic this is the focal point of the master bathroom. Following the tile paths further into the bathroom brings one to the large glass shower, with its own intricate tile detailing within leading up the walls to the waterfall feature. Equipped with everything from shower seating and a towel heater, to a secluded toilet area able to be hidden by a pocket door, this master bathroom is impeccably furnished. Each element contributes to the remarkably classic simplicity of this master bathroom design, making it truly a breath of fresh air.
Custom designed by Hartley and Hill Design. All materials and furnishings in this space are available through Hartley and Hill Design. www.hartleyandhilldesign.com 888-639-0639

 Lands End Development - Designers & Builders
Corner shower - mid-sized rustic 3/4 metal tile ceramic tile and brown floor corner shower idea in Minneapolis with flat-panel cabinets, medium tone wood cabinets, a two-piece toilet, orange walls, a console sink and white countertops


 Hueber Industries
This railing was the first planned update of the Fort Collins, CO couples home renovation. The wavy lines give the room a natural feel. Design and fabrication by Hueber Industries LLC. Photo: Rory Schaar.
 Tile Doctor Ltd
During an inspection for alteration work, this customer from Cheshunt discovered what appeared to be an original encaustic tiled floor under the hallway carpet. Keen to work out what it was, and have it restored, I was asked to pop round and look.
I went over as requested to survey the hallway floor and confirm their suspicions. The carpet had been secured with gripper rods glued onto the floor and that came away easily enough. Underneath, the tiles had been covered with self-levelling cement which had to be carefully scraped away to reveal the tiles.
I ran a test to see if the cement leveller could be easily removed and using a combination of a scraper with Tile Doctor Pro-Clean, I was able to confirm the tiled floor was indeed salvageable. The house was Edwardian, and the tiles had been laid in a classic black and white geometric pattern typical of the period so I suspect the floor was indeed original.
I worked out a quote to restore the whole floor including the removal of the cement, deep cleaning and then sealing the tiles. Without removing all the cement, it would be difficult to price for replacing broken tiles, but I suspected there may be a few as its quite usual for a floor of this age. Keen to have the floor restored we were given the go-ahead and a date scheduled for the work to start.
The first step was to remove all the carpet and gripper rod so we could see the full extent of the self-levelling screed. Once done it was a case of carefully chipping and scraping away to break up the cement until the tiled floor had been fully revealed. Its slow and detailed work but quite rewarding when the tiled floor is finally revealed. The tiles had survived well under the carpet and cement but as suspected a few repairs and replacement would be needed.
With all the cement brushed away work moved onto cleaning which started with a strong dilution of Tile Doctor Pro-Clean applied to the floor and left to soak in for fifteen minutes the scrubbed in with a rotary machine fitted with a Black pad. A lot of soiling is generated from this which is rinsed off with water and extracted with a wet vacuum. The floor was then inspected and the process repeated where required.
The next step was to treat the tiles to an acid wash using Tile Doctor Grout Clean-up. This is applied as before and has several benefits including dissolving the remaining cement residue and neutralising the pH of the floor after the use of Tile Doctor Pro-Clean which is a strong alkaline.
The floor was then inspected and the broken tiles carefully removed so they could be replaced. This is delicate work as lifting a tile can sometimes upset its neighbour and before you know it the size of the work has tripled. Replacement tiles were then cut to fit the existing geometric pattern and secured into place with a rapid set adhesive and grouted in.
Once the replacement tile and grout had set, the floor was given a light clean using Tile Doctor Neutral Tile Cleaner and then left to dry out overnight.
The next day the tiles were sealed using a single coat of Tile Doctor Colour Grow and the followed up with give coats of Tile Doctor Seal & Go. Colour Grow is an impregnator that soaks into the pores of the tile protecting it from within and improving colour, where as Seal and Go adds a nice subtle sheen to the tiles. Both products are breathable which is an important feature with old floors that don’t have a damp proof membrane.
For aftercare I recommended Neutral Tile Cleaner which is a gentle but effective tile cleaning product that won’t damage the sealer.
Robert Voyce
Hertfordshire TIle Doctor

 Closet Factory (Fort Lauderdale)
Our daily routine begins and ends in the closet, so we believe it should be a place of peace, organization and beauty. When it comes to the custom design of one of the most personal rooms in your home, we want to transform your closet and make space for everything. With an inspired closet design you are able to easily find what you need, take charge of your morning routine, and discover a feeling of harmony to carry you throughout your day.

 Thompson Remodeling
This family’s basement had become a catch-all space and was sorely underutilized. Although it was spacious, the current layout wasn’t working. The homeowners wanted to transform this space from closed and dreary to open and inviting.
Specific requirements of the design included:
- Opening up the area to create an awesome family hang out space game room for kids and adults
- A bar and eating area
- A theater room that the parents could enjoy without disturbing the kids at night
- An industrial design aesthetic
The transformation of this basement is amazing. Walls were opened to create flow between the game room, eating space and theater rooms. One end of a staircase was closed off, enabling the soundproofing of the theater.
A light neutral palette and gorgeous lighting fixtures make you forget that you are in the basement. Unique materials such as galvanized piping, corrugated metal and cool light fixtures give the space an industrial feel.
Now, this basement functions as the great family hang out space the homeowners envisioned.

 L & L Home Restoration, LLC
Complete luxury with this large walk-in shower. Overhead rainfall panel and two separate shower heads keep you warm and relaxed. The tile is a rustic barnwood look with small travertine squares for the inset.

 All Surface Restoration
Exposed Aggregate Driveway After Application Of Paver Gloss Acrylic Sealer.
This is an example of a large front yard driveway in Detroit.
This is an example of a large front yard driveway in Detroit.

 Metal Innovations
Stainless Steel Cable Rail West Hollywood
Example of a trendy wooden floating open staircase design in Los Angeles
Example of a trendy wooden floating open staircase design in Los Angeles

 Kim Rooney Design
Landscape by Kim Rooney
Fire, Water, Wood, & Rock - A Northwest modern garden for family and friends
Inspiration for a mid-sized modern partial sun backyard concrete paver water fountain landscape in Seattle with no cover.
Inspiration for a mid-sized modern partial sun backyard concrete paver water fountain landscape in Seattle with no cover.

 Garage Solutions Savannah
Many accessories to help store your sporting equipment
Garage workshop - mid-sized transitional attached two-car garage workshop idea in Atlanta
Garage workshop - mid-sized transitional attached two-car garage workshop idea in Atlanta


 Refined House, LLC
Example of a small transitional kids' gray tile and ceramic tile ceramic tile and white floor alcove shower design with shaker cabinets, blue cabinets, a two-piece toilet, gray walls, an undermount sink, quartz countertops and a hinged shower door

 Keuka Studios, Inc
Floating staircase with steel mono-stringer and white oak treads as seen from below. The wood top rail seamlessly flows up the multi level staircase.
Stairs and railings by Keuka Studios
Photography by Dave Noonan

 Lauren Rubin Architecture
Example of a small trendy master blue tile and ceramic tile marble floor corner bathtub design in New York with white cabinets, marble countertops, an undermount sink, flat-panel cabinets, a one-piece toilet and blue walls
7