
Search results for "Final adjusted" in Home Design Ideas
 Just the Thing Decorating, Staging, and Windows
This recent renovation project began with a desire to open up the kitchen to the family room. Today everyone seems to want the big island to live and entertain around, right?
I always recommend taking your time during the planning phase—6 weeks at least! Kitchens and bathrooms are highly functional areas, so you want to give yourself time to think thoughts like, “where am I going to put all my plastic cups?” I ask my clients lots of questions during this phase to help them design a kitchen that truly has a place for everything. Appliances and plumbing are part of this phase as well.
Once the cabinet design was finalized, the demo began! Because that troublesome wall was load bearing, so the GC, Miland Home Construction, had to install a beam to support the second floor. But once that was done, boy we had a lot of space to work with!
Picking your countertops is a little like picking an ice cream flavor: you really want to see all your options! Not only is function important here, but your counter material is really a major element of the kitchen, so pick one you love! This client fell in love with Taj Mahal Quartzite.
The backsplash was the next layer of fun. Now the mood of the kitchen becomes clear. Will it be elegant? Homey? Rustic? Picking the lighting then becomes like the fine tuner on a microscope, adjusting the view to its perfect clarity.
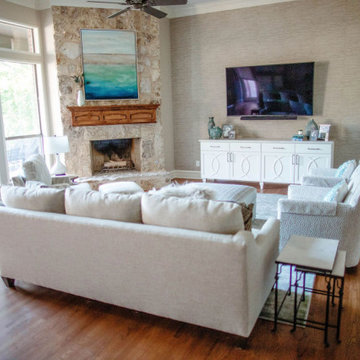
With construction underway, and the mood of the new space established, soft furnishings become the focus. Layering in luxurious, yet durable fabrics are the name of the game for most families. We all want beautiful spaces that can stand up to spouses, kids, and pets! It’s always a lot fun to select a deep and comfy sofa and chairs!
The finishing touches are what really give the project that designer look—so be sure to save room in the budget for art, window treatments, and accessories. In this home I wallpapered the wall behind the tv with a subtle grasscloth, selected a large abstract to center the room, and echoed its colors throughout the accessories. The result is eye-pleasing indeed: soft, textured, interesting and peaceful. This busy family was thrilled with the results.
 Drury Design
The Setup
For this primary bathroom project, the homeowners wanted to transform their large, T-shaped bathroom into a functional, multi-purpose sanctuary. The existing layout was inefficient, with a bulky built-in tub, a closed-off shower, and an awkward footprint that limited practical use.
This remodel also presented a unique challenge – the homeowners wanted to use the space for workouts as well. The design needed to maximize the large open area in the middle of the T, providing enough room for yoga and light free-weight exercises while maintaining the bathroom’s aesthetic and functionality.
Design objectives:
Expand and brighten the shower area without major layout changes
Replace the oversized built-in tub with a sleek freestanding alternative
Create a flexible space for workouts while maintaining the bathroom’s design integrity
Address cold flooring with added comfort solutions
Enhance lighting for both beauty and functionality
Incorporate storage for workout equipment and everyday essentials
Integrate natural elements to accommodate the homeowners’ love of plants
The Remodel
Design challenges to be solved:
Shower Expansion – The homeowners want a more open, spa-like shower but don’t want to dramatically alter the footprint.
Workout Integration – Balancing fitness functionality with a serene bathroom design will require creative layout adjustments.
Storage Solutions – With workout gear to stow away, the space needs discrete and versatile storage options.
Lighting – Enhancing both natural and artificial lighting to brighten the large space.
Cold Floors – Positioned above the garage, the bathroom tends to feel colder than the adjacent primary bedroom. A solution is needed to add warmth and comfort during use, without the need to reconfigure the home’s overall heating system.
The Renewed Space
Design solutions:
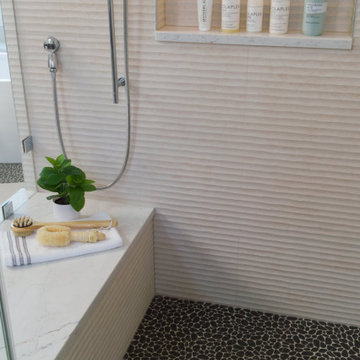
Spa-Like Shower Expansion – Removing a wall and replacing it with glass transformed the shower into an open, airy retreat, allowing natural light to flow freely through the space. A curved black river rock floor and neutral linear wall tiles add warmth and texture, while carefully placed niche lighting enhances the tranquil, luxurious atmosphere.
Workout-Friendly Layout – A custom full-length mirror was strategically placed to accommodate multiple uses, creating a fitness studio-like experience for yoga or light weight training. The mirror’s size and positioning allow for clear visibility during workouts, while also enhancing the room by adding light and a greater sense of depth.
Custom Storage Solutions – A custom cabinet with a wood top was crafted to discreetly store workout equipment, preserving the clean, open feel of the space. Its design not only enhances functionality but also creates a sense of symmetry, bringing visual balance and cohesion to the overall layout.
Enhanced Lighting – Replacing the shower wall with glass, installing a full-length mirror, and incorporating vanity mirrors with built-in lighting dramatically brighten the space. LED strip lighting under the cabinets, along the tub half wall, and in both the side and shower niches adds layered illumination, enhancing both function and ambiance.
Heated Floors – Installing heated flooring provides consistent warmth and comfort year-round, enhancing the space for both workouts and daily routines. A European-style towel warmer brings additional warmth and a touch of luxury, elevating the overall experience.
Final Thoughts:
This transformed bathroom blends luxury with intentional design. By addressing the homeowners’ needs – from workout flexibility to spa-inspired details – the space now serves multiple purposes without compromise. The warm cabinetry, black accents and thoughtful lighting tie the design together, while the curved textures and plant-friendly ledge add a personalized touch. This bathroom is now a bright, welcoming sanctuary for daily routines and mindful moments.
 enticengdesigns
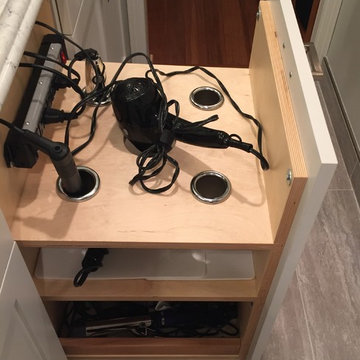
We gutted this 1990's bathroom that had a corner jetted tub, oak cabinets, 4" white tile and cultured marble vanity tops and gave it a sophisticated and elegant update with a custom vanity topped with quartz counter-top, heated floors, plugs wired into cabinetry for electric toothbrushes and hot tools, lighting placed perfectly (and dimmable) for primping or lounging in the adjustable air tub, and an extra large walk-in shower with rain-head, body sprays, wall mount and hand spray. And when you finally leave this spa shower, you can dry off with a warm towel from the heated towel bar. Every detail has been thought of in this beautiful master retreat.
Find the right local pro for your project
 Just the Thing Decorating, Staging, and Windows
This recent renovation project began with a desire to open up the kitchen to the family room. Today everyone seems to want the big island to live and entertain around, right?
I always recommend taking your time during the planning phase—6 weeks at least! Kitchens and bathrooms are highly functional areas, so you want to give yourself time to think thoughts like, “where am I going to put all my plastic cups?” I ask my clients lots of questions during this phase to help them design a kitchen that truly has a place for everything. Appliances and plumbing are part of this phase as well.
Once the cabinet design was finalized, the demo began! Because that troublesome wall was load bearing, so the GC, Miland Home Construction, had to install a beam to support the second floor. But once that was done, boy we had a lot of space to work with!
Picking your countertops is a little like picking an ice cream flavor: you really want to see all your options! Not only is function important here, but your counter material is really a major element of the kitchen, so pick one you love! This client fell in love with Taj Mahal Quartzite.
The backsplash was the next layer of fun. Now the mood of the kitchen becomes clear. Will it be elegant? Homey? Rustic? Picking the lighting then becomes like the fine tuner on a microscope, adjusting the view to its perfect clarity.
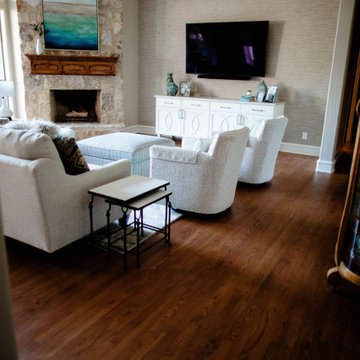
With construction underway, and the mood of the new space established, soft furnishings become the focus. Layering in luxurious, yet durable fabrics are the name of the game for most families. We all want beautiful spaces that can stand up to spouses, kids, and pets! It’s always a lot fun to select a deep and comfy sofa and chairs!
The finishing touches are what really give the project that designer look—so be sure to save room in the budget for art, window treatments, and accessories. In this home I wallpapered the wall behind the tv with a subtle grasscloth, selected a large abstract to center the room, and echoed its colors throughout the accessories. The result is eye-pleasing indeed: soft, textured, interesting and peaceful. This busy family was thrilled with the results.
 Terri Becker Designs
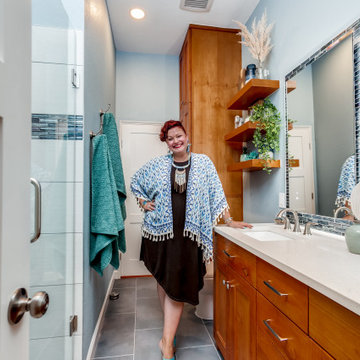
The soothing coastal vibes of this bathroom remodel are sure to take you to a place of calm. What a transformation this project underwent! Not only did we transform this bathroom into a spa-like sanctuary, but we also did it ahead of schedule. That's a rare occurrence in the construction and design industry.
We removed the tub and extended out the wall for the shower, which the homeowners chose to expand. This created a walk-in space, made to look even bigger by its frameless glass and large format, linen-look porcelain tile on the walls. For the shower floor, we selected a blue multicolored penny tile, and for the accent band, an opulent glass mosaic tile in dreamy ocean tones. The accent tile also graces the back of a new wall niche. This shower is now beautiful and functional.
To address the issues of storage, we removed a wall, freeing up space near the toilet, which was much-needed. Now there is a custom-built linen pantry crafted from alder wood stretching to the ceiling, adding to the visual height of the room and making the bathroom just work better.
A new vanity, also made of alder wood, and the linen closet were both stained a rich, warm tone to show off that gorgeous grain. For the walls, we chose a cool blue hue that is soothing and fresh.
The accent tile from the shower was carried behind the vanity's two LED mirrors for a bold visual impact. I love the reflection of the light on the tile! The LED mirrors are pretty high-tech, with a defogger and a dimmer to adjust the light levels.
Topping the vanity is a creamy quartz countertop, two under-mount sinks, and plumbing and cabinetry hardware in brushed nickel finishes. The cabinet knobs have a stunning iridescent shell that's hard to miss.
For the floors, we went with a large-format porcelain tile in dark grey that complements the coloring of the space as well as the look and feel.
As a final touch, floating shelves in the same rich wood-tone create additional space for décor items and storage. I styled the shelves with items to inspire and soothe this dreamy bathroom.
 Go Home Builders
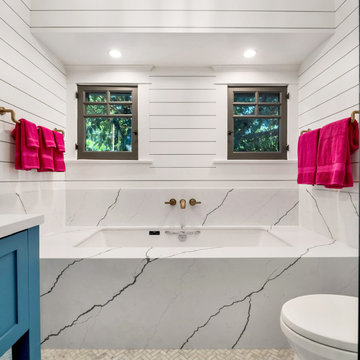
Step into this beautifully transformed bathroom, a serene blue and bold sanctuary nestled within a distinguished South Pasadena home. This space artfully marries modern indulgence with historical charm.
The first thing that captivates your attention is the gleaming brass fixtures from Brizo. These fixtures aren’t merely functional; they’re bold statement pieces that inject a layer of refined elegance. The brass showerhead, sink faucet, and bathtub faucet radiate against the calm backdrop.
Next to these radiant fixtures, you’ll find cabinets bathed in a soothing shade of sky blue. This tranquil hue instills a sense of serenity, transforming the bathroom into a peaceful oasis. This is the perfect place to start and end your day in the city of South Pasadena.
Contrasting the contemporary fixtures and cabinetry, the walls display traditional Tongue and Groove paneling. This classic design detail pays homage to the home’s rich history. When paired with the sky-blue cabinets, it ushers in a coastal, airy vibe.
As you venture further into the space, your gaze naturally falls onto the floor. Here, a striking chevron pattern captures the eye. The rhythmic alternation of tile shades creates a dynamic visual journey across the room.
The shower and the bathtub are enveloped in immaculate white quartz slabs. The subtle grey veins throughout the quartz radiate a spa-like ambiance. These serene elements, along with the white quartz, brass fixtures, sky-blue cabinets, and dynamic chevron tile flooring, harmonize perfectly.
Illuminating this exquisite ensemble is the soft, warm glow of strategically placed LED recessed lighting. These modern lights enhance every design detail, creating a cozy, inviting atmosphere. The LEDs highlight the textures and colors in the room, providing efficient and adjustable light.
Finally, in acknowledgment of the house’s historical lineage, the bathroom window has been custom-crafted. These windows invite an abundance of natural light, offering glimpses of the charming South Pasadena neighborhood. They fill the room with warmth, paying homage to the history and character of the city.
In summary, this ‘blue and bold’ bathroom stands as a testament to the seamless fusion of modern elements with historical charm. It showcases visually stunning aesthetics combined with practical functionality. Truly embodying the spirit of the city of South Pasadena.
 MikhailovCORG
Bright primary bathroom with a double vanity for the homeowners.
White shaker fronts, a marble-look quartz countertop and a full-wall mirror create a calm, hotel-inspired atmosphere. Two sinks make busy mornings easier, giving everyone their own space.
Our MIKHAILOVCORG team completed the precise installation of the vanity and top, adjusted all reveals and hardware, and aligned the cabinetry for a clean, seamless look — ready for final styling and move-in.
 Just the Thing Decorating, Staging, and Windows
This recent renovation project began with a desire to open up the kitchen to the family room. Today everyone seems to want the big island to live and entertain around, right?
I always recommend taking your time during the planning phase—6 weeks at least! Kitchens and bathrooms are highly functional areas, so you want to give yourself time to think thoughts like, “where am I going to put all my plastic cups?” I ask my clients lots of questions during this phase to help them design a kitchen that truly has a place for everything. Appliances and plumbing are part of this phase as well.
Once the cabinet design was finalized, the demo began! Because that troublesome wall was load bearing, so the GC, Miland Home Construction, had to install a beam to support the second floor. But once that was done, boy we had a lot of space to work with!
Picking your countertops is a little like picking an ice cream flavor: you really want to see all your options! Not only is function important here, but your counter material is really a major element of the kitchen, so pick one you love! This client fell in love with Taj Mahal Quartzite.
The backsplash was the next layer of fun. Now the mood of the kitchen becomes clear. Will it be elegant? Homey? Rustic? Picking the lighting then becomes like the fine tuner on a microscope, adjusting the view to its perfect clarity.
With construction underway, and the mood of the new space established, soft furnishings become the focus. Layering in luxurious, yet durable fabrics are the name of the game for most families. We all want beautiful spaces that can stand up to spouses, kids, and pets! It’s always a lot fun to select a deep and comfy sofa and chairs!
The finishing touches are what really give the project that designer look—so be sure to save room in the budget for art, window treatments, and accessories. In this home I wallpapered the wall behind the tv with a subtle grasscloth, selected a large abstract to center the room, and echoed its colors throughout the accessories. The result is eye-pleasing indeed: soft, textured, interesting and peaceful. This busy family was thrilled with the results.
 Last Closet
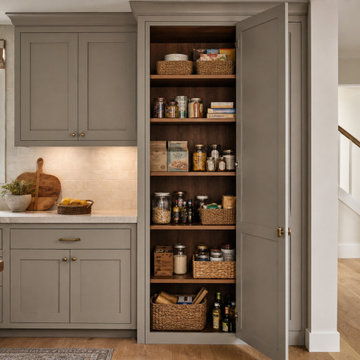
A floor-to-ceiling pantry cabinet uses one existing kitchen wall to organize everyday groceries without adding a separate room. The open cabinet shows adjustable wood shelves, while the surrounding kitchen run keeps the footprint relationship clear. AI-assisted planning concept; final cabinet dimensions, door swing, materials and site conditions require project-specific review.
 Medford Design-Build
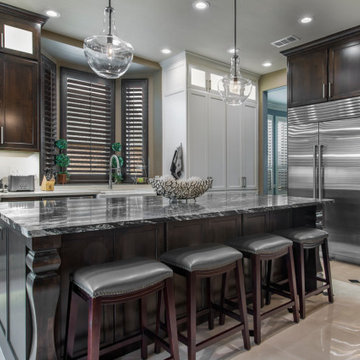
The first and most obvious change in the beautifully finished kitchen is the stunning new island. Removing the L-shaped bar around the perimeter of the kitchen along with the very small original island allowed ample space for this luxe showstopper. The new island provides plenty of workspace on it’s sleek, 4 ft x 9 ft Titanium Granite countertop, which also doubles as a seating area. Our clients are now able to host guests while preparing their meals without feeling removed from the conversation.
This monster-sized beauty also houses additional hidden storage cabinets with adjustable shelving just behind the barstools and convenient storage drawers on the other side. You’ll also notice the elegant furniture-style Baroque posts that were installed on each end, creating a very custom, high-end look.
Final photos by www.impressia.net
 Modern Citi Group: Renovations & Remodeling
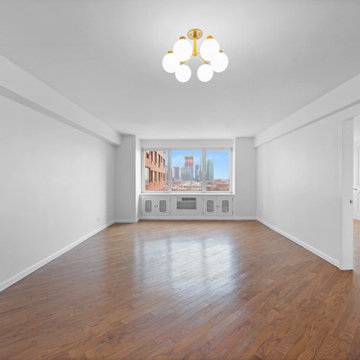
Modern Citi Group helped Andrew and Malabika in their renovation journey, as they sought to transform their 2,400 sq ft apartment in Sutton Place.
This comprehensive renovation project encompassed both architectural and construction components. On the architectural front, it involved a legal combination of the two units and layout adjustments to enhance the overall functionality, create an open floor plan and improve the flow of the residence. The construction aspect of the remodel included all areas of the home: the kitchen and dining room, the living room, three bedrooms, the master bathroom, a powder room, and an office/den.
Throughout the renovation process, the primary objective remained to modernize the apartment while ensuring it aligned with the family’s lifestyle and needs. The design challenge was to deliver the modern aesthetics and functionality while preserving some of the existing design features. The designers worked on several layouts and design visualizations so they had options. Finally, the choice was made and the family felt confident in their decision.
From the moment the permits were approved, our construction team set out to transform every corner of this space. During the building phase, we meticulously refinished floors, walls, and ceilings, replaced doors, and updated electrical and plumbing systems.
The main focus of the renovation was to create a seamless flow between the living room, formal dining room, and open kitchen. A stunning waterfall peninsula with pendant lighting, along with Statuario Nuvo Quartz countertop and backsplash, elevated the aesthetics. Matte white cabinetry was added to enhance functionality and storage in the newly remodeled kitchen.
The three bedrooms were elevated with refinished built-in wardrobes and custom closet solutions, adding both usability and elegance. The fully reconfigured master suite bathroom, included a linen closet, elegant Beckett double vanity, MSI Crystal Bianco wall and floor tile, and high-end Delta and Kohler fixtures.
In addition to the comprehensive renovation of the living spaces, we've also transformed the office/entertainment room with the same great attention to detail. Complete with a sleek wet bar featuring a wine fridge, Empira White countertop and backsplash, and a convenient adjacent laundry area with a renovated powder room.
In a matter of several months, Modern Citi Group has redefined luxury living through this meticulous remodel, ensuring every inch of the space reflects unparalleled sophistication, modern functionality, and the unique taste of its owners.
 Drury Design
The Setup
When our clients decided to remodel their primary bathroom, the goal was to transform the space into a brighter, more open retreat tailored to their needs. The previous layout, with its enclosed zones and limited functionality, no longer met their needs. By reimagining the layout and introducing thoughtful design choices, we created a modern, elegant bathroom that serves their current and future lifestyle.
Design objectives:
- Create a brighter, more open bathroom while maintaining privacy.
- Provide functional storage solutions without relying on the old linen closet.
- Incorporate a freestanding tub, large shower, and a makeup area for added versatility.
- Retain natural light from existing windows.
- Introduce elegant finishes and accents for a timeless aesthetic.
The Remodel
Design challenges to be solved:
- Reconfiguring the layout while keeping the existing plumbing for the toilet.
- Creating storage that houses everything that resided within the linen closet.
- Designing clearance and functionality for a freestanding tub, shower, and makeup area within the limited space.
- Accommodating the client’s desire for a pocket door in the commode room despite spatial constraints.
Introducing accent tile and cabinetry colors that align with the client’s vision yet maintain a cohesive look with the rest of the home.
The Renewed Space
Design solutions:
- Reimagined Layout: Moved the shower from the back of the room, creating a more open feel with additional glass while preserving privacy with a wing wall and bench. The freestanding tub was angled to optimize space and enhance circulation, with textured tile behind it adding visual interest.
- Efficient Storage: Eliminated the original linen closet and incorporated functional base cabinet storage and a designated makeup area for added utility.
- Optimized Access: Adjusted the depth of the makeup vanity to provide sufficient walkway clearance, ensuring a comfortable flow around the tub.
- Tailored Features: Installed a smaller pocket door in the commode room to resolve framing and plumbing limitations.
- Elegant Accents: Introduced a subtle marble herringbone mosaic tile in the shower and textured tile behind the tub to enhance the monochromatic palette. Painted cabinetry in a dark gray finish provided a bold yet refined contrast to the light countertops.
Final Thoughts:
The reimagined primary bathroom is a true reflection of the client’s needs and style preferences. By thoughtfully reworking the layout and incorporating functional yet elegant design elements, we created a serene and practical space that serves as a personal retreat. The result is a timeless bathroom that supports their busy lifestyle while providing moments of tranquility.
 Aniko Nicholson Design
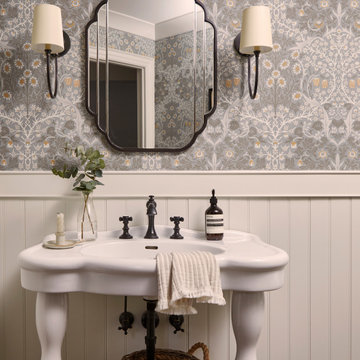
Let me walk you through how this unique powder room layout was transformed into a charming space filled with vintage charm:
First, I took a good look at the layout of the powder room to see what I was working with. I wanted to keep any special features while making improvements where needed.
Next, I added vintage-inspired fixtures like a pedestal sink, faucet with exposed drain (key detail) along with beautiful lighting to give the space that old hotel charm. I made sure to choose pieces with intricate details and finishes that matched the vintage vibe.
Then, I picked out some statement wallpaper with bold, vintage patterns to really make the room pop. Think damask, floral, or geometric designs in rich colours that transport you back in time; hello William Morris.
Of course, no vintage-inspired space is complete without antique accessories. I added mirrors, sconces, and artwork with ornate frames and unique details to enhance the room's vintage charm.
To add warmth and texture, I chose luxurious textiles like hand towels with interesting detail. These soft, plush fabrics really make the space feel cozy and inviting.
For lighting, I installed vintage-inspired fixtures such as a gun metal pendant light along with sophisticated sconces topped with delicate cream shades to create a warm and welcoming atmosphere. I made sure they had dimmable bulbs so you can adjust the lighting to suit your mood.
To enhance the vintage charm even further, I added architectural details like wainscoting, shiplap and crown molding. These details really elevate the space and give it that old-world feel.
I also incorporated unique artifacts and vintage finds, like cowbells and vintage signage, to add character and interest to the room. These items were perfect for displaying in our cabinet as decorative accents.
Finally, I upgraded the hardware with vintage-inspired designs to complement the overall aesthetic of the space. I chose pieces with modern detailing and aged finishes for an authentic vintage look.
And there you have it! I was able to transform a unique powder room layout into a charming space reminiscent of an old hotel.
 Kitchen Solvers of Spring Hill
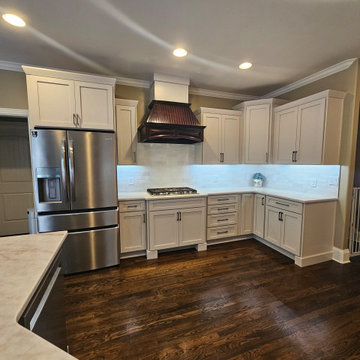
This homeowner had lived with her dark, crowded kitchen long enough and was ready for a change. Through our design process, we identified several ways to maximize storage, improve functionality, and create a brighter, more open feel.
To transform the space, we removed the raised bar top, repaired the rounded wall corners, added roll-out trays and an adjustable lazy Susan for easier access, installed tray dividers, repaired the refrigerator panel, modified toe-kick areas, and refaced all the cabinetry and range hood surround. We also installed beautiful new doors and drawer fronts, updated the countertops, added a stunning tile backsplash, and finished the project with task lighting to brighten every workspace.
The result is a kitchen that feels larger, more functional, and much more inviting while allowing the existing wood hood to remain a beautiful focal point.
The homeowner's reaction said it all: “Ahhh, I can finally breathe!”
 Modern Citi Group: Renovations & Remodeling
Modern Citi Group helped Andrew and Malabika in their renovation journey, as they sought to transform their 2,400 sq ft apartment in Sutton Place.
This comprehensive renovation project encompassed both architectural and construction components. On the architectural front, it involved a legal combination of the two units and layout adjustments to enhance the overall functionality, create an open floor plan and improve the flow of the residence. The construction aspect of the remodel included all areas of the home: the kitchen and dining room, the living room, three bedrooms, the master bathroom, a powder room, and an office/den.
Throughout the renovation process, the primary objective remained to modernize the apartment while ensuring it aligned with the family’s lifestyle and needs. The design challenge was to deliver the modern aesthetics and functionality while preserving some of the existing design features. The designers worked on several layouts and design visualizations so they had options. Finally, the choice was made and the family felt confident in their decision.
From the moment the permits were approved, our construction team set out to transform every corner of this space. During the building phase, we meticulously refinished floors, walls, and ceilings, replaced doors, and updated electrical and plumbing systems.
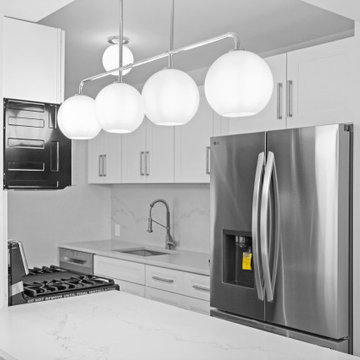
The main focus of the renovation was to create a seamless flow between the living room, formal dining room, and open kitchen. A stunning waterfall peninsula with pendant lighting, along with Statuario Nuvo Quartz countertop and backsplash, elevated the aesthetics. Matte white cabinetry was added to enhance functionality and storage in the newly remodeled kitchen.
The three bedrooms were elevated with refinished built-in wardrobes and custom closet solutions, adding both usability and elegance. The fully reconfigured master suite bathroom, included a linen closet, elegant Beckett double vanity, MSI Crystal Bianco wall and floor tile, and high-end Delta and Kohler fixtures.
In addition to the comprehensive renovation of the living spaces, we've also transformed the office/entertainment room with the same great attention to detail. Complete with a sleek wet bar featuring a wine fridge, Empira White countertop and backsplash, and a convenient adjacent laundry area with a renovated powder room.
In a matter of several months, Modern Citi Group has redefined luxury living through this meticulous remodel, ensuring every inch of the space reflects unparalleled sophistication, modern functionality, and the unique taste of its owners.
 Just the Thing Decorating, Staging, and Windows
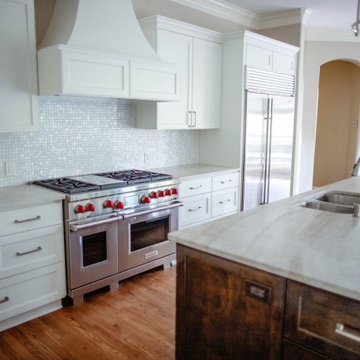
This recent renovation project began with a desire to open up the kitchen to the family room. Today everyone seems to want the big island to live and entertain around, right?
I always recommend taking your time during the planning phase—6 weeks at least! Kitchens and bathrooms are highly functional areas, so you want to give yourself time to think thoughts like, “where am I going to put all my plastic cups?” I ask my clients lots of questions during this phase to help them design a kitchen that truly has a place for everything. Appliances and plumbing are part of this phase as well.
Once the cabinet design was finalized, the demo began! Because that troublesome wall was load bearing, so the GC, Miland Home Construction, had to install a beam to support the second floor. But once that was done, boy we had a lot of space to work with!
Picking your countertops is a little like picking an ice cream flavor: you really want to see all your options! Not only is function important here, but your counter material is really a major element of the kitchen, so pick one you love! This client fell in love with Taj Mahal Quartzite.
The backsplash was the next layer of fun. Now the mood of the kitchen becomes clear. Will it be elegant? Homey? Rustic? Picking the lighting then becomes like the fine tuner on a microscope, adjusting the view to its perfect clarity.
With construction underway, and the mood of the new space established, soft furnishings become the focus. Layering in luxurious, yet durable fabrics are the name of the game for most families. We all want beautiful spaces that can stand up to spouses, kids, and pets! It’s always a lot fun to select a deep and comfy sofa and chairs!
The finishing touches are what really give the project that designer look—so be sure to save room in the budget for art, window treatments, and accessories. In this home I wallpapered the wall behind the tv with a subtle grasscloth, selected a large abstract to center the room, and echoed its colors throughout the accessories. The result is eye-pleasing indeed: soft, textured, interesting and peaceful. This busy family was thrilled with the results.
 ARCLIGHT INTERNATIONAL
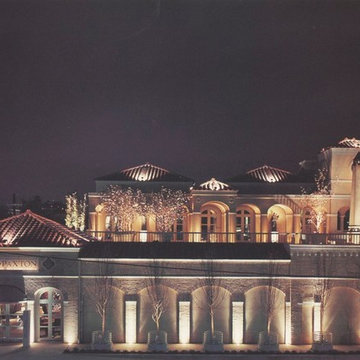
A glowing villa would set the tone for what is housed within. The entire project was illuminated with a single custom uplight from Hydrel. Each uplight was manufactured with the junction box on the bottom so not add any additional visual clutter to the floor. They were recessed into a floor covered in 1/2"x1/2" taupe colored tile.
The cover plate was cast aluminum 12"x12" in a square with an eight inch diameter opening to coddle a heavy molded piece of borosilicate made to fit flush with plate and floor tile. The glass was selected for its excellent thermal properties and extremely low expansion. It also has exceptional crystal clear clarity.
The fixtures housed a krypton gas filled PAR 38 SPOT from GE Lamps on an adjustable swing arm. GE Lamps were chosen because of the single rolled bullnose edge design the lens has were it connects to the parabolic glass sides. Others fix the lens to the edge creating two rolled edges and a crease. These edges capture and project the light and create more than one artifact prarabola caused by the lens edge and the way it is attached. This creates distracting and multiple visual parabolas being projected on the the walls and ceilings. A single one is problematic, having multiple ones with so many fixture being used becomes overwhelmingly distracting.
The fixture housing was also designed to be 12" deep keeping the top of the lamp recess 4" below the glass. The swing arm also contained a custom gimbal ring that allowed for both a lens and an internal louver to be mounted just above the lamp face. The louver was a custom black color in a custom large cell egg crate design of 1/2"x1/2"x1/2" size. The entire interior of this uplight was custom painted so that all parts were powder coated with Paxton Matte Black, named for the client who helped perfect the exact black color.
The color was tested and fabricated multiple times before the results were finally achieved. It was to be an exceptionally matte black that did not reflect in the slightst way any light or light source. It was supposed to be void of reflectance. The larger size of the uplight was selected over other choices because the lighting designer wanted to illuminate the 24" wide columns and pilasters through out the project. Smaller lamps and fixtures came out of the floor with a steep reverse parabola grazing the architecture. The depth of the custom fixture was dictated by the desire to have the narrow portion of the parabola effect occur inside the fixture before it even was viewable. The beam emitted from the fixture came out almost as fat as the columns were wide. The fixture was positioned a half inch from the vertical walls to keep the center beam six inches away. This helped perfectly graze the wall surface as well as control up light glare. The louvers were exactly the size of the floor tile so there was a consistency to the floor grid even within the light fixtures.
The position of the lamp and the 45° cutoff of the louver kept the visual cutoff at around 20° where people would be standing. You really have to hold your head near the wall and look down into the fixtures in order to see the source.
Everything was also dimmed with multiple presets for the clients command and a preprogrammed fade that started at dusk and continually reduced itself as the night progressed into early morning. The entire building would be bathed in a soft candle like glow of 10% from 2 am until sunrise with on the hour 2 minute fades from 80% brightness.
Photo: Robert Cook
 PRESTIGE Pools & Spas
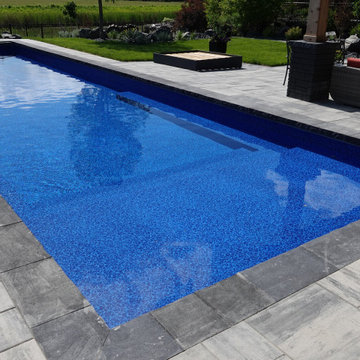
The clients had a wish-list that required a tanning ledge, a bench to accommodate many people, multiple lights, multiple water-features and finally an auto cover for safety. We designed a symmetrical pool interior that checks off all the boxes. We incorporated two 15’ long benches on each side of the pool to accommodate large groups. The tanning ledge is just over 6’ x 14’ and is perfect for in-pool loungers. This pool is ready for all the parties they will be enjoying over the next several decades. The multiple water feature is 3 x 3’ Sheer LED lighted Waterfalls that are actuated by the Omni Smartphone App. The whole pool is on the Omni App including adjusting pool water temperature, lighting and the water-features. The pool is very exciting at night with 10 lights and and the water-features all lit up.
 Medford Design-Build
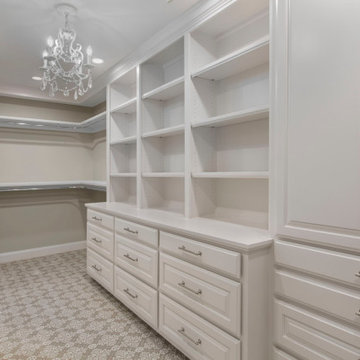
For this truly custom part of the project, our team wanted to give the clients specifically what they wanted – a complete “glam closet,” including a glitzy chandelier, specialty carpet, and boutique-style hanging wardrobes. Our design incorporated each of these items, along with custom LED lighting, stainless-steel rods, adjustable open shelving, and plenty of stacked drawers.
We also added an accessory cabinet with some shallow stacked drawers so our client can easily organize belts, jewelry, scarves, and other small items.
Final photos by www.impressia.net
 ESM Construction LLC
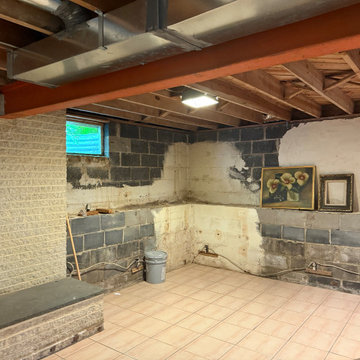
This project involved finishing a basement space to create a clean, functional, and comfortable living area. The scope of work included installation of insulation to reduce sound transfer between floors, new drywall installation, recessed lighting, and electrical upgrades with new wiring connected to the main panel.
An egress window was installed to meet safety requirements and provide emergency exit access. The installation included cutting the foundation wall, installing the window well, gravel drainage system, and ensuring code compliance.
Existing tile flooring was maintained, while walls and ceilings were repaired, textured, and painted. Select areas were finished with decorative stucco to highlight the original brick for a unique design feature. Plumbing lines were adjusted as needed to allow proper drywall installation on the ceiling.
The final result is a bright and functional basement space suitable for comfortable daily use.
18