
Search results for "Hold loose" in Home Design Ideas


 The Foxy Garden
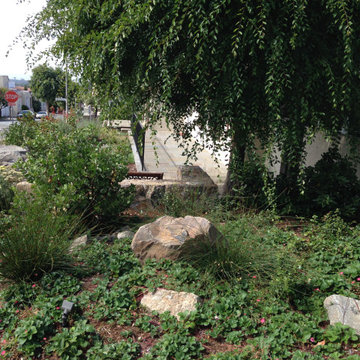
This very large corner site was shrouded in tired and thirsty conventional lawn. Really a bland, uninteresting monoculture—impossible to maintain especially in light of our dwindling resources and our growing understanding about sustainable practices.
We chose to approach this project not with the idea that existing lawn is bad, but with respect for what lawn has historically represented: a socially connective tissue.
Instead of conventional grass requiring endlessly large amounts of water, chemicals and mowing, this lawn conversion shifts to a naturalistic native meadow mix splashed with wildflowers and drought tolerant native shrubs. It was the clients’ desire to be wrapped by a garden attracting native pollinators and beneficial insects. A wildlife photographer, they wanted the opportunity to open windows and doors and feel immediately connected to a coastal native environment.
The handsome new stone walls, stairs and massive boulders became the structural framework containing the loose, coastal sage scrub plant community, holding the landscape together during the dormant months.
As we continue to grow our acceptance of and appreciation for climate appropriate California gardens, and embrace the paradigm shift, let us graciously bid adieu to our home’s unsustainable velvet robe.

 SUPERIOR CHIMNEY SERVICES CORPORATION
Standard annual or mechanical Chimney cleaning for gas and wood burning fireplaces typically works to remove any type of buildup as well as checking for the structural integrity of the chimney. Maintaining an annual chimney cleaning will meet the national safety standard set by the NFPA, CSIA, IRC and NCSG, helping homeowners avoid chimney fires and blockages.
Why does safety matter? Did you know that there was a chimney fire in Marengo in January? Or a chimney fire at a Peotone home at the end of March? Or a log cabin fire caused by the chimney in June? That’s just a few that happened in the past 7 months.
Why Does a Chimney Cleaning Matter?
Chimney sweeps also known as chimney cleanings, fireplace cleanings, or fireplace sweeps. Regardless of what you call it, it still means the same thing.
Chimney cleaning for gas and wood burning fireplaces serve 3 key purposes:
confirming structural integrity
removing flammable deposits and
obstruction-free assurance.
Homeowners with gas or wood burning fireplaces benefit from each of these safeguards.
The National Fire Protection Association addresses this directly through NFPA 211, a widely recognized fire safety code. The standard states that chimneys, fireplaces, and vents require inspection at least once a year for soundness, free from deposits, and correct clearances, with cleaning, maintenance, and repairs to be done whenever needed.
This annual requirement applies equally to gas and wood burning fireplaces. Organizations including the Chimney Safety Institute of America, the National Chimney Sweep Guild, International Residential code and the National Fire Protection Association each reference this standard as the requirement for home fire safety.
Free 14-Point Certified Written Inspection
Every chimney sweep completed through Superior Chimney includes a complimentary 14-point certified written inspection along with photo documentation delivered to you by email. This documentation gives homeowners a clear visual record of their chimney system.
The written report covers the condition of the flue liner, smoke chamber, smoke shelf, damper, firebox, chimney crown, and chimney cap, among other components examined during a standard visit. Photo documentation captures each area so homeowners can review the findings independently of the technician’s verbal summary. Written inspection reports allow families to track the condition of their fireplace chimney system over time.
Chimney Cleaning and Structural Integrity
A CSIA Certified Chimney Sweep technician, such as Superior Chimney technicians, visually examines the chimney from the top opening to the firebox below, gaining a full evaluation of the interior.
When chimney rods and brushes pass through the chimney system, loose pieces of fire clay tile, damaged tile joints, or crumbling brick sometimes fall down into the fireplace. This debris can mean there is an integrity problem. By knowing this is a problem, will protect families and their homes. Now it’s time to take care of it and call in a certified chimney technician.
Fireplace Cleaning and Creosote Removal
Creosote, is the technical name for soot. Soot forms as a natural byproduct of burning wood. Smoke traveling upward through the chimney and leaves deposits of creosote along the interior walls. With every fire, a little more gets built up.
The issue with creosote is that it is highly flammable and is the leading cause of chimney fires nationwide. Removing the buildup through regular chimney cleanings keeps a fireplace serviceable for continuous use throughout the spring, fall and winter seasons.
Standard and mechanical chimney cleanings pay close attention to the flue liner, smoke chamber, smoke shelf, damper, and firebox in a single service visit. Superior Chimney performs each fireplace chimney inspection using a no-mess process that protects the home during service. This keeps soot contained within specialized equipment rather than the living room.
An Obstruction Free Chimney
Several conditions create blockages within a chimney system. Bird, squirrel, bat and raccoon nesting material, feces, and debris frequently accumulate inside an unprotected flue, especially during spring and summer months when the fireplace sits unused.
Excessive creosote accumulation or a collapsed chimney liner can restrict proper airflow. Homeowners that address obstructions with a chimney inspection will be able to maintain proper draft and ventilation with their gas or wood burning fireplace. This will reduce the risk of smoke backing into the home.
Gas Chimney Cleaning Compared to Wood burning Chimney Cleaning
Gas and wood burning fireplaces share the same annual chimney inspection requirement. Whether you are burning wood, gas or a “pile of shirts” there is still heat and flame that requires worthy firewalls to protect the home from heat transfer. Fire worthiness and checking the firewall integrity is priority.
Wood burning fireplaces generate creosote that builds along the flue liner with every fire. Gas fireplace systems accumulate lighter deposits along with potential venting obstructions, since gas appliances rely heavily on venting for safe combustion byproduct release. Each system accumulates different residues that need attention.
A CSIA Certified Chimney Sweep technician from Superior Chimney adjusts the specific cleaning approach based on fuel type. However, the same core safety elements apply: structural integrity, deposit removal, and clear airflow.
What Happens During a Chimney Cleaning?
A typical chimney inspection begins with a walkthrough of the fireplace and the chimney on top of the roof, allowing the technician to record any visible concerns the homeowner reported in advance as well as any new findings.
The certified technician then covers the immediate hearth area with protective material before setting up specialized equipment designed to contain creosote throughout the cleaning and inspection.
Chimney rods and brushes pass through the flue liner to loosen and remove creosote deposits along the smoke chamber, smoke shelf, and damper. The certified technician inspects each section closely for loose or crumbling firewall, cracked joints, or other signs of weak structural damage.
A final walkthrough of the firebox and chimney completes the visual inspection. Photo documentation captures each component, and the certified written report is sent to the homeowner by email. This consistent process gives homeowners the documentation they need to compare year to year.
Chimney Cleaning Safety Standards
The table below summarizes the organizations that set national chimney safety standards, along with their specific requirements for fireplace chimney sweeps.
NFPA211
National Fire Protection Association
Annual inspection for soundness, deposit buildup, and correct clearances; cleaning and repairs completed as needed
CSIA
Chimney Safety Institute of America
Certifies technicians through testing on chimney and venting system knowledge
NCSG
National Chimney Sweep Guild
Establishes trade standards and best practices for chimney sweep professionals
How Often Should You Schedule a Chimney Cleaning and Inspection?
CSIA recommends scheduling chimney cleaning and inspection annually by CSIA Certified Chimney Sweeps. This recommendation applies to gas and wood burning fireplaces, regardless of how frequently a household uses the fireplace and especially in freeze/thaw geographic areas.
Regular chimney sweeps save lives, since a clean fireplace chimney rarely catches fire. CSIA encourages homeowners to rely on Certified Chimney Sweeps, as these technicians undergo regular testing on the complexities of chimney and venting systems throughout their careers.
Frequently Asked Questions
What is included in a chimney sweep? A chimney sweep includes the flue liner, smoke chamber, smoke shelf, damper, and firebox, removing creosote while checking for obstructions and structural concerns throughout the chimney system (NOT the ashpit).
How often should gas and wood burning fireplaces receive chimney sweeps? CSIA, NFPA, IRC and NCSG guidelines each call for chimney sweeps at least once a year for gas and wood burning fireplace systems.
Why does creosote removal matter for fireplace safety? Creosote is highly flammable and builds along the interior walls of a fireplace chimney with every fire, creating conditions that lead directly to chimney fires when left in place over time. Creosote is unburned particles from the combustion chamber.
Who should perform a fireplace chimney sweep? CSIA Certified Chimney Sweep technicians complete fireplace chimney sweeps after passing regular testing on chimney and venting system knowledge, meeting the certification standard recognized across the industry.
Does a fireplace chimney sweep remove animal nests and debris? No, a fireplace chimney sweep addresses soot and creosote, while significant nesting material, feces, or collapsed liner debris often calls for dedicated obstruction removal alongside the standard service.
What does the free 14-point inspection include? The complimentary 14-point certified written inspection documents the flue liner, smoke chamber, smoke shelf, damper, firebox, crown, and cap through photo evidence delivered directly by email for homeowner records.
Choose Superior Chimney for Your Certified Chimney Inspection
All service technicians completing chimney sweeps through Superior Chimney hold National Certification through the Chimney Safety Institute of America (CSIA), reflecting the training standard recommended by fire safety organizations nationwide.
Scheduling regular chimney sweeps to clean gas and wood burning fireplace systems protects a home from fire risk, preserves the structural integrity of the chimney, and keeps airflow clear for proper, continuous use throughout the year. Contact us today to schedule a chimney inspection at 877-244-6349.
Find the right local pro for your project

 John
JohnCoco coir is a versatile and sustainable growing medium that is gaining popularity among gardeners. Made from the fibrous husk of coconuts, it’s an eco-friendly alternative to peat moss and can greatly enhance the quality of your soil. In gardening, it is often utilized in systems like Coco Coir Hydroponic, where it helps create an efficient water and nutrient delivery system.
What is Coco Coir?
Coco coir is a natural fiber extracted from coconut husks. It has a neutral pH, excellent water retention, and is reusable, making it a favorite among gardeners who prefer organic and sustainable practices. It is available in different forms such as blocks, bricks, or loose coir, each requiring some preparation before use in gardening.
Benefits of Using Coco Coir in Gardening
Coco coir offers several advantages for gardening. Here are the benefits of using coco coir in gardening:
Holds up to 10 times its weight in water, ensuring plants have consistent moisture.
Promotes oxygen flow to plant roots, leading to healthier root systems.
Coco coir is a renewable and eco-friendly alternative to peat moss.
It can be washed, rehydrated, and reused, reducing waste.
Naturally pH neutral, making it suitable for various plants without major adjustments.
Enhances the texture and moisture retention of garden soil.
How to Prepare Coco Coir for Planting
Preparing coco coir for planting involves a few essential steps. First, you need to hydrate the coir block, as it typically comes in a compressed form. Place the block in a large container and add warm water, allowing the block to expand and absorb the water. Once fully expanded, the coir should be fluffed up by breaking it apart with your hands or a tool to ensure it becomes loose and airy. After the coir has been fluffed, it is important to drain any excess water, as overly wet coir can lead to root suffocation. Finally, since coco coir is inert and does not contain nutrients, it’s a good idea to add organic compost or liquid fertilizer to enrich the coir before planting.
Do You Need to Soak Coco Coir Before Planting?
Yes, soaking coco coir before planting is necessary. Since it comes in a compressed form, it needs to be broken down and hydrated for proper use. The soaking process allows the coir to expand and release the fibers, making it usable as a growing medium. After soaking, the coir should be fluffed to ensure the water is evenly distributed. Draining any excess water is crucial because overly wet coir may impede plant root health.
How to Prepare Coco Peat for Planting
Coco peat, a fine, powdery form of coco coir, is highly beneficial for seed starting and improving water retention in soil. To prepare coco peat, it first needs to be hydrated, similar to how you prepare coir blocks. Slowly add water to the peat in a container and allow it to absorb and fluff up. Once hydrated, coco peat can be used on its own or mixed with other growing media such as perlite or vermiculite for added aeration and drainage. It is advisable to check the pH level of your final mix, as coco peat generally has a neutral pH, but adjustments may be necessary depending on the plants being grown.
Can You Use Just Coco Coir for Plants?
Yes, coco coir can be used by itself to grow plants, especially in hydroponic systems or as a seed-starting medium. However, because coco coir does not naturally contain nutrients, you will need to provide regular fertilizer to support plant growth. This makes it particularly suitable for plants grown in controlled environments, such as hydroponics, where nutrient solutions can be carefully managed. In traditional soil-based gardening, mixing coco coir with other organic materials like compost is recommended to provide essential nutrients and improve the overall soil structure.
How to Use Coco Coir in Hydroponics
Coco coir is widely used in hydroponic systems due to its water retention and aeration properties. To use coco coir in hydroponics, it first needs to be soaked and hydrated, as discussed earlier. Once the coir is fully prepared, it can be placed in the hydroponic system. Since coco coir does not contain natural nutrients, you will need to supply a balanced nutrient solution tailored for hydroponic plants. Regular monitoring of water and nutrient levels is essential to prevent nutrient imbalances or root rot. One of the benefits of coco coir in hydroponics is its reusability. After completing a growing cycle, the coir can be washed, rehydrated, and used again in future plantings.
Using Coco Coir as a Soil Amendment
Coco coir is also an excellent soil amendment, as it improves the texture and moisture retention of garden soil. To use coco coir in this way, mix loose coir with your existing garden soil at a ratio of one part coco coir to two parts soil. This will help retain moisture without compacting the soil, improving both water drainage and root growth. For optimal results, you can also add organic compost to the mix, ensuring that the nutrient levels are sufficient for plant growth. Coco coir works particularly well in raised beds, where it helps maintain proper soil structure over time.
Advantages of Using Coco Coir Over Peat Moss
While peat moss has been traditionally used as a growing medium, coco coir offers several advantages over it. Coco coir is a renewable resource, as it is a byproduct of coconut processing, while peat moss is harvested from peat bogs that take centuries to regenerate. Coco coir is also more durable, as it can be reused multiple times without breaking down, while peat moss disintegrates after a single use. Another key benefit is its neutral pH, whereas peat moss is more acidic and may require balancing to meet the needs of specific plants.
Conclusion
Coco coir is a highly versatile and sustainable growing medium that benefits both novice and experienced gardeners alike. Whether you are using it for hydroponics, as a soil amendment, or as a standalone medium for growing plants, knowing how to properly prepare and use it is key to maximizing its benefits. By following the steps detailed above, you can improve water retention, aeration, and overall plant health in your garden, all while contributing to eco-friendly gardening practices.
 The Foxy Garden
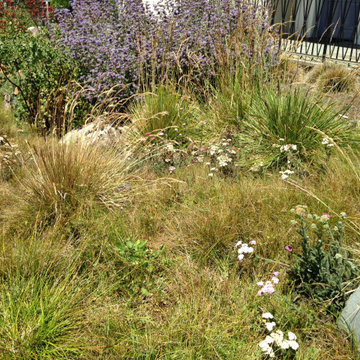
This very large corner site was shrouded in tired and thirsty conventional lawn. Really a bland, uninteresting monoculture—impossible to maintain especially in light of our dwindling resources and our growing understanding about sustainable practices.
We chose to approach this project not with the idea that existing lawn is bad, but with respect for what lawn has historically represented: a socially connective tissue.
Instead of conventional grass requiring endlessly large amounts of water, chemicals and mowing, this lawn conversion shifts to a naturalistic native meadow mix splashed with wildflowers and drought tolerant native shrubs. It was the clients’ desire to be wrapped by a garden attracting native pollinators and beneficial insects. A wildlife photographer, they wanted the opportunity to open windows and doors and feel immediately connected to a coastal native environment.
The handsome new stone walls, stairs and massive boulders became the structural framework containing the loose, coastal sage scrub plant community, holding the landscape together during the dormant months.
As we continue to grow our acceptance of and appreciation for climate appropriate California gardens, and embrace the paradigm shift, let us graciously bid adieu to our home’s unsustainable velvet robe.
 The Foxy Garden
This very large corner site was shrouded in tired and thirsty conventional lawn. Really a bland, uninteresting monoculture—impossible to maintain especially in light of our dwindling resources and our growing understanding about sustainable practices.
We chose to approach this project not with the idea that existing lawn is bad, but with respect for what lawn has historically represented: a socially connective tissue.
Instead of conventional grass requiring endlessly large amounts of water, chemicals and mowing, this lawn conversion shifts to a naturalistic native meadow mix splashed with wildflowers and drought tolerant native shrubs. It was the clients’ desire to be wrapped by a garden attracting native pollinators and beneficial insects. A wildlife photographer, they wanted the opportunity to open windows and doors and feel immediately connected to a coastal native environment.
The handsome new stone walls, stairs and massive boulders became the structural framework containing the loose, coastal sage scrub plant community, holding the landscape together during the dormant months.
As we continue to grow our acceptance of and appreciation for climate appropriate California gardens, and embrace the paradigm shift, let us graciously bid adieu to our home’s unsustainable velvet robe.

 PI Photography Wall Art & Fine Art
 https://pipafineart.com/products/vintage-rustic-wall-art-abandoned-echoes-subdued-effect-painting-digital-artwork-loose-art-print. Journey into a world of forgotten memories with "Abandoned Echoes." This evocative artwork transports you to a desolate landscape where a solitary farmhouse stands against a brooding sky. The weathered facade and overgrown path tell a silent story of time's passage and the inevitable decay of what was once a vibrant home. Printed on high-quality photo paper with premium inks, this loose art print captures the haunting beauty of the scene, from the texture of the dilapidated wood to the subtle shifts in the overcast sky.
"Abandoned Echoes" invites contemplation and introspection, prompting questions about the lives once lived and the stories left untold. Hang it in your living room, bedroom, dining room, or office to create a captivating focal point that sparks curiosity and conversation. The muted tones and stark composition evoke a sense of mystery and melancholy, adding a touch of rustic charm with a hint of the unseen.
This artwork is made in the USA and printed on demand, ensuring a high-quality piece that will be cherished for years to come. Available in a variety of sizes, "Abandoned Echoes" is a perfect gift for those who appreciate the beauty of abandoned places, the stories they hold, and the evocative power of art.

Sponsored
Columbus, OH

Hope Restoration & General Contracting
Columbus Design-Build, Kitchen & Bath Remodeling, Historic Renovations
 PI Photography Wall Art & Fine Art
 https://pipafineart.com/products/amber-explosion-realism-painting-digital-artwork-loose-art-print. Capture the exhilarating energy of "Amber Explosion," an artwork that transforms the simple act of pouring a drink into a dynamic spectacle. This photorealistic print showcases a glass of amber liquid erupting with ice and a splash of vibrant color, frozen in a moment of captivating motion. The interplay of light and shadow, the intricate details of the ice, and the rich hues of the liquid create a visually stunning composition that evokes a sense of excitement and vibrancy. Printed on high-quality photo paper with premium inks, this loose art print brings the explosive energy of the moment into your home.
"Amber Explosion" is a celebration of the beauty found in unexpected moments, a reminder that even the simplest actions can hold a touch of magic. Hang it in your home bar, rec. room, den, dining room, or office to add a touch of drama and intrigue. The dynamic composition and rich color palette make it a captivating conversation starter, while the sense of movement and energy adds a touch of vibrancy to any space.
This artwork is made in the USA and printed on demand, ensuring a high-quality piece that will be cherished for years to come. Available in a variety of sizes, "Amber Explosion" is a perfect gift for those who appreciate the art of mixology or lovers of whiskey, the beauty of everyday moments, and the power of visual storytelling.
 Windy City Painters
Iron Fence Painting in Wicker Park: A Windy City Painters Case Study
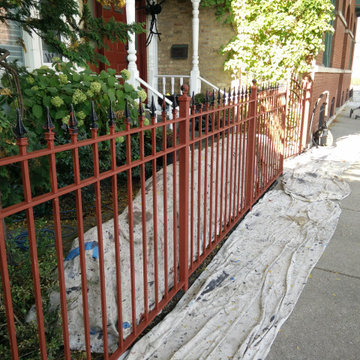
Iron fence painting in Wicker Park is one of the most requested exterior services Windy City Painters performs each season, and this recent project shows exactly why. Set behind an ornate 1890s greystone two-flat, the client's wrought iron fence had endured years of Chicago winters without professional attention. Rust had spread across the pickets, the original black enamel was flaking away in sheets, and the fence's structural hardware had begun to loosen at several joints.
As the trusted local expert for Chicago's North Side and Near West Side, Windy City Painters approached this project the same way we approach every iron fence painting job in Wicker Park: with a methodical, multi-step process designed to outlast Midwest weather rather than simply mask the damage.
The Process, Step by Step
Step 1 — Rust Removal and Surface Preparation. Our crew wire-brushed and mechanically ground every rusted section down to clean, stable metal. For pitted or heavily corroded areas, we applied a chemical rust converter to neutralize corrosion at the molecular level before any coating touched the surface. Furthermore, because this greystone was built well before 1978, Windy City Painters tested the existing paint layers for lead and followed strict containment protocols throughout the removal process.
Step 2 — Spot Repairs. Loose pickets were re-secured, small pits were filled, and hardware at the gate hinges was tightened. In contrast to a quick spray-paint refresh, this stage ensures the fence is structurally sound before a single drop of primer goes on.
Step 3 — Priming. A full coat of rust-inhibiting primer, engineered specifically for ferrous metal, was applied by brush to every surface — with particular attention to welds and joints where moisture tends to collect and restart the corrosion cycle.
Step 4 — Topcoat Application. Two finish coats of industrial-grade, direct-to-metal enamel were applied by brush and roller. This built a durable, uniform barrier in classic gloss black, the most popular finish among Wicker Park's historic properties. Finally, our team inspected every inch of the fence for thin spots or missed sections before calling the job complete.
Project Specs
Surface: Ornamental wrought iron fence, posts, and gate hardware
Products used: Rust-inhibiting DTM primer, chemical rust converter, industrial-grade direct-to-metal enamel
Coats applied: 1 primer coat, 2 finish coats
Finish: Gloss black
Timeline: Completed in under two days
Advice for Wicker Park Homeowners
Before starting a similar iron fence painting project in Wicker Park, homeowners should keep a few things in mind. Notably, never paint directly over active rust — trapped moisture underneath will cause the new coat to fail within a season. Additionally, always ask whether a contractor tests for lead paint on pre-1978 homes, since many Wicker Park greystones fall into that category. Meanwhile, hand brushwork matters: the intricate scrollwork common on Wicker Park ironwork requires careful, detailed application that spray equipment simply cannot replicate. Therefore, hiring a crew experienced specifically in historic Chicago ironwork, like Windy City Painters, makes a measurable difference in the finished result.
Windy City Painters also handles related exterior and interior work for Wicker Park properties, including interior painting, drywall and plaster repair, and additional metal refinishing for porches and railings.
Iron fence painting in Wicker Park protects one of the neighborhood's most defining architectural features while restoring curb appeal instantly. As a result, this greystone now has a fence that matches the quality of the home behind it — and will hold up through many more Chicago winters.
See more of our work and request a free estimate at www.windypainters.com.
Ready to transform your Wicker Park home? Contact Windy City Painters for a free estimate — visit www.windypainters.com today. Proudly serving Wicker Park, West Town, Lincoln Park, Roscoe Village, Lakeview, Ukrainian Village, River North, and all of Chicago.

 Brooklyn City Furniture
The Foundry Upholstery Series showcases tailored minimalism with details that elevate fashion and function to suit any residential or commercial setting. Inspired by elements of classic Scandinavian design, the Foundry Bi-Sectional offers ample sophistication as a standalone piece, showcasing striking lines, an extra slender tightback frame and cushions that seem to float above elevated, cylindrical steel legs. Two bolsters offer additional style and comfort, while the sturdy, steel reinforced FSC®-Certified frame ensures that Foundry holds up in high-traffic environments.
Features elegant lines and thin, elevated legs.
The tightback sectional is comprised of two components, a Foundry Sofa and a Foundry Ottoman.
Has two removable seat cushions, a removable ottoman cushion and comes with two loose bolster cushions.
Seat and bolster cushions are made with Dacron-wrapped, high resiliency, medium density foam.
Inner frame is 100% kiln-dried FSC®-Certified hardwood in support of responsible forest management (FSC® 092551).
Frame is reinforced with steel for long lasting durability.
9-gauge No-Sag, sinuous spring suspension system.
Cylindrical legs are made from black powder-coated steel.
Non-marking leveler feet can be adjusted for stability on uneven floor surfaces.
Manufactured to meet California TB117-2013 fire safety standards without the use of flame retardant additives in the upholstery foam.
All fabric is California TB117-2013 certified and double rub tested.
* Fabric samples available upon request. Need help? Chat with us online or send us an email to info@cityfurnitureshop.com
 SUPERIOR CHIMNEY SERVICES CORPORATION
A friend noticed a damp, musty smell coming from her living room fireplace the week after a February thaw. When she called a masonry technician from Superior Chimney, to take a look, and found that water had been working its way behind the bricks for years. What started as a small crack now meant her chimney needed structural repairs before she could safely use it again.
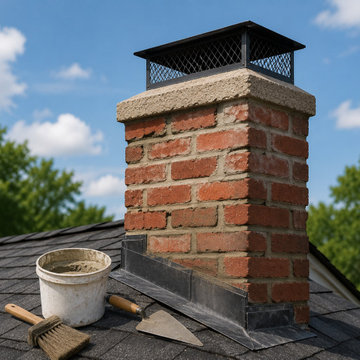
Chimney repairs are any work done to restore the structural and weatherproof condition of a chimney. This can include mortar joint repair, brick replacement, crown repair, flue repair, and cap or flashing replacement. Most Chicagoland homeowners discover the need for chimney repairs often times after winter, when the freeze and thaw cycles have already done its damage. Uncovering the symptoms early is the best way to keep chimney repairs down. Let’s discuss how that can be done.
Why Chicagoland Weather Is Especially Hard on Chimneys
Chicagoland has some of the most polarized weather. One day it’s a blizzard and the next week hot, humid and 100 degrees. That swing in weather conditions and temperatures are the real reasons why chimney repairs are needed.
When moisture from humid and rainy days’ soak into brick and mortar and then freezes, it expands. As it begins to thaw, the materials contract. Repeat that cycle dozens of times in a single Illinois winter and even solid masonry in the chimney starts to crack, spall, and separate from the joints holding it together. This is called the freeze thaw cycle. We’ve talked about it many times over the years, and it continues to be the single biggest reason homes need chimney repairs more often than homes in milder climates.
The Chimney Safety Institute of America (CSIA), the leading nonprofit certifying body for chimney professionals in the United States, notes that water intrusion is one of the most damaging and most preventable problems. If the problem is left to mature, it affects more than the appearance. It compromises the structure itself.
What Do Chimney Repairs Involve?
Not every chimney problem requires the same fix. Chimney repairs generally fall into a few categories. Understanding the difference, helps homeowners have a more informed conversation with the expert technician.
Mortar joint repair or tuckpointing. This involves removing deteriorated mortar between bricks and replacing it with fresh mortar, matched to the original color and texture as closely as possible.
Brick replacement. When individual bricks have spalled, meaning the face has cracked or popped off from trapped moisture, those bricks are removed and replaced.
Crown and cap repair. The crown is the concrete slab at the very top of the chimney. Cracks both big and small let water directly into the chimney flue. Chimney crown repair is often one of the most urgent forms of chimney repairs.
Flashing repair. Flashing is the barrier where the chimney meets the roofline. Loose, damaged or poorly installed flashing is a common source for water leaks. The roof gets the blame as it is the largest piece that covers the house. However, it certainly can be the overlooked chimney.
Flue and liner repair. Cracked flue tiles or damaged liners affect how safely a chimney vents smoke and combustion gases.
When to Know a Chimney Needs Repair
Most chimney damage shows up as small, easy to dismiss way. Let’s take a look at the following list. Be sure to print this out and keep it handy so if/when something happens, you know what to look for.
• Water stains near the fireplace or on the ceiling
• A brownish stain on the wall around your fireplace, or a stain on the ceiling near an exterior chimney. This means water is getting in somewhere it should not.
• Crumbling or missing mortar
• If you can see gaps between bricks, or mortar that flakes off when you touch it
• A leaning or visibly shifting chimney
• A chimney that appears to pull away from the house, even slightly, could indicate a structural issue
• White staining on the brick (efflorescence)
• Chalky white residue left behind as water evaporates out of the masonry. It is a visible sign that moisture is moving through brick
• Rusted damper or firebox components
• Metal parts inside a fireplace that are rusting are a strong indicator that moisture is present
• Debris in the fireplace
• Small chunks of brick, mortar, or tile landing in the firebox
What are the Various Types of Chimney Repair?
This is a compiled list of chimney repairs so you can be aware of what to look for. If you have any questions, contact us directly at 877-244-6349.
Homeowners who schedule chimney repairs at the first sign of trouble typically spend far less than those who wait until water damage reaches the interior of the home. This is a great reason to contact Superior Chimney at 877-244-6349.
Why an Annual Inspection Matters More Than People Think
The CSIA and the National Fire Protection Association both recommend that chimneys, fireplaces, and vents be inspected at least once a year, whether or not the fireplace gets used. This recommendation exists because damage does not take a break just because a chimney sits without any use.
According to data stated by the CSIA, chimney related fires still contribute to tens of thousands of residential fires across the United States each year, and a large share of those incidents can be traced back to deferred maintenance. An annual chimney inspection is what catches the small mortar crack or the hairline crown crack before it turns into a repair bill.
Hiring the Right Company for Chimney Repairs
Not every company who offers chimney repair work has the certified training to diagnose a problem correctly. CSIA certification is the most widely recognized credential in the industry, and it requires technicians to study chimney physics, venting systems, and fire codes. After the studies, the new technician needs to pass an exam and agree to a professional code of ethics.
When you call, be sure to ask:
Are your technicians CSIA certified, and can I verify that certification?
Will you show me photos or video of the damage before starting work?
Does the estimate distinguish between cosmetic repair and structural repair?
At Superior Chimney, we welcome these and other of your questions.
How Chimney Repairs Affect Insurance and Resale
A chimney in poor condition can complicate a home sale or an insurance claim. Home inspectors routinely report on visible mortar loss, leaning chimneys, or missing chimney caps. Some insurers will request proof of repair before renewing a policy on an older home. Addressing chimney repairs proactively protects more than curb appeal. It protects the sale timeline and the claims history associated to the property.
Frequently Asked Questions
How often should a Chicago area chimney be inspected? At least once a year, per CSIA and NFPA guidance, regardless of how often the fireplace is used.
Can chimney repairs be done in winter? Some interior repairs can happen in cold weather, but most masonry repair requires temperatures consistently above freezing. Spring and fall are the most common repair times in the Chicago area.
Is tuckpointing the same thing as chimney repair? Tuckpointing is one type of chimney repair, focused on replacing deteriorated mortar joints.
Does homeowners insurance cover chimney repairs? It depends. Sudden damage from a storm may be covered, while gradual deterioration from lack of maintenance typically is not.
So Finally…
Taking care of your home includes a chimney. Just because you don’t see it every day, doesn’t mean things aren’t happening. Be sure to get a chimney inspection done once per year by a certified and credible company such as Superior Chimney to take care of the issues. Contact us today by calling 877-244-6349.
 Brooklyn City Furniture
The Foundry Upholstery Series showcases tailored minimalism with details that elevate fashion and function to suit any residential or commercial setting. Inspired by elements of classic Scandinavian design, the Foundry Bi-Sectional offers ample sophistication as a standalone piece, showcasing striking lines, an extra slender tightback frame and cushions that seem to float above elevated, cylindrical steel legs. Two bolsters offer additional style and comfort, while the sturdy, steel reinforced FSC®-Certified frame ensures that Foundry holds up in high-traffic environments.
Features elegant lines and thin, elevated legs.
The tightback sectional is comprised of two components, a Foundry Sofa and a Foundry Ottoman.
Has two removable seat cushions, a removable ottoman cushion and comes with two loose bolster cushions.
Seat and bolster cushions are made with Dacron-wrapped, high resiliency, medium density foam.
Inner frame is 100% kiln-dried FSC®-Certified hardwood in support of responsible forest management (FSC® 092551).
Frame is reinforced with steel for long lasting durability.
9-gauge No-Sag, sinuous spring suspension system.
Cylindrical legs are made from black powder-coated steel.
Non-marking leveler feet can be adjusted for stability on uneven floor surfaces.
Manufactured to meet California TB117-2013 fire safety standards without the use of flame retardant additives in the upholstery foam.
All fabric is California TB117-2013 certified and double rub tested.
* Fabric samples available upon request. Need help? Chat with us online or send us an email to info@cityfurnitureshop.com
 The Foxy Garden
This very large corner site was shrouded in tired and thirsty conventional lawn. Really a bland, uninteresting monoculture—impossible to maintain especially in light of our dwindling resources and our growing understanding about sustainable practices.
We chose to approach this project not with the idea that existing lawn is bad, but with respect for what lawn has historically represented: a socially connective tissue.
Instead of conventional grass requiring endlessly large amounts of water, chemicals and mowing, this lawn conversion shifts to a naturalistic native meadow mix splashed with wildflowers and drought tolerant native shrubs. It was the clients’ desire to be wrapped by a garden attracting native pollinators and beneficial insects. A wildlife photographer, they wanted the opportunity to open windows and doors and feel immediately connected to a coastal native environment.
The handsome new stone walls, stairs and massive boulders became the structural framework containing the loose, coastal sage scrub plant community, holding the landscape together during the dormant months.
As we continue to grow our acceptance of and appreciation for climate appropriate California gardens, and embrace the paradigm shift, let us graciously bid adieu to our home’s unsustainable velvet robe.
Sponsored
Columbus, OH
Hope Restoration & General Contracting
Columbus Design-Build, Kitchen & Bath Remodeling, Historic Renovations
 The Foxy Garden
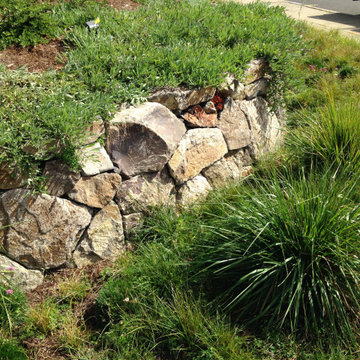
This very large corner site was shrouded in tired and thirsty conventional lawn. Really a bland, uninteresting monoculture—impossible to maintain especially in light of our dwindling resources and our growing understanding about sustainable practices.
We chose to approach this project not with the idea that existing lawn is bad, but with respect for what lawn has historically represented: a socially connective tissue.
Instead of conventional grass requiring endlessly large amounts of water, chemicals and mowing, this lawn conversion shifts to a naturalistic native meadow mix splashed with wildflowers and drought tolerant native shrubs. It was the clients’ desire to be wrapped by a garden attracting native pollinators and beneficial insects. A wildlife photographer, they wanted the opportunity to open windows and doors and feel immediately connected to a coastal native environment.
The handsome new stone walls, stairs and massive boulders became the structural framework containing the loose, coastal sage scrub plant community, holding the landscape together during the dormant months.
As we continue to grow our acceptance of and appreciation for climate appropriate California gardens, and embrace the paradigm shift, let us graciously bid adieu to our home’s unsustainable velvet robe.
 Rocky Tops Granite & Marble LLC
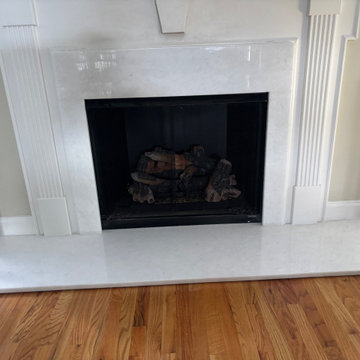
Hanoi White marble makes a fireplace surround the centerpiece of a room instead of just a backdrop for the TV. This one went into a home in Blythewood, and it's the kind of stone that earns that spot. White marble with soft gray veining has been the go-to for fireplaces for a reason: it catches light off to either side of the mantel and gives the whole wall a calm, finished look that paint or tile just can't match.
Marble takes a mellower polish than a lot of other stones, and the veining moves in loose, natural patterns that give it a warmer feel to the eye even though the stone itself stays cool to the touch. For a surround, we're not dealing with knife cuts or hot pans, so the wear concerns people sometimes bring up with marble in a kitchen don't really apply here. It's decorative and structural at the same time, built to frame a firebox and take the heat that comes off it without any trouble.
Fabricating a surround like this means getting the slab selection right before anything else. You want the veining to read well across the face and up the legs, not fight itself at the seams. We templated this one to the fireplace opening and cut it so the pattern carries through cleanly, then set it with an eased edge, simple and out of the way so the stone itself stays the focus. That's really the right call on a piece like this. Anything fussier on the edge would just compete with what the marble's already doing.
Day to day, a surround like this asks for very little. It's not a work surface, so scratching isn't a real concern, and a light sealing keeps it looking the way it did on install day for years. It'll take the ambient heat from the firebox fine, it wipes clean, and it holds up as the kind of feature you don't think about, you just enjoy.
Jobs like this are why we like doing this kind of work around Blythewood and the rest of the Midlands. A fireplace wall is one of the first things people see walking into a room, and Hanoi White marble with an eased edge gives this one a quiet, finished presence that's going to hold up for a long time.
 The Foxy Garden
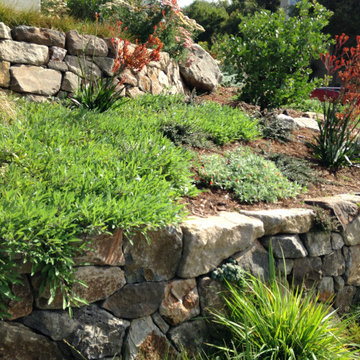
This very large corner site was shrouded in tired and thirsty conventional lawn. Really a bland, uninteresting monoculture—impossible to maintain especially in light of our dwindling resources and our growing understanding about sustainable practices.
We chose to approach this project not with the idea that existing lawn is bad, but with respect for what lawn has historically represented: a socially connective tissue.
Instead of conventional grass requiring endlessly large amounts of water, chemicals and mowing, this lawn conversion shifts to a naturalistic native meadow mix splashed with wildflowers and drought tolerant native shrubs. It was the clients’ desire to be wrapped by a garden attracting native pollinators and beneficial insects. A wildlife photographer, they wanted the opportunity to open windows and doors and feel immediately connected to a coastal native environment.
The handsome new stone walls, stairs and massive boulders became the structural framework containing the loose, coastal sage scrub plant community, holding the landscape together during the dormant months.
As we continue to grow our acceptance of and appreciation for climate appropriate California gardens, and embrace the paradigm shift, let us graciously bid adieu to our home’s unsustainable velvet robe.

 Tile Doctor Ltd
Here’s a job I completed just before Christmas last year, at a house in Northampton which has a rich history and mix of architectural styles. The run up to Christmas is always popular as people try to get their household projects finished off in time for celebrating the festive season with family so this is always a busy time for Tile Doctor.
The photos below show a neglected Victorian Quarry tiled floor in need of repair, with cracked tiles along the edges. These were caused by somebody in the past using brute force to remove carpet gripper rods which had been glued to the tiles. These cracks were present around the edges of the entire hallway, however; this particular type of tile is very hard to get hold of. Furthermore, it is a costly process to replace the tiles as the skirting boards would have had to have been removed.
As well as the physical issues the floor had a dull appearance due to the build-up of builder’s dust and the general wearing down of the paintwork over time. I agreed with the client that the best course of action would be to fill the tiles, and paint the damaged tiles using a colour that matched as close as possible. Many of my Tile Doctor colleagues would disagree with this approach opting to source the correct tile and rebuild the damaged section however unfortunately in this case we didn’t have the time or the budget.
My first action was to use a brush and vacuum to remove as much loose debris and dust as possible. I followed this by agitating the tiles with a dilution of Tile Doctor Pro Clean which is a strong alkaline product and safe to use on tile and stone. I use a combination of a coarse burnishing pad fitted to a rotary machine and hand held brushes, in order to get the floor clean. The resulting slurry was then rinsed and removed using a wet vacuum. This process was repeated twice followed by a thorough rinse to ensure any trace of cleaning agent had been removed and the floor neutralised.
As this was such an old property, I then used a steamer to heat up the tiles in order to draw out any contaminants and assist with the drying process. I installed a fan to dry the floor before starting repairs, mixing up some coloured grout and filling all holes and cracks along the edges, including the doormat area.
I allowed the coloured grout to dry overnight, before hand painting the black and Terracotta tiles. These were then given time to dry (about a couple of hours). Following this, I carefully painted in the other colours: brown and cream. The overall effect was quite convincing and you had to look very closely to notice.
Due to the fact that there were other tradesmen working in the house at the time, the floors were sheeted up to protect from additional dust and muck. I then left the house for a week, allowing the floor ample time to dry completely in preparation for sealing.
Upon my return, I took damp meter readings, and once satisfied with the dryness of the tiles, I began the sealing process with the impregnating, colour-enhancing sealer Tile Doctor Colour Grow. The sealer provides both durable surface protection and an aesthetically pleasing matte finish.
The below photos show how the product has enriched the colours with the two coats applied.
The process of restoring this wonderful Victorian Quarry tiled floor was certainly time consuming, but very rewarding. I am exceptionally pleased with the results myself, and my client couldn’t have been happier and I’m sure the newly revitalised hallway will have been a talking point for all their visitors during the Christmas break.
Phil Vissian
Northamptonshire Tile Doctor
 Tile Doctor Ltd
We received a request to renovate Victorian tiled hallway floor at a house in the London borough of Harlesden NW10. My client had modernised the heating system and this unfortunately required a section of the tiled flooring to be dug up so new pipework could be laid.
After speaking on the phone, I arranged an initial visit to the property so I could properly assess the work required and provide a price for restoring the floor. During my visit I could see there was another section of missing tiles at one of the door thresholds which would need attention. Except for the missing sections of floor I could see that the tiles themselves were in good condition for their age and would respond well to a deep clean and fresh seal.
I was confident on being able to source matching replacements for the missing tiles and reassured my client that we would be able not only repair the floor but also renovate it to a good standard. I gave them a price to do the restoration which they were happy to accept, and the work was booked.
After some research I managed to source replacement tiles from the Vintage Floor Tile Company in Kent; Victorian tiles are still popular so there a few companies that keep stock so we can usually find a match.
With the replacements in hand, work started by removing the cement and loose material from the missing sections of flooring and backfilling with self-levelling compound to bring the exposed base up to the right level for tiling.
The tiles were then cut to shape as required to match the existing patten and fixed into place with a quick setting adhesive and then grouted.
The floor was left to overnight to allow the adhesive to harden fully, and I returned the next day to deep clean the whole floor. To give the tiles are deep clean a strong dilution of Tile Doctor Remove and Go was sprayed onto the floor and left to soak in for ten minutes. It was then scrubbed into the floor using a rotary machine fitted with a with a black pad. This action lifted the dirt out of the tiles and the resulting slurry was removed with the wet vacuum.
It turned out that the pores of the tiles were holding a lot of dirt, so the process was repeated until I was satisfied. Due to the age of the property, there was no damp-proof membrane installed so I do try to minimise the amount of water I use in this process as there is always a chance of exacerbating any latent efflorescence issues.
Efflorescence occurs where moisture rises through the tile bringing with it salts from underneath the floor as it evaporates on the surface. This can lead to unsightly white marks appearing on the tile. To counteract this potential problem the cleaning was followed by an acid wash using Tile Doctor Acid Gel applied with a 100 then 200-grit pad, before finishing on a 400-grit burnishing pad. The floor was again rinsed with water after the application of each pad to remove the slurry and extracted with a wet vacuum.
Once I was satisfied the floor was as clean as possible, we left site and the area was left to dry over the weekend ready for application of a new sealer.
I returned on the Monday and started by taking a few moisture readings to check the floor was dry. The floor was in an acceptable range, so I applied the first of 4 coats of sealer. For this floor I chose Tile Doctor Seal and Go Extra which is specially formulated product that provides stain resistance with a hard wearing low-sheen finish.
This product is also breathable which is an important feature for old floors, anything that blocks moisture from rising through the tile will cause it to become trapped underneath where it will pool and eventually reach out to the walls and result in rising damp.
Once complete the floor looked brand new and I’m pleased to say with the deep clean and a fresh sealer applied it was impossible to tell the difference between the original and repaired sections of flooring.
For the aftercare of sealed Victorian tiled floors, I recommend Tile Doctor Neutral Cleaner, it’s a mild day to day cleaner with a neutral pH that won’t damage the sealer. Many of the tile cleaning products you find in supermarkets are simply too strong.
Andrew Newstead
North London Tile Doctor
 The Foxy Garden
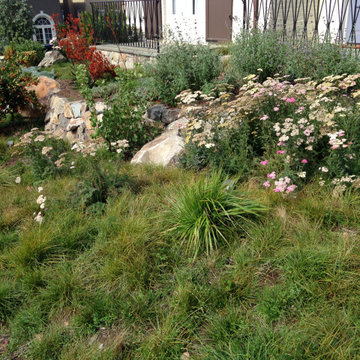
This very large corner site was shrouded in tired and thirsty conventional lawn. Really a bland, uninteresting monoculture—impossible to maintain especially in light of our dwindling resources and our growing understanding about sustainable practices.
We chose to approach this project not with the idea that existing lawn is bad, but with respect for what lawn has historically represented: a socially connective tissue.
Instead of conventional grass requiring endlessly large amounts of water, chemicals and mowing, this lawn conversion shifts to a naturalistic native meadow mix splashed with wildflowers and drought tolerant native shrubs. It was the clients’ desire to be wrapped by a garden attracting native pollinators and beneficial insects. A wildlife photographer, they wanted the opportunity to open windows and doors and feel immediately connected to a coastal native environment.
The handsome new stone walls, stairs and massive boulders became the structural framework containing the loose, coastal sage scrub plant community, holding the landscape together during the dormant months.
As we continue to grow our acceptance of and appreciation for climate appropriate California gardens, and embrace the paradigm shift, let us graciously bid adieu to our home’s unsustainable velvet robe.
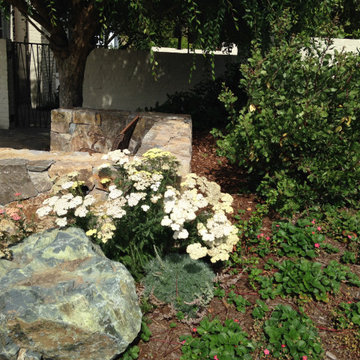 The Foxy Garden
This very large corner site was shrouded in tired and thirsty conventional lawn. Really a bland, uninteresting monoculture—impossible to maintain especially in light of our dwindling resources and our growing understanding about sustainable practices.
We chose to approach this project not with the idea that existing lawn is bad, but with respect for what lawn has historically represented: a socially connective tissue.
Instead of conventional grass requiring endlessly large amounts of water, chemicals and mowing, this lawn conversion shifts to a naturalistic native meadow mix splashed with wildflowers and drought tolerant native shrubs. It was the clients’ desire to be wrapped by a garden attracting native pollinators and beneficial insects. A wildlife photographer, they wanted the opportunity to open windows and doors and feel immediately connected to a coastal native environment.
The handsome new stone walls, stairs and massive boulders became the structural framework containing the loose, coastal sage scrub plant community, holding the landscape together during the dormant months.
As we continue to grow our acceptance of and appreciation for climate appropriate California gardens, and embrace the paradigm shift, let us graciously bid adieu to our home’s unsustainable velvet robe.
4