
Search results for "Impractical" in Home Design Ideas

 User
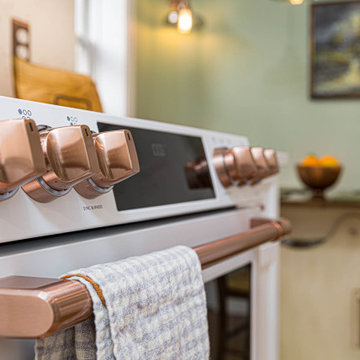
What should I cook today? Gee maybe I will just invite a few girl friends over and enjoy some coffee and muffins.
That is how I feel when I'm in this kitchen. I don't want to mess it up - it is so nice.
However what I hear from the homeowner is that this oven is tough and can take the everyday use. Not a problem with this French stove.
Photo Credit: N. Leonard
 ALL Renovation & Design LLC
Could a dreadful dishwasher leak be a blessing in disguise?
The Redding kitchen was very odd. The house was a beautiful brick house from the early 1900’s, but the kitchen had been renovated since then with an impractical layout. It worked, but, for as much time as Mr. and Mrs. spend in the kitchen, it left much to be desired. Because they enjoy cooking so much, they dreamed of having a functional kitchen that added to the character of the home and respected the history of it.
So that’s why Mr. and Mrs. went to a Lancaster Home Show where they meet ALL Renovation & Design. They were impressed with our process which guides clients through the design phase in a unique way that guarantees a customized remodel, tailored to their dreams. We really hit it off, but, since they were still in the idea stage, the years passed quickly.
Then one morning they discovered a puddle under the dishwasher. And, as is often the case, the damage had already spread to the surrounding cabinets and a large area of the floor. And upon further inspection, it was discovered that part of the floor was made with asbestos – which would require expert remediation. This was turning into a major rehab project.
That’s when they were faced with a tough call: do they patch it up now and rip it out in a few years when they remodel the entire kitchen, or, do they remodel now? They called ALL Renovation & Design.
First we worked with the insurance company to raise the damage claim to what it would have actually cost to repair the damage done by the leak… several thousand dollars higher than what they had initially appraised it.
Then we guided Mr. and Mrs. through the design process that carefully articulated the goals and vision for the new kitchen. Functionality and complementing the home’s character were top priority. They were extremely pleased with the help we provided in guiding them through the cabinet choices, layout, and color selections.
Communication was key. Especially when we got into the demolition and construction work. One thing you can be sure of when working with older homes is that there are almost always surprises between the walls. For the Redding kitchen it took the form of a steel support beam that we discovered on the second day of demolition. Because it prevented us from opening up the doorway, we had to pivot and adjust the cabinet spacing. Electrical access was also a serious problem that required added creativity to be sure the new space would include all the functionality of a modern kitchen. But all the challenges were overcome through creativity and almost constant communication.
At last, it was complete. Together we transformed the space into a beautiful transitional kitchen that is a joy to work in.
The maple cabinets with full-overlay doors were painted in matte white with copper hardware. The countertop and backsplash were Hanstone Quartz in the Strato color. It included a 30” single-basin sink in 14-gauge hammered copper. For the floor they chose Lauzan Maple Hardwood in the Sahara finish, installed in the herringbone pattern. And to really set off the kitchen, the old appliances were replaced with new GE Café appliances in their classy matte white with brushed copper accents.
 United Porte Inc
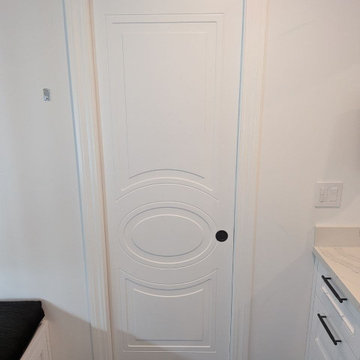
Collection of classic painted doors with a discreet design. Clean lines, simple and unabashed design. Multi-layer finishing with enamels followed by matt varnishes makes the surface smooth, almost velvety. Premium decorative films are made on the basis of polypropylene. A special feature of this fims is outstanding imitation effect of a painted surface. Free from solvents and formaldehyde the Premium films are also extremely environmentally friendly and contribute to a healthier living climate. High quality material surface makes it easy to clean and guarantees outstanding resistance against mechanical stress and chemicals..
Finish - white paint. It is not recommended to paint.
Door core - solid wood (engineered wood).
Thickness of the door - 1 1/2". Thickness of the glass - 1/6", 1 lite of Opaque Glass.
Doors have NO holes for the hardware.
What included: - door slab;- casings (2.95" wide);- pocket frames (require extra 4 1/2" of the opening);- track;- hangers;- door guide;- bumper;-pulls;- mounting screws;
Pocket Doors Frame What included: (1ea) frame header with preinstalled heavy-duty aluminum track; (2ea) steel wrapped upright pairs; (2ea) self-adjusting floor anchors; (2ea) 3-wheel door hangers, (1ea) door guide; (1ea) door stop; wrench, screws and instructions. Easily assembled and structurally strong pocket door frame; Designed for fast installation in standard 2 x 4 timber or steel frame walls typically sheeted with drywall;
Introducing the "Classic Pocket Doors" from the Mela Collection, crafted with a blend of high-quality wood and solid wood to create a stunning piece that is sure to elevate the style of any home or office. These doors come in a sleek white finish that adds a timeless touch to any interior design.
With the Mela Collection, you're getting doors that are not only durable but also built to last. The craftsmanship on these doors is top-notch, ensuring that they can withstand the test of time. The solid wood also makes them lightweight, which makes them easy to install and use.
These doors are a perfect fit for any space that requires a practical and stylish solution. The Classic Pocket Doors are designed to save space, making them ideal for smaller rooms where a traditional hinged door would be impractical. These doors slide effortlessly into the wall, providing easy access to any room.
As a New York-based door supplier, we take pride in providing our customers with top-quality products that meet their needs. The Classic Pocket Doors are no exception. We're confident that these doors will exceed your expectations, and we're proud to offer them as part of our extensive collection of interior and exterior doors.
In summary, the Classic Pocket Doors from the Mela Collection are a stylish, durable, and practical solution that is perfect for any space that requires a door that saves space. With their white finish and top-notch craftsmanship, they're sure to add a touch of elegance to any room. Whether you're a homeowner, interior designer, or contractor, these doors are an excellent investment that will stand the test of time. So why wait? Contact us today to order your Classic Pocket Doors from the Mela Collection!
Find the right local pro for your project

 SolusLumber.com
Ipe, tongue and groove, cable rail, pregrooved decking, ipe deck, ipe porch, hidden fastener, covered porch, western red cedar beams, fire pit, swimming pool, cumaru, FSC Cumaru, vanity, wood slab, reclaimed river cypress, wood bridge, siding, railing, pergola, yoga studio, mediatation center, Asian design, Japanese, zen, fence, fencing, ceiling, soffits
 Mayflower Construction Group
How to Tell When a Design Trend is Timeless
Design trends come and go, but some styles withstand the test of time. Whether in architecture, interior design, or branding, timeless design is one that remains relevant and appealing for decades. But how can you tell if a trend is truly timeless or just a fleeting fad? Here are key indicators to help you identify designs that will never go out of style.
1. Simplicity Over Complexity
Timeless designs are often clean, simple, and functional. They avoid excessive ornamentation or gimmicky elements that might feel outdated in a few years. Classic materials, neutral color palettes, and well-balanced proportions contribute to a look that remains fresh over time.
2. Rooted in Functionality
If a design prioritizes function as much as form, it is more likely to endure. Practicality and usability should be at the core, ensuring that the design continues to serve its purpose efficiently. In construction, for example, well-planned layouts and durable materials contribute to long-lasting appeal.
3. Inspired by Nature
Natural elements, such as stone, wood, and earth tones, have always been a staple of timeless design. Since nature itself is everlasting, incorporating organic textures and colors helps create a look that never feels outdated.
4. Influenced by History, Not Hype
Timeless designs often take cues from historical influences that have proven their longevity. Architectural styles like mid-century modern, classical, and industrial remain relevant because they have strong foundations in design principles rather than passing fads.
5. Balanced and Harmonious Composition
Good design follows fundamental principles such as symmetry, proportion, and scale. If a trend maintains a sense of balance and harmony, it’s more likely to stand the test of time. Designs that feel chaotic or unbalanced tend to fade quickly as they become overwhelming or impractical.
6. Adaptability Across Different Eras
A timeless design is versatile enough to blend with evolving styles and trends. Whether paired with modern elements or classic details, it should integrate seamlessly without looking out of place.
7. Enduring Materials and Craftsmanship
Materials and craftsmanship play a major role in a design’s longevity. High-quality materials like marble, hardwood, and concrete age beautifully, while cheap, synthetic alternatives often deteriorate and lose appeal. Investing in quality ensures a long-lasting impact.
8. Avoiding Overly Trendy Details
Fads are often characterized by extreme variations in color, form, or material. If a design heavily relies on a specific moment’s aesthetic (like neon colors in the '80s or millennial pink in the 2010s), it will likely feel outdated once the hype fades.
9. Emotional Connection and Comfort
Timeless design tends to evoke a sense of comfort, nostalgia, or familiarity. Whether in architecture, web design, or fashion, people gravitate toward designs that make them feel at ease and connected to something meaningful.
Conclusion
The key to identifying a timeless design trend is recognizing qualities that prioritize longevity, function, and balance over fleeting hype. Whether designing a website, a home, or a brand identity, choosing elements that are simple, high-quality, and adaptable will ensure lasting appeal.
Do you want a design that stands the test of time? Let’s create something that never goes out of style!

 Kari P
When I bought my house in May 2014, there was one thing I really didn’t like about it – the 1950s bathroom complete with pink tile and mismatched gaudy fixtures was absolutely hideous. I knew redoing the bathroom would be a big, expensive project, so I vowed to just live with it while I fixed up parts of the house that were easier to update, such as putting a fresh coat of paint on the walls and updating the curtains (which I still haven’t done, by the way). Well my first winter in the new house turned out to be a bad one, and in February 2015, I noticed water stains on the walls and ceiling of the second bedroom that only got worse and worse each day. The water damage quickly spread to other rooms, and when contractors came to the house to access and fix the damage, they discovered moisture behind the pink tiled walls of my bathroom. And so started the bathroom remodel.
Start to finish, this project took close to six months, due to going back and forth with insurance and difficulty finding a contractor I liked. I lived without a shower for at least four of those months, showering at the gym where I worked or in a pop-up tent in my backyard once it was warm enough out. My friend Eric and I demoed the bathroom and for the remodel, I picked out all of the design components and had a local contractor, Fred Haas do the work. I kept the original layout – as my bathroom was small to begin with and it was both impractical and expensive to start moving things around – but just about everything else about the bathroom is new, except for maybe the window and door. New tub, sink, and toilet, new tile floor and shower surround, new walls and ceiling, fresh paint, new fixtures and mirror, updated lighting, and a better ventilation system were all added.
Tub – Sterling Vikrell
Toilet – Kohler Wellworth® two-piece round-front dual-flush toilet
Sink – Kohler Veer™ 21" pedestal bathroom sink
Fixtures – Kohler Alteo® line
Tile floor and shower surround – American Olean Laurel Heights ceramic tile in Summit Gray
Lighting – I don't remember... will have to see if I can find it
Ventilation system – NuTone
Mirror – Ikea
Paint – Behr
Shower Curtain – eBay
Here are photos of my project from start to finish. As you can see, I probably still need a thing or two (a toilet paper holder, mini storage shelf, and some art wouldn’t hurt, nor would replacing the door or painting it white), but overall I’m really happy with how my new bathroom came out. I LOVE it, which is the exact opposite of how I felt about the original bathroom.
Photos © Kari Post
 Kari P
When I bought my house in May 2014, there was one thing I really didn’t like about it – the 1950s bathroom complete with pink tile and mismatched gaudy fixtures was absolutely hideous. I knew redoing the bathroom would be a big, expensive project, so I vowed to just live with it while I fixed up parts of the house that were easier to update, such as putting a fresh coat of paint on the walls and updating the curtains (which I still haven’t done, by the way). Well my first winter in the new house turned out to be a bad one, and in February 2015, I noticed water stains on the walls and ceiling of the second bedroom that only got worse and worse each day. The water damage quickly spread to other rooms, and when contractors came to the house to access and fix the damage, they discovered moisture behind the pink tiled walls of my bathroom. And so started the bathroom remodel.
Start to finish, this project took close to six months, due to going back and forth with insurance and difficulty finding a contractor I liked. I lived without a shower for at least four of those months, showering at the gym where I worked or in a pop-up tent in my backyard once it was warm enough out. My friend Eric and I demoed the bathroom and for the remodel, I picked out all of the design components and had a local contractor, Fred Haas do the work. I kept the original layout – as my bathroom was small to begin with and it was both impractical and expensive to start moving things around – but just about everything else about the bathroom is new, except for maybe the window and door. New tub, sink, and toilet, new tile floor and shower surround, new walls and ceiling, fresh paint, new fixtures and mirror, updated lighting, and a better ventilation system were all added.
Tub – Sterling Vikrell
Toilet – Kohler Wellworth® two-piece round-front dual-flush toilet
Sink – Kohler Veer™ 21" pedestal bathroom sink
Fixtures – Kohler Alteo® line
Tile floor and shower surround – American Olean Laurel Heights ceramic tile in Summit Gray
Lighting – I don't remember... will have to see if I can find it
Ventilation system – NuTone
Mirror – Ikea
Paint – Behr
Shower Curtain – eBay
Here are photos of my project from start to finish. As you can see, I probably still need a thing or two (a toilet paper holder, mini storage shelf, and some art wouldn’t hurt, nor would replacing the door or painting it white), but overall I’m really happy with how my new bathroom came out. I LOVE it, which is the exact opposite of how I felt about the original bathroom.
Photos © Kari Post

 Uccello Fine Homes, LLC
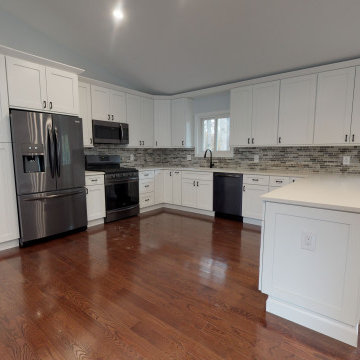
The transitional style of the interior of this remodeled shingle style home in Connecticut hits all of the right buttons for todays busy family. The sleek white and gray kitchen is the centerpiece of The open concept great room which is the perfect size for large family gatherings, but just cozy enough for a family of four to enjoy every day. The kids have their own space in addition to their small but adequate bedrooms whch have been upgraded with built ins for additional storage. The master suite is luxurious with its marble bath and vaulted ceiling with a sparkling modern light fixture and its in its own wing for additional privacy. There are 2 and a half baths in addition to the master bath, and an exercise room and family room in the finished walk out lower level.

 A&E Construction and Design Center
A&E Construction. Our Pennington NJ client had recently moved into this home and was dissatisfied with the way the kitchen functioned. As it was before, the kitchen was closed off from the rest of the home with the single entrance being on the far end of the main first-floor hallway, next to the door to the garage. A&E Construction developed a design for her kitchen remodel that both creates a better flow between the kitchen and the rest of the house, and also offers a better option for eating/work space.

 Familia Windows
Small trendy 3/4 multicolored tile and pebble tile corner shower photo in Denver with shaker cabinets, white cabinets, beige walls, an undermount sink and marble countertops


 San Luis Kitchen Co.
Having been referred to San Luis Kitchen by the mother of a co-worker, this month’s homeowners came to our showroom with high hopes. Tried and true do-it-yourselfers, the couple had already knocked out a wall to create a pass-thru between their kitchen and living room. However life intervened and they were stalled with raw drywall and partially demolished cabinets. Hence, the recognition of need for professional remodeling help!
An initial interview with San Luis Kitchen’s design team revealed a few things that had to change. First, this busy professional couple had been living for years without a dishwasher! “NO more!” exclaimed the wife. Secondly, there was a marked lack of convenient workspace in this small kitchen. The workable counter space was limited to one corner of the room between the sink and the range – the microwave was filling the counter to the left of the sink and there was no counter at all to the right of the range.
To add insult to injury, a room divider that had a nice large top was basically unusable – it was in an awkward location for prep work (facing the dining room with your back to the kitchen), had an old wood counter that was aesthetically appealing but impractical for food prep, and just ended up covered in clutter. Thirdly, the work area of the kitchen was blah, boring and uninspiring – when standing at the sink you stared at a blank wall and the range faced the unfinished drywall from the stalled remodel – not a place to spend quality time!
There were some interesting plus points to the existing space that could be capitalized upon. The homeowner absolutely loved her range – a freestanding 30” unit with double stacked ovens. She definitely wanted to reuse it. Another plus was the placement of the refrigerator. It was recessed into a niche built into the connecting garage. This allowed the spacious deep refrigerator to remain unimposing in the kitchen – it wasn’t sticking out in the space the way fridges often are!
And now to the redesign and the new kitchen. We decided to remove the center room divider and integrate the kitchen with the dining area. We gave the homeowners lots of storage space by designing a dining area hutch that has four tall pantry cabinets in addition to a display area and two banks of nice deep drawers. We kept the refrigerator recessed into the garage (pulling it forward a bit to align with the hutch) and added a decorative open shelf above it. Next, we moved the new farmhouse style stainless sink to face the living area pass-thru (the designated clean-up person can now interact with guests who are relaxing after dinner) and added a small dishwasher to the left of the sink and a double pull-out trash cabinet to the right of it – all the essentials for clean-up – and counter space to boot! We also tucked a narrow tray storage cabinet into the corner next to the dishwasher.
The range now centers on the end wall of the kitchen with a microwave hood and cabinetry detail above creating a focal point for the kitchen. On either side of the range are swing-out shelves to access the base corners – space was tight here, we custom sized the cabinets and squeezed them in. A bank of four drawers is located under the window extending the counter around the corner so that the homeowners now have food prep space both left and right of the range. In the upper cabinets to the left of the microwave we installed a swing-out spice pantry for organized storage and easy access to essential items. Their Kitchenaid mixer lives on the counter here with adjustable shelf storage above it – this corner has become a bake center. And there is now a designated coffee space in the other corner featuring a diagonal wall corner cabinet and decorative corner mug shelf.
In conclusion, San Luis Kitchen and these intrepid homeowners took an old boring white kitchen and transformed it into a whole new room. Now the kitchen complements the up-beat and energetic lifestyle of its users.

 Andonian Rugs Sales & Service
Example of a small transitional wooden u-shaped staircase design in Seattle with painted risers

 Village Home Stores
Full-overlay Rustic Beech cabinets in the "Charleston" door style and "Briarwood" finish.
Village Home Stores
Example of a large mountain style kitchen design in Chicago
Example of a large mountain style kitchen design in Chicago
 J&S by STARK
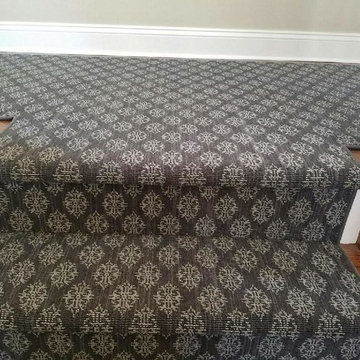
Mid-sized elegant carpeted straight wood railing home design photo in New York with carpeted risers

 Migala Carpet One
Master Bath Floor: MSI Navona 20x20
Color: Sole with 961 Sandstone Beige Grout
Master Shower: MSI Navona 20x20
Color: Sole with 961 Sandstone Beige grout
Deco Inside Niche Only: MSI Fossil Canyon Blend
Shower Floor: MSI Navona 2x2
Color: Sole

 JM Carpets
Large country u-shaped medium tone wood floor kitchen photo in Milwaukee with white cabinets and a peninsula

 Bloomington Carpet One
Beautiful custom runner to match the unique measurements of this staircase.
Small wooden curved staircase photo in Minneapolis with wooden risers
Small wooden curved staircase photo in Minneapolis with wooden risers

 360 Yardware
Because the double doors were the showpiece of the courtyard entry, the homeowners chose a different latch and lock for their side yard gate. They chose the Nero Contemporary Lever Latch and Square Modern Style Deadbolt in black.
This photo shows the interior of the gate, latching against a fence panel.
Photos by 360 Yardware

 Craig Alan Homes, Inc
Mid-sized elegant wooden u-shaped staircase photo in Atlanta with painted risers
60