
Search results for "Inconvenience" in Home Design Ideas
 Copper Sky Design + Remodel
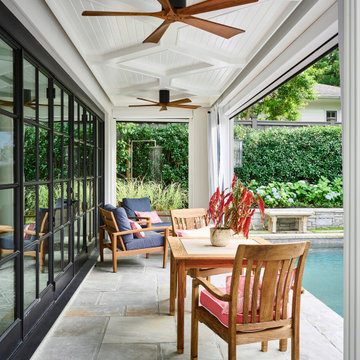
With a modest patio between the home and the pool, the homeowners longed for better entertaining spaces and more connection between their interior, exterior, pool, and second floor. Copper Sky Design + Remodel began this renovation with the removal of a weathered pergola and creating a large opening from their living room to the patio for new sleek accordion steel doors that seamlessly merge the indoor and outdoor spaces.
To further elevate the outdoor space, the adjacent patio was covered, and retractable screens and vinyl panels were installed. These features provide flexibility to enjoy the outdoors without the inconvenience of summertime insects, pollen, and unpredictable weather. The ceiling of the newly covered porch was custom designed to discreetly house the electrical components for the motorized screens, maintaining a clean and uncluttered appearance.
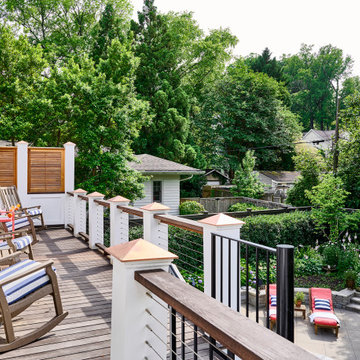
A spiral staircase was introduced, leading to a second-story deck that spans the width of the home. This addition provides easy access to the outdoors directly from the bedrooms, offering a serene spot for enjoying the stunning views of the backyard. The deck features cable railing, which preserves the unobstructed view, and is adorned with elegant copper post caps. For added privacy, louvered wooden screens were installed at one end of the deck.
Given the homeowners' joy for entertaining, this design included the installation of outdoor speakers and color-changing LED lights on the porch ceiling and upper deck railings. The LED lights allow for a customizable ambiance, enabling the homeowners to set the perfect mood for any occasion. Additionally, gas lanterns were added to the porch beams, casting a romantic glow over the pool area, and enhancing the atmosphere for evening gatherings.
 Copper Sky Design + Remodel
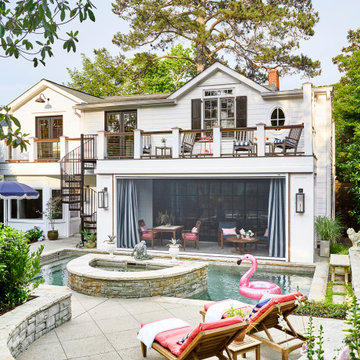
With a modest patio between the home and the pool, the homeowners longed for better entertaining spaces and more connection between their interior, exterior, pool, and second floor. Copper Sky Design + Remodel began this renovation with the removal of a weathered pergola and creating a large opening from their living room to the patio for new sleek accordion steel doors that seamlessly merge the indoor and outdoor spaces.
To further elevate the outdoor space, the adjacent patio was covered, and retractable screens and vinyl panels were installed. These features provide flexibility to enjoy the outdoors without the inconvenience of summertime insects, pollen, and unpredictable weather. The ceiling of the newly covered porch was custom designed to discreetly house the electrical components for the motorized screens, maintaining a clean and uncluttered appearance.
A spiral staircase was introduced, leading to a second-story deck that spans the width of the home. This addition provides easy access to the outdoors directly from the bedrooms, offering a serene spot for enjoying the stunning views of the backyard. The deck features cable railing, which preserves the unobstructed view, and is adorned with elegant copper post caps. For added privacy, louvered wooden screens were installed at one end of the deck.
Given the homeowners' joy for entertaining, this design included the installation of outdoor speakers and color-changing LED lights on the porch ceiling and upper deck railings. The LED lights allow for a customizable ambiance, enabling the homeowners to set the perfect mood for any occasion. Additionally, gas lanterns were added to the porch beams, casting a romantic glow over the pool area, and enhancing the atmosphere for evening gatherings.
 Copper Sky Design + Remodel
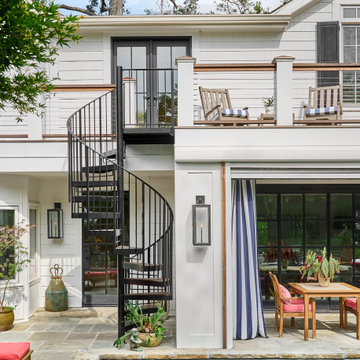
With a modest patio between the home and the pool, the homeowners longed for better entertaining spaces and more connection between their interior, exterior, pool, and second floor. Copper Sky Design + Remodel began this renovation with the removal of a weathered pergola and creating a large opening from their living room to the patio for new sleek accordion steel doors that seamlessly merge the indoor and outdoor spaces.
To further elevate the outdoor space, the adjacent patio was covered, and retractable screens and vinyl panels were installed. These features provide flexibility to enjoy the outdoors without the inconvenience of summertime insects, pollen, and unpredictable weather. The ceiling of the newly covered porch was custom designed to discreetly house the electrical components for the motorized screens, maintaining a clean and uncluttered appearance.
A spiral staircase was introduced, leading to a second-story deck that spans the width of the home. This addition provides easy access to the outdoors directly from the bedrooms, offering a serene spot for enjoying the stunning views of the backyard. The deck features cable railing, which preserves the unobstructed view, and is adorned with elegant copper post caps. For added privacy, louvered wooden screens were installed at one end of the deck.
Given the homeowners' joy for entertaining, this design included the installation of outdoor speakers and color-changing LED lights on the porch ceiling and upper deck railings. The LED lights allow for a customizable ambiance, enabling the homeowners to set the perfect mood for any occasion. Additionally, gas lanterns were added to the porch beams, casting a romantic glow over the pool area, and enhancing the atmosphere for evening gatherings.
Find the right local pro for your project

 Copper Sky Design + Remodel
With a modest patio between the home and the pool, the homeowners longed for better entertaining spaces and more connection between their interior, exterior, pool, and second floor. Copper Sky Design + Remodel began this renovation with the removal of a weathered pergola and creating a large opening from their living room to the patio for new sleek accordion steel doors that seamlessly merge the indoor and outdoor spaces.
To further elevate the outdoor space, the adjacent patio was covered, and retractable screens and vinyl panels were installed. These features provide flexibility to enjoy the outdoors without the inconvenience of summertime insects, pollen, and unpredictable weather. The ceiling of the newly covered porch was custom designed to discreetly house the electrical components for the motorized screens, maintaining a clean and uncluttered appearance.
A spiral staircase was introduced, leading to a second-story deck that spans the width of the home. This addition provides easy access to the outdoors directly from the bedrooms, offering a serene spot for enjoying the stunning views of the backyard. The deck features cable railing, which preserves the unobstructed view, and is adorned with elegant copper post caps. For added privacy, louvered wooden screens were installed at one end of the deck.
Given the homeowners' joy for entertaining, this design included the installation of outdoor speakers and color-changing LED lights on the porch ceiling and upper deck railings. The LED lights allow for a customizable ambiance, enabling the homeowners to set the perfect mood for any occasion. Additionally, gas lanterns were added to the porch beams, casting a romantic glow over the pool area, and enhancing the atmosphere for evening gatherings.

 TKS Design Group
Download our free ebook, Creating the Ideal Kitchen. DOWNLOAD NOW
This homeowner’s daughter originally contacted us on behalf of her parents who were reluctant to begin the remodeling process in their home due to the inconvenience and dust. Once we met and they dipped their toes into the process, we were off to the races. The existing bathroom in this beautiful historical 1920’s home, had not been updated since the 70’/80’s as evidenced by the blue carpeting, mirrored walls and dropped ceilings. In addition, there was very little storage, and some health setbacks had made the bathroom difficult to maneuver with its tub shower.
Once we demoed, we discovered everything we expected to find in a home that had not been updated for many years. We got to work bringing all the electrical and plumbing up to code, and it was just as dusty and dirty as the homeowner’s anticipated! Once the space was demoed, we got to work building our new plan. We eliminated the existing tub and created a large walk-in curb-less shower.
An existing closet was eliminated and in its place, we planned a custom built in with spots for linens, jewelry and general storage. Because of the small space, we had to be very creative with the shower footprint, so we clipped one of the walls for more clearance behind the sink. The bathroom features a beautiful custom mosaic floor tile as well as tiled walls throughout the space. This required lots of coordination between the carpenter and tile setter to make sure that the framing and tile design were all properly aligned. We worked around an existing radiator and a unique original leaded window that was architecturally significant to the façade of the home. We had a lot of extra depth behind the original toilet location, so we built the wall out a bit, moved the toilet forward and then created some extra storage space behind the commode. We settled on mirrored mullioned doors to bounce lots of light around the smaller space.
We also went back and forth on deciding between a single and double vanity, and in the end decided the single vanity allowed for more counter space, more storage below and for the design to breath a bit in the smaller space. I’m so happy with this decision! To build on the luxurious feel of the space, we added a heated towel bar and heated flooring.
One of the concerns the homeowners had was having a comfortable floor to walk on. They realized that carpet was not a very practical solution but liked the comfort it had provided. Heated floors are the perfect solution. The room is decidedly traditional from its intricate mosaic marble floor to the calacutta marble clad walls. Elegant gold chandelier style fixtures, marble countertops and Morris & Co. beaded wallpaper provide an opulent feel to the space.
The gray monochromatic pallet keeps it feeling fresh and up-to-date. The beautiful leaded glass window is an important architectural feature at the front of the house. In the summertime, the homeowners love having the window open for fresh air and ventilation. We love it too!
The curb-less shower features a small fold down bench that can be used if needed and folded up when not. The shower also features a custom niche for storing shampoo and other hair products. The linear drain is built into the tilework and is barely visible. A frameless glass door that swings both in and out completes the luxurious feel.
Designed by: Susan Klimala, CKD, CBD
Photography by: Michael Kaskel
For more information on kitchen and bath design ideas go to: www.kitchenstudio-ge.com

 Design Directions
 - Home Remodeling, Interior Design and Design Build
Please Note: All “related,” “similar,” and “sponsored” products tagged or listed by Houzz are not actual products pictured. They have not been approved by Design Directions nor any of the professionals credited. For information about our work, please contact info@designdirections.com.

 Fiorito Interior Design
Like many California ranch homes built in the 1950s, this original master bathroom was not really a "master bath." My clients, who only three years ago purchased the home from the family of the original owner, were saddled with a small, dysfunctional space. Chief among the dysfunctions: a vanity only 30" high, and an inconveniently placed window that forced the too-low vanity mirror to reflect only the waist and partial torso--not the face--of anyone standing in front of it. They wanted not only a more spacious bathroom but a bedroom as well, so we worked in tandem with an architect and contractor to come up with a fantastic new space: a true Master Suite. In order to refine a design concept for the soon-to-be larger space, and thereby narrow down material choices, my clients and I had a brainstorming session: we spoke of an elegant Old World/ European bedroom and bathroom, a luxurious bath that would reference a Roman spa, and finally the idea of a Hammam was brought into the mix. We blended these ideas together in oil-rubbed bronze fixtures, and a tiny tile mosaic in beautiful Bursa Beige marble from Turkey and white Thassos marble from Greece. The new generously sized bathroom boasts a jetted soaking tub, a very large walk-in shower, a double-sided fireplace (facing the tub on the bath side), and a luxurious 8' long vanity with double sinks and a storage tower.
The vanity wall is covered with a mosaic vine pattern in a beautiful Bursa Beige marble from Turkey and white Thassos marble from Greece,. The custom Larson Juhl framed mirrors are flanked by gorgeous hand-wrought scones from Hubbardton Forge which echo the vine and leaf pattern in the mosaic. And the vanity itself features an LED strip in the toe-kick which allows one to see in the middle of the night without having to turn on a shockingly bright overhead fixture. At the other end of the master bath, a luxurious jetted tub nestles by a fireplace in the bay window area. Views of my clients' garden can be seen while soaking in bubbles. The over-sized walk-in shower features a paneled wainscoting effect which I designed in Crema Marfil marble. The vine mosaic continues in the shower, topped by green onyx squares. A rainshower head and a hand-held spray on a bar provides showering options. The shower floor slopes gently in one direction toward a hidden linear drain; this allows the floor to be read as a continuation of the main space, without being interrupted by a center drain.
Photo by Jeff Fiorito
 Joni Spear Interior Design
A long-term client was expecting her third child. Alas, this meant that baby number two was getting booted from the coveted nursery as his sister before him had. The most convenient room in the house for the son, was dad’s home office, and dad would be relocated into the garage carriage house.
For the new bedroom, mom requested a bold, colorful space with a truck theme.
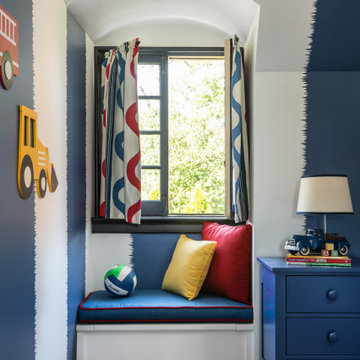
The existing office had no door and was located at the end of a long dark hallway that had been painted black by the last homeowners. First order of business was to lighten the hall and create a wall space for functioning doors. The awkward architecture of the room with 3 alcove windows, slanted ceilings and built-in bookcases proved an inconvenient location for furniture placement. We opted to place the bed close the wall so the two-year-old wouldn’t fall out. The solid wood bed and nightstand were constructed in the US and painted in vibrant shades to match the bedding and roman shades. The amazing irregular wall stripes were inherited from the previous homeowner but were also black and proved too dark for a toddler. Both myself and the client loved them and decided to have them re-painted in a daring blue. The daring fabric used on the windows counter- balance the wall stripes.
Window seats and a built-in toy storage were constructed to make use of the alcove windows. Now, the room is not only fun and bright, but functional.
 Majestic Painters and Decorators
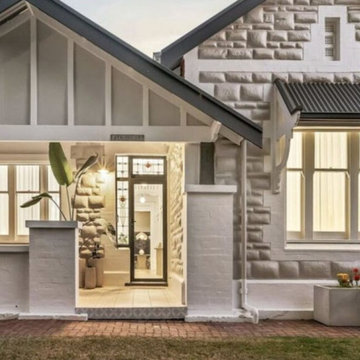
Majestic Painters is a premier painting service based in Adelaide, specializing in transforming interiors with a touch of elegance and professionalism. As leading interior painters in Adelaide, we understand that the ambiance of a space is significantly influenced by its color palette and overall aesthetic. Our team of skilled painters is dedicated to delivering high-quality results that not only meet but exceed our clients' expectations. We take pride in our meticulous attention to detail, ensuring that every brushstroke contributes to a flawless finish. Our process begins with a comprehensive consultation, where we discuss your vision and preferences. We believe that effective communication is key to achieving the desired outcome, so we take the time to understand your specific needs and style. Whether you are looking to refresh a single room or undertake a complete home makeover, our experienced interior painters in Adelaide are equipped to handle projects of any scale. We utilize premium paints and materials that not only enhance the beauty of your interiors but also ensure durability and longevity. At Majestic Painters, we are committed to maintaining a clean and organized work environment. Our team respects your space and takes all necessary precautions to protect your furniture and flooring during the painting process. We understand that having contractors in your home can be disruptive, which is why we strive to complete our work efficiently and with minimal inconvenience to you. Our goal is to create a seamless experience from start to finish, allowing you to enjoy the transformation of your space without unnecessary stress.

 Tracy Spake
Open concept kitchen - large craftsman l-shaped medium tone wood floor open concept kitchen idea with a single-bowl sink, shaker cabinets, white cabinets, granite countertops, gray backsplash, stone tile backsplash, stainless steel appliances and an island
 TKS Design Group
Download our free ebook, Creating the Ideal Kitchen. DOWNLOAD NOW
This homeowner’s daughter originally contacted us on behalf of her parents who were reluctant to begin the remodeling process in their home due to the inconvenience and dust. Once we met and they dipped their toes into the process, we were off to the races. The existing bathroom in this beautiful historical 1920’s home, had not been updated since the 70’/80’s as evidenced by the blue carpeting, mirrored walls and dropped ceilings. In addition, there was very little storage, and some health setbacks had made the bathroom difficult to maneuver with its tub shower.
Once we demoed, we discovered everything we expected to find in a home that had not been updated for many years. We got to work bringing all the electrical and plumbing up to code, and it was just as dusty and dirty as the homeowner’s anticipated! Once the space was demoed, we got to work building our new plan. We eliminated the existing tub and created a large walk-in curb-less shower.
An existing closet was eliminated and in its place, we planned a custom built in with spots for linens, jewelry and general storage. Because of the small space, we had to be very creative with the shower footprint, so we clipped one of the walls for more clearance behind the sink. The bathroom features a beautiful custom mosaic floor tile as well as tiled walls throughout the space. This required lots of coordination between the carpenter and tile setter to make sure that the framing and tile design were all properly aligned. We worked around an existing radiator and a unique original leaded window that was architecturally significant to the façade of the home. We had a lot of extra depth behind the original toilet location, so we built the wall out a bit, moved the toilet forward and then created some extra storage space behind the commode. We settled on mirrored mullioned doors to bounce lots of light around the smaller space.
We also went back and forth on deciding between a single and double vanity, and in the end decided the single vanity allowed for more counter space, more storage below and for the design to breath a bit in the smaller space. I’m so happy with this decision! To build on the luxurious feel of the space, we added a heated towel bar and heated flooring.
One of the concerns the homeowners had was having a comfortable floor to walk on. They realized that carpet was not a very practical solution but liked the comfort it had provided. Heated floors are the perfect solution. The room is decidedly traditional from its intricate mosaic marble floor to the calacutta marble clad walls. Elegant gold chandelier style fixtures, marble countertops and Morris & Co. beaded wallpaper provide an opulent feel to the space.
The gray monochromatic pallet keeps it feeling fresh and up-to-date. The beautiful leaded glass window is an important architectural feature at the front of the house. In the summertime, the homeowners love having the window open for fresh air and ventilation. We love it too!
The curb-less shower features a small fold down bench that can be used if needed and folded up when not. The shower also features a custom niche for storing shampoo and other hair products. The linear drain is built into the tilework and is barely visible. A frameless glass door that swings both in and out completes the luxurious feel.
Designed by: Susan Klimala, CKD, CBD
Photography by: Michael Kaskel
For more information on kitchen and bath design ideas go to: www.kitchenstudio-ge.com
 Fiorito Interior Design
Like many California ranch homes built in the 1950s, this original master bathroom was not really a "master bath." My clients, who only three years ago purchased the home from the family of the original owner, were saddled with a small, dysfunctional space. Chief among the dysfunctions: a vanity only 30" high, and an inconveniently placed window that forced the too-low vanity mirror to reflect only the waist and partial torso--not the face--of anyone standing in front of it. They wanted not only a more spacious bathroom but a bedroom as well, so we worked in tandem with an architect and contractor to come up with a fantastic new space: a true Master Suite. In order to refine a design concept for the soon-to-be larger space, and thereby narrow down material choices, my clients and I had a brainstorming session: we spoke of an elegant Old World/ European bedroom and bathroom, a luxurious bath that would reference a Roman spa, and finally the idea of a Hammam was brought into the mix. We blended these ideas together in oil-rubbed bronze fixtures, and a tiny tile mosaic in beautiful Bursa Beige marble from Turkey and white Thassos marble from Greece. The new generously sized bathroom boasts a jetted soaking tub, a very large walk-in shower, a double-sided fireplace (facing the tub on the bath side), and a luxurious 8' long vanity with double sinks and a storage tower.
The vanity wall is covered with a mosaic vine pattern in a beautiful Bursa Beige marble from Turkey and white Thassos marble from Greece,. The custom Larson Juhl framed mirrors are flanked by gorgeous hand-wrought scones from Hubbardton Forge which echo the vine and leaf pattern in the mosaic. And the vanity itself features an LED strip in the toe-kick which allows one to see in the middle of the night without having to turn on a shockingly bright overhead fixture. At the other end of the master bath, a luxurious jetted tub nestles by a fireplace in the bay window area. Views of my clients' garden can be seen while soaking in bubbles. The over-sized walk-in shower features a paneled wainscoting effect which I designed in Crema Marfil marble. The vine mosaic continues in the shower, topped by green onyx squares. A rainshower head and a hand-held spray on a bar provides showering options. The shower floor slopes gently in one direction toward a hidden linear drain; this allows the floor to be read as a continuation of the main space, without being interrupted by a center drain.
Photo by Jeff Fiorito
 TKS Design Group
Download our free ebook, Creating the Ideal Kitchen. DOWNLOAD NOW
This homeowner’s daughter originally contacted us on behalf of her parents who were reluctant to begin the remodeling process in their home due to the inconvenience and dust. Once we met and they dipped their toes into the process, we were off to the races. The existing bathroom in this beautiful historical 1920’s home, had not been updated since the 70’/80’s as evidenced by the blue carpeting, mirrored walls and dropped ceilings. In addition, there was very little storage, and some health setbacks had made the bathroom difficult to maneuver with its tub shower.
Once we demoed, we discovered everything we expected to find in a home that had not been updated for many years. We got to work bringing all the electrical and plumbing up to code, and it was just as dusty and dirty as the homeowner’s anticipated! Once the space was demoed, we got to work building our new plan. We eliminated the existing tub and created a large walk-in curb-less shower.
An existing closet was eliminated and in its place, we planned a custom built in with spots for linens, jewelry and general storage. Because of the small space, we had to be very creative with the shower footprint, so we clipped one of the walls for more clearance behind the sink. The bathroom features a beautiful custom mosaic floor tile as well as tiled walls throughout the space. This required lots of coordination between the carpenter and tile setter to make sure that the framing and tile design were all properly aligned. We worked around an existing radiator and a unique original leaded window that was architecturally significant to the façade of the home. We had a lot of extra depth behind the original toilet location, so we built the wall out a bit, moved the toilet forward and then created some extra storage space behind the commode. We settled on mirrored mullioned doors to bounce lots of light around the smaller space.
We also went back and forth on deciding between a single and double vanity, and in the end decided the single vanity allowed for more counter space, more storage below and for the design to breath a bit in the smaller space. I’m so happy with this decision! To build on the luxurious feel of the space, we added a heated towel bar and heated flooring.
One of the concerns the homeowners had was having a comfortable floor to walk on. They realized that carpet was not a very practical solution but liked the comfort it had provided. Heated floors are the perfect solution. The room is decidedly traditional from its intricate mosaic marble floor to the calacutta marble clad walls. Elegant gold chandelier style fixtures, marble countertops and Morris & Co. beaded wallpaper provide an opulent feel to the space.
The gray monochromatic pallet keeps it feeling fresh and up-to-date. The beautiful leaded glass window is an important architectural feature at the front of the house. In the summertime, the homeowners love having the window open for fresh air and ventilation. We love it too!
The curb-less shower features a small fold down bench that can be used if needed and folded up when not. The shower also features a custom niche for storing shampoo and other hair products. The linear drain is built into the tilework and is barely visible. A frameless glass door that swings both in and out completes the luxurious feel.
Designed by: Susan Klimala, CKD, CBD
Photography by: Michael Kaskel
For more information on kitchen and bath design ideas go to: www.kitchenstudio-ge.com
 highland
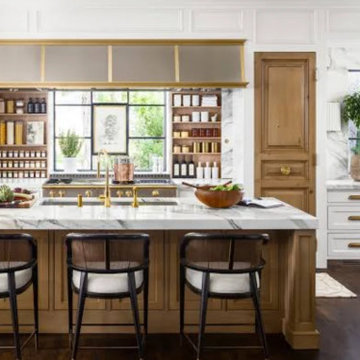
Renovating a home can completely transform the way a space looks, feels, and functions, but successful improvements require thoughtful planning rather than rushing into expensive changes. These renovation tips and tricks house ideas can help homeowners organize projects, control costs, select practical materials, and create rooms that remain useful for years. Start by identifying what genuinely needs improvement, such as outdated finishes, poor lighting, inefficient storage, damaged surfaces, or an inconvenient layout. Create a realistic budget that includes materials, labor, permits where applicable, and a contingency amount for unexpected issues. Taking measurements, collecting inspiration, and deciding priorities before work begins can prevent unnecessary purchases and make the renovation process much easier to manage.
One of the most useful renovation tips and tricks house projects can benefit from is improving the layout before focusing on decoration. A beautiful room will still feel inconvenient if furniture blocks walkways or storage is insufficient. Consider how people actually use each space and whether doors, windows, lighting, electrical outlets, and storage are positioned effectively. In kitchens, for example, practical work zones and accessible storage can make everyday tasks easier. In bedrooms and living rooms, built-in shelving, multifunctional furniture, and organized storage can reduce clutter without making the space feel crowded. Whenever possible, repair or improve the existing structure before replacing everything, because thoughtful upgrades can deliver significant results without creating unnecessary renovation costs.
Choosing materials carefully is another important part of renovation tips and tricks house planning. Look beyond appearance and consider durability, maintenance, safety, and suitability for the room. High-moisture areas require materials that can handle regular exposure to water, while frequently used floors and work surfaces should be selected for durability. Neutral foundations can also provide flexibility because wall colors, textiles, artwork, and accessories can be changed later without another major renovation. Lighting deserves equal attention: combine general illumination with task and accent lighting to make rooms more functional and visually comfortable. Energy-efficient lighting, improved insulation, weather sealing, and efficient fixtures may also contribute to better long-term household performance.
Before beginning major work, divide the project into manageable stages. A useful approach is to complete structural or repair work first, followed by electrical or plumbing updates when necessary, then walls, flooring, cabinetry, fixtures, and finally decorative details. This order can reduce the chance of damaging newly finished surfaces. Keep a record of measurements, product specifications, receipts, and important project decisions so replacements or future repairs are easier. For specialized work involving structural changes, electrical systems, plumbing, gas, or other regulated areas, consult appropriately qualified professionals and follow local requirements. Among the most practical renovation tips and tricks house owners can follow is to avoid changing too many things simultaneously; completing priority areas systematically makes budgets, timelines, and quality easier to control.
Finally, focus on improvements that combine appearance with everyday usefulness. Fresh paint, updated hardware, better organization, improved lighting, refreshed flooring, and carefully selected fixtures can make a noticeable difference without requiring a complete transformation. Outdoor areas can also benefit from simple maintenance, improved lighting, seating, planting, or repaired surfaces that extend the usable living space. Before declaring the project finished, inspect each room for functionality, storage, lighting, ventilation, safety, and finishing quality. The best renovation tips and tricks house approach is not necessarily about spending more it is about making informed choices that solve real problems and create a home that feels comfortable, practical, and personal.
One of the most useful renovation tips and tricks house projects can benefit from is improving the layout before focusing on decoration. A beautiful room will still feel inconvenient if furniture blocks walkways or storage is insufficient. Consider how people actually use each space and whether doors, windows, lighting, electrical outlets, and storage are positioned effectively. In kitchens, for example, practical work zones and accessible storage can make everyday tasks easier. In bedrooms and living rooms, built-in shelving, multifunctional furniture, and organized storage can reduce clutter without making the space feel crowded. Whenever possible, repair or improve the existing structure before replacing everything, because thoughtful upgrades can deliver significant results without creating unnecessary renovation costs.
Choosing materials carefully is another important part of renovation tips and tricks house planning. Look beyond appearance and consider durability, maintenance, safety, and suitability for the room. High-moisture areas require materials that can handle regular exposure to water, while frequently used floors and work surfaces should be selected for durability. Neutral foundations can also provide flexibility because wall colors, textiles, artwork, and accessories can be changed later without another major renovation. Lighting deserves equal attention: combine general illumination with task and accent lighting to make rooms more functional and visually comfortable. Energy-efficient lighting, improved insulation, weather sealing, and efficient fixtures may also contribute to better long-term household performance.
Before beginning major work, divide the project into manageable stages. A useful approach is to complete structural or repair work first, followed by electrical or plumbing updates when necessary, then walls, flooring, cabinetry, fixtures, and finally decorative details. This order can reduce the chance of damaging newly finished surfaces. Keep a record of measurements, product specifications, receipts, and important project decisions so replacements or future repairs are easier. For specialized work involving structural changes, electrical systems, plumbing, gas, or other regulated areas, consult appropriately qualified professionals and follow local requirements. Among the most practical renovation tips and tricks house owners can follow is to avoid changing too many things simultaneously; completing priority areas systematically makes budgets, timelines, and quality easier to control.
Finally, focus on improvements that combine appearance with everyday usefulness. Fresh paint, updated hardware, better organization, improved lighting, refreshed flooring, and carefully selected fixtures can make a noticeable difference without requiring a complete transformation. Outdoor areas can also benefit from simple maintenance, improved lighting, seating, planting, or repaired surfaces that extend the usable living space. Before declaring the project finished, inspect each room for functionality, storage, lighting, ventilation, safety, and finishing quality. The best renovation tips and tricks house approach is not necessarily about spending more it is about making informed choices that solve real problems and create a home that feels comfortable, practical, and personal.
 Fiorito Interior Design
Like many California ranch homes built in the 1950s, this original master bathroom was not really a "master bath." My clients, who only three years ago purchased the home from the family of the original owner, were saddled with a small, dysfunctional space. Chief among the dysfunctions: a vanity only 30" high, and an inconveniently placed window that forced the too-low vanity mirror to reflect only the waist and partial torso--not the face--of anyone standing in front of it. They wanted not only a more spacious bathroom but a bedroom as well, so we worked in tandem with an architect and contractor to come up with a fantastic new space: a true Master Suite. In order to refine a design concept for the soon-to-be larger space, and thereby narrow down material choices, my clients and I had a brainstorming session: we spoke of an elegant Old World/ European bedroom and bathroom, a luxurious bath that would reference a Roman spa, and finally the idea of a Hammam was brought into the mix. We blended these ideas together in oil-rubbed bronze fixtures, and a tiny tile mosaic in beautiful Bursa Beige marble from Turkey and white Thassos marble from Greece. The new generously sized bathroom boasts a jetted soaking tub, a very large walk-in shower, a double-sided fireplace (facing the tub on the bath side), and a luxurious 8' long vanity with double sinks and a storage tower.
The vanity wall is covered with a mosaic vine pattern in a beautiful Bursa Beige marble from Turkey and white Thassos marble from Greece,. The custom Larson Juhl framed mirrors are flanked by gorgeous hand-wrought scones from Hubbardton Forge which echo the vine and leaf pattern in the mosaic. And the vanity itself features an LED strip in the toe-kick which allows one to see in the middle of the night without having to turn on a shockingly bright overhead fixture. At the other end of the master bath, a luxurious jetted tub nestles by a fireplace in the bay window area. Views of my clients' garden can be seen while soaking in bubbles. The over-sized walk-in shower features a paneled wainscoting effect which I designed in Crema Marfil marble. The vine mosaic continues in the shower, topped by green onyx squares. A rainshower head and a hand-held spray on a bar provides showering options. The shower floor slopes gently in one direction toward a hidden linear drain; this allows the floor to be read as a continuation of the main space, without being interrupted by a center drain.
Photo by Bernardo Grijalva

 User
When seeking a professional painting contractor in Houston, a thousand things must run through your mind. Let the painting professionals at Duran’s Roofing & Remodeling set your mind at ease. Painting is second nature to us. As you may be good at your job, we’re pretty good at ours. Painting, you might say, is in our blood. Family owned and operated is all we know.
Before our painters put the first brush of paint to your walls, we make sure that your surfaces are clean and free of damage. Preparing a fresh canvas and painting with proper technique makes your old walls look like brand new once again.
Duran’s Roofing & Remodeling works hard to make sure your property looks amazing, inside and out. Our experienced paint crews know how to create beautiful finishes inside your home, while properly protecting your home’s fixtures and non-painted surfaces.
From offices to storefronts, let our experienced commercial paint maintenance specialists make sure your business looks great all year long. Whether it is damage touch-up or whole property repainting, we can do it. We’ll work with your schedule to ensure minimal downtime and inconvenience to your employees and customers.
Our painting services are more than just a few rollers and cans of paint. We take pride in our work and in the relationships we build with our clients. Complete client satisfaction is our goal, and we attain it by keeping the process simple. Our courteous, clean-cut staff will arrive when they say they will, get the job done right, complete all work on time, and finish on job on budget.

 Alair Homes Plano
This master closet is pure luxury! The floor to ceiling storage cabinets and drawers wastes not a single inch of space. Rotating automated shoe racks and wardrobe lifts make it easy to stay organized. Lighted clothes racks and glass cabinets highlight this beautiful space. Design by California Closets | Space by Hatfield Builders & Remodelers | Photography by Versatile Imaging

 Ky-Kan Coatings
Concrete can be made to look like any substance. Tile, stone, wood, brick, etc. With unlimited color options, Ky-Kan Coatings can transform any room in your home or business using lightweight, beautiful concrete.

 ALL Renovation & Design LLC
The Deistel’s had an ultimatum: either completely renovate their home exactly the way they wanted it and stay forever – or move.
Like most homes built in that era, the kitchen was semi-dysfunctional. The pantry and appliance placement were inconvenient. The layout of the rooms was not comfortable and did not fit their lifestyle.
Before making a decision about moving, they called Amos at ALL Renovation & Design to create a remodeling plan. Amos guided them through two basic questions: “What would their ideal home look like?” And then: “What would it take to make it happen?” To help with the first question, Amos brought in Ambience by Adair as the interior designer for the project.
Amos and Adair presented a design that, if acted upon, would transform their entire first floor into their dream space.
The plan included a completely new kitchen with an efficient layout. The style of the dining room would change to match the décor of antique family heirlooms which they hoped to finally enjoy. Elegant crown molding would give the office a face-lift. And to cut down cost, they would keep the existing hardwood floors.
Amos and Adair presented a clear picture of what it would take to transform the space into a comfortable, functional living area, within the Deistel’s reasonable budget. That way, they could make an informed decision about investing in their current property versus moving.
The Deistel’s decided to move ahead with the remodel.
The ALL Renovation & Design team got right to work.
Gutting the kitchen came first. Then came new painted maple cabinets with glazed cove panels, complemented by the new Arley Bliss Element glass tile backsplash. Armstrong Alterna Mesa engineered stone tiles transformed the kitchen floor.
The carpenters creatively painted and trimmed the wainscoting in the dining room to give a flat-panel appearance, matching the style of the heirloom furniture.
The end result is a beautiful living space, with a cohesive scheme, that is both restful and practical.
17