
Search results for "Initial step" in Home Design Ideas

 Hearthstone Inc
Richard Herman is in the hospitality business and owns several upscale hotels in Florida and in other states as well as cattle ranches in both Florida and Missouri. Their farm in Ocala is by farm their most unique. The property serves as a 4-H demonstration project for the purpose of children’s education. They have been working with the Academy Prep of St. Pete which is dedicated to inner-city youths that are selected on the basis of need and achievement. Wife Diane spends her time on the farm raising Gypsy Vanners, a diminutive draft horse named after the job they did in Eastern Europe, pulling the wagons (vans) for gypsies that wandered across the continent. On the Ocala farm, there are several mules with a unique profession.
Richard had visited the Hearthstone display at a Log & Timber Home Shows at the Orlando Convention Center many years ago. He was impressed that Hearthstone had stayed in touch with him over the years by mailings, invitations to shows, and periodic phone calls. When the time came to start serious consideration of the design of barn, Hearthstone responded promptly and professionally to Richard and Diane’s requests for information and a review of their ideas for their barn, which would serve as the centerpiece for their new farm.
They wanted a multipurpose facility that could accommodate an educational environment and a large hall suitable for the fundraising events for his charities. Richard wanted a barn that reflected the look and feel of barns built at the dawn of the 20th century. Besides the rustic chicken houses and vegetable gardens, they have completely renovated a 1020’s era farmhouse to be as historically correct as possible and serves as the entry to the farm.
“They very careful to feel us out, get comfortable with our capabilities, and be convinced that we could perform as promised,” said Project Manager John Ricketson of Hearthstone.
Design Process
There were some initial drawings that gave us a start on the basic shape and size of the barn. From there, it was a process of narrowing down the uses of each area and the spans that could be achieved. The barn was going to have the traditional “board & batten” exterior siding and a metal roof. There is a cantilevered ‘hay hood” on the north gable end above the large sliding barn doors that open into the foyer and horse stalls. The wings house a combination of areas, beginning with the large restrooms to accommodate crowds for events. Other parts of the wings have garage areas for the farm vehicles, feed room, tack room, wash rack, storage, offices, and smaller restrooms.
Keeping with the look and feel of the turn of the century, Hearthstone developed a process for giving the timbers a surface texture that mimicked the circular cuts of timbers that had just come out of an old sawmill. This was easier said than done. Randy Giles guided his millwright (Wolfgang) in designing a machine that would do this effectively.
The barn was delivered in October of 2014 and was erected over the course of two weeks, thanks to a hardworking crew (Eric Foster) and near-perfect weather. After the Hearthstone crew completed the erection and roof dry-in, it was time for the local carpenters to step up and install some light conventional framing on the gable ends before applying the roof fascia and exterior board & batten siding. Next came the big sliding barn doors, plumbing, electrical, heating, and cooling. Large rustic fixtures were hung from the great hall roof timbers.
Exterior
The board & batten siding was cypress and allowed to turn color naturally as rain hit it and the sun started working on it with UV rays. This method causes a much grayer look closer to the ground and less so where the roof overhang provides protection. The North end has some large limestone boulders and planters arranged around the pad with tall pampas grass. The planters provide casual seating before events and during outside receptions. The entire area was sodded with lush St. Augustine grass and split rail fences were added to enclose the barn area. The corrugated metal roof was a special order material that immediately rusted after being exposed to moisture. The layer of rust protects the metal from the elements.
Interior
The board & batten theme was carried throughout most of the interior with the timbers left natural to show off the circular saw texture. All of the tongue & groove decking was shipped in advance to allow the local painter to pre-stain it with a dark brown transparent stain that is a beautiful background to the light color Eastern White Pine timbers.
“Everything was unique in this project” said Project Manager John Ricketson. “The setting on a small demonstration farm close to Ocala, the multipurpose design, the circular saw texture on the timbers.”
The Hermans are very proud of their farm’s outcome. Richard sent a note to Randy Giles, owner of Hearthstone: “The Barn is fantastic, not a single problem, period. Next month, we have Jo Dee Messina coming in to help with a fundraiser for a local center for abused kids. Folks love the farm, ...... but that barn gets all of the attention. I would encourage you to use me as a reference for your sales team, feel free to extend my cell phone to any prospective purchasers.”

 Nextoffice
Sharifi-ha House
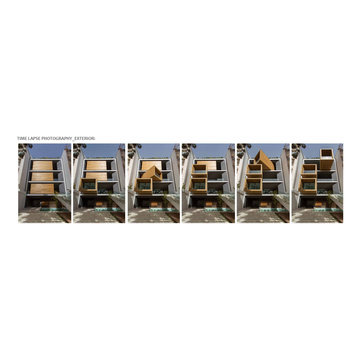
Uncertainty and flexibility lie at the heart of the design concept in Sharifi-ha House. The sensational, spatial qualities of the interiors, as well as the formal configuration of its exterior, directly respond to the displacement of turning boxes that lead the building volume to become open or closed, obtaining introverted or extroverted character. These changes may occur according to changing seasons or functional scenarios of floor plans.
Like many other urban plots, the land for this project had a noticeably narrow façade-width compared with its length. Consequently, our expertise in transforming a two-dimensional façade to a three-dimensional one became indispensable. Here, the openness /closure of the building volume is a reference to traditional Iranian houses, which would dynamically serve as seasonal modes of habitation by offering both a Zemestan-Neshin (winter living room) and Taabestan-Neshin (summer living room) to their residents. In summertime, Sharifi-ha House offers an open /transparent /perforated volume with wide, large terraces. In contrast, during Tehran’s cold, snowy winters the volume closes itself, offering minimal openings in total absence of those wide summer terraces. In this project, the challenges to the concepts of open/closed typology (introverted/extroverted character) led to an exciting spatial transformation of an ever-changing residential building.
The House is distributed over seven floors: the two basement floors are allocated to family conviviality, fitness facilities, and wellness areas, while the ground floor hosts parking and housekeeping rooms. Public activities all happen on the first and second floors, and the family’s private life takes place on the third and fourth floors.
The project consisted of four major parts; the fixed volume of the structure, the void, and the fixed volume and the mobile volume, respectively. When the turning boxes are closed, the building captures sunlight throughout the space of the central void, which also connects the two fixed volumes by suspended bridges.
The house adapts to the functional needs of its residents. For instance, depending on whether there is a guest or not, the guest room (located on the second floor) can be reconfigured for different purposes. Similarly, home office and breakfast room (turning rooms on the first and third floors) can change the formality of their appearance according to their residents’ desire. In other words, there is always the possibility of having different seasonal or lighting scenarios, some of which have been already considered in the BMS program of the project.
From the initial design steps, we noticed that three pine trees outside could be incorporated into the spaces of the interior. Now, in the open mode of the house, the trees are pleasantly captured by the window frames.
Stepping back for about three meters from the permitted construction boundary line allowed us to provide splendid daylight for the basement floors by inserting a glass fountain. The fitness and wellness areas are accommodated between this fountain and the basement pool where reflective installations reverberate the water’s radiance all over the space.
The applied manufacturing technique for the turning mechanism was in fact a simple one; the same method which is currently employed in turning theatrical scenes, turning the floor of car exhibitions, steel companies and the shipping industry in Iran. But as our client himself was into importing CNC and other similar industrial German machines, he preferred the structural system to be fabricated in Germany. In doing so, he could engage his employees in the manufacturing process and thus train them for future maintenance purposes.
Details of the handrails and air-penetration controlling methods were major issues considered in developing the design of the turning boxes. Designing foldable handrails and refining the edges of the boxes happened to be our feasible solutions.
Considering the specialties of this kind of architecture, the structural system was inevitably a customized one. After digitally modeling the structure, a series of SAP2000 analysis were undertaken to examine static/dynamic performance of the proposed system. Being partially moveable is the dominant feature of this structural assembly, which was contemplated throughout the fabrication process by the German manufacturer company. The main loads all rest on the beams of the living rooms.
Due to the various configurations the turning boxes may take, the loading calculation has been estimated based on the largest possible loading value applied to the system. Additionally, in order to prevent structural deformation controlling the probable vibrations in the turning boxes was taken into account during the design/calculations of the structure.
The house was titled Sharifi-ha House, in honor of traditional Iranian mansions.

 Advance Design Studio, Ltd.
After six years of living in their Huntley IL home, Chris and Meghan were tired of their dark, dingy, outdated kitchen and it was finally time for a long-anticipated change. “The kitchen is the place where we live, it’s where we do everything,” Meghan said. “It was important that it be a space where we wanted to be.” Meghan loves cooking and enjoys including their girls in healthy meal prepping, this led them to want a brighter, more enjoyable kitchen with increased functionality and improved storage.
For Chris especially, the laundry room was an entirely dysfunctional eyesore. “We had a washer and a dryer, but it was all kind-of cobbled together!” Chris said. “There were always laundry piles everywhere, we weren’t really sure what we wanted to do in there, but it was time for us to make a change.” The mess of the space was stressful every time they walked in the door from the garage each day. Kids’ backpacks and shoes piled up haphazardly in the makeshift boot-bench closet left the family feeling disorganized and stressed. They needed space for folding clothes and locker cubbies to help keep the family organized.
Having known Christine and Todd in the Huntley community for years, Chris and Meghan were familiar with their work. “We already trusted them personally and having seen their projects for years we knew they did top notch work. After we reviewed the initial round of designs, we knew that hiring them was definitely the right choice,” Meghan and Chris said. Although Chris had done a lot of work in their home himself, the kitchen and laundry room renovation was such a large undertaking that he didn’t want to steal time away from his family to spend what would surely be many long weekends doing the job himself. “That would not have been a wise choice for us,” Chris laughed.
“Our designer, Michelle was very, very, easy to work with; anything we wanted to see or weren’t sure about, she went above and beyond to make this easy for us. She was easy to get hold of and always quick to respond,” the couple said. Michelle pulled ideas that mirrored the couple’s taste and style and was adept at directing the couple to limited choices that didn’t overwhelm them and kept the process moving. “I have a hard time making decisions. Michelle made the decision-making process so easy. I loved how she listened to what I liked and then presented three great options for me to choose from,” Meghan said.
The main objectives for the kitchen were better storage solutions, they wanted the space to reflect their lifestyle and taste, and they wanted it to last for years with low maintenance. One of the first steps in creating a more functional kitchen was relocating the refrigerator, creating an improved workflow for the busy family.
“We didn’t know that we could even move the refrigerator to a new location where it is now, that was something that we never would have thought of,” Chris said. “The new refrigerator location makes the kitchen feel so much bigger. We didn’t add any space, but our whole kitchen with the new design just seems like it’s so much larger than before!” Meghan said.
The perimeter mist colored cabinets helped warm and brighten the entire room, while the graphite colored cabinets on the island added contrast. Using this fresh, clean color palette satisfied the couple’s desire for a bright space that was the exact opposite of what they had before. Organization accessories were also added to the cabinets such as a spice drawer tray and roll outs to create hidden convenience.
“I absolutely love the hidden spices – it makes cooking so much more enjoyable!” Chris said. “And all the pull outs, and the double trash bin, who would think you could get so excited about organization!” the couple said in unison.
One thing they hated in their original kitchen was how dark the space felt. Added lighting on the ceiling with the new light fixtures combined with the lighter cabinetry colors throughout solved this problem. “Our new kitchen has this warm, almost cozy feeling that our old kitchen never had, it’s just a space that I love spending my time in now,” Meghan said. The light airy feeling was accentuated with the use of floating white shelves on either side of the decorative range hood. “We have so much cabinetry space, the new design is amazing we actually have more storage space than we will ever need,” Meghan said.
The island was extended to create more work surface and added space for stool seating. “The new island changes how we live. Now the kids can be in the kitchen with us, doing homework, eating breakfast, and the three of us have special dinners there when Chris is working late,” Meghan said.
The Carrara Marmi Quartz countertops were chosen because they are, not only beautiful, but are made from hard-working material that doesn’t require maintenance. The white subway tile backsplash that wraps to the ceiling behind the focal point cooktop range/hood compliments the crisp white countertops perfectly, while brushed brass hardware and light fixtures keep the design fresh and new.
The couple had a few fears at the beginning of the project, as most homeowners do. Their biggest fear was being out of their kitchen and laundry room for an extended time. The crew made it very easy for the family to work in a limited space keeping the washer and dryer hooked up the majority of the time, and also getting appliances working with minimal downtime.
“They above and beyond accommodated us to get us through the process,” Meghan said. “They did a great job making sure we were as comfortable as possible throughout the process,” Chris added.
“Our project manager DJ did a great job. He was very good at updating us on schedule changes, getting guys in as quickly as possible. Everyone that stepped in the house was nice and did great work,” said Chris. They thought Advance’s carpenter was phenomenal and were impressed when he took a conceptual idea from a photograph and worked with designer Michelle to create a one of a kind range/hood that has become the topic of conversation with friends and family who visit the new kitchen. “He was in our house literally every day for several weeks. He was easy to work with and good at what he did,” Meghan and Chris said.
The focal point of the kitchen; a hand-crafted, custom-built ventilation hood was clad with handpicked reclaimed barnwood. Advance Design’s carpenter built the framework and the cladding to create a one-of-a-kind design element that the couple loves.
“I think it was especially fun for him to create something unique from scratch, showcasing his talent in this area,” Meghan said. “I love that my kitchen is not like everyone else’s. I got to pick out the wood on my hood and watch it being built and was able to choose what pieces of wood went where on it. It’s totally unique.”
Red Oak flooring was toothed-in throughout the kitchen and the rest of the first floor anywhere changes were made. Then the whole floor was refinished to tone down the orange undertones in the existing floor stain, ultimately changing the color complexion of the entire first floor. The result is a completely new feeling to the entire home.
Renovating the laundry room was extremely important to Meghan and Chris, but they had trouble visualizing what the possibilities were for the seemingly small space. Michelle produced beautiful 3D illustrations that helped them envision the space in a whole new way.
“I must have told Michelle 100 times that I am a visual person, seeing the designs in 3D made it so easy to make decisions and see what we could really do with our space,” Meghan said.
A dividing wall and doorway were removed between the existing laundry room and hallway formerly containing a coat closet, providing space to design specialized graphite colored cabinetry matching the kitchen island to house custom storage cubbies for each family member. Adding the tall utility cabinetry in the new laundry area helped solve the storage issue, tucking away cleaning supplies, household items, and even the cat got its own cubby.
“I love how everything is now hidden in its own space. I can’t tell you how much I hated coming home and seeing everything sitting around on counters,” Chris said.
Electrical outlets were planned for the inside of utility cabinets, so devices could charge in hidden locations. Stacking the washer and dryer allowed for wider countertop space to provide a folding area and a special space for clothes to hang. “The way I do laundry has been completely transformed! I can actually fold clothes and hang them now right out of the washer and dryer,” Meghan said.
“The end result in the kitchen and the laundry/mud room was an updated light and bright space, with a smarter work flow that better meets the needs of this family,” Michelle said.
“I would totally recommend Advance Design,” Meghan said. “Sometimes I sit and just look at my kitchen and laundry room and think ‘Wow, I can’t believe I get to live here!’ It’s an understatement to say we love our new space.”
Find the right local pro for your project
 Nextoffice
Sharifi-ha House
Uncertainty and flexibility lie at the heart of the design concept in Sharifi-ha House. The sensational, spatial qualities of the interiors, as well as the formal configuration of its exterior, directly respond to the displacement of turning boxes that lead the building volume to become open or closed, obtaining introverted or extroverted character. These changes may occur according to changing seasons or functional scenarios of floor plans.
Like many other urban plots, the land for this project had a noticeably narrow façade-width compared with its length. Consequently, our expertise in transforming a two-dimensional façade to a three-dimensional one became indispensable. Here, the openness /closure of the building volume is a reference to traditional Iranian houses, which would dynamically serve as seasonal modes of habitation by offering both a Zemestan-Neshin (winter living room) and Taabestan-Neshin (summer living room) to their residents. In summertime, Sharifi-ha House offers an open /transparent /perforated volume with wide, large terraces. In contrast, during Tehran’s cold, snowy winters the volume closes itself, offering minimal openings in total absence of those wide summer terraces. In this project, the challenges to the concepts of open/closed typology (introverted/extroverted character) led to an exciting spatial transformation of an ever-changing residential building.
The House is distributed over seven floors: the two basement floors are allocated to family conviviality, fitness facilities, and wellness areas, while the ground floor hosts parking and housekeeping rooms. Public activities all happen on the first and second floors, and the family’s private life takes place on the third and fourth floors.
The project consisted of four major parts; the fixed volume of the structure, the void, and the fixed volume and the mobile volume, respectively. When the turning boxes are closed, the building captures sunlight throughout the space of the central void, which also connects the two fixed volumes by suspended bridges.
The house adapts to the functional needs of its residents. For instance, depending on whether there is a guest or not, the guest room (located on the second floor) can be reconfigured for different purposes. Similarly, home office and breakfast room (turning rooms on the first and third floors) can change the formality of their appearance according to their residents’ desire. In other words, there is always the possibility of having different seasonal or lighting scenarios, some of which have been already considered in the BMS program of the project.
From the initial design steps, we noticed that three pine trees outside could be incorporated into the spaces of the interior. Now, in the open mode of the house, the trees are pleasantly captured by the window frames.
Stepping back for about three meters from the permitted construction boundary line allowed us to provide splendid daylight for the basement floors by inserting a glass fountain. The fitness and wellness areas are accommodated between this fountain and the basement pool where reflective installations reverberate the water’s radiance all over the space.
The applied manufacturing technique for the turning mechanism was in fact a simple one; the same method which is currently employed in turning theatrical scenes, turning the floor of car exhibitions, steel companies and the shipping industry in Iran. But as our client himself was into importing CNC and other similar industrial German machines, he preferred the structural system to be fabricated in Germany. In doing so, he could engage his employees in the manufacturing process and thus train them for future maintenance purposes.
Details of the handrails and air-penetration controlling methods were major issues considered in developing the design of the turning boxes. Designing foldable handrails and refining the edges of the boxes happened to be our feasible solutions.
Considering the specialties of this kind of architecture, the structural system was inevitably a customized one. After digitally modeling the structure, a series of SAP2000 analysis were undertaken to examine static/dynamic performance of the proposed system. Being partially moveable is the dominant feature of this structural assembly, which was contemplated throughout the fabrication process by the German manufacturer company. The main loads all rest on the beams of the living rooms.
Due to the various configurations the turning boxes may take, the loading calculation has been estimated based on the largest possible loading value applied to the system. Additionally, in order to prevent structural deformation controlling the probable vibrations in the turning boxes was taken into account during the design/calculations of the structure.
The house was titled Sharifi-ha House, in honor of traditional Iranian mansions.

 Tile Doctor Ltd
I was contacted about a Georgian property in the Kent village of Leeds , to see if I could do anything to improve a Travertine tiled floor. The use of Travertine was extensive and had been installed throughout the ground floor including the kitchen, dining room, utility and bathroom WC. Travertine is probably my favourite stone, but it is acid sensitive and attracts dirt easily, due to its ‘holey’ composition.
Initially we discussed the floor over the phone where I got to know about the issues they were experiencing, and I detailed the renovation process I normally use to restore it including the products and timelines. Naturally they wanted to me to provide a quote for the work however its tricky to do that accurately without seeing the floor, so I arranged a date to pop over.
Upon arriving I could see the tiles and the wide grout joints had extensive, ingrained dirt indicating the previous sealer had long since worn away. This is a common issue with stone floors, and to re-assure myself and the client it could be resolved I cleaned a small area in the utility room with pleasing results!
This test clean helped me to understand which products and methods would work best on the floor and later that day I emailed over a detailed quote for the renovation. Happy with the quote I received a reply the same day asking when I could start.
My colleague and I arrived on the agreed date and work started with adding protection to all areas that required it. We use a lot of water during the cleaning process and some materials such as MDF can become damaged with water ingress, so it makes sense to do this.
To get the floor clean, a coarse Carbide Brush fitted to a rotary machine was run over the Travertine tiles to scrub in a strong solution of Tile Doctor Pro-Clean. This process generates a lot of slurry as the dirt was washed out of the stone and grout which is extracted with a wet vacuum as we progressed.
Next it was on hands and knees with more Tile Doctor Pro-Clean and handheld brushes run over stubborn areas and along the grout lines to take them from 80% up to 100%.
Happy with the results, the next step was to renovate the stone using a series of diamond encrusted burnishing pads. Using only water for lubrication this process starts with the application of a coarse 400-grit burnishing pad attached to the floor buffer. This produces a lot of slurry which again was removed with a wet vacuum.
This left the Travertine clean, but the pores of the stone had been opened giving the floor a matt finish and more absorbent than it was originally. To further refine the appearance of the stone the next two burnishing pads were applied which are 800 and 1500-grit. These pads polish the stone and close the pores, restoring the natural sheen in the process. After each pad was applied the slurry was rinsed off the floor with water and extracted with the wet vacuum. Once complete the floor was left to dry off fully overnight.
I arrived the next day and took several moisture readings from the floor to check that it had dried off sufficiently overnight. The results were good, so work moved onto sealing the Travertine with two coats of Tile Doctor Ultra Seal which is a natural look impregnating sealer. It works by soaking into the stone, occupying the pores and thereby preventing dirt from becoming ingrained there. This ensures dirt remains on the surface where it is easily cleaned away.
The final step in the floor’s renovation was to apply the last of the diamond polishing pads which is a very fine 3000-grit. This pad further improves the polished appearance of the stone resulting in a satisfying sheen.
The work made a massive difference to the floor, and I received an email the next day from one of the owners who was really pleased with the transformation:
”Floors look brilliant. Very pleased.”
For the care and maintenance of polished sealed floors I recommend the use of Tile Doctor’s Stone Soap which is a gentle but effective cleaning product that won’t impact the sealer and contains a patina enhancer. When it comes to sealed floors my mantra is:
“If you look after the sealer, the sealer will look after the floor!”
Graham Davis
North Kent Tile Doctor
 Tile Doctor Ltd
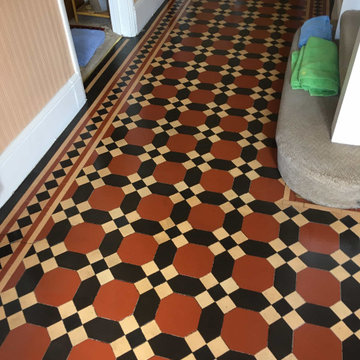
This Victorian floor in Twickenham, Middlesex was in good physical condition for its age but needed a good deep clean. Our customer had informed us that they had never cleaned or sealed the floor in the sixteen years that they had lived there so it was well overdue.
I went over to survey the floor and completed a test clean on a small section of tiling to see which products/techniques would work best. I like to do this as it demonstrates to the client what can be done, and it allows me to come up with an accurate price for doing the work.
As you can see from the pictures, there was quite a difference in the test patch compared to the rest of the floor. Years of foot traffic from the street had taken its’ toll and the floor was very dirty. Luckily, the floor was in very good condition and had not worn too badly.
Once they had seen the test patch, they were confident that it would be worth go ahead with my quote. It would ensure that the period feature was retained for many years to come. The colours on the floor were quite faded so it would be nice to get it restored.
I started the cleaning process by first taping up the surrounding skirting boards and doors to ensure they were protected from potential splashing. Cleaning involved spraying the Victorian tiles with a strong dilution of Tile Doctor Pro-Clean which is a dedicated Tile and Grout cleaning product. This was left to soak in for about ten minutes and then scrubbed in using a black pad fitted to a heavy-duty rotary scrubber.
This gives the floor a good mechanical scrub and works wonders releasing the ground-in dirt and soil from the tiles. The strong dilution of Pro-Clean will also remove any remaining sealers from the tile, however after sixteen years I doubted there would much trace of sealer left. Once done the floor was rinsed with water and all the soils removed with a wet vacuum.
Following the initial clean the colours were already much stronger. Next step however was to improve on that by giving the floor an acid rinse using Tile Doctor Grout Clean-Up. This removes mineral deposits and generally brightens up the appearance of the tile. After another round of scrubbing the floor was rinsed with our high-pressure washer and then vacuumed, extracting all of the dirty water and dirt away in one go. The floor was looking a lot better and was left to dry overnight.
After allowing the floor to dry overnight, we returned the next day to seal the floor. First, checking the floor was dry using the damp meter. Floors of this age can take a little longer to dry as there is no damp-proof membrane so it’s always worth checking as applying a sealer to damp tiles is not a good idea.
Once I was satisfied it was dry eight coats of Tile Doctor Seal and Go sheen finish sealer were applied. This takes a while to do as each coat needs to dry before applying the next. The sealer will protect the Victorian tiles for dirt and stains, it also enhanced the colours in the tile and will make it easier to keep the floor clean going forward.
My client was very pleased with the floor and mentioned that they should have called me in sooner! For aftercare cleaning I recommended Tile Doctor Neutral Clean which is an effective cleaner with a neutral pH, its designed for cleaning tiles without degrading the sealer.
Jonathan Oldham
South Middlesex Tile Doctor
 Tile Doctor Ltd
This Tumbled Travertine tiled floor at a beautiful house in Horley had been poorly maintained through the years using the wrong type of sealer which quickly wore down allowing dirt to become ingrained in the stone. The owner had become concerned about the state of the tiles and decided it was time to call in an expert that could restore the tiles to a condition that complimented the environment in which it was situated.
Travertine is known for being very distinctive in character and very durable, making it a very popular choice for tiled flooring in properties worldwide. However, the stone does require regular professional maintenance and polishing to keep it looking it top shape and home owners rarely realise this when they decide to have it installed. Fortunately, in the UK at least you can rely on your local tile doctor to maintain it for you.
The first part of the job involved giving the floor a thorough clean to remove what was left of old sealers and any polishing compounds that remained on the floor. Before beginning that however I brought in all my equipment and products into the house and then prepped the area by taping up the woodwork to protect it during the renovation process.
To remove what was left of the old sealers and other coatings still present on the floor a strong solution of Tile Doctor Remove and Go was applied to the floor and left to soak in for about ten minutes before being actively worked in with a rotary machine fitted with a black scrubbing pad. The solution turned black with the soil as it was lifted out of the pores of the stone and it was then rinsed off with water and extracted with a wet vacuum.
Following this, we moved on to a process we know as burnishing that hones the stone and brings up the polished appearance. Working in sections due to the size of the floor It involves the application of a series of diamond encrusted burnishing pads from coarse through to very fine.
The coarse 400-grit pad fitted to the rotary floor buffer and run over the floor using only water for lubrication. The water turns into a slurry as the pad does its job removing dirt and this has to be rinsed off the floor and extracted with the wet vacuum before applying the next pad. The process was then repeated with medium 800 grit pad for an initial polish followed by the Fine 1500 grit pad for the second polish using water for lubrication and rinsing and extracting in between each pad.
The last pad is a very fine 3000 grit pad for the final polish and is applied with only a little water sprayed onto the floor using a technique we call a Spray Burnish. This last pad really brings up the polished appearance of the stone.
To bring up the appearance of the stone even further and add a really durable polish Tile Doctor Shine Powder was applied. This is a crystallising powder sealer that ensures a very high shine and a tough, durable finish. This powder is applied directly to the tiles in combination with approximately ½ a litre of water and a soft white buffing pad.
Last step was to add to the protection provided by the Shine Powder with two coats of Tile Doctor Ultra-Seal which is a natural look sealer that doesn’t change the look of the stone and is applied to the stone and grout. This sealer works by seeping into the stone, occupying the pores and preventing dirt from becoming ingrained.
The customer was ecstatic with the results, being particularly pleased that she got the floor looking the way she originally wanted without significant expense, not to mention stress.
Michael Conlon
East Surrey Tile Doctor

 Signal House
Pelican Bay Home Reborn: A Complete Redesign and Rebuild
Pelican Bay Home Reborn: A Complete Redesign and Rebuild
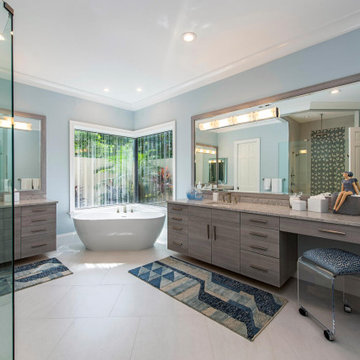
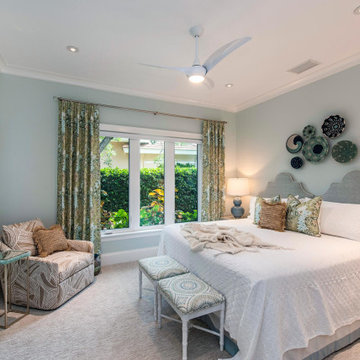
Blog Introduction: The Pelican Bay community in Naples, Florida has seen many homes come and go, but one house stands out from the rest. Recently, a 3,400 square-foot, four bedroom home underwent a complete renovation that breathed new life into it. With a renewed design and upgraded features, this is the perfect example of what can be done when you take on a full redesign and rebuild of your property. Let’s explore what makes this home so special.
The Open Kitchen & Dining Room
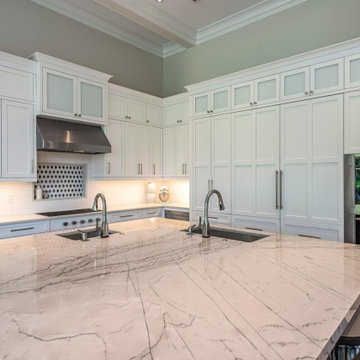
One of the most striking elements of the home is its open kitchen and dining room. The kitchen area was designed to maximize space by utilizing an island with storage underneath as well as bar seating for entertaining guests. The cabinets are made from solid wood with intricate details that add to the overall aesthetic of the kitchen. Adjacent to this area is a spacious dining room with enough seating for six people comfortably. The unique ceiling feature adds drama to the room while still keeping it light and airy.
The Gas Fireplace & Ground Floor Living Room
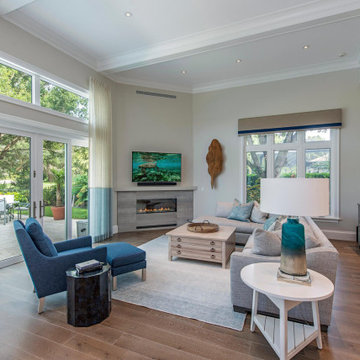
The cozy living room is anchored by a gas fireplace covered in stone tile that gives off a warm ambiance throughout the whole house. This space was designed to be inviting yet comfortable, allowing visitors to relax while still feeling inspired by its modern touches such as built-in shelves and neutral furniture pieces. There are also two sliding doors that lead out onto the back patio which gives even more options for entertaining guests or just enjoying some fresh air on a nice day!
The dramatic entryway sets the tone for what's to come throughout this newly renovated Pelican Bay home in Naples, Florida. With its inviting living areas, open kitchen/dining area, gas fireplace centerpiece, ceiling features throughout, outdoor patio space—this home has been completely transformed into something truly special! Whether you're looking for inspiration on how to renovate your own property or just want to admire an amazing work of art—this remodeled Pelican Bay home should definitely be at the top of your list!
About Pelican Bay
Pelican Bay in Naples, Florida is known for its stunning beaches and crystal clear turquoise waters. Its ideal location nestled between the Gulf of Mexico and a vast nature preserve ensures that visitors to the area can experience an array of outdoor activities, from fishing and kayaking, to swimming, golfing or hiking through mangrove swamps. With an abundance of luxurious resorts, fine dining establishments, spa treatments and shopping galore, Pelican Bay is one of the premier destinations on the west coast of Florida. Whether you're looking for a relaxing beach vacation or an action packed getaway full of adventure and excitement, Pelican Bay offers something for everyone.
Award-Winning House Builders in Florida
If you're looking for a reliable house builder in Florida, look no further! Every project is important to us and each one is completed with the utmost commitment to quality and attention to detail. With years of experience in the field, our team has the expertise and resources necessary to create whatever kind of home you can imagine. Whether you're building from scratch or remodeling an existing structure, we provide friendly and professional service every step of the way, from initial design and permitting all the way through construction and follow up! Let us help make your dream house a reality today.
 Signal House
Pelican Bay Home Reborn: A Complete Redesign and Rebuild
Pelican Bay Home Reborn: A Complete Redesign and Rebuild
Blog Introduction: The Pelican Bay community in Naples, Florida has seen many homes come and go, but one house stands out from the rest. Recently, a 3,400 square-foot, four bedroom home underwent a complete renovation that breathed new life into it. With a renewed design and upgraded features, this is the perfect example of what can be done when you take on a full redesign and rebuild of your property. Let’s explore what makes this home so special.
The Open Kitchen & Dining Room
One of the most striking elements of the home is its open kitchen and dining room. The kitchen area was designed to maximize space by utilizing an island with storage underneath as well as bar seating for entertaining guests. The cabinets are made from solid wood with intricate details that add to the overall aesthetic of the kitchen. Adjacent to this area is a spacious dining room with enough seating for six people comfortably. The unique ceiling feature adds drama to the room while still keeping it light and airy.
The Gas Fireplace & Ground Floor Living Room
The cozy living room is anchored by a gas fireplace covered in stone tile that gives off a warm ambiance throughout the whole house. This space was designed to be inviting yet comfortable, allowing visitors to relax while still feeling inspired by its modern touches such as built-in shelves and neutral furniture pieces. There are also two sliding doors that lead out onto the back patio which gives even more options for entertaining guests or just enjoying some fresh air on a nice day!
The dramatic entryway sets the tone for what's to come throughout this newly renovated Pelican Bay home in Naples, Florida. With its inviting living areas, open kitchen/dining area, gas fireplace centerpiece, ceiling features throughout, outdoor patio space—this home has been completely transformed into something truly special! Whether you're looking for inspiration on how to renovate your own property or just want to admire an amazing work of art—this remodeled Pelican Bay home should definitely be at the top of your list!
About Pelican Bay
Pelican Bay in Naples, Florida is known for its stunning beaches and crystal clear turquoise waters. Its ideal location nestled between the Gulf of Mexico and a vast nature preserve ensures that visitors to the area can experience an array of outdoor activities, from fishing and kayaking, to swimming, golfing or hiking through mangrove swamps. With an abundance of luxurious resorts, fine dining establishments, spa treatments and shopping galore, Pelican Bay is one of the premier destinations on the west coast of Florida. Whether you're looking for a relaxing beach vacation or an action packed getaway full of adventure and excitement, Pelican Bay offers something for everyone.
Award-Winning House Builders in Florida
If you're looking for a reliable house builder in Florida, look no further! Every project is important to us and each one is completed with the utmost commitment to quality and attention to detail. With years of experience in the field, our team has the expertise and resources necessary to create whatever kind of home you can imagine. Whether you're building from scratch or remodeling an existing structure, we provide friendly and professional service every step of the way, from initial design and permitting all the way through construction and follow up! Let us help make your dream house a reality today.
 Tile Doctor Ltd
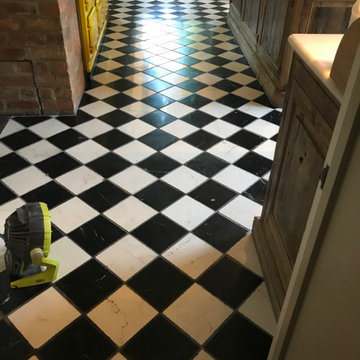
The tiles shown in the photographs below are classic distressed Black and White Italian Marble installed in the kitchen of a property in Bamber Bridge which is South of Preston. Some of the tiles had an issue with loose grout which I suspect was due to the suspended wooden floor and a small amount of movement had resulted in the grout cracking.
Ideally more support would be needed under the floor to prevent this, in the meantime however I recommended removing the grout and replacing with a flexible grout product that could cope with the movement. The tiles also needed a clean, polish and reseal so it made sense to address the issue with the grout as part of the work.
Working as a two-man team we started by cleaning the floor with a set of diamond burnishing pads starting with a coarse 400-grit, followed by 800 and 1500 grit. Water was used to lubricate the process and the floor was rinsed with water between pads with the fine slurry generated by the process extracted using a wet vacuum. These pads remove ingrained dirt and then slowly refine the appearance of the Marble building up its polished appearance in the process.
The next step was to rake out all the grout which as discussed was compromised and needed replacing. We had to be very careful when removing the grout due to the electric heating mat under the floor, any damage to that would require ripping the floor up. With the old grout removed and the floor cleaned the floor was then grouted using Mapei Ultra-colour which is a flexible and fully waterproof grout more than suitable for this situation.
Between us we managed to pack a lot into day one which was tough, however with the hardest tasks out of the way day two should be a lot easier.
Day two started with an initial clean making sure to remove any excess grout smeared on the surface that can affect the look of the tile if not removed. This was followed by the application of the last of the set of burnishing pads which is a 3,000-grit pad that really brings up the polish on the marble. You only need a small amount of water sprayed onto the floor when applying this last pad so by late morning the floor was dry and ready for sealing. The customer wanted a better sheen appearance than they previously had, fortunately we find the Diamond burnishing pads do this well, they also tighten up the pores of the stone as well which means less sealer is needed.
The floor was then sealed with Tile Doctor Colour Grow which is an impregnating sealer that improves colour and soaks into the stone occupying the pores and thereby preventing dirt from becoming ingrained. Once complete the floor looked great and the client was very happy.
Sealers and Polish do wear down with use over time so before leaving I discussed our annual maintenance plan option which will ensure the appearance of the Marble floor always looks good. The plan involves returning once a year to further polish the floor with a high-grade burnishing pad and to add more sealer if required. We also discussed the use of Tile Doctor Stone Soap for regular cleaning, it is a pH neutral cleaner which is ideal for stone floors like Marble which are acid sensitive.
Russell Taylor
Lancashire Tile Doctor


 Signal House
Pelican Bay Home Reborn: A Complete Redesign and Rebuild
Pelican Bay Home Reborn: A Complete Redesign and Rebuild
Blog Introduction: The Pelican Bay community in Naples, Florida has seen many homes come and go, but one house stands out from the rest. Recently, a 3,400 square-foot, four bedroom home underwent a complete renovation that breathed new life into it. With a renewed design and upgraded features, this is the perfect example of what can be done when you take on a full redesign and rebuild of your property. Let’s explore what makes this home so special.
The Open Kitchen & Dining Room
One of the most striking elements of the home is its open kitchen and dining room. The kitchen area was designed to maximize space by utilizing an island with storage underneath as well as bar seating for entertaining guests. The cabinets are made from solid wood with intricate details that add to the overall aesthetic of the kitchen. Adjacent to this area is a spacious dining room with enough seating for six people comfortably. The unique ceiling feature adds drama to the room while still keeping it light and airy.
The Gas Fireplace & Ground Floor Living Room
The cozy living room is anchored by a gas fireplace covered in stone tile that gives off a warm ambiance throughout the whole house. This space was designed to be inviting yet comfortable, allowing visitors to relax while still feeling inspired by its modern touches such as built-in shelves and neutral furniture pieces. There are also two sliding doors that lead out onto the back patio which gives even more options for entertaining guests or just enjoying some fresh air on a nice day!
The dramatic entryway sets the tone for what's to come throughout this newly renovated Pelican Bay home in Naples, Florida. With its inviting living areas, open kitchen/dining area, gas fireplace centerpiece, ceiling features throughout, outdoor patio space—this home has been completely transformed into something truly special! Whether you're looking for inspiration on how to renovate your own property or just want to admire an amazing work of art—this remodeled Pelican Bay home should definitely be at the top of your list!
About Pelican Bay
Pelican Bay in Naples, Florida is known for its stunning beaches and crystal clear turquoise waters. Its ideal location nestled between the Gulf of Mexico and a vast nature preserve ensures that visitors to the area can experience an array of outdoor activities, from fishing and kayaking, to swimming, golfing or hiking through mangrove swamps. With an abundance of luxurious resorts, fine dining establishments, spa treatments and shopping galore, Pelican Bay is one of the premier destinations on the west coast of Florida. Whether you're looking for a relaxing beach vacation or an action packed getaway full of adventure and excitement, Pelican Bay offers something for everyone.
Award-Winning House Builders in Florida
If you're looking for a reliable house builder in Florida, look no further! Every project is important to us and each one is completed with the utmost commitment to quality and attention to detail. With years of experience in the field, our team has the expertise and resources necessary to create whatever kind of home you can imagine. Whether you're building from scratch or remodeling an existing structure, we provide friendly and professional service every step of the way, from initial design and permitting all the way through construction and follow up! Let us help make your dream house a reality today.
 Signal House
Pelican Bay Home Reborn: A Complete Redesign and Rebuild
Pelican Bay Home Reborn: A Complete Redesign and Rebuild
Blog Introduction: The Pelican Bay community in Naples, Florida has seen many homes come and go, but one house stands out from the rest. Recently, a 3,400 square-foot, four bedroom home underwent a complete renovation that breathed new life into it. With a renewed design and upgraded features, this is the perfect example of what can be done when you take on a full redesign and rebuild of your property. Let’s explore what makes this home so special.
The Open Kitchen & Dining Room
One of the most striking elements of the home is its open kitchen and dining room. The kitchen area was designed to maximize space by utilizing an island with storage underneath as well as bar seating for entertaining guests. The cabinets are made from solid wood with intricate details that add to the overall aesthetic of the kitchen. Adjacent to this area is a spacious dining room with enough seating for six people comfortably. The unique ceiling feature adds drama to the room while still keeping it light and airy.
The Gas Fireplace & Ground Floor Living Room
The cozy living room is anchored by a gas fireplace covered in stone tile that gives off a warm ambiance throughout the whole house. This space was designed to be inviting yet comfortable, allowing visitors to relax while still feeling inspired by its modern touches such as built-in shelves and neutral furniture pieces. There are also two sliding doors that lead out onto the back patio which gives even more options for entertaining guests or just enjoying some fresh air on a nice day!
The dramatic entryway sets the tone for what's to come throughout this newly renovated Pelican Bay home in Naples, Florida. With its inviting living areas, open kitchen/dining area, gas fireplace centerpiece, ceiling features throughout, outdoor patio space—this home has been completely transformed into something truly special! Whether you're looking for inspiration on how to renovate your own property or just want to admire an amazing work of art—this remodeled Pelican Bay home should definitely be at the top of your list!
About Pelican Bay
Pelican Bay in Naples, Florida is known for its stunning beaches and crystal clear turquoise waters. Its ideal location nestled between the Gulf of Mexico and a vast nature preserve ensures that visitors to the area can experience an array of outdoor activities, from fishing and kayaking, to swimming, golfing or hiking through mangrove swamps. With an abundance of luxurious resorts, fine dining establishments, spa treatments and shopping galore, Pelican Bay is one of the premier destinations on the west coast of Florida. Whether you're looking for a relaxing beach vacation or an action packed getaway full of adventure and excitement, Pelican Bay offers something for everyone.
Award-Winning House Builders in Florida
If you're looking for a reliable house builder in Florida, look no further! Every project is important to us and each one is completed with the utmost commitment to quality and attention to detail. With years of experience in the field, our team has the expertise and resources necessary to create whatever kind of home you can imagine. Whether you're building from scratch or remodeling an existing structure, we provide friendly and professional service every step of the way, from initial design and permitting all the way through construction and follow up! Let us help make your dream house a reality today.
Sponsored
Westerville, OH

Custom Home Works
Franklin County's Award-Winning Design, Build and Remodeling Expert
 Signal House
Pelican Bay Home Reborn: A Complete Redesign and Rebuild
Pelican Bay Home Reborn: A Complete Redesign and Rebuild
Blog Introduction: The Pelican Bay community in Naples, Florida has seen many homes come and go, but one house stands out from the rest. Recently, a 3,400 square-foot, four bedroom home underwent a complete renovation that breathed new life into it. With a renewed design and upgraded features, this is the perfect example of what can be done when you take on a full redesign and rebuild of your property. Let’s explore what makes this home so special.
The Open Kitchen & Dining Room
One of the most striking elements of the home is its open kitchen and dining room. The kitchen area was designed to maximize space by utilizing an island with storage underneath as well as bar seating for entertaining guests. The cabinets are made from solid wood with intricate details that add to the overall aesthetic of the kitchen. Adjacent to this area is a spacious dining room with enough seating for six people comfortably. The unique ceiling feature adds drama to the room while still keeping it light and airy.
The Gas Fireplace & Ground Floor Living Room
The cozy living room is anchored by a gas fireplace covered in stone tile that gives off a warm ambiance throughout the whole house. This space was designed to be inviting yet comfortable, allowing visitors to relax while still feeling inspired by its modern touches such as built-in shelves and neutral furniture pieces. There are also two sliding doors that lead out onto the back patio which gives even more options for entertaining guests or just enjoying some fresh air on a nice day!
The dramatic entryway sets the tone for what's to come throughout this newly renovated Pelican Bay home in Naples, Florida. With its inviting living areas, open kitchen/dining area, gas fireplace centerpiece, ceiling features throughout, outdoor patio space—this home has been completely transformed into something truly special! Whether you're looking for inspiration on how to renovate your own property or just want to admire an amazing work of art—this remodeled Pelican Bay home should definitely be at the top of your list!
About Pelican Bay
Pelican Bay in Naples, Florida is known for its stunning beaches and crystal clear turquoise waters. Its ideal location nestled between the Gulf of Mexico and a vast nature preserve ensures that visitors to the area can experience an array of outdoor activities, from fishing and kayaking, to swimming, golfing or hiking through mangrove swamps. With an abundance of luxurious resorts, fine dining establishments, spa treatments and shopping galore, Pelican Bay is one of the premier destinations on the west coast of Florida. Whether you're looking for a relaxing beach vacation or an action packed getaway full of adventure and excitement, Pelican Bay offers something for everyone.
Award-Winning House Builders in Florida
If you're looking for a reliable house builder in Florida, look no further! Every project is important to us and each one is completed with the utmost commitment to quality and attention to detail. With years of experience in the field, our team has the expertise and resources necessary to create whatever kind of home you can imagine. Whether you're building from scratch or remodeling an existing structure, we provide friendly and professional service every step of the way, from initial design and permitting all the way through construction and follow up! Let us help make your dream house a reality today.

 Ginkgo Leaf Studio
A combination brick sailor-soldier course adds interest to the bluestone patio.
Westhauser Photography
Inspiration for a mid-sized timeless backyard brick patio remodel in Milwaukee
Inspiration for a mid-sized timeless backyard brick patio remodel in Milwaukee

 Gallery KBNY
This brownstone renovation was a full gut project in every sense of the word. On top of installing new floors, a kitchen and bath renovation, and all the typical restoration and refinishing involved in a brownstone built in 1899, we also completely updated the exterior, constructed a balcony that was not originally there, and converted the space from a single-family home into an an owner’s triplex. A newly separated studio rental on the garden level offers the opportunity for supplemental income, an uncommon and welcome addition to a New York brownstone.
A TRANSITIONAL GEM
The result is a two-family brownstone that perfectly combines classic townhouse living with today’s modern needs, including SmartHome technology that we installed to control Bluetooth speakers, Nest thermostats, and the security system.
The overall aesthetic goal was to pay homage to the historical periods the brownstone has lived through in a cohesive way that is the hallmark of modern transitional style.
In the kitchen, white Shaker-style cabinetry, a subway tile backsplash, and marble rather than quartz countertops bring a classically upscale sensibility. To modernize the space further, we opened up the back wall to create floor-to-ceiling windows that are also doors, opening up into the newly built balcony.
TIMELY TOUCHES
This brownstone renovation included many quintessential elements, such as millwork like the ceiling medallions. We restored some and custom built others, perfectly recreating their original appearance.
The heated master bathroom is now serene, with a walk-in shower featuring a subtly modern linear drain. A herringbone Carrera marble tiled floor and marble slab sink complete the scene. In the powder room, we embraced a contemporary look by pairing dark hexagonal floors with light chevron tiles, accented with dramatic navy blue wallpaper. With its clear-cut 1920s-style, we selected the wall sconce to reference one of the brownstone’s earlier eras.
DESIGN DETAILS
Natural oak herringbone floors we installed throughout the entire home bring a modern yet warm touch. We restored the wood-burning marble fireplace, which is fully functioning. An elegant staircase with a custom-crafted black wooden banister and white balusters winds up and down alongside a real brick interior wall that we restored and refinished.
In this brownstone renovation, we were also able to create ceiling height, an unexpected yet aesthetically pleasing side benefit. When working on the joists and beams to level out the floors (a common issue in pre-war renovations) we added ceiling height in the main parlor floor by taking the second floor and raising the ceiling an entire foot. The end result is a main floor with stunning 9-foot ceilings.
SOME HIGHLIGHTS
- Solid natural oak herringbone floors throughout
- A fully restored, refinished, and functioning wood burning fireplace with a marble mantle
- Complete exterior renovation of the facade, cornices, windows, mouldings, and even the ironwork, including the railings leading up to the stoop and those facing the street
- A brand new central air and heating system with uniquely modern vents – look above the couch in the living room with the fuzzy rug and large painting
Considering a brownstone renovation? Contact us today! We specialize in brownstone renovations in New York as well as all pre-war apartments. When you work with a design-and-build firm like Gallery to renovate your brownstone, you get the full range of our expertise in working with all the finest details and pre-war architectural elements of these classic New York spaces. We also handle every step of the process, from filing permits and organizing schedules to sourcing custom pieces and building entirely new rooms (or even balconies). Call us for a free initial consultation when you’re ready.
 Advance Design Studio, Ltd.
After six years of living in their Huntley IL home, Chris and Meghan were tired of their dark, dingy, outdated kitchen and it was finally time for a long-anticipated change. “The kitchen is the place where we live, it’s where we do everything,” Meghan said. “It was important that it be a space where we wanted to be.” Meghan loves cooking and enjoys including their girls in healthy meal prepping, this led them to want a brighter, more enjoyable kitchen with increased functionality and improved storage.
For Chris especially, the laundry room was an entirely dysfunctional eyesore. “We had a washer and a dryer, but it was all kind-of cobbled together!” Chris said. “There were always laundry piles everywhere, we weren’t really sure what we wanted to do in there, but it was time for us to make a change.” The mess of the space was stressful every time they walked in the door from the garage each day. Kids’ backpacks and shoes piled up haphazardly in the makeshift boot-bench closet left the family feeling disorganized and stressed. They needed space for folding clothes and locker cubbies to help keep the family organized.
Having known Christine and Todd in the Huntley community for years, Chris and Meghan were familiar with their work. “We already trusted them personally and having seen their projects for years we knew they did top notch work. After we reviewed the initial round of designs, we knew that hiring them was definitely the right choice,” Meghan and Chris said. Although Chris had done a lot of work in their home himself, the kitchen and laundry room renovation was such a large undertaking that he didn’t want to steal time away from his family to spend what would surely be many long weekends doing the job himself. “That would not have been a wise choice for us,” Chris laughed.
“Our designer, Michelle was very, very, easy to work with; anything we wanted to see or weren’t sure about, she went above and beyond to make this easy for us. She was easy to get hold of and always quick to respond,” the couple said. Michelle pulled ideas that mirrored the couple’s taste and style and was adept at directing the couple to limited choices that didn’t overwhelm them and kept the process moving. “I have a hard time making decisions. Michelle made the decision-making process so easy. I loved how she listened to what I liked and then presented three great options for me to choose from,” Meghan said.
The main objectives for the kitchen were better storage solutions, they wanted the space to reflect their lifestyle and taste, and they wanted it to last for years with low maintenance. One of the first steps in creating a more functional kitchen was relocating the refrigerator, creating an improved workflow for the busy family.
“We didn’t know that we could even move the refrigerator to a new location where it is now, that was something that we never would have thought of,” Chris said. “The new refrigerator location makes the kitchen feel so much bigger. We didn’t add any space, but our whole kitchen with the new design just seems like it’s so much larger than before!” Meghan said.
The perimeter mist colored cabinets helped warm and brighten the entire room, while the graphite colored cabinets on the island added contrast. Using this fresh, clean color palette satisfied the couple’s desire for a bright space that was the exact opposite of what they had before. Organization accessories were also added to the cabinets such as a spice drawer tray and roll outs to create hidden convenience.
“I absolutely love the hidden spices – it makes cooking so much more enjoyable!” Chris said. “And all the pull outs, and the double trash bin, who would think you could get so excited about organization!” the couple said in unison.
One thing they hated in their original kitchen was how dark the space felt. Added lighting on the ceiling with the new light fixtures combined with the lighter cabinetry colors throughout solved this problem. “Our new kitchen has this warm, almost cozy feeling that our old kitchen never had, it’s just a space that I love spending my time in now,” Meghan said. The light airy feeling was accentuated with the use of floating white shelves on either side of the decorative range hood. “We have so much cabinetry space, the new design is amazing we actually have more storage space than we will ever need,” Meghan said.
The island was extended to create more work surface and added space for stool seating. “The new island changes how we live. Now the kids can be in the kitchen with us, doing homework, eating breakfast, and the three of us have special dinners there when Chris is working late,” Meghan said.
The Carrara Marmi Quartz countertops were chosen because they are, not only beautiful, but are made from hard-working material that doesn’t require maintenance. The white subway tile backsplash that wraps to the ceiling behind the focal point cooktop range/hood compliments the crisp white countertops perfectly, while brushed brass hardware and light fixtures keep the design fresh and new.
The couple had a few fears at the beginning of the project, as most homeowners do. Their biggest fear was being out of their kitchen and laundry room for an extended time. The crew made it very easy for the family to work in a limited space keeping the washer and dryer hooked up the majority of the time, and also getting appliances working with minimal downtime.
“They above and beyond accommodated us to get us through the process,” Meghan said. “They did a great job making sure we were as comfortable as possible throughout the process,” Chris added.
“Our project manager DJ did a great job. He was very good at updating us on schedule changes, getting guys in as quickly as possible. Everyone that stepped in the house was nice and did great work,” said Chris. They thought Advance’s carpenter was phenomenal and were impressed when he took a conceptual idea from a photograph and worked with designer Michelle to create a one of a kind range/hood that has become the topic of conversation with friends and family who visit the new kitchen. “He was in our house literally every day for several weeks. He was easy to work with and good at what he did,” Meghan and Chris said.
The focal point of the kitchen; a hand-crafted, custom-built ventilation hood was clad with handpicked reclaimed barnwood. Advance Design’s carpenter built the framework and the cladding to create a one-of-a-kind design element that the couple loves.
“I think it was especially fun for him to create something unique from scratch, showcasing his talent in this area,” Meghan said. “I love that my kitchen is not like everyone else’s. I got to pick out the wood on my hood and watch it being built and was able to choose what pieces of wood went where on it. It’s totally unique.”
Red Oak flooring was toothed-in throughout the kitchen and the rest of the first floor anywhere changes were made. Then the whole floor was refinished to tone down the orange undertones in the existing floor stain, ultimately changing the color complexion of the entire first floor. The result is a completely new feeling to the entire home.
Renovating the laundry room was extremely important to Meghan and Chris, but they had trouble visualizing what the possibilities were for the seemingly small space. Michelle produced beautiful 3D illustrations that helped them envision the space in a whole new way.
“I must have told Michelle 100 times that I am a visual person, seeing the designs in 3D made it so easy to make decisions and see what we could really do with our space,” Meghan said.
A dividing wall and doorway were removed between the existing laundry room and hallway formerly containing a coat closet, providing space to design specialized graphite colored cabinetry matching the kitchen island to house custom storage cubbies for each family member. Adding the tall utility cabinetry in the new laundry area helped solve the storage issue, tucking away cleaning supplies, household items, and even the cat got its own cubby.
“I love how everything is now hidden in its own space. I can’t tell you how much I hated coming home and seeing everything sitting around on counters,” Chris said.
Electrical outlets were planned for the inside of utility cabinets, so devices could charge in hidden locations. Stacking the washer and dryer allowed for wider countertop space to provide a folding area and a special space for clothes to hang. “The way I do laundry has been completely transformed! I can actually fold clothes and hang them now right out of the washer and dryer,” Meghan said.
“The end result in the kitchen and the laundry/mud room was an updated light and bright space, with a smarter work flow that better meets the needs of this family,” Michelle said.
“I would totally recommend Advance Design,” Meghan said. “Sometimes I sit and just look at my kitchen and laundry room and think ‘Wow, I can’t believe I get to live here!’ It’s an understatement to say we love our new space.”
Sponsored
Columbus, OH
Free consultation for landscape design!

Peabody Landscape Group
Franklin County's Reliable Landscape Design & Contracting
 Hearthstone Inc
Richard Herman is in the hospitality business and owns several upscale hotels in Florida and in other states as well as cattle ranches in both Florida and Missouri. Their farm in Ocala is by farm their most unique. The property serves as a 4-H demonstration project for the purpose of children’s education. They have been working with the Academy Prep of St. Pete which is dedicated to inner-city youths that are selected on the basis of need and achievement. Wife Diane spends her time on the farm raising Gypsy Vanners, a diminutive draft horse named after the job they did in Eastern Europe, pulling the wagons (vans) for gypsies that wandered across the continent. On the Ocala farm, there are several mules with a unique profession.
Richard had visited the Hearthstone display at a Log & Timber Home Shows at the Orlando Convention Center many years ago. He was impressed that Hearthstone had stayed in touch with him over the years by mailings, invitations to shows, and periodic phone calls. When the time came to start serious consideration of the design of barn, Hearthstone responded promptly and professionally to Richard and Diane’s requests for information and a review of their ideas for their barn, which would serve as the centerpiece for their new farm.
They wanted a multipurpose facility that could accommodate an educational environment and a large hall suitable for the fundraising events for his charities. Richard wanted a barn that reflected the look and feel of barns built at the dawn of the 20th century. Besides the rustic chicken houses and vegetable gardens, they have completely renovated a 1020’s era farmhouse to be as historically correct as possible and serves as the entry to the farm.
“They very careful to feel us out, get comfortable with our capabilities, and be convinced that we could perform as promised,” said Project Manager John Ricketson of Hearthstone.
Design Process
There were some initial drawings that gave us a start on the basic shape and size of the barn. From there, it was a process of narrowing down the uses of each area and the spans that could be achieved. The barn was going to have the traditional “board & batten” exterior siding and a metal roof. There is a cantilevered ‘hay hood” on the north gable end above the large sliding barn doors that open into the foyer and horse stalls. The wings house a combination of areas, beginning with the large restrooms to accommodate crowds for events. Other parts of the wings have garage areas for the farm vehicles, feed room, tack room, wash rack, storage, offices, and smaller restrooms.
Keeping with the look and feel of the turn of the century, Hearthstone developed a process for giving the timbers a surface texture that mimicked the circular cuts of timbers that had just come out of an old sawmill. This was easier said than done. Randy Giles guided his millwright (Wolfgang) in designing a machine that would do this effectively.
The barn was delivered in October of 2014 and was erected over the course of two weeks, thanks to a hardworking crew (Eric Foster) and near-perfect weather. After the Hearthstone crew completed the erection and roof dry-in, it was time for the local carpenters to step up and install some light conventional framing on the gable ends before applying the roof fascia and exterior board & batten siding. Next came the big sliding barn doors, plumbing, electrical, heating, and cooling. Large rustic fixtures were hung from the great hall roof timbers.
Exterior
The board & batten siding was cypress and allowed to turn color naturally as rain hit it and the sun started working on it with UV rays. This method causes a much grayer look closer to the ground and less so where the roof overhang provides protection. The North end has some large limestone boulders and planters arranged around the pad with tall pampas grass. The planters provide casual seating before events and during outside receptions. The entire area was sodded with lush St. Augustine grass and split rail fences were added to enclose the barn area. The corrugated metal roof was a special order material that immediately rusted after being exposed to moisture. The layer of rust protects the metal from the elements.
Interior
The board & batten theme was carried throughout most of the interior with the timbers left natural to show off the circular saw texture. All of the tongue & groove decking was shipped in advance to allow the local painter to pre-stain it with a dark brown transparent stain that is a beautiful background to the light color Eastern White Pine timbers.
“Everything was unique in this project” said Project Manager John Ricketson. “The setting on a small demonstration farm close to Ocala, the multipurpose design, the circular saw texture on the timbers.”
The Hermans are very proud of their farm’s outcome. Richard sent a note to Randy Giles, owner of Hearthstone: “The Barn is fantastic, not a single problem, period. Next month, we have Jo Dee Messina coming in to help with a fundraiser for a local center for abused kids. Folks love the farm, ...... but that barn gets all of the attention. I would encourage you to use me as a reference for your sales team, feel free to extend my cell phone to any prospective purchasers.”


 Victor Mulbauer
New Installation of Red Oak Wood, 3 1/4 in width. White-washed Bona Stain was used, Bona Finish, as well as Bona Traffic HD.
**This photo is of the Red Oak Wood (3 1/4 inch) prior to the application of the white-washed Bona Stain.
47