
Search results for "Involve testing" in Home Design Ideas

 Monley Cronin Construction
We were honored to be chosen by Honda Corporation North America to be involved in the Honda Smart Home project which was designed and built in partnership with the University of California Davis on the West Davis Campus in 2014. This was the fifth Honda Smart Home Honda Corporation had built throughout the world (the first in the United States). The goal of each Honda Smart Home is to provide a “Living Laboratory” that allows the most current and innovative design and products to be implemented in construction and tested over time.

 EVA Architecture, LLC
The Lakota Residence occupies a spectacular 10-acre site in the hills above northwest Portland, Oregon. The residence consists of a main house of nearly 10,000 sf and a caretakers cottage/guest house of 1,200 sf over a shop/garage. Both have been sited to capture the four mountain Cascade panorama plus views to the city and the Columbia River gorge while maintaining an internal privacy. The buildings are set in a highly manicured and refined immediate site set within a largely forested environment complete with a variety of wildlife.
Successful business people, the owners desired an elegant but "edgey" retreat that would accommodate an active social life while still functional as "mission control" for their construction materials business. There are days at a time when business is conducted from Lakota. The three-level main house has been benched into an edge of the site. Entry to the middle or main floor occurs from the south with the entry framing distant views to Mt. St. Helens and Mt. Rainier. Conceived as a ruin upon which a modernist house has been built, the radiused and largely opaque stone wall anchors a transparent steel and glass north elevation that consumes the view. Recreational spaces and garage occupy the lower floor while the upper houses sleeping areas at the west end and office functions to the east.
Obsessive with their concern for detail, the owners were involved daily on site during the construction process. Much of the interiors were sketched on site and mocked up at full scale to test formal concepts. Eight years from site selection to move in, the Lakota Residence is a project of the old school process.
Find the right local pro for your project

 MIDWEST CONSTRUCTION & SUPPLY INC
Paul Despenas: Since 1995 Midwest Construction has been offering insulated vinyl siding, because we believed in the product in many ways.
Vinyl siding has come a long way since I (Paul Despenas – VP Marketing) installed the companies 1st job in 1982. The product was Alside D-5 Endura Supreme. I drove by the job 6 years later and it was still on the house, wall lines looked good, but the color had faded from nice Beige to a dirty white.
Manufacturers stepped up to the plate and added the right blends of vinyl resins, the addition of color stabilizers, thicker and better material, and the best improvement to vinyl siding was to add laminated foam behind it for strength and energy savings.
Well here is some documented proof to what we have been saying for years, Your new American Classic Insulated Siding will save energy and maintenance over fiber cement siding.
NYSERDA HOME VINYL SIDING INSTITUTE STUDY
NYSERDA Home- In a new study, Insulated Vinyl Siding (Fullback® siding insulation laminated to vinyl siding) proved to outperform fiber cement in multiple categories. The Vinyl Siding Institute (VSI) recently commissioned a study to evaluate the environmental performance of Fullback® Insulated Siding. The Vinyl Siding Institute study was conducted by Newport Ventures, a research and consulting firm with expertise in the housing industry.
Two high-performance homes were built to comply with the rigorous goals of the New York State Energy Research and Development Authority's (NYSERDA) High Performance Residential Development Challenge, one in Saratoga Springs, NY and one in Burnt Hills, NY. The challenge was conceived to educate home builders on construction of cost-effective, high performance homes designed to achieve 50-60% energy savings above that of typical homes built to New York's stringent energy code. In achieving this goal, both builders involved in the challenge showed preferences for systems that offered both energy savings and affordability. Fullback® Insulated Siding was specified by both builders as a system to help them achieve energy conservation and LEED for Homes.
Fullback V Siding Comparison
BURNT HILLS, NY: Researchers performed a side-by-side field test on the Burnt Hills home to compare Fullback® Insulated Siding against uninsulated fiber cement. This Vinyl Siding Institute study was conducted during the winter on a two story colonial built by Stewart Construction. The thermal imaging clearly indicated that there was less heat loss from the home to the outdoors with the Fullback® Insulated Siding compared to the fiber cement. The exterior surface temperature of the Fullback® Insulated Siding section of the wall was considerably colder, indicating that there was more thermal bridging (heat loss) with the fiber cement product.
SARATOGA SPRINGS, NY:
In the case of the Saratoga Springs home, the LEED case study found that environmental performance and visual appeal can go hand-in-hand through the use of Fullback® Insulated Siding. This home became the first home in New York's capital region to achieve LEED for Homes' Gold Rating. Sixty eight percent of visitors to the home found the siding to be "very attractive" while 95% agreed that the visual appeal of the Fullback® Insulated Siding was "better than average".
Overall, the study provides documentation that insulated vinyl siding can outperform exterior cladding alternatives on environmental issues while at the same time remaining aesthetically pleasing.
Midwest Construction Qualified Remodeler Magazine Big 50 inductee and Top 500 remodeler's has won the Better Business Bureau Integrity Award 2 times.(1999 & 2015) Quality Products & Quality Installation is our motto since 1958 and we still live up to that today by delivering the best home improvement products in our industry. Backing those products up with top notch installation crews with all of the certifications and water management techniques to give you the home owner some peace of mind and comfort knowing your products will save you energy and maintenance for years to come.
Midwest Construction is also a Progressive Foam Preferred Platinum Contractor which gives you the home owner, extra benefits, Lifetime warranty on the thermal performance of the insulation and a 10 year labor warranty from Progressive foam including our American Classic Insulated Vinyl siding lifetime warranty with lifetime non fade protection.
 EVA Architecture, LLC
The Lakota Residence occupies a spectacular 10-acre site in the hills above northwest Portland, Oregon. The residence consists of a main house of nearly 10,000 sf and a caretakers cottage/guest house of 1,200 sf over a shop/garage. Both have been sited to capture the four mountain Cascade panorama plus views to the city and the Columbia River gorge while maintaining an internal privacy. The buildings are set in a highly manicured and refined immediate site set within a largely forested environment complete with a variety of wildlife.
Successful business people, the owners desired an elegant but "edgey" retreat that would accommodate an active social life while still functional as "mission control" for their construction materials business. There are days at a time when business is conducted from Lakota. The three-level main house has been benched into an edge of the site. Entry to the middle or main floor occurs from the south with the entry framing distant views to Mt. St. Helens and Mt. Rainier. Conceived as a ruin upon which a modernist house has been built, the radiused and largely opaque stone wall anchors a transparent steel and glass north elevation that consumes the view. Recreational spaces and garage occupy the lower floor while the upper houses sleeping areas at the west end and office functions to the east.
Obsessive with their concern for detail, the owners were involved daily on site during the construction process. Much of the interiors were sketched on site and mocked up at full scale to test formal concepts. Eight years from site selection to move in, the Lakota Residence is a project of the old school process.
 Kitchen Tune-Up Franchise System
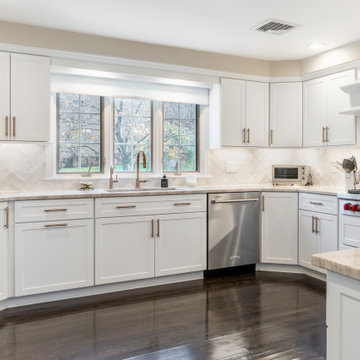
Your kitchen is the heart of your home, but if it's outdated and in desperate need of a makeover, it can be difficult to enjoy spending time in it. Fortunately, a kitchen reface update can completely transform your space and give it a fresh, modern look without the need for a full remodel. And if you're looking for a timeless and elegant design, a white shaker reface may be just what you need.
Why Choose a White Shaker Reface?
The white shaker style is a classic design that has been popular for decades. It features clean, simple lines and a versatile color that can be easily paired with a wide range of decor styles. White shaker cabinets are also a great choice for those who want a bright and airy kitchen, as the light color reflects natural light and makes the space feel larger.
When it comes to a reface update, choosing a white shaker design can help to modernize your kitchen and make it feel more up-to-date. Whether your existing cabinets are dark and dated, or simply in need of a refresh, a white shaker reface can give them a fresh new look that will stand the test of time.
The Refacing Process
One of the benefits of a reface update is that it is a much quicker and less invasive process than a full remodel. Instead of tearing out your existing cabinets and starting from scratch, a reface involves removing the doors and drawers and replacing them with new ones that are custom-made to fit your existing cabinets.
In the case of a white shaker reface, your new doors and drawers will feature the classic shaker style, with clean lines and a fresh white finish. You may also choose to update other elements of your kitchen, such as the hardware or countertops, to complete the look.

 Boca Tech and Automation
This project was the design and delivery of a flexible and fault-tolerant main equipment closet (MEC) housing an enterprise-class infrastructure that services a 20,000 square foot home, a vibrant business, and a world-class home theater. In Boca Theater and Automation’s experience, the three cornerstones of any successful project in South Florida involve clean power, proper management of heat, and ANSI/TIA certified copper and fiber terminations; enterprise-class systems add in redundancy where it matters.
To achieve this level of performance, the MEC and all endpoints are powered by a RoseWater HUB20 system backed up by a large-scale generator. The MEC is cooled using a dedicated air conditioner with four backup 300CFM exhaust fans triggered by temperature sensors. Both systems send alerts monitoring key parameters such as heat, moisture, incoming power, battery health, and more. Every rack-mounted device can be individually rebooted using the custom-designed touch panel interface, or from sixty-four labeled buttons on the user side of the rack.
BTA designed patch bays provide professional landing points for 11.7 miles of low voltage copper and fiber runs servicing the entire campus, and each termination was tested using a Fluke DSX8000 system following extended ANSI/TIA guidelines for 10GB permalink installations.
 New Era Builders Inc
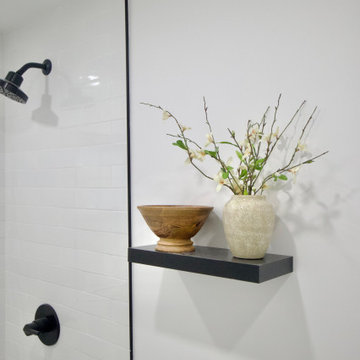
We completely transformed this bathroom by starting from scratch, ripping it down to the studs and gutting every inch of the space. The process involved redoing the electrical and plumbing systems to ensure everything was up to modern standards. Several walls were reframed to accommodate the new layout and design, ensuring both functionality and flow. With the client's budget in mind, we carefully planned every detail of the design, creating a sleek, modern bathroom that would stand the test of time. The tile work was executed with absolute precision, creating a flawless finish that added both style and sophistication. One of the standout features was re-glazing the original 1969 cast iron bathtub, giving it a fresh, new look while preserving its vintage charm. The end result was a beautifully renovated bathroom that met all of the client’s needs while respecting both their vision and budget.
 Kitchen Tune-Up Franchise System
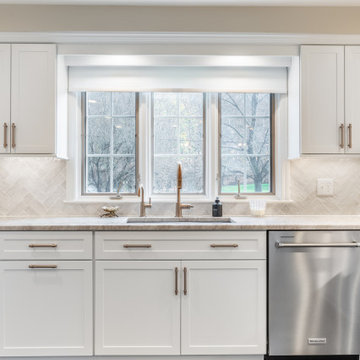
Your kitchen is the heart of your home, but if it's outdated and in desperate need of a makeover, it can be difficult to enjoy spending time in it. Fortunately, a kitchen reface update can completely transform your space and give it a fresh, modern look without the need for a full remodel. And if you're looking for a timeless and elegant design, a white shaker reface may be just what you need.
Why Choose a White Shaker Reface?
The white shaker style is a classic design that has been popular for decades. It features clean, simple lines and a versatile color that can be easily paired with a wide range of decor styles. White shaker cabinets are also a great choice for those who want a bright and airy kitchen, as the light color reflects natural light and makes the space feel larger.
When it comes to a reface update, choosing a white shaker design can help to modernize your kitchen and make it feel more up-to-date. Whether your existing cabinets are dark and dated, or simply in need of a refresh, a white shaker reface can give them a fresh new look that will stand the test of time.
The Refacing Process
One of the benefits of a reface update is that it is a much quicker and less invasive process than a full remodel. Instead of tearing out your existing cabinets and starting from scratch, a reface involves removing the doors and drawers and replacing them with new ones that are custom-made to fit your existing cabinets.
In the case of a white shaker reface, your new doors and drawers will feature the classic shaker style, with clean lines and a fresh white finish. You may also choose to update other elements of your kitchen, such as the hardware or countertops, to complete the look.
 Fixi Handyman Services
SMART CAMERA & KEYPAD INSTALL — HANDYMAN KATY, TX (77494)
Client: Brittany
Location: Katy, TX 77494
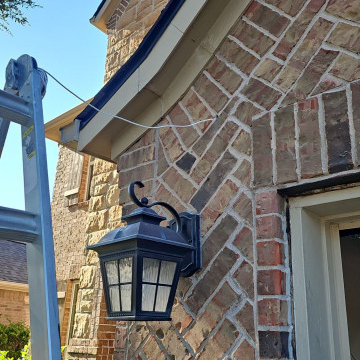
Scope of Work: myQ Smart Garage Video Keypad, two myQ cameras, plus a cabinet LED strip, organizer assembly, and a Christmas tree repair
Smart home gear is easy to buy and a lot less easy to mount into brick. Brittany had the equipment. We handled the part that involves a masonry bit and a ladder.
We walked the property with her first to pick camera angles, then mounted the exterior myQ camera on the garage, drilled through brick for the power run, routed and secured the wiring, and sealed the exterior penetration against moisture. Second camera went inside the garage, wiring secured along the wall. Then the myQ Smart Garage Video Keypad at the exterior door, paired and programmed to her opener.
Every unit tested before we left: cameras live, keypad working, garage door cycling right.
While we were there we also installed an LED strip above her kitchen cabinets, assembled a bamboo bottle organizer, and repaired a decorative Christmas tree.
Brittany, thank you for having our Katy handyman crew out and for trusting us with the drilling.
And thank you for the 5-star review! Helpful and friendly is exactly what we’re after.
Smart cameras, keypads, or a mixed list in Katy? Text a handyman a photo and we’ll respond same day.
 Tile Doctor Ltd
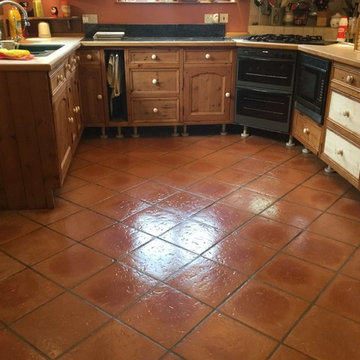
This Terracotta tiled floor was installed in the kitchen of a cottage in the small village of Maidford near Towcester. The tiles were not looking their best and the owner of the property realised it was time to do something about it and contacted Tile Doctor to have the floor stripped and resealed. Stripping and Sealing tile and stone floors is our bread and butter so I was more than happy to pop round and survey the floor which was approximately 9m2.
The grout had darkened with dirt and the previous tile sealer was failing so dirt was now getting ingrained in the Terracotta making it difficult to clean in places and leading to a patchy appearance. We discussed the work involved, my quote was accepted, and a date agreed for me to return and complete the work which would take two days, one to clean and one to seal.
After tidying up the Kitchen and removing the kickboards from underneath the kitchen units I set about working on cleaning and stripping the Terracotta floor of old sealers. To start I tested a small area with a strong dilution of Tile Doctor Wax Away. Wax was quite often used on Terracotta so I figured this product would be a good place to start. My suspicions were proved correct, and I found this to be the best product for removing the many layers of sealant on the floor. Wax Away is a new alkaline product by Tile Doctor and ideal for cleaning clay-based tiles such as Terracotta.
With my sights set on the rest of the floor Wax Away was scrubbed into the tile using a 17” rotary floor scrubbing machine and a black scrubbing pad running on a slow speed which helps to reduce splashing. This activity soon brought the dirt off the floor and the soiled cleaning solution was removed using a wet vacuum and the floor was rinsed down with clean water. The cleaning process was repeated a couple of times until I was happy with the floor, a stiff hand brush was then used along the grout lines with a dilution of Tile Doctor Pro-Clean to clean up the grout.
After rinsing and extracting the floor again the floor was inspected, and I noticed there were a few stubborn paint splashes on the tiles. I managed to remove these and these by spot treating the affected area with Tile Doctor Remove and Go and a steamer to lift the stain out of the clay tile. Once happy the floor was clean it was given a thorough rinse to neutralise it and remove any trace of cleaning products and then left it to dry.
I allowed the floor to dry for several days before returning to seal the Terracotta using numerous coats of Tile Doctor Seal and Go which is an ideal sealer for Terracotta and provides durable stain protection together with a low sheen finish. Terracotta is by its nature very porous and so it’s not unknown for it to take up to nine coats of sealer, which can take some time to apply as like paint you have to wait until it’s dry before it will take the next coat.
The customer was so impressed by the results I achieved in their kitchen they decided to go ahead and book me in to carry out this process throughout the whole of the ground floor which included lounge, study and hallway.
Phil Vissian
Northamptonshire Tile Doctor
 Tile Doctor Ltd
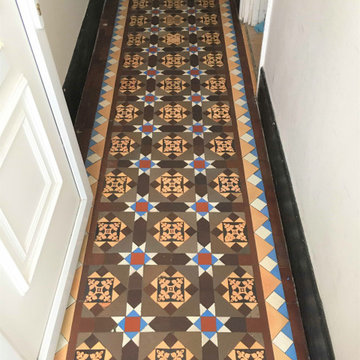
This client owned a property in Haringey, North London, which had a classic Victorian tiled floor laid in the hallway. Unfortunately, the floor was in a bad state, the tiles were dull and dirty and there was a missing section by the bottom of the stairs that had been back filled with cement. Fortunately for him however his neighbour decided to remove their front path which was made with matching tiles and so he was able acquire replacements from him. He then contacted us to see if we could use those tiles to fill in the missing ones and revive the whole floor with a clean and seal at the same time.
Before quoting for the restoration work, I paid a visit to the property to survey the floor. I can give quotes from photographs, but much prefer to visit and conduct a test clean, and in this case, I was able to check the spare tiles he had acquired. From that I emailed a quote which the client was happy with, so we arranged a date to return and do the work.
This was a large job, so I teamed up with Jackson Davis the Central London Tile Doctor and whilst Jackson started on cleaning the floor, I took the reclaimed tiles outside and carefully grinded off the excess cement and adhesive from them and cleaned them by hand. We managed to do this by about 3pm. Jackson and I work on a lot of jobs together so it made sense to work as a bubble from the beginning of Covid so we could continue to work together, with two of us on the job it also means we can get the job done quicker.
Cleaning the floor involved applying a 200-grit diamond burnishing pad to the tile lubricated with a strong dilution of Tile Doctor Remove and Go, the slurry was then rinsed off the floor with more water and then extracted with an industrial vacuum. The process was repeated on stubborn areas until we were satisfied the tiles were really clean.
We then moved onto carefully removing the cement from the floor at the bottom of the stairs and cleaning up the base. Once done the newly renovated replacement tiles were laid in place using a rapid setting adhesive which meant they could be grouted later that day before heading home. The floor was then left overnight to dry off.
We then returned the following day and took some moisture readings with the damp meter. The readings were within the expected range, so we were good to go ahead and apply the sealer. If the floor is not dry the seal will not cure properly, and this can lead to a patchy finish.
Three coats of Tile Doctor Colour Grow were applied to seal the tiles. This is a colour intensifying impregnating sealer that works from with and will gives the Victorian tiles durable protection, ideal for a high traffic area such as the hallway. In addition, Colour Grow is a fully breathable sealer so it will allow for moisture to rise through the tile and evaporate, this is critical for floors of this age that will not have the benefit of a damp proof membrane installed under the floor.
The hallway is now looking transformed by the work we did, we certainly thought so, but more importantly our client was very happy with the result and now has the floor he hoped for.
Andrew Newstead
North London Tile Doctor
 Cross Blinds & Shutters
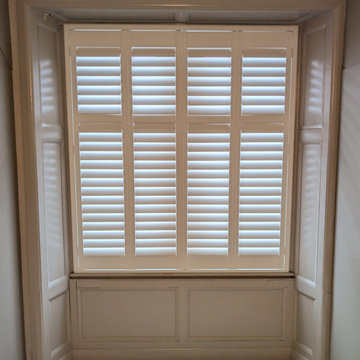
This project involved a full upgrade of window treatments for a traditional sash bay and adjacent tall windows. The goal was to improve light control, thermal performance, and aesthetics by installing made‑to‑measure plantation shutters and bespoke blinds. The result is a cohesive, high‑quality finish that respects the property’s character while adding modern convenience.
Scope of Work
- Full site survey and precise measuring of all windows.
- Manufacture and supply of bespoke plantation shutters for the bay sections.
- Supply and installation of made‑to‑measure roller blinds with blackout lining for tall sash windows.
- Motorisation for long‑drop blinds where required, plus wiring and testing.
- Final adjustments, sealing, and a quality inspection.
Challenges and Solutions
- Long drop blinds: For windows with a 3 m drop we specified reinforced headrails and high‑torque motors to prevent sagging and ensure smooth operation.
- Sash window geometry: Custom shutter panels were designed to fit bay angles and sash reveals, using discreet fixings to preserve original frames.
- Insulation and noise reduction: We selected thicker louvres and lined blinds to improve thermal retention and reduce external noise.
Results and Benefits
- Improved comfort: Noticeable reduction in drafts and better temperature control.
- Enhanced light control: Motorised blinds provide effortless, precise daylight management.
- Aesthetic upgrade: A unified, premium finish that complements the sash architecture.
- Increased property appeal: The upgrade enhances perceived value and homeowner satisfaction.
For a free on‑site measure and quote in Cumbernauld and the greater Glasgow area, contact us to schedule a visit. We document each project with before and after photos to showcase workmanship and results.
 Andrew Osborne Kitchens
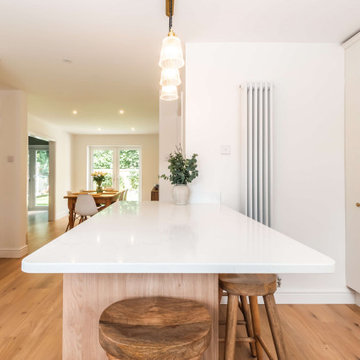
This project in Southampton involved a full kitchen remodel, beginning with the removal of the existing kitchen and a complete reconfiguration of the space. From minor building works to final decoration, every stage was carefully managed to ensure a seamless transformation.
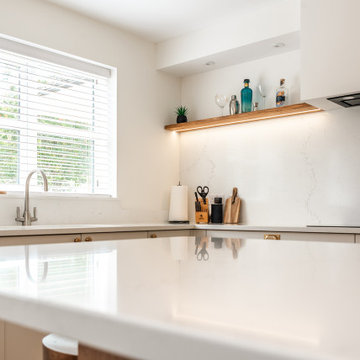
The new kitchen features a contemporary shaker design that blends clean, modern lines with a warm, homely feel, making it ideal for a busy family lifestyle. A practical peninsula provides generous prep space and casual seating, creating a true hub of the home. Oak shelves with integrated LED lighting add depth and warmth to the design, while full-height cabinetry ensures every inch of space is maximised. Solid timber doors were chosen for their durability and quality, guaranteeing a kitchen that will stand the test of time.
The result is a space that delivers both style and practicality, beautifully tailored to modern family living and designed to be enjoyed for years to come.
 Andrew Osborne Kitchens
This project in Southampton involved a full kitchen remodel, beginning with the removal of the existing kitchen and a complete reconfiguration of the space. From minor building works to final decoration, every stage was carefully managed to ensure a seamless transformation.
The new kitchen features a contemporary shaker design that blends clean, modern lines with a warm, homely feel, making it ideal for a busy family lifestyle. A practical peninsula provides generous prep space and casual seating, creating a true hub of the home. Oak shelves with integrated LED lighting add depth and warmth to the design, while full-height cabinetry ensures every inch of space is maximised. Solid timber doors were chosen for their durability and quality, guaranteeing a kitchen that will stand the test of time.
The result is a space that delivers both style and practicality, beautifully tailored to modern family living and designed to be enjoyed for years to come.

 Joanne Dolan Design
This unique project involved furnishing a 700 square foot terrace in the east end of the city (and getting our hands dirty with lots of plants!). Taking advantage of this private oasis in the city was our client’s number one goal. Using high quality outdoor furnishings meant to stand the test of time (and Canadian winters!) we created separate dining and living areas to maximize entertaining space and added a significant amount of storage. A neutral palette of grey and blue lets the surrounding greenery and city views take centre stage. Planters in a variety of shapes and sizes will allow the client to experiment with different plants and flowers each year, moving them around the terrace as the light changes from Spring to Fall.
 Cross Blinds & Shutters
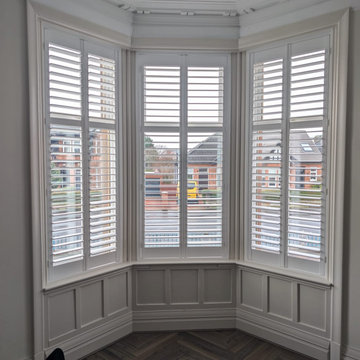
This project involved a full upgrade of window treatments for a traditional sash bay and adjacent tall windows. The goal was to improve light control, thermal performance, and aesthetics by installing made‑to‑measure plantation shutters and bespoke blinds. The result is a cohesive, high‑quality finish that respects the property’s character while adding modern convenience.
Scope of Work
- Full site survey and precise measuring of all windows.
- Manufacture and supply of bespoke plantation shutters for the bay sections.
- Supply and installation of made‑to‑measure roller blinds with blackout lining for tall sash windows.
- Motorisation for long‑drop blinds where required, plus wiring and testing.
- Final adjustments, sealing, and a quality inspection.
Challenges and Solutions
- Long drop blinds: For windows with a 3 m drop we specified reinforced headrails and high‑torque motors to prevent sagging and ensure smooth operation.
- Sash window geometry: Custom shutter panels were designed to fit bay angles and sash reveals, using discreet fixings to preserve original frames.
- Insulation and noise reduction: We selected thicker louvres and lined blinds to improve thermal retention and reduce external noise.
Results and Benefits
- Improved comfort: Noticeable reduction in drafts and better temperature control.
- Enhanced light control: Motorised blinds provide effortless, precise daylight management.
- Aesthetic upgrade: A unified, premium finish that complements the sash architecture.
- Increased property appeal: The upgrade enhances perceived value and homeowner satisfaction.
For a free on‑site measure and quote in Cumbernauld and the greater Glasgow area, contact us to schedule a visit. We document each project with before and after photos to showcase workmanship and results.
 Tile Doctor Ltd
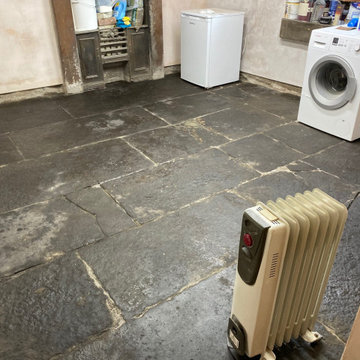
I was contacted by a client in Kendal to see if I could help with their Black Flagstone basement floor. As you can see from the photographs it was in a bit of a state and the stone looked mostly White rather than Black.
I carried out a site visit, to survey the floor and work out the best approach to restore its appearance. After testing a few different products and techniques I worked out an effective restoration plan and discussed this with the owner. Happy with my plan and costing’s we agreed a date to start the work. Being in the basement of the property had its challenges but it would mean we could work socially distanced from the owner.
To restore the floors appearance, I started with a set of coarse wire (60 and 120 grit) brushes lubricated with Tile Doctor Remove and Go which is a strong coatings remover. I had considered using milling pads on the tiles to reveal a new surface underneath but that does involve the use of an expensive set of coarse pads and given it was a basement the owners didn’t feel the extra expense would be justified.
The wire grits work well on rough stone floors when attached to a weighted buffing machine and we add some Tile Doctor Remove and Go to the mix. Once clean the floor was rinsed with water and the slurry extracted using an industrial wet vacuum. After cleaning the floor, it looked transformed, some pointing was required so we carried this out after the main clean.
The stone was left to dry out for a few days before returning to apply a sealer. For this floor I felt Tile Doctor X-Tra seal would be the best product and applied two coats. I chose X-Tra seal for this job as it ticks a lot of boxes, it’s a breathable oil-based resin sealer which being breathable will allow moisture to rise through the floor. Old floors like this don’t have a damp proof membrane so it is important to choose a sealer that can allow the floor to breath and not let damp build up under the floor where it can reach out to the walls and cause rising damp.
I also chose X-Tra Seal as it has a great ability to bring out the colour of the darker stone due to its high oil content, the oil will deter salts from forming if efflorescence is an issue. This is a unique property of this sealer as we never know if efflorescent salts are going to form or not so having this in place as a sealer is a great plus for a Tile Doctor, it is new to the market and is already proving popular on floors like this and for protecting external stone.
If the tiles are smooth Tile Doctor X-Tra Seal adds a bit of a sheen to the appearance of the stone however this stone was very rough, so we didn’t manage a shine, but the customer was happy with the matt finish and the slightly honed effect.
The floor looked great and much more appealing making the space more attractive and likely to be used. For aftercare I recommended Tile Doctor Neutral Tile Cleaner which will clean the floor without impacting the sealer which can be a problem with many of the stronger products you find in supermarkets.
Heidi Taylor
South Cumbria Tile Doctor
 Andrew Osborne Kitchens
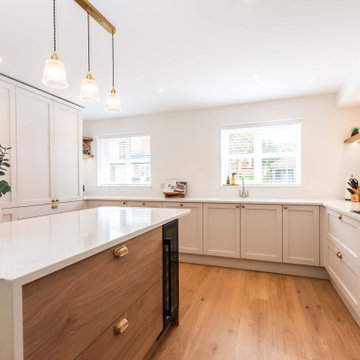
This project in Southampton involved a full kitchen remodel, beginning with the removal of the existing kitchen and a complete reconfiguration of the space. From minor building works to final decoration, every stage was carefully managed to ensure a seamless transformation.
The new kitchen features a contemporary shaker design that blends clean, modern lines with a warm, homely feel, making it ideal for a busy family lifestyle. A practical peninsula provides generous prep space and casual seating, creating a true hub of the home. Oak shelves with integrated LED lighting add depth and warmth to the design, while full-height cabinetry ensures every inch of space is maximised. Solid timber doors were chosen for their durability and quality, guaranteeing a kitchen that will stand the test of time.
The result is a space that delivers both style and practicality, beautifully tailored to modern family living and designed to be enjoyed for years to come.
 Andrew Osborne Kitchens
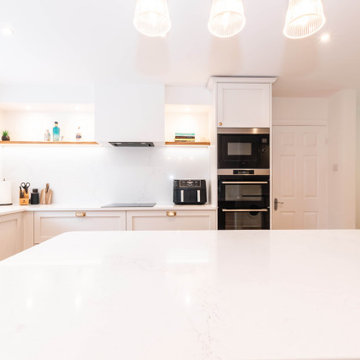
This project in Southampton involved a full kitchen remodel, beginning with the removal of the existing kitchen and a complete reconfiguration of the space. From minor building works to final decoration, every stage was carefully managed to ensure a seamless transformation.
The new kitchen features a contemporary shaker design that blends clean, modern lines with a warm, homely feel, making it ideal for a busy family lifestyle. A practical peninsula provides generous prep space and casual seating, creating a true hub of the home. Oak shelves with integrated LED lighting add depth and warmth to the design, while full-height cabinetry ensures every inch of space is maximised. Solid timber doors were chosen for their durability and quality, guaranteeing a kitchen that will stand the test of time.
The result is a space that delivers both style and practicality, beautifully tailored to modern family living and designed to be enjoyed for years to come.
4