
Search results for "Involves keeping" in Home Design Ideas
 Yankee Barn Homes
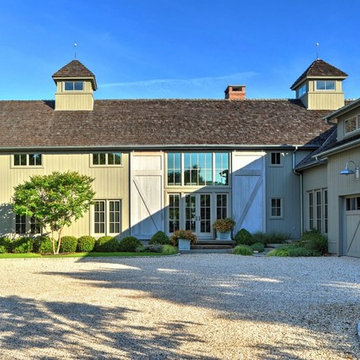
Southold Barn House
Chris Foster Photography
Large cottage gray two-story wood gable roof photo in Burlington
Large cottage gray two-story wood gable roof photo in Burlington
 Urban Oasis Landscape Design
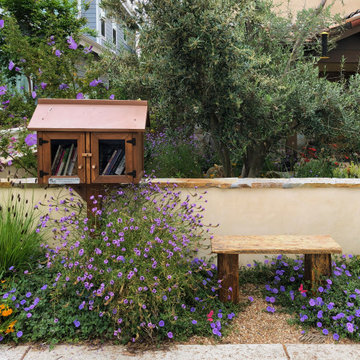
A “Little Free Library” with a bespoke rustic bench on the outside of the wall has become a neighborhood gathering spot.
Photo of a small eclectic drought-tolerant and full sun front yard stone and stone fence landscaping in Los Angeles for spring.
Photo of a small eclectic drought-tolerant and full sun front yard stone and stone fence landscaping in Los Angeles for spring.
 Roomscapes Cabinetry and Design Center
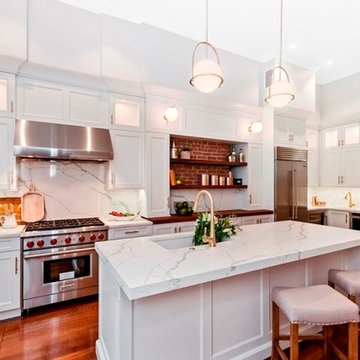
Reworking a classic Boston Brownstone today always involves updated kitchen and baths. And if possible, adding a powder room and flexible room that could function as a guest room or office on the main floor. This project did not have an owner and was being remarketed for sale. Creating an ideal space that prospective buyers would identify with requires the designer to research the target market for the home and detail/design spaces tailored to fit that niche.
Relocating the kitchen to the other side of the space provided for a guest/office.
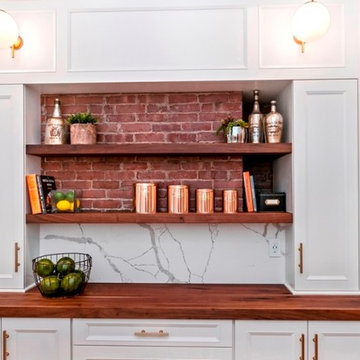
Boston Red-brick chimney became the focal point of the new kitchen with closed door storage and walnut countertop and floating shelves. Keeping the line of sight to the original back metal bay-window with stained glass insert at the back of the unit complimented the crisp white cabinets and quartz stone tops
Removing a series of built-ins and bookcases to the right of the fireplace freed up space for a large built-in Subzero along with a wet bar and wine fridge
Mixing stainless steel appliances with brass faucets and light fixtures keep the space transitional
Find the right local pro for your project
 TKS Design Group
Free ebook, CREATING THE IDEAL KITCHEN
Download now → http://bit.ly/idealkitchen
This Glen Ellyn couple wanted to transform their dated kitchen into a more family-friendly space to use on a daily basis for cooking family meals and for entertaining friends. The existing kitchen was quite chopped up with strange soffits and different ceiling heights. To make the space flow in a more logical manner, we borrowed an unused desk area from the adjoining hallway and reconfigured a neighboring bath. Getting it to work on paper was fairly straightforward, but there was a bit of complicated beam work involved as the new kitchen flows through what was an old exterior wall. The new ceiling is now completely flush as we were able to hide the support in the ceiling joists.
A new, larger window was added at the sink, the doorway to the room was widened and the resulting space creates a more easy flow from dining room to family room.
The clients chose white inset cabinets, white marble tops and an apron sink to keep the space feeling simple yet original to the home's Colonial styling.
Ship lap siding on the back of the island and at the pantry storage ceiling, a walnut butcher block, and antique brass details give the space an updated look.
Professional stainless appliances are functional and beautiful. In addition to a large built-in fridge and 36" range, a second oven is housed in the island for flexibility.
The pantry area has a convenience station that houses the family's espresso machine along with the microwave drawer. Another large bank of cabinets in the same area serves as pantry storage for dry goods.
The bathroom was also remodeled as part of this project. The full bath has a vanity, shower and convenient baby changing area.
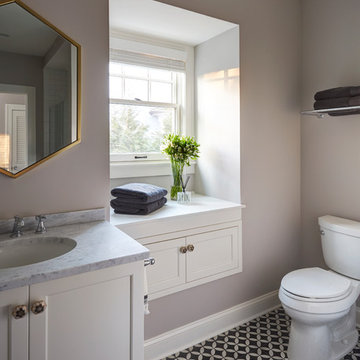
The floor is encaustic tile, a type of concrete tile recognizable by its bold graphics. The mirror and lighting add a few modern touches to keep it in line with the Owner's personal style.
Designed by: Susan Klimala, CKD, CBD
Photography by: Carlos Vergara
For more information on kitchen and bath design ideas go to: www.kitchenstudio-ge.com
 Roomscapes Cabinetry and Design Center
Reworking a classic Boston Brownstone today always involves updated kitchen and baths. And if possible, adding a powder room and flexible room that could function as a guest room or office on the main floor. This project did not have an owner and was being remarketed for sale. Creating an ideal space that prospective buyers would identify with requires the designer to research the target market for the home and detail/design spaces tailored to fit that niche.
Relocating the kitchen to the other side of the space provided for a guest/office.
Boston Red-brick chimney became the focal point of the new kitchen with closed door storage and walnut countertop and floating shelves. Keeping the line of sight to the original back metal bay-window with stained glass insert at the back of the unit complimented the crisp white cabinets and quartz stone tops
Removing a series of built-ins and bookcases to the right of the fireplace freed up space for a large built-in Subzero along with a wet bar and wine fridge
Mixing stainless steel appliances with brass faucets and light fixtures keep the space transitional
 Goldenline Remodeling
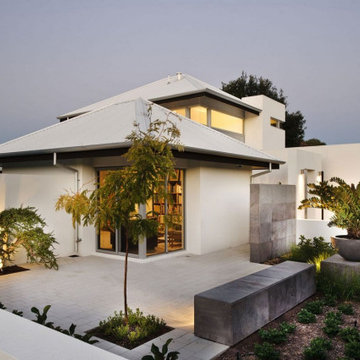
Goldenline Remodeling provides a vast range of services for all of your construction and renovations needs. While home construction and remodeling can be exciting, choosing the right contractor for your project is essential. You need a local builder in your area who is experienced and known to have completed the work on time as promised. You want a licensed contractor you can trust to be ethical and known for his integrity. We are your friendly contractor.
We strive to provide a high end services and outstanding build quality, while keeping within your budget and time frames. Our reliable and professional services are comprised of our accumulated knowledge and years of successful construction experience. We will guide you through all of the design and build process and manage the entire project for you while keeping you involved and informed in all major decisions, to ensure your total satisfaction.
 J T Construction & Design LLC
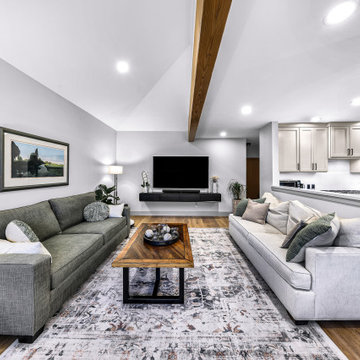
This family living room is well appointed with two couches just off the kitchen so the family can relax as they cook a great meal and everybody can stay involved. As we redesigned the space we made sure we made sure to keep all aspects of family living involved with this design

Sponsored
Columbus, OH

Hope Restoration & General Contracting
Columbus Design-Build, Kitchen & Bath Remodeling, Historic Renovations

 Tile Doctor Ltd
This Tumbled Travertine tiled floor at a beautiful house in Horley had been poorly maintained through the years using the wrong type of sealer which quickly wore down allowing dirt to become ingrained in the stone. The owner had become concerned about the state of the tiles and decided it was time to call in an expert that could restore the tiles to a condition that complimented the environment in which it was situated.
Travertine is known for being very distinctive in character and very durable, making it a very popular choice for tiled flooring in properties worldwide. However, the stone does require regular professional maintenance and polishing to keep it looking it top shape and home owners rarely realise this when they decide to have it installed. Fortunately, in the UK at least you can rely on your local tile doctor to maintain it for you.
The first part of the job involved giving the floor a thorough clean to remove what was left of old sealers and any polishing compounds that remained on the floor. Before beginning that however I brought in all my equipment and products into the house and then prepped the area by taping up the woodwork to protect it during the renovation process.
To remove what was left of the old sealers and other coatings still present on the floor a strong solution of Tile Doctor Remove and Go was applied to the floor and left to soak in for about ten minutes before being actively worked in with a rotary machine fitted with a black scrubbing pad. The solution turned black with the soil as it was lifted out of the pores of the stone and it was then rinsed off with water and extracted with a wet vacuum.
Following this, we moved on to a process we know as burnishing that hones the stone and brings up the polished appearance. Working in sections due to the size of the floor It involves the application of a series of diamond encrusted burnishing pads from coarse through to very fine.
The coarse 400-grit pad fitted to the rotary floor buffer and run over the floor using only water for lubrication. The water turns into a slurry as the pad does its job removing dirt and this has to be rinsed off the floor and extracted with the wet vacuum before applying the next pad. The process was then repeated with medium 800 grit pad for an initial polish followed by the Fine 1500 grit pad for the second polish using water for lubrication and rinsing and extracting in between each pad.
The last pad is a very fine 3000 grit pad for the final polish and is applied with only a little water sprayed onto the floor using a technique we call a Spray Burnish. This last pad really brings up the polished appearance of the stone.
To bring up the appearance of the stone even further and add a really durable polish Tile Doctor Shine Powder was applied. This is a crystallising powder sealer that ensures a very high shine and a tough, durable finish. This powder is applied directly to the tiles in combination with approximately ½ a litre of water and a soft white buffing pad.
Last step was to add to the protection provided by the Shine Powder with two coats of Tile Doctor Ultra-Seal which is a natural look sealer that doesn’t change the look of the stone and is applied to the stone and grout. This sealer works by seeping into the stone, occupying the pores and preventing dirt from becoming ingrained.
The customer was ecstatic with the results, being particularly pleased that she got the floor looking the way she originally wanted without significant expense, not to mention stress.
Michael Conlon
East Surrey Tile Doctor
 Get My Rugs LLC
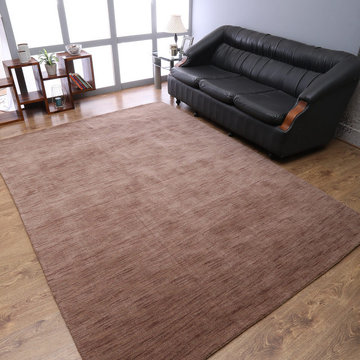
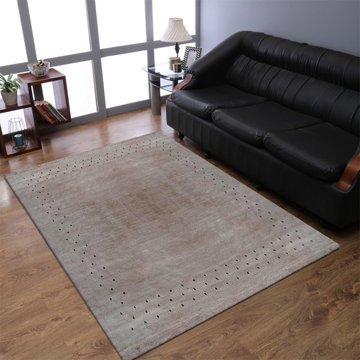
Improve your bedroom with the perfect area rug, an essential piece that adds both style and comfort to your space. A well-chosen rug does more than just cover the floor—it injects warmth, texture, and personality into your bedroom decor. With a variety of options available, finding the ideal rug involves considering design, material, and practical features.
Design and Style: Choose a rug that complements your bedroom’s aesthetic, whether it’s contemporary, modern, traditional, mid-century modern, or transitional. Hand-tufted and hand-knotted rugs offer luxurious textures and detailed craftsmanship, perfect for adding a touch of elegance. For a sleek, modern look, machine-woven rugs feature vibrant patterns and are designed for durability, often with heat-set fibers that extend their lifespan. Flat-woven rugs, such as kilims, are versatile and reversible, fitting seamlessly into various decor styles.
Materials and Comfort: The material of your rug affects both its look and feel. Shag and flokati rugs provide a plush, cozy experience with their long, soft fibers, making your bedroom a more inviting retreat. Hand-loomed rugs offer unique textures and artisanal quality, while braided and hand-hooked rugs bring a charming, handcrafted element. Opt for machine washable rugs to simplify maintenance, ensuring your rug remains fresh and clean with minimal effort.
Practical Features: Select rugs that combine style with practical benefits. Stain-resistant and water-resistant rugs maintain their appearance and withstand spills. Non-slip and adhesive backings are essential for safety on hardwood floors, preventing slips and keeping the rug securely in place. Cushioned rugs provide added comfort, enhancing the luxury and coziness of your bedroom.
Customization and Personalization: Personalize your space with custom or personalized rug sets. An 8x10 area rug offers ample coverage and can be tailored to fit your bedroom perfectly. Features like fringe details or organic textures allow you to create a rug that reflects your unique style and complements your existing decor.
Versatility and Maintenance: The top 15 area rugs provide a diverse range of styles and features to suit any bedroom theme. From distressed designs that add character to contemporary patterns that offer a modern edge, there’s a rug for every aesthetic. Look for options that blend style with practicality to ensure your rug enhances your bedroom decor while standing up to everyday use.
In summary, selecting the right area rug involves balancing visual appeal with functional benefits. Whether you choose a luxurious hand-tufted design, a practical machine-woven option, or a versatile flat-woven style, the right rug will elevate your bedroom decor and create a stylish, comfortable retreat. Explore various choices to find the perfect rug that aligns with your design preferences and practical needs.
 Get My Rugs LLC
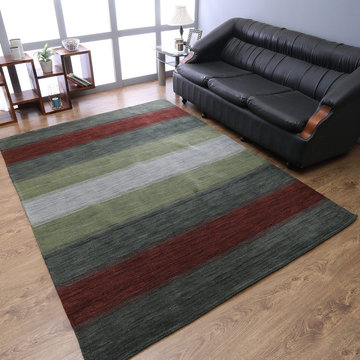
Improve your bedroom with the perfect area rug, an essential piece that adds both style and comfort to your space. A well-chosen rug does more than just cover the floor—it injects warmth, texture, and personality into your bedroom decor. With a variety of options available, finding the ideal rug involves considering design, material, and practical features.
Design and Style: Choose a rug that complements your bedroom’s aesthetic, whether it’s contemporary, modern, traditional, mid-century modern, or transitional. Hand-tufted and hand-knotted rugs offer luxurious textures and detailed craftsmanship, perfect for adding a touch of elegance. For a sleek, modern look, machine-woven rugs feature vibrant patterns and are designed for durability, often with heat-set fibers that extend their lifespan. Flat-woven rugs, such as kilims, are versatile and reversible, fitting seamlessly into various decor styles.
Materials and Comfort: The material of your rug affects both its look and feel. Shag and flokati rugs provide a plush, cozy experience with their long, soft fibers, making your bedroom a more inviting retreat. Hand-loomed rugs offer unique textures and artisanal quality, while braided and hand-hooked rugs bring a charming, handcrafted element. Opt for machine washable rugs to simplify maintenance, ensuring your rug remains fresh and clean with minimal effort.
Practical Features: Select rugs that combine style with practical benefits. Stain-resistant and water-resistant rugs maintain their appearance and withstand spills. Non-slip and adhesive backings are essential for safety on hardwood floors, preventing slips and keeping the rug securely in place. Cushioned rugs provide added comfort, enhancing the luxury and coziness of your bedroom.
Customization and Personalization: Personalize your space with custom or personalized rug sets. An 8x10 area rug offers ample coverage and can be tailored to fit your bedroom perfectly. Features like fringe details or organic textures allow you to create a rug that reflects your unique style and complements your existing decor.
Versatility and Maintenance: The top 15 area rugs provide a diverse range of styles and features to suit any bedroom theme. From distressed designs that add character to contemporary patterns that offer a modern edge, there’s a rug for every aesthetic. Look for options that blend style with practicality to ensure your rug enhances your bedroom decor while standing up to everyday use.
In summary, selecting the right area rug involves balancing visual appeal with functional benefits. Whether you choose a luxurious hand-tufted design, a practical machine-woven option, or a versatile flat-woven style, the right rug will elevate your bedroom decor and create a stylish, comfortable retreat. Explore various choices to find the perfect rug that aligns with your design preferences and practical needs.
 Get My Rugs LLC
Improve your bedroom with the perfect area rug, an essential piece that adds both style and comfort to your space. A well-chosen rug does more than just cover the floor—it injects warmth, texture, and personality into your bedroom decor. With a variety of options available, finding the ideal rug involves considering design, material, and practical features.
Design and Style: Choose a rug that complements your bedroom’s aesthetic, whether it’s contemporary, modern, traditional, mid-century modern, or transitional. Hand-tufted and hand-knotted rugs offer luxurious textures and detailed craftsmanship, perfect for adding a touch of elegance. For a sleek, modern look, machine-woven rugs feature vibrant patterns and are designed for durability, often with heat-set fibers that extend their lifespan. Flat-woven rugs, such as kilims, are versatile and reversible, fitting seamlessly into various decor styles.
Materials and Comfort: The material of your rug affects both its look and feel. Shag and flokati rugs provide a plush, cozy experience with their long, soft fibers, making your bedroom a more inviting retreat. Hand-loomed rugs offer unique textures and artisanal quality, while braided and hand-hooked rugs bring a charming, handcrafted element. Opt for machine washable rugs to simplify maintenance, ensuring your rug remains fresh and clean with minimal effort.
Practical Features: Select rugs that combine style with practical benefits. Stain-resistant and water-resistant rugs maintain their appearance and withstand spills. Non-slip and adhesive backings are essential for safety on hardwood floors, preventing slips and keeping the rug securely in place. Cushioned rugs provide added comfort, enhancing the luxury and coziness of your bedroom.
Customization and Personalization: Personalize your space with custom or personalized rug sets. An 8x10 area rug offers ample coverage and can be tailored to fit your bedroom perfectly. Features like fringe details or organic textures allow you to create a rug that reflects your unique style and complements your existing decor.
Versatility and Maintenance: The top 15 area rugs provide a diverse range of styles and features to suit any bedroom theme. From distressed designs that add character to contemporary patterns that offer a modern edge, there’s a rug for every aesthetic. Look for options that blend style with practicality to ensure your rug enhances your bedroom decor while standing up to everyday use.
In summary, selecting the right area rug involves balancing visual appeal with functional benefits. Whether you choose a luxurious hand-tufted design, a practical machine-woven option, or a versatile flat-woven style, the right rug will elevate your bedroom decor and create a stylish, comfortable retreat. Explore various choices to find the perfect rug that aligns with your design preferences and practical needs.
 BMR BelMax Remodeling
Master Bathroom Remodeling in Maple Glen, PA: A Stunning Transformation by BMR Belmax Remodeling
At BMR Belmax Remodeling, we pride ourselves on delivering exceptional remodeling services that combine elegance, functionality, and personalized design. One of our recent projects involved a master bathroom remodeling in Maple Glen, PA, where we transformed a dated bathroom into a luxurious retreat. This comprehensive bathroom renovation in Maple Glen, PA showcases our commitment to craftsmanship and attention to detail, leaving our client thrilled with the results.
A Vision for the Perfect Master Bathroom
Our client envisioned a serene and modern master bathroom that would elevate the aesthetics and functionality of their space. They sought a design that offered a balance of contemporary style and practicality, incorporating sleek fixtures, premium materials, and improved lighting. We collaborated closely with the client to bring their vision to life, ensuring that every detail met their expectations. The result was a master bathroom that perfectly aligned with their lifestyle and design preferences.
Key Features of the Master Bathroom Remodel
Our team tackled every aspect of this master bathroom remodeling project with precision and care. Here’s a breakdown of the upgrades and improvements we completed:
1. Plumbing Reconfiguration
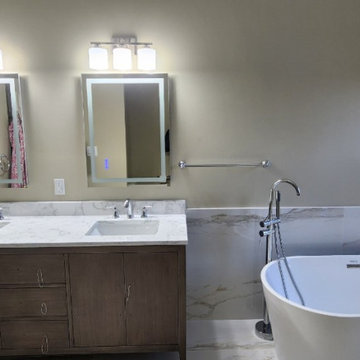
To accommodate the updated design, we reconfigured the bathroom’s plumbing to support a sleek, smaller vanity and a stylish freestanding bathtub. This change not only optimized the layout but also created a more open and inviting feel.
2. Upgraded Bathroom Fixtures
The client opted for high-quality bathroom fixtures to enhance the space’s overall look and functionality. We installed a modern bathtub faucet, a new toilet, and other premium fixtures that seamlessly complemented the updated design.
3. Enhanced Lighting and Electrical Work
Lighting was a crucial element of this remodel. We installed new electrical wiring to accommodate lighted mirrors, which added a touch of sophistication and practicality. Additional lighting was installed above the mirrors to ensure optimal brightness for daily grooming routines, and a new exhaust fan was added to improve ventilation and maintain air quality.
4. Large-Format Tile Installation
To achieve a luxurious and contemporary look, we used 24″x48″ large-format tiles for the walls in the bathtub area and on the flooring. These tiles created a clean, seamless aesthetic, with fewer grout lines to maintain and a striking visual impact. The client was particularly impressed with the elegance and durability of this choice.
5. Freestanding Bathtub Installation
A standout feature of this remodel was the addition of a stunning freestanding bathtub. Positioned as a focal point of the bathroom, it offered both aesthetic appeal and a relaxing space for unwinding after a long day.
A Seamless Process and Impressive Results
The project was completed in just eight working days, thanks to our efficient project management and skilled team of professionals. From the initial consultation to the final walkthrough, we ensured clear communication with the client to address their questions and keep them updated on progress.
Our streamlined process involved careful planning, precise execution, and meticulous attention to detail. This approach not only delivered a beautiful transformation but also minimized disruptions for the client, ensuring a stress-free remodeling experience.
Why Choose BMR Belmax Remodeling?
This master bathroom remodeling in Maple Glen, PA exemplifies the quality and care that define our work. Here are some reasons why homeowners trust us for their bathroom renovation needs:
Expert Craftsmanship: Our team is skilled in delivering high-quality finishes and innovative solutions tailored to your preferences.
Personalized Designs: We work closely with you to create a space that aligns with your style, needs, and budget.
Premium Materials: We use top-tier materials to ensure durability, functionality, and aesthetic appeal.
Efficient Project Management: Our well-coordinated approach ensures that projects are completed on time without compromising quality.
Customer Satisfaction: We prioritize your satisfaction, striving to exceed your expectations in every aspect of the project.
Client Satisfaction and Lasting Value
The client was overjoyed with their newly remodeled master bathroom, expressing appreciation for the seamless process and stunning results. They particularly loved the enhanced lighting, the luxurious feel of the large-format tiles, and the functionality of the upgraded features. The renovation not only improved the bathroom’s aesthetics but also added significant value to their home.
Transform Your Bathroom with BMR Belmax Remodeling
If you’re considering a bathroom renovation in Maple Glen, PA, BMR Belmax Remodeling is here to help. Whether you’re looking for a complete master bathroom transformation or specific upgrades, we bring expertise, creativity, and a commitment to excellence to every project.
Contact us today to schedule a consultation and let us bring your dream bathroom to life. With BMR Belmax Remodeling, your ideal space is closer than you think!
 Tile Doctor Ltd
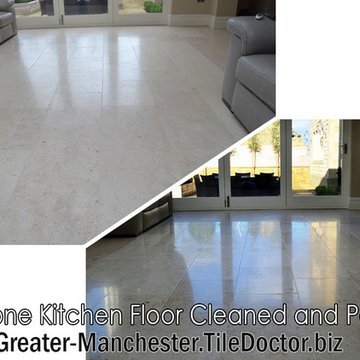
This beautiful Limestone kitchen tiled floor at a property in Peel Green was only a year old and, while it wasn’t in too bad of a state, the customer told me the floor had not been sealed properly due to issues with retaining moisture. The lack of an adequate sealer had allowed the Limestone to become duller over time after exposure to dirt and muck. It also had some more obvious marks and stains in some place and needed some grouting to be done around the corners and edges of the room.
I travelled to the property in Peel Green, which is within the Greater City of Salford in Greater Manchester, to see what could be done to restore the condition of the tiles.
Upon closer inspection of the tiles, I recommended to the customer that we proceed with the process known as burnishing, which we use primarily on Limestone, Marble, and Travertine. Burnishing, which involves the application of diamond encrusted burnishing pads, breaks down old sealers, gets rid of marks, stains and ingrained dirt, and gradually builds and evens out the polish on the tiles.
I started burnishing the Limestone kitchen tiles straight away when I arrived at the property as it was a big area and would require lots of hard work to achieve the desired results within the space of a day.
Our burnishing system consists of four diamond encrusted pads: Coarse, Medium, a Fine and Very Fine. Each pad was applied to the Limestone in sequence in tandem with a small amount of water to act as lubrication, gradually smoothing and polishing the surface of the tiles. After every pad, I also used my wet vac machine to remove any dirty water left on the floor and, after the Fine pad I rinsed the floor thoroughly to remove any dirt left on floor. I then left it to dry.
When I was satisfied that the floor was completely dry, it was time to seal the Limestone tiles. However, I first went over the floor with Very Fine grit pad to provide a final polish before sealing.
My choice of sealer was the impregnating Tile Doctor Colour Grow, a product which enhances the natural colours in the stone whilst also offering robust protection against dirt and stains. Remembering that the tiles had never been properly sealed, I applied plenty of sealer and left it to dry for 10 minutes. Following this, I carefully removed any excess sealer left on the surface with a dry cotton cloth. After sealing I went over the floor once final time with the Very Fine pad, just to smoothen things down and leave an exceptionally neat finish.
When the job was finished, I gave the owner some tips and recommendations on the cleaning of the floor going forward and a complimentary bottle of neutral cleaner to get them started.
The customer was very pleased with the finish, so much so that she opted and take up the Tile Doctor Maintenance Plan to keep the floor looking good for years to come! This involves popping round every 6-12 months to top up the sealer and give the floor a quick polish.
Tony Olmet
Greater Manchester Tile Doctor
Sponsored
Columbus, OH
Hope Restoration & General Contracting
Columbus Design-Build, Kitchen & Bath Remodeling, Historic Renovations
 House of a Different Color
Design consultation and advising for DIY/Budget Renovation.
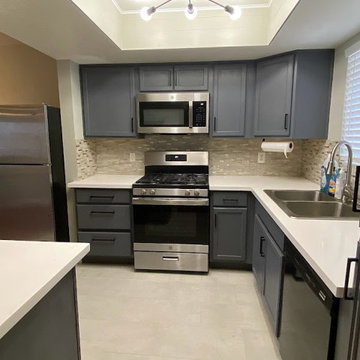
Owner purchased this condo with a very cramped and dated kitchen and light fixtures, and early 2000s-era café paint colors.
Owner did a lot of the work himself or with friends to keep the budget down.
HDC advised on design details and paint colors, chose light fixtures (ceiling lights for kitchen and dining and arch floor lamp in living room). HDC also assisted with creating a new kitchen floor plan, which involved removing one wall, replacing existing tile and modifying flooring transition location, replacing all cabinetry except for the tall pantry cabinet, choosing cabinet paint, installing modern cabinet hardware, replacing laminate counters with a budget white quartz prefab counter, replacing appliances, sink, and faucet, and installing a low-cost peel & stick backsplash.
Due to budget constraints, we could not remove the entire wall between the kitchen and dining space to make the wall completely flush from the kitchen to dining area transition, but decided to relocate the refrigerator to that wall nonetheless, in order to improve sightlines and improve traffic flow and function for refrigerator access. We created a coffee/drinks bar where the original fridge was located. The owner decided to keep the existing water line that had serviced the ice maker in the fridge where it was previously located (and cap it temporarily). He plans to plumb it in the future to support a filtered drinking water line and auto-filling coffee maker to finish out the drink center.
Ultimately, we couldn't stretch the budget for a perfect layout, but we were still able to improve the function and open up the flow of this hub of the condo for better entertaining and more convenient homeowner use of the space.
 Tile Doctor Ltd
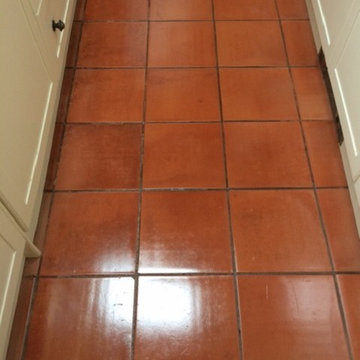
Terracotta is an interesting type of stone manufactured using a variety of techniques dependant on the country of origin which leads to a number of differences such as Spanish Terracotta being less porous than its Mexican counterpart: the former is semi-hand made and finished in a factory kiln, while the latter is completely handmade. Spanish Terracotta is therefore a lot less than porous and ultimately, of a higher quality.
But despite the Spanish Terracotta being less porous, and therefore being less prone to ingrained dirt, it still, like any other stone, needs regular maintenance to keep it looking smart. In the tiling trade, we quite often refer to this as a good old fashioned ‘Clean and Seal’ and this is exactly what was requested by this property owner in Halifax, for their Spanish Terracotta tiled floors in the kitchen and adjacent hallway.
I cleaned both sets of Terracotta tiles using the same process, which involved the application of our reliable alkaline cleaner known as Tile a Doctor Pro Clean, diluted with five parts of warm water. Once the solution had been left to dwell for a short period, it was scrubbed into the tiles to remove all dust, dirt, and general muck. This created a slurry of cleaning residue, which I promptly soaked up using a wet vac. A wet vac machine is an essential tool when it comes to cleaning porous tiles since, unlike a traditional mop and bucket, it sucks the excess trapped dirt out of the clay and thus provides a superior clean.
Following this, I applied a small amount of our heavy duty remover, known as Tile Doctor Remove & Go, to deal with some of the more stubborn stains and paint splashes, before rinsing with clean water and wet vaxing in a similar fashion to before.
Once the clean had been completed I left the tiles to dry completely. This can take 12 to 24 hours depending on numerous factors including whether a Damp proof Membrane and underfloor heating has been installed which can really help reduce drying times. Letting the tiles dry completely before sealing is paramount as moisture can cloud the sealer and affect its performance.
Upon my return to the property I ran some quick damp tests, which revealed the tiles were ready to be sealed. I then applied several coats of Tile Doctor Seal and Go, our topical sealer which provides a satin finish and accentuates colour. A new coat of this product is recommended every six months on Terracotta to ensure the continuous protection of the tiles’ soft clay particles.
My customer was extremely pleased with her refreshed Terracotta tiles. It goes to show what a big difference a bit of regular maintenance can make. I advised the customer that an everyday cleaner called Tile Doctor pH Neutral cleaner can also be used regularly to keep the tiles looking great without damaging the sealer.
Nigel Stoker
North West Yorkshire Tile Doctor
 Sweet Smiling Landscape Design
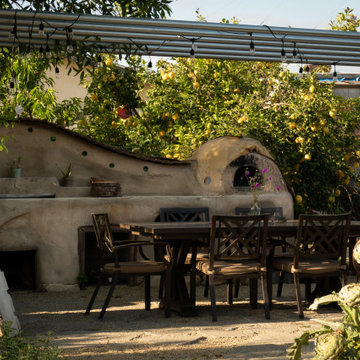
This very social couple were tying the knot and looking to create a space to host their friends and community, while also adding much needed living space to their 900 square foot cottage. The couple had a strong emphasis on growing edible and medicinal plants. With many friends from a community garden project they were involved in and years of learning about permaculture, they wanted to incorporate many of the elements that the permaculture movement advocates for.
We came up with a California native and edible garden that incorporates three composting systems, a gray water system, rain water harvesting, a cob pizza oven, and outdoor kitchen. A majority of the materials incorporated into the hardscape were found on site or salvaged within 20-mile of the property. The garden also had amenities like an outhouse and shower for guests they would put up in the converted garage.
Coming into this project there was and An old clawfoot bathtub on site was used as a worm composting bin, and for no other reason than the cuteness factor, the bath tub composter had to stay. Added to that was a compost tumbler, and last but not least we erected an outhouse with a composting toilet system (The Nature's Head Composting Toilet).
We developed a gray water system incorporating the water that came out of the washing machine and from the outdoor shower to help water bananas, gingers, and canailles. All the down spouts coming off the roof were sent into depressions in the front yard. The depressions were planted with carex grass, which can withstand, and even thrive on, submersion in water that rain events bring to the swaled-out area. Aesthetically, carex reads as a lawn space in keeping with the cottage feeling of the home.
As with any full-fledged permaculture garden, an element of natural building needed to be incorporated. So, the heart and hearth of the garden is a cob pizza oven going into an outdoor kitchen with a built-in bench. Cob is a natural building technique that involves sculpting a mixture of sand, soil, and straw around an internal structure. In this case, the internal structure is comprised of an old built-in brick incinerator, and rubble collected on site.
Besides using the collected rubble as a base for the cob structure, other salvaged elements comprise major features of the project: the front fence was reconstructed from the preexisting fence; a majority of the stone edging was created by stones found while clearing the landscape in preparation for construction; the arbor was constructed from old wash line poles found on site; broken bricks pulled from another project were mixed with concrete and cast into vegetable beds, creating durable insulated planters while reducing the amount of concrete used ( and they also just have a unique effect); pathways and patio areas were laid using concrete broken out of the driveway and previous pathways. (When a little more broken concrete was needed, we busted out an old pad at another project a few blocks away.)
Far from a perfectly polished garden, this landscape now serves as a lush and inviting space for my clients, their friends and family to gather and enjoy each other’s company. Days after construction was finished the couple hosted their wedding reception in the garden—everyone danced, drank and celebrated, christening the garden and the union!
 PBC Design + Build
We here at PBC love a great project, especially when it involves one of our favorite local non-profit organizations. Kids Making It is a youth woodworking program that teaches valuable vocational, entrepreneurial and life skills to at-risk, low income, and disadvantaged kids. At KMI they strive to keep local kids in school, out of trouble, and on a path to a successful future. It is an amazing organization that is all heart, and one that we are proud to have been involved with for several years.
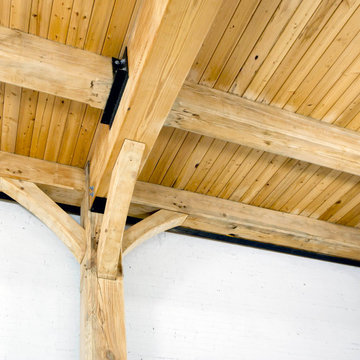
When Jimmy Pierce, founder and executive director of KMI, came to PBC with a specific need (more space) and general idea of what he wanted we knew that we had to be a part of it. As with all of our projects, the addition to the current Kids Making It building started as a design-build consultation. We called upon our friend and amazing architect Rob Romero to sit down with us, along with Jimmy and KMI program director, Andy Crowther to discuss the possibilities. The specific focus was on creating a space that KMI could use as they continued to grow their organization. Jimmy and Andy wanted a place where they could train the students in new trades and take the wood-working that they had already learned a step further. They needed open and they needed BIG. That’s where the timber framing came in.
Timber framing is a style of building construction that uses heavy timber frames as opposed to more slender lumber. It is post and beam construction, built like furniture using wood joinery to hold the framing in place. This type of construction has been around for hundreds of years but isn’t used as commonly as it once was due to the high cost of materials and specialized tradespeople that it requires. That’s where Atlantic Barn and Timber Company came in, they heard about the need and answered the call. Very graciously, they offered to erect the timber framing for free. And just like that the materials and equipment arrived, the frames were assembled, stood up, and secured in place…all on that little corner of 7th and Castle Street.
At 2,257 square feet, the first floor will be the home to the new storefront, a large (class)room, and a storage bay for donated materials. The second floor of the addition will measure 1,982 square feet and offer an open space, offices, a full bathroom, conference room, and aforementioned decks overlooking the front and the rear of the building.
PBC Design + Build is beyond proud to be a part of such a wonderful project, and we consider ourselves very fortunate to be able to aid in KMI’s mission.

Sponsored
Sunbury, OH

J.Holderby - Renovations
Franklin County's Leading General Contractors - 2X Best of Houzz!
 Zieba Builders, Inc.
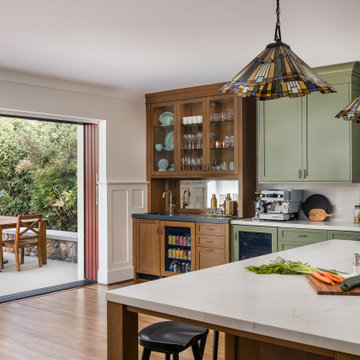
Our clients are a family with three young kids. They wanted to open up and expand their kitchen so their kids could have space to move around, and it gave our clients the opportunity to keep a close eye on the children during meal preparation and remain involved in their activities. By relocating their laundry room, removing some interior walls, and moving their downstairs bathroom we were able to create a beautiful open space. The LaCantina doors and back patio we installed really open up the space even more and allow for wonderful indoor-outdoor living. Keeping the historic feel of the house was important, so we brought the house into the modern era while maintaining a high level of craftsmanship to preserve the historic ambiance. The bar area with soapstone counters with the warm wood tone of the cabinets and glass on the cabinet doors looks exquisite.

 Safari Thatch Inc.
The Sedgwick County Zoo’s Reed Family Elephants of the Zambezi River Valley exhibit opened to the public on May 26 2016. This is one of the newest, most advanced and the third largest elephant exhibit in North America at over 5 acres with the largest swimming hole at 550,000 gallons. The project will be used as an example of the correct way to design and build an Elephant exhibit for years to come. Safari Thatch provided all the thatching for the main pavilion and the other out buildings. We also provided all the materials for the pedestrian fencing, trellises and shade structures. It was an honor to work with the zoo on this project.
The Camp Zambezi main pavilion was one of the largest single structures we have thatched, at over 6000 sq ft, with our synthetic Viro Bali Class A Fire Rated Thatching at the time. The zoo went with this thatch for its look, cost, longevity, ease of application, and warranty. Safari Thatch also provided all the pedestrian fencing lining the walkways though out the exhibit. For this we used our Rustic Eucalyptus 4’ tall prefabricated fence panels with 6” Eucalyptus posts and 4” rails. This produces an almost indestructible fence with many years of use. Our original design with the varied heights of the upright pickets keeps patrons from placing anything on top of the fencing thus reducing the chance of people or property from falling inside exhibits protecting both the customers and the animals. We also used a post and rail fence to separate the people and landscaping. This was a 4” post and 3” rail Eucalyptus fence.
We used Eucalyptus poles for all the structural pole construction on all the out building in the exhibit. Eucalyptus is the fastest and straightest growing tree. They are all plantation grown and forest certified. We prefer these for pole style construction due to their strength over other wood poles and lack of taper, with less than an inch over 20 feet, removing extra weight that would be found in other poles. This is a beautiful and very large and state of the art exhibit and is a feather in the cape of the Sedgwick County Zoo. The people of Wichita and the surrounding area have adopted and taken great interest in
the newly arrived Elephants involving the entire community. The Elephants of the Zambezi River Valley has been a major attraction since it opened and should be on anyone must see list. Safari Thatch is proud to have been involved in this project.
 Sweet Smiling Landscape Design
This very social couple were tying the knot and looking to create a space to host their friends and community, while also adding much needed living space to their 900 square foot cottage. The couple had a strong emphasis on growing edible and medicinal plants. With many friends from a community garden project they were involved in and years of learning about permaculture, they wanted to incorporate many of the elements that the permaculture movement advocates for.
We came up with a California native and edible garden that incorporates three composting systems, a gray water system, rain water harvesting, a cob pizza oven, and outdoor kitchen. A majority of the materials incorporated into the hardscape were found on site or salvaged within 20-mile of the property. The garden also had amenities like an outhouse and shower for guests they would put up in the converted garage.
Coming into this project there was and An old clawfoot bathtub on site was used as a worm composting bin, and for no other reason than the cuteness factor, the bath tub composter had to stay. Added to that was a compost tumbler, and last but not least we erected an outhouse with a composting toilet system (The Nature's Head Composting Toilet).
We developed a gray water system incorporating the water that came out of the washing machine and from the outdoor shower to help water bananas, gingers, and canailles. All the down spouts coming off the roof were sent into depressions in the front yard. The depressions were planted with carex grass, which can withstand, and even thrive on, submersion in water that rain events bring to the swaled-out area. Aesthetically, carex reads as a lawn space in keeping with the cottage feeling of the home.
As with any full-fledged permaculture garden, an element of natural building needed to be incorporated. So, the heart and hearth of the garden is a cob pizza oven going into an outdoor kitchen with a built-in bench. Cob is a natural building technique that involves sculpting a mixture of sand, soil, and straw around an internal structure. In this case, the internal structure is comprised of an old built-in brick incinerator, and rubble collected on site.
Besides using the collected rubble as a base for the cob structure, other salvaged elements comprise major features of the project: the front fence was reconstructed from the preexisting fence; a majority of the stone edging was created by stones found while clearing the landscape in preparation for construction; the arbor was constructed from old wash line poles found on site; broken bricks pulled from another project were mixed with concrete and cast into vegetable beds, creating durable insulated planters while reducing the amount of concrete used ( and they also just have a unique effect); pathways and patio areas were laid using concrete broken out of the driveway and previous pathways. (When a little more broken concrete was needed, we busted out an old pad at another project a few blocks away.)
Far from a perfectly polished garden, this landscape now serves as a lush and inviting space for my clients, their friends and family to gather and enjoy each other’s company. Days after construction was finished the couple hosted their wedding reception in the garden—everyone danced, drank and celebrated, christening the garden and the union!
18