
Search results for "Measure tool" in Home Design Ideas
 The First Time Trading Corporation
Product Description:
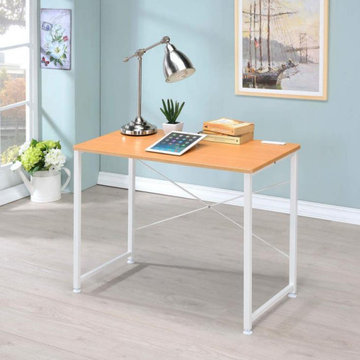
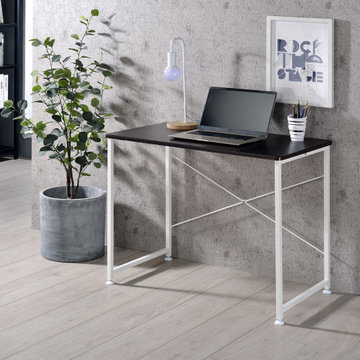
Modern Design Style Computer Writing Desk Unifies Rigid Metal With MDF wood, Resulting In A Unique Display Of Delicate Charm.
Unique Features:
•Medium Workspace The Computer Desk Surface Measures 90*50*1.7cm, Which Provides Ample Space For Writing, Studying, Gaming And Other Home Office Activities
•Easy To Assemble Very Minimal Assembly Effort Required Step By Step Instruction And Included Assembly Tools, You'Ll Enjoy This Modern Simple Desk When You Finish It
•This Computer Desk Brings You A Modern Style Desk Ideal For Any Modern Home Great For Apartments Or Houses In Need Of A Space-Saving Desk, It Is Designed For Multiple Purposes, Well Fitted In The Office For Work, Playroom For Board Games, Living Room For Family Use, And More
•The Easy-To-Follow And Well-Illustrated Instructions Are Also Available To Make The Assembly Easy And Interesting
Product Details:
•Top Material: MDF wood
•Base Material: Metal
•Assembly Required: Yes
Product Dimensions:
Width * Depth * Height: 90 CM * 50 CM * 72 CM (35.5" * 19.75" * 28.5")
Shipping Dimensions:
Width * Depth * Height:93 CM * 51 CM * 8.3 CM (36.5" * 20" * 3.25")
Package Includes: Desk comes in 1 box
Warranty: 1 Year Limited Manufacturers Warranty
Origin: Made in Taiwan
 The First Time Trading Corporation
Product Description:
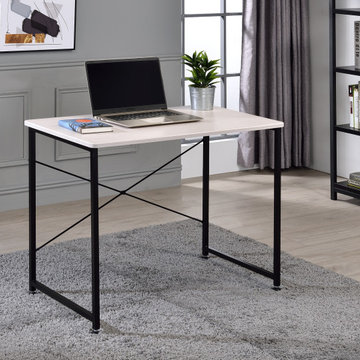
Modern Design Style Computer Writing Desk Unifies Rigid Metal With MDF wood, Resulting In A Unique Display Of Delicate Charm.
Unique Features:
•Medium Workspace The Computer Desk Surface Measures 90*50*1.7cm, Which Provides Ample Space For Writing, Studying, Gaming And Other Home Office Activities
•Easy To Assemble Very Minimal Assembly Effort Required Step By Step Instruction And Included Assembly Tools, You'Ll Enjoy This Modern Simple Desk When You Finish It
•This Computer Desk Brings You A Modern Style Desk Ideal For Any Modern Home Great For Apartments Or Houses In Need Of A Space-Saving Desk, It Is Designed For Multiple Purposes, Well Fitted In The Office For Work, Playroom For Board Games, Living Room For Family Use, And More
•The Easy-To-Follow And Well-Illustrated Instructions Are Also Available To Make The Assembly Easy And Interesting
Product Details:
•Top Material: MDF wood
•Base Material: Metal
•Assembly Required: Yes
Product Dimensions:
Width * Depth * Height: 90 CM * 50 CM * 72 CM (35.5" * 19.75" * 28.5")
Shipping Dimensions:
Width * Depth * Height:93 CM * 51 CM * 8.3 CM (36.5" * 20" * 3.25")
Package Includes: Desk comes in 1 box
Warranty: 1 Year Limited Manufacturers Warranty
Origin: Made in Taiwan
 The First Time Trading Corporation
Product Description:
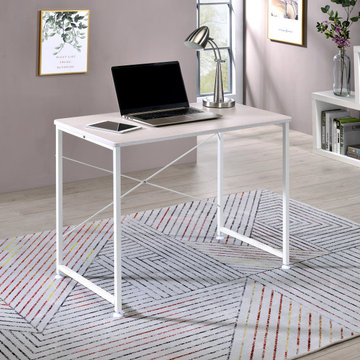
Modern Design Style Computer Writing Desk Unifies Rigid Metal With MDF wood, Resulting In A Unique Display Of Delicate Charm.
Unique Features:
•Medium Workspace The Computer Desk Surface Measures 90*50*1.7cm, Which Provides Ample Space For Writing, Studying, Gaming And Other Home Office Activities
•Easy To Assemble Very Minimal Assembly Effort Required Step By Step Instruction And Included Assembly Tools, You'Ll Enjoy This Modern Simple Desk When You Finish It
•This Computer Desk Brings You A Modern Style Desk Ideal For Any Modern Home Great For Apartments Or Houses In Need Of A Space-Saving Desk, It Is Designed For Multiple Purposes, Well Fitted In The Office For Work, Playroom For Board Games, Living Room For Family Use, And More
•The Easy-To-Follow And Well-Illustrated Instructions Are Also Available To Make The Assembly Easy And Interesting
Product Details:
•Top Material: MDF wood
•Base Material: Metal
•Assembly Required: Yes
Product Dimensions:
Width * Depth * Height: 90 CM * 50 CM * 72 CM (35.5" * 19.75" * 28.5")
Shipping Dimensions:
Width * Depth * Height:93 CM * 51 CM * 8.3 CM (36.5" * 20" * 3.25")
Package Includes: Desk comes in 1 box
Warranty: 1 Year Limited Manufacturers Warranty
Origin: Made in Taiwan
Find the right local pro for your project
 The First Time Trading Corporation
Product Description:
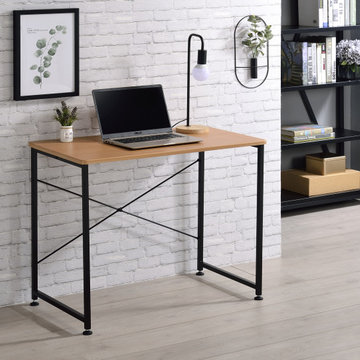
Modern Design Style Computer Writing Desk Unifies Rigid Metal With MDF wood, Resulting In A Unique Display Of Delicate Charm.
Unique Features:
•Medium Workspace The Computer Desk Surface Measures 90*50*1.7cm, Which Provides Ample Space For Writing, Studying, Gaming And Other Home Office Activities
•Easy To Assemble Very Minimal Assembly Effort Required Step By Step Instruction And Included Assembly Tools, You'Ll Enjoy This Modern Simple Desk When You Finish It
•This Computer Desk Brings You A Modern Style Desk Ideal For Any Modern Home Great For Apartments Or Houses In Need Of A Space-Saving Desk, It Is Designed For Multiple Purposes, Well Fitted In The Office For Work, Playroom For Board Games, Living Room For Family Use, And More
•The Easy-To-Follow And Well-Illustrated Instructions Are Also Available To Make The Assembly Easy And Interesting
Product Details:
•Top Material: MDF wood
•Base Material: Metal
•Assembly Required: Yes
Product Dimensions:
Width * Depth * Height: 90 CM * 50 CM * 72 CM (35.5" * 19.75" * 28.5")
Shipping Dimensions:
Width * Depth * Height:93 CM * 51 CM * 8.3 CM (36.5" * 20" * 3.25")
Package Includes: Desk comes in 1 box
Warranty: 1 Year Limited Manufacturers Warranty
Origin: Made in Taiwan
 The First Time Trading Corporation
Product Description:
Modern Design Style Computer Writing Desk Unifies Rigid Metal With MDF wood, Resulting In A Unique Display Of Delicate Charm.
Unique Features:
•Medium Workspace The Computer Desk Surface Measures 90*50*1.7cm, Which Provides Ample Space For Writing, Studying, Gaming And Other Home Office Activities
•Easy To Assemble Very Minimal Assembly Effort Required Step By Step Instruction And Included Assembly Tools, You'Ll Enjoy This Modern Simple Desk When You Finish It
•This Computer Desk Brings You A Modern Style Desk Ideal For Any Modern Home Great For Apartments Or Houses In Need Of A Space-Saving Desk, It Is Designed For Multiple Purposes, Well Fitted In The Office For Work, Playroom For Board Games, Living Room For Family Use, And More
•The Easy-To-Follow And Well-Illustrated Instructions Are Also Available To Make The Assembly Easy And Interesting
Product Details:
•Top Material: MDF wood
•Base Material: Metal
•Assembly Required: Yes
Product Dimensions:
Width * Depth * Height: 90 CM * 50 CM * 72 CM (35.5" * 19.75" * 28.5")
Shipping Dimensions:
Width * Depth * Height:93 CM * 51 CM * 8.3 CM (36.5" * 20" * 3.25")
Package Includes: Desk comes in 1 box
Warranty: 1 Year Limited Manufacturers Warranty
Origin: Made in Taiwan

 Trilogy Construction Company
Great glass scallop tile detail. This tile is bordered by slabs of white marble.
Bathroom - modern bathroom idea in Miami
Bathroom - modern bathroom idea in Miami


Sponsored
Delaware, OH

Buckeye Basements, Inc.
Central Ohio's Basement Finishing ExpertsBest Of Houzz '13-'21

 INSPIRED KITCHEN DESIGN
It was imperative that this IKEA remodel kitchen featured a simple, timeless design with a functional flow.
“Since this is a rental unit, we needed the kitchen to have broad appeal. We wanted functionality foremost and we were also trying to get as much storage space as possible in the kitchen without making it feel cramped and small,” he says.
Therefore, Justin relied on IKD’s design services as well as Los Angeles, CA-based RTC Services, Inc. to install the IKEA cabinetry.
He explains: “For us, having a designer was essential because we didn’t want to invest a ton of money in a kitchen only to find that there were errors like a dishwasher that opened up into a cabinet or a countertop or cabinet that didn’t fit an appliance. There are so many decisions that go along with designing a kitchen, we didn’t want to be responsible for measuring all aspects of our space and trying to master IKEA’s in-store Home Planner design tool, which we had read could take hours.”
He concludes: “While searching online we ran into many horror stories of IKEA customers trying to design their own kitchens. Overall, the process sounded time consuming and prone to mistakes. We thought that for IKD’s price point, they offered an invaluable service. Not only were they very familiar with all of IKEA’s product lines, they also understood design fundamentals in a way that we didn’t.

 ING Construction
The cooking zone is the focal point of this kitchen, and this straight-on view shows how well the pieces work together. A KitchenAid gas cooktop with five burners, heavy cast-iron grates, and polished chrome knobs sits flush in the stone countertop. The cutout is tight and even all the way around, which shows careful measuring and fabrication. ---- Behind it, a full-height slab backsplash makes the statement. Bold, flowing gray veining runs across a soft cream and gray background, and because it’s one continuous piece with no grout lines, the pattern reads like a piece of art above the range. White GFCI outlets on either side are set cleanly into the stone, so even the electrical details look intentional. ---- Flat-front cabinetry frames the cooktop, with a warm, mid-tone wood-grain drawer below and a lighter, creamy wood-look finish on the uppers. The upper cabinets are fitted with slim brushed bronze pulls, and a long brushed bar pull on the drawer below the cooktop completes the clean, modern look. The deep drawer below offers easy access to pots, pans, and cooking tools right where they’re needed.

 Luxapatio
This contemporary Sedona By Lynx Outdoor Kitchen Project was completed late 2015 as part of an outdoor living area of model home for a prominent developer in South Florida. This outdoor kitchen maintains a minimalistic approach with a straight one level layout, clean lines and plenty of space. the dimensions of this outdoor kitchen (13ft wide – 36 inches tall – 30 inches deep) fit perfectly along an IPE wood backdrop which provides a beautiful contrast. the materials used to finish the outdoor kitchen included a white Lapitec countertop and and a light gray thin stone wall finish material.
the Appliances Featured in this outdoor kitchen are all part of the Sedona By Lynx line; a little about Sedona: “The true value of a grill is in the cooking performance, ease of use and enduring beauty it brings to your outdoor kitchen. by every measure Sedona by Lynx clearly stands apart. Sedona grills and related accessories are designed in every detail to exceed your expectations and enhance your outdoor entertainment pleasure. Crafted by the Lynx specialist at the Lynx factory in Southern California, each Sedona grill displays the meticulous fit, finish and high-quality materials that have made Lynx products the favorites among grilling enthusiast.”
Products Featured:
Sedona 36 inch Grill
Sedona 36 inch Double Doors
Sedona Double Side Burner
Sedona 17 inch Double Drawer
Delta Heat trash center
Summit 24 inch refrigerator
For more information regarding this or any of our other projects thought south Florida or If you would like to purchase this Outdoor kitchen appliance package with a blue print of this outdoor kitchen please send us an email store@luxapatio.com or visit our online store at www.store.luxapatio.com

 Estate Cabinetry
Trendy medium tone wood floor closet photo in New York with raised-panel cabinets and light wood cabinets
 Allreno
How AI is Revolutionizing Bathroom and Kitchen Renovations in 2025
The renovation industry is entering a new era — and it’s powered by artificial intelligence. For decades, bathroom and kitchen makeovers required weeks of back-and-forth planning, consultations, and budgeting. But in 2025, AI bathroom design and AI kitchen renovation tools are transforming the experience, making it faster, smarter, and far more personalized.
A Smarter Way to Renovate
Traditional renovation processes are known for being time-consuming and stressful. From collecting measurements to selecting products and coordinating contractors, homeowners are often left overwhelmed. That’s where AI comes in — simplifying every step of the journey.
Using platforms like the Allreno app, homeowners can now scan their space with a smartphone, instantly generate a 3D model, and receive personalized layout suggestions. The app’s AI engine automatically recommends styles, color palettes, and materials that match your preferences — saving hours of guesswork.
AI Bathroom Design: A Game-Changer
Designing a bathroom used to mean working with spreadsheets, mood boards, and several design consultations. Today, AI bathroom design streamlines this process into minutes. Tools like Allreno analyze space dimensions, plumbing positions, lighting conditions, and user style inputs to generate design proposals that are not only beautiful but also practical and code-compliant.
Homeowners can preview their dream bathroom in realistic 3D, adjust fixtures and finishes, and even get instant price estimates — all before a single tile is laid.
AI Kitchen Renovation: Built for Speed and Precision
AI kitchen renovation takes things even further. AI models can detect where cabinetry fits best, suggest storage optimizations, and align design with ergonomic principles. Whether you’re planning a sleek modern kitchen or a cozy traditional space, AI delivers layouts that balance aesthetics with function.
Allreno’s smart design engine can pull directly from product inventories, ensuring the designs you see are not only buildable but immediately available — reducing delays and backorders.
Empowering Professionals and Homeowners
What makes AI-powered home renovation truly powerful is how it bridges the gap between homeowners and professionals. Contractors, designers, and suppliers can now work with exact specifications and visuals shared directly through platforms like Allreno, eliminating miscommunication and ensuring smoother execution.
This also means cost savings. With AI managing space planning, product selection, and budgeting, professionals spend less time on repetitive tasks and more time delivering quality craftsmanship.
The Rise of Smart Home Remodels
The trend toward smart home remodels is also being fueled by AI. Renovation projects now consider how your bathroom or kitchen connects with your smart lighting, voice assistants, or energy-efficient systems. Allreno helps integrate this tech seamlessly into your renovation plan, future-proofing your investment.
Why Allreno Is Leading the AI Renovation Movement
The Allreno app is at the forefront of this AI-driven shift. It’s not just a design tool — it’s a full renovation ecosystem. By combining design automation, real-time pricing, local contractor matching, and AI-powered recommendations, Allreno makes renovation as easy as ordering a product online.
In a world where speed and personalization are key, Allreno empowers homeowners to take control of their renovation journey — with clarity, confidence, and creativity.
Ready to renovate smarter?
Try the Allreno app and experience the future of home renovation today.

 Industrial Projects
Creating a comfortable outdoor living space is a priority for many homeowners and DIY enthusiasts. With rising summer temperatures, installing a shade tarp in your backyard offers an affordable and effective solution for sun protection. We’ve developed this detailed, step-by-step guide to help you confidently install a shade tarp that not only shields you from the sun but also adds aesthetic appeal to your outdoor area.
Benefits of Installing a Backyard Shade Tarp
Before diving into the installation process, let’s explore the key benefits of having a backyard shade tarp:
Provides UV Protection: Keeps your family and guests safe from harmful sun exposure.
Reduces Outdoor Temperatures: Creates a cooler, more enjoyable outdoor space.
Protects Outdoor Furniture: Extends the life of patio furniture by reducing sun damage.
Enhances Outdoor Aesthetics: Adds a modern, stylish look to your yard.
Budget-Friendly: More affordable compared to permanent structures like pergolas.
Materials and Tools You’ll Need
To begin your DIY backyard shade project, gather the following materials and tools:
Materials:
Shade tarp (UV-resistant and breathable)
Sturdy posts or existing structures (trees, fences, walls)
Mounting hardware (eye bolts, D-rings, turnbuckles, snap hooks)
Nylon or polyester rope, or stainless-steel wire
Concrete (if installing new posts)
Tools:
Power drill
Measuring tape
Level
Ladder
Wrench or adjustable spanner
Post hole digger (if installing new posts)
Step 1: Plan Your Shade Tarp Layout
The first step in installing your backyard shade tarp is careful planning. Take time to assess your outdoor area and answer these key questions:
Where is the sun’s path throughout the day?
What size and shape of tarp best suits your space?
Will you anchor the tarp to existing structures or install new posts?
What height do you want the tarp to sit at for maximum shade and airflow?
Pro Tip: Use string or garden hoses to visualize the tarp layout on the ground before making permanent decisions.
Step 2: Measure and Mark Anchor Points
Once you’ve determined the tarp’s location and orientation:
Measure the tarp dimensions.
Mark the exact points where each corner of the tarp will be anchored.
Ensure that the anchor points are at least 5–10% longer than the tarp size to allow for tensioning and slight adjustments.
Consider slope angles for water runoff. Aim for at least a 20-degree angle to prevent water pooling on the tarp.
Step 3: Install Support Posts (If Necessary)
If your backyard lacks existing anchor points like trees or fences, you’ll need to install sturdy support posts:
Dig post holes at least 24 inches deep and 8-12 inches wide for stability.
Set posts in concrete, making sure they remain plumb and level.
Allow the concrete to cure for at least 24–48 hours before applying tension from the tarp.
We recommend using pressure-treated wood, galvanized steel poles, or aluminum posts for longevity and strength.
Step 4: Install Mounting Hardware
With your anchor points ready, it’s time to install the necessary hardware:
Attach eye bolts or pad eyes securely into walls, posts, or other fixed structures.
For added flexibility and adjustability, install turnbuckles or tensioners to fine-tune the tarp’s tightness.
Connect snap hooks, D-rings, or carabiners to make assembly and disassembly easier.
Make sure all hardware is rated for outdoor use to prevent rust and corrosion.
Step 5: Attach and Tension the Shade Tarp
Now it’s time for the most satisfying part—mounting the shade tarp:
Begin by attaching one corner of the tarp to an anchor point.
Gradually attach the remaining corners, moving diagonally for even tension.
Adjust each connection point using your turnbuckles, ropes, or cables.
Pull the tarp tight enough to avoid sagging, but not so tight that it risks tearing.
Check that the tarp maintains the desired slope for rainwater runoff and adjust tension as needed.
Step 6: Final Adjustments and Safety Check
Before enjoying your new shaded area:
Inspect all anchor points and hardware for stability.
Test the tarp’s tension and make adjustments for even distribution.
Ensure that no sharp edges or loose connections remain that could damage the tarp or pose a safety hazard.
Confirm that the tarp is secure in windy conditions by giving it a gentle tug.
If you live in an area with frequent high winds, consider removing the tarp during storms to prevent damage.
Step 7: Enjoy Your Shaded Backyard Oasis
Once installed, your backyard shade tarp provides a comfortable and protective space for outdoor gatherings, relaxation, or family activities. You can decorate underneath with outdoor furniture, string lights, or potted plants to create a personalized outdoor retreat.
Maintenance Tips for Long-Lasting Shade Tarp Performance
To extend the life of your shade tarp, follow these maintenance guidelines:
Regularly check for wear and tear, especially around anchor points and seams.
Clean the tarp periodically with mild soap and water to prevent mildew buildup.
Store the tarp indoors during harsh weather seasons if it's not designed for year-round use.
Tighten hardware as needed to maintain proper tension and avoid sagging.
By following these simple care steps, your shade tarp will continue to deliver years of sun protection and outdoor comfort.
Conclusion: Upgrade Your Outdoor Space with a DIY Shade Tarp
Installing a shade tarp in your backyard is a cost-effective and rewarding DIY project. With careful planning, quality materials, and proper installation techniques, you’ll enjoy cool, shaded outdoor living all season long. This step-by-step guide ensures your project goes smoothly from start to finish.


 Plain & Fancy Custom Cabinetry
White Cabinetry - Lakeview door style, Dove White finish on Maple.
Base Can Goods pullout accessory from Kesseboehmer.
Example of a mid-sized trendy l-shaped medium tone wood floor kitchen pantry design with flat-panel cabinets, white cabinets, blue backsplash, subway tile backsplash, stainless steel appliances, an island and a double-bowl sink
Example of a mid-sized trendy l-shaped medium tone wood floor kitchen pantry design with flat-panel cabinets, white cabinets, blue backsplash, subway tile backsplash, stainless steel appliances, an island and a double-bowl sink
 Windy City Painters
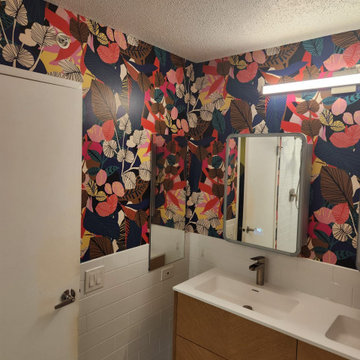
Expert wallpaper installer Lakeview services transform Chicago homes with precision and style. This stunning project showcases our commitment to quality craftsmanship in one of Chicago's most desirable neighborhoods.
Project Overview and Architecture
This beautiful Lakeview greystone required careful wallpaper installation that would complement the home's original architectural details. The vintage building's unique character demanded specialized techniques to ensure perfect results while preserving the historic charm that makes these homes so special.
Materials and Products
We utilized premium wallpaper adhesive, professional smoothing tools, and high-quality materials specifically chosen for Chicago's climate conditions. Our team selected products that work exceptionally well with the plaster walls common in vintage Lakeview homes.
Installation Process
First, we thoroughly prepared surfaces by repairing imperfections and priming walls. Next, we precisely measured and cut each strip, ensuring perfect pattern alignment. Then, we applied adhesive evenly and positioned wallpaper with expert precision. Finally, we eliminated bubbles, trimmed edges, and completed finishing touches.
Chicago Home Challenges
Lakeview's vintage homes present unique challenges including uneven plaster walls, settling issues, and temperature fluctuations. Our wallpaper installer Lakeview expertise addresses these concerns with specialized preparation techniques and climate-appropriate materials that ensure lasting results.
Results and Quality
The finished installation showcases flawless pattern matching, smooth surfaces, and crisp edges that enhance the room's architectural features. This wallpaper installer Lakeview project demonstrates our commitment to excellence and attention to detail.
Professional Tips
Homeowners should always hire experienced professionals for wallpaper installation. Proper surface preparation is crucial for longevity. Additionally, choosing quality materials appropriate for Chicago's climate ensures your investment lasts for years.
See more work and request free estimate at windypainters.com.
Q: Why choose professional wallpaper installer Lakeview services over DIY? / A: Professional installation prevents costly mistakes, ensures proper adhesion, and guarantees beautiful results that enhance your home's value and appearance.
Q: How do you handle vintage Lakeview home challenges? / A: Our wallpaper installer Lakeview team addresses plaster walls, settling issues, and architectural details with specialized techniques and appropriate materials.
Q: What preparation is required before wallpaper installation? / A: We repair wall imperfections, apply primer, ensure smooth surfaces, and address any moisture issues for optimal wallpaper installer Lakeview results.
Q: How long does professional wallpaper installation take? / A: Most rooms require 1-2 days depending on complexity, though our wallpaper installer Lakeview team works efficiently while maintaining quality standards.
Q: Can you work with designer or specialty wallpapers? / A: Absolutely, our wallpaper installer Lakeview experts handle luxury papers, grasscloth, murals, and specialty materials with appropriate techniques and care.
Q: Do you remove existing wallpaper before installation? / A: Yes, we provide complete removal services using safe methods that protect your walls and prepare surfaces for new wallpaper installer Lakeview projects.
Q: How do you ensure pattern alignment and matching? / A: Our wallpaper installer Lakeview professionals use precise measuring, professional tools, and years of experience to achieve perfect pattern continuity.
Q: What types of walls can accommodate wallpaper? / A: We install wallpaper on various surfaces including drywall, plaster, and painted walls after proper preparation for wallpaper installer Lakeview projects.
Q: How do you handle corners and trim work? / A: Our wallpaper installer Lakeview team uses specialized techniques for inside corners, outside corners, and detailed trim work ensuring professional results.
Q: What warranty do you provide on installation? / A: Windy City Painters guarantees our wallpaper installer Lakeview work with comprehensive warranty coverage protecting your investment and ensuring satisfaction.
 Twelve Stones Designs, LLC
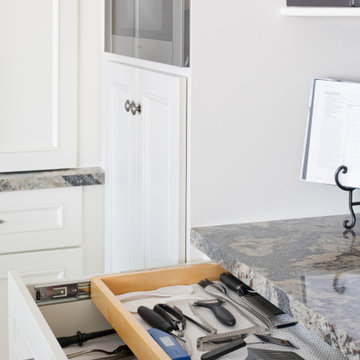
The owners of this kitchen had spent the money to upgrade the finishes in their kitchen upon building the home 12 years ago, but after living in the space for several years they realized how nonfunctional the layout really was. The (then) two preschool aged children had grown into busy, hungry teenagers with many friends who also liked to hang out at the house. So the family needed a more functional kitchen with better traffic flow, space for daily activities revolving around the kitchen at different times of day, and a kitchen that could accommodate cooking for and serving large groups. Furthermore, the dark, traditional finishes no longer reflected the homeowners’ style. They requested a brighter, more relaxed, coastal style that reflected their love of the seaside cities they like to visit.
Originally, the kitchen was U-shaped with a narrow island in the middle. The island created narrow aisles that bottle-necked at the dishwasher, refrigerator, and cooktop areas. There was a pass-through from the foyer into the kitchen, but the owners never liked that the pass-through was also located so close to the powder room. The awkward proximity was unappealing and made guests feel uncomfortable.
The kitchen’s storage was made up of lots of narrow cabinets, apothecary drawers, clipped corner units, and very few drawers. It lacked useful storage for the larger items the family used on a daily basis. And the kitchen’s only pantry was small closet that had only builder-grade, narrow shelving with no illumination to be able to see the contents inside.
Overall, the kitchen’s lighting plan was poorly executed. Only six recessed cans illuminated the entire kitchen and nook areas. The under cabinet lighting was not evenly distributed either. In fact, the builder had mis-placed the under cabinet lighting around the decorative pilasters which made for choppy, dark cubbies. Further, the builder didn’t include any lighting over the sink or the bar area, which meant whoever was doing the dishes was always in their own shadow. That, coupled with the steep overhang of the game room above made the bar area feel like a dim, cavernous space that wasn’t inviting or task oriented. The kitchen looked out into the main living space, but the raised bar and a narrow wall (which held the only large cabinet in the kitchen) created more of a barrier than a relationship to the living room or breakfast nook. In fact, one couldn’t even see the breakfast nook from the cooktop or sink areas due to its orientation. The raised bar top was too narrow to comfortably sit to either dine at or chat from due to the lack of knee space. The the homeowners confided that the kitchen felt more like a dark, dirty prison than place where the family, or their guests, wanted to gather and commune.
The clients' needs and desires were:
➢ to create a kitchen that would be a space the family loved to be in; to relate to the adjacent spaces all around, and to have better flow for entertaining large groups
➢ to remove the walls between the breakfast nook and living area and to be able to utilize the natural light from the windows in both those areas
➢ to incorporate a functional chopping block for prepping fresh food for home cooked meals, an island with a large sink and drain board, 2 pull out trash cans, and seating for at least the 2 teens to eat or do homework
➢ to design a kitchen and breakfast nook with an airy, coastal, relaxed vibe that blended with the rest of the house's coastal theme
➢ to integrate a layered lighting plan which would include ample general illumination, specific task lighting, decorative lighting, and lots of illuminated storage
➢ to design a kitchen with not only more storage for all the husband’s kitchen gadgets and collection of oils and spices, but smart storage, including a coffee/breakfast bar and a place to store and conceal the toaster oven and microwave
➢ to find a way to utilize the large open space between the kitchen, pantry area, and breakfast nook
Twelve Stones Designs achieved the owner's goals by:
➢ removing the walls between the kitchen and living room to allow the natural light to filter in from the adjacent rooms and to create a connection between the kitchen, nook, and living spaces for a sense of unity and communion
➢ removing the existing pantry and designing 3 large pantry style cabinets with LED tape lights and rollout drawers to house lots of kitchen appliances, gadgets, and tons of groceries. We also took the cabinets all the way up to the 9’ ceiling for additional storage for seasonal items and bulk storage.
➢ designing 2 islands - 1 with a gorgeous black walnut chopping block that houses a drawer for chopping and carving knives and a custom double pull out trash unit for point of use utilization - and 1 that houses the dishwasher, a large Blanco Gourmet sink with integrated drain board, woven baskets for fresh root vegetables and kitchen towels, plenty of drawer storage for kitchen items, and bar seating for up to 4 diners.
➢ closing off the space between the kitchen and the powder room to create a beautiful new private alcove for the powder room as well as adding some decorative storage. This also gave us space to include more tall storage near the new range for precision placement of the husband’s extensive oil and spice collection as well as a location for a combo-steam oven the wife wanted for baking and cooking healthy meals.
The project is enhanced functionally by:
➢ incorporated USB and standard receptacles for the kids’ laptops and phone charging in the large island
➢ designing the small island to include additional open shelving for items used on a daily basis such as a variety of bowls, plates, and colanders. This set up also works well for the husband who prefers to “plate” his dinners in restaurant-style fashion before presenting them to the table.
➢ the integration of specific storage units, such as double stacked cutlery drawers, a custom spice pull-out, a Kuerig coffee and tea pod drawer, and custom double stacked utensil drawers
➢ moving the refrigerator to the old oven location - this eliminated the bottle neck as well as created a better relationship to the eating table. It also utilizes the floor space between the pantry, nook, and kitchen
➢ creating a banquet style breakfast nook - this banquette seating not only doubles the amount of seating for large gatherings but it better utilizes the odd space between the kitchen and the previous nook area. It also helps to create a distinct pathway from the mudroom room through the pantry area, kitchen, nook, and living room.
➢ the coffee/breakfast bar area which includes the perfect location for the concealed microwave and toaster oven, convenient storage for the coffee pods and tea accoutrements. Roll-out drawers below also house the smoothie maker, hot water kettle, and a plethora of smoothie-making ingredients such as protein powders, smoothie additives, etc. Furthermore, the drawers below the Keurig house measuring utensil, cutlery, baking supplies and tupperware storage.
➢ incorporating lots of wide drawers and pullouts to accommodate large cookware.
➢ utilizing as much vertical space as possible by building storage to the ceiling which accommodates the family’s abundant amount of serving platters, baking sheets, bakeware, casserole dishes, and additional cutting boards.
The project is enhanced aesthetically by:
➢ new 5-piece Versailles pattern porcelain tile that now seamlessly joins the entire down stairs area together creating a bright, cohesiveness feeling instead of choppy separated spaces - it also adds a coastal feeling
➢ designing a cabinet to conceal the microwave and toaster oven
➢ the coastal influenced light fixtures over the nook table and island
➢ the sandy colors of the Langdon Cambria countertops. The swirling pattern and sparkling quartz pieces remind the homeowner of black-and-tan sandy beaches
➢ the striped banquet seating whose creamy white background and blue-green stripes were the inspiration for the cabinet and wall colors.
➢ All the interior doors were painted black to coordinate with the blacks and grays in the backsplash tile and countertop. This also adds a hint of tailored formality to an otherwise casual space.
➢ the use of WAC's Oculux small aperture LED units for the overhead lighting complimented with Diode LED strips for task lighting under the cabinets and inside the pantry and glass wall cabinets. All of the lighting applications are on separate dimmer switches.
Innovative uses of materials or construction methods by Realty Restoration LLC:
➢ Each 1-1/2” x 3” block of reclaimed end-grain black walnut that makes up the center island chopping block was hand milled and built in the shop. It was designed to look substantial and proportional to the surrounding elements, executed by creating the 4 inch tall top with a solid wood chamfered edge band.
➢ The metal doors on either side of the vent hood were also custom designed for this project and built in the Realty Restoration LLC shop. They are made 1x2, 11-gauge mild steel with ribbed glass. Weighing 60 lbs a piece, heavy duty cabinet hinges were added to support the weight of the door and keep them from sagging.
➢ Under-cabinet receptacles were added along the range wall in order to have a clean, uninterrupted backsplash.
Design obstacles to overcome:
➢ Because we were removing the demising walls between the kitchen and living room, we had to find a way to plumb and vent the new island. We did this by tunneling through the slab (the slab had post tension cables which prevented us from just trenching) to run a new wet vent through a nearby structural wall. We pulled the existing hot and cold lines between upper floor joists and ran them down the structural wall as well and up through a conduit in the tunnel.
➢ Since we were converting from wall overs to a gas range it allowed us to utilize the 220 feed for the wall ovens to provide a new sub panel for all the new kitchen circuits
➢ Due to framing deficiencies inherited from the original build there was a 1-1/2” differential in the floor-to-ceiling height over a 20 foot span; by utilizing the process of cutting and furring coupled with the crown moulding details on the cabinet elevations we were able to mask the problem and provide seamless transitions between the cabinet components.
Evidence of superior craftsmanship:
➢ uniquely designed, one-of-a-kind metal “X” end panels on the large island. The end panels were custom made in the Realty Restoration LLC shop and fitted to the exact dimensions of the island. The welding seams are completely indistinguishable - the posts look like they are cut from a single sheet of metal
➢ square metal posts on the small island were also custom made and designed to compliment and carry through the metal element s throughout the kitchen
➢ the beautiful, oversized end panels on the pantry cabinets which give the breakfast nook a tailored look
➢ integrating a large format 5 piece Versailles tile pattern to seamlessly flow from the existing spaces into the new kitchen space
➢ By constructing a custom cabinet that jogged around a corner we could not remodel (housing the entry way coat closet) we were able to camouflage the adjacent wall offset within the upper and lower cabinets. By designing around the existing jog in the structural walls we accomplished a few things: we were able to find the space to house, and hide, the microwave and toaster oven yet still have a clean cohesive appearance from the kitchen side. Additionally, the owners were able to keep their much needed coat closet and we didn’t have to increase the budget with unnecessary structural work.
 Cascada Showers
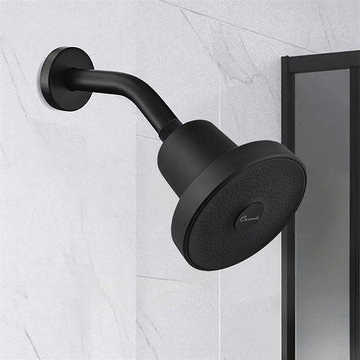
Cascada 5.5" Matt Black Filtered Rainfall Showerhead
Tap water in most US cities contains chlorine, dissolved metals, and sediment that accumulate on your skin and hair every time you shower. If your skin has been feeling dry, your hair dull, or your scalp irritated and you can't figure out why — the water is usually the reason. This matt black filtered rainfall showerhead addresses it with an activated carbon system that works in 15 or 20 stages depending on your water supply, delivers 2 GPM of rainfall coverage, and fits any standard shower arm without tools.
What the Activated Carbon Filter Actually Does
Activated carbon works by binding to contaminants at a molecular level as water passes through — the same principle used in high-end drinking water filtration. In this showerhead, it targets chlorine (the most common municipal water additive), heavy metals from aging supply pipes, sediment, and chemical residue. The result is water that feels measurably softer and rinses cleaner. Skin that was reacting to chlorine stops reacting. Hair that was absorbing heavy metals starts holding its natural oils again.
Which Filter Stage Is Right for You
15-Stage — covers standard municipal water with typical chlorine treatment; the right choice for most US city water
20-Stage — adds extra filtration layers for harder water, higher chlorine concentrations, or well water with more dissolved minerals; worth upgrading if you notice scale buildup on faucets or fixtures

 Bluworld HOMelements
With a double panel of multi-colored Indian Rajah slate, the Nojoqui Falls Double fountain creates a display that is irresistible to the eye and combines a sound that is soothing to the ear. Capturing the raw beauty of its namesake, the beautiful 164 foot Nojoqui Falls near Solvang, California, our fountain combines natural elements with modern technology to bring nature's majesty to your living room. Nearly five feet tall and over four feet wide, this wall mounted fountain makes its presence felt in your home or office.
These water fountains feature your choice of four contemporary finishes framing double panels of Rajah slate layered onto lightweight composite material. The fountain is made with a splash-free design and features LED lighting to bring even more attention to the water falling past the slate. An adjustable flow valve allows you to adjust the rate of the falling water based on your mood, from a tranquil, calming curtain to a torrential cascade. Even with these features, installation is still a breeze, with no special tools. For truly unique and functional decorations, our indoor water fountains are beyond compare.
This water fountain can be customized with your logo.
NSI Slate™ – Water fountains made with our NSI™ Slate use our patent pending technology which sheers a layer of genuine Indian Raja Slate and fuses it to composite material with the same chipped edge technique as slab slate. They are indistinguishable from a thick slab of slate. All the beauty is retained and the weight is reduced by over 90% making it easier to hang a wall fountain.
*Please note that these units are handmade and measurements may vary slightly. Texture and color of the copper and slate may also vary slightly with each fountain.
 Bluworld HOMelements
With a double panel of multi-colored Indian Rajah slate, the Nojoqui Falls Double fountain creates a display that is irresistible to the eye and combines a sound that is soothing to the ear. Capturing the raw beauty of its namesake, the beautiful 164 foot Nojoqui Falls near Solvang, California, our fountain combines natural elements with modern technology to bring nature's majesty to your living room. Nearly five feet tall and over four feet wide, this wall mounted fountain makes its presence felt in your home or office.
These water fountains feature your choice of four contemporary finishes framing double panels of Rajah slate layered onto lightweight composite material. The fountain is made with a splash-free design and features LED lighting to bring even more attention to the water falling past the slate. An adjustable flow valve allows you to adjust the rate of the falling water based on your mood, from a tranquil, calming curtain to a torrential cascade. Even with these features, installation is still a breeze, with no special tools. For truly unique and functional decorations, our indoor water fountains are beyond compare.
This water fountain can be customized with your logo.
NSI Slate™ – Water fountains made with our NSI™ Slate use our patent pending technology which sheers a layer of genuine Indian Raja Slate and fuses it to composite material with the same chipped edge technique as slab slate. They are indistinguishable from a thick slab of slate. All the beauty is retained and the weight is reduced by over 90% making it easier to hang a wall fountain.
*Please note that these units are handmade and measurements may vary slightly. Texture and color of the copper and slate may also vary slightly with each fountain.
9