
Search results for "Missing simply" in Home Design Ideas
 Sosna Inc
This young couple, busy raising two young boys (plus a playful cat), had always planned to renovate—it was just a matter of finding the right people for the job.
Their biggest concern? Hiring a contractor they could truly rely on to bring their vision to life without added stress.
The master ensuite simply wasn’t working. A large, unused deck-mount tub dominated the space, while the tiny, dim shower made daily routines uncomfortable. The layout didn’t make sense for how they actually used the room, which ended up being mostly for the toilet and vanity. On top of that, the master bedroom sat in an open loft without proper walls or a door, making privacy nearly impossible.
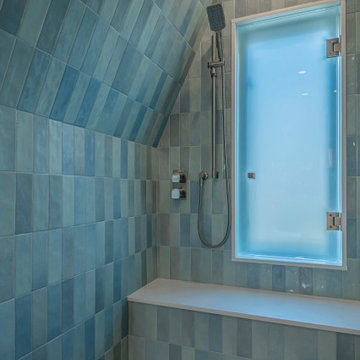
Our solution involved a thoughtful reconfiguration of the ensuite. We removed the oversized tub and replaced it with a spacious walk-in shower. The old, cramped shower space became the perfect spot for a relocated vanity, allowing for better flow and use of the room. Up in the loft, we built a new wall with a door to give the bedroom the privacy it was missing. The stairway was also refreshed with new oak treads and a stained handrail to match the existing flooring.
One challenge during construction was installing the custom shower glass and tile within the sloped ceilings and angled walls—but our team carefully managed every detail to ensure a precise and polished finish.
The new master ensuite now feels like a retreat.
Handmade-style blue subway tiles add a calming pop of colour in the shower, paired with crème porcelain floor tiles. A prefabricated solid wood vanity with quartz countertop, brushed nickel fixtures, and an electric towel warmer complete the space—bringing comfort and functionality together beautifully.
A fun moment during the design phase? We used stools, tables, and even a piano to mock up the future layout—helping the homeowners get a real feel for the spacing between the new vanity and toilet. It was a creative, hands-on way to ensure everyone felt confident moving forward.
Now, the ensuite functions exactly as it should: a fully usable and relaxing 3-piece bathroom, styled just the way they wanted. And with the new loft wall and door, the bedroom finally feels like a true primary suite—private, peaceful, and made for them.
 Harmonic Horticulture and Construction
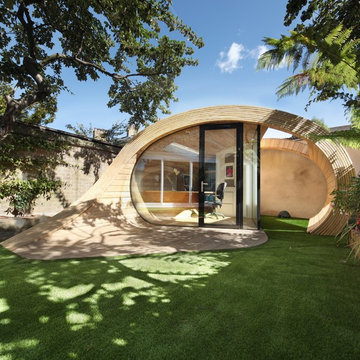
I think that many carpenters today consider nails and screws to be what holds a structure together. As a result, I think that many structures today are held together by little more than nails and screws. I often see knee braces bolted to the side of a post for a pergola when they should be positioned between the post and beam to take the load directly. Fasteners should not be load-bearing! They should be used to pin a piece of lumber into a position that allows it to shoulder the load directly.
Nails and screws are fast. When used appropriately, they can keep costs down by reducing the time it takes to build something. But they are not the answer to everything. Joist hangars do little to stop a deck from pulling away from a house, just as nailing from the side is not a replacement for putting a post directly under a beam.
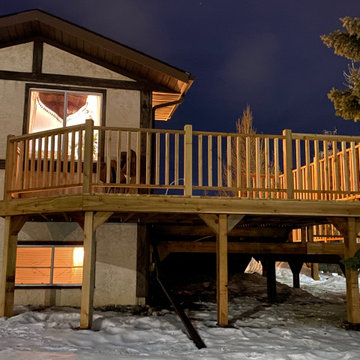
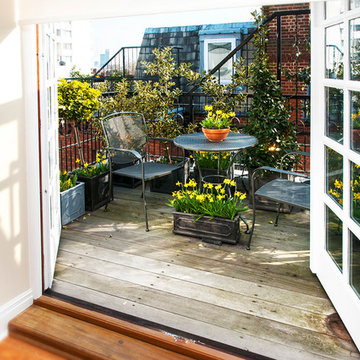
On more than one occasion I've solved a challenging framing problem by employing lap-joints. I've used lap-jointed framing to build curves without having to bend wood, and in the example shown I've used them simply to avoid having to look at an unsightly beam underneath a raised section of deck.
I cut notches half way through my beam where the joists will go, then I cut a corresponding notch into each joist that allows it to fit into the notch in the beam. This allows the joists to cantilever 'through' the beam, which gives me a number of advantages. Using this technique, I can build deck frames tight to the ground without having to rim the structure with joist-hangared beams. I can also use the cantilever to sculpt the edge of the deck into nearly any shape.
As the lumber is locked in from every direction, it is also a far stronger joint than a joist-hangared butt-end, as it resists pulling away, and it is stronger than joist-on-beam because it does not allow for any twisting or 'flopping' of the joists. The beam and joist are locked together, and they each replace the missing pieces of one another, so there is no strength lost in either member.
-Tyler Collins, Operations Manager
 Harmonic Horticulture and Construction
I think that many carpenters today consider nails and screws to be what holds a structure together. As a result, I think that many structures today are held together by little more than nails and screws. I often see knee braces bolted to the side of a post for a pergola when they should be positioned between the post and beam to take the load directly. Fasteners should not be load-bearing! They should be used to pin a piece of lumber into a position that allows it to shoulder the load directly.
Nails and screws are fast. When used appropriately, they can keep costs down by reducing the time it takes to build something. But they are not the answer to everything. Joist hangars do little to stop a deck from pulling away from a house, just as nailing from the side is not a replacement for putting a post directly under a beam.
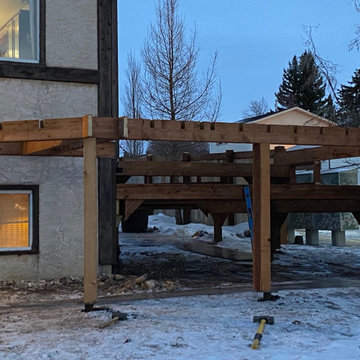
On more than one occasion I've solved a challenging framing problem by employing lap-joints. I've used lap-jointed framing to build curves without having to bend wood, and in the example shown I've used them simply to avoid having to look at an unsightly beam underneath a raised section of deck.
I cut notches half way through my beam where the joists will go, then I cut a corresponding notch into each joist that allows it to fit into the notch in the beam. This allows the joists to cantilever 'through' the beam, which gives me a number of advantages. Using this technique, I can build deck frames tight to the ground without having to rim the structure with joist-hangared beams. I can also use the cantilever to sculpt the edge of the deck into nearly any shape.
As the lumber is locked in from every direction, it is also a far stronger joint than a joist-hangared butt-end, as it resists pulling away, and it is stronger than joist-on-beam because it does not allow for any twisting or 'flopping' of the joists. The beam and joist are locked together, and they each replace the missing pieces of one another, so there is no strength lost in either member.
-Tyler Collins, Operations Manager
Find the right local pro for your project
 Sosna Inc
This young couple, busy raising two young boys (plus a playful cat), had always planned to renovate—it was just a matter of finding the right people for the job.
Their biggest concern? Hiring a contractor they could truly rely on to bring their vision to life without added stress.
The master ensuite simply wasn’t working. A large, unused deck-mount tub dominated the space, while the tiny, dim shower made daily routines uncomfortable. The layout didn’t make sense for how they actually used the room, which ended up being mostly for the toilet and vanity. On top of that, the master bedroom sat in an open loft without proper walls or a door, making privacy nearly impossible.
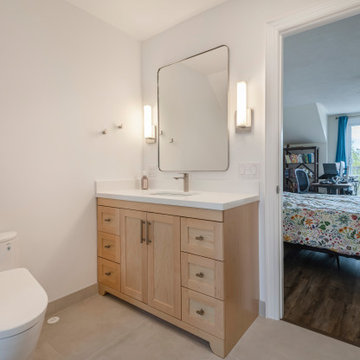
Our solution involved a thoughtful reconfiguration of the ensuite. We removed the oversized tub and replaced it with a spacious walk-in shower. The old, cramped shower space became the perfect spot for a relocated vanity, allowing for better flow and use of the room. Up in the loft, we built a new wall with a door to give the bedroom the privacy it was missing. The stairway was also refreshed with new oak treads and a stained handrail to match the existing flooring.
One challenge during construction was installing the custom shower glass and tile within the sloped ceilings and angled walls—but our team carefully managed every detail to ensure a precise and polished finish.
The new master ensuite now feels like a retreat.
Handmade-style blue subway tiles add a calming pop of colour in the shower, paired with crème porcelain floor tiles. A prefabricated solid wood vanity with quartz countertop, brushed nickel fixtures, and an electric towel warmer complete the space—bringing comfort and functionality together beautifully.
A fun moment during the design phase? We used stools, tables, and even a piano to mock up the future layout—helping the homeowners get a real feel for the spacing between the new vanity and toilet. It was a creative, hands-on way to ensure everyone felt confident moving forward.
Now, the ensuite functions exactly as it should: a fully usable and relaxing 3-piece bathroom, styled just the way they wanted. And with the new loft wall and door, the bedroom finally feels like a true primary suite—private, peaceful, and made for them.
 Harmonic Horticulture and Construction
I think that many carpenters today consider nails and screws to be what holds a structure together. As a result, I think that many structures today are held together by little more than nails and screws. I often see knee braces bolted to the side of a post for a pergola when they should be positioned between the post and beam to take the load directly. Fasteners should not be load-bearing! They should be used to pin a piece of lumber into a position that allows it to shoulder the load directly.
Nails and screws are fast. When used appropriately, they can keep costs down by reducing the time it takes to build something. But they are not the answer to everything. Joist hangars do little to stop a deck from pulling away from a house, just as nailing from the side is not a replacement for putting a post directly under a beam.
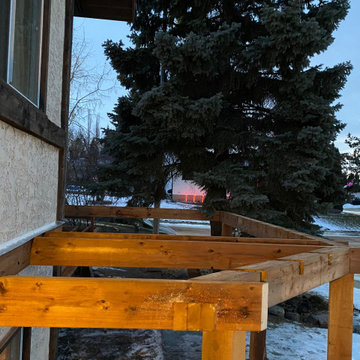
On more than one occasion I've solved a challenging framing problem by employing lap-joints. I've used lap-jointed framing to build curves without having to bend wood, and in the example shown I've used them simply to avoid having to look at an unsightly beam underneath a raised section of deck.
I cut notches half way through my beam where the joists will go, then I cut a corresponding notch into each joist that allows it to fit into the notch in the beam. This allows the joists to cantilever 'through' the beam, which gives me a number of advantages. Using this technique, I can build deck frames tight to the ground without having to rim the structure with joist-hangared beams. I can also use the cantilever to sculpt the edge of the deck into nearly any shape.
As the lumber is locked in from every direction, it is also a far stronger joint than a joist-hangared butt-end, as it resists pulling away, and it is stronger than joist-on-beam because it does not allow for any twisting or 'flopping' of the joists. The beam and joist are locked together, and they each replace the missing pieces of one another, so there is no strength lost in either member.
-Tyler Collins, Operations Manager

 Adar Moy
Travel is more than just the act of going from one place to another; it’s an exploration of new perspectives, cultures, and experiences. Whether you’re a seasoned globetrotter or a first-time adventurer, the journey holds the power to change you in unexpected ways. Exoticca Helps a lot to Travel.
1. Embrace the Journey, Not Just the Destination
Too often, we focus on reaching the destination, ticking off items on our travel bucket list. But some of the most memorable moments in travel happen when we slow down and engage with the world around us. Take time to walk through a bustling market, share a meal with a local family, or simply sit on a beach at sunset. These moments allow us to experience the true essence of a place beyond its landmarks.
2. Travel with Purpose
In today’s fast-paced world, many travelers are seeking deeper, more meaningful experiences. Whether it’s volunteering in a foreign country, participating in eco-tourism, or learning a new skill, travel can be a gateway to personal growth. Traveling with purpose adds value to your journey and ensures that it impacts not only you but the places you visit. Volunteering in a community, helping preserve nature, or supporting local artisans can leave you with a sense of accomplishment and connection to the world.
3. The Magic of Cultural Immersion
One of the best ways to travel is to truly immerse yourself in the culture of the place you’re visiting. Skip the tourist traps and spend time in local neighborhoods. Try the street food, learn a few words in the local language, and embrace local traditions. The more you engage with the culture, the richer your experience will be. This immersion leads to a greater understanding and respect for different ways of life, fostering deeper connections between people across the globe.
4. Sustainable Travel: A Responsibility for the Future
As travelers, we must recognize the impact our journeys can have on the environment. Sustainable travel practices are becoming more essential than ever before. From reducing plastic usage to supporting eco-friendly accommodations, there are many ways to ensure that our travels leave a positive legacy. Before your trip, research sustainable activities, respect wildlife, and consider how your visit affects local ecosystems. This mindset not only protects the planet but enhances your overall travel experience by aligning it with a purpose.
5. Travel Challenges: Growth Through Adversity
It’s not always smooth sailing. Missed flights, language barriers, unexpected weather, or cultural misunderstandings can make travel seem daunting. However, these challenges can also offer some of the most rewarding experiences. Overcoming adversity while traveling encourages adaptability, patience, and resilience. These moments allow you to connect more deeply with yourself and the world, turning what could be a frustrating experience into an unforgettable lesson in growth.
6. Rediscovering Yourself Through Travel
The act of leaving behind your daily routine and exploring new places often leads to self-reflection. Away from the distractions of everyday life, you have space to reconnect with yourself. Whether it’s finding peace in nature, discovering a new passion, or challenging your comfort zone, travel is a powerful tool for self-discovery. Many travelers report feeling more energized, inspired, and aware of their true desires after a meaningful journey.
7. Tips for a Seamless Travel Experience
To make the most of your travels, planning is key. Here are a few tips for a smooth and enjoyable journey:
Research your destination: Learn about the local culture, customs, and etiquette to show respect and avoid misunderstandings.
Pack smart: Pack light and include only essentials to keep your travels stress-free. A good travel bag and comfortable shoes are a must!
Stay flexible: Sometimes, plans go awry. Stay adaptable and be open to spontaneous adventures.
Engage with locals: The best recommendations often come from those who live in the area. Don't be afraid to ask for tips or hidden gems.
Capture memories: While it’s important to live in the moment, capturing photos or journaling your experiences can help you relive your journey long after it ends.
8. The Future of Travel: Trends to Watch
As we look to the future, the way we travel is evolving. Virtual reality and AI are changing the way we plan and experience destinations, allowing for more personalized and immersive adventures. Moreover, the rise of wellness travel is focusing on mental and physical health, with more travelers seeking destinations that offer relaxation and rejuvenation. Regardless of how travel continues to evolve, the spirit of discovery and connection will always remain at the heart of every journey.
Conclusion: Traveling for a Better World
Travel is a transformative experience that connects us to the world, broadens our understanding, and enriches our lives. By approaching travel with an open mind, a sense of responsibility, and a desire for authentic experiences, we not only enhance our journeys but contribute to the global community. As you pack your bags for your next adventure, remember that every step you take is an opportunity to learn, grow, and contribute to a more interconnected world.
 Simply Home Decorating
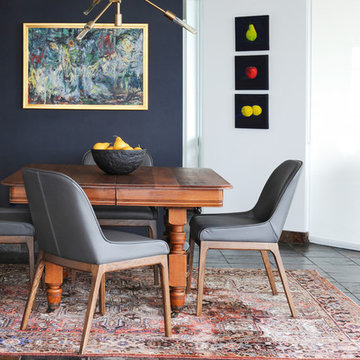
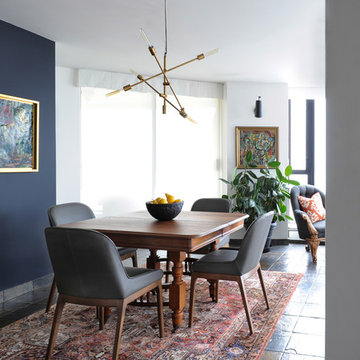
The homeowners of this condo sought our assistance when downsizing from a large family home on Howe Sound to a small urban condo in Lower Lonsdale, North Vancouver. They asked us to incorporate many of their precious antiques and art pieces into the new design. Our challenges here were twofold; first, how to deal with the unconventional curved floor plan with vast South facing windows that provide a 180 degree view of downtown Vancouver, and second, how to successfully merge an eclectic collection of antique pieces into a modern setting. We began by updating most of their artwork with new matting and framing. We created a gallery effect by grouping like artwork together and displaying larger pieces on the sections of wall between the windows, lighting them with black wall sconces for a graphic effect. We re-upholstered their antique seating with more contemporary fabrics choices - a gray flannel on their Victorian fainting couch and a fun orange chenille animal print on their Louis style chairs. We selected black as an accent colour for many of the accessories as well as the dining room wall to give the space a sophisticated modern edge. The new pieces that we added, including the sofa, coffee table and dining light fixture are mid century inspired, bridging the gap between old and new. White walls and understated wallpaper provide the perfect backdrop for the colourful mix of antique pieces. Interior Design by Lori Steeves, Simply Home Decorating. Photos by Tracey Ayton Photography
 Tile Doctor Ltd
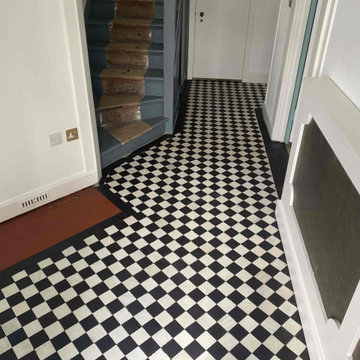
This client from North London had recently bought a property in Highgate N6 and during renovation had discovered an original Victorian tiled floor in the hallway. The floor was laid in a classic black and white diamond pattern but unfortunately a large section was missing and had been filled with concrete. Furthermore, most of the remaining floor had been covered in cement and glue.
I carried out a survey of the floor to determine the main issues and was then able to email over a quote later that day that included rebuilding the missing section of flooring. I suspect the floor had been excavated at some point in the past to install central heating and then rather than have the excavated section restored it was simply back filled and then levelled with a cement screed before finally gluing down a carpet on top.
Once the quote was accepted, I sourced replacement tiles from the Vintage Floor Tile company. Situated in Kent they are a reclamation yard that specialises in supplying original geometric and encaustic tiles including the major historical makers such as Minton and Craven Dunnill.
Armed with replacement tiles I started by removing the concrete that had been used to backfill the missing section and prepare a new surface for tiling with quick drying cement. When ready I was able to carefully build back the original pattern using the replacements. The tiles were secured with tile adhesive and once that had gone off, they were grouted.
The floor was left to set fully overnight and then the next day I was able to return and clean the whole floor using a strong dilution of Tile Doctor Remove and Go. As usual this was left to soak into the tiles for a good ten minutes before being scrubbed into the tiles using a black scrubbing pad. The Tile Doctor Remove and Go did a good job of cleaning the floor and the cleaning solution soon turned black with dirt during the scrubbing. The floor was rinsed with water and the soil extracted with a wet vacuum. After inspecting the floor any areas that needed further work were hand scrubbed and rinsed again until I was happy the floor was clean.
The last part of the cleaning process was to give the tiles an acid wash using Tile Doctor Acid Gel which further cleans the floor by removing old cement residue and grout haze. It also neutralises efflorescent salts in the tiles which are a common issue with floors of this age with no damp proof membrane. After another rinse and extraction, the floor was given a final rinse and then dried as much as possible using the wet vacuum.
I left the floor to dry out for a couple of days before returning to apply a protective sealer. Tile and Stone should be dry before sealing so I use a damp meter first to double check. All was well so to seal the tiles I proceeded to apply the first of what would be three coats of sealer. I used Tile Doctor Colour Grow for this, it works by impregnating the tile occupying the pores and thereby preventing dirt from becoming ingrained there. This product also enhances the black and white colour of the tiles and makes the floor much easier to clean.
Once done the floor was transformed and needless to say my customer was very pleased with the result. For the aftercare of Victorian Tiled floors, I recommend the use of a ph neural tile cleaner such as Tile Doctor Neutral Cleaner; most supermarket tile cleaners are simply too strong for use on sealed floors and can strip off the sealer prematurely.
Andrew Newstead
North London Tile Doctor
 Lemon Remodeling & Services
Explore Lemon Remodeling’s comprehensive bathroom remodeling project!
Schedule an appointment via https://calendly.com/lemonremodeling or simply give us a call now! ??✨
Step into our Master and Hallway Bathroom Remodeling project in San Jose. Witness the journey from concept to completion as we meticulously overhaul these spaces from A to Z. Through a captivating collection of photographs, our portfolio showcases the artistry, craftsmanship, and attention to detail that define our work.
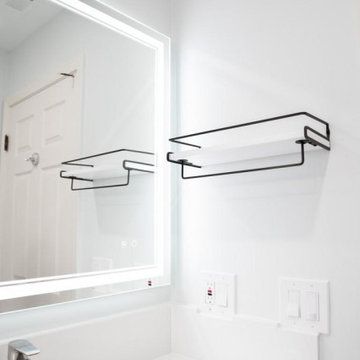
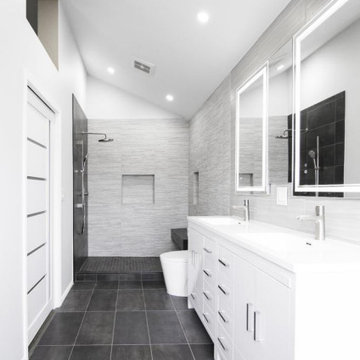
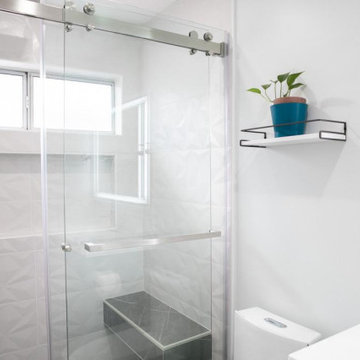
Discover this two-bathroom remodel in San Jose that redefines luxury. With a vaulted ceiling, a custom white metal trim edge, and a recessed shampoo box, this bathroom offers both elegance and practicality. Don't miss the shower bench for added comfort. Explore the transformation today!
 Simply Home Decorating
The homeowners of this condo sought our assistance when downsizing from a large family home on Howe Sound to a small urban condo in Lower Lonsdale, North Vancouver. They asked us to incorporate many of their precious antiques and art pieces into the new design. Our challenges here were twofold; first, how to deal with the unconventional curved floor plan with vast South facing windows that provide a 180 degree view of downtown Vancouver, and second, how to successfully merge an eclectic collection of antique pieces into a modern setting. We began by updating most of their artwork with new matting and framing. We created a gallery effect by grouping like artwork together and displaying larger pieces on the sections of wall between the windows, lighting them with black wall sconces for a graphic effect. We re-upholstered their antique seating with more contemporary fabrics choices - a gray flannel on their Victorian fainting couch and a fun orange chenille animal print on their Louis style chairs. We selected black as an accent colour for many of the accessories as well as the dining room wall to give the space a sophisticated modern edge. The new pieces that we added, including the sofa, coffee table and dining light fixture are mid century inspired, bridging the gap between old and new. White walls and understated wallpaper provide the perfect backdrop for the colourful mix of antique pieces. Interior Design by Lori Steeves, Simply Home Decorating. Photos by Tracey Ayton Photography

 Madeleine Design Group Inc.
Example of a large trendy open concept beige floor living room design in Vancouver with white walls, a standard fireplace and a metal fireplace

 David Coulson Design Ltd.
Tony Colangelo
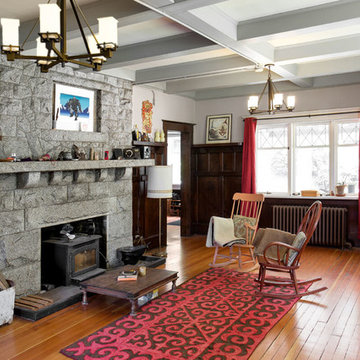
Example of an arts and crafts living room design in Vancouver
Example of an arts and crafts living room design in Vancouver
 Studio Ten Interior Design Ltd.
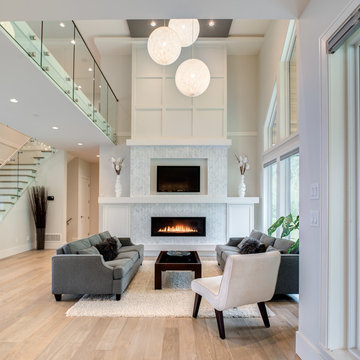
Living room - mid-sized transitional open concept light wood floor and beige floor living room idea in Vancouver with white walls, a standard fireplace, a stone fireplace and a wall-mounted tv
 Lemon Remodeling & Services
Explore Lemon Remodeling’s comprehensive bathroom remodeling project!
Schedule an appointment via https://calendly.com/lemonremodeling or simply give us a call now! ??✨
Step into our Master and Hallway Bathroom Remodeling project in San Jose. Witness the journey from concept to completion as we meticulously overhaul these spaces from A to Z. Through a captivating collection of photographs, our portfolio showcases the artistry, craftsmanship, and attention to detail that define our work.
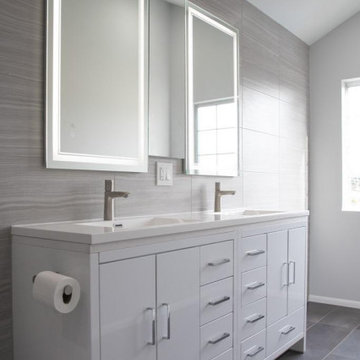
Discover this two-bathroom remodel in San Jose that redefines luxury. With a vaulted ceiling, a custom white metal trim edge, and a recessed shampoo box, this bathroom offers both elegance and practicality. Don't miss the shower bench for added comfort. Explore the transformation today!
 Lemon Remodeling & Services
Explore Lemon Remodeling’s comprehensive bathroom remodeling project!
Schedule an appointment via https://calendly.com/lemonremodeling or simply give us a call now! ??✨
Step into our Master and Hallway Bathroom Remodeling project in San Jose. Witness the journey from concept to completion as we meticulously overhaul these spaces from A to Z. Through a captivating collection of photographs, our portfolio showcases the artistry, craftsmanship, and attention to detail that define our work.
Discover this two-bathroom remodel in San Jose that redefines luxury. With a vaulted ceiling, a custom white metal trim edge, and a recessed shampoo box, this bathroom offers both elegance and practicality. Don't miss the shower bench for added comfort. Explore the transformation today!
 Meredith Heron Design
Donna Griffith for House and Home Magazine
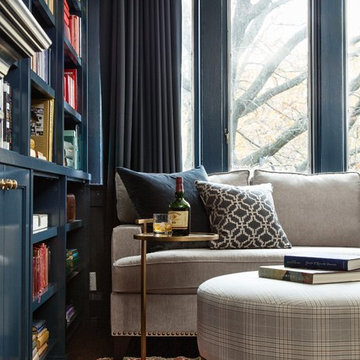
Example of a small classic enclosed dark wood floor living room design in Toronto with blue walls
Example of a small classic enclosed dark wood floor living room design in Toronto with blue walls
 Lemon Remodeling & Services
Explore Lemon Remodeling’s comprehensive bathroom remodeling project!
Schedule an appointment via https://calendly.com/lemonremodeling or simply give us a call now! ??✨
Step into our Master and Hallway Bathroom Remodeling project in San Jose. Witness the journey from concept to completion as we meticulously overhaul these spaces from A to Z. Through a captivating collection of photographs, our portfolio showcases the artistry, craftsmanship, and attention to detail that define our work.
Discover this two-bathroom remodel in San Jose that redefines luxury. With a vaulted ceiling, a custom white metal trim edge, and a recessed shampoo box, this bathroom offers both elegance and practicality. Don't miss the shower bench for added comfort. Explore the transformation today!
9