
Search results for "Money cleaned" in Home Design Ideas
 Tile Doctor Ltd
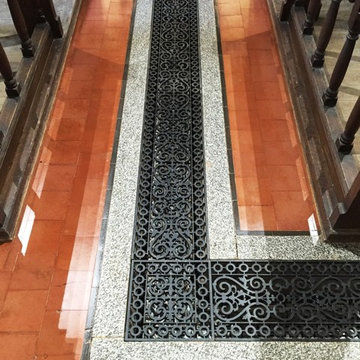
Did you know that Wantage, the town in Oxfordshire where I completed this job, is the birthplace of Alfred the Great? The town is certainly a historic area – in fact, I was contacted by the warden of a church dating back to the 12th century, who asked Tile Doctor Oxfordshire to help restore the building’s flooring, consisting of Quarry and Marble tiles.
This is an interesting mix of hard wearing and high end tiles, and while the floor was in
dire need of a deep clean, it could be restored back to looking fantastic once again.
The church has recently undergone a complete refurbishment with the help of a grant from lottery money. We were called after the builders had finished their work, to restore the floor to the finish required by the church warden.
His specification was to provide the Marble with a Matt finish and the Quarry tiles with a sheen finish. The floor was, at one point in its history, covered in carpet which had been taken up, no doubt exposing many years’ worth of muck.
My first task was to clean the floor with a diluted solution of Tile Doctor Pro-Clean, a high alkaline cleaner safe to use on tile and stone. This was left to dwell for a short period to seep into the tile, before being scrubbed in to remove the initial layers of muck. The resulting residue was promptly vacuumed away.
To tackle the tougher areas of soil buildup, I opted to use Tile Doctor Nanotech HBU which was spread over the floor and left to dwell for about 30 minutes. This product differs from most cleaners in that it uses nano-sized cleaning particles to deal with difficult to reach dirt ingrained in the stone. I then rinsed the area with water and vacuumed this up.
Due to the substantial size of the church floor I had to work in multiple sections, and so the cleaning process took three days to complete. After finishing, I left the church for a few days to allow the floor time to dry.
When I returned to the church I checked the floor with a damp meter and was satisfied that it was dry enough to seal.
First, I sealed the Marble tiles with Tile Doctor Colour Grow, which is a colour enhancing impregnating sealer suitable for use on high end stone such as Marble and Limestone. I applied two coats, leaving a few hours between coats; this brought the colour back without a high shine, as per the church warden’s request.
The next day I returned to seal the Quarry tiles, this time using Tile Doctor Seal & Go Extra which is a topical sealer specially formulated to lea e a nice sheen as requested. I applied several thin coats of the sealer to build up solid protection on the floor.
The warden was extremely pleased with the finished floor, leaving the following feedback:
“We found the Tile Doctor online and watched some of the very helpful slideshows on YouTube. The Victorian Quarry tiles in our 12th century church had been covered with carpet for many years and needed a thorough clean and polish at the end of our major restoration project. Barry was very quick to respond to our enquiry and over the course of a week he did a brilliant job on our tiles. We’re delighted with the results, just in time for our reopening service with our bishop and MP.”
Barry Woodward
Oxfordshire Tile Doctor


 BDI Furniture
The modern FORMAT office collection creates a workspace where form and function are elegantly intertwined. The collection includes a 3-drawer desk, a mobile file pedestal and a versatile mobile credenza that includes storage for a printer, hanging files and other supplies. This modern collection features nickel-plated steel details and is available in two finishes.
Find the right local pro for your project

 ESI Builders & Remodelers
3,800sf, 4 bdrm, 3.5 bath with oversized 4 car garage and over 270sf Loggia; climate controlled wine room and bar, Tech Room, landscaping and pool. Solar, high efficiency HVAC and insulation was used which resulted in huge rebates from utility companies, enhancing the ROI. The challenge with this property was the downslope lot, sewer system was lower than main line at the street thus requiring a special pump system. Retaining walls to create a flat usable back yard.
ESI Builders is a subsidiary of EnergyWise Solutions, Inc. and was formed by Allan, Bob and Dave to fulfill an important need for quality home builders and remodeling services in the Sacramento region. With a strong and growing referral base, we decided to provide a convenient one-stop option for our clients and focus on combining our key services: quality custom homes and remodels, turnkey client partnering and communication, and energy efficient and environmentally sustainable measures in all we do. Through energy efficient appliances and fixtures, solar power, high efficiency heating and cooling systems, enhanced insulation and sealing, and other construction elements – we go beyond simple code compliance and give you immediate savings and greater sustainability for your new or remodeled home.
All of the design work and construction tasks for our clients are done by or supervised by our highly trained, professional staff. This not only saves you money, it provides a peace of mind that all of the details are taken care of and the job is being done right – to Perfection. Our service does not stop after we clean up and drive off. We continue to provide support for any warranty issues that arise and give you administrative support as needed in order to assure you obtain any energy-related tax incentives or rebates. This ‘One call does it all’ philosophy assures that your experience in remodeling or upgrading your home is an enjoyable one.
ESI Builders was formed by professionals with varying backgrounds and a common interest to provide you, our clients, with options to live more comfortably, save money, and enjoy quality homes for many years to come. As our company continues to grow and evolve, the expertise has been quickly growing to include several job foreman, tradesmen, and support staff. In response to our growth, we will continue to hire well-qualified staff and we will remain committed to maintaining a level of quality, attention to detail, and pursuit of perfection.

 Saltbox Architecture
Inspiration for a large contemporary light wood floor sunroom remodel in DC Metro with no fireplace and a standard ceiling

 Dresner Design | Chicago Custom Kitchens Cabinets
A Lake Michigan Home gets a Modern Refresh from Dresner Design.
Photos by Tony Soluri.
This couple moved from Chicago’s Wicker Park to a rural setting but wanted to maintain their modern aesthetic. Scott Dresner of Dresner Design created a light bright clean-lined kitchen perfect for the couple’s need to entertain. Must have’s included a drawer for over sixty spices, storage for three sets of dishes, a coffee bar, and a huge island the couple uses for entertaining. The palette is mostly white to maximize outdoor views. Constraints were plenty both timeline and budgetary. Dresner came up with some creative solutions, which allowed the homeowners to save on cabinetry and materials and splurge on appliances.
 nicks building supply
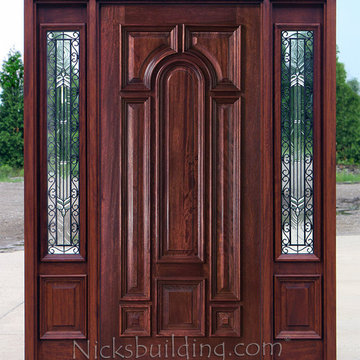
Solid Mahogany Exterior doors with two sidelights-
Model: N-525PP & N-75 Sidelight
Solid Wood Door
Door size: 36”
sidelight size: From 11” sidelights threw 16” sidelights
Glass type:Iron Classic sandwiched for easy clean
Rough opening- Built to suit
Wood Species: 100% Solid Brazilian Mahogany (no veneers)
Door Thickness: 1 3/4"
System is Pre-hung with Solid Mahogany Jambs, 2" Brick-molding, Adjustable Continuous Bronze Threshold,
Our Pre-Hung Door Systems are "NOT" Kits! Shipped truly and completely pre-hung with hinges mortised to door and pre-installed in the Jamb for the easiest installation possible. This will save you Time and Money. No extra work needed for the carpenter. Ready to install into the doorway.
Your Choice of Commercial Grade Ball-Bearing Hinge Color, Q-Lon compression Weather-stripping and Rubber Door Sweep.
Lock Prep included. Left or Right Hand Door Swing. Single or Double Bored. 2 1/8" diameter hole(s), w/ 2 3/4" backset, 5 1/2" spread.
Price is for Unfinished - Optional Exterior Grade UV Stain and UV Sealer Finishing Available
Call 219-663-2279 for more info & sales

 Kang Contractors LLC
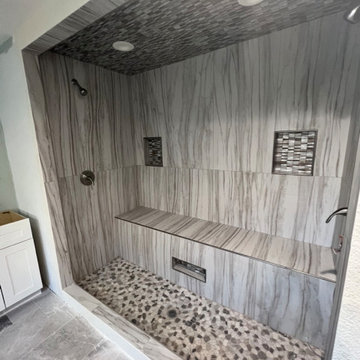
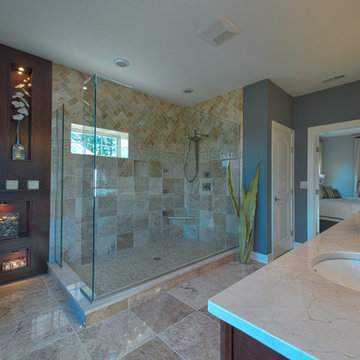
Custom built 6' wide steam shower with bench.
Built frame, hardy back, red guard then installed tile peices along with mesh tiles for ceiling and floors. Cut out 3 Niches, the one at the bottom has steam valves.
Installed (2) shower heads and (2) recessed LED lights.
This project was a nightmare becuase the customers used another contractor to do what we accomplished and he ended up taking their money and ruining their home. We had to demo the entire Master bathroom to get a clean slate which then we were able to build a floor plan off of what was able to be used. A ton of fabrication, relocating plumbing, walls, paint and much more.
If you look at the "before" photos, you will see how this home used to look compared to what it does now.
Customers lived on-site while we worked, which made it twice as hard with all of their belongings in the way but a great company works around all the obstacles thrown at them!
 Bellwether Windows, Siding & Doors
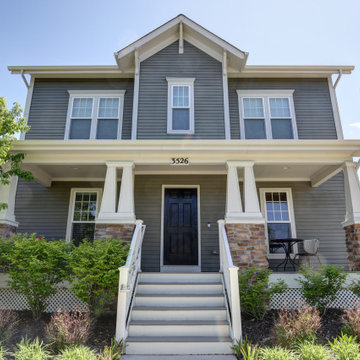
Built in 2011, this home is gorgeous. Unfortunately, sections of the home’s exterior had CertainTeed WeatherBoard siding, a budget fiber cement product that failed and was implicated in a class-action lawsuit. The siding was cracking and falling off the home after less than 10 years!
The original homeowner collected money from the lawsuit settlement and needed the siding replaced to pass inspection for a pending sale of the home. Colorado Siding Repair installed James Hardie fiber cement lap siding on the entire home, as well as new James Hardie panel siding and trim on the front porch columns. We painted the whole home with Sherwin-Williams Duration paint to update the color scheme and protect the new siding.
We are seasoned contractors who have helped dozens of homeowners replace failing CertainTeed siding with James Hardie fiber cement siding and trim. Call us if you’d like help replacing yours siding!

 Jami Abbadessa
This couple was ready for some major changes in their home on north Euclid in Upland, CA. After completing their nursery last year, they asked for help designing their family room. Everything had to go! The brick fireplace, the TV niche next to the fireplace, the wet bar…none of it portrayed my client’s taste or style in any way. They requested a space that was modern, not fussy, clean and contemporary. I achieved this look by transforming the fireplace wall with limestone and paneled walls with hidden storage behind where the TV niche used to be. Other features that helped in this transformation are updated recessed and accent lighting, fixtures, window coverings, sleek, contemporary furnishings, art and accessories. The existing carpet was replaced with dark wood flooring that seamlessly meets the new limestone fireplace hearth that runs the distance of the entire focal wall.
A roadblock popped up when we found out the SMALLEST WALL in the house that was part of the existing wet bar turned out to be where the main plumbing and electrical were housed. Instead of spending the exorbitant amount of money that it would’ve cost to remove this wall, I instead turned the unused wet bar into a functional feature with oodles of storage on one side and a wall niche on the opposite to display art.
Now this space is a functional and comfortable room in their house where they can relax and spend time with family.

 Kang Contractors LLC
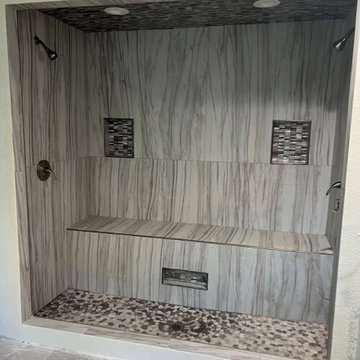
Custom built 6' wide steam shower with bench.
Built frame, hardy back, red guard then installed tile peices along with mesh tiles for ceiling and floors. Cut out 3 Niches, the one at the bottom has steam valves.
Installed (2) shower heads and (2) recessed LED lights.
This project was a nightmare becuase the customers used another contractor to do what we accomplished and he ended up taking their money and ruining their home. We had to demo the entire Master bathroom to get a clean slate which then we were able to build a floor plan off of what was able to be used. A ton of fabrication, relocating plumbing, walls, paint and much more.
If you look at the "before" photos, you will see how this home used to look compared to what it does now.
Customers lived on-site while we worked which made it twice as hard with all of their belongings in the way but a great company works around all the obstacles thrown at them!
 Sunburst Shutters Ft. Lauderdale
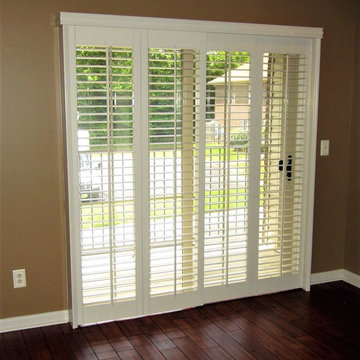
We design sliding shutters from our best-selling plantation shutters: Polywood. Not only do these shutters last more than 50 years, but they're also excellent at blocking the effects of weather conditions to save you money on your energy bills. And the louvers can be easily tilted open to let in as much light as you want. We offer these shutters for sliding glass doors in two configurations based on the space you have available. Bypass configuration works well in rooms where there isn't space to spare on either side of the sliding glass doors. In the bifold configuration, both sets of shutter panels fold out from the center and move to the side, thanks to a top-mounted track.
 Tile Doctor Ltd
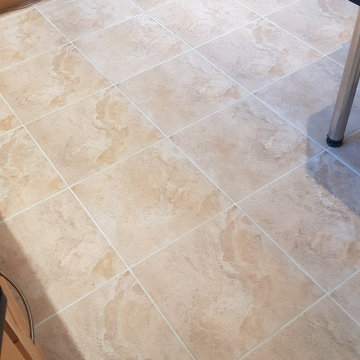
This Ceramic Tiled kitchen floor at a property in Wickersley was proving to be a pain for our clients, whatever they did the grout just looked dark, dirty, and unsightly. No amount of scrubbing would make a difference and eager to find a solution they wasted a lot of money on various products trying to clean the grout lines, but nothing had worked. Ceramic tiles are glazed which makes them very easy to clean, grout however is a different story.
Wickersley is in Rotherham close to the 3 main motorways in South Yorkshire, the M1, M18 and A1. The village took its’ name from the Wickersley family who eventually moved to Sheffield and built the famous Broom Hall, incredibly we restored 100sqm of stone flooring in that very house not too long back. It was a beautiful restoration.
On the first visit we tried a few of our products to clean the grout lines up but sometimes grout just can’t be cleaned, if the staining has penetrated the surface layer and gone right down into the grout it is stained forever. Grinding the grout out and putting in new grout is a big messy expensive job. For this reason, our grout recolouring service is an ideal option and the best thing about it is once it is recoloured the grout is protected and stain resistant.
Tile Doctor have a range of ten grout colours to choose from and in this case our client chose the light grey colour. They were happy to go ahead with our quote and just thankful that we were able to do it relatively inexpensively and without making a huge mess!
Work started by treating the grout lines with an acidic pre-treater that comes with the Grout Colourant kit that Tile Doctor sell, Tile Doctor Grout Colourant Pre-Treat cleaner, this gets rid of any contamination and prepares the grout for the colourant, so you get a superior bond.
Once dry the Light Grey Grout Colourant was applied the grout lines with a small brush. A steady hand is required, and you need to ensure any excess is immediately wiped away before it dries. It is quite a slow job, but very satisfying when you see the difference it makes. Glazed tiles are sealed during manufacture, so we do not need to apply a sealer like we do on most of our jobs.
The customer was over the moon with the transformation, the grubby grout lines had been irradicated and because the grout colourant forms a barrier over the grout, they will remain looking good for a long time to come. For aftercare cleaning I recommended using Tile Doctor Neutral Tile Cleaner which is pH neutral and gentle enough to use on a regular basis, it also has a nice fresh smell.
Matthew Lovett
South Yorkshire TIle Doctor

 Distinctive Drywall & Painting
Spacecrafting Photography
Large tuscan light wood floor and brown floor living room photo in Minneapolis with white walls, a corner fireplace and a plaster fireplace
Large tuscan light wood floor and brown floor living room photo in Minneapolis with white walls, a corner fireplace and a plaster fireplace

 User
Want the most unique backyard covered area in town? Your friends will be amazed by your Aluminum Louvered Patio Roof System that OPENS and CLOSES by remote control! It’s even Solar Powered! These are not kits. We build them to your specifications for both residential and commercial, up to any size. With the Lifetime Warranty on the powder coated finish, you will enjoy this maintenance free roof for YEARS! (The system pictured is attached to the house which is our most popular!)
This product will totally protect you from the SUN and RAIN! When closed all the way the roof will not leak underneath. Each louver acts as a gutter that channels all the water off into the grass or an optional gutter system. You can adjust the amount of sunlight you want coming through your roof because you can stop it in any position between open and close.
This is the Cadillac of roof systems so be prepared to spend some money, but it will be one of the best investments you can ever make in your home.
What good is a Florida backyard if it’s too hot or wet to enjoy it!
 Atlas Roofing - Shingles
Summer will soon be knocking at your door, begging you to come outside and spend time in its warm sunshine. The nicer weather means hosting family barbecues and parties, kicking back in the shade with a good book or floating around in the pool, allowing the stresses of everyday life to slowly drift away.
Outdoor Seating - Sectional
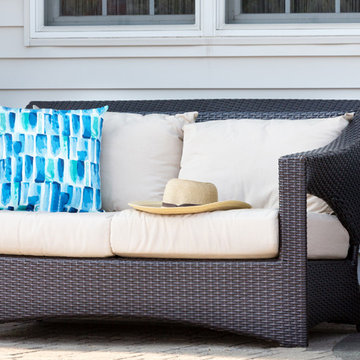
Is your back yard ready for all of the summertime fun? More specifically, take a good look at your patio furniture. Perhaps certain pieces should be spruced up or repurposed, while others may need to be replaced altogether.
Whether you’re dealing with a big or small project, don’t let the details intimidate you. With the right preparation and planning, you can transform your outdoor living space into an oasis where everyone can relax and enjoy themselves.
Choose Your Aesthetic
Before you dive into an outdoor renovation and end up feeling like you’re drowning in all of the possibilities and decisions, take some time to think about how you envision your new space. How will you be using it? Do you spend more time entertaining or relaxing? What kind of seating do you need? Does it need to be kid- and/or pet-friendly? Do you prefer clean, modern lines or playful, colorful textures? Do you like harder surfaces, such as wood, or softer ones, like cushions?
Addressing these questions should help you narrow down the outdoor seating options that work best for your family.
Get Trendy
Once you’ve honed in on your desired aesthetic, start putting your ideas into action. Looking at this year’s trends can help.
For instance, the biggest trend of 2017 is bringing the indoor look outdoors. This theme incorporates plush sofas made from durable fabrics, side tables, ottomans, vibrant-colored throw pillows and outdoor rugs. To protect their outdoor living room, many homeowners also opt for a patio cover, which can be either a hard cover or soft awning.
Outdoor Seating - Benches
This year’s outdoor furniture also blends wood-grain finishes with worn surface textures and pairs neutral colors with pastels for a washed-out effect. When it comes to dining tables and chairs, classic wrought-iron tea garden furniture is always in style.
Go Green
Adding a new chair or replacing an entire outdoor living room can be a great opportunity to bring in materials that look great and are also good for the environment. You can make your own (try these ideas from WooHome) or purchase eco-friendly furniture from shops such as Breezesta and Viesso, which offer “green” seating options in a variety of styles and colors.
Create A Warm Front
While you’ll probably focus on furnishing your back yard, don’t forget to pay some attention to the front of your house, too. Curb appeal counts – it’s the first thing your friends and neighbors see, so making a good impression is a must.
Be sure to keep the area clean. As for décor, don’t over-decorate. A simple rocking chair or swing can generate a warm, welcoming feeling for all.
Stay On Budget
Outdoor Seating - Wicker
Whether money is no object or you follow a strict budget, options are available for every wallet.
High-end luxury furniture sites such as Frontgate, offer posh designer couches, mosaic dining tables, cushioned hammocks and even a hanging daybed.
However, affordable, luxurious-looking options are available, too — especially if you’re not afraid to roll up your sleeves and do some of the work yourself. Pinterest provides countless design inspirations for do-it-yourselfers, such as repurposing an old tire into a cushioned seat and building a lawn chair using wood pallets, among others.
Plus, check out money-saving suggestions from Better Homes and Gardens’ Budget-Friendly Ideas for Outdoor Rooms, DIY Network’s 10 Outdoor Rooms on a Budget and HGTV’s 25 Budget-Friendly Ideas for Small Outdoor Spaces.
Remember, you don’t have to do everything at once. Concentrate on small areas and budget your time and money for the items that will best fit each space.
Have you recently redone your outdoor living space? We’d love to see photos! Post them in the comments below.

 Twelve Stones Designs, LLC
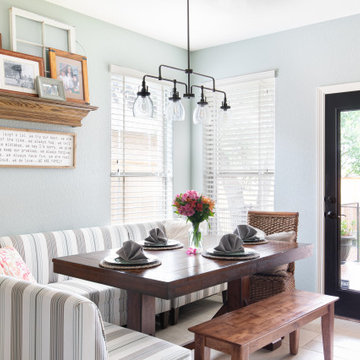
The owners of this kitchen had spent the money to upgrade the finishes in their kitchen upon building the home 12 years ago, but after living in the space for several years they realized how nonfunctional the layout really was. The (then) two preschool aged children had grown into busy, hungry teenagers with many friends who also liked to hang out at the house. So the family needed a more functional kitchen with better traffic flow, space for daily activities revolving around the kitchen at different times of day, and a kitchen that could accommodate cooking for and serving large groups. Furthermore, the dark, traditional finishes no longer reflected the homeowners’ style. They requested a brighter, more relaxed, coastal style that reflected their love of the seaside cities they like to visit.
Originally, the kitchen was U-shaped with a narrow island in the middle. The island created narrow aisles that bottle-necked at the dishwasher, refrigerator, and cooktop areas. There was a pass-through from the foyer into the kitchen, but the owners never liked that the pass-through was also located so close to the powder room. The awkward proximity was unappealing and made guests feel uncomfortable.
The kitchen’s storage was made up of lots of narrow cabinets, apothecary drawers, clipped corner units, and very few drawers. It lacked useful storage for the larger items the family used on a daily basis. And the kitchen’s only pantry was small closet that had only builder-grade, narrow shelving with no illumination to be able to see the contents inside.
Overall, the kitchen’s lighting plan was poorly executed. Only six recessed cans illuminated the entire kitchen and nook areas. The under cabinet lighting was not evenly distributed either. In fact, the builder had mis-placed the under cabinet lighting around the decorative pilasters which made for choppy, dark cubbies. Further, the builder didn’t include any lighting over the sink or the bar area, which meant whoever was doing the dishes was always in their own shadow. That, coupled with the steep overhang of the game room above made the bar area feel like a dim, cavernous space that wasn’t inviting or task oriented. The kitchen looked out into the main living space, but the raised bar and a narrow wall (which held the only large cabinet in the kitchen) created more of a barrier than a relationship to the living room or breakfast nook. In fact, one couldn’t even see the breakfast nook from the cooktop or sink areas due to its orientation. The raised bar top was too narrow to comfortably sit to either dine at or chat from due to the lack of knee space. The the homeowners confided that the kitchen felt more like a dark, dirty prison than place where the family, or their guests, wanted to gather and commune.
The clients' needs and desires were:
➢ to create a kitchen that would be a space the family loved to be in; to relate to the adjacent spaces all around, and to have better flow for entertaining large groups
➢ to remove the walls between the breakfast nook and living area and to be able to utilize the natural light from the windows in both those areas
➢ to incorporate a functional chopping block for prepping fresh food for home cooked meals, an island with a large sink and drain board, 2 pull out trash cans, and seating for at least the 2 teens to eat or do homework
➢ to design a kitchen and breakfast nook with an airy, coastal, relaxed vibe that blended with the rest of the house's coastal theme
➢ to integrate a layered lighting plan which would include ample general illumination, specific task lighting, decorative lighting, and lots of illuminated storage
➢ to design a kitchen with not only more storage for all the husband’s kitchen gadgets and collection of oils and spices, but smart storage, including a coffee/breakfast bar and a place to store and conceal the toaster oven and microwave
➢ to find a way to utilize the large open space between the kitchen, pantry area, and breakfast nook
Twelve Stones Designs achieved the owner's goals by:
➢ removing the walls between the kitchen and living room to allow the natural light to filter in from the adjacent rooms and to create a connection between the kitchen, nook, and living spaces for a sense of unity and communion
➢ removing the existing pantry and designing 3 large pantry style cabinets with LED tape lights and rollout drawers to house lots of kitchen appliances, gadgets, and tons of groceries. We also took the cabinets all the way up to the 9’ ceiling for additional storage for seasonal items and bulk storage.
➢ designing 2 islands - 1 with a gorgeous black walnut chopping block that houses a drawer for chopping and carving knives and a custom double pull out trash unit for point of use utilization - and 1 that houses the dishwasher, a large Blanco Gourmet sink with integrated drain board, woven baskets for fresh root vegetables and kitchen towels, plenty of drawer storage for kitchen items, and bar seating for up to 4 diners.
➢ closing off the space between the kitchen and the powder room to create a beautiful new private alcove for the powder room as well as adding some decorative storage. This also gave us space to include more tall storage near the new range for precision placement of the husband’s extensive oil and spice collection as well as a location for a combo-steam oven the wife wanted for baking and cooking healthy meals.
The project is enhanced functionally by:
➢ incorporated USB and standard receptacles for the kids’ laptops and phone charging in the large island
➢ designing the small island to include additional open shelving for items used on a daily basis such as a variety of bowls, plates, and colanders. This set up also works well for the husband who prefers to “plate” his dinners in restaurant-style fashion before presenting them to the table.
➢ the integration of specific storage units, such as double stacked cutlery drawers, a custom spice pull-out, a Kuerig coffee and tea pod drawer, and custom double stacked utensil drawers
➢ moving the refrigerator to the old oven location - this eliminated the bottle neck as well as created a better relationship to the eating table. It also utilizes the floor space between the pantry, nook, and kitchen
➢ creating a banquet style breakfast nook - this banquette seating not only doubles the amount of seating for large gatherings but it better utilizes the odd space between the kitchen and the previous nook area. It also helps to create a distinct pathway from the mudroom room through the pantry area, kitchen, nook, and living room.
➢ the coffee/breakfast bar area which includes the perfect location for the concealed microwave and toaster oven, convenient storage for the coffee pods and tea accoutrements. Roll-out drawers below also house the smoothie maker, hot water kettle, and a plethora of smoothie-making ingredients such as protein powders, smoothie additives, etc. Furthermore, the drawers below the Keurig house measuring utensil, cutlery, baking supplies and tupperware storage.
➢ incorporating lots of wide drawers and pullouts to accommodate large cookware.
➢ utilizing as much vertical space as possible by building storage to the ceiling which accommodates the family’s abundant amount of serving platters, baking sheets, bakeware, casserole dishes, and additional cutting boards.
The project is enhanced aesthetically by:
➢ new 5-piece Versailles pattern porcelain tile that now seamlessly joins the entire down stairs area together creating a bright, cohesiveness feeling instead of choppy separated spaces - it also adds a coastal feeling
➢ designing a cabinet to conceal the microwave and toaster oven
➢ the coastal influenced light fixtures over the nook table and island
➢ the sandy colors of the Langdon Cambria countertops. The swirling pattern and sparkling quartz pieces remind the homeowner of black-and-tan sandy beaches
➢ the striped banquet seating whose creamy white background and blue-green stripes were the inspiration for the cabinet and wall colors.
➢ All the interior doors were painted black to coordinate with the blacks and grays in the backsplash tile and countertop. This also adds a hint of tailored formality to an otherwise casual space.
➢ the use of WAC's Oculux small aperture LED units for the overhead lighting complimented with Diode LED strips for task lighting under the cabinets and inside the pantry and glass wall cabinets. All of the lighting applications are on separate dimmer switches.
Innovative uses of materials or construction methods by Realty Restoration LLC:
➢ Each 1-1/2” x 3” block of reclaimed end-grain black walnut that makes up the center island chopping block was hand milled and built in the shop. It was designed to look substantial and proportional to the surrounding elements, executed by creating the 4 inch tall top with a solid wood chamfered edge band.
➢ The metal doors on either side of the vent hood were also custom designed for this project and built in the Realty Restoration LLC shop. They are made 1x2, 11-gauge mild steel with ribbed glass. Weighing 60 lbs a piece, heavy duty cabinet hinges were added to support the weight of the door and keep them from sagging.
➢ Under-cabinet receptacles were added along the range wall in order to have a clean, uninterrupted backsplash.
Design obstacles to overcome:
➢ Because we were removing the demising walls between the kitchen and living room, we had to find a way to plumb and vent the new island. We did this by tunneling through the slab (the slab had post tension cables which prevented us from just trenching) to run a new wet vent through a nearby structural wall. We pulled the existing hot and cold lines between upper floor joists and ran them down the structural wall as well and up through a conduit in the tunnel.
➢ Since we were converting from wall overs to a gas range it allowed us to utilize the 220 feed for the wall ovens to provide a new sub panel for all the new kitchen circuits
➢ Due to framing deficiencies inherited from the original build there was a 1-1/2” differential in the floor-to-ceiling height over a 20 foot span; by utilizing the process of cutting and furring coupled with the crown moulding details on the cabinet elevations we were able to mask the problem and provide seamless transitions between the cabinet components.
Evidence of superior craftsmanship:
➢ uniquely designed, one-of-a-kind metal “X” end panels on the large island. The end panels were custom made in the Realty Restoration LLC shop and fitted to the exact dimensions of the island. The welding seams are completely indistinguishable - the posts look like they are cut from a single sheet of metal
➢ square metal posts on the small island were also custom made and designed to compliment and carry through the metal element s throughout the kitchen
➢ the beautiful, oversized end panels on the pantry cabinets which give the breakfast nook a tailored look
➢ integrating a large format 5 piece Versailles tile pattern to seamlessly flow from the existing spaces into the new kitchen space
➢ By constructing a custom cabinet that jogged around a corner we could not remodel (housing the entry way coat closet) we were able to camouflage the adjacent wall offset within the upper and lower cabinets. By designing around the existing jog in the structural walls we accomplished a few things: we were able to find the space to house, and hide, the microwave and toaster oven yet still have a clean cohesive appearance from the kitchen side. Additionally, the owners were able to keep their much needed coat closet and we didn’t have to increase the budget with unnecessary structural work.

 Ehrlich Yanai Rhee Chaney Architects
In modern architecture, summer heat and heavy rainfall are often managed with deep roof overhangs and slatted sunscreens shielding glazed surfaces as in this contemporary house.
© Matthew Millman

 Classic Kitchens of Charleston
Inspiration for a large transitional single-wall dark wood floor and brown floor open concept kitchen remodel in Charleston with an undermount sink, raised-panel cabinets, white cabinets, granite countertops, beige backsplash, glass tile backsplash, stainless steel appliances and an island
54