
Search results for "Money cleaned" in Home Design Ideas

 Budget Bath, Inc.
Jill Hughes
Huge elegant master beige tile and ceramic tile ceramic tile freestanding bathtub photo in Baltimore with an undermount sink, recessed-panel cabinets, medium tone wood cabinets, a one-piece toilet and beige walls
Huge elegant master beige tile and ceramic tile ceramic tile freestanding bathtub photo in Baltimore with an undermount sink, recessed-panel cabinets, medium tone wood cabinets, a one-piece toilet and beige walls
 Care Free Homes, Inc.
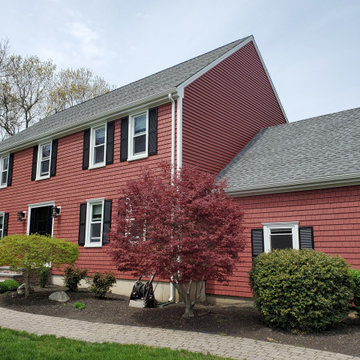
Mastic Vinyl Siding, Harvey Windows, and a Therma-Tru Entry Door look beautiful on this Lakeville, MA colonial!
The homeowner chose a combination of Mastic Cedar Discovery and Carvedwood 44 Vinyl Siding in the historic color, Russet Red. Cedar Discovery mimics the look of painted cedar shingles and Carvedwood 44 replicates the look of painted cedar clapboard siding. With realistic wood textures and shadow lines, these homeowners have a durable and affordable siding option that looks beautiful without the worry that comes along with wood siding. With a 230 mph wind rating and an lovely collection of colors, textures, and styles, our customers enjoy both the durability and beauty of professional grade siding.
We also installed Harvey Classic Double Hung Vinyl Replacement windows. The Harvey Classic is our top-selling, energy efficient replacement window. Homeowners enjoy tilt-in sashes for easy cleaning, customizable colors, hardware, and grid patterns. As one of the area’s select Harvey Elite Window Dealers, Care Free customers can also choose from exclusive package upgrades and warranties that can’t be offered by ordinary contractors.
A Therm-Tru Fiberglass Entry system is factory-finished in the color, onyx. This Smooth Star door welcomes guests with a pair of coordinating sidelites featuring decorative glass and grids.
Care Free Homes is the preferred contractor of thousands of homeowners. Past customers and referrals are responsible for over half of our business each year! Once you become a Care Free customer – chances are you’ll stay a Care Free customer and invite your friends and family to become one, too! We ask for absolutely no money until the project is complete and have financing options for qualified homeowners.
Get started on your project with a FREE Quote by calling (508) 997-1111 or contact us online and we’ll follow up with you! Make your house a Care Free home!
 Twelve Stones Designs, LLC
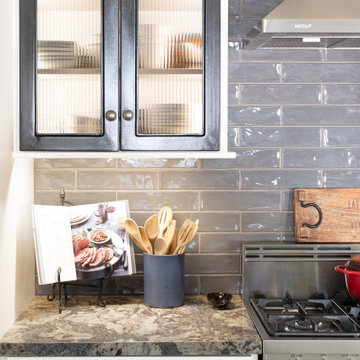
The owners of this kitchen had spent the money to upgrade the finishes in their kitchen upon building the home 12 years ago, but after living in the space for several years they realized how nonfunctional the layout really was. The (then) two preschool aged children had grown into busy, hungry teenagers with many friends who also liked to hang out at the house. So the family needed a more functional kitchen with better traffic flow, space for daily activities revolving around the kitchen at different times of day, and a kitchen that could accommodate cooking for and serving large groups. Furthermore, the dark, traditional finishes no longer reflected the homeowners’ style. They requested a brighter, more relaxed, coastal style that reflected their love of the seaside cities they like to visit.
Originally, the kitchen was U-shaped with a narrow island in the middle. The island created narrow aisles that bottle-necked at the dishwasher, refrigerator, and cooktop areas. There was a pass-through from the foyer into the kitchen, but the owners never liked that the pass-through was also located so close to the powder room. The awkward proximity was unappealing and made guests feel uncomfortable.
The kitchen’s storage was made up of lots of narrow cabinets, apothecary drawers, clipped corner units, and very few drawers. It lacked useful storage for the larger items the family used on a daily basis. And the kitchen’s only pantry was small closet that had only builder-grade, narrow shelving with no illumination to be able to see the contents inside.
Overall, the kitchen’s lighting plan was poorly executed. Only six recessed cans illuminated the entire kitchen and nook areas. The under cabinet lighting was not evenly distributed either. In fact, the builder had mis-placed the under cabinet lighting around the decorative pilasters which made for choppy, dark cubbies. Further, the builder didn’t include any lighting over the sink or the bar area, which meant whoever was doing the dishes was always in their own shadow. That, coupled with the steep overhang of the game room above made the bar area feel like a dim, cavernous space that wasn’t inviting or task oriented. The kitchen looked out into the main living space, but the raised bar and a narrow wall (which held the only large cabinet in the kitchen) created more of a barrier than a relationship to the living room or breakfast nook. In fact, one couldn’t even see the breakfast nook from the cooktop or sink areas due to its orientation. The raised bar top was too narrow to comfortably sit to either dine at or chat from due to the lack of knee space. The the homeowners confided that the kitchen felt more like a dark, dirty prison than place where the family, or their guests, wanted to gather and commune.
The clients' needs and desires were:
➢ to create a kitchen that would be a space the family loved to be in; to relate to the adjacent spaces all around, and to have better flow for entertaining large groups
➢ to remove the walls between the breakfast nook and living area and to be able to utilize the natural light from the windows in both those areas
➢ to incorporate a functional chopping block for prepping fresh food for home cooked meals, an island with a large sink and drain board, 2 pull out trash cans, and seating for at least the 2 teens to eat or do homework
➢ to design a kitchen and breakfast nook with an airy, coastal, relaxed vibe that blended with the rest of the house's coastal theme
➢ to integrate a layered lighting plan which would include ample general illumination, specific task lighting, decorative lighting, and lots of illuminated storage
➢ to design a kitchen with not only more storage for all the husband’s kitchen gadgets and collection of oils and spices, but smart storage, including a coffee/breakfast bar and a place to store and conceal the toaster oven and microwave
➢ to find a way to utilize the large open space between the kitchen, pantry area, and breakfast nook
Twelve Stones Designs achieved the owner's goals by:
➢ removing the walls between the kitchen and living room to allow the natural light to filter in from the adjacent rooms and to create a connection between the kitchen, nook, and living spaces for a sense of unity and communion
➢ removing the existing pantry and designing 3 large pantry style cabinets with LED tape lights and rollout drawers to house lots of kitchen appliances, gadgets, and tons of groceries. We also took the cabinets all the way up to the 9’ ceiling for additional storage for seasonal items and bulk storage.
➢ designing 2 islands - 1 with a gorgeous black walnut chopping block that houses a drawer for chopping and carving knives and a custom double pull out trash unit for point of use utilization - and 1 that houses the dishwasher, a large Blanco Gourmet sink with integrated drain board, woven baskets for fresh root vegetables and kitchen towels, plenty of drawer storage for kitchen items, and bar seating for up to 4 diners.
➢ closing off the space between the kitchen and the powder room to create a beautiful new private alcove for the powder room as well as adding some decorative storage. This also gave us space to include more tall storage near the new range for precision placement of the husband’s extensive oil and spice collection as well as a location for a combo-steam oven the wife wanted for baking and cooking healthy meals.
The project is enhanced functionally by:
➢ incorporated USB and standard receptacles for the kids’ laptops and phone charging in the large island
➢ designing the small island to include additional open shelving for items used on a daily basis such as a variety of bowls, plates, and colanders. This set up also works well for the husband who prefers to “plate” his dinners in restaurant-style fashion before presenting them to the table.
➢ the integration of specific storage units, such as double stacked cutlery drawers, a custom spice pull-out, a Kuerig coffee and tea pod drawer, and custom double stacked utensil drawers
➢ moving the refrigerator to the old oven location - this eliminated the bottle neck as well as created a better relationship to the eating table. It also utilizes the floor space between the pantry, nook, and kitchen
➢ creating a banquet style breakfast nook - this banquette seating not only doubles the amount of seating for large gatherings but it better utilizes the odd space between the kitchen and the previous nook area. It also helps to create a distinct pathway from the mudroom room through the pantry area, kitchen, nook, and living room.
➢ the coffee/breakfast bar area which includes the perfect location for the concealed microwave and toaster oven, convenient storage for the coffee pods and tea accoutrements. Roll-out drawers below also house the smoothie maker, hot water kettle, and a plethora of smoothie-making ingredients such as protein powders, smoothie additives, etc. Furthermore, the drawers below the Keurig house measuring utensil, cutlery, baking supplies and tupperware storage.
➢ incorporating lots of wide drawers and pullouts to accommodate large cookware.
➢ utilizing as much vertical space as possible by building storage to the ceiling which accommodates the family’s abundant amount of serving platters, baking sheets, bakeware, casserole dishes, and additional cutting boards.
The project is enhanced aesthetically by:
➢ new 5-piece Versailles pattern porcelain tile that now seamlessly joins the entire down stairs area together creating a bright, cohesiveness feeling instead of choppy separated spaces - it also adds a coastal feeling
➢ designing a cabinet to conceal the microwave and toaster oven
➢ the coastal influenced light fixtures over the nook table and island
➢ the sandy colors of the Langdon Cambria countertops. The swirling pattern and sparkling quartz pieces remind the homeowner of black-and-tan sandy beaches
➢ the striped banquet seating whose creamy white background and blue-green stripes were the inspiration for the cabinet and wall colors.
➢ All the interior doors were painted black to coordinate with the blacks and grays in the backsplash tile and countertop. This also adds a hint of tailored formality to an otherwise casual space.
➢ the use of WAC's Oculux small aperture LED units for the overhead lighting complimented with Diode LED strips for task lighting under the cabinets and inside the pantry and glass wall cabinets. All of the lighting applications are on separate dimmer switches.
Innovative uses of materials or construction methods by Realty Restoration LLC:
➢ Each 1-1/2” x 3” block of reclaimed end-grain black walnut that makes up the center island chopping block was hand milled and built in the shop. It was designed to look substantial and proportional to the surrounding elements, executed by creating the 4 inch tall top with a solid wood chamfered edge band.
➢ The metal doors on either side of the vent hood were also custom designed for this project and built in the Realty Restoration LLC shop. They are made 1x2, 11-gauge mild steel with ribbed glass. Weighing 60 lbs a piece, heavy duty cabinet hinges were added to support the weight of the door and keep them from sagging.
➢ Under-cabinet receptacles were added along the range wall in order to have a clean, uninterrupted backsplash.
Design obstacles to overcome:
➢ Because we were removing the demising walls between the kitchen and living room, we had to find a way to plumb and vent the new island. We did this by tunneling through the slab (the slab had post tension cables which prevented us from just trenching) to run a new wet vent through a nearby structural wall. We pulled the existing hot and cold lines between upper floor joists and ran them down the structural wall as well and up through a conduit in the tunnel.
➢ Since we were converting from wall overs to a gas range it allowed us to utilize the 220 feed for the wall ovens to provide a new sub panel for all the new kitchen circuits
➢ Due to framing deficiencies inherited from the original build there was a 1-1/2” differential in the floor-to-ceiling height over a 20 foot span; by utilizing the process of cutting and furring coupled with the crown moulding details on the cabinet elevations we were able to mask the problem and provide seamless transitions between the cabinet components.
Evidence of superior craftsmanship:
➢ uniquely designed, one-of-a-kind metal “X” end panels on the large island. The end panels were custom made in the Realty Restoration LLC shop and fitted to the exact dimensions of the island. The welding seams are completely indistinguishable - the posts look like they are cut from a single sheet of metal
➢ square metal posts on the small island were also custom made and designed to compliment and carry through the metal element s throughout the kitchen
➢ the beautiful, oversized end panels on the pantry cabinets which give the breakfast nook a tailored look
➢ integrating a large format 5 piece Versailles tile pattern to seamlessly flow from the existing spaces into the new kitchen space
➢ By constructing a custom cabinet that jogged around a corner we could not remodel (housing the entry way coat closet) we were able to camouflage the adjacent wall offset within the upper and lower cabinets. By designing around the existing jog in the structural walls we accomplished a few things: we were able to find the space to house, and hide, the microwave and toaster oven yet still have a clean cohesive appearance from the kitchen side. Additionally, the owners were able to keep their much needed coat closet and we didn’t have to increase the budget with unnecessary structural work.
Find the right local pro for your project
 Inspired Closets Baton Rouge
Do you ever think about DIYing your closet renovation, but you’re just not sure it’ll turn out the way you want?
This is where we found our recent client, Amanda, and her husband, Terry.
DIY Dreamers
The couple was in the middle of renovating their master bath when Amanda went down a Pinterest ‘rabbit hole.’
There in her endless scrolling, she was mesmerized by photos of beautiful master closets…efficient master closets…organized master closets…inspired master closets.
Amanda began thinking…If she and Terry were already redoing their master bath, it only made sense to renovate their ensuite closet at the same time.
They could even DIY it and save a little bit of money, too. Right?
Amanda took measurements, researched closet organization systems online, and prepared to become a closet DIY warrior.
But a little thought was holding her back.
It wasn’t that she didn’t think they could do it themselves.
Could they survive the stress of the renovation process?
What if they ended up hating the result?
What if they ended up hating each other in the process?
That’s when Amanda found us and decided to explore a different option.
A Professional Job – At the Same Price
Our Designer Felicity arrived for a consultation, worked up a complete closet renovation plan, explained our signature stress-free installation process, and gave the couple a price.
The number ended up rivaling the final DIY cost.
Amanda and Terry were sold (and relieved).
The couple’s professional closet renovation & end-to-end installation took place over just 2 days last summer.
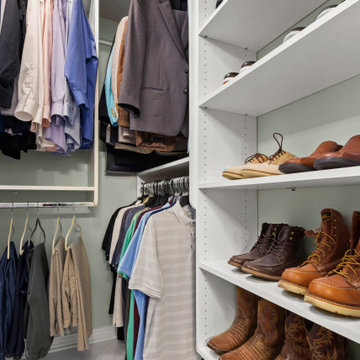
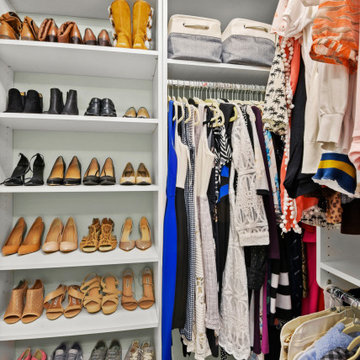
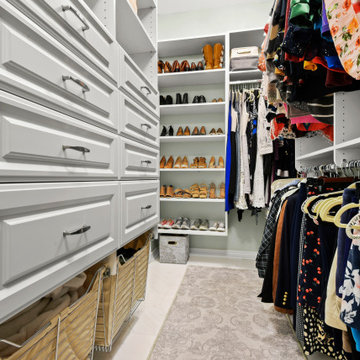
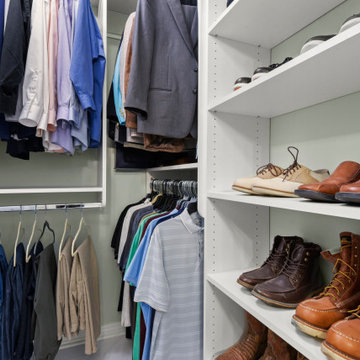
They now have custom floor-to-ceiling closet organization – and new weight off of their shoulders that only comes with a clean, organized space.
We later returned to revamp their daughter Savannah’s closet a few weeks later.
Before you DIY your closet revamp, give us a quick call. We’d love to show you what we can do.
Request a free consultation to get started on your dream closet here: https://www.inspiredclosets.com/locations/baton-rouge/contact/
 Inspired Closets Baton Rouge
Do you ever think about DIYing your closet renovation, but you’re just not sure it’ll turn out the way you want?
This is where we found our recent client, Amanda, and her husband, Terry.
DIY Dreamers
The couple was in the middle of renovating their master bath when Amanda went down a Pinterest ‘rabbit hole.’
There in her endless scrolling, she was mesmerized by photos of beautiful master closets…efficient master closets…organized master closets…inspired master closets.
Amanda began thinking…If she and Terry were already redoing their master bath, it only made sense to renovate their ensuite closet at the same time.
They could even DIY it and save a little bit of money, too. Right?
Amanda took measurements, researched closet organization systems online, and prepared to become a closet DIY warrior.
But a little thought was holding her back.
It wasn’t that she didn’t think they could do it themselves.
Could they survive the stress of the renovation process?
What if they ended up hating the result?
What if they ended up hating each other in the process?
That’s when Amanda found us and decided to explore a different option.
A Professional Job – At the Same Price
Our Designer Felicity arrived for a consultation, worked up a complete closet renovation plan, explained our signature stress-free installation process, and gave the couple a price.
The number ended up rivaling the final DIY cost.
Amanda and Terry were sold (and relieved).
The couple’s professional closet renovation & end-to-end installation took place over just 2 days last summer.
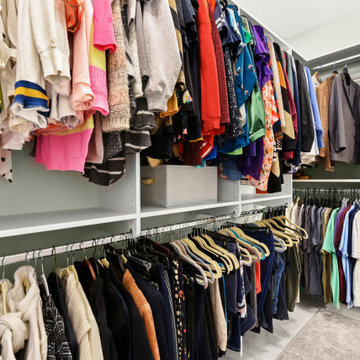
They now have custom floor-to-ceiling closet organization – and new weight off of their shoulders that only comes with a clean, organized space.
We later returned to revamp their daughter Savannah’s closet a few weeks later.
Before you DIY your closet revamp, give us a quick call. We’d love to show you what we can do.
Request a free consultation to get started on your dream closet here: https://www.inspiredclosets.com/locations/baton-rouge/contact/
 Inspired Closets Baton Rouge
Do you ever think about DIYing your closet renovation, but you’re just not sure it’ll turn out the way you want?
This is where we found our recent client, Amanda, and her husband, Terry.
DIY Dreamers
The couple was in the middle of renovating their master bath when Amanda went down a Pinterest ‘rabbit hole.’
There in her endless scrolling, she was mesmerized by photos of beautiful master closets…efficient master closets…organized master closets…inspired master closets.
Amanda began thinking…If she and Terry were already redoing their master bath, it only made sense to renovate their ensuite closet at the same time.
They could even DIY it and save a little bit of money, too. Right?
Amanda took measurements, researched closet organization systems online, and prepared to become a closet DIY warrior.
But a little thought was holding her back.
It wasn’t that she didn’t think they could do it themselves.
Could they survive the stress of the renovation process?
What if they ended up hating the result?
What if they ended up hating each other in the process?
That’s when Amanda found us and decided to explore a different option.
A Professional Job – At the Same Price
Our Designer Felicity arrived for a consultation, worked up a complete closet renovation plan, explained our signature stress-free installation process, and gave the couple a price.
The number ended up rivaling the final DIY cost.
Amanda and Terry were sold (and relieved).
The couple’s professional closet renovation & end-to-end installation took place over just 2 days last summer.
They now have custom floor-to-ceiling closet organization – and new weight off of their shoulders that only comes with a clean, organized space.
We later returned to revamp their daughter Savannah’s closet a few weeks later.
Before you DIY your closet revamp, give us a quick call. We’d love to show you what we can do.
Request a free consultation to get started on your dream closet here: https://www.inspiredclosets.com/locations/baton-rouge/contact/
 Inspired Closets Baton Rouge
Do you ever think about DIYing your closet renovation, but you’re just not sure it’ll turn out the way you want?
This is where we found our recent client, Amanda, and her husband, Terry.
DIY Dreamers
The couple was in the middle of renovating their master bath when Amanda went down a Pinterest ‘rabbit hole.’
There in her endless scrolling, she was mesmerized by photos of beautiful master closets…efficient master closets…organized master closets…inspired master closets.
Amanda began thinking…If she and Terry were already redoing their master bath, it only made sense to renovate their ensuite closet at the same time.
They could even DIY it and save a little bit of money, too. Right?
Amanda took measurements, researched closet organization systems online, and prepared to become a closet DIY warrior.
But a little thought was holding her back.
It wasn’t that she didn’t think they could do it themselves.
Could they survive the stress of the renovation process?
What if they ended up hating the result?
What if they ended up hating each other in the process?
That’s when Amanda found us and decided to explore a different option.
A Professional Job – At the Same Price
Our Designer Felicity arrived for a consultation, worked up a complete closet renovation plan, explained our signature stress-free installation process, and gave the couple a price.
The number ended up rivaling the final DIY cost.
Amanda and Terry were sold (and relieved).
The couple’s professional closet renovation & end-to-end installation took place over just 2 days last summer.
They now have custom floor-to-ceiling closet organization – and new weight off of their shoulders that only comes with a clean, organized space.
We later returned to revamp their daughter Savannah’s closet a few weeks later.
Before you DIY your closet revamp, give us a quick call. We’d love to show you what we can do.
Request a free consultation to get started on your dream closet here: https://www.inspiredclosets.com/locations/baton-rouge/contact/
Sponsored
Columbus, OH

Hope Restoration & General Contracting
Columbus Design-Build, Kitchen & Bath Remodeling, Historic Renovations
 Inspired Closets Baton Rouge
Do you ever think about DIYing your closet renovation, but you’re just not sure it’ll turn out the way you want?
This is where we found our recent client, Amanda, and her husband, Terry.
DIY Dreamers
The couple was in the middle of renovating their master bath when Amanda went down a Pinterest ‘rabbit hole.’
There in her endless scrolling, she was mesmerized by photos of beautiful master closets…efficient master closets…organized master closets…inspired master closets.
Amanda began thinking…If she and Terry were already redoing their master bath, it only made sense to renovate their ensuite closet at the same time.
They could even DIY it and save a little bit of money, too. Right?
Amanda took measurements, researched closet organization systems online, and prepared to become a closet DIY warrior.
But a little thought was holding her back.
It wasn’t that she didn’t think they could do it themselves.
Could they survive the stress of the renovation process?
What if they ended up hating the result?
What if they ended up hating each other in the process?
That’s when Amanda found us and decided to explore a different option.
A Professional Job – At the Same Price
Our Designer Felicity arrived for a consultation, worked up a complete closet renovation plan, explained our signature stress-free installation process, and gave the couple a price.
The number ended up rivaling the final DIY cost.
Amanda and Terry were sold (and relieved).
The couple’s professional closet renovation & end-to-end installation took place over just 2 days last summer.
They now have custom floor-to-ceiling closet organization – and new weight off of their shoulders that only comes with a clean, organized space.
We later returned to revamp their daughter Savannah’s closet a few weeks later.
Before you DIY your closet revamp, give us a quick call. We’d love to show you what we can do.
Request a free consultation to get started on your dream closet here: https://www.inspiredclosets.com/locations/baton-rouge/contact/
 Windy City Painters
PREPARATION AND PLANNING
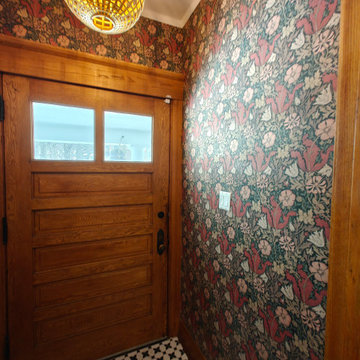
First, we assessed existing wall conditions and repaired minor imperfections. Next, surfaces were thoroughly cleaned and primed for maximum adhesion. Then, precise measurements ensured perfect pattern alignment throughout the space.
INSTALLATION PROCESS
Subsequently, we carefully cut each strip accounting for pattern matching. Moreover, professional installation techniques eliminated bubbles and ensured seamless seams. Finally, detailed finishing work created flawless edges and corners.
CHICAGO-SPECIFIC CHALLENGES
Furthermore, older Chicago buildings present unique challenges including settling walls, vintage plaster surfaces, and lead paint considerations. Therefore, proper preparation becomes crucial for long-lasting results that withstand seasonal temperature fluctuations.
RESULTS AND QUALITY
Consequently, the finished installation showcases perfect pattern alignment and professional craftsmanship. The wallpaper enhances the entry hall's architectural character while providing durability for high-traffic use.
PROFESSION AL TIPS
Homeowners should always hire experienced installers for complex patterns. Additionally, investing in quality primer saves money long-term by ensuring proper adhesion and easier future removal.
See more work and request free estimate at windypainters.com.
Q: How long does wallpaper installation take? / A: Most entry halls require one to two days depending on pattern complexity, surface preparation needs, and room size for professional wallpaper installation.
Q: Can you install over existing wallpaper? / A: We recommend removing old wallpaper first for best adhesion, though some situations allow installation over existing wallpaper after proper preparation and assessment.
Q: What wallpaper works best in Chicago? / A: Vinyl and fabric-backed wallpapers handle Chicago's climate changes best, providing durability against humidity fluctuations and temperature variations throughout seasons.
Q: Do you guarantee installation work? / A: Yes, Windy City Painters provides comprehensive warranties covering wallpaper installation craftsmanship and adhesion for specified warranty periods on all projects.
Q: How do you handle pattern matching? / A: We carefully measure walls, calculate pattern repeats, and plan installation sequence to ensure perfect wallpaper installation pattern alignment throughout the space.
Q: Can wallpaper work in vintage buildings? / A: Absolutely, we specialize in wallpaper installation for older Chicago homes, understanding unique challenges like settling walls and vintage plaster surfaces.
Q: What preparation is required? / A: Proper wallpaper installation requires surface assessment, repairs, thorough cleaning, appropriate priming, and climate control for optimal adhesion and lasting results.
Q: Do you remove old wallpaper? / A: Yes, we provide professional wallpaper removal services using safe techniques that protect underlying wall surfaces during the wallpaper installation preparation process.
Q: How much does installation cost? / A: Wallpaper installation costs vary based on room size, pattern complexity, surface preparation needs, and wallpaper selection - contact for detailed estimates.
Q: What tools do professionals use? / A: Professional wallpaper installation requires specialized smoothing tools, precision cutting equipment, quality brushes, and professional-grade adhesives for optimal results and longevity.

 Advance Design Studio, Ltd.
Mike and Michelle of Lake Barrington knew they needed extra space. Their home was becoming too crowded for their family with blossoming teenagers, so a basement renovation offered the perfect solution for more space for the kids and more room to entertain for the adults.
“Our project consisted of expanding our laundry room, putting in a first floor wet bar so we had adult space upstairs, while also renovating our basement for a family-friendly and teen-functional area as well,” Michelle says.
They found Advance Design Studio through a neighbor who gave a glowing recommendation, giving Michelle and Mike the confidence they needed to move forward with a major home renovation. They felt like they knew Advance Design before they even worked together. When they met with the owner Todd Jurs and designer Nicole Ryan, Mike and Michelle knew they were getting a trustworthy, dependable team that could create the project they had been dreaming about for 7 years.
Having virtually no natural light to work with, one of the biggest design challenges was creating a basement that did not feel dark and depressing. The Advance team got to work creating architectural archways and custom detailed dry-stack stone columns artfully designed into the space, adding a dramatic element that made the space feel less like a basement or more like a relaxing family room. Color 3D renderings were created to portray what the space would look like so Mike and Michelle could visualize the space in advance.
Detailed trim and crown moldings grace the built in buffet and wet bar making for an amazingly functional space that lacks nothing in style and visual interest. Cherry wood cabinetry by Dura Supreme is featured in the space with a “Cocoa Brown” finish and includes beautiful mirrored glass doors embellished with unique elliptical mullion details. A built-in microwave, dishwasher and mini fridge add practicality to the ample entertainment mecca. An under mounted sink finishes the space joined with a intricate mosaic tile backsplash and “Ventisca Polished” quartz countertops.
The basement is absolutely perfect for hosting friends and family with expertly designed key areas such as a game space for the kids, a movie area for the family, an ample workout room with luxurious full bath, and even built in wine storage. The family absolutely loves the new basement living space, and has already enjoyed numerous family movie nights and sleep-overs with friends.
While custom cabinets made by Dura Supreme were used to create unique spaces that lived up to Mike and Michelle’s expectations., heated flooring under the 16”x16” “Mongolian Spring” tile was installed giving all tiled areas of the basement a much cozier feel, eliminating that cold hard surface most of us hate in our basements!
The new basement must-have requirement list included a new bath space, which was incorporated adjacent to the work out room. The sleek shower door and cabinets in the new bathroom make guests and family feel like they are in an elegant hotel. The new guest bath features 4”x36” “Silver Screen” honed marble tile in a brick pattern on the shower walls and 2”x2” “Chenille” limestone tile in a hexagon mosaic pattern on the shower floor.
“I came in with very specific requirements for our three project areas,” Michelle says. “There was not one time that I felt like I was asking for something that was not going to turn out how I anticipated.”
Tying in multiple rooms during a renovation if you have can do it makes a lot of sense and saves money in the long run. A fully functional laundry room as well was a must on this family’s wish list. Michelle wanted to add space to the existing cramped and awkward laundry room, and Mike wanted to make sure they could still park a car in the garage. Reconfiguring interior walls required borrowing unused space cleverly from the garage in order to enlarge the laundry room space.
Drawers under the stairs added beautiful hidden storage created almost magically out of dead space. White painted Dura Supreme cabinets bring additional light into the small space; while the 16”x16” cleft slate tile flooring provides excellent contrast and the naturally earthy feel Michelle wanted. Quartz countertops with a 3”x12” “Debut Dew” subway tile backsplash add elegance to the now upliftingly bright laundry room.
The extra space makes doing laundry much more pleasurable and the added storage is a great for all those little things like winter hats and gloves, umbrellas and the like. “The Advance Design project team was phenomenal to work with,” Michelle says. “They came in, shared the plans with us and walked us through the expectations. We always knew what was coming next.”
Converting an existing closet space, the wet bar upstairs was challenging because they wanted a functional area that didn’t look or feel like cabinets just sticking out of a closet. So the Advance team transformed this ordinary closet space into a stunning wet bar that architecturally appears as if it’s always been there. Traditional, elegant hand carved custom molding matching the adjacent fireplace ties the new entertainment bar area in nicely with the existing family room and kitchen area.
Featuring a built in wine refrigerator, Dura Supreme cabinetry in deep cherry wood elegantly displays wine bottles and etched glass mullion doors that fill with soft light in the evening hours. Cambria “Windermere” quartz countertops with a sophisticated hammered copper sink and a glimmering backsplash round out the stunning wet bar. Hosting parties and family functions has become much more enjoyable now that they have a dedicated beverage serving area large enough to include hors devours.
All three projects were designed and constructed together at the same time, making for a cohesive project that was administered smoothly and easily both for the design team and for the family. Disruption to the home was minimal as each phase was completed in each project conclusively, and design and meeting time for the homeowner was efficient and organized making for an enjoyable process.
“Advance Design was great to work with,” Michelle says. “I would highly recommend them to anyone considering a home improvement project. They took the time at the beginning to understand our needs, our budget, and our vision for our home. The field team was great, attentive, on time, cleaned up each day and made the overall experience very positive. We couldn't be happier with the finished product.”
With the help of our talented, award winning design team you can create the basement, laundry room, or any other home renovation that you have been dreaming of. With our “Common Sense Remodeling” approach, the process of renovating you home has never been easier. Contact us today at 847-836-2600 or schedule an appointment to talk with us about that kitchen remodeling project.
Joe Nowak

 Jarrett Design
A former client came to us to renovate her cramped master bathroom into a serene, spa-like setting. Armed with an inspiration photo from a magazine, we set out and commissioned a local, custom furniture maker to produce the cabinetry. The hand-distressed reclaimed wormy chestnut vanities and linen closet bring warmth to the space while the painted shiplap and white glass countertops brighten it up. Handmade subway tiles welcome you into the bright shower and wood-look porcelain tile offers a practical flooring solution that still softens the space. It’s not hard to imagine yourself soaking in the deep freestanding tub letting your troubles melt away.
Matt Villano Photography

 Floor Decor
CoreTEC Plus 5 x 48 Luxury Vinyl Plank, Gold Coast Acacia 50LVP201 - Beautiful Luxury Vinyl Flooring Planks Installed in Residence.
Example of a classic living room design in Bridgeport
Example of a classic living room design in Bridgeport

 BluPath Design
Blau-Thompson Residence
This Civil War era, 1680-square-foot three-story row house is located in the Italian Market section of Philadelphia. The BluPath Design principals and their young child were the clients. The project goal was to upgrade a traditional housing type to meet a contemporary lifestyle, applying both sustainable criteria and clean, modern yet sensual aesthetics. The challenge of the property (only 830 square feet in lot size) was to create a design that was small, but smart.
The structure formerly housed a luncheonette with two apartments above. The interior was gutted and renovated into a single family home. The construction of a small rear addition added a new kitchen on the first floor and new bathrooms on the second and third levels. The east-west orientation of the home was ideal for the roof-mounted solar collectors, which were installed to provide domestic hot water and supplement the new radiant floor heating system. Exterior sensors improve the efficiency of the heating system's response to fluctuations in outside temperature. A new white-coated, rubber membrane roof reduced the structure's heat gain by 20 percent. A water catch system collects rainwater and air conditioner condensation to water the home's small rear garden.
Large windows and skylights bring light deep into the row house and reduce the use of light fixtures. The rear yard garden features ipe decking (a dense, water-repellent hardwood) on permeable compacted gravel to minimize storm water runoff. BluPath Design’s principals used the project to demonstrate how sustainability can be integrated with beauty and function, with sensual materials and colors, well-proportioned and light-filled rooms, economic use of space, and thoughtful details. Cherry flooring and custom stairs complement the Indian slate tile in the kitchen and bathrooms. The kitchen features custom walnut cabinets with blue granite counters and backsplashes. The first floor dining area is illuminated by a BluPath-designed fiber-optic chandelier. Ipe hardwood is also used for the master bath tub-surround and shower floor. Sliding frosted glass panels separating the master bath from other living areas allows light from the corner windows to naturally illuminate the adjacent room.
Awards
Honorable Mention for Sustainability and Energy Efficiency
IIDA Philadelphia City Center Chapter 3rd Annual Interior Design Awards, June 2007
Bronze 2006 Commonwealth Design Award
10,000 Friends of PA, May 2006
Media
HGTV ‘What You Get for the Money’ February 2007
Philadelphia Style Magazine March/April 2007
Philadelphia Inquirer June 11, 2006
Philadelphia CityPaper September 25-October 2, 2003
Photography by Barry Halkin

Sponsored
Sunbury, OH

J.Holderby - Renovations
Franklin County's Leading General Contractors - 2X Best of Houzz!

 Edmund Terrence, LLC ( HP Builders)
Simply Beautiful Remodeling, LLC
Inspiration for a mid-sized contemporary master gray tile and porcelain tile porcelain tile alcove shower remodel in Minneapolis with an integrated sink, flat-panel cabinets, medium tone wood cabinets, marble countertops, a two-piece toilet and gray walls
Inspiration for a mid-sized contemporary master gray tile and porcelain tile porcelain tile alcove shower remodel in Minneapolis with an integrated sink, flat-panel cabinets, medium tone wood cabinets, marble countertops, a two-piece toilet and gray walls
 BluPath Design
Blau-Thompson Residence
This Civil War era, 1680-square-foot three-story row house is located in the Italian Market section of Philadelphia. The BluPath Design principals and their young child were the clients. The project goal was to upgrade a traditional housing type to meet a contemporary lifestyle, applying both sustainable criteria and clean, modern yet sensual aesthetics. The challenge of the property (only 830 square feet in lot size) was to create a design that was small, but smart.
The structure formerly housed a luncheonette with two apartments above. The interior was gutted and renovated into a single family home. The construction of a small rear addition added a new kitchen on the first floor and new bathrooms on the second and third levels. The east-west orientation of the home was ideal for the roof-mounted solar collectors, which were installed to provide domestic hot water and supplement the new radiant floor heating system. Exterior sensors improve the efficiency of the heating system's response to fluctuations in outside temperature. A new white-coated, rubber membrane roof reduced the structure's heat gain by 20 percent. A water catch system collects rainwater and air conditioner condensation to water the home's small rear garden.
Large windows and skylights bring light deep into the row house and reduce the use of light fixtures. The rear yard garden features ipe decking (a dense, water-repellent hardwood) on permeable compacted gravel to minimize storm water runoff. BluPath Design’s principals used the project to demonstrate how sustainability can be integrated with beauty and function, with sensual materials and colors, well-proportioned and light-filled rooms, economic use of space, and thoughtful details. Cherry flooring and custom stairs complement the Indian slate tile in the kitchen and bathrooms. The kitchen features custom walnut cabinets with blue granite counters and backsplashes. The first floor dining area is illuminated by a BluPath-designed fiber-optic chandelier. Ipe hardwood is also used for the master bath tub-surround and shower floor. Sliding frosted glass panels separating the master bath from other living areas allows light from the corner windows to naturally illuminate the adjacent room.
Awards
Honorable Mention for Sustainability and Energy Efficiency
IIDA Philadelphia City Center Chapter 3rd Annual Interior Design Awards, June 2007
Bronze 2006 Commonwealth Design Award
10,000 Friends of PA, May 2006
Media
HGTV ‘What You Get for the Money’ February 2007
Philadelphia Style Magazine March/April 2007
Philadelphia Inquirer June 11, 2006
Philadelphia CityPaper September 25-October 2, 2003
Photography by Barry Halkin
 Twelve Stones Designs, LLC
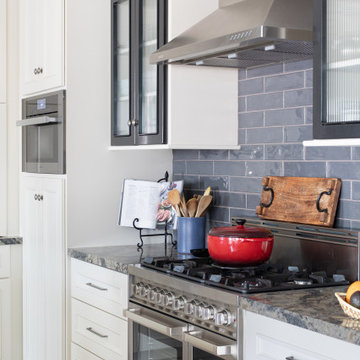
The owners of this kitchen had spent the money to upgrade the finishes in their kitchen upon building the home 12 years ago, but after living in the space for several years they realized how nonfunctional the layout really was. The (then) two preschool aged children had grown into busy, hungry teenagers with many friends who also liked to hang out at the house. So the family needed a more functional kitchen with better traffic flow, space for daily activities revolving around the kitchen at different times of day, and a kitchen that could accommodate cooking for and serving large groups. Furthermore, the dark, traditional finishes no longer reflected the homeowners’ style. They requested a brighter, more relaxed, coastal style that reflected their love of the seaside cities they like to visit.
Originally, the kitchen was U-shaped with a narrow island in the middle. The island created narrow aisles that bottle-necked at the dishwasher, refrigerator, and cooktop areas. There was a pass-through from the foyer into the kitchen, but the owners never liked that the pass-through was also located so close to the powder room. The awkward proximity was unappealing and made guests feel uncomfortable.
The kitchen’s storage was made up of lots of narrow cabinets, apothecary drawers, clipped corner units, and very few drawers. It lacked useful storage for the larger items the family used on a daily basis. And the kitchen’s only pantry was small closet that had only builder-grade, narrow shelving with no illumination to be able to see the contents inside.
Overall, the kitchen’s lighting plan was poorly executed. Only six recessed cans illuminated the entire kitchen and nook areas. The under cabinet lighting was not evenly distributed either. In fact, the builder had mis-placed the under cabinet lighting around the decorative pilasters which made for choppy, dark cubbies. Further, the builder didn’t include any lighting over the sink or the bar area, which meant whoever was doing the dishes was always in their own shadow. That, coupled with the steep overhang of the game room above made the bar area feel like a dim, cavernous space that wasn’t inviting or task oriented. The kitchen looked out into the main living space, but the raised bar and a narrow wall (which held the only large cabinet in the kitchen) created more of a barrier than a relationship to the living room or breakfast nook. In fact, one couldn’t even see the breakfast nook from the cooktop or sink areas due to its orientation. The raised bar top was too narrow to comfortably sit to either dine at or chat from due to the lack of knee space. The the homeowners confided that the kitchen felt more like a dark, dirty prison than place where the family, or their guests, wanted to gather and commune.
The clients' needs and desires were:
➢ to create a kitchen that would be a space the family loved to be in; to relate to the adjacent spaces all around, and to have better flow for entertaining large groups
➢ to remove the walls between the breakfast nook and living area and to be able to utilize the natural light from the windows in both those areas
➢ to incorporate a functional chopping block for prepping fresh food for home cooked meals, an island with a large sink and drain board, 2 pull out trash cans, and seating for at least the 2 teens to eat or do homework
➢ to design a kitchen and breakfast nook with an airy, coastal, relaxed vibe that blended with the rest of the house's coastal theme
➢ to integrate a layered lighting plan which would include ample general illumination, specific task lighting, decorative lighting, and lots of illuminated storage
➢ to design a kitchen with not only more storage for all the husband’s kitchen gadgets and collection of oils and spices, but smart storage, including a coffee/breakfast bar and a place to store and conceal the toaster oven and microwave
➢ to find a way to utilize the large open space between the kitchen, pantry area, and breakfast nook
Twelve Stones Designs achieved the owner's goals by:
➢ removing the walls between the kitchen and living room to allow the natural light to filter in from the adjacent rooms and to create a connection between the kitchen, nook, and living spaces for a sense of unity and communion
➢ removing the existing pantry and designing 3 large pantry style cabinets with LED tape lights and rollout drawers to house lots of kitchen appliances, gadgets, and tons of groceries. We also took the cabinets all the way up to the 9’ ceiling for additional storage for seasonal items and bulk storage.
➢ designing 2 islands - 1 with a gorgeous black walnut chopping block that houses a drawer for chopping and carving knives and a custom double pull out trash unit for point of use utilization - and 1 that houses the dishwasher, a large Blanco Gourmet sink with integrated drain board, woven baskets for fresh root vegetables and kitchen towels, plenty of drawer storage for kitchen items, and bar seating for up to 4 diners.
➢ closing off the space between the kitchen and the powder room to create a beautiful new private alcove for the powder room as well as adding some decorative storage. This also gave us space to include more tall storage near the new range for precision placement of the husband’s extensive oil and spice collection as well as a location for a combo-steam oven the wife wanted for baking and cooking healthy meals.
The project is enhanced functionally by:
➢ incorporated USB and standard receptacles for the kids’ laptops and phone charging in the large island
➢ designing the small island to include additional open shelving for items used on a daily basis such as a variety of bowls, plates, and colanders. This set up also works well for the husband who prefers to “plate” his dinners in restaurant-style fashion before presenting them to the table.
➢ the integration of specific storage units, such as double stacked cutlery drawers, a custom spice pull-out, a Kuerig coffee and tea pod drawer, and custom double stacked utensil drawers
➢ moving the refrigerator to the old oven location - this eliminated the bottle neck as well as created a better relationship to the eating table. It also utilizes the floor space between the pantry, nook, and kitchen
➢ creating a banquet style breakfast nook - this banquette seating not only doubles the amount of seating for large gatherings but it better utilizes the odd space between the kitchen and the previous nook area. It also helps to create a distinct pathway from the mudroom room through the pantry area, kitchen, nook, and living room.
➢ the coffee/breakfast bar area which includes the perfect location for the concealed microwave and toaster oven, convenient storage for the coffee pods and tea accoutrements. Roll-out drawers below also house the smoothie maker, hot water kettle, and a plethora of smoothie-making ingredients such as protein powders, smoothie additives, etc. Furthermore, the drawers below the Keurig house measuring utensil, cutlery, baking supplies and tupperware storage.
➢ incorporating lots of wide drawers and pullouts to accommodate large cookware.
➢ utilizing as much vertical space as possible by building storage to the ceiling which accommodates the family’s abundant amount of serving platters, baking sheets, bakeware, casserole dishes, and additional cutting boards.
The project is enhanced aesthetically by:
➢ new 5-piece Versailles pattern porcelain tile that now seamlessly joins the entire down stairs area together creating a bright, cohesiveness feeling instead of choppy separated spaces - it also adds a coastal feeling
➢ designing a cabinet to conceal the microwave and toaster oven
➢ the coastal influenced light fixtures over the nook table and island
➢ the sandy colors of the Langdon Cambria countertops. The swirling pattern and sparkling quartz pieces remind the homeowner of black-and-tan sandy beaches
➢ the striped banquet seating whose creamy white background and blue-green stripes were the inspiration for the cabinet and wall colors.
➢ All the interior doors were painted black to coordinate with the blacks and grays in the backsplash tile and countertop. This also adds a hint of tailored formality to an otherwise casual space.
➢ the use of WAC's Oculux small aperture LED units for the overhead lighting complimented with Diode LED strips for task lighting under the cabinets and inside the pantry and glass wall cabinets. All of the lighting applications are on separate dimmer switches.
Innovative uses of materials or construction methods by Realty Restoration LLC:
➢ Each 1-1/2” x 3” block of reclaimed end-grain black walnut that makes up the center island chopping block was hand milled and built in the shop. It was designed to look substantial and proportional to the surrounding elements, executed by creating the 4 inch tall top with a solid wood chamfered edge band.
➢ The metal doors on either side of the vent hood were also custom designed for this project and built in the Realty Restoration LLC shop. They are made 1x2, 11-gauge mild steel with ribbed glass. Weighing 60 lbs a piece, heavy duty cabinet hinges were added to support the weight of the door and keep them from sagging.
➢ Under-cabinet receptacles were added along the range wall in order to have a clean, uninterrupted backsplash.
Design obstacles to overcome:
➢ Because we were removing the demising walls between the kitchen and living room, we had to find a way to plumb and vent the new island. We did this by tunneling through the slab (the slab had post tension cables which prevented us from just trenching) to run a new wet vent through a nearby structural wall. We pulled the existing hot and cold lines between upper floor joists and ran them down the structural wall as well and up through a conduit in the tunnel.
➢ Since we were converting from wall overs to a gas range it allowed us to utilize the 220 feed for the wall ovens to provide a new sub panel for all the new kitchen circuits
➢ Due to framing deficiencies inherited from the original build there was a 1-1/2” differential in the floor-to-ceiling height over a 20 foot span; by utilizing the process of cutting and furring coupled with the crown moulding details on the cabinet elevations we were able to mask the problem and provide seamless transitions between the cabinet components.
Evidence of superior craftsmanship:
➢ uniquely designed, one-of-a-kind metal “X” end panels on the large island. The end panels were custom made in the Realty Restoration LLC shop and fitted to the exact dimensions of the island. The welding seams are completely indistinguishable - the posts look like they are cut from a single sheet of metal
➢ square metal posts on the small island were also custom made and designed to compliment and carry through the metal element s throughout the kitchen
➢ the beautiful, oversized end panels on the pantry cabinets which give the breakfast nook a tailored look
➢ integrating a large format 5 piece Versailles tile pattern to seamlessly flow from the existing spaces into the new kitchen space
➢ By constructing a custom cabinet that jogged around a corner we could not remodel (housing the entry way coat closet) we were able to camouflage the adjacent wall offset within the upper and lower cabinets. By designing around the existing jog in the structural walls we accomplished a few things: we were able to find the space to house, and hide, the microwave and toaster oven yet still have a clean cohesive appearance from the kitchen side. Additionally, the owners were able to keep their much needed coat closet and we didn’t have to increase the budget with unnecessary structural work.

 Bella Tile and Stone
Mid-sized transitional enclosed light wood floor and beige floor family room photo with white walls, a standard fireplace, a tile fireplace and no tv

 BluPath Design
Blau-Thompson Residence
This Civil War era, 1680-square-foot three-story row house is located in the Italian Market section of Philadelphia. The BluPath Design principals and their young child were the clients. The project goal was to upgrade a traditional housing type to meet a contemporary lifestyle, applying both sustainable criteria and clean, modern yet sensual aesthetics. The challenge of the property (only 830 square feet in lot size) was to create a design that was small, but smart.
The structure formerly housed a luncheonette with two apartments above. The interior was gutted and renovated into a single family home. The construction of a small rear addition added a new kitchen on the first floor and new bathrooms on the second and third levels. The east-west orientation of the home was ideal for the roof-mounted solar collectors, which were installed to provide domestic hot water and supplement the new radiant floor heating system. Exterior sensors improve the efficiency of the heating system's response to fluctuations in outside temperature. A new white-coated, rubber membrane roof reduced the structure's heat gain by 20 percent. A water catch system collects rainwater and air conditioner condensation to water the home's small rear garden.
Large windows and skylights bring light deep into the row house and reduce the use of light fixtures. The rear yard garden features ipe decking (a dense, water-repellent hardwood) on permeable compacted gravel to minimize storm water runoff. BluPath Design’s principals used the project to demonstrate how sustainability can be integrated with beauty and function, with sensual materials and colors, well-proportioned and light-filled rooms, economic use of space, and thoughtful details. Cherry flooring and custom stairs complement the Indian slate tile in the kitchen and bathrooms. The kitchen features custom walnut cabinets with blue granite counters and backsplashes. The first floor dining area is illuminated by a BluPath-designed fiber-optic chandelier. Ipe hardwood is also used for the master bath tub-surround and shower floor. Sliding frosted glass panels separating the master bath from other living areas allows light from the corner windows to naturally illuminate the adjacent room.
Awards
Honorable Mention for Sustainability and Energy Efficiency
IIDA Philadelphia City Center Chapter 3rd Annual Interior Design Awards, June 2007
Bronze 2006 Commonwealth Design Award
10,000 Friends of PA, May 2006
Media
HGTV ‘What You Get for the Money’ February 2007
Philadelphia Style Magazine March/April 2007
Philadelphia Inquirer June 11, 2006
Philadelphia CityPaper September 25-October 2, 2003
Photography by Barry Halkin
 BluPath Design
Blau-Thompson Residence
This Civil War era, 1680-square-foot three-story row house is located in the Italian Market section of Philadelphia. The BluPath Design principals and their young child were the clients. The project goal was to upgrade a traditional housing type to meet a contemporary lifestyle, applying both sustainable criteria and clean, modern yet sensual aesthetics. The challenge of the property (only 830 square feet in lot size) was to create a design that was small, but smart.
The structure formerly housed a luncheonette with two apartments above. The interior was gutted and renovated into a single family home. The construction of a small rear addition added a new kitchen on the first floor and new bathrooms on the second and third levels. The east-west orientation of the home was ideal for the roof-mounted solar collectors, which were installed to provide domestic hot water and supplement the new radiant floor heating system. Exterior sensors improve the efficiency of the heating system's response to fluctuations in outside temperature. A new white-coated, rubber membrane roof reduced the structure's heat gain by 20 percent. A water catch system collects rainwater and air conditioner condensation to water the home's small rear garden.
Large windows and skylights bring light deep into the row house and reduce the use of light fixtures. The rear yard garden features ipe decking (a dense, water-repellent hardwood) on permeable compacted gravel to minimize storm water runoff. BluPath Design’s principals used the project to demonstrate how sustainability can be integrated with beauty and function, with sensual materials and colors, well-proportioned and light-filled rooms, economic use of space, and thoughtful details. Cherry flooring and custom stairs complement the Indian slate tile in the kitchen and bathrooms. The kitchen features custom walnut cabinets with blue granite counters and backsplashes. The first floor dining area is illuminated by a BluPath-designed fiber-optic chandelier. Ipe hardwood is also used for the master bath tub-surround and shower floor. Sliding frosted glass panels separating the master bath from other living areas allows light from the corner windows to naturally illuminate the adjacent room.
Awards
Honorable Mention for Sustainability and Energy Efficiency
IIDA Philadelphia City Center Chapter 3rd Annual Interior Design Awards, June 2007
Bronze 2006 Commonwealth Design Award
10,000 Friends of PA, May 2006
Media
HGTV ‘What You Get for the Money’ February 2007
Philadelphia Style Magazine March/April 2007
Philadelphia Inquirer June 11, 2006
Philadelphia CityPaper September 25-October 2, 2003
Photography by Barry Halkin
 BluPath Design
Blau-Thompson Residence
This Civil War era, 1680-square-foot three-story row house is located in the Italian Market section of Philadelphia. The BluPath Design principals and their young child were the clients. The project goal was to upgrade a traditional housing type to meet a contemporary lifestyle, applying both sustainable criteria and clean, modern yet sensual aesthetics. The challenge of the property (only 830 square feet in lot size) was to create a design that was small, but smart.
The structure formerly housed a luncheonette with two apartments above. The interior was gutted and renovated into a single family home. The construction of a small rear addition added a new kitchen on the first floor and new bathrooms on the second and third levels. The east-west orientation of the home was ideal for the roof-mounted solar collectors, which were installed to provide domestic hot water and supplement the new radiant floor heating system. Exterior sensors improve the efficiency of the heating system's response to fluctuations in outside temperature. A new white-coated, rubber membrane roof reduced the structure's heat gain by 20 percent. A water catch system collects rainwater and air conditioner condensation to water the home's small rear garden.
Large windows and skylights bring light deep into the row house and reduce the use of light fixtures. The rear yard garden features ipe decking (a dense, water-repellent hardwood) on permeable compacted gravel to minimize storm water runoff. BluPath Design’s principals used the project to demonstrate how sustainability can be integrated with beauty and function, with sensual materials and colors, well-proportioned and light-filled rooms, economic use of space, and thoughtful details. Cherry flooring and custom stairs complement the Indian slate tile in the kitchen and bathrooms. The kitchen features custom walnut cabinets with blue granite counters and backsplashes. The first floor dining area is illuminated by a BluPath-designed fiber-optic chandelier. Ipe hardwood is also used for the master bath tub-surround and shower floor. Sliding frosted glass panels separating the master bath from other living areas allows light from the corner windows to naturally illuminate the adjacent room.
Awards
Honorable Mention for Sustainability and Energy Efficiency
IIDA Philadelphia City Center Chapter 3rd Annual Interior Design Awards, June 2007
Bronze 2006 Commonwealth Design Award
10,000 Friends of PA, May 2006
Media
HGTV ‘What You Get for the Money’ February 2007
Philadelphia Style Magazine March/April 2007
Philadelphia Inquirer June 11, 2006
Philadelphia CityPaper September 25-October 2, 2003
Photography by Barry Halkin
64