
Search results for "Moving essentials" in Home Design Ideas
 Ridgeline Renovations
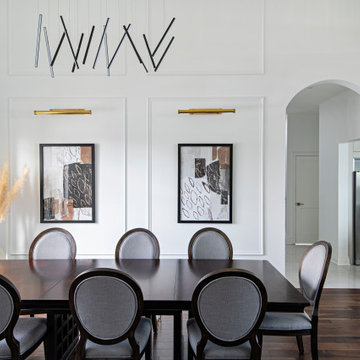
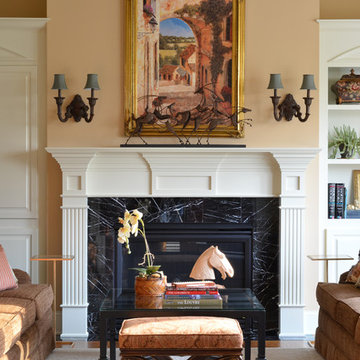
Here, our clients hoped to introduce a mix of modern elements to their traditional country home. The space was remodelled from top to bottom as we accommodated the varying objectives of the homeowners. Structurally, this included installing coffer ceilings and elongating select windows to reach the floor. These windows, as well as heightened ceilings, make the most out of the light for this East-facing home, which is finally a fitting welcome for the glorious morning sun.
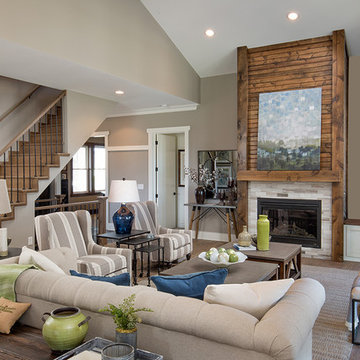
Moving through the home, modern touches can be found throughout, especially in the kitchen and main living areas. A stylish wood-front fireplace provides the perfect place to gather and relax, while a newly optimized kitchen with an array of strategically positioned storage spaces, modern accoutrements, and traditional mouldings makes entertaining a breeze.
Accessibility and the ability to age in place was another priority for this couple. To achieve both, we ensured our clients’ essentials were designed for the main floor. The installation of a roll-in and barrier-free steam shower, and small accommodative features like the sliding ladder in the roomy walk-in closet ensure this space will stand the test of time. Now a beautiful, functional, and elegant space, this couple no longer need to consider moving from the place they've so lovingly called home.
 Aleto Construction Group
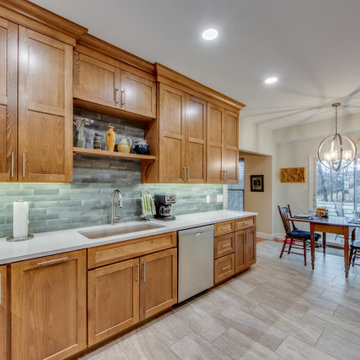
After building a home in North Carolina and using their smaller St. Louis Home when they were in town our clients decided to move to St. Louis permanently and contacted us to completely gut their existing non-functional kitchen into something that works for their storage and cooking needs. Functionality was top of mind as both homeowners are exquisite chefs. They needed room to store all their cooking essentials in easy to access locations, they wanted to open the kitchen up by removing a peninsula that shrunk the room and left space for only one cook at a time. They also wanted to brighten and lighten the finishes. The kitchen felt heavy with black countertops, dark floors and lighting that was subpar. We completely gutted the kitchen by moving the location of the sink and dishwasher from the peninsula, putting cabinetry along the two main walls in the kitchen. Cabinets were replaced with thoughtfully planned out drawers for easy access and convenient pantry cabinets with pull out shelves. The cabinets were taken to the ceiling to take advantage of extra space for storage as well as making the room feel taller. White countertops and well-placed lighting throughout the kitchen and under the cabinets brighten the room while the green handmade tiles bring dimension and interest that compliment the earth tones of the cabinetry.

 Five Star Tree Care
Using a chainsaw is a quick way to make work of fallen branches, damaged trees, and more. However, unless you have been plenty of experience, you may not be able to use this tool safely. For those who have never used a chainsaw before, it is a good idea to start with a lighter saw to prevent injury. It is also a good idea to enroll in a training course. If you plan to use a chainsaw in a professional company, it is even mandatory. Five Star Tree Services has created a quick guide that will help you decide if using a chainsaw is the best option for you.
Chainsaw Maintenance
Before you start using a chainsaw, you need to know if the blades are properly sharpened. Dull blades can cause jagged cuts or even cause injury. A sharp blade allows the saw to cut smoothly and produce straight cuts. The next step is to review is the cutting chain. It should be adjusted to the right tension, so the chain doesn’t move when the engine is idle. Make sure there are no loose screws and that the chain brake is in proper working order.
Operating a Chainsaw
Once you ensure that the chainsaw is safe to operate, it is time to get it started. Do you know the right amount of throttle and pressure to use? What about which cut would be best for your current project? Each type of cut will affect the wood differently, so it is important to keep these factors in mind when using a chainsaw. Situational awareness is also an important part of chainsaw use. No one should be within 10 feet while you are cutting. Also, avoid getting distracted by people seeking your attention since it only takes a second for a grave mistake to occur.
Protection During Chainsaw Operation
Proper protection is essential when operating machinery. When using a chainsaw, you should have on personal protection equipment such as; chainsaw pants, steel toe boots, gloves, ear protection, high visibility clothing, a helmet, and eye protection. All of these items should be in good working order and made from high-quality materials. Protecting your face, neck, chest, and abdomen is critical when working with any type of cutting tool.
The best way to keep yourself protected while wearing your personal protective equipment (PPE) is to maintain control over the chainsaw. Gloves may reduce control for many people, but a firm stance and proper balance can work wonders for maintaining control. PPE usage is very important, but it is equally important not to get lulled into a false sense of security by wearing it.
Practice Makes Perfect
It is best to practice using your chainsaw before taking on big projects. This will help you learn to move your body and your head in a safe way and a way that supports a clean cut. Most often, work with chainsaws is completed on ground that is uneven or covered in obstacles. Practicing will ensure that you can adapt to your environment without risking damage to your property or bodily harm.
How We Can Help
Working with chainsaws can make tree care simpler, but without the proper training and protection, it can be hazardous. Instead of taking the risk, hire the professionals here at Five Star Tree Services for all of your Richmond Hill tree removal and tree care needs. Give us a call at (416) 990-3355 to find out more about our rates and services.
Find the right local pro for your project
 Dream Kitchens
This home has a beautiful view of the Nashua River. They wanted to include the natural, earthy feeling of the riverbed while continuing with the modern and sleek style of their home.
As you walk into this home you have a warm and cozy feel. At the same time you see the personality of the homeowners. The feeling is simple, natural with a splash of playful. The cabinetry and furniture is in a flat panel door which accents the beautiful natural cherry wood. The artwork is modern with a splash of color.
The dining room has a love natural cherry table with a stone fireplace behind it. The dining room as a lovely cherry cabinet that looks like the dining room table that actually is hiding the pantry items of the kitchen. The artwork has a modern flair and the pumpkin paint brings a warm and inviting feel to the room.
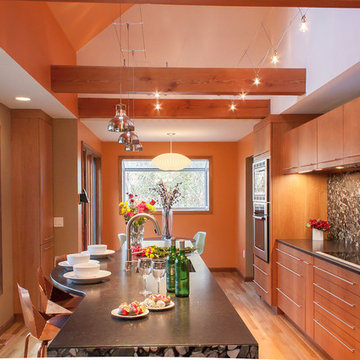
The dining room is open to the kitchen. The first thing that was done was to move the kitchen on the other side of the room so that the wall that has the view included a floor to ceiling window. This insured that no matter where you were- in the dining room or the kitchen, or the kitchen table you would get a truly wonderful view of the river.
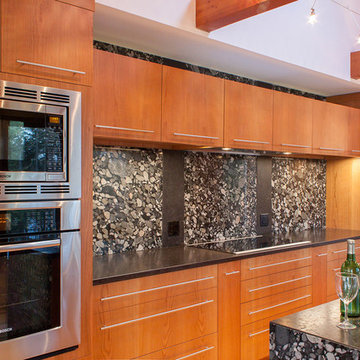
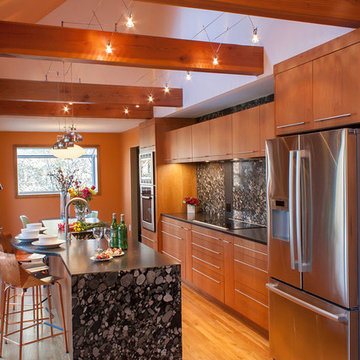
The kitchen has many exciting features. The hood is hidden to look like a row of cabinets. The granite is the main feature of this kitchen. The pebbled granite is mixed with leathered black granite in many interesting ways. The backsplash has the pebble granite mixed with black stripes. These black stripes hide the outlets and make for the backsplash have a wonderful design. The sides of the island have the pebble granite and the sink has the pebble granite.
Lighting was essential to this design as the kitchen as wonderful wooded beams and it was essential to light up the kitchen without taking away from the effect of the wooded beams.
The space has become that truly earthy, warm and playful space that they have dreamed.
 Liberty Homes
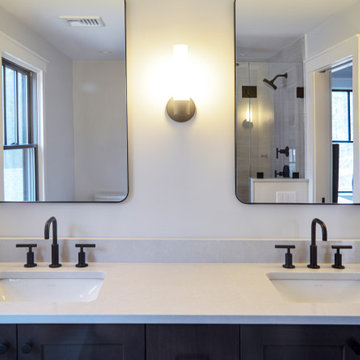
To create the master suite this home owner dreamed of, we moved a few walls, and a lot of doors and windows. Essentially half the house went under construction. Within the same footprint we created a larger master bathroom, walk in closet, and guest room while retaining the same number of bedrooms. The second room became smaller but officially became a bedroom with a closet and more functional layout. What you don’t see in the finished pictures is a new utility room that had to be built downstairs in the garage to service the new plumbing and heating.
All those black bathroom fixtures are Kohler and the tile is from Ann Sacks. The stunning grey tile is Andy Fleishman and the grout not only fills in the separations but defines the white design in the tile. This time-intensive process meant the tiles had to be sealed before install and twice after.
All the black framed windows are by Anderson Woodright series and have a classic 3 light over 0 light sashes.
The doors are true sealer panels with a classic trim, as well as thicker head casings and a top cap.
We moved the master bathroom to the side of the house where it could take advantage of the windows. In the master bathroom in addition to the ann sacks tile on the floor, some of the tile was laid out in a way that made it feel like one sheet with almost no space in between. We found more storage in the master by putting it in the knee wall and bench seat. The master shower also has a rain head as well as a regular shower head that can be used separately or together.
The second bathroom has a unique tub completely encased in grey quartz stone with a clever mitered edge to minimize grout lines. It also has a larger window to brighten up the bathroom and add some drama.
 Allreno
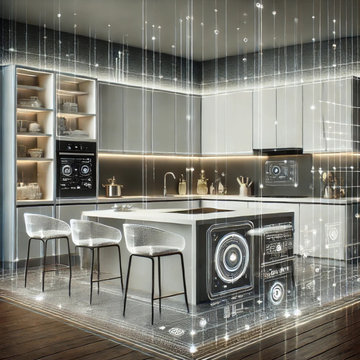
In What Order Should You Renovate a Kitchen? Revolutionizing Kitchen and Bath Renovation with Allreno's Design AI
Renovating a kitchen can be one of the most exciting and rewarding home improvement projects. However, with so many decisions to make, it can also be overwhelming. From selecting kitchen cabinets to choosing countertops and appliances, the process often involves careful planning and organization. So, how do you ensure the renovation goes smoothly? One important factor is knowing the right order in which to tackle the project.
The Right Order for Kitchen Renovation
Renovating a kitchen involves multiple steps, and knowing the proper order of operations is crucial for both time efficiency and cost savings. Here’s a general guideline for how to approach your kitchen renovation:
1. Planning and Design: The first step in any renovation is planning. This includes deciding on the layout, design, and features you want in your kitchen. At this stage, you’ll also need to think about your budget and timeline. It’s essential to finalize these details before moving forward with the actual work.
2. Demolition: Once the design is set, it’s time to remove old fixtures, cabinets, appliances, and flooring. Demolition can be a messy process, but it’s necessary for starting fresh. Having a professional handle this phase is often a smart move to ensure everything is safely removed.
3. Structural Work: If you plan on altering the layout of the kitchen by knocking down walls or adding new plumbing or electrical work, now is the time to do it. Structural changes can be complicated and costly, so it’s important to ensure these are completed before installing any new elements.
4. Plumbing and Electrical Work: With the structure in place, you can begin installing plumbing and electrical systems. This might include adding new water lines, sinks, or electrical outlets for appliances. It’s best to bring in licensed professionals for this stage, as electrical and plumbing work requires expert knowledge.
5. Cabinet Installation: Once the plumbing and electrical work are in place, you can install the kitchen cabinets. Cabinets are one of the most important elements of the kitchen, and the Allreno design AI can make this process easier. Allreno's AI-driven platform allows you to visualize how different kitchen cabinets will fit into your space, ensuring you make the best choice based on your preferences and layout.
6. Countertops: After the cabinets are installed, it’s time to add countertops. Whether you choose granite, quartz, or a more budget-friendly option, countertops are a focal point of the kitchen, and they should complement the cabinets and other design elements.
7. Flooring: Now that the major structural elements are in place, it’s time to install your flooring. Whether you opt for tile, hardwood, or vinyl, flooring should be installed after the cabinets and countertops to prevent any damage during the installation process.
8. Appliances and Fixtures: With the foundation in place, you can now add your appliances (oven, refrigerator, dishwasher, etc.) and fixtures (sink, faucets, lighting). Allreno’s AI can also help here by offering kitchen design recommendations based on available appliances and space dimensions.
9. Final Touches: The last step is adding the finishing touches to your kitchen. This includes painting the walls, adding backsplash tiles, and installing accessories like handles and knobs on your cabinets. This is also the stage where you can implement any stylistic choices to make the space uniquely yours.
How Allreno's AI Transforms the Renovation Process
One of the biggest challenges of a kitchen renovation is visualizing how everything will come together. Allreno’s design AI changes that by offering an intuitive platform that brings your ideas to life. Here’s how:
• Personalized Design Recommendations: Allreno’s AI suggests design elements based on your preferences, style, and space dimensions. Whether it’s selecting the perfect kitchen cabinets or countertop finishes, the AI ensures everything works together cohesively.
• 3D Visualization: With Allreno’s AI-driven design tools, you can visualize your kitchen layout in 3D before any work begins. This allows you to see how different elements will fit into your space and make adjustments as needed.
• Efficient Project Management: Allreno helps you streamline the entire renovation process by generating accurate material lists, estimates, and timelines. This means you can avoid costly errors and keep your renovation on track.
Conclusion
Renovating a kitchen is an exciting project, but it requires careful planning and organization to ensure it’s done right. By following a strategic order of operations and leveraging cutting-edge technology like Allreno’s design AI, homeowners can streamline the process, save time and money, and bring their dream kitchen to life with ease. Allreno not only simplifies the design process but also provides innovative solutions that make kitchen and bath renovations faster and more efficient than ever before.
Ready to get started with your kitchen renovation? Allreno's AI-powered design platform is here to help you every step of the way.
 Liberty Homes
To create the master suite this home owner dreamed of, we moved a few walls, and a lot of doors and windows. Essentially half the house went under construction. Within the same footprint we created a larger master bathroom, walk in closet, and guest room while retaining the same number of bedrooms. The second room became smaller but officially became a bedroom with a closet and more functional layout. What you don’t see in the finished pictures is a new utility room that had to be built downstairs in the garage to service the new plumbing and heating.
All those black bathroom fixtures are Kohler and the tile is from Ann Sacks. The stunning grey tile is Andy Fleishman and the grout not only fills in the separations but defines the white design in the tile. This time-intensive process meant the tiles had to be sealed before install and twice after.
All the black framed windows are by Anderson Woodright series and have a classic 3 light over 0 light sashes.
The doors are true sealer panels with a classic trim, as well as thicker head casings and a top cap.
We moved the master bathroom to the side of the house where it could take advantage of the windows. In the master bathroom in addition to the ann sacks tile on the floor, some of the tile was laid out in a way that made it feel like one sheet with almost no space in between. We found more storage in the master by putting it in the knee wall and bench seat. The master shower also has a rain head as well as a regular shower head that can be used separately or together.
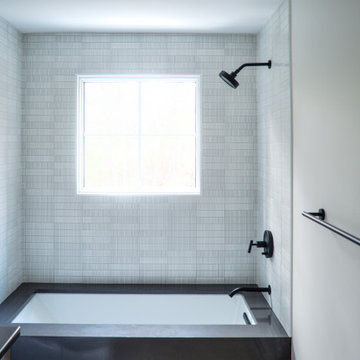
The second bathroom has a unique tub completely encased in grey quartz stone with a clever mitered edge to minimize grout lines. It also has a larger window to brighten up the bathroom and add some drama.

 Liberty Homes
To create the master suite this home owner dreamed of, we moved a few walls, and a lot of doors and windows. Essentially half the house went under construction. Within the same footprint we created a larger master bathroom, walk in closet, and guest room while retaining the same number of bedrooms. The second room became smaller but officially became a bedroom with a closet and more functional layout. What you don’t see in the finished pictures is a new utility room that had to be built downstairs in the garage to service the new plumbing and heating.
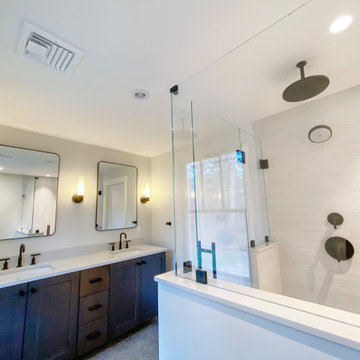
All those black bathroom fixtures are Kohler and the tile is from Ann Sacks. The stunning grey tile is Andy Fleishman and the grout not only fills in the separations but defines the white design in the tile. This time-intensive process meant the tiles had to be sealed before install and twice after.
All the black framed windows are by Anderson Woodright series and have a classic 3 light over 0 light sashes.
The doors are true sealer panels with a classic trim, as well as thicker head casings and a top cap.
We moved the master bathroom to the side of the house where it could take advantage of the windows. In the master bathroom in addition to the ann sacks tile on the floor, some of the tile was laid out in a way that made it feel like one sheet with almost no space in between. We found more storage in the master by putting it in the knee wall and bench seat. The master shower also has a rain head as well as a regular shower head that can be used separately or together.
The second bathroom has a unique tub completely encased in grey quartz stone with a clever mitered edge to minimize grout lines. It also has a larger window to brighten up the bathroom and add some drama.
 San Luis Kitchen Co.
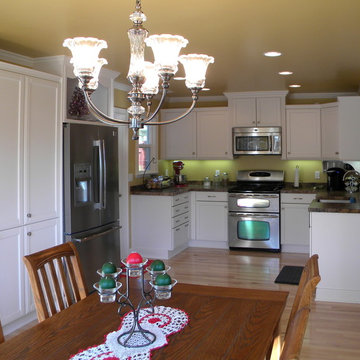
Having been referred to San Luis Kitchen by the mother of a co-worker, this month’s homeowners came to our showroom with high hopes. Tried and true do-it-yourselfers, the couple had already knocked out a wall to create a pass-thru between their kitchen and living room. However life intervened and they were stalled with raw drywall and partially demolished cabinets. Hence, the recognition of need for professional remodeling help!
An initial interview with San Luis Kitchen’s design team revealed a few things that had to change. First, this busy professional couple had been living for years without a dishwasher! “NO more!” exclaimed the wife. Secondly, there was a marked lack of convenient workspace in this small kitchen. The workable counter space was limited to one corner of the room between the sink and the range – the microwave was filling the counter to the left of the sink and there was no counter at all to the right of the range.
To add insult to injury, a room divider that had a nice large top was basically unusable – it was in an awkward location for prep work (facing the dining room with your back to the kitchen), had an old wood counter that was aesthetically appealing but impractical for food prep, and just ended up covered in clutter. Thirdly, the work area of the kitchen was blah, boring and uninspiring – when standing at the sink you stared at a blank wall and the range faced the unfinished drywall from the stalled remodel – not a place to spend quality time!
There were some interesting plus points to the existing space that could be capitalized upon. The homeowner absolutely loved her range – a freestanding 30” unit with double stacked ovens. She definitely wanted to reuse it. Another plus was the placement of the refrigerator. It was recessed into a niche built into the connecting garage. This allowed the spacious deep refrigerator to remain unimposing in the kitchen – it wasn’t sticking out in the space the way fridges often are!
And now to the redesign and the new kitchen. We decided to remove the center room divider and integrate the kitchen with the dining area. We gave the homeowners lots of storage space by designing a dining area hutch that has four tall pantry cabinets in addition to a display area and two banks of nice deep drawers. We kept the refrigerator recessed into the garage (pulling it forward a bit to align with the hutch) and added a decorative open shelf above it. Next, we moved the new farmhouse style stainless sink to face the living area pass-thru (the designated clean-up person can now interact with guests who are relaxing after dinner) and added a small dishwasher to the left of the sink and a double pull-out trash cabinet to the right of it – all the essentials for clean-up – and counter space to boot! We also tucked a narrow tray storage cabinet into the corner next to the dishwasher.
The range now centers on the end wall of the kitchen with a microwave hood and cabinetry detail above creating a focal point for the kitchen. On either side of the range are swing-out shelves to access the base corners – space was tight here, we custom sized the cabinets and squeezed them in. A bank of four drawers is located under the window extending the counter around the corner so that the homeowners now have food prep space both left and right of the range. In the upper cabinets to the left of the microwave we installed a swing-out spice pantry for organized storage and easy access to essential items. Their Kitchenaid mixer lives on the counter here with adjustable shelf storage above it – this corner has become a bake center. And there is now a designated coffee space in the other corner featuring a diagonal wall corner cabinet and decorative corner mug shelf.
In conclusion, San Luis Kitchen and these intrepid homeowners took an old boring white kitchen and transformed it into a whole new room. Now the kitchen complements the up-beat and energetic lifestyle of its users.
 Five Star Tree Care
When you have found the home of your dreams, having a beautiful tree in the yard is simply an added bonus. Many people specifically search for homes that have one or more trees when considering a new property. Trees are an essential part of our environment, but it is important to note that these beautiful living pieces of art can also be dangerous.
Five Star Tree Services has come across quite a few situations where trees have done some incredible damage to homes. So if you have a tree or several trees on your property, it is important to keep a few things in mind to avoid similar accidents.
Mind the Tree Roots
The roots of a tree help it to grow up straight and tall. They also help to anchor it in its position. While the roots are important in keeping the tree firmly in the ground, they are also one of the leading causes of damage. Roots can move the soil and materials of your foundation which can weaken the overall structure of your home. In addition to the foundation, roots have the strength to break underground pipes as well. Many homeowners with leaking water in their basement or puddles in their lower levels can trace the problem back to roots disturbing the plumbing.
In order to repair these issues, you must call a professional tree care company. In some cases, the roots can be moved from around your plumbing or foundations, but in most cases, tree removal is required.
Dead or Dying Trees
Trees that are on the verge of dying or those that have already died need to be removed as soon as possible. It is important to pay attention to the health of your trees to keep your family and your property safe. The biggest sign of a tree that is at risk of falling over is deep cracks in the trunk and branches. The tree may have died due to old age, diseases, or an infestation. The cause could have also been a result of storm damage. Regardless of the cause, dead trees can tip over and fall on your home or even people who happen to be passing by. Instead of risking your family’s health or your property, have ailing trees removed as soon as possible.
Natural Pests
Pest control is important, especially if you have one or more trees on your property. Trees attract critters no matter how well you maintain them, from owls and squirrels to termites and other bugs. Depending on how close the trees in your yard are to your home, you may need to watch out for pests invading your home. Termites are the most harmful, so it is important to have both your trees and your home inspected on a regular basis. The other pests can be controlled with proper pruning and regular maintenance. Squirrels are the second-largest danger. If they can reach your roof from nearby trees, you will have to worry about holes in your roof, insulation, and even in your foundation.
Taking Care of Your Trees
Trees are an important part of our environment and can add beauty and value to any property. With the right care and regular maintenance from Five Star Tree Services, you can enjoy the beauty of your trees while avoiding the dangers. Give us a call at (416) 990-3355 to find out more about our Toronto tree care services.
 Ridgeline Renovations
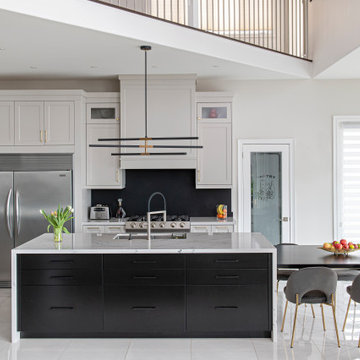
Here, our clients hoped to introduce a mix of modern elements to their traditional country home. The space was remodelled from top to bottom as we accommodated the varying objectives of the homeowners. Structurally, this included installing coffer ceilings and elongating select windows to reach the floor. These windows, as well as heightened ceilings, make the most out of the light for this East-facing home, which is finally a fitting welcome for the glorious morning sun.
Moving through the home, modern touches can be found throughout, especially in the kitchen and main living areas. A stylish wood-front fireplace provides the perfect place to gather and relax, while a newly optimized kitchen with an array of strategically positioned storage spaces, modern accoutrements, and traditional mouldings makes entertaining a breeze.
Accessibility and the ability to age in place was another priority for this couple. To achieve both, we ensured our clients’ essentials were designed for the main floor. The installation of a roll-in and barrier-free steam shower, and small accommodative features like the sliding ladder in the roomy walk-in closet ensure this space will stand the test of time. Now a beautiful, functional, and elegant space, this couple no longer need to consider moving from the place they've so lovingly called home.
 Ridgeline Renovations
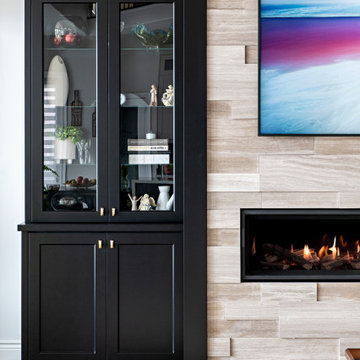
Here, our clients hoped to introduce a mix of modern elements to their traditional country home. The space was remodelled from top to bottom as we accommodated the varying objectives of the homeowners. Structurally, this included installing coffer ceilings and elongating select windows to reach the floor. These windows, as well as heightened ceilings, make the most out of the light for this East-facing home, which is finally a fitting welcome for the glorious morning sun.
Moving through the home, modern touches can be found throughout, especially in the kitchen and main living areas. A stylish wood-front fireplace provides the perfect place to gather and relax, while a newly optimized kitchen with an array of strategically positioned storage spaces, modern accoutrements, and traditional mouldings makes entertaining a breeze.
Accessibility and the ability to age in place was another priority for this couple. To achieve both, we ensured our clients’ essentials were designed for the main floor. The installation of a roll-in and barrier-free steam shower, and small accommodative features like the sliding ladder in the roomy walk-in closet ensure this space will stand the test of time. Now a beautiful, functional, and elegant space, this couple no longer need to consider moving from the place they've so lovingly called home.
 Aleto Construction Group
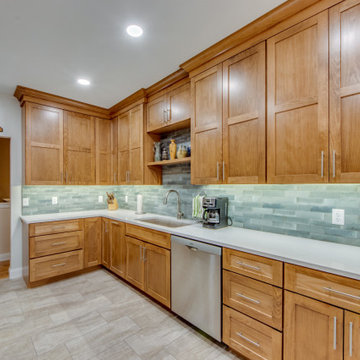
After building a home in North Carolina and using their smaller St. Louis Home when they were in town our clients decided to move to St. Louis permanently and contacted us to completely gut their existing non-functional kitchen into something that works for their storage and cooking needs. Functionality was top of mind as both homeowners are exquisite chefs. They needed room to store all their cooking essentials in easy to access locations, they wanted to open the kitchen up by removing a peninsula that shrunk the room and left space for only one cook at a time. They also wanted to brighten and lighten the finishes. The kitchen felt heavy with black countertops, dark floors and lighting that was subpar. We completely gutted the kitchen by moving the location of the sink and dishwasher from the peninsula, putting cabinetry along the two main walls in the kitchen. Cabinets were replaced with thoughtfully planned out drawers for easy access and convenient pantry cabinets with pull out shelves. The cabinets were taken to the ceiling to take advantage of extra space for storage as well as making the room feel taller. White countertops and well-placed lighting throughout the kitchen and under the cabinets brighten the room while the green handmade tiles bring dimension and interest that compliment the earth tones of the cabinetry.
Sponsored
Columbus, OH

Wannemacher Interiors
Customized Award-Winning Interior Design Solutions in Franklin Cnty OH
 Dream Kitchens
This home has a beautiful view of the Nashua River. They wanted to include the natural, earthy feeling of the riverbed while continuing with the modern and sleek style of their home.
As you walk into this home you have a warm and cozy feel. At the same time you see the personality of the homeowners. The feeling is simple, natural with a splash of playful. The cabinetry and furniture is in a flat panel door which accents the beautiful natural cherry wood. The artwork is modern with a splash of color.
The dining room has a love natural cherry table with a stone fireplace behind it. The dining room as a lovely cherry cabinet that looks like the dining room table that actually is hiding the pantry items of the kitchen. The artwork has a modern flair and the pumpkin paint brings a warm and inviting feel to the room.
The dining room is open to the kitchen. The first thing that was done was to move the kitchen on the other side of the room so that the wall that has the view included a floor to ceiling window. This insured that no matter where you were- in the dining room or the kitchen, or the kitchen table you would get a truly wonderful view of the river.
The kitchen has many exciting features. The hood is hidden to look like a row of cabinets. The granite is the main feature of this kitchen. The pebbled granite is mixed with leathered black granite in many interesting ways. The backsplash has the pebble granite mixed with black stripes. These black stripes hide the outlets and make for the backsplash have a wonderful design. The sides of the island have the pebble granite and the sink has the pebble granite.
Lighting was essential to this design as the kitchen as wonderful wooded beams and it was essential to light up the kitchen without taking away from the effect of the wooded beams.
The space has become that truly earthy, warm and playful space that they have dreamed.
 Dream Kitchens
This home has a beautiful view of the Nashua River. They wanted to include the natural, earthy feeling of the riverbed while continuing with the modern and sleek style of their home.
As you walk into this home you have a warm and cozy feel. At the same time you see the personality of the homeowners. The feeling is simple, natural with a splash of playful. The cabinetry and furniture is in a flat panel door which accents the beautiful natural cherry wood. The artwork is modern with a splash of color.
The dining room has a love natural cherry table with a stone fireplace behind it. The dining room as a lovely cherry cabinet that looks like the dining room table that actually is hiding the pantry items of the kitchen. The artwork has a modern flair and the pumpkin paint brings a warm and inviting feel to the room.
The dining room is open to the kitchen. The first thing that was done was to move the kitchen on the other side of the room so that the wall that has the view included a floor to ceiling window. This insured that no matter where you were- in the dining room or the kitchen, or the kitchen table you would get a truly wonderful view of the river.
The kitchen has many exciting features. The hood is hidden to look like a row of cabinets. The granite is the main feature of this kitchen. The pebbled granite is mixed with leathered black granite in many interesting ways. The backsplash has the pebble granite mixed with black stripes. These black stripes hide the outlets and make for the backsplash have a wonderful design. The sides of the island have the pebble granite and the sink has the pebble granite.
Lighting was essential to this design as the kitchen as wonderful wooded beams and it was essential to light up the kitchen without taking away from the effect of the wooded beams.
The space has become that truly earthy, warm and playful space that they have dreamed.


 CITYDESKSTUDIO, Inc.
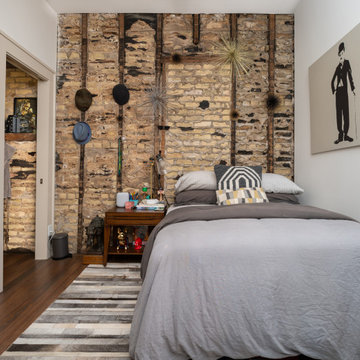
Believed to be the oldest building in Excelsior Minnesota, this humble brick structure has transformed, been moved, and housed countless people over its 162 years. Affectionately known as ‘The Beehive’, it was built in 1857 and began as the original Excelsior schoolhouse. It was moved to its’ current location in the 1880’s and became a 23-room dormitory for Northwestern Christian College, followed by a boarding house, and finally apartments (in addition to the rumors of more sordid activities in the early 20th century!).
After being in the same family for several decades, the owner wanted to transform the building one more time to make it her own home. Citydeskstudio worked closely with her and the Excelsior Historic Preservation Commission on the design. She now occupies the main floor, with additional units above and below for rental and for family.
The design celebrates the stout and blocky character of the building with a new modern expansion off the back. There, the building steps and expands outwards in glassy boxes of charred cedar. Inside, the original structure was repaired and uncovered where possible, and previous poorly done modifications were corrected. The center piece of this more open and light-filled home is a rich modern kitchen in walnut, travertine, and steel. The old character remains ever present and is essential to the spirit of The Beehive’s latest transformation.
This multigenerational home’s design honors the legacy of the property, marrying the original Excelsior schoolhouse with a beautiful, modern, contextually-sensitive remodel and addition.
Project Team:
Ben Awes, AIA, Principal-In-Charge
Chris Bach
Nate Dodge

 Liberty Homes
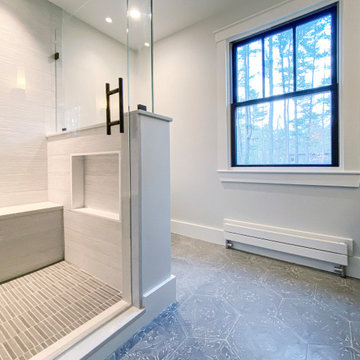
To create the master suite this home owner dreamed of, we moved a few walls, and a lot of doors and windows. Essentially half the house went under construction. Within the same footprint we created a larger master bathroom, walk in closet, and guest room while retaining the same number of bedrooms. The second room became smaller but officially became a bedroom with a closet and more functional layout. What you don’t see in the finished pictures is a new utility room that had to be built downstairs in the garage to service the new plumbing and heating.
All those black bathroom fixtures are Kohler and the tile is from Ann Sacks. The stunning grey tile is Andy Fleishman and the grout not only fills in the separations but defines the white design in the tile. This time-intensive process meant the tiles had to be sealed before install and twice after.
All the black framed windows are by Anderson Woodright series and have a classic 3 light over 0 light sashes.
The doors are true sealer panels with a classic trim, as well as thicker head casings and a top cap.
We moved the master bathroom to the side of the house where it could take advantage of the windows. In the master bathroom in addition to the ann sacks tile on the floor, some of the tile was laid out in a way that made it feel like one sheet with almost no space in between. We found more storage in the master by putting it in the knee wall and bench seat. The master shower also has a rain head as well as a regular shower head that can be used separately or together.
The second bathroom has a unique tub completely encased in grey quartz stone with a clever mitered edge to minimize grout lines. It also has a larger window to brighten up the bathroom and add some drama.
 Ridgeline Renovations
Here, our clients hoped to introduce a mix of modern elements to their traditional country home. The space was remodelled from top to bottom as we accommodated the varying objectives of the homeowners. Structurally, this included installing coffer ceilings and elongating select windows to reach the floor. These windows, as well as heightened ceilings, make the most out of the light for this East-facing home, which is finally a fitting welcome for the glorious morning sun.
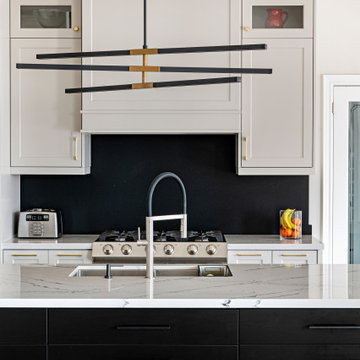
Moving through the home, modern touches can be found throughout, especially in the kitchen and main living areas. A stylish wood-front fireplace provides the perfect place to gather and relax, while a newly optimized kitchen with an array of strategically positioned storage spaces, modern accoutrements, and traditional mouldings makes entertaining a breeze.
Accessibility and the ability to age in place was another priority for this couple. To achieve both, we ensured our clients’ essentials were designed for the main floor. The installation of a roll-in and barrier-free steam shower, and small accommodative features like the sliding ladder in the roomy walk-in closet ensure this space will stand the test of time. Now a beautiful, functional, and elegant space, this couple no longer need to consider moving from the place they've so lovingly called home.
 CITYDESKSTUDIO, Inc.
Believed to be the oldest building in Excelsior Minnesota, this humble brick structure has transformed, been moved, and housed countless people over its 162 years. Affectionately known as ‘The Beehive’, it was built in 1857 and began as the original Excelsior schoolhouse. It was moved to its’ current location in the 1880’s and became a 23-room dormitory for Northwestern Christian College, followed by a boarding house, and finally apartments (in addition to the rumors of more sordid activities in the early 20th century!).
After being in the same family for several decades, the owner wanted to transform the building one more time to make it her own home. Citydeskstudio worked closely with her and the Excelsior Historic Preservation Commission on the design. She now occupies the main floor, with additional units above and below for rental and for family.
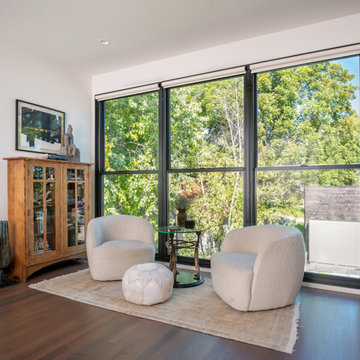
The design celebrates the stout and blocky character of the building with a new modern expansion off the back. There, the building steps and expands outwards in glassy boxes of charred cedar. Inside, the original structure was repaired and uncovered where possible, and previous poorly done modifications were corrected. The center piece of this more open and light-filled home is a rich modern kitchen in walnut, travertine, and steel. The old character remains ever present and is essential to the spirit of The Beehive’s latest transformation.
This multigenerational home’s design honors the legacy of the property, marrying the original Excelsior schoolhouse with a beautiful, modern, contextually-sensitive remodel and addition.
Project Team:
Ben Awes, AIA, Principal-In-Charge
Chris Bach
Nate Dodge
15