
Search results for "Neutralize acids" in Home Design Ideas

 User
Located just north of Highway 24, the neighborhood of Hiller Highlands was rebuilt shortly after being ravaged by the 1991 Oakland fires. The client, who is an artist, recently purchased her two-bedroom, 2-1/2 bath townhouse on Treasure Hill intending to completely renovate the interior before moving in. Her goal was to have a home that reflected her eclectic and modern aesthetics; working with Mackey Builders, Inc., she was able to realize her vision.
Updating the kitchen was a top priority for the owner, as she is a gourmet cook. Collaborating with Stacey to create a design that was streamlined and functional, she chose quartz countertops and a natural stone backsplash to replace the ceramic counters and backsplash original to the home. She exchanged contractor-grade appliances for a Miele double oven, cooktop, and dishwasher, and purchased a Sub-Zero refrigerator with a glass door. Open shelving was integrated into the design so that the owner could display her beautiful ceramic collection. When designing the kitchen's custom cabinetry, Stacey chose a horizontal wood grain to balance the room's high ceilings. He also suggested removing a small bar area in order to expand the kitchen.
Amber Flooring was brought in to resurface the hardwood floors and the Mackey Builders team replaced windows and doors, upgraded the lighting, painted all interior walls, and installed more modern trim details. In the master bath, guest bather, and powder room, they installed new quartz countertops, sinks, and custom cabinets. Bathroom walls were hand-plastered in neutral tones that show subtle variations in color.
In the living room, the wood-burning fireplace, mantel, and built-in shelving were removed and replaced with a sleek high efficiency gas fireplace set into a wall of black large format tile. In keeping the owner's eclectic taste, a new stair railing made of custom-milled maple, wire rope, and acid-etched steel was designed and built. Because the owner loves to draw, Stacey came up with the idea of painting a wall in the dining area with blackboard paint and framing it. He then added a ceramic skull and lights; the finished product is a unique and changeable art installation that is also a focal point for the room.
While this project began as an interior remodel, it expanded to include a fence and siding replacement.
About Mackey Builders, Inc.
Mackey Builders, an award-winning contracting firm, has been in business for over 30 years and is proud to have completed hundreds of remodeling projects in the East Bay, San Francisco, and Marin County. An artist by nature, Stacey has an exquisite eye for detail and creates designs that are as beautiful as they are functional. Client satisfaction is paramount; he is always willing to "go the extra mile" to ensure the finished product meets both the client's and his own exacting standards.

 Truitt and White Window and Door Showroom
Mackey Builders- Located just north of Highway 24, the neighborhood of Hiller Highlands was rebuilt shortly after being ravaged by the 1991 Oakland fires. The client, who is an artist, recently purchased her two-bedroom, 2-1/2 bath townhouse on Treasure Hill intending to completely renovate the interior before moving in. Her goal was to have a home that reflected her eclectic and modern aesthetics; working with Mackey Builders, Inc., she was able to realize her vision.
Updating the kitchen was a top priority for the owner, as she is a gourmet cook. Collaborating with Stacey to create a design that was streamlined and functional, she chose quartz countertops and a natural stone backsplash to replace the ceramic counters and backsplash original to the home. She exchanged contractor-grade appliances for a Miele double oven, cooktop, and dishwasher, and purchased a Sub-Zero refrigerator with a glass door. Open shelving was integrated into the design so that the owner could display her beautiful ceramic collection. When designing the kitchen's custom cabinetry, Stacey chose a horizontal wood grain to balance the room's high ceilings. He also suggested removing a small bar area in order to expand the kitchen.
Amber Flooring was brought in to resurface the hardwood floors and the Mackey Builders team replaced windows and doors, upgraded the lighting, painted all interior walls, and installed more modern trim details. In the master bath, guest bather, and powder room, they installed new quartz countertops, sinks, and custom cabinets. Bathroom walls were hand-plastered in neutral tones that show subtle variations in color.
In the living room, the wood-burning fireplace, mantel, and built-in shelving were removed and replaced with a sleek high efficiency gas fireplace set into a wall of black large format tile. In keeping the owner's eclectic taste, a new stair railing made of custom-milled maple, wire rope, and acid-etched steel was designed and built. Because the owner loves to draw, Stacey came up with the idea of painting a wall in the dining area with blackboard paint and framing it. He then added a ceramic skull and lights; the finished product is a unique and changeable art installation that is also a focal point for the room.
While this project began as an interior remodel, it expanded to include a fence and siding replacement.
About Mackey Builders, Inc.
Mackey Builders, an award-winning contracting firm, has been in business for over 30 years and is proud to have completed hundreds of remodeling projects in the East Bay, San Francisco, and Marin County. An artist by nature, Stacey has an exquisite eye for detail and creates designs that are as beautiful as they are functional. Client satisfaction is paramount; he is always willing to "go the extra mile" to ensure the finished product meets both the client's and his own exacting standards.
 Truitt and White Window and Door Showroom
Mackey Builders: Located just north of Highway 24, the neighborhood of Hiller Highlands was rebuilt shortly after being ravaged by the 1991 Oakland fires. The client, who is an artist, recently purchased her two-bedroom, 2-1/2 bath townhouse on Treasure Hill intending to completely renovate the interior before moving in. Her goal was to have a home that reflected her eclectic and modern aesthetics; working with Mackey Builders, Inc., she was able to realize her vision.
Updating the kitchen was a top priority for the owner, as she is a gourmet cook. Collaborating with Stacey to create a design that was streamlined and functional, she chose quartz countertops and a natural stone backsplash to replace the ceramic counters and backsplash original to the home. She exchanged contractor-grade appliances for a Miele double oven, cooktop, and dishwasher, and purchased a Sub-Zero refrigerator with a glass door. Open shelving was integrated into the design so that the owner could display her beautiful ceramic collection. When designing the kitchen's custom cabinetry, Stacey chose a horizontal wood grain to balance the room's high ceilings. He also suggested removing a small bar area in order to expand the kitchen.
Amber Flooring was brought in to resurface the hardwood floors and the Mackey Builders team replaced windows and doors, upgraded the lighting, painted all interior walls, and installed more modern trim details. In the master bath, guest bather, and powder room, they installed new quartz countertops, sinks, and custom cabinets. Bathroom walls were hand-plastered in neutral tones that show subtle variations in color.
In the living room, the wood-burning fireplace, mantel, and built-in shelving were removed and replaced with a sleek high efficiency gas fireplace set into a wall of black large format tile. In keeping the owner's eclectic taste, a new stair railing made of custom-milled maple, wire rope, and acid-etched steel was designed and built. Because the owner loves to draw, Stacey came up with the idea of painting a wall in the dining area with blackboard paint and framing it. He then added a ceramic skull and lights; the finished product is a unique and changeable art installation that is also a focal point for the room.
While this project began as an interior remodel, it expanded to include a fence and siding replacement.
About Mackey Builders, Inc.
Mackey Builders, an award-winning contracting firm, has been in business for over 30 years and is proud to have completed hundreds of remodeling projects in the East Bay, San Francisco, and Marin County. An artist by nature, Stacey has an exquisite eye for detail and creates designs that are as beautiful as they are functional. Client satisfaction is paramount; he is always willing to "go the extra mile" to ensure the finished product meets both the client's and his own exacting standards.
Find the right local pro for your project
 User
Located just north of Highway 24, the neighborhood of Hiller Highlands was rebuilt shortly after being ravaged by the 1991 Oakland fires. The client, who is an artist, recently purchased her two-bedroom, 2-1/2 bath townhouse on Treasure Hill intending to completely renovate the interior before moving in. Her goal was to have a home that reflected her eclectic and modern aesthetics; working with Mackey Builders, Inc., she was able to realize her vision.
Updating the kitchen was a top priority for the owner, as she is a gourmet cook. Collaborating with Stacey to create a design that was streamlined and functional, she chose quartz countertops and a natural stone backsplash to replace the ceramic counters and backsplash original to the home. She exchanged contractor-grade appliances for a Miele double oven, cooktop, and dishwasher, and purchased a Sub-Zero refrigerator with a glass door. Open shelving was integrated into the design so that the owner could display her beautiful ceramic collection. When designing the kitchen's custom cabinetry, Stacey chose a horizontal wood grain to balance the room's high ceilings. He also suggested removing a small bar area in order to expand the kitchen.
Amber Flooring was brought in to resurface the hardwood floors and the Mackey Builders team replaced windows and doors, upgraded the lighting, painted all interior walls, and installed more modern trim details. In the master bath, guest bather, and powder room, they installed new quartz countertops, sinks, and custom cabinets. Bathroom walls were hand-plastered in neutral tones that show subtle variations in color.
In the living room, the wood-burning fireplace, mantel, and built-in shelving were removed and replaced with a sleek high efficiency gas fireplace set into a wall of black large format tile. In keeping the owner's eclectic taste, a new stair railing made of custom-milled maple, wire rope, and acid-etched steel was designed and built. Because the owner loves to draw, Stacey came up with the idea of painting a wall in the dining area with blackboard paint and framing it. He then added a ceramic skull and lights; the finished product is a unique and changeable art installation that is also a focal point for the room.
While this project began as an interior remodel, it expanded to include a fence and siding replacement.
About Mackey Builders, Inc.
Mackey Builders, an award-winning contracting firm, has been in business for over 30 years and is proud to have completed hundreds of remodeling projects in the East Bay, San Francisco, and Marin County. An artist by nature, Stacey has an exquisite eye for detail and creates designs that are as beautiful as they are functional. Client satisfaction is paramount; he is always willing to "go the extra mile" to ensure the finished product meets both the client's and his own exacting standards.
 User
Located just north of Highway 24, the neighborhood of Hiller Highlands was rebuilt shortly after being ravaged by the 1991 Oakland fires. The client, who is an artist, recently purchased her two-bedroom, 2-1/2 bath townhouse on Treasure Hill intending to completely renovate the interior before moving in. Her goal was to have a home that reflected her eclectic and modern aesthetics; working with Mackey Builders, Inc., she was able to realize her vision.
Updating the kitchen was a top priority for the owner, as she is a gourmet cook. Collaborating with Stacey to create a design that was streamlined and functional, she chose quartz countertops and a natural stone backsplash to replace the ceramic counters and backsplash original to the home. She exchanged contractor-grade appliances for a Miele double oven, cooktop, and dishwasher, and purchased a Sub-Zero refrigerator with a glass door. Open shelving was integrated into the design so that the owner could display her beautiful ceramic collection. When designing the kitchen's custom cabinetry, Stacey chose a horizontal wood grain to balance the room's high ceilings. He also suggested removing a small bar area in order to expand the kitchen.
Amber Flooring was brought in to resurface the hardwood floors and the Mackey Builders team replaced windows and doors, upgraded the lighting, painted all interior walls, and installed more modern trim details. In the master bath, guest bather, and powder room, they installed new quartz countertops, sinks, and custom cabinets. Bathroom walls were hand-plastered in neutral tones that show subtle variations in color.
In the living room, the wood-burning fireplace, mantel, and built-in shelving were removed and replaced with a sleek high efficiency gas fireplace set into a wall of black large format tile. In keeping the owner's eclectic taste, a new stair railing made of custom-milled maple, wire rope, and acid-etched steel was designed and built. Because the owner loves to draw, Stacey came up with the idea of painting a wall in the dining area with blackboard paint and framing it. He then added a ceramic skull and lights; the finished product is a unique and changeable art installation that is also a focal point for the room.
While this project began as an interior remodel, it expanded to include a fence and siding replacement.
About Mackey Builders, Inc.
Mackey Builders, an award-winning contracting firm, has been in business for over 30 years and is proud to have completed hundreds of remodeling projects in the East Bay, San Francisco, and Marin County. An artist by nature, Stacey has an exquisite eye for detail and creates designs that are as beautiful as they are functional. Client satisfaction is paramount; he is always willing to "go the extra mile" to ensure the finished product meets both the client's and his own exacting standards.
 Truitt and White Window and Door Showroom
Mackey Builders- Located just north of Highway 24, the neighborhood of Hiller Highlands was rebuilt shortly after being ravaged by the 1991 Oakland fires. The client, who is an artist, recently purchased her two-bedroom, 2-1/2 bath townhouse on Treasure Hill intending to completely renovate the interior before moving in. Her goal was to have a home that reflected her eclectic and modern aesthetics; working with Mackey Builders, Inc., she was able to realize her vision.
Updating the kitchen was a top priority for the owner, as she is a gourmet cook. Collaborating with Stacey to create a design that was streamlined and functional, she chose quartz countertops and a natural stone backsplash to replace the ceramic counters and backsplash original to the home. She exchanged contractor-grade appliances for a Miele double oven, cooktop, and dishwasher, and purchased a Sub-Zero refrigerator with a glass door. Open shelving was integrated into the design so that the owner could display her beautiful ceramic collection. When designing the kitchen's custom cabinetry, Stacey chose a horizontal wood grain to balance the room's high ceilings. He also suggested removing a small bar area in order to expand the kitchen.
Amber Flooring was brought in to resurface the hardwood floors and the Mackey Builders team replaced windows and doors, upgraded the lighting, painted all interior walls, and installed more modern trim details. In the master bath, guest bather, and powder room, they installed new quartz countertops, sinks, and custom cabinets. Bathroom walls were hand-plastered in neutral tones that show subtle variations in color.
In the living room, the wood-burning fireplace, mantel, and built-in shelving were removed and replaced with a sleek high efficiency gas fireplace set into a wall of black large format tile. In keeping the owner's eclectic taste, a new stair railing made of custom-milled maple, wire rope, and acid-etched steel was designed and built. Because the owner loves to draw, Stacey came up with the idea of painting a wall in the dining area with blackboard paint and framing it. He then added a ceramic skull and lights; the finished product is a unique and changeable art installation that is also a focal point for the room.
While this project began as an interior remodel, it expanded to include a fence and siding replacement.
About Mackey Builders, Inc.
Mackey Builders, an award-winning contracting firm, has been in business for over 30 years and is proud to have completed hundreds of remodeling projects in the East Bay, San Francisco, and Marin County. An artist by nature, Stacey has an exquisite eye for detail and creates designs that are as beautiful as they are functional. Client satisfaction is paramount; he is always willing to "go the extra mile" to ensure the finished product meets both the client's and his own exacting standards.
 User
Located just north of Highway 24, the neighborhood of Hiller Highlands was rebuilt shortly after being ravaged by the 1991 Oakland fires. The client, who is an artist, recently purchased her two-bedroom, 2-1/2 bath townhouse on Treasure Hill intending to completely renovate the interior before moving in. Her goal was to have a home that reflected her eclectic and modern aesthetics; working with Mackey Builders, Inc., she was able to realize her vision.
Updating the kitchen was a top priority for the owner, as she is a gourmet cook. Collaborating with Stacey to create a design that was streamlined and functional, she chose quartz countertops and a natural stone backsplash to replace the ceramic counters and backsplash original to the home. She exchanged contractor-grade appliances for a Miele double oven, cooktop, and dishwasher, and purchased a Sub-Zero refrigerator with a glass door. Open shelving was integrated into the design so that the owner could display her beautiful ceramic collection. When designing the kitchen's custom cabinetry, Stacey chose a horizontal wood grain to balance the room's high ceilings. He also suggested removing a small bar area in order to expand the kitchen.
Amber Flooring was brought in to resurface the hardwood floors and the Mackey Builders team replaced windows and doors, upgraded the lighting, painted all interior walls, and installed more modern trim details. In the master bath, guest bather, and powder room, they installed new quartz countertops, sinks, and custom cabinets. Bathroom walls were hand-plastered in neutral tones that show subtle variations in color.
In the living room, the wood-burning fireplace, mantel, and built-in shelving were removed and replaced with a sleek high efficiency gas fireplace set into a wall of black large format tile. In keeping the owner's eclectic taste, a new stair railing made of custom-milled maple, wire rope, and acid-etched steel was designed and built. Because the owner loves to draw, Stacey came up with the idea of painting a wall in the dining area with blackboard paint and framing it. He then added a ceramic skull and lights; the finished product is a unique and changeable art installation that is also a focal point for the room.
While this project began as an interior remodel, it expanded to include a fence and siding replacement.
About Mackey Builders, Inc.
Mackey Builders, an award-winning contracting firm, has been in business for over 30 years and is proud to have completed hundreds of remodeling projects in the East Bay, San Francisco, and Marin County. An artist by nature, Stacey has an exquisite eye for detail and creates designs that are as beautiful as they are functional. Client satisfaction is paramount; he is always willing to "go the extra mile" to ensure the finished product meets both the client's and his own exacting standards.
Sponsored
Columbus, OH

Snider & Metcalf Interior Design, LTD
Leading Interior Designers in Columbus, Ohio & Ponte Vedra, Florida
 Tile Doctor Ltd
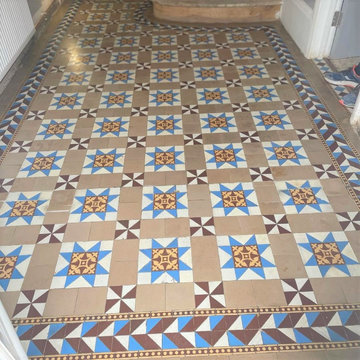
These pictures of a Victorian Tiled Hallway are from a property in Canterbury that was once a nursing home and was now being renovated to become a children’s home. The building was being gutted and extended at the same time and when the carpet was pulled up in the hallway, they were surprised to find a relatively intact Victorian tiled floor underneath.
Whilst they thought it bizarre that anyone would want to cover up such an attractive floor the carpet had protected it over the years. They realized it would make a marvellous feature at the entrance to the property, but professional restoration would be needed to do it justice. After a bit of research, they came across Tile Doctor and got in touch.
Canterbury comes under my North Kent designation, so I went to visit the property and survey the floor and quote for doing the restoration. There were a few missing and loose tiles that would need replacing and refixing also there was a lot of ingrained dirt so a deep clean and application of a new sealer would be required. I gave them a price for the work which they readily accepted, and we arranged a suitable time to carry out the work. Subject to the building schedule I had calculated the floor would take three days to restore.
On the first day I set about replacing and re-fixing the missing, broken, and loose tiles. This is delicate work as you need to extract the old tile without disturbing its neighbours and then clean up the area ready for its replacement. Being a Tile Doctor I keep a selection of stock tiles for repairs, some are reclaimed, and some are replica. Also, there are several companies still making Victorian style tiles so I can usually source what I need.
After the individual missing and broken tiles had been replaced and the adhesive had set, it was then a matter of renovating the floor as a whole. The tiles were covered in a thick layer of carpet adhesive which needed a combination of specialist tools and products to remove. First, a liberal layer of Tile Doctor Remove and Go was applied and left to dwell for thirty minutes. Next, Tile Doctor Pro-Clean was added and scrubbed in with a black pad.
This process softened the adhesive sufficiently in readiness for the next stage which involves using a set of diamond burnishing pads on a weighted buffing machine. Several applications were needed, each time with a successively finer grade of diamond pad and rinsing off the slurry in between. The tiles were first milled using a very coarse 50-grit pad, followed by 100, 200 and finally burnished with a 400-grit burnishing pads. This removed all the adhesive and dirt in the tiles, which was cleaned up using the wet vacuum.
Old Victorian floors like this do not have a damp proof membrane installed under the floor, and with a lot of water being used in the cleaning process I was concerned White efflorescence salts could appear later as the floor dried. To counter this, I gave the floor an acid wash using Tile Doctor Acid Gel to counter and dissolve the salts, it also gives the tiles another clean and will remove any old grout smears further improving the appearance of the tiles. Once done the floor was left to dry overnight.
On my return I tested the floor was dry by taking several moisture readings around the floor with a damp meter. Applying sealer to a damp floor is never advised and can lead to clouding and an unwanted finish.
Happy that the tiles were dry, a single coat of Tile Doctor Colour Grow sealer was applied. This is an impregnating sealer with a colour enhancing component to ‘lift’ the stronger colours of the floor. Colour Grow however does leave a matt appearance and as the client had asked for a shiny finish it was topped up with five coats of Tile Doctor Seal and Go. This is a compatible topical sealer which added a mid to high sheen.
By the end of the third day the Victorian floor looked brand new, and I received the following feedback from the client. Its rare to receive feedback from commercial customers so they were clearly overwhelmed with the transformation.
Did not think this glued covered bad old floor could look sooooo good Fabulous Fantastic job Looks Amazing Thank you
For aftercare I recommend the use of Tile Doctor Neutral Cleaner which isn’t as harsh as many of the products you find in supermarket. Stronger products can actually strip off the sealer over time leaving it vulnerable to dirt and detracting from its appearance.
Graham Davis
North Kent Tile Doctor

 Segal Shuart Landscape Architects
Sedum morganianum (Burro's Tail)
Design ideas for a rustic shade landscaping in Los Angeles.
Design ideas for a rustic shade landscaping in Los Angeles.
 Tile Doctor Ltd
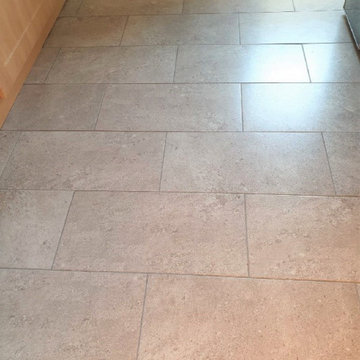
The owners of this house in Adwick Le Street, which is North of Doncaster, were fed up with the appearance of the Grout in their Ceramic tiled kitchen floor. They had not been able to keep the grout clean and it was now patchy, discoloured, darker and consequently always looked dirty.
I visited the property, to survey the floor and could see the Ceramic tiles and where in good condition, but the grout lines were really letting the kitchen down. I discussed with my client the option of re-colouring the grout, which they agreed was sensible, anything to keep the impossible grout clean. The alternative of scraping out the grout and replacing would be a messy and time-consuming option which we both agreed was not the choice they wanted to go for. I gave them a price to complete the work which they were happy to go ahead with.
Before any grout colouring could be done the grout first needed to be prepared, this was done using Tile Doctors Grout Colourant Pre-Treater which is an acid-based cleaner specially made for the job. This product cleans and prepares the grout for the colourant to ensure a better contact with the colourant later. It’s very simple to apply and is simply sprayed onto the grout lines, left to dwell for five minutes and then scrubbed into the grout by hand. Once done the soiled pre-treater is rinsed off with water and removed with a wet vacuum.
Once the grout lines are dry, they are ready to be coloured, unfortunately this is a manual process which take a lot of attention to detail and can be quite tedious. The best way of doing it I have found is go get down on your hands and knees with a toothbrush and gently scrub the colourant into each grout line, any colourant that seeps over onto the tiles needs to be quicky wiped away before it dries. The one upside however is observing the highly satisfying transformation of the grout as the result is instant and you can see the improvement as you go along.
There are ten grout colours of Tile Doctor Grout Colourant to choose from and in this case the owners had chosen Natural Grey. If you want to save a few points they also sell a Grout Colourant kit that contains both the colourant and the pre-treater. The grout colourant is epoxy based so it remains water and stain proof and will last for years.
I’m not sure the pictures I took do the transformation justice, but my client was over the moon with the difference it had made to the floor. The patchy grout was gone and then whole room seemed brighter.
For regular cleaning I recommended the use of Tile Doctor Neutral Tile Cleaner which will keep the floor looking good but is gentle enough to use every day and won’t compromise the colourant.
Matthew Lovett
South Yorkshire Tile Doctor
 Tile Doctor Ltd
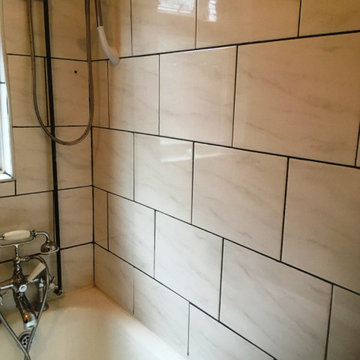
We were contacted by a client from the Levenshulme area of Greater Manchester who had just purchased a property there and hated the state of the grout which despite cleaning did not improve. The owner said she could not use the bathroom in this state as it looked disgusting and unclean and was keen to have it renovated. The rest of the house was being redecorated so whilst that was going on, I was called over to have a proper look at the grout and quote for sorting it out.
It didn’t take long to understand the issue, is seems the previous owner in an attempt to improve the appearance of the grout had touched it up by applying another thin layer of grout on top of the original. Now both the new and old was starting to flake off making a real mess.
I explained to the client we would need to scrape out the new layer, clean the original and then apply a grout colourant to improve the overall appearance. I gave her a price for the work, and she was happy for me to go ahead with the job.
My first task was to scrape off the new layer of grout, so I had a stable grout line to work from. I then started cleaning the grout up using a Tile Doctor Grout Colourant Pre-Treater cleaner, this cleans up the grout and being acidic it etches the surface to provide a better base for the grout colourant to adhere to. The dirt was rinsed off and then the area was dried using a heat gun.
Once dry I used a Tile Doctor Grout Colourant in Charcoal Grey (one bottle was sufficient). This product is equally effective for interior or exterior applications including bathrooms and kitchens and it is available in ten different colours. The client had requested to darken the grout and give it a completely new modern look. The colourant is painted onto the grout with a small brush and any excess which gets onto the tile is removed with a cloth before it dries.
The best thing about the grout colourant is it forms an easy to clean seal over the grout which ensures the grout is protected. Given Ceramic tiles are glazed and therefore don’t need sealing the new combination should ensure the tiles keep their appearance for a very long time with minimal cleaning. The silicone sealant between the bath and the wall tiles looked in good condition and had not discoloured so there was no need for this to be replaced.
The bathroom now looked clean and inviting and I’m pleased to report my client was very happy with the completed renovation and was finally happy to use the bathroom!
I recommended that for on-going cleaning that they use Tile Doctor Aqua-Pro, this is a pH neutral cleaner with a trigger action for easy application. It can be used in the bathroom every day. It helps to keep soap scum and limescale at bay and has a pleasant lemon smell so cleaning should not be too much of a chore.
Alex Logonzy
Greater Manchester Tile Doctor

 Mark Brand Architecture
For this kitchen and bath remodel in San Francisco's Cole Valley, our client wanted us to open the kitchen up to the living room and create a new modern feel for all of the remodeled areas. Opening the kitchen to the living area provided a structural challenge as the wall we had to remove was load-bearing and there was a separately owned condo on the floor below. Working closely with a structural engineer, we created a strategy to carry the weight to the exterior walls of the building. In order to do this we had to tear off the entire roof and rebuild it with new structural joists which could span from property line to property line. To achieve a dramatic daylighting effect, we created a slot skylight over the back wall of the kitchen with the beams running through the skylight. Cerulean blue, back-painted glass for the backsplash and a thick waterfall edge for the island add more distinctive touches to this kitchen design. In the master bath we created a sinuous counter edge which tracks its way to the floor to create a curb for the shower. Green tile imported from Morocco adds a pop of color in the shower and a custom built indirect LED lighting cove creates a glow of light around the mirror. Photography by Christopher Stark.

 Angelo's Marble & Granite Inc.
Inspiration for a timeless u-shaped kitchen remodel in Philadelphia with a farmhouse sink and granite countertops



 CairnsCraft Design & Remodel
Great spacious bathroom with lot of amenities.
Photographer: Jon Upson
Large elegant master beige tile and porcelain tile drop-in bathtub photo in San Diego with an undermount sink, raised-panel cabinets, medium tone wood cabinets, granite countertops, beige walls and a two-piece toilet
Large elegant master beige tile and porcelain tile drop-in bathtub photo in San Diego with an undermount sink, raised-panel cabinets, medium tone wood cabinets, granite countertops, beige walls and a two-piece toilet
 Windy City Painters
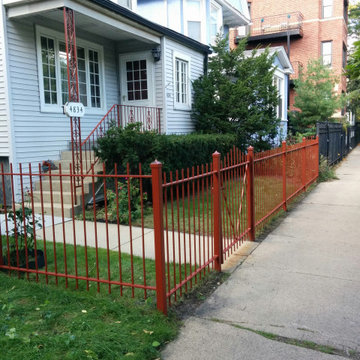
ver look at your iron fence and wonder how rust crept up so fast? For homeowners across Chicago's North Side and Near West Side, that moment of recognition often comes too late. Windy City Painters built this project guide to help you understand exactly what a professional iron fence restoration involves, what products matter, and what Chicago's climate demands from every coat of paint applied to exposed metal.
PROJECT OVERVIEW
This iron fence restoration involved a multi-unit property featuring an ornamental iron perimeter fence typical of Chicago's greystone and courtyard building streetscape. The fence presented moderate-to-severe surface rust, multiple areas of paint delamination, and two sections with deep pitting requiring needle gun descaling before any coating could be applied. The goal was full rust remediation and a durable topcoat finish built for Chicago's demanding climate. Windy City Painters completed the project in two days with zero damage to surrounding hardscape.
MATERIALS AND PRODUCTS
Ospho Rust Converter - A phosphoric acid-based treatment that chemically transforms iron oxide into iron phosphate, halting active corrosion before primer is applied. Essential on Chicago iron exposed to decades of salt air and freeze-thaw cycling.
Corroseal Rust-Inhibitive Primer - A water-based latex primer with built-in rust inhibitors, applied over converted surfaces to seal and prepare metal for topcoating.
Sherwin-Williams DTM Acrylic Coating - Direct-to-Metal formulation delivering exceptional adhesion, flexibility, and corrosion resistance. Available in satin and semi-gloss, ideal for ornamental iron fence painting across Chicago properties.
THE PROCESS
Step 1 - Mechanical Surface Preparation: Wire wheel grinding with angle grinder attachments removed all loose rust scale, failing paint, and surface contamination. Heavily pitted sections received needle gun descaling to expose clean stable metal beneath. This step determines everything. No primer or topcoat performs correctly over compromised metal, regardless of product quality. Windy City Painters treats prep as the primary investment on every iron fence project.
Step 2 - Rust Conversion: Ospho was applied liberally to all areas showing active rust. The phosphoric acid reaction was allowed to complete fully before any priming began. On severely oxidized sections, a second Ospho application ensured complete conversion. This step is non-negotiable in Chicago where freeze-thaw cycles push moisture into every surface irregularity.
Step 3 - Priming with Corroseal: Full coverage Corroseal primer coat sealed the converted surface and established adhesion for the finish coats. Corroseal's rust-inhibitive chemistry adds a secondary barrier against moisture penetration, extending the effective life of the topcoat by years in Chicago's humid lakefront environment.
Step 4 - DTM Topcoat Application: Two coats of Sherwin-Williams DTM acrylic in satin black were applied by brush to ensure full penetration into ornamental detail. DTM's flexibility accommodates the metal expansion and contraction Chicago temperatures demand, from minus-15 winters to 95-degree July afternoons. Final coverage was uniform and true to color.
CHICAGO-SPECIFIC CHALLENGES
Chicago iron faces challenges most other markets do not. Lake Michigan humidity accelerates surface oxidation year-round. Road salt from winter de-icing migrates to fence bases and lower rails. Freeze-thaw cycling cracks poorly adhered coatings within a single winter. Greystones, two-flats, and Victorian brownstones often feature original ornamental ironwork with decades of layered paint that must be assessed before any new coating is added. Windy City Painters factors all of these conditions into every iron fence estimate and material selection.
WHAT TO EXPECT LONG-TERM
A properly prepared and coated iron fence using the Ospho, Corroseal, and Sherwin-Williams DTM system should deliver 5-8 years of performance in Chicago conditions. Annual visual inspection for chips or scratches, followed by prompt spot priming, extends that timeline significantly. Full refinishing cycles become less frequent when the initial prep work is done correctly.
PRO TIPS
Tip 1 - Never skip the rust converter. Painting over active rust with even the best topcoat guarantees early failure. Ospho or a comparable phosphoric acid treatment must precede any primer on iron showing orange or brown oxidation.
Tip 2 - Assess for weld repairs before scheduling painting. If rust has eaten through the metal creating structural voids or broken sections, a welder must address those areas before painting begins. Windy City Painters identifies weld repair needs during the free estimate.
Tip 3 - Choose satin or semi-gloss finish on iron. Flat finishes on metal hold moisture and show wear faster. Satin DTM provides enough sheen to shed water while maintaining the traditional look Chicago ornamental iron demands.
Ready to restore your iron fence the right way? Visit windypainters.com to schedule your free estimate with Windy City Painters.
FAQ
Q: What does iron fence painting cost in Chicago?
A: Most residential iron fence projects range from $500 to $1,800 depending on linear footage, rust severity, and prep requirements. Windy City Painters provides free detailed on-site estimates for accurate iron fence painting cost in Chicago.
Q: How do I know if my fence needs rust conversion or just repainting?
A: Any visible orange or brown rust requires chemical conversion before priming. Windy City Painters evaluates every fence during the estimate to determine whether Ospho, mechanical prep, or weld repair is needed before coating begins.
Q: Can you paint iron in cold Chicago weather?
A: DTM coatings have lower application temperature thresholds than standard exterior paint, but we avoid application below 35 degrees Fahrenheit. Windy City Painters schedules iron fence projects for appropriate weather windows throughout the season.
Q: How long does iron fence paint last in Chicago?
A: With complete rust conversion, Corroseal priming, and Sherwin-Williams DTM topcoat, iron fence painting in Chicago lasts 5-8 years. Annual inspections and prompt touch-ups of chips extend that timeline further.
Q: Do I need a welder before an iron fence can be painted?
A: Only if rust has created structural voids or breaks in the metal. Windy City Painters assesses this during the free estimate and can coordinate with welders when needed before our painting crew begins.
Q: What is the difference between Ospho and Corroseal?
A: Ospho is a rust converter applied directly to active rust to chemically neutralize it. Corroseal is a rust-inhibitive primer applied over converted or clean metal. Windy City Painters often uses both in sequence for maximum protection on Chicago iron.
Q: How often should Chicago iron fences be inspected?
A: Annual inspection is recommended, ideally in early spring after winter salt and freeze-thaw exposure. Catching small chips and bare spots early allows simple touch-up rather than full iron fence repainting, saving significant cost.

 GS Construction
Example of a small classic 3/4 white tile and stone tile mosaic tile floor alcove shower design in Chicago with an undermount sink, recessed-panel cabinets, black cabinets, quartzite countertops, a two-piece toilet and gray walls

 Spire North
Tucked away in the backwoods of Torch Lake, this home marries “rustic” with the sleek elegance of modern. The combination of wood, stone and metal textures embrace the charm of a classic farmhouse. Although this is not your average farmhouse. The home is outfitted with a high performing system that seamlessly works with the design and architecture.
The tall ceilings and windows allow ample natural light into the main room. Spire Integrated Systems installed Lutron QS Wireless motorized shades paired with Hartmann & Forbes windowcovers to offer privacy and block harsh light. The custom 18′ windowcover’s woven natural fabric complements the organic esthetics of the room. The shades are artfully concealed in the millwork when not in use.
Spire installed B&W in-ceiling speakers and Sonance invisible in-wall speakers to deliver ambient music that emanates throughout the space with no visual footprint. Spire also installed a Sonance Landscape Audio System so the homeowner can enjoy music outside.
Each system is easily controlled using Savant. Spire personalized the settings to the homeowner’s preference making controlling the home efficient and convenient.

Sponsored
Westerville, OH

Inspired Closets Columbus
Innovative & Creative Custom Closet Designer Servicing Franklin County

 John
Coco coir is a versatile and sustainable growing medium that is gaining popularity among gardeners. Made from the fibrous husk of coconuts, it’s an eco-friendly alternative to peat moss and can greatly enhance the quality of your soil. In gardening, it is often utilized in systems like Coco Coir Hydroponic, where it helps create an efficient water and nutrient delivery system.
What is Coco Coir?
Coco coir is a natural fiber extracted from coconut husks. It has a neutral pH, excellent water retention, and is reusable, making it a favorite among gardeners who prefer organic and sustainable practices. It is available in different forms such as blocks, bricks, or loose coir, each requiring some preparation before use in gardening.
Benefits of Using Coco Coir in Gardening
Coco coir offers several advantages for gardening. Here are the benefits of using coco coir in gardening:
Holds up to 10 times its weight in water, ensuring plants have consistent moisture.
Promotes oxygen flow to plant roots, leading to healthier root systems.
Coco coir is a renewable and eco-friendly alternative to peat moss.
It can be washed, rehydrated, and reused, reducing waste.
Naturally pH neutral, making it suitable for various plants without major adjustments.
Enhances the texture and moisture retention of garden soil.
How to Prepare Coco Coir for Planting
Preparing coco coir for planting involves a few essential steps. First, you need to hydrate the coir block, as it typically comes in a compressed form. Place the block in a large container and add warm water, allowing the block to expand and absorb the water. Once fully expanded, the coir should be fluffed up by breaking it apart with your hands or a tool to ensure it becomes loose and airy. After the coir has been fluffed, it is important to drain any excess water, as overly wet coir can lead to root suffocation. Finally, since coco coir is inert and does not contain nutrients, it’s a good idea to add organic compost or liquid fertilizer to enrich the coir before planting.
Do You Need to Soak Coco Coir Before Planting?
Yes, soaking coco coir before planting is necessary. Since it comes in a compressed form, it needs to be broken down and hydrated for proper use. The soaking process allows the coir to expand and release the fibers, making it usable as a growing medium. After soaking, the coir should be fluffed to ensure the water is evenly distributed. Draining any excess water is crucial because overly wet coir may impede plant root health.
How to Prepare Coco Peat for Planting
Coco peat, a fine, powdery form of coco coir, is highly beneficial for seed starting and improving water retention in soil. To prepare coco peat, it first needs to be hydrated, similar to how you prepare coir blocks. Slowly add water to the peat in a container and allow it to absorb and fluff up. Once hydrated, coco peat can be used on its own or mixed with other growing media such as perlite or vermiculite for added aeration and drainage. It is advisable to check the pH level of your final mix, as coco peat generally has a neutral pH, but adjustments may be necessary depending on the plants being grown.
Can You Use Just Coco Coir for Plants?
Yes, coco coir can be used by itself to grow plants, especially in hydroponic systems or as a seed-starting medium. However, because coco coir does not naturally contain nutrients, you will need to provide regular fertilizer to support plant growth. This makes it particularly suitable for plants grown in controlled environments, such as hydroponics, where nutrient solutions can be carefully managed. In traditional soil-based gardening, mixing coco coir with other organic materials like compost is recommended to provide essential nutrients and improve the overall soil structure.
How to Use Coco Coir in Hydroponics
Coco coir is widely used in hydroponic systems due to its water retention and aeration properties. To use coco coir in hydroponics, it first needs to be soaked and hydrated, as discussed earlier. Once the coir is fully prepared, it can be placed in the hydroponic system. Since coco coir does not contain natural nutrients, you will need to supply a balanced nutrient solution tailored for hydroponic plants. Regular monitoring of water and nutrient levels is essential to prevent nutrient imbalances or root rot. One of the benefits of coco coir in hydroponics is its reusability. After completing a growing cycle, the coir can be washed, rehydrated, and used again in future plantings.
Using Coco Coir as a Soil Amendment
Coco coir is also an excellent soil amendment, as it improves the texture and moisture retention of garden soil. To use coco coir in this way, mix loose coir with your existing garden soil at a ratio of one part coco coir to two parts soil. This will help retain moisture without compacting the soil, improving both water drainage and root growth. For optimal results, you can also add organic compost to the mix, ensuring that the nutrient levels are sufficient for plant growth. Coco coir works particularly well in raised beds, where it helps maintain proper soil structure over time.
Advantages of Using Coco Coir Over Peat Moss
While peat moss has been traditionally used as a growing medium, coco coir offers several advantages over it. Coco coir is a renewable resource, as it is a byproduct of coconut processing, while peat moss is harvested from peat bogs that take centuries to regenerate. Coco coir is also more durable, as it can be reused multiple times without breaking down, while peat moss disintegrates after a single use. Another key benefit is its neutral pH, whereas peat moss is more acidic and may require balancing to meet the needs of specific plants.
Conclusion
Coco coir is a highly versatile and sustainable growing medium that benefits both novice and experienced gardeners alike. Whether you are using it for hydroponics, as a soil amendment, or as a standalone medium for growing plants, knowing how to properly prepare and use it is key to maximizing its benefits. By following the steps detailed above, you can improve water retention, aeration, and overall plant health in your garden, all while contributing to eco-friendly gardening practices.
 Tile Doctor Ltd
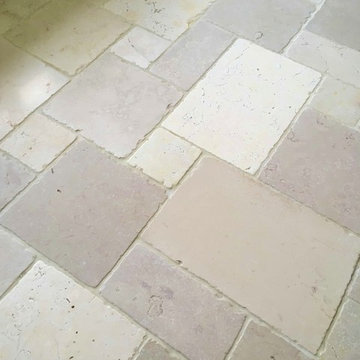
This Limestone tiled floor had been installed in the kitchen of a property in Teddington three years before and due to the use of the wrong cleaning product was now stripped of its protective sealer. Limestone like any natural stone is porous and without a sealer in place dirt becomes trapped in the stone making it very difficult to keep clean. The property was close to Bushy Park situated in South West London on the North bank of the Thames which is only about seven miles from my base in Shepperton.
I discovered all of this after visiting the property to quote for deep cleaning and resealing the floor. It turns out they have been using Flash multi-surface & floor cleaner which has an acidic pH of 10.3, compare this to Tile Doctor Remove and Go which we use to strip sealers off floors and has a pH of 12. Needless to say, this was not the right product to use and the old sealer had been completely stripped off the floor and probably within the first few months.
On top of this our customer had 3 children and a dog running in and out of the garden and was therefore transferring quite a lot of dirt into the stone. After surveying the floor, I discussed the renovation process with the customer which would take two days and include a deep clean of the Limestone followed by the application of a sealer to ensure it did not hold onto the dirt. They were after a sheen finish for the floor and were keen to have natural brown and cream variations in the stone highlighted. We agreed a price for the work and booked a date for the work to start.
To start with, we machine scrubbed the floor with Tile Doctor Pro-Clean to break down the dirt and release it from the stone. We find the best process is to spray the Pro-Clean onto the floor first and then leave to dwell for ten minutes before scrubbing. It’s not long before the cleaning solution turns dark with the dirt released from the pores of the stone and this soil is then rinsed with water and vacuumed off the floor with a low-pressure hard floor cleaning machine.
Following the cleaning, we honed the Limestone using a sequence of 800, 1500 and finally 3000-grit Tile Doctor Burnishing Pads. The pads are applied with water to lubricate and the slurry generated is rinsed off the floor as before. This burnishing process brings up the natural sheen of the stone and tightens up its pores prior to sealing. I left the floor overnight to allow it to dry out.
The next day I returned to the property and checked the floor for moisture using a damp meter. The readings were fine, so I proceeded with the application of the sealer for which I used two coats of Tile Doctor Colour Grow. This is an impregnating sealer that enhances the colours and contrast on the stone while protecting it against future soiling and spillages. It gave a lovely sheen finish to the floor as requested by the customer.
As you can see from the pictures the process made a huge difference to the floor which now looks lighter and brighter, certainly the customer was more than happy. Before leaving I recommended, they should clean the floor using Tile Doctor Stone Soap, this is a pH neutral product that will ensure the seal does not get broken down like it previously had using the household cleaners. It is gentle enough to use every day if you wish is designed to help maintain the patina of the burnished stone.
Jonathan Oldham
South Middlesex Tile Doctor
 Windy City Painters
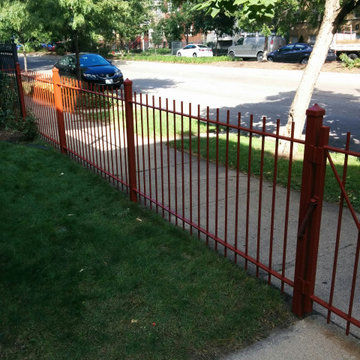
Ever notice how your iron fence looks worse every spring after another Chicago winter? That slow deterioration is not cosmetic - it is active metal failure that compounds every freeze-thaw cycle until replacement becomes the only option. Windy City Painters works with homeowners across the Chicago North Side and Near West Side to restore original iron fencing on greystones, two-flats, Victorian brownstones, and coach houses before that point is reached.
PROJECT OVERVIEW
This iron fence restoration involved a classic Chicago residential property with original wrought iron fencing showing surface rust across the majority of pickets, flaking previous paint coats, and localized deep pitting near the base rails. A structural check identified two loose pickets requiring welding before any surface preparation or coating began. Total linear footage fell in the mid-range for a standard Chicago residential lot.
MATERIALS AND PRODUCTS
Windy City Painters selected Ospho rust converter for chemically neutralizing active iron oxide before priming. Ospho reacts with rust to form a stable phosphate compound that stops corrosion progression rather than simply sealing over it. Sherwin-Williams DTM rust-inhibitive primer was applied to all bare and converted surfaces, followed by two finish coats of Rust-Oleum DTM in satin black. DTM - direct to metal - formulas provide corrosion inhibitors built into the coating matrix, which matters significantly in Chicago's climate.
THE PROCESS
Step 1 - Structural Assessment and Welding Coordination. Before any surface preparation begins, Windy City Painters inspects every picket and rail connection for structural integrity. Loose or cracked iron must be welded before coating. Paint applied over a compromised joint will fail within one season as movement continues to break the bond. On this project, two pickets were tack-welded by a coordinating welder before prep started.
Step 2 - Wire Wheel Grinding and Needle Gun Descaling. All rusted sections were ground to bare or near-bare metal using wire wheel attachments and needle gun descaling tools. This step removes loose scale, flaking previous coatings, and surface contamination that would prevent primer adhesion. Skipping mechanical prep is the single most common reason iron fence paint fails prematurely on Chicago properties.
Step 3 - Ospho Rust Converter Application. Ospho was brushed into all pitted and converted areas and allowed to cure fully. The phosphoric acid chemistry converts iron oxide into iron phosphate, arresting active rust and creating a surface that accepts primer more effectively than bare metal alone. Corroseal is an equivalent alternative used on projects with heavier pitting.
Step 4 - DTM Primer and Finish Coat Application. Sherwin-Williams DTM rust-inhibitive primer was applied across all prepared surfaces. Two topcoats of Rust-Oleum DTM in satin black followed after full primer cure. DTM finish coats add a second corrosion-inhibiting layer and provide the UV and weather resistance needed for Chicago exterior iron work.
CHICAGO-SPECIFIC CHALLENGES
Chicago iron fencing faces conditions that accelerate corrosion faster than most US markets. Lake humidity keeps metal surface moisture elevated through much of the year. Road salt splash from winter maintenance reaches fencing along parkways and sidewalk edges, introducing chlorides that aggressively attack iron. Freeze-thaw cycles expand any rust pocket that has formed under paint, lifting coatings from the inside and creating the classic bubbled-paint appearance homeowners notice every spring.
WHAT TO EXPECT LONG-TERM
With Ospho conversion, DTM primer, and two DTM finish coats properly applied over mechanically prepared surfaces, most Chicago residential iron fences hold 5-8 years before needing significant touch-up. Annual visual inspection for any chips or bare spots, with immediate touch-up using Rust-Oleum DTM, extends that window considerably.
PRO TIPS
Tip 1 - Address any bare metal spot the same season you notice it. A pinhole of exposed iron becomes a rust bubble within one Chicago winter and a flaking section by the following spring.
Tip 2 - Never paint over active rust without a converter step. Ospho or Corroseal is inexpensive insurance against a complete repaint two years early.
Tip 3 - Check picket bases at grade level every spring. Ground contact accelerates corrosion at the base faster than anywhere else on the fence. Catching it early keeps welding out of the equation.
Contact Windy City Painters at windypainters.com for a project estimate.
FAQ
Q: What does iron fence painting cost in Chicago? A: Residential iron fence painting with proper rust prep typically runs $300-$900 for standard lot footage. Windy City Painters provides itemized estimates based on linear footage, rust severity, and whether structural welding is required before surface preparation begins.
Q: Do you paint over rust or remove it first? A: Windy City Painters always addresses active rust before priming. Ospho or Corroseal rust converter chemically neutralizes iron oxide, and wire wheel grinding removes loose scale - coating over unaddressed rust guarantees early failure on Chicago iron fences.
Q: When does an iron fence need welding before painting? A: Loose pickets, cracked rails, or connections with visible movement require welding before any coating work begins. Paint cannot stabilize a structural joint - Windy City Painters coordinates with welders when this condition is identified during initial assessment.
Q: How long does iron fence paint last in Chicago? A: With mechanical prep, Ospho conversion, and Sherwin-Williams or Rust-Oleum DTM coatings, properly restored iron fencing holds 5-8 years in Chicago's freeze-thaw climate before needing significant maintenance.
Q: Is Ospho better than Corroseal for Chicago iron fences? A: Both are effective rust converters. Ospho is a liquid phosphoric acid treatment suited for moderate rust and pitting. Corroseal is a latex-based converter-primer hybrid better suited to heavier rust profiles. Windy City Painters selects based on site conditions.
Q: What finish sheen works best on iron fencing? A: Satin or semi-gloss black is the traditional and most durable choice for Chicago greystone and brownstone properties. Satin hides minor surface imperfections better than gloss while still providing adequate UV and moisture resistance.
Q: Can iron fence painting be done in spring or fall in Chicago? A: Yes. Windy City Painters schedules iron fence work in temperatures above 50 degrees Fahrenheit with low ambient humidity - spring and early fall are often ideal windows that avoid both winter cold and peak summer humidity.
11