
Search results for "Pay per call" in Home Design Ideas

 Moss Yaw Design studio
Engineered cedar siding creates beautiful gray-blue tones at the exterior of the home, while adding a textural element to activate the simple exterior design.
 Tile Doctor Ltd
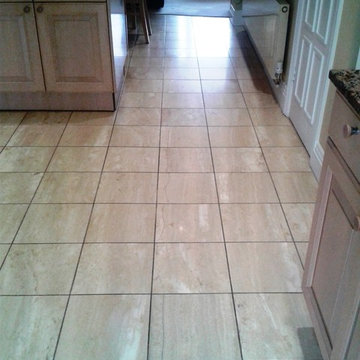
Every now and again, I get a call from a client located on the small peninsula of Sandbanks, Poole. Sandbanks, sometimes referred to as ‘Britain’s Palm Beach’, is known for its fantastic beach and high value property. My client asked me to take a look at a Travertine floor in his kitchen which was, in fact, more highly polished than he had wanted. The polished finish had worn off the travertine tiles where they had been walked on, leaving a dull trackway running down the centre of the kitchen. With its distinct characteristics, travertine is a popular choice for kitchen flooring, although it is also quite often used in bathrooms. In any case Travertine tiles will need regular maintenance to keep them looking their best.
Unfortunately, the kitchen floor must have experienced some sort of settlement or shrinkage as a long crack has appeared, which ran along the same line as the dull trackway. It is not uncommon for Travertine tiles to crack due to wear over time, or even bad fitting in some cases. While the exact cause of the crack was unclear, the homeowner concluded that the floor was certainly in need of restoration.
Repairing a crack in a Travertine tiled floor
Replacing the Travertine tiles was not an option due to a lack of spare tiles, so I opted instead to fill the crack in the floor using Harbro Stone Filler, an epoxy stone filler, matching the colour of the tile as closely as possible. I left this to set, before sanding down the excess filler.
My next action was to use a set of Tile Doctor Diamond burnishing pads to sand out any scratches and restore a more even shine to the floor, as per the client’s request. For polished stone, I recommend using a set of four burnishing pads applied in order: Coarse, Medium, Fine, and Very Fine. I used these one after the other with a little water to lubricate and restore the surface polish to the desired level.
Sealing a Travertine tiled floor
The next day, I returned to seal the floor with a couple of coats of Tile Doctor Colour Grow sealer. Colour Grow is a colour enhancing, impregnating sealer which penetrates deeply into the pores of the stone, thereby preventing dirt from becoming ingrained within. This particular sealer also enhances the natural colours within the Travertine tile, whilst also providing long term durable protection.
Although the crack could not be made to disappear completely, its appearance was much improved. The customer was also very pleased with the long-lasting lower sheen provided, describing it as “the finish I had wanted in the first place when the tiles were fitted”.


Find the right local pro for your project

 Rudloff Custom Builders
In this transitional farmhouse in West Chester, PA, we renovated the kitchen and family room, and installed new flooring and custom millwork throughout the entire first floor. This chic tuxedo kitchen has white cabinetry, white quartz counters, a black island, soft gold/honed gold pulls and a French door wall oven. The family room’s built in shelving provides extra storage. The shiplap accent wall creates a focal point around the white Carrera marble surround fireplace. The first floor features 8-in reclaimed white oak flooring (which matches the open shelving in the kitchen!) that ties the main living areas together.
Rudloff Custom Builders has won Best of Houzz for Customer Service in 2014, 2015 2016 and 2017. We also were voted Best of Design in 2016, 2017 and 2018, which only 2% of professionals receive. Rudloff Custom Builders has been featured on Houzz in their Kitchen of the Week, What to Know About Using Reclaimed Wood in the Kitchen as well as included in their Bathroom WorkBook article. We are a full service, certified remodeling company that covers all of the Philadelphia suburban area. This business, like most others, developed from a friendship of young entrepreneurs who wanted to make a difference in their clients’ lives, one household at a time. This relationship between partners is much more than a friendship. Edward and Stephen Rudloff are brothers who have renovated and built custom homes together paying close attention to detail. They are carpenters by trade and understand concept and execution. Rudloff Custom Builders will provide services for you with the highest level of professionalism, quality, detail, punctuality and craftsmanship, every step of the way along our journey together.
Specializing in residential construction allows us to connect with our clients early in the design phase to ensure that every detail is captured as you imagined. One stop shopping is essentially what you will receive with Rudloff Custom Builders from design of your project to the construction of your dreams, executed by on-site project managers and skilled craftsmen. Our concept: envision our client’s ideas and make them a reality. Our mission: CREATING LIFETIME RELATIONSHIPS BUILT ON TRUST AND INTEGRITY.
Photo Credit: JMB Photoworks

 Kathleen Jennison
An Arts & Crafts Bungalow is one of my favorite styles of homes. We have quite a few of them in our Stockton Mid-Town area. And when C&L called us to help them remodel their 1923 American Bungalow, I was beyond thrilled.
As per usual, when we get a new inquiry, we quickly Google the project location while we are talking to you on the phone. My excitement escalated when I saw the Google Earth Image of the sweet Sage Green bungalow in Mid-Town Stockton. "Yes, we would be interested in working with you," I said trying to keep my cool.
But what made it even better was meeting C&L and touring their home, because they are the nicest young couple, eager to make their home period perfect. Unfortunately, it had been slightly molested by some bad house-flippers, and we needed to bring the bathroom back to it "roots."
We knew we had to banish the hideous brown tile and cheap vanity quickly. But C&L complained about the condensation problems and the constant fight with mold. This immediately told me that improper remodeling had occurred and we needed to remedy that right away.
The Before: Frustrations with a Botched Remodel
The bathroom needed to be brought back to period appropriate design with all the functionality of a modern bathroom. We thought of things like marble countertop, white mosaic floor tiles, white subway tile, board and batten molding, and of course a fabulous wallpaper.
This small (and only) bathroom on a tight budget required a little bit of design sleuthing to figure out how we could get the proper look and feel. Our goal was to determine where to splurge and where to economize and how to complete the remodel as quickly as possible because C&L would have to move out while construction was going on.
The Process: Hard Work to Remedy Design and Function
During our initial design study, (which included 2 hours in the owners’ home), we noticed framed images of William Morris Arts and Crafts textile patterns and knew this would be our design inspiration. We presented C&L with three options and they quickly selected the Pimpernel Design Concept.
We had originally selected the Black and Olive colors with a black vanity, mirror, and black and white floor tile. C&L liked it but weren’t quite sure about the black, We went back to the drawing board and decided the William & Co Pimpernel Wallpaper in Bayleaf and Manilla color with a softer gray painted vanity and mirror and white floor tile was more to their liking.
After the Design Concept was approved, we went to work securing the building permit, procuring all the elements, and scheduling our trusted tradesmen to perform the work.
We did uncover some shoddy work by the flippers such as live electrical wires hidden behind the wall, plumbing venting cut-off and buried in the walls (hence the constant dampness), the tub barely balancing on two fence boards across the floor joist, and no insulation on the exterior wall.
All of the previous blunders were fixed and the bathroom put back to its previous glory. We could feel the house thanking us for making it pretty again.
The After Reveal: Cohesive Design Decisions
We selected a simple white subway tile for the tub/shower. This is always classic and in keeping with the style of the house.
We selected a pre-fab vanity and mirror, but they look rich with the quartz countertop. There is much more storage in this small vanity than you would think.
The Transformation: A Period Perfect Refresh
We began the remodel just as the pandemic reared and stay-in-place orders went into effect. As C&L were already moved out and living with relatives, we got the go-ahead from city officials to get the work done (after all, how can you shelter in place without a bathroom?).
All our tradesmen were scheduled to work so that only one crew was on the job site at a time. We stayed on the original schedule with only a one week delay.
The end result is the sweetest little bathroom I've ever seen (and I can't wait to start work on C&L's kitchen next).
Thank you for joining me in this project transformation. I hope this inspired you to think about being creative with your design projects, determining what works best in keeping with the architecture of your space, and carefully assessing how you can have the best life in your home.

 Gallery KBNY
This brownstone renovation was a full gut project in every sense of the word. On top of installing new floors, a kitchen and bath renovation, and all the typical restoration and refinishing involved in a brownstone built in 1899, we also completely updated the exterior, constructed a balcony that was not originally there, and converted the space from a single-family home into an an owner’s triplex. A newly separated studio rental on the garden level offers the opportunity for supplemental income, an uncommon and welcome addition to a New York brownstone.
A TRANSITIONAL GEM
The result is a two-family brownstone that perfectly combines classic townhouse living with today’s modern needs, including SmartHome technology that we installed to control Bluetooth speakers, Nest thermostats, and the security system.
The overall aesthetic goal was to pay homage to the historical periods the brownstone has lived through in a cohesive way that is the hallmark of modern transitional style.
In the kitchen, white Shaker-style cabinetry, a subway tile backsplash, and marble rather than quartz countertops bring a classically upscale sensibility. To modernize the space further, we opened up the back wall to create floor-to-ceiling windows that are also doors, opening up into the newly built balcony.
TIMELY TOUCHES
This brownstone renovation included many quintessential elements, such as millwork like the ceiling medallions. We restored some and custom built others, perfectly recreating their original appearance.
The heated master bathroom is now serene, with a walk-in shower featuring a subtly modern linear drain. A herringbone Carrera marble tiled floor and marble slab sink complete the scene. In the powder room, we embraced a contemporary look by pairing dark hexagonal floors with light chevron tiles, accented with dramatic navy blue wallpaper. With its clear-cut 1920s-style, we selected the wall sconce to reference one of the brownstone’s earlier eras.
DESIGN DETAILS
Natural oak herringbone floors we installed throughout the entire home bring a modern yet warm touch. We restored the wood-burning marble fireplace, which is fully functioning. An elegant staircase with a custom-crafted black wooden banister and white balusters winds up and down alongside a real brick interior wall that we restored and refinished.
In this brownstone renovation, we were also able to create ceiling height, an unexpected yet aesthetically pleasing side benefit. When working on the joists and beams to level out the floors (a common issue in pre-war renovations) we added ceiling height in the main parlor floor by taking the second floor and raising the ceiling an entire foot. The end result is a main floor with stunning 9-foot ceilings.
SOME HIGHLIGHTS
- Solid natural oak herringbone floors throughout
- A fully restored, refinished, and functioning wood burning fireplace with a marble mantle
- Complete exterior renovation of the facade, cornices, windows, mouldings, and even the ironwork, including the railings leading up to the stoop and those facing the street
- A brand new central air and heating system with uniquely modern vents – look above the couch in the living room with the fuzzy rug and large painting
Considering a brownstone renovation? Contact us today! We specialize in brownstone renovations in New York as well as all pre-war apartments. When you work with a design-and-build firm like Gallery to renovate your brownstone, you get the full range of our expertise in working with all the finest details and pre-war architectural elements of these classic New York spaces. We also handle every step of the process, from filing permits and organizing schedules to sourcing custom pieces and building entirely new rooms (or even balconies). Call us for a free initial consultation when you’re ready.

 User
Spectacular unobstructed views of the Bay, Bridge, Alcatraz, San Francisco skyline and the rolling hills of Marin greet you from almost every window of this stunning Provençal Villa located in the acclaimed Middle Ridge neighborhood of Mill Valley. Built in 2000, this exclusive 5 bedroom, 5+ bath estate was thoughtfully designed by architect Jorge de Quesada to provide a classically elegant backdrop for today’s active lifestyle. Perfectly positioned on over half an acre with flat lawns and an award winning garden there is unmatched sense of privacy just minutes from the shops and restaurants of downtown Mill Valley.
A curved stone staircase leads from the charming entry gate to the private front lawn and on to the grand hand carved front door. A gracious formal entry and wide hall opens out to the main living spaces of the home and out to the view beyond. The Venetian plaster walls and soaring ceilings provide an open airy feeling to the living room and country chef’s kitchen, while three sets of oversized French doors lead onto the Jerusalem Limestone patios and bring in the panoramic views.
The chef’s kitchen is the focal point of the warm welcoming great room and features a range-top and double wall ovens, two dishwashers, marble counters and sinks with Waterworks fixtures. The tile backsplash behind the range pays homage to Monet’s Giverny kitchen. A fireplace offers up a cozy sitting area to lounge and watch television or curl up with a book. There is ample space for a farm table for casual dining. In addition to a well-appointed formal living room, the main level of this estate includes an office, stunning library/den with faux tortoise detailing, butler’s pantry, powder room, and a wonderful indoor/outdoor flow allowing the spectacular setting to envelop every space.
A wide staircase leads up to the four main bedrooms of home. There is a spacious master suite complete with private balcony and French doors showcasing the views. The suite features his and her baths complete with walk – in closets, and steam showers. In hers there is a sumptuous soaking tub positioned to make the most of the view. Two additional bedrooms share a bath while the third is en-suite. The laundry room features a second set of stairs leading back to the butler’s pantry, garage and outdoor areas.
The lowest level of the home includes a legal second unit complete with kitchen, spacious walk in closet, private entry and patio area. In addition to interior access to the second unit there is a spacious exercise room, the potential for a poolside kitchenette, second laundry room, and secure storage area primed to become a state of the art tasting room/wine cellar.
From the main level the spacious entertaining patio leads you out to the magnificent grounds and pool area. Designed by Steve Stucky, the gardens were featured on the 2007 Mill Valley Outdoor Art Club tour.
A level lawn leads to the focal point of the grounds; the iconic “Crags Head” outcropping favored by hikers as far back as the 19th century. The perfect place to stop for lunch and take in the spectacular view. The Century old Sonoma Olive trees and lavender plantings add a Mediterranean touch to the two lawn areas that also include an antique fountain, and a charming custom Barbara Butler playhouse.
Inspired by Provence and built to exacting standards this charming villa provides an elegant yet welcoming environment designed to meet the needs of today’s active lifestyle while staying true to its Continental roots creating a warm and inviting space ready to call home.
 Top Price Buyers
What Do I Need To Do To Sell My House In Laveen Arizona
September 20, 2019
By brianpascal
You want to sell your Laveen house, and you want to get top dollar.
Excellent!
But “What do I need to do to sell my house in Laveen“?
Woman holding tablet pc with question marks hiding her face
Here are some tips on how to get your home ready to sell if you’re looking for top dollar that the market will bear:
*NOTE: These instructions are if you’re looking to get full retail value for your house sale. However, if you don’t want to do the things below… or don’t have the time or money to do the things below… you can still sell your Laveen house fast for a fair value in a win-win sale that’ll save you time and expense.
What Do I Need To Do To Sell My House In Laveen Arizona - Cleaning the Floor
2) Cultivate a cohesive, neutral style. You don’t have to paint everything off-white. In fact, some subtle colors can really help change the perception of spaces – for example, a soft yellow will help brighten up a dark kitchen, while a deep dark blue or green will help a bright bedroom to feel like a calm place to sleep (but be careful, dark colors will also make rooms feel small).
Spend the money to get high-quality paint and professional help. Subconsciously people will pay more money for a property with just the right colors and very neat lines – it makes the home feel better built, even though it’s just paint.
Optical illusions are real, and psychologists study this stuff. Don’t believe me?
Look it up. And don’t neglect the outside and just do the inside, or anything else that’s unbalanced.
3) Fix or replace anything that’s broken. Yeah, it might feel like a waste of money to spend an extra couple hundred bucks on a dishwasher that someone else might just pull out and replace again. But really, quite a few buyers will get a home inspection and use the opportunity to negotiate with you. As the seller, you’ll often end up paying more if you try to hide neglected maintenance from the purchaser – and of course you don’t want to be guilty of fraud.
Make sure you stay in compliance with all the laws.
It’s often a good use of money to hire a home inspector to come through before you put the property on the market. If you ask in advance, they’ll often charge you a tiny rate to come back after you’ve done a bunch of minor repairs and deliver you a clean bill of health. Prospective buyers love to see an independent report on the condition of the house – it makes them feel very comfortable with the purchase.
4) Make only the necessary improvements. The biggest mistake people make when getting their house ready to sell is over-improving. They often spend too much money on customized frills that can’t be recovered in the sale.
Paint is about the only safe investment – it’s easy to overspend on almost everything else, and it’s easy to get ripped off by unscrupulous contractors.
It’s important to know what improvements will produce a return on investment to avoid wasting money.
5) Get expert opinions. You should definitely find at least a few decent real estate brokers who will help you price your property, but be honest with them. If you’re going to market the property on your own, don’t make enemies by lying about your intentions. Great brokers are rare, but they make more money for their clients than they earn.
6) Have a really great marketing plan. Again, great brokers earn their value by doing this work and spreading the advertising expenses across many clients. It’s pretty expensive and time-consuming to start from scratch on your own, but if you’re already a marketing expert you’re ahead of the pack.
If you’re not, spend the time listening to what the best brokers do to sell houses in Laveen – just to educate yourself on the options.
What Do I Need To Do To Sell My House In Laveen Arizona - Cash Offer7) Get a cash offer. We buy houses all over the Laveen area, and we do all the work so you don’t have to deal with any of this stuff.
——————————————-
Don’t Want To Do The Things Above Yourself? But Still Want To Sell Your Laveen Arizona House Fast?
While everyone wants to get as much as they possibly can from their house sale… not everyone can do the things or wants to do the things required to sell it at full retail value to an end buyer.
Doing the repairs, cleaning the property up, upgrading the property, marketing the property… those all take money and can take lots of time.
If you have the funds to do these things... AND you can wait the 3-9 months it takes to sell houses in this market… then you’ll be better off financially to do those things then list it on the MLS (the main property listing service that real estate agents use).
If you don’t have the funds to do these things... AND can’t wait months to sell your house… then you may be a perfect fit for our local Laveen house buying service. You’ll submit basic info about your house over here on our website, we’ll evaluate your house, we’ll make you a fair all-cash offer on your house, and you can decide if it’s a fit for you.
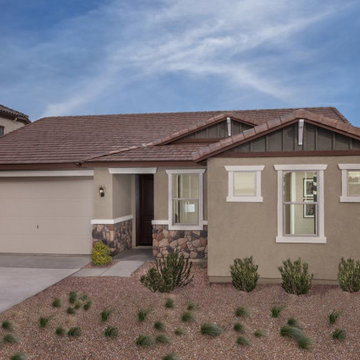
What Do I Need To Do To Sell My House In Laveen Arizona Exterior House Arizona Photo
Then we can close FAST (often times within 7 days) if you need us to.
Take a look at what we’ll pay you not to do anything versus the time, expense and hassle involved with doing it on your own.
So if you’re still asking “what do I need to do to sell my house in Laveen“… now you have 2 solid options.
Either…
Fix the property up and get it all nice and ready with the steps above to sell it at top dollar
Let us do all of the work and we’ll make you a cash offer on your house in AS-IS condition. This saves you time, money, and gets the hassle off of your hands.
If you need to sell a property near Laveen, we can help you.
We buy properties like yours from people who need to sell fast.
We’d like to make you a fair offer on your Laveen house
Give us a call anytime at (602) 560-9260 or
fill out the form on this website today!

 Homestead Doors, Inc.
Door #10
FP3190
Flat 3 Panel Interior Door with Farmhouse Sticking
Solid Poplar stiles and rails
MDF panels
Painted White
1 x 4 door casing
1 x 6 baseboard
Bravura 336B door knob
Call us for a quote on your door project
419-684-9582
Visit https://www.door.cc
 Tile Doctor Ltd
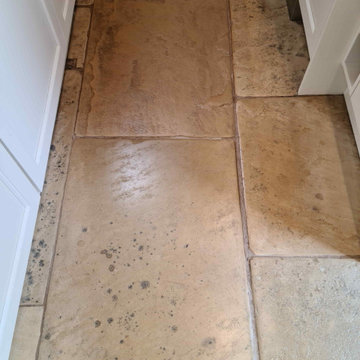
These pictures are of a beautiful Sandstone floor in Ilkley, the tiles were sourced from Lapicida of Harrogate and installed around twelve years prior. If you take a look at their website now you will see they are selling a similar London White Sandstone for nearly £100 per m2. This floor was 35 square metres so clearly this was a significant investment for the owner at the time.
After twelve years of use however the sealer had worn off the floor and dirt had become ingrained in the pores of the stone making it very difficult to keep clean. A good sealer takes a long time to wear off so the change to the appearance of the stone happens so slowly you don’t notice it. The floor was now looking permanently dirty, and the owner of the property had decided it was time to get it renovated.
Before quoting I paid a visit to the property to survey the floor and conduct an initial test clean which came out well. The test cleaning did not go as quickly as I had hoped it might however, due to traces of old satin sealer on some of the stone. It’s important to remove all the old sealer before applying new or you can end up with a patchy appearance. The remnants of old sealer proved challenging to remove as a result I had to try several products and methods before working out the right approach. In the end I resulted to using a product called Tile Doctor Wax Away. I had considered applying diamond burnishing pads which would have been a quicker option, but the flagstones had a riven finish, and the dirt was deeply pitted.
With a successful cleaning plan worked out I provided the client with a which was accepted, and a date agreed for my return.
The cleaning plan I had worked out was to apply a strong dilution of Tile Doctor Wax Away, leave it to soak into the stone for thirty minutes and then scrub it in with a rotary buffer fitted with a black scrubbing pad. The old sealer proved to be tough to remove and in total I used five litres of Tile Doctor Wax Away in the process, as I said it was a big floor!
On day three, I sealed the floor using three coats of Tile Doctor Seal and Go which gave the Sandstone a lovely satin finish that the client liked. This product is also water based so it doesn’t leave a smell as it dries.
Once done the floor was completely transformed, and my client very pleased with the floor which looked so much lighter and cleaner. For aftercare cleaning I recommended the use of Tile Doctor Neutral Tile Cleaner for maintenance, it is pH neutral so will ensure the newly applied seal is protected. It has a nice fresh smell and is gentle enough to use frequently keeping the newly renovated floor looking lovely.
Nigel Stoker
North West Yorkshire Tile Doctor
 Bedrose
The Space Bedroom includes
* Queen Size Bed with Plasma TV LCD with Cable TV
* High Speed Internet - Wi-Fi
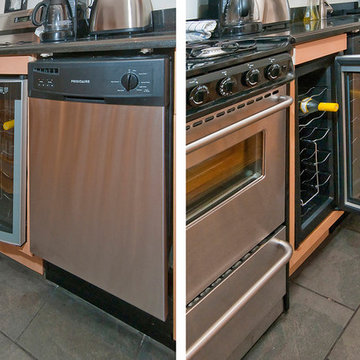
* Fully equipped Kitchen, finishes include white granite counter-tops, appliances, built-in microwave wine cooler and custom cabinetry (shared)
* Marble bathroom (shared)
* Bar with 4 Chairs (shared)
* Laundry machines and dryer in the apartment
* Heating
* Living room with comfortable Sofa Bed (shared)
* Dining table (shared)
* Private parking available in front of the building (hourly rates)
* Towels and bed sheet included and free of charge
* Spacious Closet and drawer. The building is very secured with camera 24/7
*Attended indoor parking garage.
Property Features
Cable Television
Cable TV
Central Heat
Dining Room
Dishwasher
Wine cooler
Washer
Fully Furnished
Dryer
Wood floor
Marble Bathroom
Refrigerator
Stainless Steel Appliances
Towels & Linens Provided
WiFi
With Extra Beds
Guest access
Apartment comes fully equipped with linens, towels, blankets and sufficient furnishings, shampoo, conditioner, body wash, soap, lotion. COMPLIMENTARY *This is not a hotel and we do not provide the services of a hotel*
Neighborhood
The apartment is about 3 min walk to Central Park and the Museum Of The City Of New York. 15 min walk to The Metropolitan Museum. 20 minutes away from Times Square with Subway, 15 minutes away from Grand Central. And surrounded by restaurants, bars, shops, art galeries and movie theater.
SUBWAY: N and Q Train 96 Street subway station - 4 and 6 Train 96 Street Station.
Interaction with guest
Our agency leads a very busy schedule, however, we are already available to assist you with anything you may need. Regarding check-in please contact us 24h prior your arrival, to schedule your check-in with one of our concierge/agent. We can suggest places to eat, shop and gain entertainment. You will have complete privacy, should you choose and discretion is appreciated for both parties.
Rules
CHECK IN is at 4:00 PM - CHECK OUT is at 11:00AM
LATE CHECK IN FEE may apply if the check in after 8pm. Must contact us few days before arrival to arrange the check in time.
Please, be respectful of the neighbors.
Please call 24/to an hour prior to arrival to arrange key pick up.
Absolutely no smoking in the apartment.
Absolutely no parties in the apartment.
We require a 30 night min stay on this apartment.
Only guests included in your confirmed reservation are permitted to be in the apartment.
Complete names and ages of all guests should be provided before check in.
Please leave the apartment i the same condition you entered.
Have a great time, be respectful and enjoy your stay!
Extra charges: Utilities $150 per month -
Application fee (non refundable) : $100 - Move in/out fee: $50 (each)
Fee: Equal to One (1) month of rent
 User
Spectacular unobstructed views of the Bay, Bridge, Alcatraz, San Francisco skyline and the rolling hills of Marin greet you from almost every window of this stunning Provençal Villa located in the acclaimed Middle Ridge neighborhood of Mill Valley. Built in 2000, this exclusive 5 bedroom, 5+ bath estate was thoughtfully designed by architect Jorge de Quesada to provide a classically elegant backdrop for today’s active lifestyle. Perfectly positioned on over half an acre with flat lawns and an award winning garden there is unmatched sense of privacy just minutes from the shops and restaurants of downtown Mill Valley.
A curved stone staircase leads from the charming entry gate to the private front lawn and on to the grand hand carved front door. A gracious formal entry and wide hall opens out to the main living spaces of the home and out to the view beyond. The Venetian plaster walls and soaring ceilings provide an open airy feeling to the living room and country chef’s kitchen, while three sets of oversized French doors lead onto the Jerusalem Limestone patios and bring in the panoramic views.
The chef’s kitchen is the focal point of the warm welcoming great room and features a range-top and double wall ovens, two dishwashers, marble counters and sinks with Waterworks fixtures. The tile backsplash behind the range pays homage to Monet’s Giverny kitchen. A fireplace offers up a cozy sitting area to lounge and watch television or curl up with a book. There is ample space for a farm table for casual dining. In addition to a well-appointed formal living room, the main level of this estate includes an office, stunning library/den with faux tortoise detailing, butler’s pantry, powder room, and a wonderful indoor/outdoor flow allowing the spectacular setting to envelop every space.
A wide staircase leads up to the four main bedrooms of home. There is a spacious master suite complete with private balcony and French doors showcasing the views. The suite features his and her baths complete with walk – in closets, and steam showers. In hers there is a sumptuous soaking tub positioned to make the most of the view. Two additional bedrooms share a bath while the third is en-suite. The laundry room features a second set of stairs leading back to the butler’s pantry, garage and outdoor areas.
The lowest level of the home includes a legal second unit complete with kitchen, spacious walk in closet, private entry and patio area. In addition to interior access to the second unit there is a spacious exercise room, the potential for a poolside kitchenette, second laundry room, and secure storage area primed to become a state of the art tasting room/wine cellar.
From the main level the spacious entertaining patio leads you out to the magnificent grounds and pool area. Designed by Steve Stucky, the gardens were featured on the 2007 Mill Valley Outdoor Art Club tour.
A level lawn leads to the focal point of the grounds; the iconic “Crags Head” outcropping favored by hikers as far back as the 19th century. The perfect place to stop for lunch and take in the spectacular view. The Century old Sonoma Olive trees and lavender plantings add a Mediterranean touch to the two lawn areas that also include an antique fountain, and a charming custom Barbara Butler playhouse.
Inspired by Provence and built to exacting standards this charming villa provides an elegant yet welcoming environment designed to meet the needs of today’s active lifestyle while staying true to its Continental roots creating a warm and inviting space ready to call home.
 Kathleen Jennison
An Arts & Crafts Bungalow is one of my favorite styles of homes. We have quite a few of them in our Stockton Mid-Town area. And when C&L called us to help them remodel their 1923 American Bungalow, I was beyond thrilled.
As per usual, when we get a new inquiry, we quickly Google the project location while we are talking to you on the phone. My excitement escalated when I saw the Google Earth Image of the sweet Sage Green bungalow in Mid-Town Stockton. "Yes, we would be interested in working with you," I said trying to keep my cool.
But what made it even better was meeting C&L and touring their home, because they are the nicest young couple, eager to make their home period perfect. Unfortunately, it had been slightly molested by some bad house-flippers, and we needed to bring the bathroom back to it "roots."
We knew we had to banish the hideous brown tile and cheap vanity quickly. But C&L complained about the condensation problems and the constant fight with mold. This immediately told me that improper remodeling had occurred and we needed to remedy that right away.
The Before: Frustrations with a Botched Remodel
The bathroom needed to be brought back to period appropriate design with all the functionality of a modern bathroom. We thought of things like marble countertop, white mosaic floor tiles, white subway tile, board and batten molding, and of course a fabulous wallpaper.
This small (and only) bathroom on a tight budget required a little bit of design sleuthing to figure out how we could get the proper look and feel. Our goal was to determine where to splurge and where to economize and how to complete the remodel as quickly as possible because C&L would have to move out while construction was going on.
The Process: Hard Work to Remedy Design and Function
During our initial design study, (which included 2 hours in the owners’ home), we noticed framed images of William Morris Arts and Crafts textile patterns and knew this would be our design inspiration. We presented C&L with three options and they quickly selected the Pimpernel Design Concept.
We had originally selected the Black and Olive colors with a black vanity, mirror, and black and white floor tile. C&L liked it but weren’t quite sure about the black, We went back to the drawing board and decided the William & Co Pimpernel Wallpaper in Bayleaf and Manilla color with a softer gray painted vanity and mirror and white floor tile was more to their liking.
After the Design Concept was approved, we went to work securing the building permit, procuring all the elements, and scheduling our trusted tradesmen to perform the work.
We did uncover some shoddy work by the flippers such as live electrical wires hidden behind the wall, plumbing venting cut-off and buried in the walls (hence the constant dampness), the tub barely balancing on two fence boards across the floor joist, and no insulation on the exterior wall.
All of the previous blunders were fixed and the bathroom put back to its previous glory. We could feel the house thanking us for making it pretty again.
The After Reveal: Cohesive Design Decisions
We selected a simple white subway tile for the tub/shower. This is always classic and in keeping with the style of the house.
We selected a pre-fab vanity and mirror, but they look rich with the quartz countertop. There is much more storage in this small vanity than you would think.
The Transformation: A Period Perfect Refresh
We began the remodel just as the pandemic reared and stay-in-place orders went into effect. As C&L were already moved out and living with relatives, we got the go-ahead from city officials to get the work done (after all, how can you shelter in place without a bathroom?).
All our tradesmen were scheduled to work so that only one crew was on the job site at a time. We stayed on the original schedule with only a one week delay.
The end result is the sweetest little bathroom I've ever seen (and I can't wait to start work on C&L's kitchen next).
Thank you for joining me in this project transformation. I hope this inspired you to think about being creative with your design projects, determining what works best in keeping with the architecture of your space, and carefully assessing how you can have the best life in your home.
 Tile Doctor Ltd
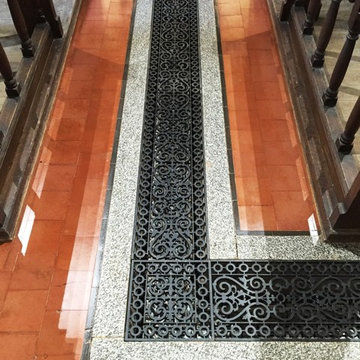
Did you know that Wantage, the town in Oxfordshire where I completed this job, is the birthplace of Alfred the Great? The town is certainly a historic area – in fact, I was contacted by the warden of a church dating back to the 12th century, who asked Tile Doctor Oxfordshire to help restore the building’s flooring, consisting of Quarry and Marble tiles.
This is an interesting mix of hard wearing and high end tiles, and while the floor was in
dire need of a deep clean, it could be restored back to looking fantastic once again.
The church has recently undergone a complete refurbishment with the help of a grant from lottery money. We were called after the builders had finished their work, to restore the floor to the finish required by the church warden.
His specification was to provide the Marble with a Matt finish and the Quarry tiles with a sheen finish. The floor was, at one point in its history, covered in carpet which had been taken up, no doubt exposing many years’ worth of muck.
My first task was to clean the floor with a diluted solution of Tile Doctor Pro-Clean, a high alkaline cleaner safe to use on tile and stone. This was left to dwell for a short period to seep into the tile, before being scrubbed in to remove the initial layers of muck. The resulting residue was promptly vacuumed away.
To tackle the tougher areas of soil buildup, I opted to use Tile Doctor Nanotech HBU which was spread over the floor and left to dwell for about 30 minutes. This product differs from most cleaners in that it uses nano-sized cleaning particles to deal with difficult to reach dirt ingrained in the stone. I then rinsed the area with water and vacuumed this up.
Due to the substantial size of the church floor I had to work in multiple sections, and so the cleaning process took three days to complete. After finishing, I left the church for a few days to allow the floor time to dry.
When I returned to the church I checked the floor with a damp meter and was satisfied that it was dry enough to seal.
First, I sealed the Marble tiles with Tile Doctor Colour Grow, which is a colour enhancing impregnating sealer suitable for use on high end stone such as Marble and Limestone. I applied two coats, leaving a few hours between coats; this brought the colour back without a high shine, as per the church warden’s request.
The next day I returned to seal the Quarry tiles, this time using Tile Doctor Seal & Go Extra which is a topical sealer specially formulated to lea e a nice sheen as requested. I applied several thin coats of the sealer to build up solid protection on the floor.
The warden was extremely pleased with the finished floor, leaving the following feedback:
“We found the Tile Doctor online and watched some of the very helpful slideshows on YouTube. The Victorian Quarry tiles in our 12th century church had been covered with carpet for many years and needed a thorough clean and polish at the end of our major restoration project. Barry was very quick to respond to our enquiry and over the course of a week he did a brilliant job on our tiles. We’re delighted with the results, just in time for our reopening service with our bishop and MP.”
Barry Woodward
Oxfordshire Tile Doctor

 Ellie Lillstrom Photography
Photo: A Darling Felicity Photography © 2015 Houzz
Example of a mid-sized country porcelain tile mudroom design in Seattle with green walls
Example of a mid-sized country porcelain tile mudroom design in Seattle with green walls


 Five Star Tree Care
Taking care of plants, trees or shrubs may seem easy, but for many homeowners, the task is riddled with complications. For those who have no previous experience with plant or tree care, mistakes can cause damage or even death to the trees. A lack of proper training or a lack of proper information about tree care can do much more harm than good.
We care about your trees and shrubs as much as you care about your property. To help you avoid common mistakes, our team at Five Star Tree Services has created an easy to follow quick start guide for shrubs and tree maintenance. Following this guide will help you take care of your trees and shrubs in-between visits from our trained arborist.
Hire Help
Professional arborists are qualified and the best to trim, plant, maintain trees and to preform shrub trimming in just about any environment. Not only does a professional arborist have the experience, but they also are specially trained in the care and diagnosis of various plant species and diseases. In addition to taking care of your plant life, they will also offer you instructions on how to care for your plants when they are unavailable.
Make sure to take care in who you decide to hire. Instead of choosing the first company you find or the lowest priced plant care service, first you should research their qualifications by asking about how they usually care for trees, what their pruning style is, and how often they plan to visit for seasonal care. If they are not willing to answer your questions or educate you on the proper tree and plant care, keep searching.
Proper Tree Care Starts With You
Tree care starts with the property owner. The moment you chose a tree and how you care for it once it has been planted, will shape its health for the rest of its life. Proper care in the early years will ensure that it grows into a healthy shape and has a long life ahead of it. Working with a certified arborist will ensure that you choose the right trees for your area and that they are planted and care for properly during the early years.
There are many different species and types of plants, shrubs, and trees. Understanding how to care for each one will give you the knowledge needed to help them thrive. Speaking with a skilled professional will allow you to take care of your property effectively and efficiently.
Listen Carefully
As tedious or as boring as tree care instructions may be, it is important to pay close attention and take notes. Understanding the responsibilities you have as a property owner towards the shrubs and trees on your property is the best way to ensure they are well cared for. In the event that you are unsure about what to do or how to care for your plant life, you can always reach out to one of our certified arborists here at Five Star Tree Services.
How We Can Help
Whenever you have any Toronto tree care questions, Five Star Tree Services is here to help. We care about your plant life and are dedicated to offering each of our client’s comprehensive care so that your trees and shrubs will thrive. For more information or to get some tips on taking care of the trees on your property, give us a call at (416) 990-3355 to find out more.
 Gallery KBNY
This brownstone renovation was a full gut project in every sense of the word. On top of installing new floors, a kitchen and bath renovation, and all the typical restoration and refinishing involved in a brownstone built in 1899, we also completely updated the exterior, constructed a balcony that was not originally there, and converted the space from a single-family home into an an owner’s triplex. A newly separated studio rental on the garden level offers the opportunity for supplemental income, an uncommon and welcome addition to a New York brownstone.
A TRANSITIONAL GEM
The result is a two-family brownstone that perfectly combines classic townhouse living with today’s modern needs, including SmartHome technology that we installed to control Bluetooth speakers, Nest thermostats, and the security system.
The overall aesthetic goal was to pay homage to the historical periods the brownstone has lived through in a cohesive way that is the hallmark of modern transitional style.
In the kitchen, white Shaker-style cabinetry, a subway tile backsplash, and marble rather than quartz countertops bring a classically upscale sensibility. To modernize the space further, we opened up the back wall to create floor-to-ceiling windows that are also doors, opening up into the newly built balcony.
TIMELY TOUCHES
This brownstone renovation included many quintessential elements, such as millwork like the ceiling medallions. We restored some and custom built others, perfectly recreating their original appearance.
The heated master bathroom is now serene, with a walk-in shower featuring a subtly modern linear drain. A herringbone Carrera marble tiled floor and marble slab sink complete the scene. In the powder room, we embraced a contemporary look by pairing dark hexagonal floors with light chevron tiles, accented with dramatic navy blue wallpaper. With its clear-cut 1920s-style, we selected the wall sconce to reference one of the brownstone’s earlier eras.
DESIGN DETAILS
Natural oak herringbone floors we installed throughout the entire home bring a modern yet warm touch. We restored the wood-burning marble fireplace, which is fully functioning. An elegant staircase with a custom-crafted black wooden banister and white balusters winds up and down alongside a real brick interior wall that we restored and refinished.
In this brownstone renovation, we were also able to create ceiling height, an unexpected yet aesthetically pleasing side benefit. When working on the joists and beams to level out the floors (a common issue in pre-war renovations) we added ceiling height in the main parlor floor by taking the second floor and raising the ceiling an entire foot. The end result is a main floor with stunning 9-foot ceilings.
SOME HIGHLIGHTS
- Solid natural oak herringbone floors throughout
- A fully restored, refinished, and functioning wood burning fireplace with a marble mantle
- Complete exterior renovation of the facade, cornices, windows, mouldings, and even the ironwork, including the railings leading up to the stoop and those facing the street
- A brand new central air and heating system with uniquely modern vents – look above the couch in the living room with the fuzzy rug and large painting
Considering a brownstone renovation? Contact us today! We specialize in brownstone renovations in New York as well as all pre-war apartments. When you work with a design-and-build firm like Gallery to renovate your brownstone, you get the full range of our expertise in working with all the finest details and pre-war architectural elements of these classic New York spaces. We also handle every step of the process, from filing permits and organizing schedules to sourcing custom pieces and building entirely new rooms (or even balconies). Call us for a free initial consultation when you’re ready.
 julianhardacre
Top Tips for Selling a Home in 2016
Want to sell your house in 2016? It’s a great year to sell your home and if you go about it the right way you’ll get what it’s worth and maybe more.
Now I could write this post and do the usual “do this, “do that” type stuff but I wouldn’t be doing you any favors. Because unless you know your numbers and the value of your home, you could wind up leaving money on the table or even losing it.
So here you go.
If you want tips for selling your house in 2016, listen to me - a guy who has bought and sold hundreds of properties as a full-time professional Real Estate Investor. Before you repair anything or call a real estate agent…
...you have to know your numbers.
Tip #1: Know the After Repair Value (ARV) of Your Home
If you’re going to get the right amount of money for your house, you have to know the After Repair Value (ARV). Essentially this means that you should know what your home can sell for after it’s is 100% rehabbed.
If you have a house that you can sell for $120,000, you need to know that. If it will sell for $350,000, you need to know what you need to do to your house to get it there. At the same time, you don’t want to overdo it.
If you have a house that’s currently worth $100,000 as is and it can sell for $115,000 when it’s all fixed up, you may or may not want to put the money into a rehab job. If you put $10,000 in just to make an extra $5,000, it might not be worth the hassle.
So whatever you do, know what it’s worth now (as -is) and know what it’ll sell for afterward. If you want to find out how much your house is worth, there are plenty of agents out there who will give you comps (Comps is a term that is short for “Comparisons” that lets you determine an appraisal value for your home by comparing it to recently sold homes in your area that are similar to yours) or advice for free, so ask them.
So don’t over do it, but don’t be hesitant to put money into your house if it’ll yield a big payoff when you sell it.
TIP #2: Make Your Agent Work For You
After you determine your ARV and enlist a good agent to help you sell your home, It might be worthwhile to hop in their Escalade to drive around town and look at some high end houses in your area to see what kind of upgrades they have. And when you see a common theme, you’ll have a good idea as to what kind of upgrades you might want to do to be able to sell your house.
Granite? Concrete? Tile? Carpet? Wood floors?
It depends.
I don’t know your area or market so you have to do the research, ask your agent questions, and exercise wisdom. Every market is different and you don’t want to put money into an upgrade or rehab if it’s not the type of thing people in your area are looking for.
So talk to a competent agent, and even offer to pay them a bit more in commissions if they can sell your home for a higher price.
This is not a waste of money.
A good agent with a proven track record is worth every penny because they know exactly what needs to be done to sell your home for the most money.
Tip #3: Interior Improvements
So once you have an idea about what your home is worth, have a good agent, and have toured homes in your area to see what kind of upgrades homes in your area typically have, it's time to look at your interior to decide what you should and shouldn’t do to sell your house in 2016.
No matter what you do, you need to be wise about it. Maybe you live in non-traditional or funky house. That’s fine. Just go through 2 or 3 times with a notepad, write down the frustrations you have with it, and do what you need to do to make it functional, warm, beautiful, and inviting.
Interior must-haves:
1. Make sure your kitchen is functional.
2. Always have (or add) a 2nd bathroom: If you don’t have a second bathroom, build one. Sure it could cost you $5-$6k, but it could net you an additional $20k when you sell. No matter what you do, make sure there is a second bathroom. It’s a must.
1. Open floor plans are huge in 2016: If you don’t have one, first- make sure it’s right for your area, and if it is, create one. This might mean building or breaking down a wall, but it’ll pay off in the end.
2. Stage your house: Just do it. Staging your home means that you hire a home stager and/or an interior design consultant (like the lady on Love It or List It) to set up your home in the most inviting way possible and tell you everything you need to do to make it sell. You’ll pay some cash up front but staged homes are shown to sell for 6% to 10% higher according to realtor.org.
Tip #4: Exterior Improvements
Just like the interior, you have to make sure the exterior of your house looks appealing if you want to get the most value of your house in 2016.
Exterior must haves:
1. Add curb appeal: When people pull up to your house, most won’t even want to go inside or look at it unless it looks good from the curb. So make sure it looks gorgeous. Rake the leaves, plant some flowers, mow the lawn - make it inviting.
2. Make sure the picture on the MLS listing matches what your house currently looks like: People don’t want to look at a picture and pull up to your house, only to be disappointed.
3. Hire a professional photographer: This is crucial. It could mean the difference between someone viewing your house, or someone skipping it because the pictures look like a child took them. Hire a pro - it’s worth it. Ask me how I know.
4. Don’t paint your house diarrhea green or brown: This is just common sense. If you’re going to paint, use a neutral color. You don’t want to make your house unsellable because you chose an odd color or made a bad decision elsewhere.
Tip #5: Common Sense, Common Sense, Common Sense
No matter what you do or do not do, don’t make any hasty decisions. Ask your agent questions, look around, be observant, and don't do anything extreme. If you need to fix up your house to see a big profit, do it. If you have a modest budget and improvements won’t raise the value or your house (the ARV) anyways, don’t go crazy.
2016 is a great year to sell your house.
Do it right and do it wisely.
Cheers,
Nate
---
Nate Pyles is a long term Real Estate Investor who made it through the crash in 2008 and spends his week buying and selling houses for profit in the Boise, ID area. He runs House Flip Mentor, has 4 kids, a gorgeous wife, loves to fly, and even built his own Irish pub on his property.

 Gameroom Show
Vintage catalog photos from some of our antique game room collectibles for sale on Gameroom Show. We offer a unique variety of antique slot machines, vintage coin-operated machines, penny arcade machines, fortune tellers, mutoscopes, circus and carousel items, pinball machines, and many more game room collectibles. Want a particular item not found on our website? Send us an email or give us a call to learn if we have what you want.
37