
Search results for "Post work socials" in Home Design Ideas
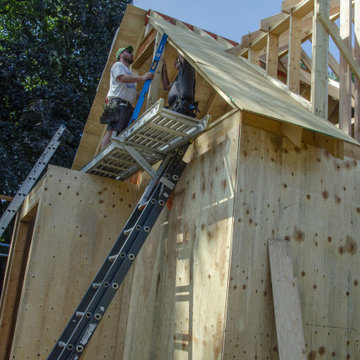
 Jacobson Construction
“If everyone is moving forward together,
then success takes care of itself.”
- Henry Ford
It’s no secret that one big reason for Jacobson Construction’s success is because of our people. I’ve always hired the best people who work together as a team while respecting our customers. These are real professionals who work together and get the job done.
Sean, our project leader, has been with me since 1995, and my electrician has been with me even longer. Many of my current staff have been with me for over 15 years. I am fortunate to have these skilled professionals working with me.
The addition is coming along. There’s a hole in the kitchen where there used to be a supporting wall. Framing’s done in the basement, and a gas fireplace is ready to be installed. The second-floor dormers are framed, and all of our windows have been delivered.
Now that it’s taking shape, looks like one of our new favorite spaces will be the new second-floor bedroom. Because it’s adjacent to the master suite it could make an ideal nursery and add value to my home.
Paying for things you can’t see is hard. For example, putting on a new roof is expensive, and because you can’t see it this seems like an even bigger expense.
What you can’t see on this addition is how much effort is made in securely tying the addition to the existing home – originally built in 1936.
We needed to support part of the old roof and all the new roof with stacked support posts. To do that we installed 3 stacked posts to carry the load from new footings in the basement to the beam three stories up.
The red marked beam in the photo at the top of the page is supported by footings three stories below, halfway into the existing home.
We also physically connected the new addition with beams that extend halfway into the current home.
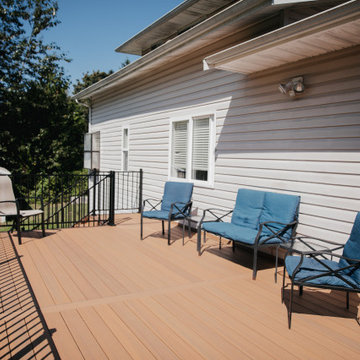
 Legacy Decking
Legacy Decking exceeded our expectations in every way. David and Ben were unbelievably professional and wonderful to work with. They were on time every time they came to the house, and they were super friendly and accommodating, going out of their way to make sure everything was perfect and to our satisfaction. Their crew started on time and finished in 5 days.They worked long hours in the hot sun, and one day they didn't leave until 9:00 p.m. to ensure they finished on time and stayed on schedule. I've never seen anyone work as hard as they did. Our deck is beautiful and it turned out exactly as planned. Several of our friends have commented on how nice it looks and how well it was built. One day David noticed that one of the posts on our other deck (that they did not build) was wobbly and he tried to tighten it for us. Upon realizing that it was defective, he replaced it with a new post, free of charge. We cannot say enough good things about Legacy Decking and we are so happy we chose them to build our deck. We couldn't be happier.” -Lynne
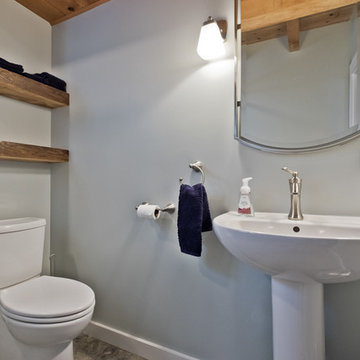
 Mottram Architecture
Timber frame homes offer unique challenges during a remodel. What often makes them beautiful and attractive to most homeowners, also makes them challenging for space requirements.
Context: The lovely couple that owned this home were struggling with some interesting floor plan challenges that just didn't work for their family. The loved the beautiful timbers and woodwork of their home, but the dramatically sloping ceilings on the second floor, particularly in the bathroom, just didn't work for this 1 1/2 bath home. Needing to use the skylight to approach the toilet was a less then ideal scenario. Although the bathroom footprint was more then adequate, the sloped ceiling only made half of the space useable. Check out the Before/After post on our blog to see the photos of the house pre-renovation. As much as they loved all the wood features in their home, another challenge they had was light. The wood ceiling made everything inside the house darker, even with a fantastic array of south facing windows, there were spaces in the home that felt dark and small. When they contacted us they wanted to know how could they make their brighter and more inviting, were there solutions to the 2nd floor sloped ceiling issues, and if they were going to do all of this work, how could they make their home more comfortable and efficient. A nagging water leak in the upstairs bathroom spurred them into action and here is how we solved their dilemma.
Conclusion: First, we added a little dormer to the rear of the house so we could get full headroom in nearly all of the upstairs bathroom! Then we decided to extend that dormer one more timber bay over to create a walk in closet with natural light and plenty of space. Since we were contemplating energy efficiency, we resolved a nagging issue that is present in a lot of timber frame construction, air tightness. Commonly found in timber frame construction, fiberglass insulation is installed in the rafter bays and board ceilings are installed over top. Unfortunately, board ceilings are anything but air tight, and fiberglass insulation needs to be in an airtight cavity for maximum effectiveness. So we were able to solve two issues at the same time for this homeowner. We removed the board ceiling and fiberglass insulation, we dense packed the rafter bays with cellulose insulation, and installed sheetrock in place of the boards. The boards were salvaged for re-use by the homeowner, and the space and light quality was dramatically improved. Some may think that losing the board ceiling took something away from the space, but what you'll see in the pictures is that it highly accentuates the heavy timbers and really makes them stand out in a beautiful way. Now with this added airtightness, better insulation, and brighter space, the homeowner hardly runs their wood stove, and it's so quiet in the space, an added bonus from changing the insulation. It became necessary to also add a sheetrock ceiling to the living room to hide the plumbing from the new bathroom layout above. Changing this ceiling gave the homeowner some real quality lighting that was lacking in the living room before. The brighter ceiling and new lighting layout completely transforms the living room into a space you want to hang out, even though the layout didn't change at all. When the homeowner saw the finished spaces she said "I can't believe this is my house, I want to live in this house"
Energy Efficiency: I touched a little on the efficiency above, but like all projects done with Mottram Architecture, we always want to leave you with a little extra. Timber frame construction with board ceilings and fiberglass insulation are notoriously leaky! If you want to know what we think about fiberglass insulation, check our our blog post on Why Fiberglass Insulation Sucks. By installing cellulose insulation and covering it with sheetrock we were able to greatly reduce the heat flowing out of this home. It not only improves cashflow it improves the comfort level in the space. Who wants to sit in their living room and feel a draft? Let us remind you, we are not saying cellulose insulation is an air barrier, we use the sheetrock to help with that, but it does significantly reduce the air flow over fiberglass insulation. And when we reduce the airflow, we reduce the heat flow. And when we reduce the heat flow, we reduce the need to re-heat that drafty air from outside. When it comes to energy efficiency the first and best place to start is air infiltration. We greatly reduced the air infiltration with the new insulation, but we also added a hat and warm boots. What I mean by that is, we improved the insulation in the roof, and we installed insulation in the basement. Maybe it's a silly analogy, but when you think about keeping warm, we always start with the hat and boots! With sustainability in mind, the next project will be to add a deck to the front of this house with rain catchment barrels from the metal roof. They are planning to plant a garden in the spring and the rain catchment system will help to irrigate the new garden.
Builder: East Shore Builders
Photographer: Michael Eric Berube
Find the right local pro for your project
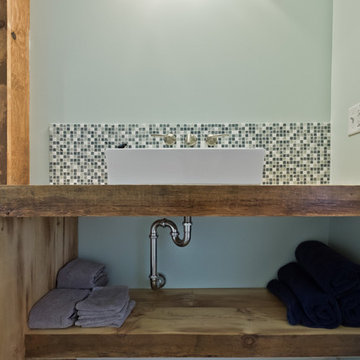 Mottram Architecture
Timber frame homes offer unique challenges during a remodel. What often makes them beautiful and attractive to most homeowners, also makes them challenging for space requirements.
Context: The lovely couple that owned this home were struggling with some interesting floor plan challenges that just didn't work for their family. The loved the beautiful timbers and woodwork of their home, but the dramatically sloping ceilings on the second floor, particularly in the bathroom, just didn't work for this 1 1/2 bath home. Needing to use the skylight to approach the toilet was a less then ideal scenario. Although the bathroom footprint was more then adequate, the sloped ceiling only made half of the space useable. Check out the Before/After post on our blog to see the photos of the house pre-renovation. As much as they loved all the wood features in their home, another challenge they had was light. The wood ceiling made everything inside the house darker, even with a fantastic array of south facing windows, there were spaces in the home that felt dark and small. When they contacted us they wanted to know how could they make their brighter and more inviting, were there solutions to the 2nd floor sloped ceiling issues, and if they were going to do all of this work, how could they make their home more comfortable and efficient. A nagging water leak in the upstairs bathroom spurred them into action and here is how we solved their dilemma.
Conclusion: First, we added a little dormer to the rear of the house so we could get full headroom in nearly all of the upstairs bathroom! Then we decided to extend that dormer one more timber bay over to create a walk in closet with natural light and plenty of space. Since we were contemplating energy efficiency, we resolved a nagging issue that is present in a lot of timber frame construction, air tightness. Commonly found in timber frame construction, fiberglass insulation is installed in the rafter bays and board ceilings are installed over top. Unfortunately, board ceilings are anything but air tight, and fiberglass insulation needs to be in an airtight cavity for maximum effectiveness. So we were able to solve two issues at the same time for this homeowner. We removed the board ceiling and fiberglass insulation, we dense packed the rafter bays with cellulose insulation, and installed sheetrock in place of the boards. The boards were salvaged for re-use by the homeowner, and the space and light quality was dramatically improved. Some may think that losing the board ceiling took something away from the space, but what you'll see in the pictures is that it highly accentuates the heavy timbers and really makes them stand out in a beautiful way. Now with this added airtightness, better insulation, and brighter space, the homeowner hardly runs their wood stove, and it's so quiet in the space, an added bonus from changing the insulation. It became necessary to also add a sheetrock ceiling to the living room to hide the plumbing from the new bathroom layout above. Changing this ceiling gave the homeowner some real quality lighting that was lacking in the living room before. The brighter ceiling and new lighting layout completely transforms the living room into a space you want to hang out, even though the layout didn't change at all. When the homeowner saw the finished spaces she said "I can't believe this is my house, I want to live in this house"
Energy Efficiency: I touched a little on the efficiency above, but like all projects done with Mottram Architecture, we always want to leave you with a little extra. Timber frame construction with board ceilings and fiberglass insulation are notoriously leaky! If you want to know what we think about fiberglass insulation, check our our blog post on Why Fiberglass Insulation Sucks. By installing cellulose insulation and covering it with sheetrock we were able to greatly reduce the heat flowing out of this home. It not only improves cashflow it improves the comfort level in the space. Who wants to sit in their living room and feel a draft? Let us remind you, we are not saying cellulose insulation is an air barrier, we use the sheetrock to help with that, but it does significantly reduce the air flow over fiberglass insulation. And when we reduce the airflow, we reduce the heat flow. And when we reduce the heat flow, we reduce the need to re-heat that drafty air from outside. When it comes to energy efficiency the first and best place to start is air infiltration. We greatly reduced the air infiltration with the new insulation, but we also added a hat and warm boots. What I mean by that is, we improved the insulation in the roof, and we installed insulation in the basement. Maybe it's a silly analogy, but when you think about keeping warm, we always start with the hat and boots! With sustainability in mind, the next project will be to add a deck to the front of this house with rain catchment barrels from the metal roof. They are planning to plant a garden in the spring and the rain catchment system will help to irrigate the new garden.
Builder: East Shore Builders
Photographer: Michael Eric Berube
 Kettle River Timberworks Ltd.
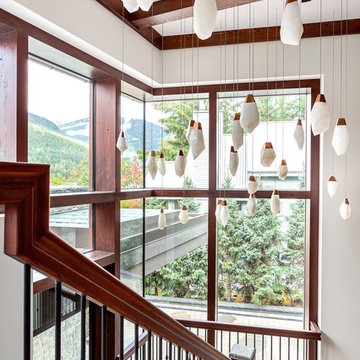
Our clients for this grand mountain lodge wanted the warmth and solidness of timber to contrast many of the contemporary steel, glass and stone architecture more prevalent in the area recently. A desire for timberwork with ‘GRRRR’ equipped to handle the massive snowloads in this location, ensured that the timbers were fit to scale this awe-inspiring 8700sq ft residence. Working with Peter Rose Architecture + Interiors Inc., we came up with unique designs for the timberwork to be highlighted throughout the entire home. The Kettle River crew worked for 2.5 years designing and erecting the timber frame as well as the 2 feature staircases and complex heavy timber mouldings and mantle in the great room. We also coordinated and installed the direct set glazing on the timberwork and the unique Unison lift and slide doors that integrate seamlessly with the timberwork. Huge credit should also be given to the very talented builder on this project - MacDougall Construction & Renovations, it was a pleasure to partner with your team on this project.
 Century Stair Company
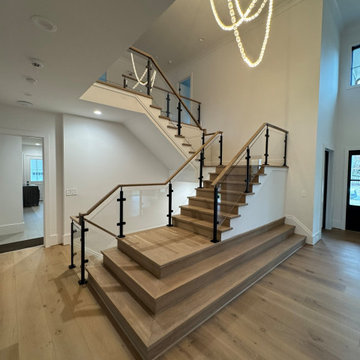
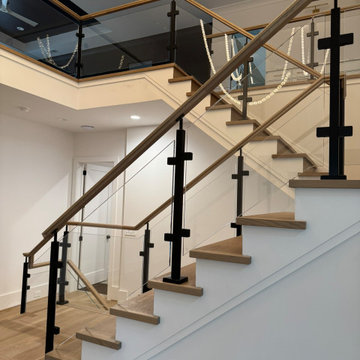
Warm wood and cold glass don't always work well together, but here they do. This white oak staircase pairs naturally grained treads with a sleek glass balustrade anchored by bold black metal posts, a combination that feels considered rather than contrived. The wrap-around starting steps ease the entry, softening what could have been a hard geometric statement into something more welcoming. Overhead, a statement lighting installation pulls the eye upward, casting a warm glow that works with the oak rather than against it. Clean lines throughout, nothing excessive.
1976-2026 © Century Stair Company
 Century Stair Company
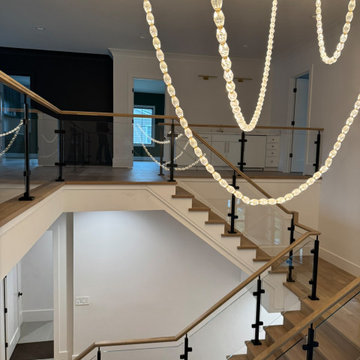
Warm wood and cold glass don't always work well together, but here they do. This white oak staircase pairs naturally grained treads with a sleek glass balustrade anchored by bold black metal posts, a combination that feels considered rather than contrived. The wrap-around starting steps ease the entry, softening what could have been a hard geometric statement into something more welcoming. Overhead, a statement lighting installation pulls the eye upward, casting a warm glow that works with the oak rather than against it. Clean lines throughout, nothing excessive.
1976-2026 © Century Stair Company

 Century Stair Company
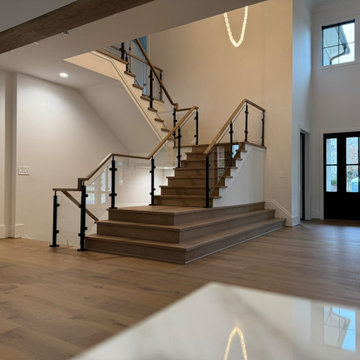
Warm wood and cold glass don't always work well together, but here they do. This white oak staircase pairs naturally grained treads with a sleek glass balustrade anchored by bold black metal posts, a combination that feels considered rather than contrived. The wrap-around starting steps ease the entry, softening what could have been a hard geometric statement into something more welcoming. Overhead, a statement lighting installation pulls the eye upward, casting a warm glow that works with the oak rather than against it. Clean lines throughout, nothing excessive.
1976-2026 © Century Stair Company
 Century Stair Company
Warm wood and cold glass don't always work well together, but here they do. This white oak staircase pairs naturally grained treads with a sleek glass balustrade anchored by bold black metal posts, a combination that feels considered rather than contrived. The wrap-around starting steps ease the entry, softening what could have been a hard geometric statement into something more welcoming. Overhead, a statement lighting installation pulls the eye upward, casting a warm glow that works with the oak rather than against it. Clean lines throughout, nothing excessive.
1976-2026 © Century Stair Company
 CraftPro Contracting LLC
PHOTO: Richard D'Angelo, CraftPro Contracting LLC owner-operator (www.craftprocontracting.com)
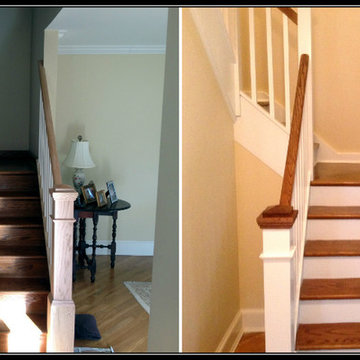
BEFORE & AFTER: Second view from living room.
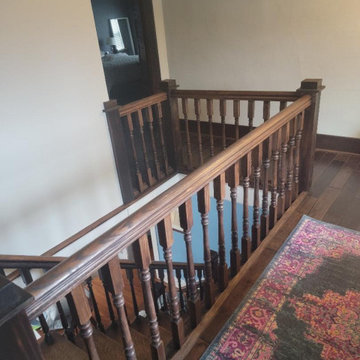
SCOPE OF WORK: The main staircase that faces the entry door of this home in Madison, NJ (07940) was redone with new boxed newel posts, balusters and handrails. The existing inner and outer stringers and the risers were old stained wood. The homeowners wanted the staircase – a main focal point from three areas: the entry, the kitchen and the living room – to look a little more modern. CraftPro was brought in to refinish the existing parts of this staircase and paint and stain the new work. We also painted a closet, some bathroom trim, touched-up areas of the hallway walls and more.
Details and more photos of this staircase finishing home improvement project are on our website at http://www.craftprocontracting.com/portfolio/madison-nj-staircase-painting-staining/.
 Century Stair Company
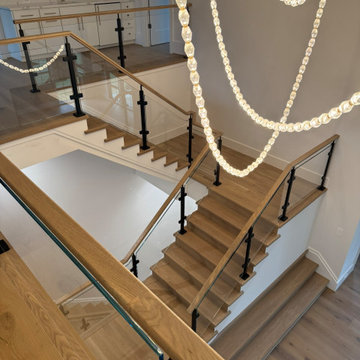
Warm wood and cold glass don't always work well together, but here they do. This white oak staircase pairs naturally grained treads with a sleek glass balustrade anchored by bold black metal posts, a combination that feels considered rather than contrived. The wrap-around starting steps ease the entry, softening what could have been a hard geometric statement into something more welcoming. Overhead, a statement lighting installation pulls the eye upward, casting a warm glow that works with the oak rather than against it. Clean lines throughout, nothing excessive.
1976-2026 © Century Stair Company
 Elegant Hardwood Floors
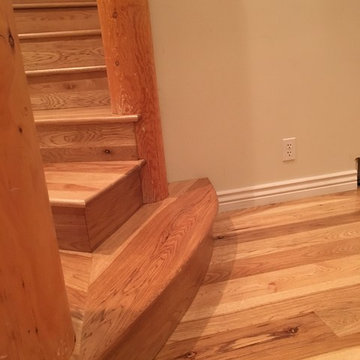
Rounded tread intersected by posts | This has by far been our most technically challenging house, and I can't be more proud of the work Clay, Matt and Will did! This house had tons of challenges - rounded tile at the entry, rounded upstairs hallway exposed to the downstairs, floor to ceiling posts that intersected our work throughout the home, and very few walls with right angles. Clay Anderson, of Anderson Service, made all of the custom radius pieces for the entry and upstairs hallway, and installed this beautiful staircase. Matt installed the 5" long length casa hickory. Will stained the floor with Nutmeg stain and applied the polyurethane finish. The least challenging part - our wonderful homeowners! Thank you so much for the opportunity to work on your beautiful home!
 Mottram Architecture
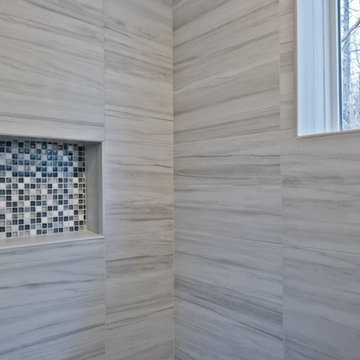
Timber frame homes offer unique challenges during a remodel. What often makes them beautiful and attractive to most homeowners, also makes them challenging for space requirements.
Context: The lovely couple that owned this home were struggling with some interesting floor plan challenges that just didn't work for their family. The loved the beautiful timbers and woodwork of their home, but the dramatically sloping ceilings on the second floor, particularly in the bathroom, just didn't work for this 1 1/2 bath home. Needing to use the skylight to approach the toilet was a less then ideal scenario. Although the bathroom footprint was more then adequate, the sloped ceiling only made half of the space useable. Check out the Before/After post on our blog to see the photos of the house pre-renovation. As much as they loved all the wood features in their home, another challenge they had was light. The wood ceiling made everything inside the house darker, even with a fantastic array of south facing windows, there were spaces in the home that felt dark and small. When they contacted us they wanted to know how could they make their brighter and more inviting, were there solutions to the 2nd floor sloped ceiling issues, and if they were going to do all of this work, how could they make their home more comfortable and efficient. A nagging water leak in the upstairs bathroom spurred them into action and here is how we solved their dilemma.
Conclusion: First, we added a little dormer to the rear of the house so we could get full headroom in nearly all of the upstairs bathroom! Then we decided to extend that dormer one more timber bay over to create a walk in closet with natural light and plenty of space. Since we were contemplating energy efficiency, we resolved a nagging issue that is present in a lot of timber frame construction, air tightness. Commonly found in timber frame construction, fiberglass insulation is installed in the rafter bays and board ceilings are installed over top. Unfortunately, board ceilings are anything but air tight, and fiberglass insulation needs to be in an airtight cavity for maximum effectiveness. So we were able to solve two issues at the same time for this homeowner. We removed the board ceiling and fiberglass insulation, we dense packed the rafter bays with cellulose insulation, and installed sheetrock in place of the boards. The boards were salvaged for re-use by the homeowner, and the space and light quality was dramatically improved. Some may think that losing the board ceiling took something away from the space, but what you'll see in the pictures is that it highly accentuates the heavy timbers and really makes them stand out in a beautiful way. Now with this added airtightness, better insulation, and brighter space, the homeowner hardly runs their wood stove, and it's so quiet in the space, an added bonus from changing the insulation. It became necessary to also add a sheetrock ceiling to the living room to hide the plumbing from the new bathroom layout above. Changing this ceiling gave the homeowner some real quality lighting that was lacking in the living room before. The brighter ceiling and new lighting layout completely transforms the living room into a space you want to hang out, even though the layout didn't change at all. When the homeowner saw the finished spaces she said "I can't believe this is my house, I want to live in this house"
Energy Efficiency: I touched a little on the efficiency above, but like all projects done with Mottram Architecture, we always want to leave you with a little extra. Timber frame construction with board ceilings and fiberglass insulation are notoriously leaky! If you want to know what we think about fiberglass insulation, check our our blog post on Why Fiberglass Insulation Sucks. By installing cellulose insulation and covering it with sheetrock we were able to greatly reduce the heat flowing out of this home. It not only improves cashflow it improves the comfort level in the space. Who wants to sit in their living room and feel a draft? Let us remind you, we are not saying cellulose insulation is an air barrier, we use the sheetrock to help with that, but it does significantly reduce the air flow over fiberglass insulation. And when we reduce the airflow, we reduce the heat flow. And when we reduce the heat flow, we reduce the need to re-heat that drafty air from outside. When it comes to energy efficiency the first and best place to start is air infiltration. We greatly reduced the air infiltration with the new insulation, but we also added a hat and warm boots. What I mean by that is, we improved the insulation in the roof, and we installed insulation in the basement. Maybe it's a silly analogy, but when you think about keeping warm, we always start with the hat and boots! With sustainability in mind, the next project will be to add a deck to the front of this house with rain catchment barrels from the metal roof. They are planning to plant a garden in the spring and the rain catchment system will help to irrigate the new garden.
Builder: East Shore Builders
Photographer: Michael Eric Berube
Sponsored
Delaware, OH

Buckeye Basements, Inc.
Central Ohio's Basement Finishing ExpertsBest Of Houzz '13-'21
 Century Stair Company
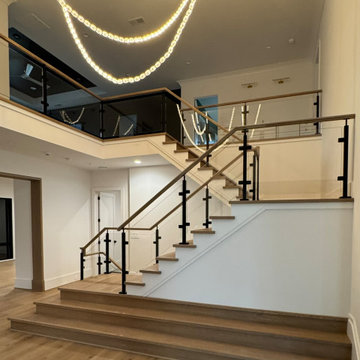
Warm wood and cold glass don't always work well together, but here they do. This white oak staircase pairs naturally grained treads with a sleek glass balustrade anchored by bold black metal posts, a combination that feels considered rather than contrived. The wrap-around starting steps ease the entry, softening what could have been a hard geometric statement into something more welcoming. Overhead, a statement lighting installation pulls the eye upward, casting a warm glow that works with the oak rather than against it. Clean lines throughout, nothing excessive.
1976-2026 © Century Stair Company
 Century Stair Company
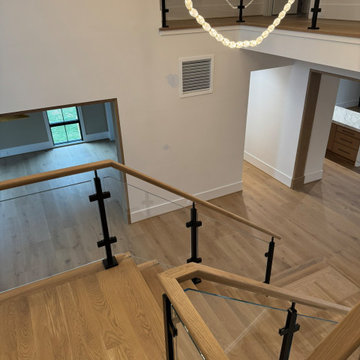
Warm wood and cold glass don't always work well together, but here they do. This white oak staircase pairs naturally grained treads with a sleek glass balustrade anchored by bold black metal posts, a combination that feels considered rather than contrived. The wrap-around starting steps ease the entry, softening what could have been a hard geometric statement into something more welcoming. Overhead, a statement lighting installation pulls the eye upward, casting a warm glow that works with the oak rather than against it. Clean lines throughout, nothing excessive.
1976-2026 © Century Stair Company
 CraftPro Contracting LLC
PHOTO: Richard D'Angelo, CraftPro Contracting LLC owner-operator
BEFORE & AFTER: View from upstairs hallway.
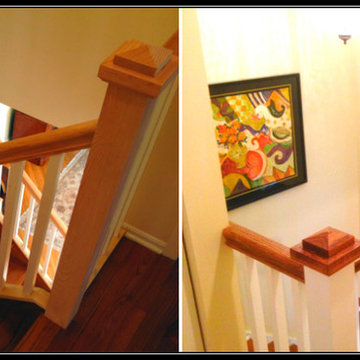
SCOPE OF WORK: The main staircase that faces the entry door of this home in Madison, NJ (07940) was redone with new boxed newel posts, balusters and handrails. The existing inner and outer stringers and the risers were old stained wood. The homeowners wanted the staircase – a main focal point from three areas: the entry, the kitchen and the living room – to look a little more modern. CraftPro was brought in to refinish the existing parts of this staircase and paint and stain the new work. Details and more photos of this staircase finishing home improvement project are on our website at http://www.craftprocontracting.com/portfolio/madison-nj-staircase-painting-staining/. We also painted a closet, some bathroom trim, touched-up areas of the hallway walls and more.
 Century Stair Company
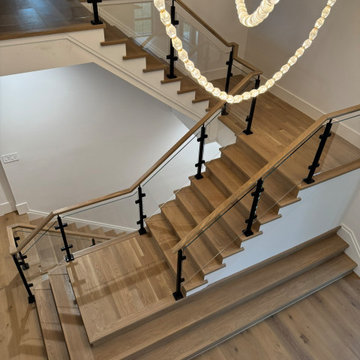
Warm wood and cold glass don't always work well together, but here they do. This white oak staircase pairs naturally grained treads with a sleek glass balustrade anchored by bold black metal posts, a combination that feels considered rather than contrived. The wrap-around starting steps ease the entry, softening what could have been a hard geometric statement into something more welcoming. Overhead, a statement lighting installation pulls the eye upward, casting a warm glow that works with the oak rather than against it. Clean lines throughout, nothing excessive.
1976-2026 © Century Stair Company
Sponsored
Columbus, OH

Hope Restoration & General Contracting
Columbus Design-Build, Kitchen & Bath Remodeling, Historic Renovations
 RWH Architect PLLC
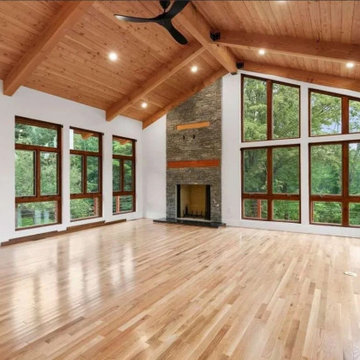
Set among mature pine and willow trees, the Bow Bog Road Residence transforms a once-neglected property into a refined modern home that feels inseparable from its natural setting. The original structure was removed while the existing foundation was preserved, presenting a unique design challenge: how to create a contemporary residence that respected the site’s constraints while maximizing light, views, and connection to the surrounding landscape.
RWH Architects designed a modern post-and-beam home with a carefully integrated addition that expands the livable footprint while maintaining a modest, single-story profile. The home’s form follows the contours of the land, appearing grounded and intentional—almost as if it has always existed within the wooded setting.
Inside, exposed timber beams and tongue-and-groove ceilings bring warmth and craftsmanship to the open living spaces. Expansive floor-to-ceiling windows and clerestory glazing flood the interior with natural light while framing views of the ever-changing New England foliage. A dramatic stone fireplace anchors the great room, creating a sense of permanence and balance between natural materials and modern design.
The home is thoughtfully arranged for both comfort and flexibility, featuring a primary suite, guest suite, and two additional bedrooms. A sunroom serves as a transitional space between indoors and out, seamlessly connecting the living areas to the surrounding landscape. The custom kitchen introduces a darker wood palette, offering a rich contrast to the lighter finishes used throughout the home.
Sustainability was a core consideration in the design. The residence operates fully off-grid, utilizing geothermal heating and cooling, solar power, a private septic system, and a 1,000-foot well—delivering modern amenities while minimizing environmental impact.
The Bow Bog Road Residence reflects RWH Architects’ commitment to site-responsive design, craftsmanship, and sustainable living, resulting in a home that balances contemporary comfort with a deep connection to nature.
“Robert was excellent to work with and very receptive to our desires with our new home build, working with us across several significant revisions on a beautiful custom home. Truly a pleasure to work with.”
— Jeff Craig, Homeowner
 Century Stair Company
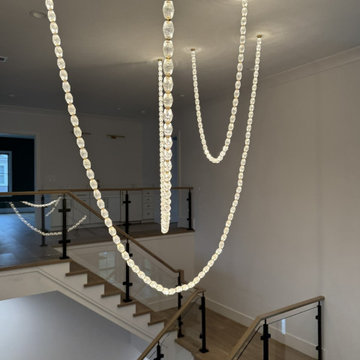
Warm wood and cold glass don't always work well together, but here they do. This white oak staircase pairs naturally grained treads with a sleek glass balustrade anchored by bold black metal posts, a combination that feels considered rather than contrived. The wrap-around starting steps ease the entry, softening what could have been a hard geometric statement into something more welcoming. Overhead, a statement lighting installation pulls the eye upward, casting a warm glow that works with the oak rather than against it. Clean lines throughout, nothing excessive.
1976-2026 © Century Stair Company
 Century Stair Company
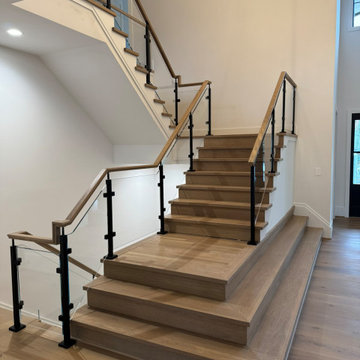
Warm wood and cold glass don't always work well together, but here they do. This white oak staircase pairs naturally grained treads with a sleek glass balustrade anchored by bold black metal posts, a combination that feels considered rather than contrived. The wrap-around starting steps ease the entry, softening what could have been a hard geometric statement into something more welcoming. Overhead, a statement lighting installation pulls the eye upward, casting a warm glow that works with the oak rather than against it. Clean lines throughout, nothing excessive.
1976-2026 © Century Stair Company
43