
Search results for "Preventing typical" in Home Design Ideas
 Liberty Windoors Corp.
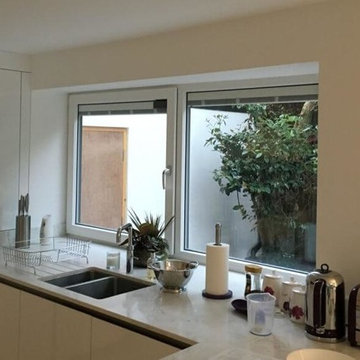
Tilt Turn windows and doors can be combined in numerous configurations with casement, awning, and fixed windows as they utilize the same profile system. The seamless integration of windows provides a uniform appearance and customization beyond compare.
Tilt turn windows are a very unique and functional European window, applicable in endless applications. These windows are quickly gaining popularity in the United States. These windows have been manufactured for almost a hundred years, starting out in Europe in the early 1900′s. The beauty of a tilt turn window is its dual action. The window will open like a casement window and will tilt in at the top. Each window is customized to your exact specifications. Tilt turn doors are also available; the window is capable of being manufactured to fit large openings.
Glancing at the window, one cannot tell that the window has two functions. The window will swing inward when opened like a casement, with a screen on the window’s exterior. The window can then be hinged at the bottom and open inward at the top. Both actions are activated by the turn of a lever, which controls all the mechanics within the frame.
There are great benefits to these operations. Ample fresh air can pass into the room when opened like a casement. When the window is open at the top, it functions as a safety precaution. Small children cannot climb up the window and fall through it as in a traditional double hung window. The same function prevents intruders from entering a room. There is simply no way to climb up the window and fit through the small opening; but ventilation is still possible.
A tilt and turn window can be used in both residential and commercial applications. The window can be utilized in almost any room within a residential home. A home’s exterior is a great place for the windows as are sunrooms and pool enclosures. Commercial applications include restaurants, office buildings, and high rise apartments. A condominium on the thirtieth floor cannot typically be cleaned, except by a professional cleaning service; tilt turn windows open inward and allow for complete cleaning of the window units with out calling costly professionals.
Modern PVC windows are suitable for many types of buildings. Weather it's a historic building, detached private residence, office building or a multi-family house, stylish window profiles can achieve consistency of design between the building's exterior and interior walls.
PVC profile is made from UV stabilized materials protecting windows from solar expositon and discoloration. This problem is often observed with standard vinyl windows. In addition, our profiles are reinforced with galvanized steel, which makes them exceptionally durable. This feature is important for large windows, which require greater strength and stability.
High thermal insulation of PVC material combined with multi chamber profile structure ensures the highest comfort of living. In fact uPVC windows have the highest energy rating in the US outperforming all brands of wooden windows. Double or triple pane glass have the added benefit of being extremely effective in deadening sound. It makes PVC windows the best choice for buildings or homes located close to railroads or noisy roads
Browse and Shop Our Online Site : www.shop.libertywindoors.com
For More Infomation About Tilt Turn Windows and Doors and Custom Order Options Visit : www.libertywindoors.com
Warehouse Location :
127 Squankum Yellowbrook Road
Farmingdale , NJ , 07727
TEL: (973) 773-2188
EMAIL: infonj@libertywindoors.com
Hours Of Operation :
Monday - Friday : 10:00am-5:00pm
Saturday : Closed
Sunday : Closed
 SUPERIOR CHIMNEY SERVICES CORPORATION
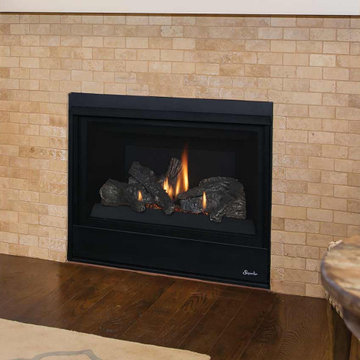
Is it necessary to clean gas fireplace? It’s intuitive that the dark black buildup of combustion needs to be cleaned from a typical wood burning fireplace, but is it needed to clean a gas fireplace? It’s gas…right? Gas fireplaces do not have a visible buildup of combustion, but should be cleaned at least once a year to prevent serious problems with the fireplace.
Gas vs. Wood Burning Fireplaces
When thinking of the inside of a family home, we think about the most comfortable room: the living room or family room. This is where the family meets, watches movies, and plays board games during rainy days, evenings and family time. It usually has a lofty, cozy couch and a wood burning fireplace. Nothing’s more comforting than falling asleep to the dim light of the fireplace and faint smell of burning wood. Nowadays, we have a close alternative to this old fashioned comfort: the gas fireplace. Gas fireplaces don’t leave much creosote behind, however gas fireplaces should be cleaned once a year, per the CSIA, due to dust, pet hair, insects, and other debris that can build up and cause performance problems. Chimney sweep are primarily for firewall worthiness assurance, cleaning and obstruction free assurance.
Gas fireplaces look similar to wood burning fireplaces, with a live flame. The logs inside the gas fireplace look real, but are not actually burning. Oftentimes, they are made of ceramic. A gas fireplace produces much less heat than a wood burning fireplace, but can retain more heat inside your home based on its type and configuration. Gas fireplaces can be low maintenance and energy friendly alternatives to a wood burning fireplace.
Some Signs to Clean Gas Fireplace
1. Buildup: Although gas fireplaces do not produce as much visible flammable and hazardous buildup, it does produce some corrosive substances and flue gasses that may settle inside your home without you knowing. Burning natural gas leaves a residue that must be cleaned annually. Failing to clean the residue may cause health risks if left untouched.
2. Technical Issues: There may be technical problems that are not visible, such as issues with the burner. Gas fireplaces are usually built to last long term but it’s imperative to check if there are any unnoticed technical issues at least once a year.
3. Gas Leaks: Over time, valves and pipes turn weaker and become corroded. It’s important to inspect these valves, as a gas leak is extremely hazardous. A certified chimney specialist must inspect and determine any damage or future damage to prevent this serious problem.
4. Condensation: Due to the high temperatures in the flue, there’s a buildup of condensation when the fireplace vapors are cooled. Natural gas exhaust also contains a high content of water vapor in emissions. The condensation reacts with byproducts and is acidic and corrosive, and must be cleaned at least once a year to not pose a potential health hazard.
It’s just as important to clean a gas fireplace at least once a year to prevent long term issues that could pose health risks if not cared for. A certified chimney professional from Superior Chimney will inspect and sweep the fireplace and ventilation system.
Contact us today to clean gas fireplace at 877-244-6349.
 Jada Windows
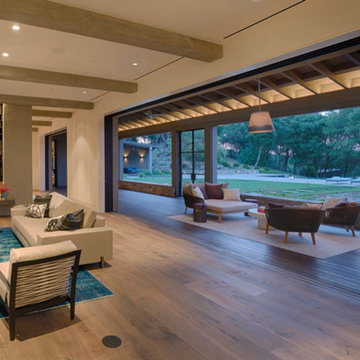
Whenever possible sill and threshold conditions are developed to create the minimal transition between interior and exterior walking surfaces. The majority of our projects have cut or cast stone threshold treatments. Some extruded sill solutions can be introduced if needed.
Outswing doors typically have a step down from interior to exterior. Inswing door sills typically need a raised threshold to prevent water blowing in. Sliding doors have top hung floor guides that are flush to finish floor and offer the most seamless transition while still acting as a water return. Bottom rolling sliding doors have a water return guide track that sits a subtle 3/16" above finish floor for a near flush transition.
Whenever weather exposure is a concern, drain slots should be added to the inswing sill designs. Extreme weather environments need more extreme measures and coordination with waterproofing consultants.
#JadaSteelWindows
Find the right local pro for your project
 Armadillo Convertible Room Solutions
All products are custom made.
Available in different fabrics and colors (extruded aluminum and cold-formed steel). Accordion shutters also available.
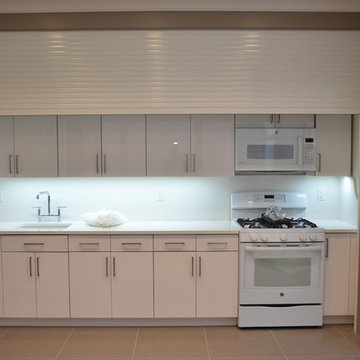
Our gates and shutters are designed for privacy and protection. They are built with extruded aluminum for added protection and durability. Traditional gates and shutters are typically built with steel. Aluminum is more aesthetically pleasing and offers maximum security.
Roller gates and shutters are useful throughout the year for privacy, security, and protection from the sun. Many clients install roller gates and shutters over doors and windows. Roller gates and shutters are optimal for hurricane protection and energy saving. They are easy to use and can be raised or lowered with the push of a button.
All gates and shutters are custom designed and are available in a variety of materials, fabrics and colors (extruded or foam-filled).
• Optional: Tension pins to prevent forced entry.
• Optional: Vent holes in slats are optional for ventilation.
 KodieK. Designs
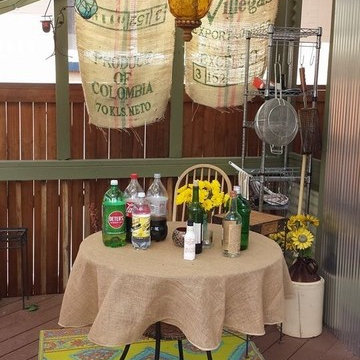
A covered portion of the deck makes for a nice spot for seating, dining and/or entertaining. Old coffee bags tacked onto the deck provide privacy from the neighbors and add a touch of whimsy.
 Diehl Concrete
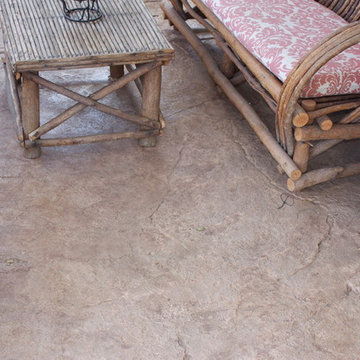
Diehl Concrete is a local Denver business that prides itself in quality decorative work such as custom stamped concrete patios. The owner, Ryan Diehl, plays a hands-on part throughout the entire process. With over 15 years of experience in creating beautiful outdoor spaces, along with his un-compromised integrity, Diehl Concrete is a wise choice for your project.
There are countless examples of his work throughout Colorado, including Denver, Aurora, Brighton, Boulder, and Evergreen. Call today and Ryan Diehl will personally evaluate your project, answer your questions, and provide a free quote.
Benefits of Stamped Concrete Patios:
Affordability: Stamped concrete patios are much more affordable when compared to brick pavers or natural stone. Fortunately, This lower cost doesn’t lack durability or beauty.
Longevity: Concrete typically lasts longer than alternative patio materials. To ensure durability, Diehl Concrete will take the extra steps to reduce cracking. We will take great care in preparing your concrete sub-grade with proper compaction, and road base as well as rebar reinforcement within the concrete. Finally, expansion joints will be strategically placed to minimize and prevent cracking.
Color and Pattern Options: The sky is truly the limit on color choices and patterns for stamped concrete patios.
Shape: Due to its versatility of the substance, concrete offers homeowners the ability to create any type of shape they would like. Would you like curves, planting beds, or even a fire pit incorporated into your stamped concrete patio? No problem.
Low Maintenance: To maintain the look and uphold the durability, a once yearly sealer may be applied. This is something you can do yourself, or we can seal your patio for you.
Increased home resale value. Decorative concrete adds curb appeal and aesthetic value to your home, allowing you to maximize the return on your investment.
 Drury Design
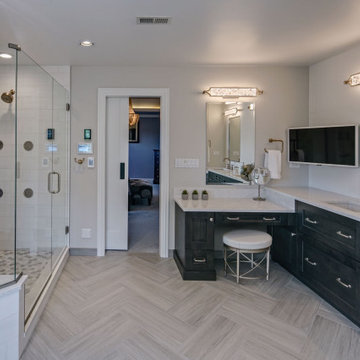
The original idea was to update the tile floor and the tub. That’s it.
A further discussion of wants and needs revealed intentions for an eventual larger shower and an improved vanity storage. It made sense to map out the possibilities and design our update with potential next steps in mind. The process was exciting, ultimately leading to the decision to do a full primary bath remodel.
Design Objectives:
-Maintain existing locations for all major bathroom functions
-Make the shower larger and more open
-Use luxurious materials throughout
-Improve vanity storage and define accessories for specific items
-Incorporate luxury shower fixtures
-Include the latest technology
Design Challenges
-Enlarging the shower in a typical rectangular shape would block the view and light from the alcove windows behind the tub
-Logical placement of the built-in shower caddy and all shower components in accordance with how and where they were to be used
-Keeping the long, back wall free from any shower modules to maintain the decorative tile design
-Combining the owner’s existing smart home system with a comprehensive shower system
-Planning cabinetry for hidden storage and use for various small appliances and make-up
-Integrating expensive shower wall tile with less expensive wall tile for aesthetic and budget purposes
-Incorporating special design features to balance the highly decorative shower tile
Design solutions:
-A clipped corner was planned for the shower bench seat – this allowed for a larger glass wall. The glass wall at the angled bench also brought more natural light into the shower
-Thoughtful shower space design prevented the crowding of features – the shower caddy and handheld shower head were placed on the full-height wall by the shower bench, the regular shower head and body sprays remained on the opposite wall, and the rain head was placed in the center of the shower
-A multi-port DTV system was installed, providing control of all shower components, including chromotherapy and music inside and outside the shower
-The lavish water-jet stone and glass decorative tile was paired with a less-expensive glass tile found in the mosaic
-Pull-out grooming organizers and electrical docking stations were incorporated into the cabinetry
Additional storage was created in the lower corner cabinet
The homeowners are thrilled with their new primary bathroom. Clear goals and carefully evaluated materials informed a fun and functional design that is both thoughtful and sumptuous!
 InnovationLand
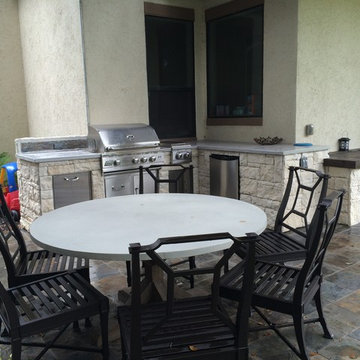
Among our Houston outdoor kitchens, this one is unique because of its concrete countertops, pergola with stucco wrapping and custom storage.
"It's not one of our biggest covered outdoor kitchens in Houston," says Outdoor Homescapes of Houston owner Wayne Franks. "But it's unique, and it looks really nice, too!"
The client, a young family, wanted an outdoor kitchen with a more minimalistic, modern look, explains Outdoor Homescapes senior designer Lisha Maxey.
"They're both doctors and very much attuned to detail," she says. "Their primary goal was to create a space where they could lounge while the children played as well as an area to entertain family and friends while cooking and dining outside."
Like a growing number of people wanting small outdoor kitchens in Houston, this client expressed interest in using concrete as a surface material: "The look is contemporary and is easily paired with any type of outdoor furniture," says Maxey, "from wicker to teak to iron."
Here's a closeup of the concrete countertops. You'll notice that they're glossy and smooth like glass, thanks to special sealers and a topcoat of UV-resistant resin that prevents the countertop from yellowing.
Since these particular clients lean toward the minimalistic side of contemporary design, she continues, "the standard granite countertop of many Houston outdoor kitchens would not work, since it typically has a lot of movement and can be busy."
Lisha sees the use of concrete as a growing outdoor design trend for Houston outdoor kitchens: "It's easy to maintain and again, leans towards a more modern look for outdoor."
All the furniture and lighting is from Restoration Hardware, says Lisha, who's offering $500 in free outdoor furniture consultation services as a special promotion. (Interested? Just contact us!)
The dining and lounge chairs are from the Antibes collection in cast aluminum with a bronze finish. The table is a Belgian Trestle made of weathered concrete and teak. Simple track lighting was used on the pergola in keeping with the minimalist look of the space.
The pergola is a treated pine, stained a Minwax Jacobean, which appears almost black. "This client chose a pergola over a roof extension off the house because they wanted it to still seem light and airy in their outdoor space for their young children," explains Lisha. "They wanted a certain degree of sun and shade protection, which a pergola does provide, but they wanted it to seem a bit like a park for the kids to play in."
"The seating/storage bin was not a part of the original design," says Lisha. "As the project progressed, the client expressed interest in some sort of chest for the new outdoor furniture cushions to be stored in."
The design for the storage bin was developed to accommodate this request: "It eventually evolved into a seating area as well. And to keep the look consistent with the new kitchen, it was agreed that the stone be carried through the design. The wood top was necessary so we could design a hinged access for storage."
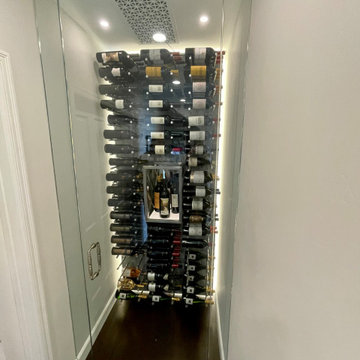
 Los Angeles Custom Wine Cellars
Wine cellars glass doors aren't your usual glass doors that are typically used in shower rooms. All the glass panels we use for our wine cellars — modern or traditional, small or big — are tempered. This means that they don't fog easily and prevent the warm air from reaching inside the cellar.
Learn more about this project here: https://www.customwinecellarslosangeles.com/small-modern-wine-cellars/
Custom Wine Cellars Los Angeles
Los Angeles, California
+1 (323) 825 - 9846
https://www.customwinecellarslosangeles.com
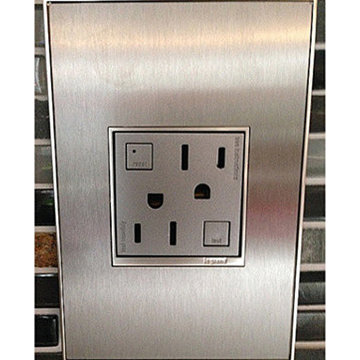
 Legrand
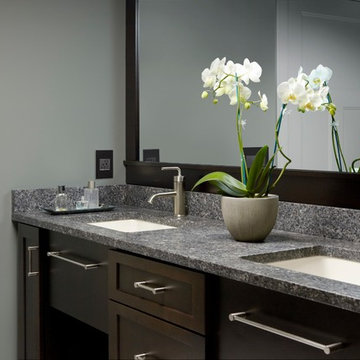
ARTR152M4: adorne® Tamper-Resistant Outlet - 15A - 125V - Magnesium
All adorne outlets include a tamper-resistant design featuring a patented shutter system, keeping children safe by preventing them from pushing small objects into the outlet. The shutters are molded a dark color that they fade into the backgorund while keeping users safe.
Patented shutter system helps prevent improper insertion of foreign objects.
Configuration easily supports two plugs and offers the capacity of a standard outlet.
Easy "1-for-1" installation lets you simply replace your existing outlet in just minutes.
Fits in your existing electrical box and does not require new wires for typical installation. Innovative assembly and snap-in system make it fast and simple to install.

 C.E. Pontz Sons
This Farm Pond Renovation in York, PA included removal of the existing land bridge at the back side of the pond that was blocking the stream water flow and also clearing the aquatic weed and other invasive plants from the stream to allow for a better water flow to the ponds edge. We snaked the existing overflow pipe and attempted to clear it of any debris blocking the flow of water. For the new overflow we cleared the existing embankment and excavated a swale at the edge of the pond and created a natural looking stream overflow similar to one we would create in a typical backyard pond or water feature. This was done to prevent and stabilize the eroding bank along the pond edge. Also installed was a large scale pond aerator and aeration system to aide in the overall health and clarity of the pond.
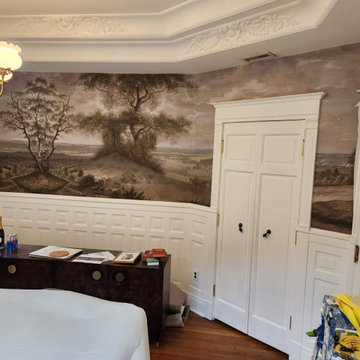
 Windy City Painters
Professional wallpaper installation Old Town requires expertise that honors the neighborhood's historic character while delivering modern durability and beauty.
Project Overview and Architecture
This Old Town wallpaper installation showcased our ability to work with the area's distinctive architecture, from classic greystones to renovated vintage condos that define this prestigious neighborhood.
Materials and Products
We selected premium wallpaper materials specifically designed for Chicago's climate conditions, using high-quality adhesives and primers that ensure long-lasting adhesion on various surface types.
Installation Process
Step 1: Surface preparation including cleaning, smoothing, and addressing imperfections common in older buildings
Step 2: Professional repairs to walls ensuring perfect foundation for wallpaper application
Step 3: Quality primer application designed specifically for wallpaper adhesion and longevity
Step 4: Expert wallpaper installation with precise pattern matching and seamless application techniques
Chicago-Specific Challenges
Old Town homes present unique challenges including weather exposure, aging building materials, potential lead paint considerations, and vintage surfaces requiring specialized preparation techniques.
Results Achieved
Windy City Painters delivered flawless wallpaper installation that enhanced the room's aesthetic while respecting the architectural integrity of this historic Old Town property.
Professional Tips
Homeowners should always hire experienced professionals for wallpaper installation, especially in historic properties where surface preparation and material selection significantly impact long-term success and beauty.
See more work and request free estimate at windypainters.com.
FAQs
Q: Why hire professionals for wallpaper installation Old Town homes? / A: Expert installation prevents costly mistakes, ensures proper adhesion, and preserves historic property values through quality craftsmanship.
Q: What wallpaper materials work best in Chicago climate? / A: High-quality papers with proper backing designed for humidity fluctuations and temperature changes typical in Chicago homes.
Q: How do you prepare Old Town walls for wallpaper? / A: Thorough cleaning, surface smoothing, repairs, and specialized primers ensure optimal wallpaper installation adhesion and longevity.
Q: Can wallpaper be installed over existing paint? / A: Sometimes, but professional assessment determines if surface preparation or primer application is needed for successful wallpaper installation.
Q: How long does professional wallpaper installation take? / A: Most rooms completed within one day, depending on size, pattern complexity, and surface preparation requirements.
Q: What about removing old wallpaper first? / A: We safely remove existing wallpaper using proper techniques that protect walls and prepare surfaces for new installation.
Q: Do you offer design consultation for wallpaper selection? / A: Yes, we help choose patterns and materials that complement Old Town architectural character and personal style preferences.
Q: How do you handle pattern matching across walls? / A: Precise measurements and expert techniques ensure seamless wallpaper installation with perfect pattern alignment throughout rooms.
Q: What's your wallpaper installation warranty coverage? / A: Comprehensive warranties cover both materials and workmanship, giving you confidence in your wallpaper installation investment.
Q: Can you work around furniture and schedules? / A: Absolutely! We coordinate timing and setup to minimize disruption during your professional wallpaper installation project.
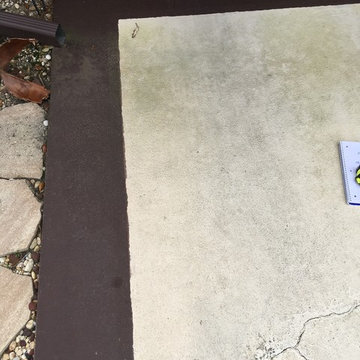
 Seaside Surfaces LLC
Before photo of the driveway. This surface was not properly coated, and sealed. The surface was exposed to the elements, and had plenty of mildew. Also, the brown border was painted on the surface, which will never hold up. Paint should not be used on concrete surfaces. The dirt, and mildew is the result of not properly sealing the stained concrete. Christopher Hill
 Drury Design
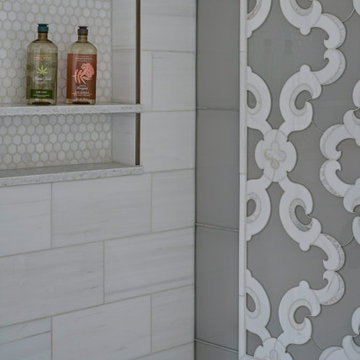
The original idea was to update the tile floor and the tub. That’s it.
A further discussion of wants and needs revealed intentions for an eventual larger shower and an improved vanity storage. It made sense to map out the possibilities and design our update with potential next steps in mind. The process was exciting, ultimately leading to the decision to do a full primary bath remodel.
Design Objectives:
-Maintain existing locations for all major bathroom functions
-Make the shower larger and more open
-Use luxurious materials throughout
-Improve vanity storage and define accessories for specific items
-Incorporate luxury shower fixtures
-Include the latest technology
Design Challenges
-Enlarging the shower in a typical rectangular shape would block the view and light from the alcove windows behind the tub
-Logical placement of the built-in shower caddy and all shower components in accordance with how and where they were to be used
-Keeping the long, back wall free from any shower modules to maintain the decorative tile design
-Combining the owner’s existing smart home system with a comprehensive shower system
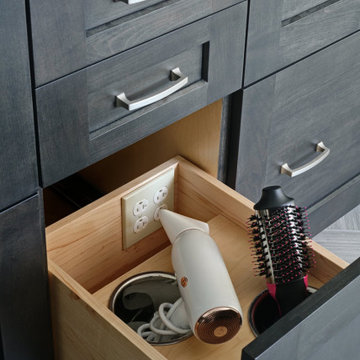
-Planning cabinetry for hidden storage and use for various small appliances and make-up
-Integrating expensive shower wall tile with less expensive wall tile for aesthetic and budget purposes
-Incorporating special design features to balance the highly decorative shower tile
Design solutions:
-A clipped corner was planned for the shower bench seat – this allowed for a larger glass wall. The glass wall at the angled bench also brought more natural light into the shower
-Thoughtful shower space design prevented the crowding of features – the shower caddy and handheld shower head were placed on the full-height wall by the shower bench, the regular shower head and body sprays remained on the opposite wall, and the rain head was placed in the center of the shower
-A multi-port DTV system was installed, providing control of all shower components, including chromotherapy and music inside and outside the shower
-The lavish water-jet stone and glass decorative tile was paired with a less-expensive glass tile found in the mosaic
-Pull-out grooming organizers and electrical docking stations were incorporated into the cabinetry
Additional storage was created in the lower corner cabinet
The homeowners are thrilled with their new primary bathroom. Clear goals and carefully evaluated materials informed a fun and functional design that is both thoughtful and sumptuous!
 California Closets Connecticut
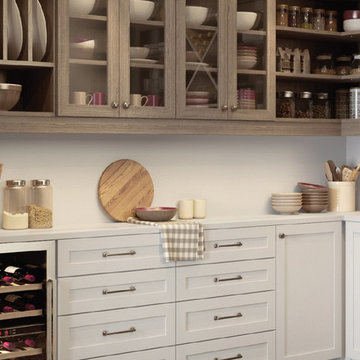
Under cabinet lighting transforms a system by providing an ideal location for task lighting that is easily concealed under the cabinet, thereby avoiding direct glare while reducing shadows cast by cabinets from overhead lighting. Horizontal Straight Ribbon consists of an aluminum profile that houses the LED ribbon which is recessed under the shelf above the area to be lit, typically towards the front of the shelf so the illumination falls to the front of the work area. This placement allows for increased visibility for the task at hand. Recessing creates a clean, minimalist aesthetic while ensuring the light fixture is out of the way preventing any bumping or catching of stored items.
 Drury Design
The original idea was to update the tile floor and the tub. That’s it.
A further discussion of wants and needs revealed intentions for an eventual larger shower and an improved vanity storage. It made sense to map out the possibilities and design our update with potential next steps in mind. The process was exciting, ultimately leading to the decision to do a full primary bath remodel.
Design Objectives:
-Maintain existing locations for all major bathroom functions
-Make the shower larger and more open
-Use luxurious materials throughout
-Improve vanity storage and define accessories for specific items
-Incorporate luxury shower fixtures
-Include the latest technology
Design Challenges
-Enlarging the shower in a typical rectangular shape would block the view and light from the alcove windows behind the tub
-Logical placement of the built-in shower caddy and all shower components in accordance with how and where they were to be used
-Keeping the long, back wall free from any shower modules to maintain the decorative tile design
-Combining the owner’s existing smart home system with a comprehensive shower system
-Planning cabinetry for hidden storage and use for various small appliances and make-up
-Integrating expensive shower wall tile with less expensive wall tile for aesthetic and budget purposes
-Incorporating special design features to balance the highly decorative shower tile
Design solutions:
-A clipped corner was planned for the shower bench seat – this allowed for a larger glass wall. The glass wall at the angled bench also brought more natural light into the shower
-Thoughtful shower space design prevented the crowding of features – the shower caddy and handheld shower head were placed on the full-height wall by the shower bench, the regular shower head and body sprays remained on the opposite wall, and the rain head was placed in the center of the shower
-A multi-port DTV system was installed, providing control of all shower components, including chromotherapy and music inside and outside the shower
-The lavish water-jet stone and glass decorative tile was paired with a less-expensive glass tile found in the mosaic
-Pull-out grooming organizers and electrical docking stations were incorporated into the cabinetry
Additional storage was created in the lower corner cabinet
The homeowners are thrilled with their new primary bathroom. Clear goals and carefully evaluated materials informed a fun and functional design that is both thoughtful and sumptuous!

 John
JohnCoco coir is a versatile and sustainable growing medium that is gaining popularity among gardeners. Made from the fibrous husk of coconuts, it’s an eco-friendly alternative to peat moss and can greatly enhance the quality of your soil. In gardening, it is often utilized in systems like Coco Coir Hydroponic, where it helps create an efficient water and nutrient delivery system.
What is Coco Coir?
Coco coir is a natural fiber extracted from coconut husks. It has a neutral pH, excellent water retention, and is reusable, making it a favorite among gardeners who prefer organic and sustainable practices. It is available in different forms such as blocks, bricks, or loose coir, each requiring some preparation before use in gardening.
Benefits of Using Coco Coir in Gardening
Coco coir offers several advantages for gardening. Here are the benefits of using coco coir in gardening:
Holds up to 10 times its weight in water, ensuring plants have consistent moisture.
Promotes oxygen flow to plant roots, leading to healthier root systems.
Coco coir is a renewable and eco-friendly alternative to peat moss.
It can be washed, rehydrated, and reused, reducing waste.
Naturally pH neutral, making it suitable for various plants without major adjustments.
Enhances the texture and moisture retention of garden soil.
How to Prepare Coco Coir for Planting
Preparing coco coir for planting involves a few essential steps. First, you need to hydrate the coir block, as it typically comes in a compressed form. Place the block in a large container and add warm water, allowing the block to expand and absorb the water. Once fully expanded, the coir should be fluffed up by breaking it apart with your hands or a tool to ensure it becomes loose and airy. After the coir has been fluffed, it is important to drain any excess water, as overly wet coir can lead to root suffocation. Finally, since coco coir is inert and does not contain nutrients, it’s a good idea to add organic compost or liquid fertilizer to enrich the coir before planting.
Do You Need to Soak Coco Coir Before Planting?
Yes, soaking coco coir before planting is necessary. Since it comes in a compressed form, it needs to be broken down and hydrated for proper use. The soaking process allows the coir to expand and release the fibers, making it usable as a growing medium. After soaking, the coir should be fluffed to ensure the water is evenly distributed. Draining any excess water is crucial because overly wet coir may impede plant root health.
How to Prepare Coco Peat for Planting
Coco peat, a fine, powdery form of coco coir, is highly beneficial for seed starting and improving water retention in soil. To prepare coco peat, it first needs to be hydrated, similar to how you prepare coir blocks. Slowly add water to the peat in a container and allow it to absorb and fluff up. Once hydrated, coco peat can be used on its own or mixed with other growing media such as perlite or vermiculite for added aeration and drainage. It is advisable to check the pH level of your final mix, as coco peat generally has a neutral pH, but adjustments may be necessary depending on the plants being grown.
Can You Use Just Coco Coir for Plants?
Yes, coco coir can be used by itself to grow plants, especially in hydroponic systems or as a seed-starting medium. However, because coco coir does not naturally contain nutrients, you will need to provide regular fertilizer to support plant growth. This makes it particularly suitable for plants grown in controlled environments, such as hydroponics, where nutrient solutions can be carefully managed. In traditional soil-based gardening, mixing coco coir with other organic materials like compost is recommended to provide essential nutrients and improve the overall soil structure.
How to Use Coco Coir in Hydroponics
Coco coir is widely used in hydroponic systems due to its water retention and aeration properties. To use coco coir in hydroponics, it first needs to be soaked and hydrated, as discussed earlier. Once the coir is fully prepared, it can be placed in the hydroponic system. Since coco coir does not contain natural nutrients, you will need to supply a balanced nutrient solution tailored for hydroponic plants. Regular monitoring of water and nutrient levels is essential to prevent nutrient imbalances or root rot. One of the benefits of coco coir in hydroponics is its reusability. After completing a growing cycle, the coir can be washed, rehydrated, and used again in future plantings.
Using Coco Coir as a Soil Amendment
Coco coir is also an excellent soil amendment, as it improves the texture and moisture retention of garden soil. To use coco coir in this way, mix loose coir with your existing garden soil at a ratio of one part coco coir to two parts soil. This will help retain moisture without compacting the soil, improving both water drainage and root growth. For optimal results, you can also add organic compost to the mix, ensuring that the nutrient levels are sufficient for plant growth. Coco coir works particularly well in raised beds, where it helps maintain proper soil structure over time.
Advantages of Using Coco Coir Over Peat Moss
While peat moss has been traditionally used as a growing medium, coco coir offers several advantages over it. Coco coir is a renewable resource, as it is a byproduct of coconut processing, while peat moss is harvested from peat bogs that take centuries to regenerate. Coco coir is also more durable, as it can be reused multiple times without breaking down, while peat moss disintegrates after a single use. Another key benefit is its neutral pH, whereas peat moss is more acidic and may require balancing to meet the needs of specific plants.
Conclusion
Coco coir is a highly versatile and sustainable growing medium that benefits both novice and experienced gardeners alike. Whether you are using it for hydroponics, as a soil amendment, or as a standalone medium for growing plants, knowing how to properly prepare and use it is key to maximizing its benefits. By following the steps detailed above, you can improve water retention, aeration, and overall plant health in your garden, all while contributing to eco-friendly gardening practices.
 Diehl Concrete
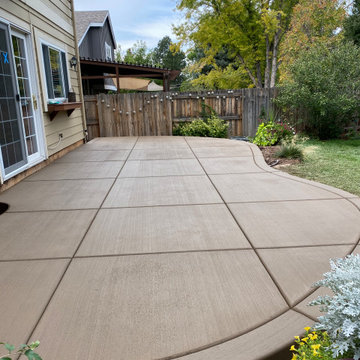
Diehl Concrete is a local Denver business that prides itself in quality decorative work such as custom stamped concrete patios. The owner, Ryan Diehl, plays a hands-on part throughout the entire process. With over 15 years of experience in creating beautiful outdoor spaces, along with his un-compromised integrity, Diehl Concrete is a wise choice for your project.
There are countless examples of his work throughout Colorado, including Denver, Aurora, Brighton, Boulder, and Evergreen. Call today and Ryan Diehl will personally evaluate your project, answer your questions, and provide a free quote.
Benefits of Stamped Concrete Patios:
Affordability: Stamped concrete patios are much more affordable when compared to brick pavers or natural stone. Fortunately, This lower cost doesn’t lack durability or beauty.
Longevity: Concrete typically lasts longer than alternative patio materials. To ensure durability, Diehl Concrete will take the extra steps to reduce cracking. We will take great care in preparing your concrete sub-grade with proper compaction, and road base as well as rebar reinforcement within the concrete. Finally, expansion joints will be strategically placed to minimize and prevent cracking.
Color and Pattern Options: The sky is truly the limit on color choices and patterns for stamped concrete patios.
Shape: Due to its versatility of the substance, concrete offers homeowners the ability to create any type of shape they would like. Would you like curves, planting beds, or even a fire pit incorporated into your stamped concrete patio? No problem.
Low Maintenance: To maintain the look and uphold the durability, a once yearly sealer may be applied. This is something you can do yourself, or we can seal your patio for you.
Increased home resale value. Decorative concrete adds curb appeal and aesthetic value to your home, allowing you to maximize the return on your investment.
 Legrand
ASTH1532M2: adorne® Touch Switch - Single Pole/3-Way - 15amps - 120V - Magnesium
ADTH700MMTUM2: adorne® Touch™ Wireless Dimmer Switch - 700W - Tru-Universal - Magnesium
ARTR152M4: adorne® Tamper-Resistant Outlet - 15A - 125V - Magnesium
The Touch design features a stunning translucent face - simply touch your finger on the circle to turn lights on and off. Switch supports single-pole and three-way operation.
Easy "1-for-1" installation lets you simply replace your existing switch in just minutes.
All adorne outlets include a tamper-resistant design featuring a patented shutter system, keeping children safe by preventing them from pushing small objects into the outlet. The shutters are molded a dark color that they fade into the background while keeping users safe. Patented shutter system helps prevent improper insertion of foreign objects.
Fits in your existing electrical box and does not require new wires for typical installation. Innovative assembly and snap-in system make it fast and simple to install.
Meant to combined with "AW" series of adorne wall plates.
UL Listed
Voltage: 120VAC
Country: Canada
Limited Lifetime Warranty
 Diehl Concrete
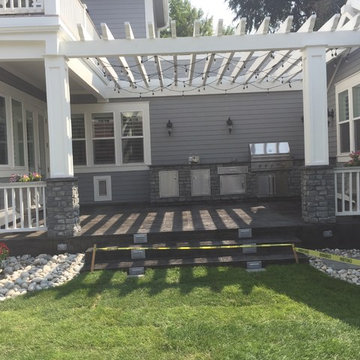
Diehl Concrete is a local Denver business that prides itself in quality decorative work such as custom stamped concrete patios. The owner, Ryan Diehl, plays a hands-on part throughout the entire process. With over 15 years of experience in creating beautiful outdoor spaces, along with his un-compromised integrity, Diehl Concrete is a wise choice for your project.
There are countless examples of his work throughout Colorado, including Denver, Aurora, Brighton, Boulder, and Evergreen. Call today and Ryan Diehl will personally evaluate your project, answer your questions, and provide a free quote.
Benefits of Stamped Concrete Patios:
Affordability: Stamped concrete patios are much more affordable when compared to brick pavers or natural stone. Fortunately, This lower cost doesn’t lack durability or beauty.
Longevity: Concrete typically lasts longer than alternative patio materials. To ensure durability, Diehl Concrete will take the extra steps to reduce cracking. We will take great care in preparing your concrete sub-grade with proper compaction, and road base as well as rebar reinforcement within the concrete. Finally, expansion joints will be strategically placed to minimize and prevent cracking.
Color and Pattern Options: The sky is truly the limit on color choices and patterns for stamped concrete patios.
Shape: Due to its versatility of the substance, concrete offers homeowners the ability to create any type of shape they would like. Would you like curves, planting beds, or even a fire pit incorporated into your stamped concrete patio? No problem.
Low Maintenance: To maintain the look and uphold the durability, a once yearly sealer may be applied. This is something you can do yourself, or we can seal your patio for you.
Increased home resale value. Decorative concrete adds curb appeal and aesthetic value to your home, allowing you to maximize the return on your investment.
7