
Search results for "Proceed" in Home Design Ideas
 Measuredworks Architecture
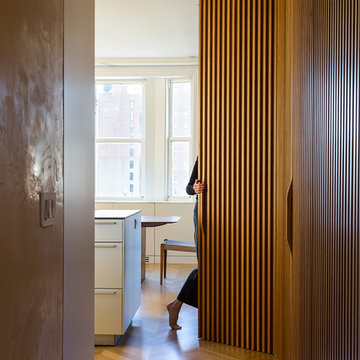
This gut renovation updates a 1,200 SF Classic 5 in an historic prewar building overlooking Gramercy Park. The design is organized around a spine of ribbed white oak proceeding from entry hall to living spaces with southwest views over the park. Concealed doors throughout the apartment provide access to storage, and a hidden door in the ribbed wall leads to the master suite.
Fran Parente
 Precision Outdoors
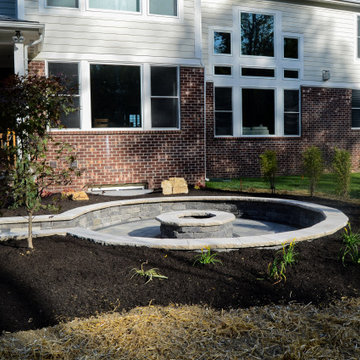
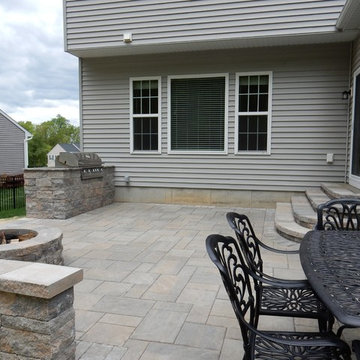
When the homeowners came to us, they had a desire to build out an outdoor space that would compliment their covered patio. Ideally, it would allow them to gather around and roast marshmallows in a cozy setting. When we inspected their property, it was fairly exposed to their neighbors; we proceeded to build out the space so it could have additional room for tables and chairs. Our team then worked to sink the fire pit patio area in, to add privacy with greenery to help create an intimate space to enjoy a fire and embrace family.
 John Rogers Design
Transitional Architectural Theatre Lighting & Interior Design
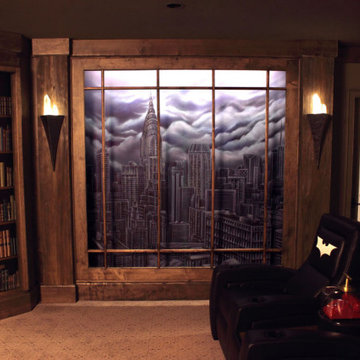
This Batman themed theater was not part of the original theater plans. I was hired by the owners to do lighting design for their new construction home. In my first preliminary lighting plan presentation the husband expressed his passion for a Batman themed theater and showed me an image of a Batman themed theater he liked. Which he followed up to say it was out of his budget.
I was hired for lighting design. What the owners did not know was that I have an interior design degree. I asked what amount he was willing to spend for a Batman themed theatre. I knew I could design the theatre for a quarter of the cost of the theatre he had shown me. I felt comfortable saying I could design lighting and interiors for the theatre within their budget.
I proceeded with bringing in my team of artists to review the images of his Batman comic magazine collection that had to be in the theater: Batcave, Wayne Manor, Lincoln Penney, Bat phone and the Joker.
As the images indicate, we succeeded in designing and installing the Batman themed theatre to meet the client's criteria.
At the owner’s request: Linear LEDs lit the Batcave faux wall murals of stone and Wayne Manor aged wood columns, custom crystal wall sconces, and a library with a life size Batman costume hidden behind a false bookcase. A false wooden window with a Gotham City Mural of the Bat signal were revealed by using ultraviolet black lights.
It was a fun project but could not have been accomplished without a team of excellent artists, building contractors, A.V. control company, millwork fabricators and electricians.
Lighting Designer: John Rogers Design
Interior Design Concept & Millwork Design: John Rogers Design
Faux stone and murals Artist: Robin Tucker
Builder: Richard Harp Homes https://www.richardharphomes.com
A.V. Company:
Electrical:
Photographer: John Watson
Published
AY Magazine
Find the right local pro for your project
 RAJ Kitchen and Bath, LLC
 “Full apartment design”.
IF you have not yet seen this apartment conversion before, we strongly urge you to go to the bottom left of this page and click on the short 2-minutes video. It would put a lot of things into perspective when you come back and continue reading this.
It is true we were literally handed the keys and told a list of things that they wanted to have happen and we were to go into the apartment, look at the space and come up with a design that would satisfy all of that need. UNTIL we showed up! The unit had really seen some better days but we knew we had to look past that and come up with a concept that would work for them.
The immediate challenges were centered around 3 big ideas:
1. Adding a second bedroom to the already small footprint
2. Figuring out a way to make the kitchen bigger, better and brighter
3. Creating a master room walk in closet
It’s always difficult to add new rooms into existing footprint without expanding out or up and not incurring any opportunity cost. In this case, that was exactly what we had to do. Item one and two above had to be tackled as one. We went ahead and switched out the location of the dining room and eliminating an area where there was a “nook” type eat-in area. By doing so, we were able to cut right into that footprint and change the layout of the kitchen.
That one move allowed us to dig into the kitchen design because it was now the main focal point in the apartment. It was no longer an option to keep it in that tiny hole where it was, so we had to ensure that this design was functional and aesthetically pleasing at the same time. By adding the table into the space where an Island typically would go, we were able to both cut cost and still provide a dining experience. The Table serves as an Island as well when cooking.
We then proceeded to block in the existing doorway to the dining room. By doing this, we were able to create a full room which allowed us to put a door on the other side and called that room Bedroom #2. This was easier to do because all of the mechanicals were already in that space (light, heater and windows). By shifting things around, we also achieved a huge wall to wall closet from inside. PERFECT!
Then we moved into the Single bedroom. We thought it was a big room with a small closet, so by creatively adding an L shaped wall and steal some footprint into the bedroom side, we were able to put a door on that new room and design it for the walk-in closet. Even after this, the bedroom still holds a queen size bed with 2 night stands, a TV on the wall, a sitting chair and plenty of room to walk around. This was done by rethinking the location for the bed and night stands.
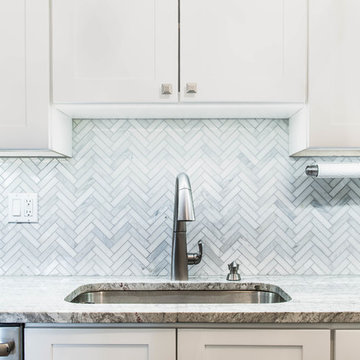
The bathroom was gutted to make sure there was no leaks and rebuild from the ground up. We kept all of the plumbing where it was, added a new vanity, medicine cabinet, tiles and lighting and it was done.
From there, the rest of the unit had new flooring all throughout, paint, and lighting. After completion and walk through, this project was handed over back to the clients.
Execution and collaboration between all the trades were: Reggie and his team from Premier Interiors and Rohan from RD Mechanical Services.
p.s. Please see our website to see the video.
 Tile Doctor Ltd
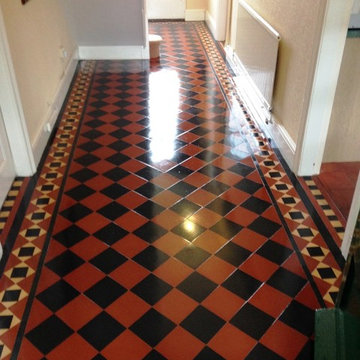
This black and red Victorian tiled hallway at a property in Newport, the third largest city in Wales, had a timeless charm about it, and a classic diamond pattern. Unfortunately, the tiles had lost their colour, leaving them looking dull and lifeless. It was clear to me, upon further inspection, that the existing sealer had failed, allowing dirt to become trapped in the pores of tile.
This can be a very difficult problem to rectify without the right professional assistance; everyday household cleaners are rarely suitable for sealed floors and acidic cleaners can actually male the problem worse. The tiles needed a deep clean with strong products, followed by a fresh, robust surface seal to prevent dirt from becoming trapped again in the future.
I started cleaning the tiles with a strong dilution of Tile Doctor Pro Clean, worked in to the stone as per usual by using a rotary machine fitted with a black scrubbing pad. Pro Clean is a reliable alkaline cleaner that works well on most kinds of natural stone, and while I could see it made a difference here, it was clear something stronger was required to remove what was left of the old sealer.
To remove this, I applied a dilution of Tile Doctor Remove and Go, which is a dedicated stripper that is safe to use on tile and stone for the purposes of breaking down old sealers, waxes, paints, and adhesives, and this proved effective in getting rid of all the old sealer.
Once the cleaning was complete, I rinsed the floor thoroughly to remove any trace of chemicals left over from the cleaning products, before leaving it to dry overnight.
I came back to the property the next day and, after checking the floor was completely dry, I proceeded to seal the floor using eight coats of Tile Doctor Seal and Go. This types of sealer is known as ‘topical’, which means that it builds up a solid layer of protection on the surface of the tile. Topical sealers tend to be more suitable to Victorian and Quarry tiles as they typically require a lot of sealer due to their porosity and these types of sealer are less costly. Seal and Go also adds a nice aesthetically pleasing low sheen finish.
As you can see from the second photo, this did wonders to the tiles and really brought this classic Victorian pattern back to life. Another satisfied client for the Monmouthshire Tile Doctor.
Paul Wales
Monmouthshire Tile Doctor
 Linda Edelwich Realtor
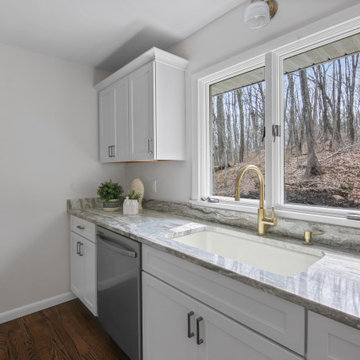
LAKE LIFE LUXURY AWAITS! Discover absolute move-in perfection in this meticulously renovated 3-bedroom, 2-full-bath one floor living RANCH HOME just a short stroll from pristine Andover Lake, where you'll simply bring your keys and kayaks to start living your dream. This exceptional property showcases designer upgrades throughout, including a brand-new kitchen with stunning granite countertops, completely renovated bathrooms, refinished hardwood floors, new boiler 2025 and a new roof installed Fall 2023. Architectural highlights include a distinctive hip roof, elegant brick facade, extra-large bay window in the fireplaced living room, and an attached 2-car garage complemented by a spacious basement offering tremendous expansion possibilities. Step outside to entertain on your new paver patio nestled on a beautifully private treed lot before taking the 2.7-mile walking path around the lake-a perfect daily exercise routine. ENJOY the tranquil Andover Lake lifestyle with optional membership granting access to swimming, sailing, kayaking, and year-round fishing in crystal-clear waters where motorboats are prohibited, preserving the lake's unspoiled serenity. This lake community cherishes lakefront living while offering surprising convenience to schools, shopping, dining, and major highways. Your lakeside sanctuary awaits in this turnkey property where every detail has been thoughtfully addressed for your immediate enjoyment. This is true 1 floor living.
 Southern Scape, LLC
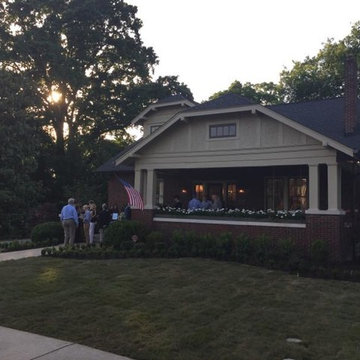
Ca. 1919 Craftsman Style Home, Revisioned by the South’s Leading Designers
Twenty‐two leading interior designers from three different states completely restored this historic home on Franklin’s historic Main Street as part of the O’More Show House, which was opened to the public from May 12‐27, 2016 and presented by leading sponsor, PARKS.
This is the third O’More Show House event in recent years, with participating designers having ties to O’More College of Design in downtown Franklin and proceeds benefiting the College’s School of Interior Design. The 2016 home, a 5,200 square‐foot ca. 1919 brick and stucco Craftsman‐style cottage, is a significant contributing property to the National Register‐listed Hincheyville Historic District. The owners have undertaken a total renovation of the home’s interior while leaving the street‐view exterior intact.
We were recommended to project managers and O'More College for the entire landscape design and installation: landscaping, irrigation, lighting, paver walks and patios, paver-raised porch with steps, paver banding in driveway!
 Linda Edelwich Realtor
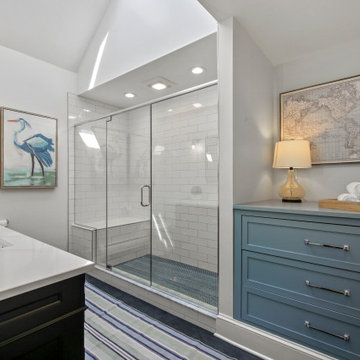
Nestled on 2.57 private acres in a highly sought-after neighborhood adjacent to Glastonbury line, this meticulously maintained custom home welcomes you through gracious double doors into a residence that emanates coastal charm. Richly toned floors contrast beautifully w/crisp neutral walls throughout, while the front-to-back living room serves as a stunning centerpiece w/its elegant gas-fireplace & French doors on either side opening to a screened porch-creating a delightful cross-breeze when open. No popcorn ceilings here! Open floor plan features a versatile home office with built-ins, flowing seamlessly into a gourmet kitchen showcasing a stylish island, custom cabinetry, & stainless-steel appliances adjacent to an expansive dining area w/stylish twin chandeliers. Practical luxury continues with a generous walk-in pantry & custom drop zone with shiplap detailing and shoe cubbies near the three-car garage with soaring ceilings. Upstairs, discover a sumptuous primary suite featuring a stylishly remodeled bathroom w/walk-in shower. Also complemented by a spacious walk-in closet & window flanked by custom built-ins, while two additional bedrooms share another beautifully updated bathroom & convenient 2nd-floor laundry. Additional space w/an unfinished walk-up attic & 880sf of finished extra living space in the walk-out lower level, complete with built in sauna, laminate flooring and ample storage-all crowned by the property's signature wrap-around porch. Roof '17

 Tile Doctor Ltd
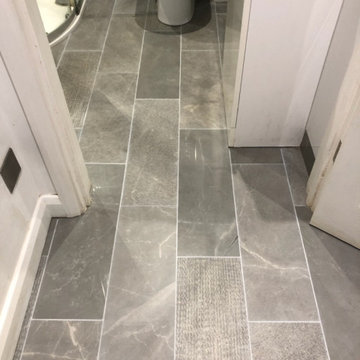
The pictures below detail the renovation of a Porcelain Tiled Floor I completed at a property in Ipswich. Installed throughout the Kitchen and into the adjacent WC the porcelain tile and grout were in a very dirty state and the client was desperate to get them clean. The situation wasn’t helped by their two dogs with grubby paws. She had tried all the usual household cleaners she could find, and nothing seemed to work. Unfortunately, household cleaners can make the problem worse due the strong chemicals they contain.
I visited the property to survey the floor and was able to reassure the client that although the grout was heavily stained it could be renovated by recolouring it with a Tile Doctor Grout Colourant. I was confident we would soon be able to get the floor looking great again and demonstrated the process I would use on a small part of the floor. The demonstration went well and happy with the result we agreed a date for my return the following week to complete the work which should be completed in a single day.
Returning on the agreed date we started by protecting the by applying a clear silicone sealant to the MDF skirting boards and kitchen base units. We left this to dry for an hour before proceeding with the cleaning.
The Porcelain tile and grout was cleaned with a strong dilution of Tile Doctor Pro-Clean using 3 parts cleaner to 5 parts water. The solution was applied to the tile and grout and then left to soak in for ten minutes before being worked in using a rotary machine fitted with a Black Scrubbing Pad. Tile Doctor Pro-Clean is a concentrated, multi-purpose high-alkaline cleaner which is designed for deep cleaning tile, stone and grout of dirt and grease and can also remove sealers.
Pads can struggle to reach into the recesses of the grout line so once I was finished with the tile, I hand scrubbed the grout with a wire brush. The floor was then rinsed with water and the resultant slurry extracted off the floor with wet vacuum.
The floor took about three hours to deep clean which was just the right timing for us to have lunch whilst the floor dried. The grout was much improved by the cleaning process but as suspected there were too many deep-seated stains to be able to guarantee a consistent finish. So as previously agreed with the client we set about colouring the grout using a light grey colourant. This took most of the afternoon as there was a lot of grout.
The Porcelain tiles were the non-porous type that won’t take a sealer and the colourant acts as a barrier over the grout protecting it and making it easy to clean so once I was done colouring there was no need to apply a sealer.
My client was relieved to have the floor looking clean and presentable again. For aftercare I recommended that moving forward it would be best to use Tile Doctor Neutral Tile Cleaner which is a pH neutral cleaner. This will ensure that with regular cleaning the floor will keep clean and the grout won’t be compromised by overly strong products.
Bruce Copping
Suffolk Tile Doctor
 Tile Doctor Ltd
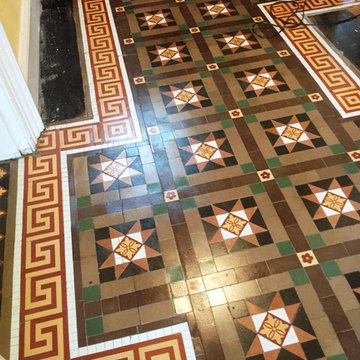
As you can see from the photographs below this Victorian tiled hallway was in quite a state and not only needed a thorough clean and fresh seal but needed to be rebuilt in parts.
Leamington Spa or Royal Leamington Spa to give its full name is one of the original UK Spa towns where people would visit to bathe the waters which are supposed to have medicinal properties, the town has many regency period properties and so Victorian floors
A good 30% of the floor tiles were lose and it took three days to rebuild the screed levelling compound before refitting loose tiles and new ones had to be cut to size, fixed in place and then re-grouted.
On day 4 a 400 grit coarse burnishing pad was applied to clean up the whole floor.
This was followed by scrubbing the tile and grout with Tile Doctor Pro-clean mixed 50/50 with NanoTech HBU remover followed by Remove and Go and finally treated with Acid Gel to remove the grout haze. After that the White tiles were steam cleaned to get them as clean and white as possible.
The floor was thoroughly rinsed after each treatment and the slurry extracted using a wet vacuum.
I left the floor for 5 days so it could thoroughly dry out and settle following the numerous treatments and then came back to seal the tiles, I used a damp test meter first to verify the floor was dry and ready for sealing. Once happy I proceed to apply a couple of coats of Tile Doctor Colour Grow which is a colour enhancing sealer that soaks into the tile protecting it from within and leaves a matt finish.
A lot of work went into restoring this floor but I’m really pleased with the way it came out and as you can imagine the owner was really happy with the transformation that had taken place in their house.
Mick Gayton
Warwickshire Tile Doctor
 Actual Art Landscape Design
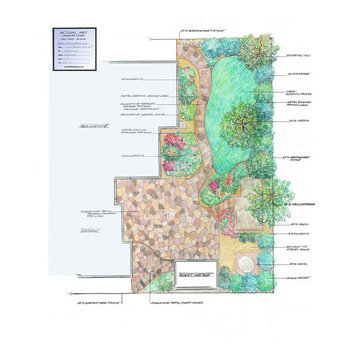
This is a Concept Drawing. It shows the design that I am proposing to the clients. If they like this basic layout, I then proceed to draw up the whole Design Plan.

 Spaces Designed, Interior Design Studio, LLC
Cozy Chic - While the entire condo is under 1000 sq ft, there's no dearth of chicness. The ultra-modern kitchen has enough room to host an intimate gathering with a large island while it looks sharp with stainless appliances against a backdrop of a darker backsplash. The living room with its vibrant color palette, luxurious rug and comfortable seating continues the theme of intimate conversations in a chic setting.
The artwork in the living room and the bedroom reflects the playful personalities of the owners accompanied by hints of old fashioned charm. The glam bathroom adds a touch of royalty to the entire proceedings with hand-selected mirror, wall paper and sconce lights in the right shades of gold.
The project reflects Spaces Designed's philosophy of designing spaces to not only meet the needs of it's clients but also their personalities and sensibilities. Every space, small or large, has it's own purpose and character - our role is to identify that and meticulously craft the outcome.
 RAJ Kitchen and Bath, LLC
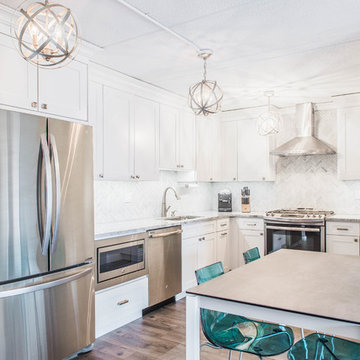
 “Full apartment design”.
IF you have not yet seen this apartment conversion before, we strongly urge you to go to the bottom left of this page and click on the short 2-minutes video. It would put a lot of things into perspective when you come back and continue reading this.
It is true we were literally handed the keys and told a list of things that they wanted to have happen and we were to go into the apartment, look at the space and come up with a design that would satisfy all of that need. UNTIL we showed up! The unit had really seen some better days but we knew we had to look past that and come up with a concept that would work for them.
The immediate challenges were centered around 3 big ideas:
1. Adding a second bedroom to the already small footprint
2. Figuring out a way to make the kitchen bigger, better and brighter
3. Creating a master room walk in closet
It’s always difficult to add new rooms into existing footprint without expanding out or up and not incurring any opportunity cost. In this case, that was exactly what we had to do. Item one and two above had to be tackled as one. We went ahead and switched out the location of the dining room and eliminating an area where there was a “nook” type eat-in area. By doing so, we were able to cut right into that footprint and change the layout of the kitchen.
That one move allowed us to dig into the kitchen design because it was now the main focal point in the apartment. It was no longer an option to keep it in that tiny hole where it was, so we had to ensure that this design was functional and aesthetically pleasing at the same time. By adding the table into the space where an Island typically would go, we were able to both cut cost and still provide a dining experience. The Table serves as an Island as well when cooking.
We then proceeded to block in the existing doorway to the dining room. By doing this, we were able to create a full room which allowed us to put a door on the other side and called that room Bedroom #2. This was easier to do because all of the mechanicals were already in that space (light, heater and windows). By shifting things around, we also achieved a huge wall to wall closet from inside. PERFECT!
Then we moved into the Single bedroom. We thought it was a big room with a small closet, so by creatively adding an L shaped wall and steal some footprint into the bedroom side, we were able to put a door on that new room and design it for the walk-in closet. Even after this, the bedroom still holds a queen size bed with 2 night stands, a TV on the wall, a sitting chair and plenty of room to walk around. This was done by rethinking the location for the bed and night stands.
The bathroom was gutted to make sure there was no leaks and rebuild from the ground up. We kept all of the plumbing where it was, added a new vanity, medicine cabinet, tiles and lighting and it was done.
From there, the rest of the unit had new flooring all throughout, paint, and lighting. After completion and walk through, this project was handed over back to the clients.
Execution and collaboration between all the trades were: Reggie and his team from Premier Interiors and Rohan from RD Mechanical Services.
p.s. Please see our website to see the video.
 BURNETTE BUILDERS
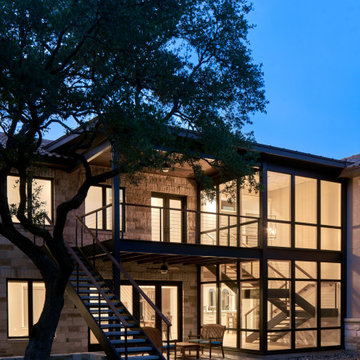
This beautiful traditional hill country-style home highlighted with contemporary elements on a family plot bringing two generations closer together.
Approaching the home, you notice the traditional Texas hill country aesthetics of limestone paired with a metal roof, but these features change as you proceed to the back exterior elevation. The back of the home is composed mostly of glass and steel, to create a luminous harmonization with the outdoors and showcase an open staircase. Integrating these contemporary design elements required much attention to detail from the Burnette team.
 Classic Kitchens Designs & Renovations Ltd.
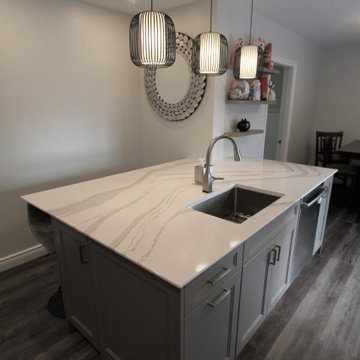
We started with a cool older bungalow that really needed updating, and the eating area to be connected to the kitchen itself, which required the removal of a loadbearing wall and installation of a new support beam. From there, we proceeded to install new waterproof luxury vinyl plank flooring and beautiful cabinetry painted in the customers chosen Benjamin Moore colours with the island with seating area done in a complimentary colour. Stunning Cambria "Brittanica" quartz countertops were then installed, followed by a grey glass subway style backsplash to tie it all together. We also revised the lighting to work with the great new layout and provide more light where it is needed. The end result is transformational and we are pleased that the customers absolutely love it!
 Need For Build- Remodeling Experts
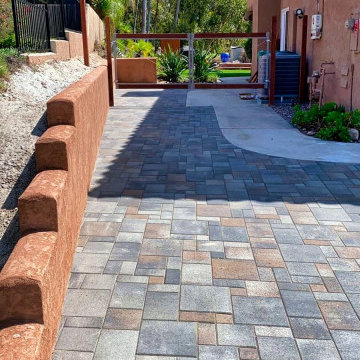
Need For Build did an outstanding job modifying the side yard of our house. The job included clearing large sections of dirt, building a 3' by 50' retaining wall, and installing pavers. The cost estimate came in thousands less than the others I received for the same work. They started on schedule and had a time estimate of 2 to 3 weeks, but they actually finished in only 8 working days. They were very flexible and made changes to the plan at my request as the job proceeded. The work crews were all very polite and helpful; they cleaned up each day and left the final site looking excellent. Another good point is that David was both the salesperson and the project manager so he showed up every day to make sure the progress matched my expectations - I've had other company's sales people disappear once the sale has been made, but not David!

 Tile Doctor Ltd
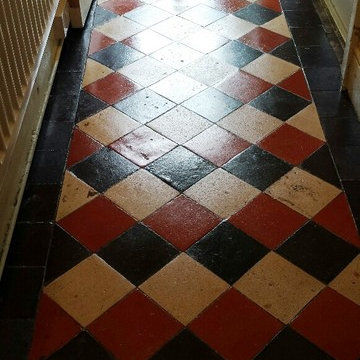
The pictures below were taken at a house in the town of Merthyr Tydfil, which is located not too far north of Cardiff. My client was keen to keep her very old Quarry tiled floor – which dated back to 1905 – intact. The floor had understandably seen a large amount of traffic in its lifetime, and was now in dire need of a professional restoration, including a thorough clean and seal.
First, I completed a survey of the area and provided my client with a quote. After completing many similar jobs in the past, I generally have a good idea of what the final result will look like. I passed on some images of a final result to my client, who was happy for me to begin my work.
On the first day, my first task was to take run some damp tests which were fine; it’s always good to know up front if there are likely to be any damp issues. Next I covered the floor with water to take the surface suction out and waited fifteen minutes before applying a cocktail of Tile Doctor NanoTech Heavy Build-Up cleaner mixed with Pro-Clean and Grout clean-up covering the whole floor. I then immediately starting to work the solution into the floor with a rotary machine fitted with a coarse black pad. The solution was then rinsed off with water which was then extracted with a wet vacuum as I worked. For stubborn areas I applied more of the previously mixed solution scrubbed into the floor with coarse wire wool by hand followed by further rinsing with water.
Each of the products used serves a particular purpose. Pro-Clean is a strong high-alkaline cleaner for natural stone, while NanoTech HBU is a particularly powerful cleaner that uses nano-sized particles to penetrate deep into the stone to get underneath and lift out ingrained dirt and stains. Grout Clean-Up, as the name implies, is a product for resolving grout related problems such as removing grout smears from tile surfaces aka grout haze.
After completing the clean I left the house for 48 hours, to leave enough time for the floor to dry completely in preparation for sealing. Upon my arrival back at the house I conducted some more damp tests to check that the floor was dry enough to seal using the previous readings as a benchmark. The results indicated that I was fine to proceed with the seal, so I applied a total of eight coats of Tile Doctor Seal & Go for durable protection. This was the product I recommended to my client as she wanted a nice, soft shine for her surface seal.
As you can see from the photos, the desired result was achieved to a high standard and needless to say my client was delighted with the transformation.
Julian Iancono
South East Wales
 Envision Web
Stuart Wade, Envision Virtual Tours
Envision Virtual Tours and High Resolution Photography is your best choice to find just what you are looking for in the Ellijay, Ga. area .Ellijay, Georgia, known as the “Apple Capital” of Georgia, is located between the Ellijay and Cartecay Rivers where they join to make the Coosawattee River and is the county seat of Gilmer County, Georgia. The origin of the city’s name is not certain but thought to be the English derivative of an Indian word(s) meaning “many waters”, “place of green things” or “new ground”. Some histories say it may have been named for an Indian chief.
Inhabited for countless years by the Cherokee people indigenous to the North Georgia, the area was first mentioned as a village and trade center before the onslaught of white settlers inhabited the region. During the 1830’s both white settlers and Indians occupied Ellijay. During the original land lottery in 1832, Martin Scalf acquired the 160 acre lot where the town now stands. In 1833, Clemonds Quinland bought 10 acres from Scalf, retained one acre for himself and donated the rest of the purchase to the County. A plan for twenty town lots, streets and a public square was created and the streets were oriented to allow maximum sunlight exposure to the buildings.
Proceeds from lot sales were used to build a jail and courthouse and pay other city expenses. During this same year, Gilmer County was appropriated $800.00 from the State to build a school, and a three-acre lot was donated for the city cemetery. On December 29, l834, Ellijay was incorporated and designated as the County seat of Gilmer County. By 1837, the town had twenty dwellings, three stores and one attorney. Most of these early buildings were of log construction.
Many roads led to Ellijay by 1849. The population had grown to 150 by 1850 and the town at five stores. Some wood-frame buildings were being constructed at this time and in 1854, a new courthouse was built in the center of the square, replacing the earlier building. The County’s first newspaper was the Ellijay Courier, started in 1875, and during this time period, Ellijay was a stop on the stagecoach line. The railroad bridge over the Cartecay River was completed in 1884 and the town now had rail service.
With the arrival of the railroad and subsequent tracks to White Path, Ellijay began to grow much faster. Many hotels were constructed and land was donated for a depot east of town. More industries, such as a cheese factory and the Shippen Brothers Lumber Mill, located in Ellijay. By 1898, the city had expanded its limits in every direction and now included the depot.
By 1900, all the buildings on the town square were brick. This included the recently completed Hyatt Hotel. Most of the other buildings in town were still of log construction, but new wood-frame buildings were being built. The Shippen Brothers Lumber Company production was expanding and exporting their lumber to Europe. Within the next few decades, this company grew to be one of the largest employers in Ellijay, often with five to six million feet of lumber in the yard at one time.
The population of Ellijay grew to 659 by 1910, and began to acquire many new modern conveniences such as electric lights and power, a telephone company and many new businesses.
Then in 1912, a fire ravaged the city, destroying 23 buildings. As a result, many new buildings were constructed under new and stricter fire and safety guidelines. The population, however, decreased slightly at this time to 632 in 1920.
During the 1920’s the town’s population began to grow again and, by this time, apples were being shipped out of the county and new storage facilities were built. Chickens were also shipped to markets outside of Ellijay and Gilmer County.
From the mid 1930’s to 1950, Ellijay received much assistance from the Federal WPA Programs. The old courthouse was removed from the center of town square and the Hyatt Hotel was remodeled to be the new courthouse. A park was created on the site of the old courthouse and the streets around the square were paved. A new street was built at this time entering town from the northeast. Other new roads, bridges, sidewalks and gutters were constructed to improve the city. A school and gymnasium were also built and other structures improved.
This growth began to impact the city’s infrastructure and in the l950’s and l960’s, a period of upgrading water systems, roads, and power supplies began. New low-rent housing appeared in l960 and a new hospital was built in l957. Georgia Highway 5 was widened in l962, new buildings around the square replaced old ones and some were remodeled. In 1974, the hospital was enlarged.
Currently, Ellijay attracts tourists who love the small-town feel and friendly atmosphere. Hotels and restaurants, unique shops, antiques and art galleries lend their charms to those who visit. A new courthouse constructed to resemble the old one, new streetscaping, family-oriented downtown events and the beautification of the square have stepped up the social and economic activity and have made Ellijay a popular destination.
18