


Search results for "Proceed" in Home Design Ideas
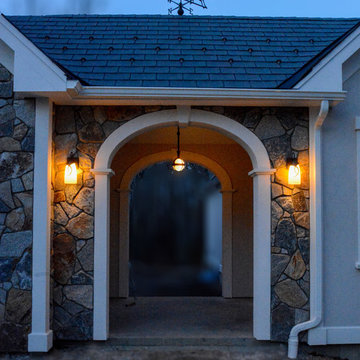
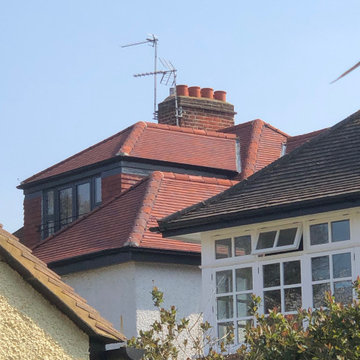
The portico, separating the main house from the garage, photo, like the photo proceeding, taken late in construction. The front porch, not shown here
is well lit and the entire house should cast a warm, welcoming glow from the extensive exterior lighting.
Free ebook, Creating the Ideal Kitchen. DOWNLOAD NOW
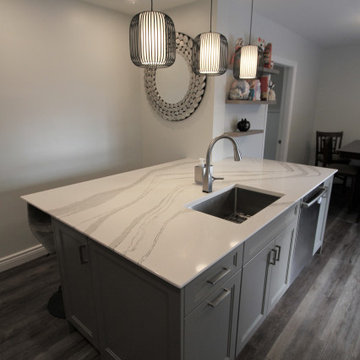
One of my very favorite parts of the design process is space planning and considering all the possible floor plan solutions at the beginning stages of the project. What works for one person as a solution may not be the best solution for the next. What you think you want going into the process, may change once all the space planning options are considered. This was exactly the case for this family. They thought they really wanted an island configuration.
Once we figured out the flow of the work triangle and saw how great a large peninsula would work for the family, we proceeded along those lines. The peninsula not only works great for food prep, it also allows more of a traditional table seating versus an island with everyone lined up in a row — not so great for daily dinner conversation.
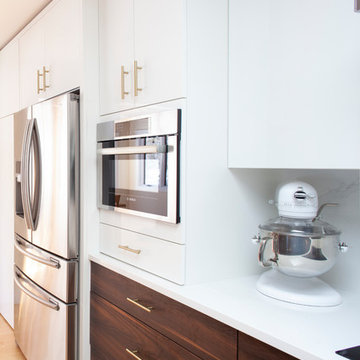
To the right of that is a counter depth fridge and a speed oven which gives some flexibility with cooking and reheating smaller meals instead of having to heat the entire oven. An induction cooktop with its easy to clean surface keeps the space looking clean and tidy. Induction heats very quickly to high temperatures so is also wonderful to cook on. To the right of cooktop is a long stretch of countertop perfect for prep space.
Storage was very important to the homeowners. We took our time discussing where spice pull outs and tray dividers would be located, how the corner storage would be addressed and the location of the other items such as trash and recycling cans. We worked as many drawers as possible into the space, as I always recommend drawers over doors and/or roll outs as they offer the most flexibility and ease of use. Customizing these details is time well spent as having a place for everything and everything in its place, just like Mom said, really is the key to a functional and professionally designed kitchen.
The talls and wall cabinets are white acrylic which combined with the white marble look quartz countertops and full height backsplash keep the room feeling light, bright and airy. The wood toned base cabinets are made of a textured laminate that has the look of wood but is a very easy to maintain product. Brushed gold metal on the hardware, faucet and chandelier add a warm touch and ties into the blond maple flooring. The neighboring breakfast room was also remodeled as part of the project and houses a small coffee station.
Designed by: Susan Klimala, CKBD
Photography by: Kari Firak
For more information on kitchen and bath design ideas go to: www.kitchenstudio-ge.com

Advice on interior design is available everywhere—from TV shows and websites to books, magazines and apps.
We love seeing people become engaged in design and educated on the wide range of possibilities. But we hope you’ll proceed with caution.
It’s not that style errors are a matter of life and death. It’s just that it’s easy to choose designs that aren’t necessarily reflective of your own personality and character. And since you’re typically stuck with your interior design decisions for years, styles that don’t quite fit can tend to grate on you.
Interiors that give one person comfort may unleash chaos in someone else. This goes beyond favorite colors or hot trends, right to the heart of interior design, where you find questions of composition, balance, repetition, space and more.
The goal is to find that unique combination of design elements that gives you comfort, support and balance.
In one home, that perfect balance was struck through the use of symmetry. A pair of comfortable swivel chairs sit beneath matching indigo patterned paintings. Matching bookcases below the paintings contain similar, but not identical, arrangements of books, vases and bowls. Woods and bronzes help warm up the simple white bookcase shelving.
Two matching poufs in front of the fireplace provide additional seating. The sofa is accented with a pair of pillows with a blue pattern that echoes the artwork.
The effect of the symmetry is to achieve order and simplicity, which I promote at every opportunity. After all, your home interiors should be the setting or the backdrop of your life—not center stage.
Antique bronze and blue are complementary colors. Together, they offer a rich palette of richness and depth, which brings out the beauty of wood and stone.
In the home office, a unique, whitewash-stained wooden desk rests on metal, Sawhorse-inspired legs for a warm, rustic look. The black leather chair features a contemporary silhouette with an antique brass frame. An adjustable desk lamp has bronze accents.
The bookcase combines a sleek, black metal frame with concrete shelves, for another unusual pairing. It’s kept uncluttered for an orderly, peaceful look. Items on the shelves include a bronze-accented lamp and a pair
of high gloss-finished wooden bookends.
The elegant artwork behind the desk is a simple midnight-blue and bronze with mottled white. Deep blues are again picked up in the rug, which adds a stately vibe with a modern pattern and satisfying texture.
Within the framework of symmetry, the living room repeats the blue-and-bronze color scheme.
A large midcentury brass clock above the fireplace keeps the natural stone visible, rather than hidden behind a painting or television, while its straight lines and color create a beautiful contrast.
The sofa is a soft, neutral blue. The pattern on the round brass side table features echoes the darker blue-patterned rug, as well as the rug in the office, tying the rooms together.
Indigo blue books adjacent to bronze vases on the shelves repeat the color scheme. The soapstone-topped coffee table echoes the shape of the fireplace. A pair of tall, matching floor lamps with long wooden bases, brass pulls and simple linen shades combine both the colors and symmetry found throughout the home.
Find the right local pro for your project

Mike and Anne of Barrington Hills desperately needed to update and renovate both their kid’s hall bath and guest bath, and in their 1980’s home each project presented a different set of unique challenges to overcome. When they set out to identify the right remodeling company to partner with, it was important to find a company that could help them to visualize design solutions for the bath renovations. When they came across Advance Design Studio’s website, they were immediately drawn to the solution-oriented remodeling process and the family friendly company.
They say they chose Advance Design because of the integrated approach of “Common Sense Remodeling”, making the design, project management and construction all happen in one place. When they met with Project Designer Michelle Lecinski, they knew they chose the right company. “Michelle’s excellent work on the initial designs made it easy to proceed with Advance Design Studio,” Mike said.
Like most homeowners anticipating a big renovation project, they had some healthy fears; with two bathrooms being remodeled at the same time they worried about timeframes and staying within budget. With the help of Michelle, and the “Common Sense” guidelines, they were confident that Advance Design would stay true, orchestrating all the moving parts to stay within both the estimated timeline and budget.
The guest bath offered the biggest design challenge. A dormer obstruction made the already cramped shower awkward to access. Mike and Anne also wanted the shower size to be expanded, making it more accommodating. Working with Advance’s construction expert DJ Yurik, Michelle relocated the shower concealing the original dormer and creating a larger, more comfortable and aesthetically pleasing guest shower.
The unsightly and not at all user-friendly closet was removed and replaced with elegant White Maple Dura Supreme cabinetry with much improved function featuring dual tall linen cabinets, a special makeup area and two sinks, providing a dual vanity which was extremely important for better guest use.
The Fossil Brown quartz countertop is in pleasing contrast to the white cabinetry, and coordinates nicely with the mocha porcelain tile gracing the shower for an accent. The decorative glazed turquoise tile backsplash, tile border, and bottle niche adds a taste of marine green to the room, while marble-looking porcelain tile makes guests feel they are staying in a 5-star hotel. Polished nickel Kohler plumbing fixtures were chosen to add a touch of sophistication. This renovated guest bath is comfortable and elegant, and Anne and Mike’s house guests may never want to leave!
“The end result was updated and restyled bathrooms that the client will enjoy and increase the value of their home,” Designer Michelle said.
The children’s hall bath had its own set of challenges. The current placement of the sink was not conducive to the best use of the existing space, nor did it allow for any visual interest, something Advance’s designers always work to achieve even within the tight confines of a small bath. Advance removed the linen closet and used the gain in wall space to create a dramatic focal point on the vanity wall. They also took additional space that wasn’t being used for new Storm Gray Dura Supreme tall built-in linen cabinets, creating functional storage space that the former bath lacked. A customized glass splash panel was created for the bath, and the high ceilings with skylights were accented with a custom-made track lighting fixture featuring industrial pipe and cage materials.
Authentic cement encaustic tile was used wall to wall surrounding the vanity to create a dramatic and interesting back drop for the new elegant and stately furniture-like double sink wall. Hand-made encaustic tile originated in Western Europe beginning in the 1850’s and reminded Mike and Anne of tile they had seen and loved from their travels overseas. Today, encaustic tile has made a re-appearance in today’s modern bath design with its wide array of appealing patterns and artistic use of color.
Oil rubbed bronze Kohler fixtures echo the black accents in the beautiful tile pattern and reflect the matte black of the unique lighting detail. Easy to maintain Blanca Arabescato Quartz countertops add practicality and natural beauty and compliments the warm wood porcelain tile floors. This handsome bath has generated praise from friends and family even before it’s complete unveiling as photos of the space leaked out on social media! It’s not only completely functional to use, but especially pretty to look at.
“Advance Design Studio did a terrific job for us. We really appreciated how easy it was to work with them on a complex project of the complete remodeling of two bathrooms. They very capably handled all the details from design, to project management, to construction. It is a great group of people to work with and we would welcome the opportunity to work with them again anytime,” Mike said.
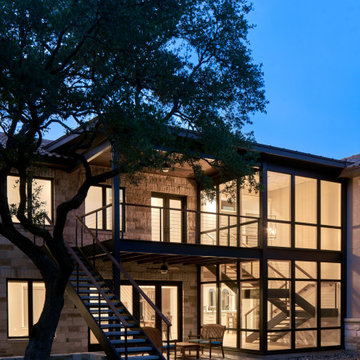
This beautiful traditional hill country-style home highlighted with contemporary elements on a family plot bringing two generations closer together.
Approaching the home, you notice the traditional Texas hill country aesthetics of limestone paired with a metal roof, but these features change as you proceed to the back exterior elevation. The back of the home is composed mostly of glass and steel, to create a luminous harmonization with the outdoors and showcase an open staircase. Integrating these contemporary design elements required much attention to detail from the Burnette team.
With overwhelming support by the community who dug deep and donated, the 2017 Central Valley St. Jude Dream Home Giveaway successfully raised $961,100 for St. Jude Children’s Research Hospital! Since 2007, De Young Properties has been a major donor and builder of 11 St. Jude Dream Homes, helping to raise $10,671,445 to help the kids of St. Jude fight cancer and other life-threatening childhood diseases. One hundred percent of the proceeds will be donated to St. Jude Children’s Research Hospital, which works around the clock to develop cures to save the lives of boys and girls, including children in the San Joaquin Valley.
"Lick Mansion", the Austin Barkitecture Entry from the team at RRS Design + Build, makes its way to its new home. The dog house was auctioned off for charity and the proceeds benefited local rescue groups.
Stuart Wade, Envision Virtual Tours
Ellijay, Georgia, known as the “Apple Capital” of Georgia, is located between the Ellijay and Cartecay Rivers where they join to make the Coosawattee River and is the county seat of Gilmer County, Georgia. The origin of the city’s name is not certain but thought to be the English derivative of an Indian word(s) meaning “many waters”, “place of green things” or “new ground”. Some histories say it may have been named for an Indian chief.
Inhabited for countless years by the Cherokee people indigenous to the North Georgia, the area was first mentioned as a village and trade center before the onslaught of white settlers inhabited the region. During the 1830’s both white settlers and Indians occupied Ellijay. During the original land lottery in 1832, Martin Scalf acquired the 160 acre lot where the town now stands. In 1833, Clemonds Quinland bought 10 acres from Scalf, retained one acre for himself and donated the rest of the purchase to the County. A plan for twenty town lots, streets and a public square was created and the streets were oriented to allow maximum sunlight exposure to the buildings.
Proceeds from lot sales were used to build a jail and courthouse and pay other city expenses. During this same year, Gilmer County was appropriated $800.00 from the State to build a school, and a three-acre lot was donated for the city cemetery. On December 29, l834, Ellijay was incorporated and designated as the County seat of Gilmer County. By 1837, the town had twenty dwellings, three stores and one attorney. Most of these early buildings were of log construction.
Many roads led to Ellijay by 1849. The population had grown to 150 by 1850 and the town at five stores. Some wood-frame buildings were being constructed at this time and in 1854, a new courthouse was built in the center of the square, replacing the earlier building. The County’s first newspaper was the Ellijay Courier, started in 1875, and during this time period, Ellijay was a stop on the stagecoach line. The railroad bridge over the Cartecay River was completed in 1884 and the town now had rail service.
With the arrival of the railroad and subsequent tracks to White Path, Ellijay began to grow much faster. Many hotels were constructed and land was donated for a depot east of town. More industries, such as a cheese factory and the Shippen Brothers Lumber Mill, located in Ellijay. By 1898, the city had expanded its limits in every direction and now included the depot.
By 1900, all the buildings on the town square were brick. This included the recently completed Hyatt Hotel. Most of the other buildings in town were still of log construction, but new wood-frame buildings were being built. The Shippen Brothers Lumber Company production was expanding and exporting their lumber to Europe. Within the next few decades, this company grew to be one of the largest employers in Ellijay, often with five to six million feet of lumber in the yard at one time.
The population of Ellijay grew to 659 by 1910, and began to acquire many new modern conveniences such as electric lights and power, a telephone company and many new businesses.
Then in 1912, a fire ravaged the city, destroying 23 buildings. As a result, many new buildings were constructed under new and stricter fire and safety guidelines. The population, however, decreased slightly at this time to 632 in 1920.
During the 1920’s the town’s population began to grow again and, by this time, apples were being shipped out of the county and new storage facilities were built. Chickens were also shipped to markets outside of Ellijay and Gilmer County.
From the mid 1930’s to 1950, Ellijay received much assistance from the Federal WPA Programs. The old courthouse was removed from the center of town square and the Hyatt Hotel was remodeled to be the new courthouse. A park was created on the site of the old courthouse and the streets around the square were paved. A new street was built at this time entering town from the northeast. Other new roads, bridges, sidewalks and gutters were constructed to improve the city. A school and gymnasium were also built and other structures improved.
This growth began to impact the city’s infrastructure and in the l950’s and l960’s, a period of upgrading water systems, roads, and power supplies began. New low-rent housing appeared in l960 and a new hospital was built in l957. Georgia Highway 5 was widened in l962, new buildings around the square replaced old ones and some were remodeled. In 1974, the hospital was enlarged.
Currently, Ellijay attracts tourists who love the small-town feel and friendly atmosphere. Hotels and restaurants, unique shops, antiques and art galleries lend their charms to those who visit. A new courthouse constructed to resemble the old one, new streetscaping, family-oriented downtown events and the beautification of the square have stepped up the social and economic activity and have made Ellijay a popular destination.

Tax problems can pop up suddenly and cause your organization and you a lot of trouble. Browse this site https://losangeles-tax-attorneys.com/offer-in-compromise-settling-for-less/ for more information on IRS tax Attorney. IRS tax Attorney is an integral part of tax proceedings and tax planning. Whether you want to contest a tax liability, get sound advice or begin using a payment plan, you will be able to feel at ease when you use a tax professional.
Follow Us: https://taxattorneyslosangeles.wordpress.com/
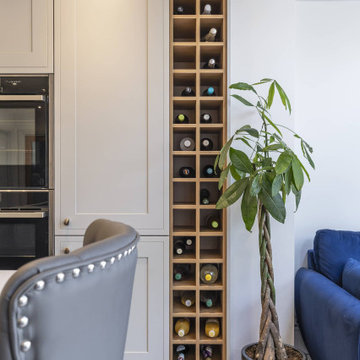
Our vision was to create a kitchen that would captivate the senses and elevate the culinary experience for our client. With this goal in mind, we curated a selection of premium elements that would set this kitchen apart.
Your eyes are immediately drawn to the magnificent floor-to-ceiling wine rack, which adds a touch of luxury to the space.
We have installed two state-of-the-art Neff double ovens to ensure that every culinary creation is executed flawlessly. These ovens offer unparalleled precision and control, allowing you to bring your culinary visions to life effortlessly, via sleek design and advanced functionality.
In the heart of the kitchen stands a contrasting blue island – a striking centrepiece. This bold choice adds a vibrant splash of colour to the space while creating a captivating focal point. The contrasting blue island adds not only visual interest but also provides ample workspace for your culinary endeavours.
Practicality meets luxury with the abundance of additional storage in this kitchen design. From concealed cabinets to spacious drawers, every inch of the kitchen has been optimised for maximum storage. Furthermore, nestled within the blue island, you'll find a wine fridge to keep your favourite vintages perfectly chilled and ready to be savoured.
Efficiency and convenience were paramount when designing this kitchen. The double sink offers ample room for food preparation and clean-up, ensuring a seamless cooking experience. We have also included a Quooker tap, providing instant boiling water. Say goodbye to waiting for the kettle to boil and embrace the convenience of modern technology.
Cooking should be an immersive experience. That's why we have incorporated a cutting-edge Bora hob into this kitchen project. The Bora hob combines innovative design with powerful extraction, ensuring a smoke and odour-free cooking environment. Relish the chance to be creative in the kitchen, while revelling in the exquisite aesthetics of this sleek and efficient cooking surface.
Completing the picture of timeless elegance is the white quartz worktop and splashback, crafted with the utmost precision. The white quartz worktop provides a pristine canvas for your culinary creations, while the splashback adds a touch of glamour and protects the walls from splatters and stains. With their seamless integration into the overall design, these elements elevate the kitchen's aesthetic appeal.
“Having a new kitchen is a huge investment and something you want to get absolutely right. I can honestly say that we are delighted with our Ridgeway kitchen, having been messed around by another company. We were so pleased to meet Jim he was amazing, he really took on board what we wanted and how the kitchen needed to work for our family and home environment. He came up with a design we loved and he managed to work this within our budget. Nothing was too much for Jim, changes were made, I regularly contacted him and he always got back to me promptly with excellent customer service. There was never any pressure to proceed. Jim followed the kitchen project all the way through the process. He was very knowledgeable, with high expectations for our kitchen and was able to offer sound advice which has resulted in a fantastic kitchen”
Looking for more kitchen ideas? Check our projects page for more design inspiration.
Cozy Chic - While the entire condo is under 1000 sq ft, there's no dearth of chicness. The ultra-modern kitchen has enough room to host an intimate gathering with a large island while it looks sharp with stainless appliances against a backdrop of a darker backsplash. The living room with its vibrant color palette, luxurious rug and comfortable seating continues the theme of intimate conversations in a chic setting.
The artwork in the living room and the bedroom reflects the playful personalities of the owners accompanied by hints of old fashioned charm. The glam bathroom adds a touch of royalty to the entire proceedings with hand-selected mirror, wall paper and sconce lights in the right shades of gold.
The project reflects Spaces Designed's philosophy of designing spaces to not only meet the needs of it's clients but also their personalities and sensibilities. Every space, small or large, has it's own purpose and character - our role is to identify that and meticulously craft the outcome.
Job type: Side & Rear dormer loft conversion
Property type: Semi-detached
Reason for loft conversion: Home working
Project spec: Standard Spec
Extra features: Juliet balcony
Client Feedback: “We are very happy about the loft. We have created a working space and we are now enjoying the extra value. Thank you City Lofts London”
Project Manager’s perspective: “Works have proceeded smoothly. We are very proud of the result.. we’re happy that our client is very happy with it”
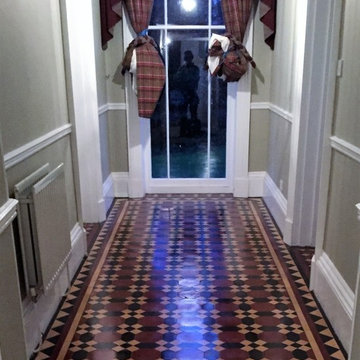
It’s fairly common for owners of older properties – especially houses those that are over 100 years old or more – to find original Victorian tiled flooring hidden underneath carpet. It can wait years for the tiles to be discovered, by which time they have amassed huge amounts of dirt and dust.
Such was the case at this property in Bridlington, a Yorkshire town through which a stream known as the ‘Gypsey Race’ runs, before emptying in the North Sea at the Bridlington Harbour. Interestingly enough, folklore says that when the stream is flowing, bad fortune is at hand. The stream must not have been running on the day that we restored this Victorian hallway, as we managed to achieve some truly fantastic results!!
The hallway had been severely dulled after going years without professional care. We set about giving it the thorough clean and fresh seal that I’d des partly needed. Here’s how we did it.
Our first task was to remove any old, no longer effectual sealer. We did this by liberally applying a strong dilution of our alkaline-based Tile a Doctor Pro Clean, which doubles as a reliable cleaner and a stripper capable of stripping away old sealer. The product was worked into the tiles using a black stripping pad fitted to a 17″ rotary machine, and the process was repeated three times.
I noticed that there was still some stubborn dirt and old sealer around the edges of the hallway, so I used some of our handheld diamond encrusted burnishing blocks to grind it away. To finish the cleaning process, we washed the floor with Tile Doctor pH Neutral Tile Cleaner, leaving it fresh and ready to be sealed once left to dry overnight.
Upon our return to the property the next day, we ran some quick tests to check for any excess moisture (even a small amount could have damaged the performance of the new sealer). Once satisfied with the the condition of the floor, we proceeded to see it with an impregnating sealer, meaning a sealer that penetrates into the pores of the tile to fill them and therefore prevent trapped dirt and ingrained stains.
Our impregnating sealer, Tile Doctor Colour Grow, has the added benefit of being colour intensifying, which really highlights the unique colourful patterns of the tiles. To give the floor a durable sheen finish, as requested by the customer, we also added a coat of Tile Doctor Seal and Go sealer.
The result was a complete transformation of the condition and appearance of this great Victorian tiled hallway. Our customer is very pleased – the floor is now a complete asset to any property, and will now be easier to keep looking great in future.
Ronnie Phipps
East Yorkshire Tile Doctor
We started with a cool older bungalow that really needed updating, and the eating area to be connected to the kitchen itself, which required the removal of a loadbearing wall and installation of a new support beam. From there, we proceeded to install new waterproof luxury vinyl plank flooring and beautiful cabinetry painted in the customers chosen Benjamin Moore colours with the island with seating area done in a complimentary colour. Stunning Cambria "Brittanica" quartz countertops were then installed, followed by a grey glass subway style backsplash to tie it all together. We also revised the lighting to work with the great new layout and provide more light where it is needed. The end result is transformational and we are pleased that the customers absolutely love it!
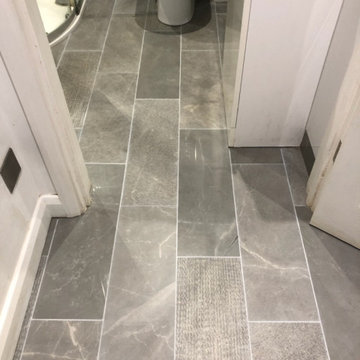
The pictures below detail the renovation of a Porcelain Tiled Floor I completed at a property in Ipswich. Installed throughout the Kitchen and into the adjacent WC the porcelain tile and grout were in a very dirty state and the client was desperate to get them clean. The situation wasn’t helped by their two dogs with grubby paws. She had tried all the usual household cleaners she could find, and nothing seemed to work. Unfortunately, household cleaners can make the problem worse due the strong chemicals they contain.
I visited the property to survey the floor and was able to reassure the client that although the grout was heavily stained it could be renovated by recolouring it with a Tile Doctor Grout Colourant. I was confident we would soon be able to get the floor looking great again and demonstrated the process I would use on a small part of the floor. The demonstration went well and happy with the result we agreed a date for my return the following week to complete the work which should be completed in a single day.
Returning on the agreed date we started by protecting the by applying a clear silicone sealant to the MDF skirting boards and kitchen base units. We left this to dry for an hour before proceeding with the cleaning.
The Porcelain tile and grout was cleaned with a strong dilution of Tile Doctor Pro-Clean using 3 parts cleaner to 5 parts water. The solution was applied to the tile and grout and then left to soak in for ten minutes before being worked in using a rotary machine fitted with a Black Scrubbing Pad. Tile Doctor Pro-Clean is a concentrated, multi-purpose high-alkaline cleaner which is designed for deep cleaning tile, stone and grout of dirt and grease and can also remove sealers.
Pads can struggle to reach into the recesses of the grout line so once I was finished with the tile, I hand scrubbed the grout with a wire brush. The floor was then rinsed with water and the resultant slurry extracted off the floor with wet vacuum.
The floor took about three hours to deep clean which was just the right timing for us to have lunch whilst the floor dried. The grout was much improved by the cleaning process but as suspected there were too many deep-seated stains to be able to guarantee a consistent finish. So as previously agreed with the client we set about colouring the grout using a light grey colourant. This took most of the afternoon as there was a lot of grout.
The Porcelain tiles were the non-porous type that won’t take a sealer and the colourant acts as a barrier over the grout protecting it and making it easy to clean so once I was done colouring there was no need to apply a sealer.
My client was relieved to have the floor looking clean and presentable again. For aftercare I recommended that moving forward it would be best to use Tile Doctor Neutral Tile Cleaner which is a pH neutral cleaner. This will ensure that with regular cleaning the floor will keep clean and the grout won’t be compromised by overly strong products.
Bruce Copping
Suffolk Tile Doctor
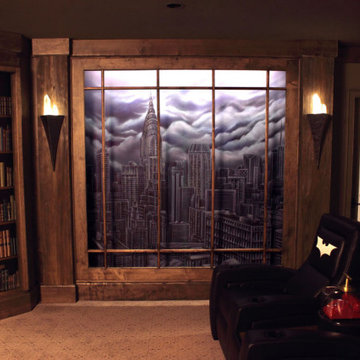
Transitional Architectural Theatre Lighting & Interior Design
This Batman themed theater was not part of the original theater plans. I was hired by the owners to do lighting design for their new construction home. In my first preliminary lighting plan presentation the husband expressed his passion for a Batman themed theater and showed me an image of a Batman themed theater he liked. Which he followed up to say it was out of his budget.
I was hired for lighting design. What the owners did not know was that I have an interior design degree. I asked what amount he was willing to spend for a Batman themed theatre. I knew I could design the theatre for a quarter of the cost of the theatre he had shown me. I felt comfortable saying I could design lighting and interiors for the theatre within their budget.
I proceeded with bringing in my team of artists to review the images of his Batman comic magazine collection that had to be in the theater: Batcave, Wayne Manor, Lincoln Penney, Bat phone and the Joker.
As the images indicate, we succeeded in designing and installing the Batman themed theatre to meet the client's criteria.
At the owner’s request: Linear LEDs lit the Batcave faux wall murals of stone and Wayne Manor aged wood columns, custom crystal wall sconces, and a library with a life size Batman costume hidden behind a false bookcase. A false wooden window with a Gotham City Mural of the Bat signal were revealed by using ultraviolet black lights.
It was a fun project but could not have been accomplished without a team of excellent artists, building contractors, A.V. control company, millwork fabricators and electricians.
Lighting Designer: John Rogers Design
Interior Design Concept & Millwork Design: John Rogers Design
Faux stone and murals Artist: Robin Tucker
Builder: Richard Harp Homes https://www.richardharphomes.com
A.V. Company:
Electrical:
Photographer: John Watson
Published
AY Magazine
The 2016 Christopher Showhouse was designed by renowned national firm, Christopher Architecture and Interiors. Proceeds from the open house tours benefited Open Hands Overflowing Hearts, a local charity helping fund pediatric cancer research.
The project showcased the designs of Christopher Architecture and Interiors and highlighted local, regional and national vendors, suppliers and contractors. FireRock was honored to have three products selected for the home: an indoor masonry fireplace, an outdoor masonry fireplace and all solid hardwood flooring.
Showing Results for "Proceed"
Line drawing of the magnificent bar with flyover cornice, framed mirrors, lighted bottle shelves and generous elbow room for four stools. The carved lion pilasters lend both gravitas & whimsy to the proceedings.
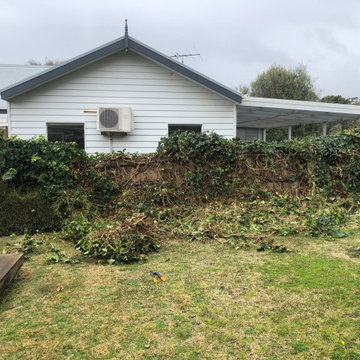
The clients was in dire need of a new boundary fence between their properties. The old fence was completely consumed by ivy and had no structural support other than the ivy it self.
The solution was simple but the process was very labour intenive. We began with clearing as much of the ivy as we could.
As the ivy was cut back the old palings and rails came of with it leaving the old timber posts expposed.
The posts were completly rotten and soil level and came out quite easily.
Once the fence line was cleared out we could then proceed to with the new fence build.
40