
Search results for "Proceeds" in Home Design Ideas
 LR Home
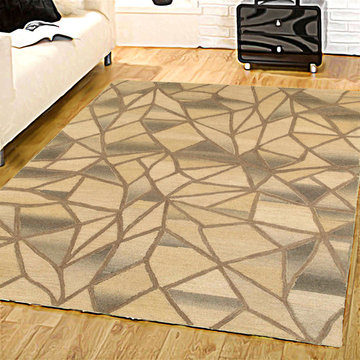
"Integrity" displays intricately beautiful rugs with a geometric uniqueness, perfect for adding a spark to your living space. This collection offers a spectrum of hues and patterns, making it impossible not to find the perfect one for you. True to it's name, a percentage of the collection's proceeds will go toward funding care for our veterans through "Wounded Warrior Project." Pieces such as these can pull together any area in your home, as well as helping those who have risked their lives pulling together our nation.
 Linda Edelwich Realtor
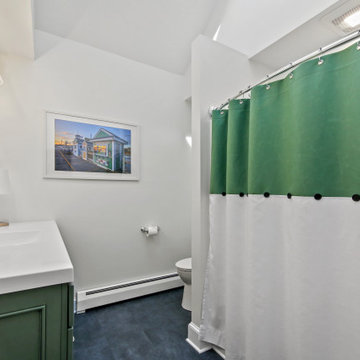
Nestled on 2.57 private acres in a highly sought-after neighborhood adjacent to Glastonbury line, this meticulously maintained custom home welcomes you through gracious double doors into a residence that emanates coastal charm. Richly toned floors contrast beautifully w/crisp neutral walls throughout, while the front-to-back living room serves as a stunning centerpiece w/its elegant gas-fireplace & French doors on either side opening to a screened porch-creating a delightful cross-breeze when open. No popcorn ceilings here! Open floor plan features a versatile home office with built-ins, flowing seamlessly into a gourmet kitchen showcasing a stylish island, custom cabinetry, & stainless-steel appliances adjacent to an expansive dining area w/stylish twin chandeliers. Practical luxury continues with a generous walk-in pantry & custom drop zone with shiplap detailing and shoe cubbies near the three-car garage with soaring ceilings. Upstairs, discover a sumptuous primary suite featuring a stylishly remodeled bathroom w/walk-in shower. Also complemented by a spacious walk-in closet & window flanked by custom built-ins, while two additional bedrooms share another beautifully updated bathroom & convenient 2nd-floor laundry. Additional space w/an unfinished walk-up attic & 880sf of finished extra living space in the walk-out lower level, complete with built in sauna, laminate flooring and ample storage-all crowned by the property's signature wrap-around porch. Roof '17
 Tile Doctor Ltd
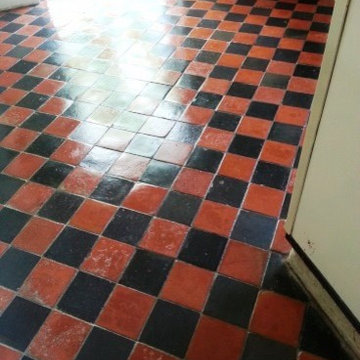
We were asked to restore a beautiful Victorian tiled floor at a house in the small village of Sharnbrook, Bedfordshire. The floor had been badly treated for many years until new occupiers decided to restore it.
The area comprised of a Pantry, Loo, Lobby, Dining room, Kitchen and Conservatory, we had several problems to deal with including some tiles that were loose, some had cement on them and the dining room floor had the remnants of a coir rug stuck to the surface.
Having moved all the furniture we started from the far end pre-treating the coir matted dining room tiles by soaking them in a strong dilution of Tile Doctor Pro-Clean; leaving them to soak in this way would soften up the matting and enabled us to remove the debris more easily with a scrapper by the time we got to the dining room.
We then started on the rest of the floor again using a strong dilution of Tile Doctor Pro-Clean which was left to dwell on the tile for ten minutes before being worked in using a scrubbing pad until any remaining old sealer was stripped off the tile the tiles were clean.
For the tiles which were covered in cement we treated them with an acid rinse using Tile Doctor Grout Clean-Up, being an acid you have to take care and wear appropriate personal protection and not to leave the acid on the tile for too long. It was satisfying however to watch the cement fizz away to reveal the beautiful tile below.
Once everything was stripped and the floor clean we gave the tiles a thorough rinse and extracted as much water from the floor as possible before installing a number of and air movers to speed up the drying process.
Whilst the floor was drying our attention moved onto the replacement of the lose tiles and re-adhering them to the floor. This was a straight forward job using tile adhesive and matching grout and we then left to allow the floor to dry out thoroughly.
We returned seven days later and took more damp readings, these all read ok so we proceeded to seal the floor. First we used a coat of Tile Doctor Colour Grow which is an impregnating sealer the gets into the pores of the tile protecting it from within and also enhancing the colours in the tile in the process; this was then followed with four coats of Tile Doctor Seal and Go to leave a high shine finish as requested by the client.
Find the right local pro for your project
 United Home Experts
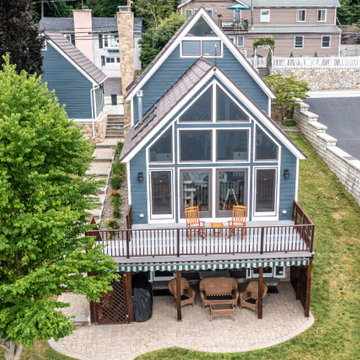
This beautiful, lakeside, colonial located in Hopkinton, MA underwent one of the most beautiful siding transformations of the year using our GorillaPlank™ Siding System.
Built in 1940, this lakeside home in Hopkinton, MA had old scalloped cedar shakes that had become old and worn out. The homeowners considered painting again, but did not want the costly expense of having to paint again, so they decided it was time to renovate and modernize their living space with a low-maintenance siding that closely resembled the appearance of wood.
Everlast Composite Siding was the siding of choice using our GorillaPlank™ Siding System.
Before installing the GorillaPlank™ Siding System, our expert team of installers went to work by stripping down the existing cedar shingles and clapboards down to the sheathing.
After verifying the underlying condition of the sheathing, our team went ahead and set staging to protect the beautiful metal roofs, then proceeded to install the moisture barrier to protect the sheathing, and then installed insulation for added protection and comfort.
Their house is now featuring Everlast Composite Siding in the 7” exposure of one of the newest colors, Blue Spruce!
 ED Enterprises, Inc.
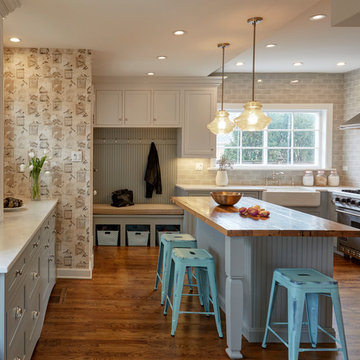
We understood the customer's dream to remove an existing closet and several walls.
We began with the removal of several structural walls and closet. We found that the previous contractor had incorrectly removed structural wood posts. We secured the structural integrity of the building with wood and steel.
We proceeded to expand the opening between
the Kitchen and Butler Pantry, which included relocating waste and water lines from the second floor.
We upgraded the existing electrical and installed a 440-volt electrical system for the entire home.
You can enjoy the illumination of the cabinetry and kitchen, by the pendant lights, recessed lights, under cabinet lights, and curio lights in the glass door cabinets,
Note the brick pattern Subway tile from the counter top to the ceiling, in the kitchen and the Butler Pantry. Take special notice of the decorative tile area above the range.
The chimney style hood was vented to the exterior.
The unique sitting area, near the rear entry, was finished with beadboard paneling and wall cabinets up to the ceiling., trimmed with crown molding.
General Contractor / Remodel: E D Enterprises, Inc.
Michael Alan Kaskel Photography
 Linda Edelwich Realtor
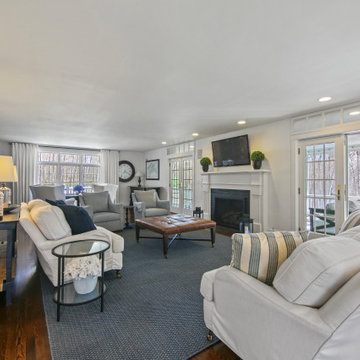
Nestled on 2.57 private acres in a highly sought-after neighborhood adjacent to Glastonbury line, this meticulously maintained custom home welcomes you through gracious double doors into a residence that emanates coastal charm. Richly toned floors contrast beautifully w/crisp neutral walls throughout, while the front-to-back living room serves as a stunning centerpiece w/its elegant gas-fireplace & French doors on either side opening to a screened porch-creating a delightful cross-breeze when open. No popcorn ceilings here! Open floor plan features a versatile home office with built-ins, flowing seamlessly into a gourmet kitchen showcasing a stylish island, custom cabinetry, & stainless-steel appliances adjacent to an expansive dining area w/stylish twin chandeliers. Practical luxury continues with a generous walk-in pantry & custom drop zone with shiplap detailing and shoe cubbies near the three-car garage with soaring ceilings. Upstairs, discover a sumptuous primary suite featuring a stylishly remodeled bathroom w/walk-in shower. Also complemented by a spacious walk-in closet & window flanked by custom built-ins, while two additional bedrooms share another beautifully updated bathroom & convenient 2nd-floor laundry. Additional space w/an unfinished walk-up attic & 880sf of finished extra living space in the walk-out lower level, complete with built in sauna, laminate flooring and ample storage-all crowned by the property's signature wrap-around porch. Roof '17
 John Rogers Design
Transitional Architectural Theatre Lighting & Interior Design
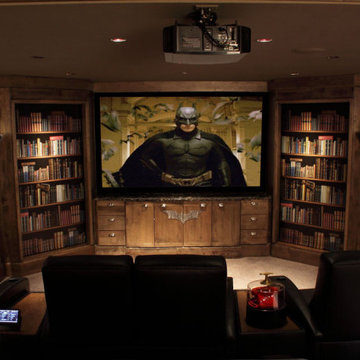
This Batman themed theater was not part of the original theater plans. I was hired by the owners to do lighting design for their new construction home. In my first preliminary lighting plan presentation the husband expressed his passion for a Batman themed theater and showed me an image of a Batman themed theater he liked. Which he followed up to say it was out of his budget.
I was hired for lighting design. What the owners did not know was that I have an interior design degree. I asked what amount he was willing to spend for a Batman themed theatre. I knew I could design the theatre for a quarter of the cost of the theatre he had shown me. I felt comfortable saying I could design lighting and interiors for the theatre within their budget.
I proceeded with bringing in my team of artists to review the images of his Batman comic magazine collection that had to be in the theater: Batcave, Wayne Manor, Lincoln Penney, Bat phone and the Joker.
As the images indicate, we succeeded in designing and installing the Batman themed theatre to meet the client's criteria.
At the owner’s request: Linear LEDs lit the Batcave faux wall murals of stone and Wayne Manor aged wood columns, custom crystal wall sconces, and a library with a life size Batman costume hidden behind a false bookcase. A false wooden window with a Gotham City Mural of the Bat signal were revealed by using ultraviolet black lights.
It was a fun project but could not have been accomplished without a team of excellent artists, building contractors, A.V. control company, millwork fabricators and electricians.
Lighting Designer: John Rogers Design
Interior Design Concept & Millwork Design: John Rogers Design
Faux stone and murals Artist: Robin Tucker
Builder: Richard Harp Homes https://www.richardharphomes.com
A.V. Company:
Electrical:
Photographer: John Watson
Published
AY Magazine
 AGM Home Store, LLC
***FOR OTHER SIZE, COLOR, AND SINK ACCOMMODATIONS, PLEASE CONTACT US WITH YOUR REQUEST***
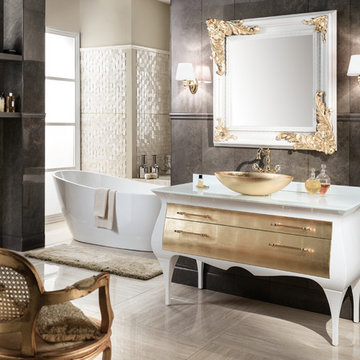
GM Luxury Rialto 55.5" Master Bathroom Vanity Gold Leaf Cabinet With Vessel Sink
Note: Made to Order item (No returns or cancellations will be accepted on this item).
- Vanity Includes: Bath furniture + countertop + Vessel sink
- Manufactured in Italy
- Material: Solid Wood Tuliper, Glass Countertop, Resin Vessel sink
- Finish: Gold Leaf on the drawers, White Ral 1013 glossy lacquer on the sides
- Number of Drawers: 2
- Type: Floor standing
- Shape: Rectangular
- soft-close drawer with braking and smooth closing.
- Faucet is not included.
- Countertop comes with predrilled holes for one hole faucet. It can be done with 3 holes for the faucet, contact us with any other request.
- Waste drain and trap not included
- Vanity Dimensions: 55.5 W x 22.8 D x 32.3 H in.
- Bazille Luxury Mirror Gold leaf and white available as an option
- Bazille Mirror Dimensions: 39.4 W x 1.5 D x 39.4 H in.
 Envision Web
Stuart Wade, Envision Virtual Tours
Envision Virtual Tours and High Resolution Photography is your best choice to find just what you are looking for in the Ellijay, Ga. area .Ellijay, Georgia, known as the “Apple Capital” of Georgia, is located between the Ellijay and Cartecay Rivers where they join to make the Coosawattee River and is the county seat of Gilmer County, Georgia. The origin of the city’s name is not certain but thought to be the English derivative of an Indian word(s) meaning “many waters”, “place of green things” or “new ground”. Some histories say it may have been named for an Indian chief.
Inhabited for countless years by the Cherokee people indigenous to the North Georgia, the area was first mentioned as a village and trade center before the onslaught of white settlers inhabited the region. During the 1830’s both white settlers and Indians occupied Ellijay. During the original land lottery in 1832, Martin Scalf acquired the 160 acre lot where the town now stands. In 1833, Clemonds Quinland bought 10 acres from Scalf, retained one acre for himself and donated the rest of the purchase to the County. A plan for twenty town lots, streets and a public square was created and the streets were oriented to allow maximum sunlight exposure to the buildings.
Proceeds from lot sales were used to build a jail and courthouse and pay other city expenses. During this same year, Gilmer County was appropriated $800.00 from the State to build a school, and a three-acre lot was donated for the city cemetery. On December 29, l834, Ellijay was incorporated and designated as the County seat of Gilmer County. By 1837, the town had twenty dwellings, three stores and one attorney. Most of these early buildings were of log construction.
Many roads led to Ellijay by 1849. The population had grown to 150 by 1850 and the town at five stores. Some wood-frame buildings were being constructed at this time and in 1854, a new courthouse was built in the center of the square, replacing the earlier building. The County’s first newspaper was the Ellijay Courier, started in 1875, and during this time period, Ellijay was a stop on the stagecoach line. The railroad bridge over the Cartecay River was completed in 1884 and the town now had rail service.
With the arrival of the railroad and subsequent tracks to White Path, Ellijay began to grow much faster. Many hotels were constructed and land was donated for a depot east of town. More industries, such as a cheese factory and the Shippen Brothers Lumber Mill, located in Ellijay. By 1898, the city had expanded its limits in every direction and now included the depot.
By 1900, all the buildings on the town square were brick. This included the recently completed Hyatt Hotel. Most of the other buildings in town were still of log construction, but new wood-frame buildings were being built. The Shippen Brothers Lumber Company production was expanding and exporting their lumber to Europe. Within the next few decades, this company grew to be one of the largest employers in Ellijay, often with five to six million feet of lumber in the yard at one time.
The population of Ellijay grew to 659 by 1910, and began to acquire many new modern conveniences such as electric lights and power, a telephone company and many new businesses.
Then in 1912, a fire ravaged the city, destroying 23 buildings. As a result, many new buildings were constructed under new and stricter fire and safety guidelines. The population, however, decreased slightly at this time to 632 in 1920.
During the 1920’s the town’s population began to grow again and, by this time, apples were being shipped out of the county and new storage facilities were built. Chickens were also shipped to markets outside of Ellijay and Gilmer County.
From the mid 1930’s to 1950, Ellijay received much assistance from the Federal WPA Programs. The old courthouse was removed from the center of town square and the Hyatt Hotel was remodeled to be the new courthouse. A park was created on the site of the old courthouse and the streets around the square were paved. A new street was built at this time entering town from the northeast. Other new roads, bridges, sidewalks and gutters were constructed to improve the city. A school and gymnasium were also built and other structures improved.
This growth began to impact the city’s infrastructure and in the l950’s and l960’s, a period of upgrading water systems, roads, and power supplies began. New low-rent housing appeared in l960 and a new hospital was built in l957. Georgia Highway 5 was widened in l962, new buildings around the square replaced old ones and some were remodeled. In 1974, the hospital was enlarged.
Currently, Ellijay attracts tourists who love the small-town feel and friendly atmosphere. Hotels and restaurants, unique shops, antiques and art galleries lend their charms to those who visit. A new courthouse constructed to resemble the old one, new streetscaping, family-oriented downtown events and the beautification of the square have stepped up the social and economic activity and have made Ellijay a popular destination.
 United Home Experts
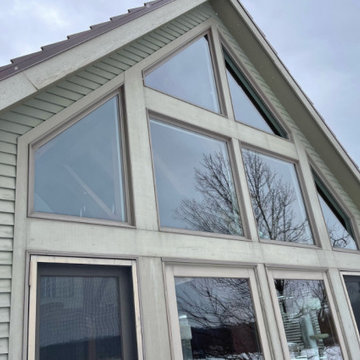
This beautiful, lakeside, colonial located in Hopkinton, MA underwent one of the most beautiful siding transformations of the year using our GorillaPlank™ Siding System.
Built in 1940, this lakeside home in Hopkinton, MA had old scalloped cedar shakes that had become old and worn out. The homeowners considered painting again, but did not want the costly expense of having to paint again, so they decided it was time to renovate and modernize their living space with a low-maintenance siding that closely resembled the appearance of wood.
Everlast Composite Siding was the siding of choice using our GorillaPlank™ Siding System.
Before installing the GorillaPlank™ Siding System, our expert team of installers went to work by stripping down the existing cedar shingles and clapboards down to the sheathing.
After verifying the underlying condition of the sheathing, our team went ahead and set staging to protect the beautiful metal roofs, then proceeded to install the moisture barrier to protect the sheathing, and then installed insulation for added protection and comfort.
Their house is now featuring Everlast Composite Siding in the 7” exposure of one of the newest colors, Blue Spruce!
 FireRock Building Materials
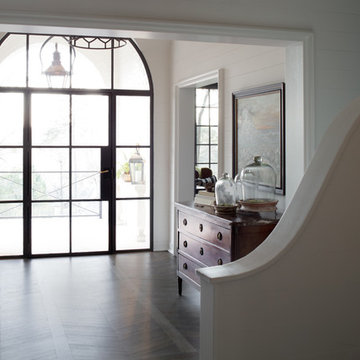
The 2016 Christopher Showhouse was designed by renowned national firm, Christopher Architecture and Interiors. Proceeds from the open house tours benefited Open Hands Overflowing Hearts, a local charity helping fund pediatric cancer research.
The project showcased the designs of Christopher Architecture and Interiors and highlighted local, regional and national vendors, suppliers and contractors. FireRock was honored to have three products selected for the home: an indoor masonry fireplace, an outdoor masonry fireplace and all solid hardwood flooring.
 United Home Experts
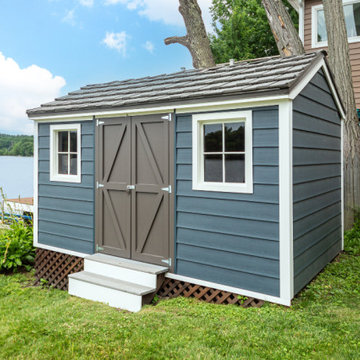
This beautiful, lakeside, colonial located in Hopkinton, MA underwent one of the most beautiful siding transformations of the year using our GorillaPlank™ Siding System.
Built in 1940, this lakeside home in Hopkinton, MA had old scalloped cedar shakes that had become old and worn out. The homeowners considered painting again, but did not want the costly expense of having to paint again, so they decided it was time to renovate and modernize their living space with a low-maintenance siding that closely resembled the appearance of wood.
Everlast Composite Siding was the siding of choice using our GorillaPlank™ Siding System.
Before installing the GorillaPlank™ Siding System, our expert team of installers went to work by stripping down the existing cedar shingles and clapboards down to the sheathing.
After verifying the underlying condition of the sheathing, our team went ahead and set staging to protect the beautiful metal roofs, then proceeded to install the moisture barrier to protect the sheathing, and then installed insulation for added protection and comfort.
Their house is now featuring Everlast Composite Siding in the 7” exposure of one of the newest colors, Blue Spruce!
 Precision Outdoors
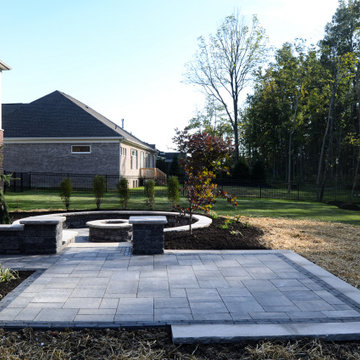
When the homeowners came to us, they had a desire to build out an outdoor space that would compliment their covered patio. Ideally, it would allow them to gather around and roast marshmallows in a cozy setting. When we inspected their property, it was fairly exposed to their neighbors; we proceeded to build out the space so it could have additional room for tables and chairs. Our team then worked to sink the fire pit patio area in, to add privacy with greenery to help create an intimate space to enjoy a fire and embrace family.
 Artistic Hardwood Floors
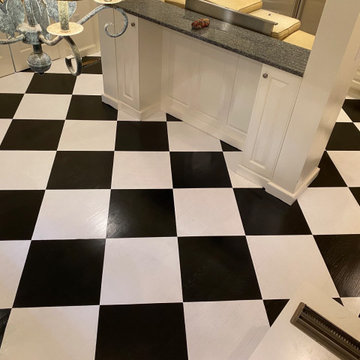
The client of this house wanted to restore the checkered pattern on the kitchen floor. We sanded the entire floor to have a fresh start and recreate the design. During the process, we bleached the red oak floors to eliminate the natural pinkish-red undertone it has. After that, we proceeded to create the checkered pattern with tape and then, stained it with Duraseal True Black and Country White. We finished the floors with three coats of Bona Traffic HD polyurethane. Although this particular polyurethane is ideal for commercial projects, it's an ideal protectant on floors with very low VOCs.
 Need For Build- Remodeling Experts
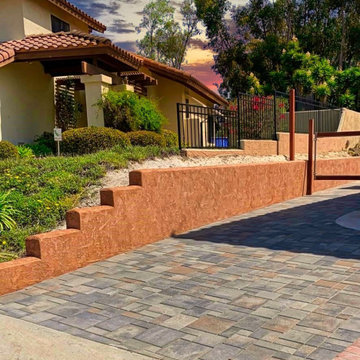
Need For Build did an outstanding job modifying the side yard of our house. The job included clearing large sections of dirt, building a 3' by 50' retaining wall, and installing pavers. The cost estimate came in thousands less than the others I received for the same work. They started on schedule and had a time estimate of 2 to 3 weeks, but they actually finished in only 8 working days. They were very flexible and made changes to the plan at my request as the job proceeded. The work crews were all very polite and helpful; they cleaned up each day and left the final site looking excellent. Another good point is that David was both the salesperson and the project manager so he showed up every day to make sure the progress matched my expectations - I've had other company's sales people disappear once the sale has been made, but not David!
 TKS Design Group
Free ebook, Creating the Ideal Kitchen. DOWNLOAD NOW
One of my very favorite parts of the design process is space planning and considering all the possible floor plan solutions at the beginning stages of the project. What works for one person as a solution may not be the best solution for the next. What you think you want going into the process, may change once all the space planning options are considered. This was exactly the case for this family. They thought they really wanted an island configuration.
Once we figured out the flow of the work triangle and saw how great a large peninsula would work for the family, we proceeded along those lines. The peninsula not only works great for food prep, it also allows more of a traditional table seating versus an island with everyone lined up in a row — not so great for daily dinner conversation.
To the right of that is a counter depth fridge and a speed oven which gives some flexibility with cooking and reheating smaller meals instead of having to heat the entire oven. An induction cooktop with its easy to clean surface keeps the space looking clean and tidy. Induction heats very quickly to high temperatures so is also wonderful to cook on. To the right of cooktop is a long stretch of countertop perfect for prep space.
Storage was very important to the homeowners. We took our time discussing where spice pull outs and tray dividers would be located, how the corner storage would be addressed and the location of the other items such as trash and recycling cans. We worked as many drawers as possible into the space, as I always recommend drawers over doors and/or roll outs as they offer the most flexibility and ease of use. Customizing these details is time well spent as having a place for everything and everything in its place, just like Mom said, really is the key to a functional and professionally designed kitchen.
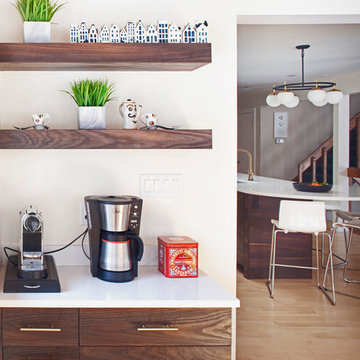
The talls and wall cabinets are white acrylic which combined with the white marble look quartz countertops and full height backsplash keep the room feeling light, bright and airy. The wood toned base cabinets are made of a textured laminate that has the look of wood but is a very easy to maintain product. Brushed gold metal on the hardware, faucet and chandelier add a warm touch and ties into the blond maple flooring. The neighboring breakfast room was also remodeled as part of the project and houses a small coffee station.
Designed by: Susan Klimala, CKBD
Photography by: Kari Firak
For more information on kitchen and bath design ideas go to: www.kitchenstudio-ge.com
 Classic Kitchens Designs & Renovations Ltd.
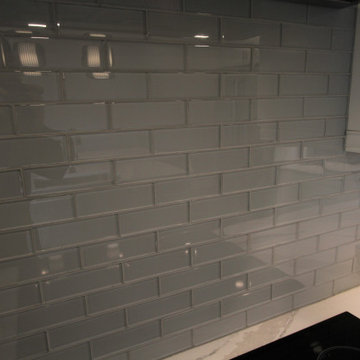
We started with a cool older bungalow that really needed updating, and the eating area to be connected to the kitchen itself, which required the removal of a loadbearing wall and installation of a new support beam. From there, we proceeded to install new waterproof luxury vinyl plank flooring and beautiful cabinetry painted in the customers chosen Benjamin Moore colours with the island with seating area done in a complimentary colour. Stunning Cambria "Brittanica" quartz countertops were then installed, followed by a grey glass subway style backsplash to tie it all together. We also revised the lighting to work with the great new layout and provide more light where it is needed. The end result is transformational and we are pleased that the customers absolutely love it!
 Tile Doctor Ltd
Another quick job here in Cheshire, this time in the town of Wilmslow. Much like Alderly Edge, where I recently completed another job, Wilmslow is an affluent area known for its upmarket lifestyle and as a popular option for residence amongst celebrities and famous figures. In fact it is currently, and has previously been, home to several Premier League footballers from the nearby clubs Manchester United and Manchester City.
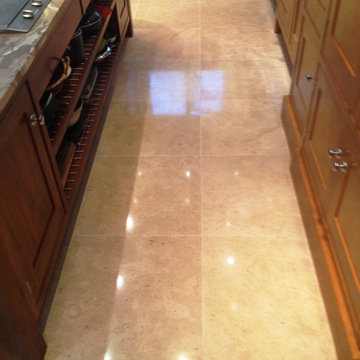
This job was another case of where a tiled floor had lost its shine due to the sealer wearing away over time. In this instance, my client had a Travertine tiled floor in her kitchen that she wanted to me to restore back to looking at its best.
Travertine is a fantastic natural stone which possesses unique features that no other stone can offer. It offers a particularly distinctive design style, making it a popular choice both for commercial and residential use. Many homeowners use Travertine tiles for kitchen flooring, bathroom walls and floors and for external floors, such as patios.
The process of stripping off old sealer can be done effectively and relatively quickly without using a liquid stripper. The best method is to use a series of fine diamond encrusted burnishing pads, which is exactly what I did in this case. The burnishing pads are applied in sequence from coarse, medium, fine and superfine to remove the old sealer without damaging the Travertine and then re-polish to a lovely polished shine.
One the floor had been burnished, rinsed and dried; I proceeded to re-seal the floor with Tile Doctor Colour Grow. Colour Grow is particularly effective when to seal porous natural stone surfaces such as Travertine and Limestone, whether internal or external. This is because the product is specially formulated to penetrate deep into the pores of the stone, providing durable surface protection from within.
The other key benefit of Colour Grow is that it intensifies the colours within the stone, as you can from the photos. This adds additional character and flair to already impressive household features like this Travertine floor.
The finished results were exactly what my client had hoped for. It goes to show that with the right methods and know-how such a big difference can be made to the appearance of tiled floors. I was very happy to help.
Steve Keary
North Cheshire Tile Doctor
 TaskRabbit
Recently, TaskRabbit challenged a group of 10 Taskers to build a Tiny House in the middle of Manhattan in just 72 hours – all for a good cause.
Building a fully outfitted tiny house in 3 days was a tall order – a build like this often takes months – but we set out to prove the power of collaboration, showing the kind of progress that can be made when people come together, bringing their best insights, skills and creativity to achieve something that seems impossible.
It was quite a week. New York was wonderful (and quite lovely, despite a bit of rain), our Taskers were incredible, and TaskRabbit’s Tiny House came together in record time, due to the planning, dedication and hard work of all involved.
A Symbol for Change
The TaskRabbit Tiny House was auctioned off with 100% of the proceeds going to our partner, Community Solutions, a national nonprofit helping communities take on complex social challenges – issues like homelessness, unemployment and health inequity – through collaboration and creative problem solving. This Tiny House was envisioned as a small symbol of the change that is possible when people have the right tools and opportunities to work together. Through our three-day build, our Taskers proved that amazing things can happen when we put our hearts into creating substantive change in our communities.
The Winning Bid
We’re proud to report that we were able to raise $26,600 to support Community Solutions’ work. Sarah, a lovely woman from New Hampshire, placed the winning bid – and it’s nice to know our tiny home is in good hands.
#ATinyTask: Behind the Scenes
The Plans
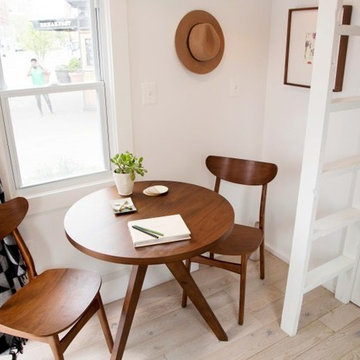
A lot of time and effort went into making sure this Tiny Home was as efficient, cozy and welcoming as possible. Our master planners, designer Lesley Morphy and TaskRabbit Creative Director Scott Smith, maximized every square inch in the little house with comfort and style in mind, utilizing a lofted bed, lofted storage, a floor-to-ceiling tiled shower, a compost toilet, and custom details throughout. There’s a surprising amount of built-in storage in the kitchen, while a conscious decision was made to keep the living space open so you could actually exist comfortably without feeling cramped.
The Build
Our Taskers worked long, hard shifts while our team made sure they were well fed, hydrated and in good spirits. The team brought amazing energy and we couldn’t be prouder of the way they worked together. Stay tuned, as we’ll be highlighting more of our Tiny House Taskers’ stories in coming days – they were so great that we want to make sure all of you get to know them better.
The Final Product
Behold, the completed Tiny House! For more photos, be sure to check out our Facebook page.
This was an incredibly inspiring project, and we really enjoyed watching the Tiny House come to life right in the middle of Manhattan. It was amazing to see what our Taskers are capable of, and we’re so glad we were able to support Community Solutions and help fight homelessness, unemployment and health inequity with #ATinyTask.
 Linda Edelwich Realtor
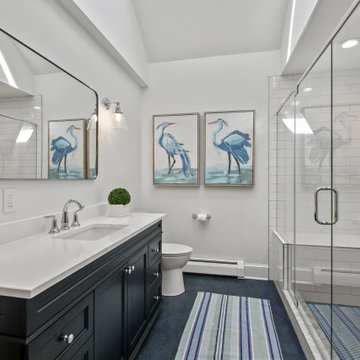
Nestled on 2.57 private acres in a highly sought-after neighborhood adjacent to Glastonbury line, this meticulously maintained custom home welcomes you through gracious double doors into a residence that emanates coastal charm. Richly toned floors contrast beautifully w/crisp neutral walls throughout, while the front-to-back living room serves as a stunning centerpiece w/its elegant gas-fireplace & French doors on either side opening to a screened porch-creating a delightful cross-breeze when open. No popcorn ceilings here! Open floor plan features a versatile home office with built-ins, flowing seamlessly into a gourmet kitchen showcasing a stylish island, custom cabinetry, & stainless-steel appliances adjacent to an expansive dining area w/stylish twin chandeliers. Practical luxury continues with a generous walk-in pantry & custom drop zone with shiplap detailing and shoe cubbies near the three-car garage with soaring ceilings. Upstairs, discover a sumptuous primary suite featuring a stylishly remodeled bathroom w/walk-in shower. Also complemented by a spacious walk-in closet & window flanked by custom built-ins, while two additional bedrooms share another beautifully updated bathroom & convenient 2nd-floor laundry. Additional space w/an unfinished walk-up attic & 880sf of finished extra living space in the walk-out lower level, complete with built in sauna, laminate flooring and ample storage-all crowned by the property's signature wrap-around porch. Roof '17
21