
Search results for "Process involves" in Home Design Ideas
 Cabinet Cures of The Triangle
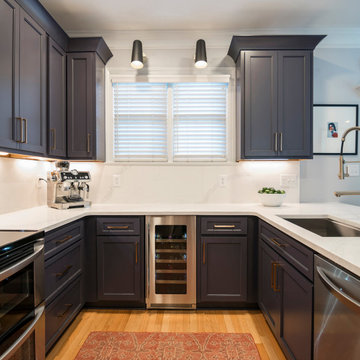
At Cabinet Cures of the Triangle, we come to your home and remove all the doors, drawer fronts, molding, and hardware. We provide brand new solid wood doors and drawer fronts that we professionally finish at our shop. Style and color/stain are our client's preference.
The new doors all come standard with new, hidden soft close hinges.
We also finish 1/4” wood, and all molding in the same color as your doors and drawers, so everything matches exactly.
At your home, we reface all exterior boxes with the finished 1/4” wood, replace all crown molding, light rail molding, and base (shoe) molding, and install the new doors, drawer fronts, and hardware.
To ensure the most professional finish, our finishing process for every item (doors, drawer fronts, molding, finish wood, etc.) involves multiple layers of stain/primer/top coat/finish and includes sanding before every coat.
This project Includes Standard Refacing and some modifications:
- We added a new larger crown, it gives a more modern look.
- New pull-out trash.
- Convert the cabinets next to the range to a 3-drawer base
- The space under the window was modified to put a wine fridge.

 Custom Design & Construction
Our client approached us while he was in the process of purchasing his ½ lot detached unit in Hermosa Beach. He was drawn to a design / build approach because although he has great design taste, as a busy professional he didn’t have the time or energy to manage every detail involved in a home remodel. The property had been used as a rental unit and was in need of TLC. By bringing us onto the project during the purchase we were able to help assess the true condition of the home. Built in 1976, the 894 sq. ft. home had extensive termite and dry rot damage from years of neglect. The project required us to reframe the home from the inside out.
To design a space that your client will love you really need to spend time getting to know them. Our client enjoys entertaining small groups. He has a custom turntable and considers himself a mixologist. We opened up the space, space-planning for his custom turntable, to make it ideal for entertaining. The wood floor is reclaimed wood from manufacturing facilities. The reframing work also allowed us to make the roof a deck with an ocean view. The home is now a blend of the latest design trends and vintage elements and our client couldn’t be happier!
View the 'before' and 'after' images of this project at:
http://www.houzz.com/discussions/4189186/bachelors-whole-house-remodel-in-hermosa-beach-ca-part-1
http://www.houzz.com/discussions/4203075/m=23/bachelors-whole-house-remodel-in-hermosa-beach-ca-part-2
http://www.houzz.com/discussions/4216693/m=23/bachelors-whole-house-remodel-in-hermosa-beach-ca-part-3
Features: subway tile, reclaimed wood floors, quartz countertops, bamboo wood cabinetry, Ebony finish cabinets in kitchen
 Artistic Wallpaper & Design
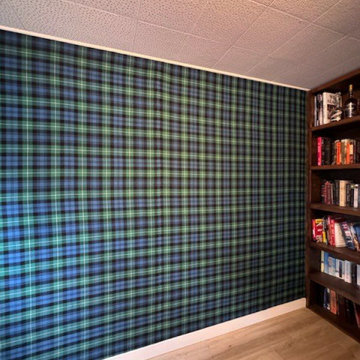
Professional vinyl wallcovering installation services tailored for commercial interiors, high-traffic corridors, healthcare facilities, hospitality venues, and modern residential spaces. Specializing in the precise fitting of high-durability wallcoverings engineered to resist moisture, stains, and daily wear while maintaining a clean, high-end aesthetic.
As a specialist vinyl wallcovering installer and wallpaper hanger, we handle all specifications—including Type I light-duty, Type II medium-to-heavy commercial vinyl, Type III heavy-duty protective coverings, and vinyl-backed textile murals. The installation process involves thorough substrate preparation, wall repair, specialized mold-inhibiting and high-tack primers, overhead and vertical laser-plumb calibration, and exact pattern matching across heavy rolls. Executed with industrial-grade adhesives, double-cut seamless joints, and razor-sharp trim work, every project guarantees a tight, durable, and flawless finish.
Find the right local pro for your project
 Cabinet Cures of The Triangle
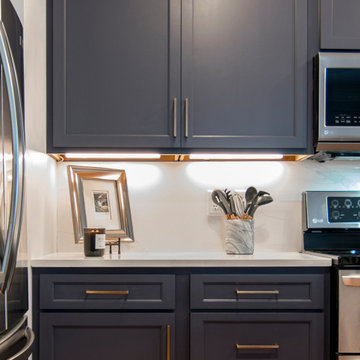
At Cabinet Cures of the Triangle, we come to your home and remove all the doors, drawer fronts, molding, and hardware. We provide brand new solid wood doors and drawer fronts that we professionally finish at our shop. Style and color/stain are our client's preference.
The new doors all come standard with new, hidden soft close hinges.
We also finish 1/4” wood, and all molding in the same color as your doors and drawers, so everything matches exactly.
At your home, we reface all exterior boxes with the finished 1/4” wood, replace all crown molding, light rail molding, and base (shoe) molding, and install the new doors, drawer fronts, and hardware.
To ensure the most professional finish, our finishing process for every item (doors, drawer fronts, molding, finish wood, etc.) involves multiple layers of stain/primer/top coat/finish and includes sanding before every coat.
This project Includes Standard Refacing and some modifications:
- We added a new larger crown, it gives a more modern look.
- New pull-out trash.
- Convert the cabinets next to the range to a 3-drawer base
- The space under the window was modified to put a wine fridge.

 Kitchen Design Concepts
We introduce to you one of our newer services we are providing here at Kitchen Design Concepts: spaces that just need a little reviving! As of recent, we are taking on projects that are in need of minimal updating, as in, spaces that don’t need a full-on remodel. Yes, you heard right! If your space has good bones, you like the layout of your kitchen, and you just need a few cosmetic changes, then today’s feature is for you! Recently, we updated a space where we did just this! The kitchen was in need of a little love, some fresh paint, and new finishes. And if we’re being honest here, the result looks almost as if the kitchen had a full-on remodel! To learn more about this space and how we did our magic, continue reading below:
The Before and After
First, see what an impact new finishes can make! The “before” image shows a kitchen with outdated finishes such as the tile countertops, backsplash, and cabinetry finish. The “after” image, is a kitchen that looks almost as if its brand new, the image speaks for itself!
Cabinetry
With the wooden cabinetry in this kitchen already having great bones, all we needed to do was our refinishing process that involved removing door and drawer fronts, sanding, priming, and painting. The main color of the cabinetry is white (Sherwin Williams Pure White 7005) and as an accent, we applied a deep navy blue that really pops in this space (Sherwin Willaims Naval 6244). As a special design element, we incorporated a natural wooden band across the hood which is subtle but adds an element of surprise.
Countertops
The original countertops in this space were a 12×12 tile with cracks and discolored grout from all the wear and tear. To replace the countertops, we installed a clean and crisp quartz that is not only durable but easy to maintain (no grout here!). The 3cm countertops are a Cambria quartz in a grey-tone color (Carrick).
Backsplash
Keeping things simple, yet classic, we installed a 3×6 subway tile from Interceramic. The crisp white pairs well with all the other finishes of the space and really brighten the space up! To spice things up, we paired the white tile with a contrasting grout color (Cape Grey) that matches the countertop. This is a simple method to add interest to your white backsplash!
Fixtures and Fittings
For the fixtures and fittings of the kitchen, we wanted pieces that made a statement. That’s why we selected this industrial style faucet from Brizo! The faucet is a Brizo LITZE™ PULL-DOWN FAUCET WITH ARC SPOUT AND INDUSTRIAL HANDLE (63044LF-BLGL). The matte black paired with the luxe gold elements really make a statement! To match the gold elements of the faucet, we installed cabinetry hardware from Topknobs in the same gold finish. The hardware is a Channing pull TK743HB. Lastly, the large single bowl sink (who doesn’t want a large sink?!) is a great functional touch to the kitchen. The sink is a Blanco Precision 16″ R10 super single with 16″ Drainer in stainless steel (516216).
 Tile Doctor Ltd
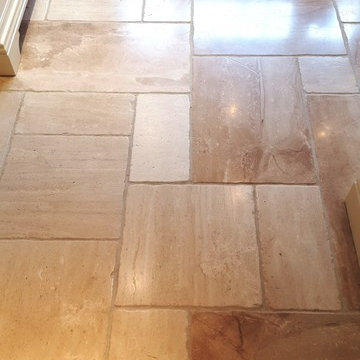
I was recently at a property in the North Yorkshire town of Harrogate, undertaking what I initially thought would be the cleaning and polishing of a Cream Limestone tiled kitchen. However, as I began the cleaning process I quickly discovered that under the dirty grout lines someone had taken a lot of effort to paint with a small brush directly onto the grout using varnish!
In a normal situation, I would have covered the whole floor with Tile Doctor Remove & Go to solve the problem, however compared to, say, adhesive or paint staining, varnish is very difficult to remove. So instead I opted for the long, yet necessary process of cleaning the grout manually with several thin wire brushes. Over the course of two days I managed to remove approximately 90% of the stubborn varnish – and could finally move onto cleaning and polishing the Limestone as originally planned.
The polish had been lost from the Limestone kitchen tiles over time, so I set about restoring it using a type of polishing known as burnishing. This involves the application of diamond encrusted pads of varying grit to the floor to gradually buff the stone and achieve an aesthetic and durable shine. Burnishing is most commonly used on high-end stone such as Marble, Travertine and, of course, Limestone.
At Tile Doctor, our burnishing system comprises four burnishing pads, ranging from a Coarse grit to a Very Fine grit. After applying the first three pads (Coarse, Medium and Fine), I gave the tiles a further clean with Tile a Doctor Pro Clean, which is our alkaline cleaner, to remove any residue from the burnishing process. I then rinsed the floor with clean water and soaked up the residue with a wet vacuum, before leaving it to dry.
The floor was then polished to a satin finish using the fourth and final Extra Fine burnishing pad. I sealed it using a couple of coats of Tile Doctor Ultra-Seal, an impregnating sealer designed to provide maximum protection against dirt and stains.
The combination of burnishing and sealing always makes a huge difference to Limestone tiles. Here, the finished result was almost like a new floor! The customer was both amazed and very pleased with the transformation.
Nigel Stoker
North West Yorkshire Tile Doctor
 safe ZOnea
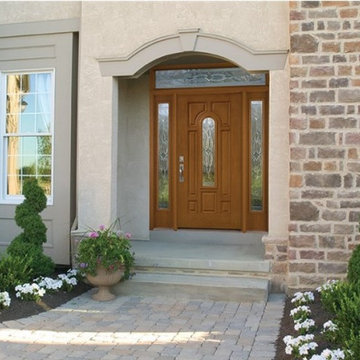
When it comes to home improvement projects, the contractor you choose can make all the difference. A skilled, reputable general contractor delivers quality work and a smooth experience, while a poor choice can lead to problems, frustration, and wasted money. For Chicago homeowners planning exterior improvements from siding to doors and beyond — understanding how to choose a good general contractor is essential. This guide covers what to look for and how to make a smart choice for your home improvement projects.
The role of a general contractor
A general contractor plays a central role in home improvement projects, overseeing and coordinating the work to bring a project to completion. For projects that involve multiple aspects or trades, a general contractor manages the process, ensuring the various pieces come together properly. This coordination and oversight are valuable, particularly for larger or more complex projects that involve numerous details and steps.
Working with a good general contractor offers several benefits. It provides a single point of responsibility for a project, brings expertise and coordination to the work, and helps ensure the project is completed properly. For homeowners, a quality general contractor can make the difference between a smooth, successful project and a stressful, problematic one. Homeowners planning projects often look for a general contractor chicago near me to handle their improvements. Understanding the role a general contractor plays helps homeowners appreciate the value of choosing a good one for their home improvement projects, especially larger or more involved ones.
Why the choice matters
The choice of general contractor has an enormous impact on a home improvement project. From the quality of the work to the smoothness of the process to the ultimate result, the contractor shapes every aspect of the project. A skilled, reputable contractor delivers quality results and a professional experience, while a poor choice can lead to shoddy work, delays, cost overruns, and frustration.
The stakes are significant, as home improvement projects represent substantial investments and affect a home that homeowners live in and value. A project done poorly can create problems that are costly to fix and diminish rather than enhance a home. This is why choosing the right contractor is so important — it's one of the most consequential decisions in any home improvement project. Homeowners do well to approach the choice carefully rather than simply hiring the first or cheapest option. Understanding why the choice of contractor matters helps homeowners give this decision the attention it deserves, recognizing its impact on the success of their project and their satisfaction with the result.
What to look for in a contractor
Choosing a good general contractor involves looking for several important qualities. Experience and a solid reputation are key indicators of a contractor's ability to deliver quality work. A contractor with a track record of successful projects and satisfied customers is generally a safer choice than an unknown quantity. Researching a contractor's reputation and past work helps in assessing their quality.
Beyond experience and reputation, other important qualities include quality workmanship, clear communication, professionalism, and reliability. A good contractor communicates clearly, provides a clear understanding of the project and its costs, treats customers professionally, and follows through reliably. These qualities contribute to both a quality result and a positive experience. Homeowners considering exterior projects, such as new vinyl siding chicago installation, do well to evaluate contractors on these factors. Understanding what to look for in a contractor helps homeowners identify professionals likely to deliver quality work and a good experience for their projects.
Considering the specific project
When choosing a contractor, it's also important to consider the specific project and whether the contractor is well-suited to it. Different projects have different requirements, and a contractor experienced in the particular type of work is often a better choice. Whether the project involves siding, doors, a broader remodel, or other work, a contractor familiar with that type of project brings relevant expertise.
For exterior projects in particular, experience with the specific work and the demands of the Chicago climate is valuable. Siding, doors, and other exterior improvements must withstand local conditions, so a contractor who understands these demands can deliver better results. Considering whether a contractor is well-suited to your specific project helps ensure a good outcome. Homeowners planning to update their exterior doors chicago or undertake other exterior work benefit from choosing a contractor experienced in that area. Understanding the importance of matching the contractor to the project helps homeowners make choices that lead to quality results for their specific improvements.
Understanding the project scope and cost
Before committing to a contractor, understanding the full scope and cost of a project is important. A reputable contractor should provide a clear explanation of what the project involves, the materials to be used, the timeline, and the total cost. Understanding these details upfront helps homeowners avoid surprises and make informed decisions. Vague estimates or a lack of clarity are warning signs worth heeding.
Understanding the scope also means being clear about what you want and ensuring the contractor's proposal matches your needs and expectations. A clear, detailed understanding of the project protects both the homeowner and the contractor and sets the stage for a successful outcome. Taking the time to ensure you understand exactly what you're getting before work begins is worthwhile. Understanding the importance of clarity about scope and cost helps homeowners enter home improvement projects with confidence and avoid the misunderstandings that can lead to problems. Clear expectations are the foundation of a smooth, successful project.
Making your decision
With these considerations in mind the role of a general contractor, why the choice matters, what to look for, matching the contractor to the project, and understanding scope and cost homeowners are well-equipped to make a smart decision. The goal is to choose a contractor who combines experience, quality workmanship, clear communication, and reliability, and who is well-suited to the specific project, at a fair and clearly understood price.
Taking the time to research and compare contractors, rather than rushing the decision, pays off in the quality of the work and the smoothness of the project. A home improvement project is a significant investment, and the right contractor makes all the difference to the outcome. Understanding how to evaluate and choose a general contractor empowers Chicago homeowners to make decisions that lead to successful projects and results they'll be happy with. The right choice is the foundation of a home improvement project that enhances a home for years to come.
The bottom line
Choosing the right general contractor is essential to successful home improvement projects, as the contractor shapes the quality of the work, the smoothness of the process, and the ultimate result. For Chicago homeowners undertaking exterior projects like siding, doors, and more, the key factors include experience and reputation, quality workmanship, clear communication, suitability to the specific project, and clarity about scope and cost. By evaluating contractors on these factors and taking the time to make an informed choice, homeowners can find a professional who delivers quality results and a positive experience. The right contractor is the foundation of home improvements that enhance a home for years to come.
 Tile Doctor Ltd
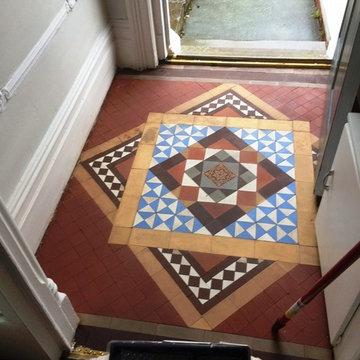
I was asked to take a look at restoring a Victorian Tiled Floor in the Cumbrian town of Barrow in Furness where the floor had been covered in black bitumen; the bitumen was so thick it was difficult to gauge the condition of the floor underneath. I did a test clean which came out well but I had to explain there could be tile damage and other hidden problems so very difficult to quote for however we agreed a date and price and I came back a couple of weeks later to do the job.
Removing Bitumen form Victorian Tiles
Removing the bitumen from the floor without damaging the tiles underneath was a slow process involving spraying on a strong solution of Tile Doctor Remove and Go, letting it soak in, applying steam and then carefully scraping off the bitumen. The floor was treated in this manner a small area at a time and a wet vacuum was used to rinse and remove the resulting slurry. This process took up the whole day and was completely successful at removing the bitumen, before finishing I gave the floor a thorough rinse with clean water and used the wet vacuum to dry the floor was much as possible before leaving.
Sealing a Victorian Tiled Floor
I had used a lot of water cleaning the floor so I agreed with the owner to leave the floor for a few days before sealing it so it could thoroughly dry out. When I did return I used Tile Doctor Colour Grow to seal the tiles, the customer had wanted a satin finish but having weighed up the options including the fact that there was a damp problem in the house I felt Colour Grow which is a penetrating and breathable sealer would have the best longevity.
The customers were very happy with the results and before leaving we discussed aftercare cleaning, with sealed surfaces you have to be careful not to use acidic products as this can reduce the life of the sealer.
 Windy City Painters
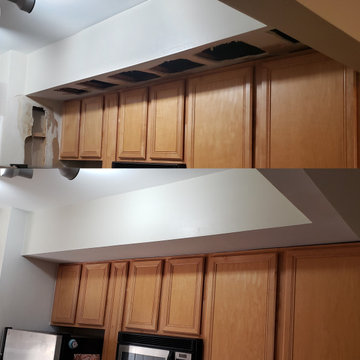
 response to water damage in a kitchen:
Assessment and Inspection:
Windy City Painters initiates the process by conducting a thorough assessment of the water damage in the kitchen. This involves inspecting the soffit above the kitchen cabinets and the side wall to identify the areas that require repair. The severity of the damage is carefully evaluated to determine the scope of the restoration.
Insulation Replacement:
In cases where water has damaged insulation, Windy City Painters removes and replaces the affected insulation to ensure proper restoration of the affected areas. This step is crucial for preventing future issues related to moisture and maintaining the integrity of the space.
Drywall Replacement:
Damaged drywall is carefully removed and replaced during the repair process. This includes removing sections of drywall that have been compromised by water, ensuring that the new drywall seamlessly integrates with the existing structure.
Sealing Water Spots with Oil-Based Primer:
To prevent any potential water stains from bleeding through the new paint, Windy City Painters applies an oil-based primer to seal water spots. This step not only ensures a smooth and uniform finish but also provides additional protection against future water damage.
Cleaning and Restoration:
After completing the repair work, Chicago painter takes the extra step of cleaning the entire area to ensure a neat and polished final result. This includes removing any debris or dust generated during the repair process, leaving the kitchen in a clean and presentable condition.
Efficient Completion by Skilled Painter:
Windy City Painters prides itself on efficiency, and the entire drywall repair job is completed within one day by a skilled painter. This quick turnaround minimizes disruptions to the homeowner's routine and allows for a prompt return to normalcy.
Scheduling and Estimates:
Customers looking to schedule an appointment or obtain an online estimate can easily do so by visiting the official website at www.windypainters.com. The user-friendly platform facilitates convenient scheduling and access to estimates.
Customer Assurance and Reviews:
Windy City Painters emphasizes customer satisfaction and provides the highest quality service. Potential customers are encouraged to check the company's 5-star reviews on Yelp ( https://www.yelp.com/biz/windy-city-painters-chicago-2) and Google, offering a glimpse into the positive experiences of previous clients.
Windy City Painters offers a comprehensive and efficient drywall repair service, addressing water damage in kitchens with expertise, professionalism, and a commitment to customer satisfaction.

 Tile Doctor Ltd
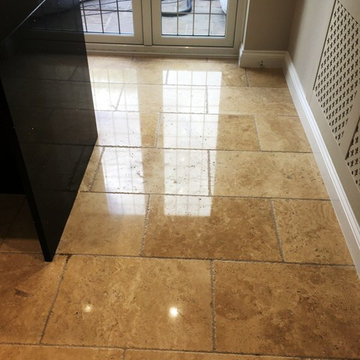
This Tumbled Travertine tiled floor at a beautiful house in Horley had been poorly maintained through the years using the wrong type of sealer which quickly wore down allowing dirt to become ingrained in the stone. The owner had become concerned about the state of the tiles and decided it was time to call in an expert that could restore the tiles to a condition that complimented the environment in which it was situated.
Travertine is known for being very distinctive in character and very durable, making it a very popular choice for tiled flooring in properties worldwide. However, the stone does require regular professional maintenance and polishing to keep it looking it top shape and home owners rarely realise this when they decide to have it installed. Fortunately, in the UK at least you can rely on your local tile doctor to maintain it for you.
The first part of the job involved giving the floor a thorough clean to remove what was left of old sealers and any polishing compounds that remained on the floor. Before beginning that however I brought in all my equipment and products into the house and then prepped the area by taping up the woodwork to protect it during the renovation process.
To remove what was left of the old sealers and other coatings still present on the floor a strong solution of Tile Doctor Remove and Go was applied to the floor and left to soak in for about ten minutes before being actively worked in with a rotary machine fitted with a black scrubbing pad. The solution turned black with the soil as it was lifted out of the pores of the stone and it was then rinsed off with water and extracted with a wet vacuum.
Following this, we moved on to a process we know as burnishing that hones the stone and brings up the polished appearance. Working in sections due to the size of the floor It involves the application of a series of diamond encrusted burnishing pads from coarse through to very fine.
The coarse 400-grit pad fitted to the rotary floor buffer and run over the floor using only water for lubrication. The water turns into a slurry as the pad does its job removing dirt and this has to be rinsed off the floor and extracted with the wet vacuum before applying the next pad. The process was then repeated with medium 800 grit pad for an initial polish followed by the Fine 1500 grit pad for the second polish using water for lubrication and rinsing and extracting in between each pad.
The last pad is a very fine 3000 grit pad for the final polish and is applied with only a little water sprayed onto the floor using a technique we call a Spray Burnish. This last pad really brings up the polished appearance of the stone.
To bring up the appearance of the stone even further and add a really durable polish Tile Doctor Shine Powder was applied. This is a crystallising powder sealer that ensures a very high shine and a tough, durable finish. This powder is applied directly to the tiles in combination with approximately ½ a litre of water and a soft white buffing pad.
Last step was to add to the protection provided by the Shine Powder with two coats of Tile Doctor Ultra-Seal which is a natural look sealer that doesn’t change the look of the stone and is applied to the stone and grout. This sealer works by seeping into the stone, occupying the pores and preventing dirt from becoming ingrained.
The customer was ecstatic with the results, being particularly pleased that she got the floor looking the way she originally wanted without significant expense, not to mention stress.
Michael Conlon
East Surrey Tile Doctor

 Jess Pedersen Architecture
PHOTOS: Mountain Home Photo
CONTRACTOR: 3C Construction
Main level living: 1455 sq ft
Upper level Living: 1015 sq ft
Guest Wing / Office: 520 sq ft
Total Living: 2990 sq ft
Studio Space: 1520 sq ft
2 Car Garage : 575 sq ft
General Contractor: 3C Construction: Steve Lee
The client, a sculpture artist, and his wife came to J.P.A. only wanting a studio next to their home. During the design process it grew to having a living space above the studio, which grew to having a small house attached to the studio forming a compound. At this point it became clear to the client; the project was outgrowing the neighborhood. After re-evaluating the project, the live / work compound is currently sited in a natural protected nest with post card views of Mount Sopris & the Roaring Fork Valley. The courtyard compound consist of the central south facing piece being the studio flanked by a simple 2500 sq ft 2 bedroom, 2 story house one the west side, and a multi purpose guest wing /studio on the east side. The evolution of this compound came to include the desire to have the building blend into the surrounding landscape, and at the same time become the backdrop to create and display his sculpture.
“Jess has been our architect on several projects over the past ten years. He is easy to work with, and his designs are interesting and thoughtful. He always carefully listens to our ideas and is able to create a plan that meets our needs both as individuals and as a family. We highly recommend Jess Pedersen Architecture”.
- Client
“As a general contractor, I can highly recommend Jess. His designs are very pleasing with a lot of thought put in to how they are lived in. He is a real team player, adding greatly to collaborative efforts and making the process smoother for all involved. Further, he gets information out on or ahead of schedule. Really been a pleasure working with Jess and hope to do more together in the future!”
Steve Lee - 3C Construction

 Hive Home
Mid-sized elegant built-in desk medium tone wood floor and brown floor home office photo in Los Angeles with white walls

 LoneStar Design Build
Corner shower - mid-sized transitional master gray tile and matchstick tile marble floor and white floor corner shower idea in Dallas with a vessel sink, recessed-panel cabinets, white cabinets, quartzite countertops, a one-piece toilet and gray walls

 Reico Kitchen & Bath
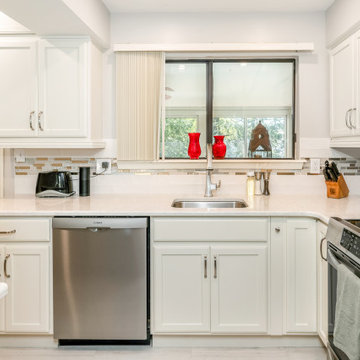
Designed by Sharleen Gomez of Reico Kitchen & Bath in Wilmington, DE in collaboration with Gives Me Shelter, this kitchen remodeling project features the transformation of a small kitchen into a transitional style inspired design. The kitchen features Merillat Classic cabinets in the door style Spring Valley in two finishes. The perimeter cabinets features a Chiffon finish with the kitchen island in a Steel Gray finish. The kitchen countertops Silestone Lusso.
The kitchen also includes Ceramica Ribesalbes 3x12 Matte Ivory subway tile, Glazzio Frost Glass Merino Glam tile and 12x24 V-Lux LVT Marfil flooring.
“I was changing the layout of my kitchen, and other companies I spoke to couldn’t get everything I needed in the confined space. Reico made it work! I love the look of the new countertop and backsplash, and Sharleen’s picks for tile were perfect! Sharleen was a wonderful and was essential to the process. She dealt with any problems that popped up quickly and efficiently,” said the customer.
“The client’s original kitchen was tiny. The space felt cramped, outdated and it made moving around and cooking difficult. The kitchen was also surrounded by soffits that we couldn’t remove,” said Sharleen.
“We wanted to create a space that was cohesive, modernized and brought in light to an otherwise dark room. The space we created is beautiful, light and so much more functional than the original! Working with the client was wonderful and making their ideas come alive was even better. She trusted my judgement and was super involved in the process!”
Photos courtesy of Dan Williams Photography.
 Reico Kitchen & Bath
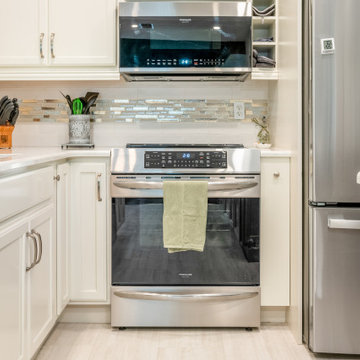
Designed by Sharleen Gomez of Reico Kitchen & Bath in Wilmington, DE in collaboration with Gives Me Shelter, this kitchen remodeling project features the transformation of a small kitchen into a transitional style inspired design. The kitchen features Merillat Classic cabinets in the door style Spring Valley in two finishes. The perimeter cabinets features a Chiffon finish with the kitchen island in a Steel Gray finish. The kitchen countertops Silestone Lusso.
The kitchen also includes Ceramica Ribesalbes 3x12 Matte Ivory subway tile, Glazzio Frost Glass Merino Glam tile and 12x24 V-Lux LVT Marfil flooring.
“I was changing the layout of my kitchen, and other companies I spoke to couldn’t get everything I needed in the confined space. Reico made it work! I love the look of the new countertop and backsplash, and Sharleen’s picks for tile were perfect! Sharleen was a wonderful and was essential to the process. She dealt with any problems that popped up quickly and efficiently,” said the customer.
“The client’s original kitchen was tiny. The space felt cramped, outdated and it made moving around and cooking difficult. The kitchen was also surrounded by soffits that we couldn’t remove,” said Sharleen.
“We wanted to create a space that was cohesive, modernized and brought in light to an otherwise dark room. The space we created is beautiful, light and so much more functional than the original! Working with the client was wonderful and making their ideas come alive was even better. She trusted my judgement and was super involved in the process!”
Photos courtesy of Dan Williams Photography.
 Jess Pedersen Architecture
PHOTOS: Mountain Home Photo
CONTRACTOR: 3C Construction
Main level living: 1455 sq ft
Upper level Living: 1015 sq ft
Guest Wing / Office: 520 sq ft
Total Living: 2990 sq ft
Studio Space: 1520 sq ft
2 Car Garage : 575 sq ft
General Contractor: 3C Construction: Steve Lee
The client, a sculpture artist, and his wife came to J.P.A. only wanting a studio next to their home. During the design process it grew to having a living space above the studio, which grew to having a small house attached to the studio forming a compound. At this point it became clear to the client; the project was outgrowing the neighborhood. After re-evaluating the project, the live / work compound is currently sited in a natural protected nest with post card views of Mount Sopris & the Roaring Fork Valley. The courtyard compound consist of the central south facing piece being the studio flanked by a simple 2500 sq ft 2 bedroom, 2 story house one the west side, and a multi purpose guest wing /studio on the east side. The evolution of this compound came to include the desire to have the building blend into the surrounding landscape, and at the same time become the backdrop to create and display his sculpture.
“Jess has been our architect on several projects over the past ten years. He is easy to work with, and his designs are interesting and thoughtful. He always carefully listens to our ideas and is able to create a plan that meets our needs both as individuals and as a family. We highly recommend Jess Pedersen Architecture”.
- Client
“As a general contractor, I can highly recommend Jess. His designs are very pleasing with a lot of thought put in to how they are lived in. He is a real team player, adding greatly to collaborative efforts and making the process smoother for all involved. Further, he gets information out on or ahead of schedule. Really been a pleasure working with Jess and hope to do more together in the future!”
Steve Lee - 3C Construction
 Reico Kitchen & Bath
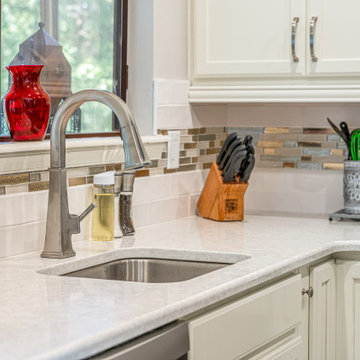
Designed by Sharleen Gomez of Reico Kitchen & Bath in Wilmington, DE in collaboration with Gives Me Shelter, this kitchen remodeling project features the transformation of a small kitchen into a transitional style inspired design. The kitchen features Merillat Classic cabinets in the door style Spring Valley in two finishes. The perimeter cabinets features a Chiffon finish with the kitchen island in a Steel Gray finish. The kitchen countertops Silestone Lusso.
The kitchen also includes Ceramica Ribesalbes 3x12 Matte Ivory subway tile, Glazzio Frost Glass Merino Glam tile and 12x24 V-Lux LVT Marfil flooring.
“I was changing the layout of my kitchen, and other companies I spoke to couldn’t get everything I needed in the confined space. Reico made it work! I love the look of the new countertop and backsplash, and Sharleen’s picks for tile were perfect! Sharleen was a wonderful and was essential to the process. She dealt with any problems that popped up quickly and efficiently,” said the customer.
“The client’s original kitchen was tiny. The space felt cramped, outdated and it made moving around and cooking difficult. The kitchen was also surrounded by soffits that we couldn’t remove,” said Sharleen.
“We wanted to create a space that was cohesive, modernized and brought in light to an otherwise dark room. The space we created is beautiful, light and so much more functional than the original! Working with the client was wonderful and making their ideas come alive was even better. She trusted my judgement and was super involved in the process!”
Photos courtesy of Dan Williams Photography.
 Reico Kitchen & Bath
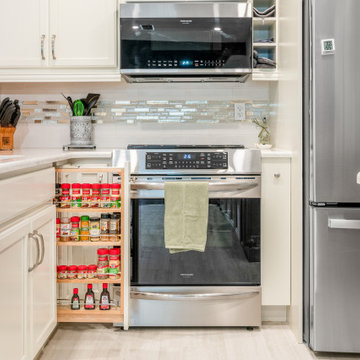
Designed by Sharleen Gomez of Reico Kitchen & Bath in Wilmington, DE in collaboration with Gives Me Shelter, this kitchen remodeling project features the transformation of a small kitchen into a transitional style inspired design. The kitchen features Merillat Classic cabinets in the door style Spring Valley in two finishes. The perimeter cabinets features a Chiffon finish with the kitchen island in a Steel Gray finish. The kitchen countertops Silestone Lusso.
The kitchen also includes Ceramica Ribesalbes 3x12 Matte Ivory subway tile, Glazzio Frost Glass Merino Glam tile and 12x24 V-Lux LVT Marfil flooring.
“I was changing the layout of my kitchen, and other companies I spoke to couldn’t get everything I needed in the confined space. Reico made it work! I love the look of the new countertop and backsplash, and Sharleen’s picks for tile were perfect! Sharleen was a wonderful and was essential to the process. She dealt with any problems that popped up quickly and efficiently,” said the customer.
“The client’s original kitchen was tiny. The space felt cramped, outdated and it made moving around and cooking difficult. The kitchen was also surrounded by soffits that we couldn’t remove,” said Sharleen.
“We wanted to create a space that was cohesive, modernized and brought in light to an otherwise dark room. The space we created is beautiful, light and so much more functional than the original! Working with the client was wonderful and making their ideas come alive was even better. She trusted my judgement and was super involved in the process!”
Photos courtesy of Dan Williams Photography.
40