
Search results for "Proper forms" in Home Design Ideas
 Aspen Builders and Remodelers
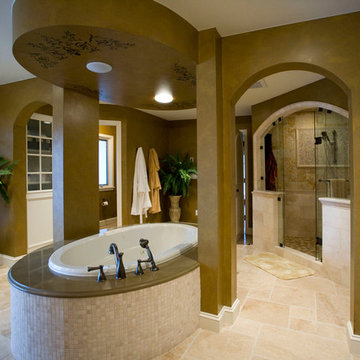
Bathroom - large traditional master beige tile and ceramic tile ceramic tile bathroom idea in Minneapolis with recessed-panel cabinets, beige cabinets, brown walls, an undermount sink and granite countertops
 ZeroEnergy Design
This modern green home offers both a vacation destination on Cape Cod near local family members and an opportunity for rental income.
FAMILY ROOTS. A West Coast couple living in the San Francisco Bay Area sought a permanent East Coast vacation home near family members living on Cape Cod. As academic professionals focused on sustainability, they sought a green, energy efficient home that was well-aligned with their values. With no green homes available for sale on Cape Cod, they decided to purchase land near their family and build their own.
SLOPED SITE. Comprised of a 3/4 acre lot nestled in the pines, the steeply sloping terrain called for a plan that embraced and took advantage of the slope. Of equal priority was optimizing solar exposure, preserving privacy from abutters, and creating outdoor living space. The design accomplished these goals with a simple, rectilinear form, offering living space on the both entry and lower/basement levels. The stepped foundation allows for a walk-out basement level with light-filled living space on the down-hill side of the home. The traditional basement on the eastern, up-hill side houses mechanical equipment and a home gym. The house welcomes natural light throughout, captures views of the forest, and delivers entertainment space that connects indoor living space to outdoor deck and dining patio.
MODERN VISION. The clean building form and uncomplicated finishes pay homage to the modern architectural legacy on the outer Cape. Durable and economical fiber cement panels, fixed with aluminum channels, clad the primary form. Cedar clapboards provide a visual accent at the south-facing living room, which extends a single roof plane to cover the entry porch.
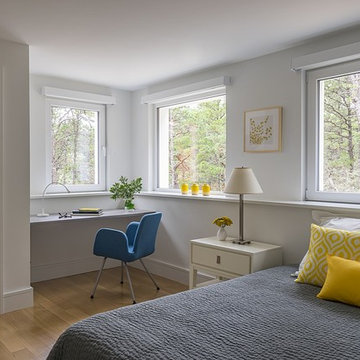
SMART USE OF SPACE. On the entry level, the “L”-shaped living, dining, and kitchen space connects to the exterior living, dining, and grilling spaces to effectively double the home’s summertime entertainment area. Placed at the western end of the entry level (where it can retain privacy but still claim expansive downhill views) is the master suite with a built-in study. The lower level has two guest bedrooms, a second full bathroom, and laundry. The flexibility of the space—crucial in a house with a modest footprint—emerges in one of the guest bedrooms, which doubles as home office by opening the barn-style double doors to connect it to the bright, airy open stair leading up to the entry level. Thoughtful design, generous ceiling heights and large windows transform the modest 1,100 sf* footprint into a well-lit, spacious home. *(total finished space is 1800 sf)
RENTAL INCOME. The property works for its owners by netting rental income when the owners are home in San Francisco. The house especially caters to vacationers bound for nearby Mayo Beach and includes an outdoor shower adjacent to the lower level entry door. In contrast to the bare bones cottages that are typically available on the Cape, this home offers prospective tenants a modern aesthetic, paired with luxurious and green features. Durable finishes inside and out will ensure longevity with the heavier use that comes with a rental property.
COMFORT YEAR-ROUND. The home is super-insulated and air-tight, with mechanical ventilation to provide continuous fresh air from the outside. High performance triple-paned windows complement the building enclosure and maximize passive solar gain while ensuring a warm, draft-free winter, even when sitting close to the glass. A properly sized air source heat pump offers efficient heating & cooling, and includes a carefully designed the duct distribution system to provide even comfort throughout the house. The super-insulated envelope allows us to significantly reduce the equipment capacity, duct size, and airflow quantities, while maintaining unparalleled thermal comfort.
ENERGY EFFICIENT. The building’s shell and mechanical systems play instrumental roles in the home’s exceptional performance. The building enclosure reduces the most significant energy glutton: heating. Continuous super-insulation, thorough air sealing, triple-pane windows, and passive solar gain work together to yield a miniscule heating load. All active energy consumers are extremely efficient: an air source heat pump for heating and cooling, a heat pump hot water heater, LED lighting, energy recovery ventilation (ERV), and high efficiency appliances. The result is a home that uses 70% less energy than a similar new home built to code requirements.
OVERALL. The home embodies the owners’ goals and values while comprehensively enabling thermal comfort, energy efficiency, a vacation respite, and supplementary income.
PROJECT TEAM
ZeroEnergy Design - Architect & Mechanical Designer
A.F. Hultin & Co. - Contractor
Pamet Valley Landscape Design - Landscape & Masonry
Lisa Finch - Original Artwork
European Architectural Supply - Windows
Eric Roth Photography - Photography
 TKS Design Group
Download our free ebook, Creating the Ideal Kitchen. DOWNLOAD NOW
Lakefront property in the northwest suburbs of Chicago is hard to come by, so when we were hired by this young family with exactly that, we were immediately inspired by not just the unusually large footprint of this 1950’s colonial revival but also the lovely views of the manmade lake it was sited on. The large 5-bedroom home was solidly stuck in the 1980’s, but we saw tons of potential. We started out by updating the existing staircase with a fresh coat of paint and adding new herringbone slate to the entry hall.
The powder room off the entryway also got a refresh - new flooring, new cabinets and fixtures. We ran the new slate right through into this space for some consistency. A fun wallpaper and shiplap trim add a welcoming feel and set the tone for the home.
Next, we tackled the kitchen. Located away from the rest of the first floor, the kitchen felt a little isolated, so we immediately began planning for how to better connect it to the rest of the first floor. We landed on removing the wall between the kitchen and dining room and designed a modified galley style space with separate cooking and clean up zones. The cooking zone consists of the refrigerator, prep sink and cooktop, along with a nice long run of prep space at the island. The cleanup side of the kitchen consists of the main sink and dishwasher. Both areas are situated so that the user can view the lake during prep work and cleanup!
One of the home’s main puzzles was how to incorporate the mudroom and area in front of the patio doors at the back of the house. We already had a breakfast table area, so the space by the patio doors was a bit of a no man’s land. We decided to separate the kitchen proper from what became the new mudroom with a large set of barn doors. That way you can quickly hide any mudroom messes but have easy access to the light coming in through the patio doors as well as the outdoor grilling station. We also love the impact the barn doors add to the overall space.
The homeowners’ first words to us were “it’s time to ditch the brown,” so we did! We chose a lovely blue pallet that reflects the home’s location on the lake which is also vibrant yet easy on the eye. Countertops are white quartz, and the natural oak floor works well with the other honey accents. The breakfast table was given a refresh with new chairs, chandelier and window treatments that frame the gorgeous views of the lake out the back.
We coordinated the slate mudroom flooring with that used in the home’s main entrance for a consistent feel. The storage area consists of open and closed storage to allow for some clutter control as needed.
Next on our “to do” list was revamping the dated brown bar area in the neighboring dining room. We eliminated the clutter by adding some closed cabinets and did some easy updates to help the space feel more current. One snag we ran into here was the discovery of a beam above the existing open shelving that had to be modified with a smaller structural beam to allow for our new design to work. This was an unexpected surprise, but in the end we think it was well worth it!
We kept the colors here a bit more muted to blend with the homeowner’s existing furnishings. Open shelving and polished nickel hardware add some simple detail to the new entertainment zone which also looks out onto the lake!
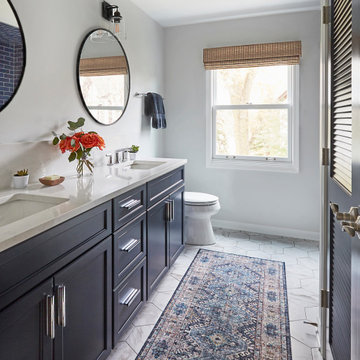
Next we tackled the upstairs starting with the homeowner’s son’s bath. The bath originally had both a tub shower and a separate shower, so we decided to swap out the shower for a new laundry area. This freed up some space downstairs in what used to be the mudroom/laundry room and is much more convenient for daily laundry needs.
We continued the blue palette here with navy cabinetry and the navy tile in the shower. Porcelain floor tile and chrome fixtures keep maintenance to a minimum while matte black mirrors and lighting add some depth the design. A low maintenance runner adds some warmth underfoot and ties the whole space together.
We added a pocket door to the bathroom to minimize interference with the door swings. The left door of the laundry closet is on a 180 degree hinge to allow for easy full access to the machines. Next we tackled the master bath which is an en suite arrangement. The original was typical of the 1980’s with the vanity outside of the bathroom, situated near the master closet. And the brown theme continued here with multiple shades of brown.
Our first move was to segment off the bath and the closet from the master bedroom. We created a short hall from the bedroom to the bathroom with his and hers walk-in closets on the left and right as well as a separate toilet closet outside of the main bathroom for privacy and flexibility.
The original bathroom had a giant soaking tub with steps (dangerous!) as well as a small shower that did not work well for our homeowner who is 6’3”. With other bathtubs in the home, they decided to eliminate the tub and create an oversized shower which takes up the space where the old tub was located. The double vanity is on the opposite wall and a bench is located under the window for morning conversations and a place to set a couple of towels.
The pallet in here is light and airy with a mix of blond wood, creamy porcelain and marble tile, and brass accents. A simple roman shade adds some texture and it’s top-down mechanism allows for light and privacy.
This large whole house remodel gave our homeowners not only the ability to maximize the potential of their home but also created a lovely new frame from which to view their fabulous lake views.
Designed by: Susan Klimala, CKD, CBD
Photography by: Michael Kaskel
For more information on kitchen and bath design ideas go to: www.kitchenstudio-ge.com
Find the right local pro for your project
 Gertler & Wente Architects
Elliott Kaufman
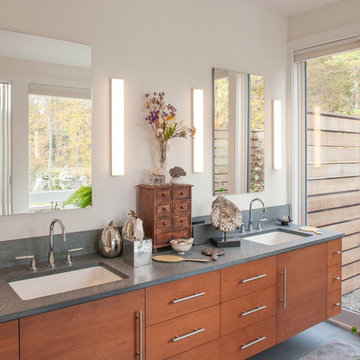
Example of a trendy gray floor bathroom design in New York with flat-panel cabinets, medium tone wood cabinets, beige walls, an undermount sink and gray countertops
Example of a trendy gray floor bathroom design in New York with flat-panel cabinets, medium tone wood cabinets, beige walls, an undermount sink and gray countertops
 Paces Construction Co
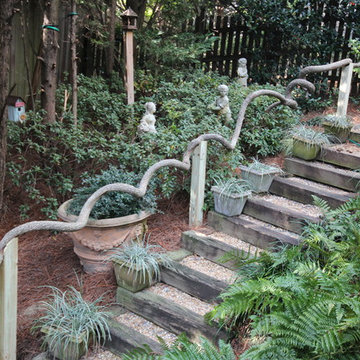
We used a free form vine we harvested from our woods as a handrail on these garden steps for a small Buckhead garden.
Design ideas for a traditional landscaping in Atlanta.
Design ideas for a traditional landscaping in Atlanta.

 Randy Angell Designs
The planning phase of this modern retreat was an intense collaboration that took place over the course of more than two years. While the initial design concept exceeded the clients' expectations, it also exceeded their budget beyond the point of comfort.
The next several months were spent modifying the design, in attempts to lower the budget. Ultimately, the decision was made that they would hold off on the project until they could budget for the original design, rather than compromising the vision.
About a year later, we repeated that same process, which resulted in the same outcome. After another year-long hiatus, we met once again. We revisited design thoughts, each of us bringing to the table new ideas and options.
Each thought simply solidified the fact that the initial vision was absolutely what we all wanted to see come to fruition, and the decision was finally made to move forward.
The main challenge of the site was elevation. The Southeast corner of the lot stands 5'6" above the threshold of the rear door, while the Northeast corner dropped a full 2' below the threshold of the door.
The backyard was also long and narrow, sloping side-to-side and toward the house. The key to the design concept was to deftly place the project into the slope and utilize the elevation changes, without allowing them to dominate the yard, or overwhelm the senses.
The unseen challenge on this project came in the form of hitting every underground issue possible. We had to relocate the sewer main, the gas line, and the electrical service; and since rock was sitting about 6" below the surface, all of these had to be chiseled through many feet of dense rock, adding to our projected timeline and budget.
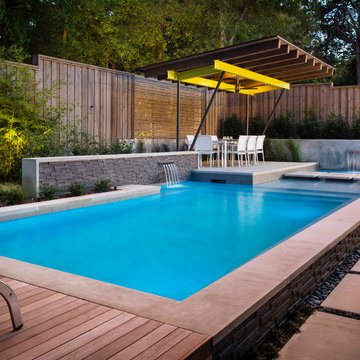
As you enter the space, your first stop is an outdoor living area. Smooth finished concrete, colored to match the 'Leuder' limestone coping, has a subtle saw-cut pattern aligned with the edges of the recessed fire pit.
In small spaces, it is important to consider a multi-purpose approach. So, the recessed fire pit has been fitted with an aluminum cover that allows our client to set up tables and chairs for entertaining, right over the top of the fire pit.
From here, it;s two steps up to the pool elevation, and the floating 'Leuder' limestone stepper pads that lead across the pool and hide the dam wall of the flush spa.
The main retaining wall to the Southeast is a poured concrete wall with an integrated sheer descent waterfall into the spa. To bring in some depth and texture, a 'Brownstone' ledgestone was used to face both the dropped beam on the pool, and the raised beam of the water feature wall.
The main water feature is comprised of five custom made stainless steel scuppers, supplied by a dedicated booster pump.
Colored concrete stepper pads lead to the 'Ipe' wood deck at the far end of the pool. The placement of this wood deck allowed us to minimize our use of retaining walls on the Northeast end of the yard, since it drops off over three feet below the elevation of the pool beam.
One of the most unique features on this project has to be the structure over the dining area. With a unique combination of steel and wood, the clean modern aesthetic of this structure creates a visual stamp in the space that standard structure could not accomplish.
4" steel posts, painted charcoal grey, are set on an angle, 4' into the bedrock, to anchor the structure. Steel I-beams painted in green-yellow color--aptly called "frolic"--act as the base to the hefty cedar rafters of the roof structure, which has a slight pitch toward the rear.
A hidden gutter on the back of the roof sends water down a copper rain chain, and into the drainage system. The backdrop for both this dining area , as well as the living area, is the horizontal screen panel, created with alternating sizes of cedar planks, stained to a calm hue of dove grey.
Sponsored
Westerville, OH

Custom Home Works
Franklin County's Award-Winning Design, Build and Remodeling Expert
 Dyer Studio Inc.
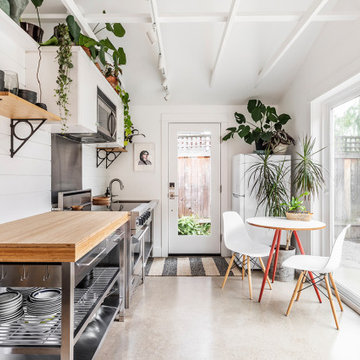
Converted from an existing Tuff Shed garage, the Beech Haus ADU welcomes short stay guests in the heart of the bustling Williams Corridor neighborhood.
Natural light dominates this self-contained unit, with windows on all sides, yet maintains privacy from the primary unit. Double pocket doors between the Living and Bedroom areas offer spatial flexibility to accommodate a variety of guests and preferences. And the open vaulted ceiling makes the space feel airy and interconnected, with a playful nod to its origin as a truss-framed garage.
A play on the words Beach House, we approached this space as if it were a cottage on the coast. Durable and functional, with simplicity of form, this home away from home is cozied with curated treasures and accents. We like to personify it as a vacationer: breezy, lively, and carefree.
 Tektoniks Architects
Custom Contemporary Home Design
Wayland, MA
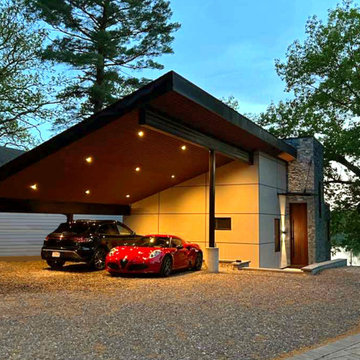
Expansion of the original building footprint (the original home was torn down) was not allowed, by zoning ordinance. This meant the design could not add a Garage to the site, which was highly desired. To solve the issue of protected parking for the home, Tektoniks Architects designed a cantilevered roof, which also forms the principle organizing element (a "spine") for the design. A Special Permit was obtained to allow us to utilize "air rights" over the required front setback to give proper coverage for the Owner's cars. Structural supports were placed at the limits of the required setback, and the structural design provided the necessary cantilever.
The underside cladding of the Carport forms the aesthetic for the eaves and interior spaces of the home, with the slatted wood treatment extending continuously from front to back for the entire roof.

 Arrigoni Woods, Inc.
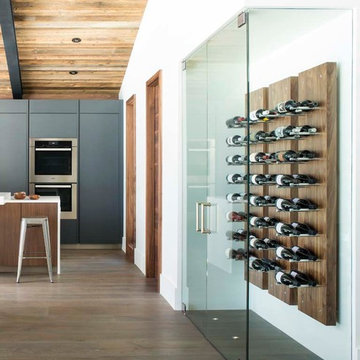
A luxury residence in Vail, Colorado featuring wire-brushed Bavarian Oak wide-plank wood floors in a custom finish and reclaimed sunburnt siding on the ceiling.
Arrigoni Woods specializes in wide-plank wood flooring, both recycled and engineered. Our wood comes from old-growth Western European forests that are sustainably managed. Arrigoni's uniquely engineered wood (which has the look and feel of solid wood) features a trio of layered engineered planks, with a middle layer of transversely laid vertical grain spruce, providing a solid core.
This gorgeous mountain modern home was completed in the Fall of 2014. Using only the finest of materials and finishes, this home is the ultimate dream home.
Photographer: Kimberly Gavin
 Windy City Painters
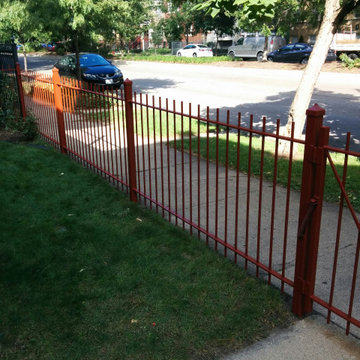
Ever notice how your iron fence looks worse every spring after another Chicago winter? That slow deterioration is not cosmetic - it is active metal failure that compounds every freeze-thaw cycle until replacement becomes the only option. Windy City Painters works with homeowners across the Chicago North Side and Near West Side to restore original iron fencing on greystones, two-flats, Victorian brownstones, and coach houses before that point is reached.
PROJECT OVERVIEW
This iron fence restoration involved a classic Chicago residential property with original wrought iron fencing showing surface rust across the majority of pickets, flaking previous paint coats, and localized deep pitting near the base rails. A structural check identified two loose pickets requiring welding before any surface preparation or coating began. Total linear footage fell in the mid-range for a standard Chicago residential lot.
MATERIALS AND PRODUCTS
Windy City Painters selected Ospho rust converter for chemically neutralizing active iron oxide before priming. Ospho reacts with rust to form a stable phosphate compound that stops corrosion progression rather than simply sealing over it. Sherwin-Williams DTM rust-inhibitive primer was applied to all bare and converted surfaces, followed by two finish coats of Rust-Oleum DTM in satin black. DTM - direct to metal - formulas provide corrosion inhibitors built into the coating matrix, which matters significantly in Chicago's climate.
THE PROCESS
Step 1 - Structural Assessment and Welding Coordination. Before any surface preparation begins, Windy City Painters inspects every picket and rail connection for structural integrity. Loose or cracked iron must be welded before coating. Paint applied over a compromised joint will fail within one season as movement continues to break the bond. On this project, two pickets were tack-welded by a coordinating welder before prep started.
Step 2 - Wire Wheel Grinding and Needle Gun Descaling. All rusted sections were ground to bare or near-bare metal using wire wheel attachments and needle gun descaling tools. This step removes loose scale, flaking previous coatings, and surface contamination that would prevent primer adhesion. Skipping mechanical prep is the single most common reason iron fence paint fails prematurely on Chicago properties.
Step 3 - Ospho Rust Converter Application. Ospho was brushed into all pitted and converted areas and allowed to cure fully. The phosphoric acid chemistry converts iron oxide into iron phosphate, arresting active rust and creating a surface that accepts primer more effectively than bare metal alone. Corroseal is an equivalent alternative used on projects with heavier pitting.
Step 4 - DTM Primer and Finish Coat Application. Sherwin-Williams DTM rust-inhibitive primer was applied across all prepared surfaces. Two topcoats of Rust-Oleum DTM in satin black followed after full primer cure. DTM finish coats add a second corrosion-inhibiting layer and provide the UV and weather resistance needed for Chicago exterior iron work.
CHICAGO-SPECIFIC CHALLENGES
Chicago iron fencing faces conditions that accelerate corrosion faster than most US markets. Lake humidity keeps metal surface moisture elevated through much of the year. Road salt splash from winter maintenance reaches fencing along parkways and sidewalk edges, introducing chlorides that aggressively attack iron. Freeze-thaw cycles expand any rust pocket that has formed under paint, lifting coatings from the inside and creating the classic bubbled-paint appearance homeowners notice every spring.
WHAT TO EXPECT LONG-TERM
With Ospho conversion, DTM primer, and two DTM finish coats properly applied over mechanically prepared surfaces, most Chicago residential iron fences hold 5-8 years before needing significant touch-up. Annual visual inspection for any chips or bare spots, with immediate touch-up using Rust-Oleum DTM, extends that window considerably.
PRO TIPS
Tip 1 - Address any bare metal spot the same season you notice it. A pinhole of exposed iron becomes a rust bubble within one Chicago winter and a flaking section by the following spring.
Tip 2 - Never paint over active rust without a converter step. Ospho or Corroseal is inexpensive insurance against a complete repaint two years early.
Tip 3 - Check picket bases at grade level every spring. Ground contact accelerates corrosion at the base faster than anywhere else on the fence. Catching it early keeps welding out of the equation.
Contact Windy City Painters at windypainters.com for a project estimate.
FAQ
Q: What does iron fence painting cost in Chicago? A: Residential iron fence painting with proper rust prep typically runs $300-$900 for standard lot footage. Windy City Painters provides itemized estimates based on linear footage, rust severity, and whether structural welding is required before surface preparation begins.
Q: Do you paint over rust or remove it first? A: Windy City Painters always addresses active rust before priming. Ospho or Corroseal rust converter chemically neutralizes iron oxide, and wire wheel grinding removes loose scale - coating over unaddressed rust guarantees early failure on Chicago iron fences.
Q: When does an iron fence need welding before painting? A: Loose pickets, cracked rails, or connections with visible movement require welding before any coating work begins. Paint cannot stabilize a structural joint - Windy City Painters coordinates with welders when this condition is identified during initial assessment.
Q: How long does iron fence paint last in Chicago? A: With mechanical prep, Ospho conversion, and Sherwin-Williams or Rust-Oleum DTM coatings, properly restored iron fencing holds 5-8 years in Chicago's freeze-thaw climate before needing significant maintenance.
Q: Is Ospho better than Corroseal for Chicago iron fences? A: Both are effective rust converters. Ospho is a liquid phosphoric acid treatment suited for moderate rust and pitting. Corroseal is a latex-based converter-primer hybrid better suited to heavier rust profiles. Windy City Painters selects based on site conditions.
Q: What finish sheen works best on iron fencing? A: Satin or semi-gloss black is the traditional and most durable choice for Chicago greystone and brownstone properties. Satin hides minor surface imperfections better than gloss while still providing adequate UV and moisture resistance.
Q: Can iron fence painting be done in spring or fall in Chicago? A: Yes. Windy City Painters schedules iron fence work in temperatures above 50 degrees Fahrenheit with low ambient humidity - spring and early fall are often ideal windows that avoid both winter cold and peak summer humidity.

Sponsored
Westerville, OH
Custom Home Works
Franklin County's Award-Winning Design, Build and Remodeling Expert
 Thinkterior LLC
For a family who believes fitness is not only an essential part of life but also a fun opportunity for the whole family to connect, build and achieve greatness together there is nothing better than a custom designed obstacle course right in your back yard.
THEME
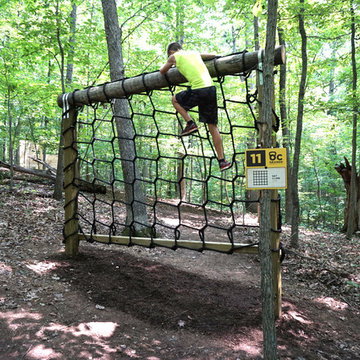
The theme of this half mile trail through the woods is evident in the fun, creative and all-inclusive obstacles hidden in the natural flow of the land around this amazing family home. The course was created with adults and children, advanced and beginner athletes, competitive and entertaining events all accounted for. Each of the 13 obstacles was designed to be challenging no matter the size, skill or ability of the athlete lucky enough to run the course.
FOCUS
The focus for this family was to create an outdoor adventure that could be an athletic, social and personal outlet for their entire family while maintaining the natural beauty of the landscape and without altering the sweeping views from the home. The large scale of the challenging obstacles is camouflaged within the landscape using the rolling hills and mature trees as a natural curtain in every season. The beauty of the course does not diminish the functional and demanding nature of the obstacles which are designed to focus on multiple strength, agility, and cardio fitness abilities and intensities.
STORAGE
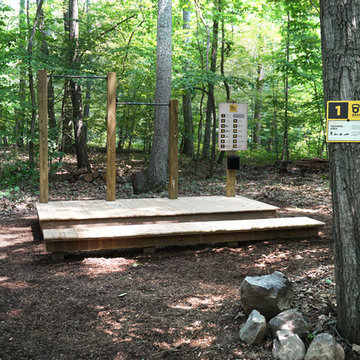
The start of the trail includes a raised training area offering a dedicated space clear from the ground to place bags, mats and other equipment used during the run. A small all-terrain storage cart was provided for use with 6 yoga mats, 3 medicine balls of various weights, rings, sprinting cones, and a large digital timer to record laps.
GROWTH
The course was designed to provide an athletic and fun challenge for children, teens and adults no matter their experience or athletic prowess. This course offers competitive athletes a challenge and budding athletes an opportunity to experience and ignite their passion for physical activity. Initially the concept for the course was focused on the youngest of the family however as the design grew so did the obstacles and now it is a true family experience that will meet their adapting needs for years. Each obstacle is paired with an instructional sign directing the runners in proper use of the obstacle, adaptations for skill levels and tips on form. These signs are all customized for this course and are printed on metal to ensure they last for many years.
SAFETY
Safety is crucial for all physical activity and an obstacle course of this scale presents unique safety concerns. Children should always be supervised when participating in an adventure on the course however additional care was paid to details on the course to ensure everyone has a great time. All of the course obstacles have been created with pressure treated lumber that will withstand the seasonal poundings. All footer pilings that support obstacles have been placed into the ground between 3 to 4 feet (.9 to 1.2 meters) and each piling has 2 to 3 bags of concrete (totaling over 90 bags used throughout the course) ensuring stability of the structure and safety of the participants. Additionally, all obstacle lumber has been given rounded corners and sanded down offering less splintering and more time for everyone to enjoy the course.
This athletic and charismatic family strives to incorporate a healthy active lifestyle into their daily life and this obstacle course offers their family an opportunity to strengthen themselves and host some memorable and active events at their amazing home.
 Drewett Works
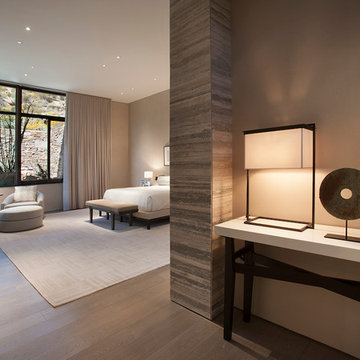
The primary goal for this project was to craft a modernist derivation of pueblo architecture. Set into a heavily laden boulder hillside, the design also reflects the nature of the stacked boulder formations. The site, located near local landmark Pinnacle Peak, offered breathtaking views which were largely upward, making proximity an issue. Maintaining southwest fenestration protection and maximizing views created the primary design constraint. The views are maximized with careful orientation, exacting overhangs, and wing wall locations. The overhangs intertwine and undulate with alternating materials stacking to reinforce the boulder strewn backdrop. The elegant material palette and siting allow for great harmony with the native desert.
The Elegant Modern at Estancia was the collaboration of many of the Valley's finest luxury home specialists. Interiors guru David Michael Miller contributed elegance and refinement in every detail. Landscape architect Russ Greey of Greey | Pickett contributed a landscape design that not only complimented the architecture, but nestled into the surrounding desert as if always a part of it. And contractor Manship Builders -- Jim Manship and project manager Mark Laidlaw -- brought precision and skill to the construction of what architect C.P. Drewett described as "a watch."
Project Details | Elegant Modern at Estancia
Architecture: CP Drewett, AIA, NCARB
Builder: Manship Builders, Carefree, AZ
Interiors: David Michael Miller, Scottsdale, AZ
Landscape: Greey | Pickett, Scottsdale, AZ
Photography: Dino Tonn, Scottsdale, AZ
Publications:
"On the Edge: The Rugged Desert Landscape Forms the Ideal Backdrop for an Estancia Home Distinguished by its Modernist Lines" Luxe Interiors + Design, Nov/Dec 2015.
Awards:
2015 PCBC Grand Award: Best Custom Home over 8,000 sq. ft.
2015 PCBC Award of Merit: Best Custom Home over 8,000 sq. ft.
The Nationals 2016 Silver Award: Best Architectural Design of a One of a Kind Home - Custom or Spec
2015 Excellence in Masonry Architectural Award - Merit Award
Photography: Dino Tonn
 Thinkterior LLC
For a family who believes fitness is not only an essential part of life but also a fun opportunity for the whole family to connect, build and achieve greatness together there is nothing better than a custom designed obstacle course right in your back yard.
THEME
The theme of this half mile trail through the woods is evident in the fun, creative and all-inclusive obstacles hidden in the natural flow of the land around this amazing family home. The course was created with adults and children, advanced and beginner athletes, competitive and entertaining events all accounted for. Each of the 13 obstacles was designed to be challenging no matter the size, skill or ability of the athlete lucky enough to run the course.
FOCUS
The focus for this family was to create an outdoor adventure that could be an athletic, social and personal outlet for their entire family while maintaining the natural beauty of the landscape and without altering the sweeping views from the home. The large scale of the challenging obstacles is camouflaged within the landscape using the rolling hills and mature trees as a natural curtain in every season. The beauty of the course does not diminish the functional and demanding nature of the obstacles which are designed to focus on multiple strength, agility, and cardio fitness abilities and intensities.
STORAGE
The start of the trail includes a raised training area offering a dedicated space clear from the ground to place bags, mats and other equipment used during the run. A small all-terrain storage cart was provided for use with 6 yoga mats, 3 medicine balls of various weights, rings, sprinting cones, and a large digital timer to record laps.
GROWTH
The course was designed to provide an athletic and fun challenge for children, teens and adults no matter their experience or athletic prowess. This course offers competitive athletes a challenge and budding athletes an opportunity to experience and ignite their passion for physical activity. Initially the concept for the course was focused on the youngest of the family however as the design grew so did the obstacles and now it is a true family experience that will meet their adapting needs for years. Each obstacle is paired with an instructional sign directing the runners in proper use of the obstacle, adaptations for skill levels and tips on form. These signs are all customized for this course and are printed on metal to ensure they last for many years.
SAFETY
Safety is crucial for all physical activity and an obstacle course of this scale presents unique safety concerns. Children should always be supervised when participating in an adventure on the course however additional care was paid to details on the course to ensure everyone has a great time. All of the course obstacles have been created with pressure treated lumber that will withstand the seasonal poundings. All footer pilings that support obstacles have been placed into the ground between 3 to 4 feet (.9 to 1.2 meters) and each piling has 2 to 3 bags of concrete (totaling over 90 bags used throughout the course) ensuring stability of the structure and safety of the participants. Additionally, all obstacle lumber has been given rounded corners and sanded down offering less splintering and more time for everyone to enjoy the course.
This athletic and charismatic family strives to incorporate a healthy active lifestyle into their daily life and this obstacle course offers their family an opportunity to strengthen themselves and host some memorable and active events at their amazing home.
 Siobhan's Outdoor Transformations
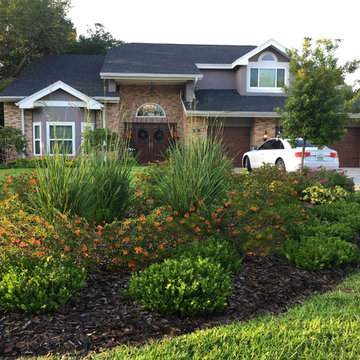
Sustainable landscaping featuring low maintenance plants. The orange blooming plants are Dwarf Firebush shrubs. I paired them with Dwarf Natal Plum and Paspalum Ornamental grass. Dwarf Firebush shrubs sport orange flowers tipped with gold, which set off their beauty. A great nectar source for butterflies and hummingbirds adds to it's appeal.
They are really tough, so tough they are used in commercial locations and on some roadways. This delightful shrub blooms on and off all year - more during warmer weather - and attracts butterflies and hummingbirds to its brightly-colored, tubular flowers.
It has a light and airy charm and looks best when it's hand-trimmed to form a natural mounded shape, rather than trying to keep it manicured with hedge trimmers.
Now this is not the native variety, for all you native plant purists out there, though many nurseries sell the dwarf as just "firebush," which can get confusing.
Here's how to tell the difference:
The native grows larger and has slightly "hairy" leaves and deep red to red-orange flowers. It's dwarf "cousin" can be kept smaller and more compact, though with a similar informal look.
The smaller variety has smoother leaves and a touch of yellow to the blossoms...and requires a bit more care.
This shrub is a fast grower that can be kept 3 feet tall and wide, though you can let it grow larger if you prefer.
Though considered evergreen, the plant can lose leaves during a cold winter, though with proper pruning in spring it should sprout new growth and flush out again. A location sheltered from winter winds will help protect it.
These plants prefer full to partial sun, though they'll grow in part shade, where they'll flower less with more open growth.
Landscape uses for dwarf fire bush:
• accent for a mixed bed
• informal hedge
• butterfly garden plant
• lining a walkway or garden path
• along a medium-height or tall fence
• around a poolcage, patio, porch or deck
• understory planting for tall palms
• backdrop planting for smaller plants
 Knauf Landscape Architecture
Architect: Sarah Susanka, AIA
Photography: Jim Westphalen
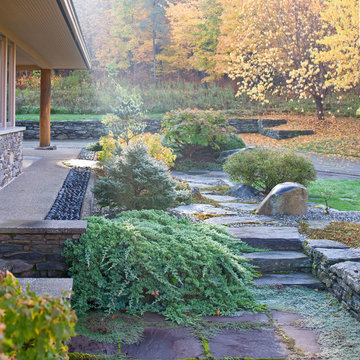
A seamless flow of overlapping color, textures and patterns guides you from one outdoor space to another. An integrated mix of local stone throughout: Vermont red and green slate patios, fieldstone walls and stepping stone paths, granite boulder sculptures from the land, river rock-lined drip edges. Low sculpted wood-stemmed plants and lush groundcovers, mostly cultivars of indigenous species. Moss-filled joints in the patios, groundcover draping over stone, thyme along edges of walls.
 Shannon Ggem Design
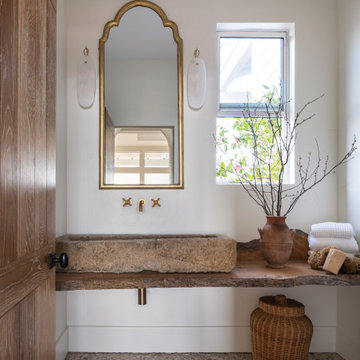
Powder room - southwestern gray floor powder room idea in Los Angeles with white walls, a vessel sink, wood countertops and brown countertops

1