
Search results for "Properly broken" in Home Design Ideas

 Lawrence and Gomez Architects
A 36" range top allows for easy access to deep drawers below to store pots and cookware.
Transitional u-shaped eat-in kitchen photo in Denver with shaker cabinets, medium tone wood cabinets, granite countertops, beige backsplash, porcelain backsplash and stainless steel appliances
Transitional u-shaped eat-in kitchen photo in Denver with shaker cabinets, medium tone wood cabinets, granite countertops, beige backsplash, porcelain backsplash and stainless steel appliances

 GS Construction
Example of a small classic 3/4 white tile and stone tile mosaic tile floor alcove shower design in Chicago with an undermount sink, recessed-panel cabinets, black cabinets, quartzite countertops, a two-piece toilet and gray walls

 C.E. Pontz Sons
The fall has snuck up on us rather quick but not before we had a final summer day to show off this amazing outdoor living project we just recently completed. This outdoor living project included pricing to excavation and installation of a ledge rock retaining wall around the perimeter of the property. The wall included the step area, large retaining walls, proper drainage behind the wall, and wall caps. After the wall was installed we constructed the sitting wall and natural stone ‘dive rock’. the sitting wall was constructed on concrete footings, with concrete block core, faced with natural stone veneer matching stone used on pool, and capped with 2″ natural flagstone. The dive rock was set on existing pool beam and concrete slab poured behind pool beam. Installation of the landscape, grading, seeding, sodding, and landscape lighting was completed around the pool area. All plants and trees were installed in new landscape beds with mulch, decorative river stone was installed between the fence and wall across back of pool area, and all disturbed areas outside of fence were graded and seeded. All lawn areas inside of the fence were sodded. A broken flagstone path was installed from concrete patio to steps in wall, and a low natural limestone boulder wall for raised planter at egress window was also installed. A low voltage LED lighting system (FX Luxor Zoning/Dimming/Color) was installed with under cap lights installed in sitting wall (Zoning/Dimming/Color) and in existing stair treads (Zoning/Dimming) to screen porch, up lights/wash lights installed on select trees (Zoning/Dimming/Color), and path lights (Zoning) installed at concrete steps, along back of patio, and wall steps. Additional drainage including adding a drain box for the Sump pump outlet pipe and adding an underground pipe to the downspout near the pool equipment and fence gate was also installed.
Find the right local pro for your project
 C.E. Pontz Sons
The fall has snuck up on us rather quick but not before we had a final summer day to show off this amazing outdoor living project we just recently completed. This outdoor living project included pricing to excavation and installation of a ledge rock retaining wall around the perimeter of the property. The wall included the step area, large retaining walls, proper drainage behind the wall, and wall caps. After the wall was installed we constructed the sitting wall and natural stone ‘dive rock’. the sitting wall was constructed on concrete footings, with concrete block core, faced with natural stone veneer matching stone used on pool, and capped with 2″ natural flagstone. The dive rock was set on existing pool beam and concrete slab poured behind pool beam. Installation of the landscape, grading, seeding, sodding, and landscape lighting was completed around the pool area. All plants and trees were installed in new landscape beds with mulch, decorative river stone was installed between the fence and wall across back of pool area, and all disturbed areas outside of fence were graded and seeded. All lawn areas inside of the fence were sodded. A broken flagstone path was installed from concrete patio to steps in wall, and a low natural limestone boulder wall for raised planter at egress window was also installed. A low voltage LED lighting system (FX Luxor Zoning/Dimming/Color) was installed with under cap lights installed in sitting wall (Zoning/Dimming/Color) and in existing stair treads (Zoning/Dimming) to screen porch, up lights/wash lights installed on select trees (Zoning/Dimming/Color), and path lights (Zoning) installed at concrete steps, along back of patio, and wall steps. Additional drainage including adding a drain box for the Sump pump outlet pipe and adding an underground pipe to the downspout near the pool equipment and fence gate was also installed.
 Five Star Tree Care
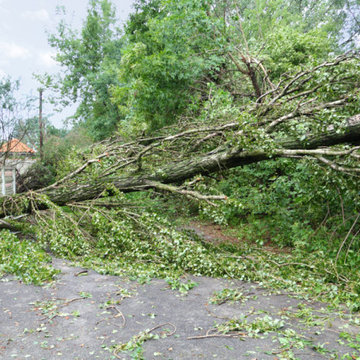
Storms are nature’s way of cleaning out the atmosphere and showing off her awesome power. As essential as this process may be, it can also cause tree damage. If your trees suffer damage during a storm, there are a few things you should do to set things back to their proper order, such as hire a tree removal service. Before you start cleaning up the mess, however, take a look at our suggestions to ensure you are doing what’s best for your trees and your property.
Check the Damage
Before you do anything, you should take the time to check the damage on your property and to the trees themselves. Sometimes broken branches and fallen leaves can hide serious damage that may require special attention. Check to ensure that there is no damage to your property, home, cars, and electrical lines. Next, after you confirm that there is no immediate danger, you can start assessing the tree itself. If you find serious damage to your trees such as splitting, leaning, or even burns from a lightning strike, it is best to call in professionals for help. If the tree is leaning on your home or vehicle, it is also a good idea to have a professional tree care service move forward with the cleanup.
Clean Up Minor Damage and Debris
After the storm has calmed down, and you have assessed the fallout, you can start your yard cleanup. Stick to cleaning up small branches and twigs in addition to leaves and other debris. Avoid large branches, any trees that may be leaning or heavily damaged. Even if your tree is upright, but showing signs of damage you should steer clear until the professionals can assess the situation. Pay close attention to any branches or trees that may be leaning near overhead power lines and also avoid damaged trees that are planted near underground utilities such as gas or power mains.
Call the Professionals at Five Star Tree Services
Anytime a storm damages your landscape, plants, or trees, a professional team of arborists can help. Not only are they trained in the proper methods of cleaning up storm debris in a safe manner, but they can also help decide the best course of action to save or remove your damaged trees. As tree care professionals, every team from Five Star Tree Services will arrive with the proper equipment needed to get the job done safely.
Five Star is fully certified and will also work with your insurance company to assess the damage and coordinate extended cleanup services if needed. For trees that are damaged but still have a chance of surviving, our experienced arborists will create a customized treatment plant and pruning plant to give your tree the best chance of survival. If other treatments are needed, we will also support your tree during its recovery until it is back to its healthy state. For more information regarding our storm tree services in Richmond Hill or our regular tree care services, give us a call at (416) 990-3355 today.

 Complete Flooring
Chris Golden
Inspiration for a transitional carpeted living room remodel in Phoenix with beige walls, a standard fireplace and a tile fireplace
Inspiration for a transitional carpeted living room remodel in Phoenix with beige walls, a standard fireplace and a tile fireplace
 C.E. Pontz Sons
The fall has snuck up on us rather quick but not before we had a final summer day to show off this amazing outdoor living project we just recently completed. This outdoor living project included pricing to excavation and installation of a ledge rock retaining wall around the perimeter of the property. The wall included the step area, large retaining walls, proper drainage behind the wall, and wall caps. After the wall was installed we constructed the sitting wall and natural stone ‘dive rock’. the sitting wall was constructed on concrete footings, with concrete block core, faced with natural stone veneer matching stone used on pool, and capped with 2″ natural flagstone. The dive rock was set on existing pool beam and concrete slab poured behind pool beam. Installation of the landscape, grading, seeding, sodding, and landscape lighting was completed around the pool area. All plants and trees were installed in new landscape beds with mulch, decorative river stone was installed between the fence and wall across back of pool area, and all disturbed areas outside of fence were graded and seeded. All lawn areas inside of the fence were sodded. A broken flagstone path was installed from concrete patio to steps in wall, and a low natural limestone boulder wall for raised planter at egress window was also installed. A low voltage LED lighting system (FX Luxor Zoning/Dimming/Color) was installed with under cap lights installed in sitting wall (Zoning/Dimming/Color) and in existing stair treads (Zoning/Dimming) to screen porch, up lights/wash lights installed on select trees (Zoning/Dimming/Color), and path lights (Zoning) installed at concrete steps, along back of patio, and wall steps. Additional drainage including adding a drain box for the Sump pump outlet pipe and adding an underground pipe to the downspout near the pool equipment and fence gate was also installed.
 House Doctors of Scotch Plains-Fanwood, NJ
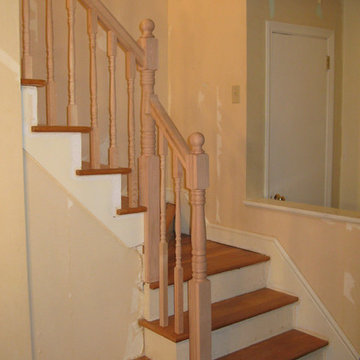
Stairways that have a baluster add beauty to a home. However, if the baluster is broken, then this can cause the stairs to look bad. Fortunately, it is not that difficult to replace a broken baluster. Below are some of the steps you will need to take:
Remove The End Cap
It is important to be very careful when you are replacing the baluster. You will need to keep the baluster intact so that a wood turner will be able to make an exact copy of it. You will most likely need to remove the end cap from the stairs. Break the seal that is between the tread and the end cap using a sturdy knife or pry bar.
Breaking The Baluster
If you do not want to salvage the baluster, then you do have other options. You can use a hammer to loosen the nails at the top of the baluster. Make sure that you do not damage the adjacent balusters or handrail. You can use your hands to loosen the bottom half of the baluster. Make sure you use gentle force.
Create A New Baluster
Unless you are fortunate enough to have the same baluster at a local home center, you are going to need a wood turner to make a new baluster. Make sure you tell your wood turner the specific type of wood you need. If you are not concerned about the original color, then you will need to select the wood that is the hardest. Ask the wood turner to leave the spindles intact. This may make it harder for you to fit the baluster into the staircase. However, this reduces the chances of getting a misfit from the wood turner.
Prepare The Stairs
It will likely take one or two weeks to turn a baluster. You can prepare the stairs during this time. Clean up the area around the stairs. Put the end cap back on the stair tread. Measure the tread to where the new baluster and handrail will meet on the upstairs side.
Prepare The Baluster
You can prepare the baluster by sanding it smooth. Measure from the bottom of the baluster to the bottom of the tenon joint. Cut the top end of the baluster so that it matches the handrail's slope. Hold a T-Bevel against the handrail's underside where the new baluster will go. Mark the angle with a pencil.
Install The Bottom Of The Baluster
Insert the tenon inside of the mortise. After that, position the top of it in the middle of the handrail's underside.
Install The Top Of The Baluster
Make sure the tenon is straight by using a carpenter's level. Have someone hold it in place in order to ensure that it matches the angle of the other balusters. Place one nail into the baluster's upstairs side. You most likely will not need more than two finishing nails. Remove dust by wiping off the baluster. Use painter's tape to mask off the handrail and stair tread. Stain or paint the new baluster.
Since this project involves a lot of work, you can save a lot of time and stress by contacting House Doctors to help. Thanks to our highly experienced team, you can depend on us to get the work done promptly and properly.
by Ken Benedetto, Owner of House Doctors of Scotch Plains - Fanwood
 C.E. Pontz Sons
The fall has snuck up on us rather quick but not before we had a final summer day to show off this amazing outdoor living project we just recently completed. This outdoor living project included pricing to excavation and installation of a ledge rock retaining wall around the perimeter of the property. The wall included the step area, large retaining walls, proper drainage behind the wall, and wall caps. After the wall was installed we constructed the sitting wall and natural stone ‘dive rock’. the sitting wall was constructed on concrete footings, with concrete block core, faced with natural stone veneer matching stone used on pool, and capped with 2″ natural flagstone. The dive rock was set on existing pool beam and concrete slab poured behind pool beam. Installation of the landscape, grading, seeding, sodding, and landscape lighting was completed around the pool area. All plants and trees were installed in new landscape beds with mulch, decorative river stone was installed between the fence and wall across back of pool area, and all disturbed areas outside of fence were graded and seeded. All lawn areas inside of the fence were sodded. A broken flagstone path was installed from concrete patio to steps in wall, and a low natural limestone boulder wall for raised planter at egress window was also installed. A low voltage LED lighting system (FX Luxor Zoning/Dimming/Color) was installed with under cap lights installed in sitting wall (Zoning/Dimming/Color) and in existing stair treads (Zoning/Dimming) to screen porch, up lights/wash lights installed on select trees (Zoning/Dimming/Color), and path lights (Zoning) installed at concrete steps, along back of patio, and wall steps. Additional drainage including adding a drain box for the Sump pump outlet pipe and adding an underground pipe to the downspout near the pool equipment and fence gate was also installed.
 C.E. Pontz Sons
The fall has snuck up on us rather quick but not before we had a final summer day to show off this amazing outdoor living project we just recently completed. This outdoor living project included pricing to excavation and installation of a ledge rock retaining wall around the perimeter of the property. The wall included the step area, large retaining walls, proper drainage behind the wall, and wall caps. After the wall was installed we constructed the sitting wall and natural stone ‘dive rock’. the sitting wall was constructed on concrete footings, with concrete block core, faced with natural stone veneer matching stone used on pool, and capped with 2″ natural flagstone. The dive rock was set on existing pool beam and concrete slab poured behind pool beam. Installation of the landscape, grading, seeding, sodding, and landscape lighting was completed around the pool area. All plants and trees were installed in new landscape beds with mulch, decorative river stone was installed between the fence and wall across back of pool area, and all disturbed areas outside of fence were graded and seeded. All lawn areas inside of the fence were sodded. A broken flagstone path was installed from concrete patio to steps in wall, and a low natural limestone boulder wall for raised planter at egress window was also installed. A low voltage LED lighting system (FX Luxor Zoning/Dimming/Color) was installed with under cap lights installed in sitting wall (Zoning/Dimming/Color) and in existing stair treads (Zoning/Dimming) to screen porch, up lights/wash lights installed on select trees (Zoning/Dimming/Color), and path lights (Zoning) installed at concrete steps, along back of patio, and wall steps. Additional drainage including adding a drain box for the Sump pump outlet pipe and adding an underground pipe to the downspout near the pool equipment and fence gate was also installed.
 C.E. Pontz Sons
The fall has snuck up on us rather quick but not before we had a final summer day to show off this amazing outdoor living project we just recently completed. This outdoor living project included pricing to excavation and installation of a ledge rock retaining wall around the perimeter of the property. The wall included the step area, large retaining walls, proper drainage behind the wall, and wall caps. After the wall was installed we constructed the sitting wall and natural stone ‘dive rock’. the sitting wall was constructed on concrete footings, with concrete block core, faced with natural stone veneer matching stone used on pool, and capped with 2″ natural flagstone. The dive rock was set on existing pool beam and concrete slab poured behind pool beam. Installation of the landscape, grading, seeding, sodding, and landscape lighting was completed around the pool area. All plants and trees were installed in new landscape beds with mulch, decorative river stone was installed between the fence and wall across back of pool area, and all disturbed areas outside of fence were graded and seeded. All lawn areas inside of the fence were sodded. A broken flagstone path was installed from concrete patio to steps in wall, and a low natural limestone boulder wall for raised planter at egress window was also installed. A low voltage LED lighting system (FX Luxor Zoning/Dimming/Color) was installed with under cap lights installed in sitting wall (Zoning/Dimming/Color) and in existing stair treads (Zoning/Dimming) to screen porch, up lights/wash lights installed on select trees (Zoning/Dimming/Color), and path lights (Zoning) installed at concrete steps, along back of patio, and wall steps. Additional drainage including adding a drain box for the Sump pump outlet pipe and adding an underground pipe to the downspout near the pool equipment and fence gate was also installed.
 Windy City Painters
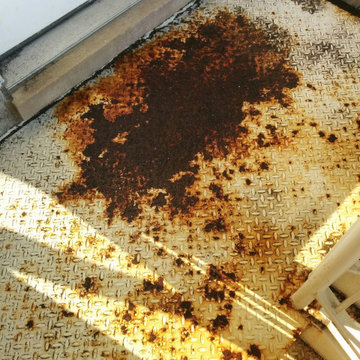
 recently tackled heavily corroded metal stairs on the North Side - the kind of job where surface prep makes or breaks the entire project. The stairs had years of rust scaling, flaking old paint, and a few sections where pitting had gone deep.Here in Chicago, metal stairs take a brutal beating. Freeze-thaw cycles crack protective coatings from October through April. Road salt spray migrates from boots and walkways. Humidity off the lake accelerates oxidation on any exposed metal. Older two-flats and greystones often have original ornamental iron stairways that haven't been properly treated in decades.OUR 4-STEP METAL STAIR PROCESS:Mechanical prep with wire wheel grinder and needle gun descaling on heavy corrosion zonesOspho rust-converting primer applied to all remaining oxidized surfaces - this chemically transforms rust into a stable baseSherwin-Williams Corothane moisture-cure urethane primer for extreme industrial barrier protectionTwo topcoats of Sherwin-Williams Corothane aliphatic finish for maximum UV, moisture, and chemical durability Q: What does metal stair painting cost in Chicago?A: Most North Side residential metal staircases run $800-$2,500 depending on step count, structure height, rust severity, and whether any welding repairs are needed before painting begins.Q: Can you paint over rust?A: Not directly. Windy City Painters always converts or removes rust first using Ospho or wire wheel grinding so high-performance coatings like Corothane bond correctly and last.Q: How long does painted metal stairs last in Chicago?A: With Sherwin-Williams Corothane moisture-cure urethane primer and topcoat, properly prepped metal staircases in Chicago typically hold 8-12 years through harsh winters and foot traffic. Q: Do you handle ornamental iron staircases on greystones or two-flats?A: Absolutely. Windy City Painters works regularly on vintage metal stairways found on North Side greystones, courtyard buildings, and Victorian brownstones.Q: What if sections are broken or bent?A: We assess whether a welder is needed before painting begins. We coordinate that repair before any coatings go down.Q: Is there prep before the primer?A: Yes - wire wheel grinding, needle gun descaling on heavy zones, and a full wipe-down before Ospho and Sherwin-Williams Corothane primer application.Q: How do I get a quote?A: Visit windypainters.com or call us directly. Windy City Painters provides free on-site estimates for all metal stair painting projects.Protect your investment before next winter hits. windypainters.com#ChicagoPainter #WindyCityPainters #ChicagoIL #HomeImprovement #ChicagoHome #MetalStairPainting #RustyStairs #ChicagoNorthSide #StairPainting #MetalPainting #ChicagoContractor #ExteriorPainting #GreystoneLiving #ChicagoTwoFlat #CurbAppeal
 Hubley Painting & Remodeling
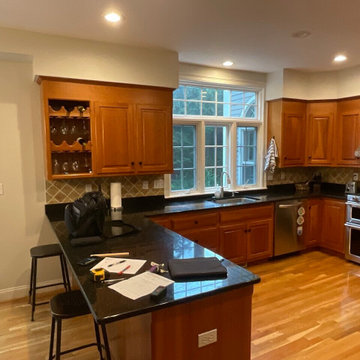
Before: cherry cabinetry, dark granite and a peninsula that closed off the room.
Kitchen - transitional kitchen idea in Boston
Kitchen - transitional kitchen idea in Boston


 Woodstock Flooring & Design Center
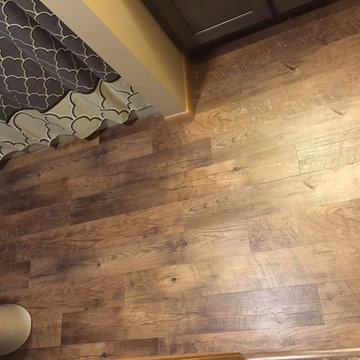
Mannington Luxury Vinyl Plank LockSolid Flooring.
Example of a small minimalist kids' vinyl floor home design design with an undermount sink, flat-panel cabinets, gray cabinets, granite countertops and beige walls
Example of a small minimalist kids' vinyl floor home design design with an undermount sink, flat-panel cabinets, gray cabinets, granite countertops and beige walls
 Interior Pros - Design Studio
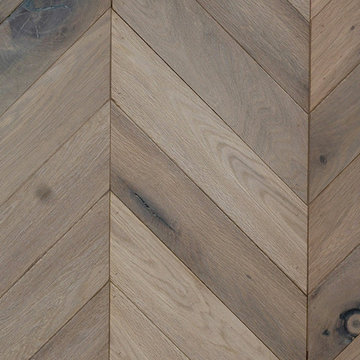
The grey trend has evolved in the last twelve months. Nowadays browns, beige and a touch of grey are in demand. Greige is the new buzzword.
Heavier hand scraped or contoured products, the rage that started around 2005 has taken a back seat in most areas, while a softer wire brushed "ceruse effect" seen mostly on White Oak has been remarkably strong showing no effects of becoming “dated” like the others mentioned.
Ceruse Color Possibilities
There are numerous color combinations to the "cerused" process with the most popular being white or off white. This design trend in hardwood flooring can have darker gray white oak with a mild ceruse off white effect.
There are limitless possibilities in either a prefinished hardwood floor or with what we can create for you in a custom on-site finished hardwood floor.
If something suits your fancy, contact us and we can work on creating just the look and sense of style you are looking for.
 Tile Doctor Ltd
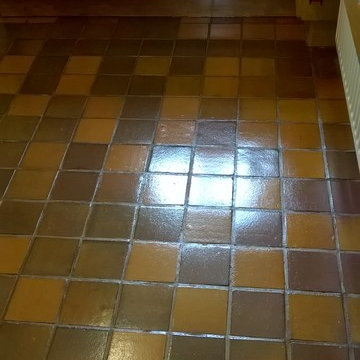
This Quarry tiled kitchen floor was in very good condition, with no cracked or broken tiles. However, my customer, who lives in the town of Tutbury, near Burton-on-Trent, was keen to boost the condition of the tiles further through professional maintenance, including a deep clean and a fresh seal to restore the sheen to the Quarry. NB, did you know it’s estimated that Tutbury has actually been inhabited for 3000 years, having once been the site of an Iron Age hill fort, this house of course was a lot more recent.
To clean the tiles, I chose to use our tried and trusted alkaline cleaner, Tile Doctor Pro Clean. We use Pro Clean on most types of natural stone floor, including Quarry, Slate, and Victorian. I applied Pro Clean liberally across the floor and left it to dwell for a short period, giving it time to seep into the tile to get underneath and lift out any ingrained dirt. The cleaner was then agitated using a scrubbing pad fitted to a rotary machine to remove the dirt and other general muck.
I then rinsed the floor with cold water and soaked up the resulting slurry with a wet-vac machine. Some areas of the floor proved to be quite stubborn to clean, so in these areas the cleaning process was repeated until satisfactory results were achieved. Finally, the floor was given another rinse and left to dry off overnight.
The next day I returned to the property and checked that the floor was ready to seal by running several damp tests, with the results indicating that was no excess moisture remaining on the tiles. We carry out these tests before sealing because moisture can cloud the sealer and prevent it from properly protecting the tiles.
My choice of sealer was Tile Doctor Seal & Go, a cost effective topical sealer that builds up a robust layer of protection on the surface of the floor and provides a durable sheen finish that, as you can see from the photographs, really lifts the appearance of the tiles.
It’s a fact that any sealed tiled floor will need to be regularly maintained as sealers do wear off over time, especially in the high traffic areas, and this is when the floor starts to lose its appearance as dirt becomes trapped in the pores of the stone. The life of the sealer can be extended however by ensuring you only clean the floor with a PH Neutral cleaner.
Trevor Preeece

 Village Home Stores
Full-overlay Rustic Beech cabinets in the "Charleston" door style and "Briarwood" finish.
Village Home Stores
Example of a large mountain style kitchen design in Chicago
Example of a large mountain style kitchen design in Chicago

 Elegant Hardwood Floors
maple hardwood floor, water-popped, and stained with 50% rosewood and 50% neutral stains.
Inspiration for a timeless medium tone wood floor living room remodel in Salt Lake City
Inspiration for a timeless medium tone wood floor living room remodel in Salt Lake City

 Hansen Brothers Construction
Freestanding bathtub - large cottage master porcelain tile and multicolored floor freestanding bathtub idea with shaker cabinets, dark wood cabinets, white walls, a vessel sink, quartz countertops, a hinged shower door and white countertops
3