
Search results for "Property damage" in Home Design Ideas
 Tile Doctor Ltd
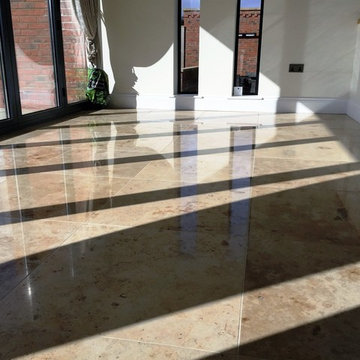
These Marble tiles were installed at a lovely property in North Ferriby by another tile company who although has done a great job laying the floor had neglected to provide the owner with any kind of post-installation maintenance.
Thus the tiles, which covered a large kitchen and hallway area, appeared dull and certainly not up to the standard that could be achieved with the right methods. Funnily enough, the tile company had told the property owner that the stone would need to be sealed, but did not offer to carry out the process themselves.
After conducting their own research, the property owner contacted her local Tile Doctor to see what could be done. I came round to inspect the floor and recommended the floor was polished through a process known as burnishing, followed by the application of a sealer to provide durable protection for the stone.
Burnishing involves the application of diamond encrusted pads with different levels of grit. At Tile Doctor we work with a four pad system that allows us to gradually refine the polish on suitable tiled floors, including Marble and Limestone.
I started the process by applying a Coarse grit burnishing pad across the entire floor lubricated with a little water, the 17 inch pads fit a rotary floor buffing machine and so are relatively straight forward to use but do take time. Following this, I worked my way through the burnishing system, repeating the process with Medium, Fine and Very Fine grit burnishing pads to achieve a brilliant, consistent shine. The floor is given a quick rinse between pads in-order to remove the resultant slurry before starting with the next pad.
The second part of the restoration was to seal the floor to protect the stone against future dirt, stains and damage, which is more common in busy areas of a house like the kitchen. I opted to seal the Marble tiles with two coats of Tile Doctor Ultra Seal.
This is a premium, no-sheen sealer that leaves the Marble with a more natural looking polished appearance. As a solvent-based, penetrating sealer it gets deep into the pores of the stone to protect against stains and ingrained dirt, especially in food preparation areas. To finish off I used the very fine diamond pad just to guarantee the brilliant shine you can see in the photos.
The property owners were exceptionally pleased with the results achieved and will undoubtedly be glad that their lovely Marble tiled flooring is now protected for long-term use. Another satisfied client.
Ronnie Phipps
East Yorkshire Tile Doctor
 Tile Doctor Ltd
Pontcanna is a popular residential area in the western district of Cardiff, in South East Wales. Known for its rather large houses and spectacular foliage, interestingly enough roughly a quarter of the population are English folk.
I was called down to a property in the area to take a look at a Victorian tiled floor which was in quite poor condition. Along with the typical amount of dirt and muck seen on poorly maintained tiles, there were a number of missing tiles and a fair bit of cement caked on the surface of the floor.
It would require a robust clean, fresh seal, and several repairs to get this floor back into optimum condition.
To begin, I checked for excess moisture problems using a damp meter in various places of the hallway floor and, thankfully, it was showing dry results. Any dampness could have potentially caused problems later on in the restoration process, so it was s good idea to run tests before starting.
Next, I manually scraped as much of the dry paint and cement off the tiles as possible, with no lubrication necessary. I then proceeded to clean the floor with a solution I mixed early, consisting of equal parts Tile Doctor NanoTech HBU and Tile Doctor Pro Clean, rinsing as I went. Both products are designed to tackle heavy soil build-up, with the former uniquely using nano-sized particles (as the product name suggests) to penetrate deep into difficult to reach areas in the tiles in order to lift out ingrained muck.
Following the initial clean, I removed all of the loose tiles and those heavily affected by cement, before retiling as necessary with fresh Victorian tiles, and grouting the whole floor. Of course, these replacement tiles were carefully sourced to ensure consistency, as far as possible, with the original pattern of the floor.
The next day, I went over the whole floor with an application of the acid-based Tile Doctor Grout Clean Up, diluted with a little alkaline Pro Clean to form a cleaning solution. I then used a black pad to scrub the cleaner into the tiles, similarly to the previous day’s cleaning. This was followed by a through rinse with water to neutralise the floor.
It was at this point that I noticed some stubborn cement stains remained so I set about breaking them down using a 60 grade hand held diamond polishing block, and this technique proved successful.
After completing the clean, I left the floor to dry out for roughly 24 hours. Upon my return to the property to seal the tiles, I tested again for moisture. It is recommended to run damp tests before sealing, as excess moisture can cloud the sealer, affecting its performance in the long run.
Fortunately, no dampness was detected and I was proceeded to seal the floor with seven coats of Tile Doctor Seal & Go, which enhances the natural colours in the stone and provides a nice satin gloss appearance, as requested by the customer.
I was extremely pleased with the results of this restoration, as was the customer. The extent of the soil build up and damage was such before the restoration that, after completion, the floor looked like it had been newly laid!
Julian Iancono
South East Wales Tile Doctor

 Qudsia Fatima
Putting up a sign in the yard and waiting for the right buyer to come along isn't always the easiest way to sell a house. The traditional process of selling your home can be slow, expensive and frustrating for many Springfield, OH homeowners. You may have to fix the house up, clean it out, show it, negotiate with buyers, wait for inspections, and hope the buyer's financing doesn't fall through. That can be a lot to manage, especially if you need to move quickly or work with a property that is no longer working for your situation.
That’s why many homeowners now look for a faster option. If you want to sell your house fast for cash in Springfield, OH, then working with a local cash home buyer like Sell House Now Columbus can be a practical solution. The company works with homeowners in Columbus, Springfield and other parts of Ohio, providing a direct cash-buying process that helps sellers avoid repairs, agent commissions, closing delays and unnecessary stress. They buy houses as-is, and offer a simple selling process and possibly help with closing costs, according to the company’s website.
Why Springfield, OH Homeowners Choose to Sell for Cash
Every homeowner has their own reason for desiring a quick sale. Some are relocating for jobs and don’t have months to wait for a buyer.” Others may have inherited a property they don’t want to keep up. Some houses need a lot of work and the owner may not have the time, money or energy to do it all before listing. There are also situations of divorce, concerns about foreclosure, bad tenants, unpaid taxes, or simply a desire to move on without the hassle of a traditional sale.
It makes sense to do a cash sale because it takes away a lot of the common roadblocks. Rather than waiting for mortgage approvals, appraisals, repair requests and lengthy negotiations, homeowners can receive a direct offer from a buyer who is ready, willing and able to purchase the property. At Sell House Now Columbus, sellers can request a fair cash offer and pick a closing timeline that suits them. The firm says homeowners can sell without agents, fees, repairs or cleaning, which can be a huge relief for anyone going through a stressful property situation.
Selling as is No repairs or cleaning
One of the biggest advantages of selling to a cash home buyer is the fact that you can sell the property as-is. This is good news because you don’t have to spend thousands of dollars on fixing the roof, replacing flooring, repainting walls, updating the kitchen, repairing plumbing or improving kerb appeal to attract buyers. Buyers expect the home to look clean, updated and move-in ready in traditional sales. Issues discovered during the inspection can force the seller to lower the price or pay for repairs prior to closing.
An as-is cash sale is a different process. The purchaser is taking the property “as is” and is offering based on the current condition. Sell House Now, Columbus, states that sellers are spared the hassle of repairs, daily showings and cleaning. They also say that unwanted items can be left behind and dealt with after purchase. This can save time and money for Springfield homeowners confronted with an older house, damaged property, rental cleanup or inherited home full of belongings.
No Real Estate Agent Fees or Hidden Commissions
When you sell your home, conventional real estate agents eat up a huge portion of your final proceeds through commission fees. You might have closing costs, staging costs, repair costs, inspection-related costs, photography fees and other costs that eat into what you actually walk away with. After deducting all expenses the final number is much lower than expected for some sellers.
A direct cash sale makes the numbers simple. “Sell House Now, Columbus says they don’t charge commissions and their process is designed to help homeowners avoid listing fees and agent-related expenses.” This provides sellers more clarity up front. Instead of guessing what the final payout might be after months of negotiations and deductions, you can review a cash offer and decide if it meets your needs.
Faster Closing Timeline for Springfield Homeowners
When you need to sell fast, time is of the essence. A traditional home sale can take weeks or even months, depending on market conditions, buyer financing, inspections, appraisals and negotiations. Once you’ve accepted an offer, there is always the risk that the buyer’s loan may be delayed or denied. Delays can add additional pressure to a homeowner who needs cash fast, who needs to stop paying taxes or utilities, or who needs to relocate soon.
Cash buyers are often faster than traditional buyers because they don’t rely on bank financing. Sell House Now Columbus says their process offers a competitive cash offer, a simple experience and Sellers can pick their closing day. That flexibility can be helpful if you need to close quickly or if you need extra time to make your next move. You don’t have to follow someone else’s schedule but can choose a plan that works better for your circumstances.
Who Can Use Selling For Cash?
Is your property stressing you out? Is it costing you money every month? If so then selling your House for cash in Springfield OH may be a good option. It can help homeowners who are behind on payments, tired of being landlords, dealing with code violations, handling probate property, in need of costly repairs, or just ready for a clean break. It can also be a benefit to those who do not live near the property and do not want to travel back and forth to manage repairs, contractors, cleaning and showings.
And the best part is you don’t need to have a perfect house. Cash buyers often see the property as an investment and are willing to do repairs after the sale. This makes it easier for sellers who are stuck with a dated, vacant, damaged, or otherwise hard-to-list property.
How it works
Generally, the process begins with a call to discuss the property in general terms. After reviewing those details, Sell House Now Columbus can assess the home and make a cash offer. If the offer interests you, you can pick a closing date that suits you. You don’t have to accept and the offer can help you explore your options before making a final decision.
This approach gives control to homeowners. You don’t have to go through months of listings, open houses, questionable buyers or last-minute repair demands. You can look at the cash offer and see if it solves your problem.
Summary
If you need to Sell your House fast for cash in Springfield, OH then a direct cash sale might be the easiest path forward. It gives homeowners a way to avoid repairs, agent commissions, delays and stress. Whether you’re looking to sell an inherited property, a damaged home, a rental you no longer want, or a life change that requires a quick sale, Sell House Now Columbus provides a simple option for homeowners that want speed and convenience.
Selling a house should be no more difficult than dragging a heavy box up hill. A good cash buyer can make the process a lot lighter, faster and easier to manage. If you are a homeowner in Springfield and want to get a fair cash offer and an easy solution, Sell House Now Columbus can make the next step a lot easier.
Find the right local pro for your project
 UpperKey
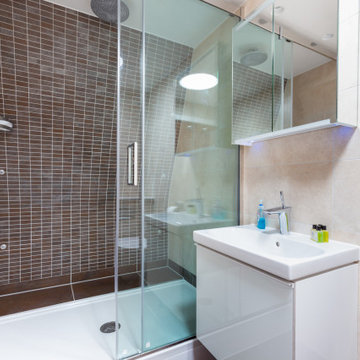
For owners thinking about renting their flat in London, look no further than UpperKey. Not only do we provide guaranteed monthly rent, but we also take care of all maintenance, so your bathroom will look as good on day one of the rental contract as the day we hand your property back to you.
To be better informed on how to protect your London property from tenant damage, view our article below: https://www.theupperkey.com/post/how-to-protect-your-london-rental-property-from-tenant-damage
 Tile Doctor Ltd
Having an effective sealer in place is essential for ensuring the long term condition of tiled floors in fact a lack of sealer can make cleaning the tiles exceptionally difficult as the sealer prevents dirt becoming ingrained in the tile.
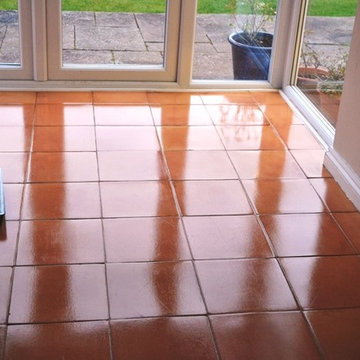
This property owner, living in the former spa town of Matlock in Derbyshire, was experiencing problems with their Terracotta tiled kitchen floor since they had applied some kind of wax to act as a sealer, and this had worn off within a few weeks. After this happened the tiles were not sealed again, making cleaning a big problem. Terracotta is a highly porous stone and thus easily soaks in spillages and stains, and allows dirt to become very easily trapped.
In this situation, the property owner resolved to contact me about some professional maintenance. I suggested that the tiles would need a deep clean followed by the application of a fresh, high quality sealer. The work was agreed on and I made my way down to the property the following week.
When I arrived at the property and saw the tiles first hand it became clear that a professional clean had been in need for a long time: greasy looking stains were particularly prevalent and covered large areas of the kitchen floor.
To remove I mixed a strong solution of Tile Doctor Pro Clean, which is a multi-purpose, high-alkaline cleaner, stripper and degreaser, and, working in small areas, applied it to the floor. Working in small sections was important because the stone is very porous and quickly soaked in any product laid down. I scrubbed the cleaner into the stone using a rotary machine fitted with a black scrubbing pad, with the dirt and stains coming away nicely. Pro Clean is highly versatile and can be used for similar cleaning purposes on most types of natural stone floor.
After cleaning each section, I quickly removed the excess dirty water and chemicals with my wet vax machine. Once the whole floor had been cleaned I rinsed it several times with fresh water just to make sure all cleaning chemicals were gone. I then left the floor to dry completely for 36 hours.
When I returned to the property, I conducted several damp tests to check for any areas of the floor that needed further drying. As is almost always the case, there were a few areas that remained slightly damp, and I set about speeding the drying process along using my heat gun. In fact, it actually took me more than three hours to get the floor completely dry, but this was worth the effort as even the slightest excess moisture can damage the performance of the sealer.
Once the floor was finally dried I began sealing the floor with one coat of Tile a Doctor Colour Grow sealer. Colour Grow is an impregnating sealer that penetrates deep into the pores of the stone, thus acting as a shield against ingrained dirt, and also raises the colour of the tiles to provide an aesthetically appealing appearance. sealer. After sealing with Colour Grow, I left the floor to dry for couple of hours and then applied six coats of Tile Doctor Seal & Go, which is a topical sealer that builds up durable protection on the surface of the tiles.
The combination of through cleaning and the application of not one, but two high quality sealers really did wonders for the appearance of these Terracotta tiles. Looking at the final results you wouldn’t have believed they had been without a proper clean and seal for so long! Needless to say the customer was exceptionally pleased and will surely be able to keep her floor looking great for a long time to come.
Tony Olmet
Derbyshire Tile Doctor

 P&B Fencing
In 2005, the south was devastated by a tropical cyclone, Hurricane Katrina. The storm was one of the deadliest tropical storm in American history, destroying billions in property damage. Paul Keyes saw a need in this devastating moment and founded P&B fencing services. The company started with just a few people helping to repair damages brought to farm and cattle fence. He worked throughout the great State of Mississippi, restoring fence to contain cattle and secure properties with wood, barbed-wire, chain-link, and more. His journey to restore the damages of Hurricane Katrina turned into a prospering business. Fifteen years later, the company continues to take pride in quality fence services and exceptional customer satisfaction. P&B Fencing specializes in residential, commercial, farm, and ranch fence. Whether the need is a chain-link, wood, vinyl, privacy, or barbed-wire, P&B Will Build Your Fence! For P&B, it is never just a fence; it is our reputation and your satisfaction. We aim to provide excellent customer service and quality fence installation.
 SUPERIOR CHIMNEY SERVICES CORPORATION
A friend noticed a damp, musty smell coming from her living room fireplace the week after a February thaw. When she called a masonry technician from Superior Chimney, to take a look, and found that water had been working its way behind the bricks for years. What started as a small crack now meant her chimney needed structural repairs before she could safely use it again.
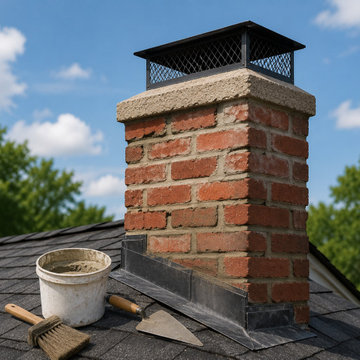
Chimney repairs are any work done to restore the structural and weatherproof condition of a chimney. This can include mortar joint repair, brick replacement, crown repair, flue repair, and cap or flashing replacement. Most Chicagoland homeowners discover the need for chimney repairs often times after winter, when the freeze and thaw cycles have already done its damage. Uncovering the symptoms early is the best way to keep chimney repairs down. Let’s discuss how that can be done.
Why Chicagoland Weather Is Especially Hard on Chimneys
Chicagoland has some of the most polarized weather. One day it’s a blizzard and the next week hot, humid and 100 degrees. That swing in weather conditions and temperatures are the real reasons why chimney repairs are needed.
When moisture from humid and rainy days’ soak into brick and mortar and then freezes, it expands. As it begins to thaw, the materials contract. Repeat that cycle dozens of times in a single Illinois winter and even solid masonry in the chimney starts to crack, spall, and separate from the joints holding it together. This is called the freeze thaw cycle. We’ve talked about it many times over the years, and it continues to be the single biggest reason homes need chimney repairs more often than homes in milder climates.
The Chimney Safety Institute of America (CSIA), the leading nonprofit certifying body for chimney professionals in the United States, notes that water intrusion is one of the most damaging and most preventable problems. If the problem is left to mature, it affects more than the appearance. It compromises the structure itself.
What Do Chimney Repairs Involve?
Not every chimney problem requires the same fix. Chimney repairs generally fall into a few categories. Understanding the difference, helps homeowners have a more informed conversation with the expert technician.
Mortar joint repair or tuckpointing. This involves removing deteriorated mortar between bricks and replacing it with fresh mortar, matched to the original color and texture as closely as possible.
Brick replacement. When individual bricks have spalled, meaning the face has cracked or popped off from trapped moisture, those bricks are removed and replaced.
Crown and cap repair. The crown is the concrete slab at the very top of the chimney. Cracks both big and small let water directly into the chimney flue. Chimney crown repair is often one of the most urgent forms of chimney repairs.
Flashing repair. Flashing is the barrier where the chimney meets the roofline. Loose, damaged or poorly installed flashing is a common source for water leaks. The roof gets the blame as it is the largest piece that covers the house. However, it certainly can be the overlooked chimney.
Flue and liner repair. Cracked flue tiles or damaged liners affect how safely a chimney vents smoke and combustion gases.
When to Know a Chimney Needs Repair
Most chimney damage shows up as small, easy to dismiss way. Let’s take a look at the following list. Be sure to print this out and keep it handy so if/when something happens, you know what to look for.
• Water stains near the fireplace or on the ceiling
• A brownish stain on the wall around your fireplace, or a stain on the ceiling near an exterior chimney. This means water is getting in somewhere it should not.
• Crumbling or missing mortar
• If you can see gaps between bricks, or mortar that flakes off when you touch it
• A leaning or visibly shifting chimney
• A chimney that appears to pull away from the house, even slightly, could indicate a structural issue
• White staining on the brick (efflorescence)
• Chalky white residue left behind as water evaporates out of the masonry. It is a visible sign that moisture is moving through brick
• Rusted damper or firebox components
• Metal parts inside a fireplace that are rusting are a strong indicator that moisture is present
• Debris in the fireplace
• Small chunks of brick, mortar, or tile landing in the firebox
What are the Various Types of Chimney Repair?
This is a compiled list of chimney repairs so you can be aware of what to look for. If you have any questions, contact us directly at 877-244-6349.
Homeowners who schedule chimney repairs at the first sign of trouble typically spend far less than those who wait until water damage reaches the interior of the home. This is a great reason to contact Superior Chimney at 877-244-6349.
Why an Annual Inspection Matters More Than People Think
The CSIA and the National Fire Protection Association both recommend that chimneys, fireplaces, and vents be inspected at least once a year, whether or not the fireplace gets used. This recommendation exists because damage does not take a break just because a chimney sits without any use.
According to data stated by the CSIA, chimney related fires still contribute to tens of thousands of residential fires across the United States each year, and a large share of those incidents can be traced back to deferred maintenance. An annual chimney inspection is what catches the small mortar crack or the hairline crown crack before it turns into a repair bill.
Hiring the Right Company for Chimney Repairs
Not every company who offers chimney repair work has the certified training to diagnose a problem correctly. CSIA certification is the most widely recognized credential in the industry, and it requires technicians to study chimney physics, venting systems, and fire codes. After the studies, the new technician needs to pass an exam and agree to a professional code of ethics.
When you call, be sure to ask:
Are your technicians CSIA certified, and can I verify that certification?
Will you show me photos or video of the damage before starting work?
Does the estimate distinguish between cosmetic repair and structural repair?
At Superior Chimney, we welcome these and other of your questions.
How Chimney Repairs Affect Insurance and Resale
A chimney in poor condition can complicate a home sale or an insurance claim. Home inspectors routinely report on visible mortar loss, leaning chimneys, or missing chimney caps. Some insurers will request proof of repair before renewing a policy on an older home. Addressing chimney repairs proactively protects more than curb appeal. It protects the sale timeline and the claims history associated to the property.
Frequently Asked Questions
How often should a Chicago area chimney be inspected? At least once a year, per CSIA and NFPA guidance, regardless of how often the fireplace is used.
Can chimney repairs be done in winter? Some interior repairs can happen in cold weather, but most masonry repair requires temperatures consistently above freezing. Spring and fall are the most common repair times in the Chicago area.
Is tuckpointing the same thing as chimney repair? Tuckpointing is one type of chimney repair, focused on replacing deteriorated mortar joints.
Does homeowners insurance cover chimney repairs? It depends. Sudden damage from a storm may be covered, while gradual deterioration from lack of maintenance typically is not.
So Finally…
Taking care of your home includes a chimney. Just because you don’t see it every day, doesn’t mean things aren’t happening. Be sure to get a chimney inspection done once per year by a certified and credible company such as Superior Chimney to take care of the issues. Contact us today by calling 877-244-6349.

 P&B Fencing
In 2005, the south was devastated by a tropical cyclone, Hurricane Katrina. The storm was one of the deadliest tropical storm in American history, destroying billions in property damage. Paul Keyes saw a need in this devastating moment and founded P&B fencing services. The company started with just a few people helping to repair damages brought to farm and cattle fence. He worked throughout the great State of Mississippi, restoring fence to contain cattle and secure properties with wood, barbed-wire, chain-link, and more. His journey to restore the damages of Hurricane Katrina turned into a prospering business. Fifteen years later, the company continues to take pride in quality fence services and exceptional customer satisfaction. P&B Fencing specializes in residential, commercial, farm, and ranch fence. Whether the need is a chain-link, wood, vinyl, privacy, or barbed-wire, P&B Will Build Your Fence! For P&B, it is never just a fence; it is our reputation and your satisfaction. We aim to provide excellent customer service and quality fence installation.
 Five Star Tree Care
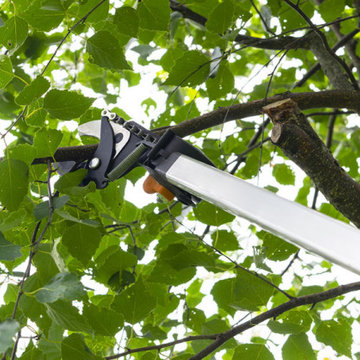
Effectively maintaining your landscape and trees take a good amount of time and effort. Often, homeowners will delay trimming or pruning their trees out of laziness or simply because they don’t know how to correctly care of their trees. But, you should know that tree trimming should be at the top of your to-do list for many reasons. Pruning, proper maintenance, and fertilization are all critical if you want the trees in your yard to thrive to grow strong. For homeowners that are unable to handle the tasks on their own, our professional tree trimming service can help. Five Star Tree Services has put together a list of the top three reasons why you need to trim your trees on a regular basis.
Healthier Trees
Regular tree trimming will keep your trees in their best health while also promoting growth. Sometimes trees may have dead or broken branches, removing them prevents decay and can even prevent an infection from spreading. If you leave damaged or rotting branches on your tree, it can spread the condition to other parts of the tree or even to other trees in the area.
When you prune your tree on a regular basis, it also promotes the growth of new leaves and branches. Reducing the thickness of the leaves and branches also opens up the inner part of the tree to the sun. Furthermore, air circulation is critical for a healthy tree and regular trimming ensures that your tree always has access to the fresh oxygen it needs to thrive. The healthier your tree is the better quality oxygen it will produce for the surrounding area.
Improve Property Value
Well-kept trees greatly improve the aesthetics of your home. Decaying branches or trees that are overgrown are not only unsightly and dangerous, but they can also have a negative impact on the curb appeal of your house. If your house is on the market, seeing an unkempt yard with untrimmed trees can leave potential buyers with a negative perception of your property. Keeping your trees trimmed and neat show that you care about your home and how it looks. Work hard for your property and it will turn the best profit when you finally sell.
Prevent Environmental Damage
Tree branches that are rotting or weak pose a safety hazard to your home and your family. Dead limbs or even overburdened are more likely to fall off of the tree and strike your home. There have been plenty of reports of dead or overly heavy branches suddenly falling on people as well. Trees that grow close to power lines also pose a threat if they are not trimmed on a regular basis. Limbs can grow too high or too long causing them to brush against the power lines. This may trigger a fire or even a power outage. Sick trees with limbs that are diseased are more likely to cause the entire tree to tip over. This can cause damage to your home, vehicles, or even a person if they are unlucky.
How Five Star Tree Services Can Help
If you are not sure about how or when to trim your trees, Five Star Tree Services is here to help. We offer a wide range of Toronto Tree Trim Services and pruning services for both commercial and residential locations. Our passionate team of tree care experts will keep your property safe and ensure that your trees are beautiful and can continue to grow in a healthy state. Give us a call at (416) 990-3355 to find out more information about the services we offer.
 Tile Doctor Ltd
This customer had some real difficulty in getting their fantastic Travertine tiled kitchen area looking as good as it should. The cleaning methods they had previously employed were unable to prevent the tiles from appearing dull, and the customer was also unable to deal with the displeasing marks and small cracks damaging the stone.
Keen to get the floor back to looking its best, the customer called me down to their property, which overlooks the beautiful countryside area of Ashbourne, to see what could be done to restore the tiles.
Upon my arrival at the property, I assessed the situation and resolved that the best way to restore the polish and general appearance of the floor was to use a process known as burnishing. The burnishing process, which involves the application of four diamond encrusted polishing pads of varying grit, works to grind away ingrained dirt while smoothing and polishing rough surfaces. Most commonly we use burnishing to restore the shine to Limestone and Marble tiles, but it can be used on most types of natural stone floor where a deep polish is required.
To start the process, I applied the Coarse 400 grit burnishing pad to the floor using a small amount of water as lubrication in order to break down and remove any old sealer from the stone. Once this had been done across the entirety of the floor, I removed any soiled water with a wet-vac machine; this removal of soiled residue was repeated after each use of a burnishing pad.
Next, I moved on to the Medium 800 grit pad which is less coarse than the 400 grit, but still rough enough still to break down layers of ingrained dirt. I followed this up with the application of a Fine 1500 grit pad, which started to smooth down the rough areas of the surface to prepare the floor for a final polish with an even finer burnishing pad later on. Before moving straight on to the final of the four pads, I took the time to carefully fill in the all of the small cracks and holes in the stone, before leaving the floor to dry until the next day.
The next morning, I returned to the property to finish off the floor restoration. As soon as I arrived I used a damp tester to make sure the floor was completely dry. Noticing a number of small damp spots, I opted to use my heat gun to speed up the drying process.
Once the floor was completely dry, I used the Very Fine 3000 burnishing pad – the last of the four – without any lubricant to finally achieve a high quality polished finish. For polished floors it is recommended to use an impregnating sealer that penetrates into the pores of the stone rather than sitting on the surface of the floor, as this ensures the quality of the polish isn’t damaged.
As such I opted to use Tile Doctor Colour Grow to seal the tiles. This is a colour intensifying sealer that provides durable surface protection and allows the surface to breathe whilst enhancing the natural colours in the stone. It’s important that any sealer that doesn’t penetrate into the stone is removed by polishing it off with a cloth.
After completing the seal, I went over the floor for a final time with the 3000 grit diamond burnishing pad to leave a smooth and shiny polished finish. Needless to say that the customer was very happy with result as they had never before been able to get the floor looking this good!
Tony Olmet
Derbyshire Tile Doctor
 Five Star Tree Care
Trees are an object of supreme beauty that brings a sense of pride and character to any property. In addition to being aesthetically pleasing, they also offer a wealth of additional benefits. They can help reduce the cost of heating and cooling as well as increase the curb appeal of a property. Trees also benefit the environment by reducing pollution and providing refuge to local wildlife. If you happen to have oak trees on your property, it is especially important to make sure your trees undergo general maintenance and tree care. One of the most common problems landowners with oak trees face is oak wilt. Five Star Tree Services is here to let you know how to spot and protect your green friends from this debilitating tree ailment.
What Is Oak Wilt?
Oak wilt is a very aggressive form of tree fungus that attacks the oak species in particular. It grows on the outer sapwood of the tree and slowly starts to sap away nutrients and water from the tree itself. Left untreated, oak wilt can cause the tree to dieback or even expire completely. Oak wilt targets healthy oak trees, mature oak trees, and stressed oak trees in equal measure. It is easiest to spot the symptoms of oak wilt in the early spring or summer. The most common signs of oak wilt are bronze and wilting foliage.
Where Does Oak Wilt Start?
Most oak wilt will start along the tips of the branches and the top of the oak tree. One reason it may take so long to spot a problem is that it begins out of the usual line of sight. Most homeowners will notice a sudden decline in the health of a usually healthy tree that starts along its crown.
Another sign of oak wilt is when the outer side of the tree bark starts to develop gum. This gum attracts other pests such as birds, insects, and squirrels who then carry the fungus from sick trees to healthy trees. Along with spores, the fungus can also spread through the root system of one oak tree to the other, but it is hard to notice unless you happen to be digging around the trees for another reason.
When Are Oak Trees Most Susceptible?
Healthy and stressed oak trees are equally prone to catching oak wilt, but is it more likely to occur in the spring. It is always best to avoid pruning oak trees in the spring to reduce the chance of new fungal infections or for infections from other trees being spread to healthy trees. Wounds or environmental damage during the spring should be cared for by professionals to help reduce the chances of oak wilt infection.
Is There A Cure For Oak Wilt?
There is no cure for oak wilt, so the best method is prevention. Avoid pruning and damage during growing seasons and stick to winter pruning in Richmond Hill to cut down on infection rates. If you do have an oak tree that is showing signs of oak wilt, the best course of action is to have it removed to prevent the fungus from spreading to other trees. If you think your oak trees may be showing signs of oak wilt, give Five Star Tree Services a call at (416) 990-3355 for an in-person assessment today.

 Pro-Roofing
The commercial roofing services, offered by this particular firm have been highly appreciated. This commercial roofing venture is backed up with great source of workers, who are capable enough to serve their clients with the first class services. The house roofing Auckland company facilitates re-roofing of the commercial properties as well. In addition to this, the firm caters residential roofing, roof repair and Cedar roofing services with equal flair. The most important fact is that, the staffs of this company also facilitate the clients with inspection services of the residential properties as well. The roof inspectors of the company usher a number of facilities starting from checking poor attic condition, corrosion, structural damage, weather damage, water leaking problem and many more. This storm damage roof inspection firm assures quality and energy efficient roofing service to the esteemed clients. The company is resourced with highly skilled employees, who are enriched with yearlong experience. All of the workers are capable of analyzing the problems of the roofs of the clients and serve accordingly. Quality of the products, used by the team is something they never compromise with. Hence, house roofing Auckland is guaranteed by the right company. People can also experience the dedicated customer service of the company. They are on desk throughput the day, in order to answer each and every query of people. The company maintains a long term relation with its customers. For more info, visit our website:- https://www.proroofing.co.nz/
 Five Star Tree Care
Once the endless winter has finally subsided, it is time to start thinking about your spring tree care! Once the last of the snow and ice has finally melted away, your trees and garden will be released once again. It is finally time to prepare for your spring tree care. If you want to maximize your tree’s new growth, you are going to want to follow Five Star Tree Services spring checklist! You can also start planning for new trees as well. We are going to give you all the information you need to know in order to properly take care of your trees this spring.
Inspect Your Trees
When all the ice and snow has left your trees, this is a good time to inspect for any damage done from the harsh winter. There aren’t any leaves that will get in your way, making it easier to see anything amiss, like damage or diseases. If you hire an arborist to do this initial spring inspection, you can guarantee that they will analyze every tree on your property very carefully to make sure they can provide you with the most accurate report. This report will make you aware of any and all tree problems on your property. The arborist will also go over all possible ways that you can fix these problems and explain them to you.
Preemptive Pruning
In order to properly prepare your trees for their spring growth, you will need to prune them. A trained arborist will be able to identify dead branches and cut them off. They will also deal with damaged branches, weak branches, and any unsafe branches and make sure they remove them before they become a problem or hazard. We recommend that you prune or hire an arborist to prune your trees in the early spring. If you wait and prune your trees after their spring growth, they are more likely to be attacked by pests and diseases. When done properly, your spring pruning is going to have a major positive impact on the overall health of your trees.
Cleanup the Gardens
Part of your spring cleaning is not limited to your home. You also need to clean your gardens too! This is an important part of your checklist routine. When all the snow and ice melt away and exposes your gardens and lawn once again, it is important to clean up your yard from any and all fallen leaves, branches, and anything else that isn’t supposed to be there. Once you do this, the sunlight will be able to get to the ground and will aid in penetrating and warming up the ground faster below the surface. Developing tree roots will have a positive effect from the sunlight. Which results in better tree growth in the spring.
Fertilization of Your Trees
After the winter has subsided, it usually takes most of the nutrients out of the soil. Which is why you should be taking advantage of fertilizing your trees in the spring. It is important to feed your trees in order to provide them with the adequate nutrients they need in order for them to be healthy and grow during the spring. When trees are properly fertilized, this helps them fight off diseases and pests.
Add Some Mulch
There are many marvelous benefits to mulching in the spring. This improves the soil quality that’s around your tree. It also helps to keep the soil fertilized and moist. Mulch is also a fantastic way to prohibit weeds from developing and growing in your gardens. This is very important for newly planted and young trees. We recommend that you add 2-4 inches of mulch around each tree in the early spring.
Plant Some New Trees!
There are many reasons why people plant trees. One major reason is to combat deforestation and provide more oxygen. If you are looking for other reasons to plant some trees, consider planting shade trees. These trees allow you to take shelter under them in the summer from the glaring sun. But did you know that they can also benefit you by maximizing your energy savings during the winter? Making it so that you can actually increase the overall value of your home when you plant new trees.
How Five Star Tree Services Can Help
When you are looking to add more magnificent trees to your yard, you need to make sure they are planted properly. One of the first important steps is to pick the right placement for your new tree. You also need to consider what trees are right for your property. Without any experience planting trees, we highly recommend that you contact your local Toronto Tree Planting Services for assistance! Our team is highly knowledgeable and will be able to help you with anything you require for your trees, both new and pre-existing. Make sure to contact Five Star Tree Service for all your tree needs. Contact us at (416) 990-3355 or go to our website to learn more!
 Tile Doctor Ltd
This beautiful Victorian tiled hallway was in desperate need of some TLC. The house had recently changed hands and the new owners of the house were having the entire property renovated. The last part of the renovation plan was to have the Victorian hallway tiles restoring back to their former glory. Floors are always best left until last, especially hallways as last as workmen don’t usually take a lot of care in my experience.
The house was built in the early 1900’s and was situated close to Doncaster town centre a couple of streets away in fact from the famous Doncaster Racecourse which dates to the late 1500’s.
There were a few areas of damage to the floor that would need dealing with first. This is not surprising given the age of the floor which must have seen a lot of comings and goings over the years. Our first task therefore was to repair the damage using replica tiles sourced to be as close a match to the originals as possible. We usually find any slight differences disappear once the floor has been deep cleaned and sealed. Once removing the damaged tile and cleaning the base we use a fast setting adhesive to fix the replacement tiles in place so we can get on with the cleaning as soon as possible.
Once the replacement tiles had set, we unloaded our slow speed rotary floor machine and large wet vacuum which would be used during the cleaning. To start the cleaning the floor was sprayed with Tile Doctor Remove & Go and this was left to dwell on the tiles for twenty minutes. This gives time for the product to break down old floor coatings and grime, this was followed by scrubbing the tiles with a 200-grit diamond pad fitted to the floor machine and assisted with the addition of more water to help lubricate the process. This process generates a lot of slurry as the dirt and old sealers etc are released from the tiles and this is extracted from the surface of the floor using the wet vacuum.
The next step was to give the floor an acid wash using Tile Doctor Acid Gel which is applied to the tiles and left to dwell for fifteen minutes and scrubbed in again with the floor buffer and 200-grit diamond pad. Once done the floor was rinsed with water and then dried using the wet vacuum to extract as much moisture as possible. This last process is designed to counter any alkaline salts that may be present in the floor which may cause efflorescence to appear later. It also removes old mineral deposits and generally get the tiles looking much brighter. Once complete the floor was left to dry off naturally overnight.
I came back the next day to seal the tiles first checking the floor was dry using a moisture meter. Satisfied that the floor was ready for sealing I started to seal the tiles using multiple coats of Tile Doctor Seal and Go Extra which is a fully breathable sealer which is important for old floors like this. Seal and Go Extra also leaves a lovely satin finish which works well on Victorian tiles and brings the floor alive.
This was the last step in this properties renovation, and I think you will agree that the floor responded really well to the restoration process and the colours in the tiles are now very vibrant.
Matthew Lovett
South Yorkshire Tile Doctor

 Mack Allen
Comprehensive Pest Control Solutions for Your Peace of Mind
Pests can quickly turn your living or working space into an uncomfortable and unhygienic environment. At Pest Control - skadedyr-kontroll.no, we offer reliable and effective pest control services to protect your property and ensure your well-being.
Silverfish consuming poisonous bait/Photo skadedyrkontroll1
The skadedyr-kontroll.no Advantage
Choosing the right pest control service can make all the difference. With our years of expertise and commitment to excellence, we provide:
- Tailored Solutions: Each pest problem is unique, and so are our solutions.
- Eco-Friendly Methods: We prioritize methods that are safe for your family, pets, and the environment.
- Expert Team: Our professionals are trained to handle all types of pest issues with precision and care.
- Thorough Inspection: We identify the type and extent of the pest problem on your property.
- Customized Plan: A detailed plan is crafted to address your specific pest issue.
- Effective Execution: Using advanced tools and methods, we eliminate pests swiftly and safely.
- Preventive Guidance: Our team provides tips and solutions to prevent pests from returning.
 Tile Doctor Ltd
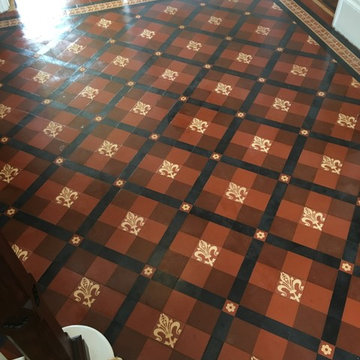
It’s always a great surprise to find old tiled flooring hidden underneath carpet or linoleum which appears especially common with 19th century properties where it’s not unusual for the owners to uncover fantastically patterned, original Victorian tiled floors and, naturally, they want to restore them to their former glory. If you have a property of this type you might want to look under the carpets.
The majority of the time, however, these tiles have been covered up for decades, allowing for thick layers of muck to build-up and are invariably damaged carpet grippers, surface glue and adhesive tape.
This was pretty much the case with this customer who lives in the town of Warminster and was keen to have her own newly discovered Victorian hallway brought back to life, and called me down to see what could be done. Upon arrival at the property, I determined that the tiles would definitely require a very deep clean, including the remove of numerous glue stains, followed by the application of a new seal.
Before I could begin the deep cleaning process, I needed to remove the carpet grippers and surface glue, attempting to remove as much as possible by hand using a scraper.
For the particularly stubborn areas, I applied Tile Doctor Remove & Go, a powerful stripper specially designed to break down adhesives and solvents, and left it to dwell for 20 minutes to eat through the glue deposits. I then attached a black pad to a rotary machine and scrubbed the area thoroughly to clean the affected areas, before removing the resulting slurry using a wet vacuum and rinsed with clean water.
Once I was satisfied that all of the glue had been removed, I proceeded to soak the floor using a solution of the high alkaline cleaner known as Tile Doctor Pro Clean. This is a versatile product that can be used on a wide range of natural stone floors to deal with heavy soil build-up.
I left the Pro-Clean to dwell for ten minutes, and then scrubbed it into the tiles to remove the ingrained dirt and also to break down any old and ineffectual seals. The floor was then once again rinsed thoroughly with clean water which was then extracted using a wet vacuum before being left to dry for a couple of days.
Upon our return to the property I immediately tested the floor for damp using a damp meter. This is an extremely important test to carry out before sealing any kind of tiled flooring, due to the fact that excess moisture left over from cleaning can cloud the sealer and damage its ability to protect against dirt and stains.
Thankfully, the damp test revealed no excess moisture, and I was able to proceed with sealing the tiles. My choice of sealer was Tile Doctor Seal and Go, a water-based topical sealer that simultaneously provides both a stain resistant surface seal and a durable and aesthetically pleasing low sheen finish, also being water based it doesn’t give off a smell as it dries.
This is a very cost effective product that is highly suitable for use on Victorian and Quarry tiles, I applied five costs to achieve the desired finish.
The customer was very pleased with the final results. It’s always satisfying to restore original Victorian tiled floors to looking their best once again – and this one was no exception.
Stuart Ford
Wiltshire Tile Doctor
 Tile Doctor Ltd
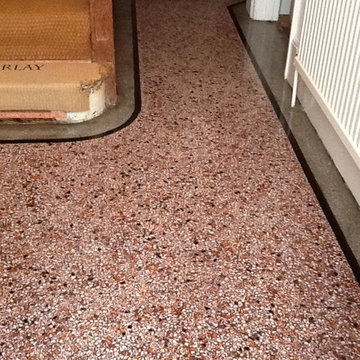
This Terrazzo tiled hallway at a property in Northampton was in a really bad state. It was heavily soiled and suffered from glue marks where the original carpet covering it had been removed. Additionally, there was some damage to the edges of the doorway, and a large crack in the floor running across the width of the hallway.
Terrazzo is an interesting material, originally produced in Italy, that consists mainly of concrete with segments of marble and other stone interspersed and held together with a resin. Since Terrazzo is formed in this way, I explained to the customer that I would fill the crack along the floor and the small holes around the edges with concrete, before then using tile paint to match in the colours as best as possible. This would be the most cost-effective solution, which was ideal since the customer had a limited budget for the repairs.
Before beginning the restoration, I tested a small area using a diamond encrusted burnishing pad, thereby giving the customer an indication of the type of results that could be achieved. With the customer pleased by the results, the job was booked in for the following week.
To begin, Tile Doctor Remove & Go was applied to the floor and was left to dwell for ten minutes to soften the carpet glue and break down any old sealer. This was then scrubbed in to the tiles with a pad fitted to a rotary machine. To remove the remaining residue and marks in the particularly stubborn areas, I used a manual hand scraper. The entire floor was then wet vaxed to soak up the soiled cleaner and leave the area clean for burnishing.
This was followed by the use of Tile Doctor diamond encrusted burnishing pads to polish the tiles, starting with a coarse grit pad, followed by wet vaxing and repeating the process with a medium grit pad and finally the fine grit pad to achieve the desired effect. I then installed a turbo dryer to dry the floor.
I returned to the property once the floor was dry and carried out the repairs which had been discussed earlier with the customer (filling the holes and cracks in the floor with concrete), cleaning off any concrete residue before I finished for the day.
Upon my return to the property the next day, I refined the polish on the floor even further by applying the extra fine grit burnishing pad.
To finish off the three day restoration, I sealed the Terrazzo tiles using two coats of Tile Doctor Colour Grow sealer. As an impregnating sealer, Colour Grow soaks into the pores of the stone, protecting it from ingrained dirt. Colour Grow also contains colour intensifying properties, allowing it to enhance the naturally occurring shades in the stone, and therefore stopping it from appearing dull.
This floor certainly was in a bad state, with damage as well as dirt to deal with, but I’m pleased to say that the work went a long way in transforming its appearance, leaving a very happy customer.
Phil Vissian
Northamptonshire Tile Doctor
 Tile Doctor Ltd
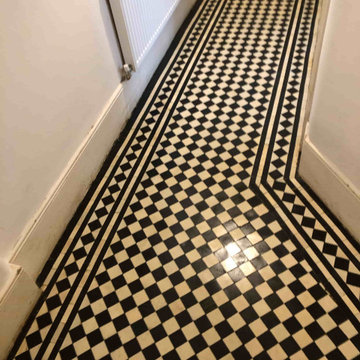
This property was in theLadbroke Grove area of West London near Kensington. The client had found an old and probably original black and white checkered pattern Victorian tiled floor under their cork tiled flooring. They also reported that it was badly damaged so I thought it would be best if I paid them a visit first to see how extensive the damage was and whether it was repairable. The floor was in a quite a state, the tiles were covered in glue from the cork and had several areas had been back filled with cement.
I reassured them that the damage could be rectified, and that it would be possible to completely restore the floor back to a good standard. I would have to remove the glue, remove the cement that had been used to level the floor and replace with reclaimed tiles to match. They were relieved to find out it could be done and happy with my quote I was instructed to go ahead with the work.
We started by taping up the skirting boards to protect the woodwork. With this done attention was turned to the glue which was softened using a strong dilution of Tile Doctor Remove and Go so it could be carefully scraped off. Multiple techniques and tools were needed to remove the glue including hand-held scrappers and a black pad fitted to a buffing machine. For the stubborn areas steam was applied to help lift the adhesive out the tile.
Once all the glue was removed the floor was rinsed and the alkaline cleaner neutralised with Tile Doctor Grout Clean Up which further cleaned the tiles and removed old traces of grout from the floor. Old floors like this generally don’t have a damp proof membrane underneath so the acids in the Grout Clean-up also counter any efflorescent salts trapped in the tile.
Once this was completed the slurry was removed with a wet vacuum and left to fully dry out overnight.
The following day focus turned to repairing the areas of the floor where the tiles were missing or broken. The main issue being the cemented areas, we see this a lot with Victorian Hallways and generally what happens is a heating engineer digs out the floor to install pipework. Not being tilers, your average plumber then repairs the floor with a self-levelling cement that brings the level up to the surface of the tile so it can be covered with lino, carpet of in this case cork.
The sub floor was then rebuilt with rapid setting self-levelling compound but this time to below the level of the tile.
Once the new base was dry it was a just a question of re-tiling with the replacement tiles to match the original checkered pattern. The replacement reproduction tiles were sourced from Original Features in Crouch End North London. After grouting we left the floor to dry out over the weekend.
When we returned to seal the floor our first step was to check the floor was dry using a moisture meter. This is critical as the sealant will not cure correctly if there is too much moisture in the floor. In this case the extra two days we had allowed had done its job and the test had confirmed it was ready to accept a sealer.
The client wanted the floor finish not to be too shiny once sealed so we opted to seal with two coats of Tile Doctor Seal and Go Extra. This is good choice for old Victorian floors such as this example as it’s special acrylic-based formula allows for moisture vapour transmission which as mentioned previously is a concern where no damp proof membrane has been installed.
I’m please to confirm my clients were delighted with the result, as you can see from the pictures the black and white floor restoration makes for a dramatic entrance well in keeping with the style of the property. For aftercare I recommended the use of Tile Doctor Neutral Tile Cleaner which will keep the tiles in good condition going forward without damaging the new sealer.
Jackson Davis
Central London Tile Doctor
 Mack Allen
Comprehensive Pest Control Solutions for Your Peace of Mind
Pests can quickly turn your living or working space into an uncomfortable and unhygienic environment. At Pest Control - skadedyr-kontroll.no, we offer reliable and effective pest control services to protect your property and ensure your well-being.
Silverfish consuming poisonous bait/Photo skadedyrkontroll1
The skadedyr-kontroll.no Advantage
Choosing the right pest control service can make all the difference. With our years of expertise and commitment to excellence, we provide:
Tailored Solutions: Each pest problem is unique, and so are our solutions.
Eco-Friendly Methods: We prioritize methods that are safe for your family, pets, and the environment.
Expert Team: Our professionals are trained to handle all types of pest issues with precision and care.
Our Key Services
Rodent Control
Rodents can wreak havoc by damaging property and spreading diseases. Our comprehensive rodent control services ensure thorough removal and long-term prevention strategies to keep your property safe.
Silverfish Treatment
Silverfish are not just unsightly but can also damage valuable items. Learn more about our specialized silverfish control methods at Silverfish - skadedyr-kontroll.no/skjeggkre-alt-du-trenger-a-vite/.
Droplet size/Photo Skadedyrkontroll1
Insect Management
Insects such as ants, cockroaches, and wasps can disrupt your peace. Our targeted treatments eradicate these pests efficiently and prevent future infestations.
Our Approach to Pest Management
Thorough Inspection: We identify the type and extent of the pest problem on your property.
Customized Plan: A detailed plan is crafted to address your specific pest issue.
Effective Execution: Using advanced tools and methods, we eliminate pests swiftly and safely.
Preventive Guidance: Our team provides tips and solutions to prevent pests from returning.
Why Regular Pest Control Matters
Pest control is not just about elimination; it’s about prevention and maintaining a healthy environment. At skadedyr-kontroll.no, we empower our clients with knowledge and solutions to ensure long-term protection against pests.
Placement of bait/Photo Skadedyrkontroll1 AS
Get Started Today
Don’t let pests compromise your comfort and safety. Whether you’re dealing with rodents, silverfish, or other pests, Pest Control - skadedyr-kontroll.no is your trusted partner for comprehensive pest management. Contact us now and take the first step toward a pest-free environment.
8