
Search results for "Real questions" in Home Design Ideas

 ZeroEnergy Design
This renovated brick rowhome in Boston’s South End offers a modern aesthetic within a historic structure, creative use of space, exceptional thermal comfort, a reduced carbon footprint, and a passive stream of income.
DESIGN PRIORITIES. The goals for the project were clear - design the primary unit to accommodate the family’s modern lifestyle, rework the layout to create a desirable rental unit, improve thermal comfort and introduce a modern aesthetic. We designed the street-level entry as a shared entrance for both the primary and rental unit. The family uses it as their everyday entrance - we planned for bike storage and an open mudroom with bench and shoe storage to facilitate the change from shoes to slippers or bare feet as they enter their home. On the main level, we expanded the kitchen into the dining room to create an eat-in space with generous counter space and storage, as well as a comfortable connection to the living space. The second floor serves as master suite for the couple - a bedroom with a walk-in-closet and ensuite bathroom, and an adjacent study, with refinished original pumpkin pine floors. The upper floor, aside from a guest bedroom, is the child's domain with interconnected spaces for sleeping, work and play. In the play space, which can be separated from the work space with new translucent sliding doors, we incorporated recreational features inspired by adventurous and competitive television shows, at their son’s request.
MODERN MEETS TRADITIONAL. We left the historic front facade of the building largely unchanged - the security bars were removed from the windows and the single pane windows were replaced with higher performing historic replicas. We designed the interior and rear facade with a vision of warm modernism, weaving in the notable period features. Each element was either restored or reinterpreted to blend with the modern aesthetic. The detailed ceiling in the living space, for example, has a new matte monochromatic finish, and the wood stairs are covered in a dark grey floor paint, whereas the mahogany doors were simply refinished. New wide plank wood flooring with a neutral finish, floor-to-ceiling casework, and bold splashes of color in wall paint and tile, and oversized high-performance windows (on the rear facade) round out the modern aesthetic.
RENTAL INCOME. The existing rowhome was zoned for a 2-family dwelling but included an undesirable, single-floor studio apartment at the garden level with low ceiling heights and questionable emergency egress. In order to increase the quality and quantity of space in the rental unit, we reimagined it as a two-floor, 1 or 2 bedroom, 2 bathroom apartment with a modern aesthetic, increased ceiling height on the lowest level and provided an in-unit washer/dryer. The apartment was listed with Jackie O'Connor Real Estate and rented immediately, providing the owners with a source of passive income.
ENCLOSURE WITH BENEFITS. The homeowners sought a minimal carbon footprint, enabled by their urban location and lifestyle decisions, paired with the benefits of a high-performance home. The extent of the renovation allowed us to implement a deep energy retrofit (DER) to address air tightness, insulation, and high-performance windows. The historic front facade is insulated from the interior, while the rear facade is insulated on the exterior. Together with these building enclosure improvements, we designed an HVAC system comprised of continuous fresh air ventilation, and an efficient, all-electric heating and cooling system to decouple the house from natural gas. This strategy provides optimal thermal comfort and indoor air quality, improved acoustic isolation from street noise and neighbors, as well as a further reduced carbon footprint. We also took measures to prepare the roof for future solar panels, for when the South End neighborhood’s aging electrical infrastructure is upgraded to allow them.
URBAN LIVING. The desirable neighborhood location allows the both the homeowners and tenant to walk, bike, and use public transportation to access the city, while each charging their respective plug-in electric cars behind the building to travel greater distances.
OVERALL. The understated rowhouse is now ready for another century of urban living, offering the owners comfort and convenience as they live life as an expression of their values.
Eric Roth Photo

 highland
Skylight blackout blinds have to be held against the frame rather than hung below it, and that one difference is why a loft stays bright when the same fabric works downstairs. A blind on a sloped window sags away from the glass and daylight spills round all four edges. The fabric is rarely the problem.
Key Takeaways
On a vertical window, weight pulls the blind flat to the glass and the only leaks are two narrow strips an overlap will cover. Tilt the same window to forty degrees and the physics invert. That weight now drags the fabric away from the frame, opening a wedge of daylight along the bottom rail and a thinner one at the head. Flat roof skylight blinds have it worst, with no angle at all for the fabric to rest against.
If you have already bought a roller and taped the edges, you know this. Choosing blackout blinds for a skylight is a decision about the fixing.
Why Skylight Blackout Blinds Have to Be Captured at the Edges
The fix is a channel down each side of the reveal with the fabric running inside it. The lip overlaps the fabric edge, so no straight sightline runs from glass to room.
Tension matters as much as the track. A limp fabric bellies between two channels on a shallow pitch, which is why cell structures hold their shape better than a flat roller. The 1ClickBlinds honeycomb panel works that way. The head needs its own answer: a channel stops where the frame stops, so without a cassette a strip of glass glows above the roller. Skylight blackout blinds are only as good as their weakest edge.
Measuring, and the Velux Question
Most roof windows carry a code on a plate at the top of the sash, visible when you swing it open. Skylight blackout blinds sold as Velux blackout blinds are sized to those codes, so read the plate before ordering. Velux blackout blinds will not always sit in another brand's frame, and blinds for Velux windows cut to a generic width rarely capture in the channels.
Heat is worth a thought too. Roof glass takes the sun almost square on at midday, so skylight blackout blinds block heat and light in one action. On flat roof skylight blinds a reflective fabric beats a black one, and the full range is here if you want to compare.
Frequently asked questions
How do you fit a blackout blind to a Velux roof window?
Find the frame code on the plate at the top of the sash and order against it, then fix the two channels before the blind goes in. They must be parallel within a couple of millimetres or the fabric binds. Blinds for Velux windows clip to the frame, so nothing goes into the ceiling.
How do you measure for skylight blinds?
Use the frame code where the window has one, since it gives the exact size without a tape. Without a code, measure the inner frame width and drop at three points each and take the smallest. Note which way the window opens, as that sets where the controls go.
What are skylight blinds?
Blinds made for roof windows rather than wall windows, held along both edges so they stay against the glass at an angle. Blinds for skylight windows come in blackout, reflective and electric forms. The defining feature is the fixing, not the fabric.
Key Takeaways
- Gravity works against you. On a sloping window a hanging blind pulls away from the frame.
- Four edges leak, not two. A roof blind leaks at the sides, head and foot.
- Channels do the real work. A track down both edges keeps the fabric flat to the glass.
- Order by frame code. Blinds for skylight windows are sized from the plate on the sash, not a tape.
-
Darkness and heat are one job. The pane that wakes you at half four in June is the hottest surface by noon.
On a vertical window, weight pulls the blind flat to the glass and the only leaks are two narrow strips an overlap will cover. Tilt the same window to forty degrees and the physics invert. That weight now drags the fabric away from the frame, opening a wedge of daylight along the bottom rail and a thinner one at the head. Flat roof skylight blinds have it worst, with no angle at all for the fabric to rest against.
If you have already bought a roller and taped the edges, you know this. Choosing blackout blinds for a skylight is a decision about the fixing.
Why Skylight Blackout Blinds Have to Be Captured at the Edges
The fix is a channel down each side of the reveal with the fabric running inside it. The lip overlaps the fabric edge, so no straight sightline runs from glass to room.
Tension matters as much as the track. A limp fabric bellies between two channels on a shallow pitch, which is why cell structures hold their shape better than a flat roller. The 1ClickBlinds honeycomb panel works that way. The head needs its own answer: a channel stops where the frame stops, so without a cassette a strip of glass glows above the roller. Skylight blackout blinds are only as good as their weakest edge.
Measuring, and the Velux Question
Most roof windows carry a code on a plate at the top of the sash, visible when you swing it open. Skylight blackout blinds sold as Velux blackout blinds are sized to those codes, so read the plate before ordering. Velux blackout blinds will not always sit in another brand's frame, and blinds for Velux windows cut to a generic width rarely capture in the channels.
Heat is worth a thought too. Roof glass takes the sun almost square on at midday, so skylight blackout blinds block heat and light in one action. On flat roof skylight blinds a reflective fabric beats a black one, and the full range is here if you want to compare.
Frequently asked questions
How do you fit a blackout blind to a Velux roof window?
Find the frame code on the plate at the top of the sash and order against it, then fix the two channels before the blind goes in. They must be parallel within a couple of millimetres or the fabric binds. Blinds for Velux windows clip to the frame, so nothing goes into the ceiling.
How do you measure for skylight blinds?
Use the frame code where the window has one, since it gives the exact size without a tape. Without a code, measure the inner frame width and drop at three points each and take the smallest. Note which way the window opens, as that sets where the controls go.
What are skylight blinds?
Blinds made for roof windows rather than wall windows, held along both edges so they stay against the glass at an angle. Blinds for skylight windows come in blackout, reflective and electric forms. The defining feature is the fixing, not the fabric.

 Trilogy Construction Company
Great glass scallop tile detail. This tile is bordered by slabs of white marble.
Bathroom - modern bathroom idea in Miami
Bathroom - modern bathroom idea in Miami
Find the right local pro for your project

 Salmon-Casson, Ltd
This dining area is clean and bright. The light fixture is from Hubbardton Forge. It has a twig design which lends an organic feel to it. We feel is complements the custom wood bench. We repurposed the client's existing chairs by painting them black.
David Keith Photography

 Pacific Coast Cabinetry
Photo by Brad Peebles
Grain Matched Solid Teak Cabinetry
Inspiration for a modern kitchen remodel with an undermount sink, flat-panel cabinets, medium tone wood cabinets, stainless steel appliances and an island
Inspiration for a modern kitchen remodel with an undermount sink, flat-panel cabinets, medium tone wood cabinets, stainless steel appliances and an island

 Proven Winners
This is a photos of a potted English Butterfly™ Adonis Blue™ Butterfly Bush (Buddleia). Adonis Blue™ has large, fragrant, deep blue inflorescences that bloom continuously throughout summer into late fall. It has a compact habit that is perfect for large containers and landscapes.
 Green Home Systems
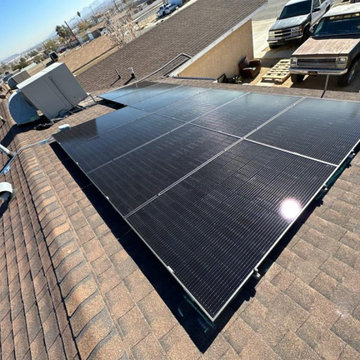
 recently completed a solar installation project in Barstow, California. We provided Albert L. with a 3.60 kW photovoltaic system that allowed him to reduce his utility bill and increase his home value.
Albert chose Green Home Systems because of our competitive pricing and easy payment terms. We worked closely with him to ensure the project was completed quickly and efficiently. Our experienced team of professionals was able to complete the project in less than a month and Albert was very pleased with the results.
At Green Home Systems, we pride ourselves on providing our customers with superior customer service and quality products. We use only the highest quality materials and equipment and take great care to ensure every installation meets our exacting standards for safety and efficiency. Our knowledgeable staff is always available to answer questions about our products or services and provide helpful advice on how to get the most out of your solar energy system.
Our solar energy systems are designed to provide maximum performance with minimal maintenance. Every system includes an inverter that converts the direct current (DC) electricity generated by the solar panels into alternating current (AC) electricity which is used by your home or business. We also offer monitoring services that allow you to track your system’s performance in real time so you can make sure your investment is working as expected.
At Green Home Systems, we understand how important it is for our customers to feel confident in their investment and that’s why we offer competitive financing options through our partners at Sunrun and Sunpower. With these programs you can get started with a low down payment and then pay off your system over time while still enjoying substantial savings on your utility bills each month.
We are proud of the work we do at Green Home Systems and we strive to ensure that every customer is satisfied with their experience. It was an honor for us to work with Albert on this project in Barstow, California and we look forward to continuing to help more people make the switch to solar energy in the future!

 Green Home Systems
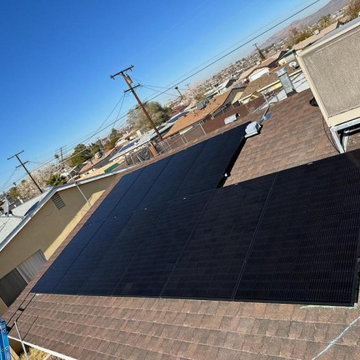
 recently completed a solar installation project in Barstow, California. We provided Albert L. with a 3.60 kW photovoltaic system that allowed him to reduce his utility bill and increase his home value.
Albert chose Green Home Systems because of our competitive pricing and easy payment terms. We worked closely with him to ensure the project was completed quickly and efficiently. Our experienced team of professionals was able to complete the project in less than a month and Albert was very pleased with the results.
At Green Home Systems, we pride ourselves on providing our customers with superior customer service and quality products. We use only the highest quality materials and equipment and take great care to ensure every installation meets our exacting standards for safety and efficiency. Our knowledgeable staff is always available to answer questions about our products or services and provide helpful advice on how to get the most out of your solar energy system.
Our solar energy systems are designed to provide maximum performance with minimal maintenance. Every system includes an inverter that converts the direct current (DC) electricity generated by the solar panels into alternating current (AC) electricity which is used by your home or business. We also offer monitoring services that allow you to track your system’s performance in real time so you can make sure your investment is working as expected.
At Green Home Systems, we understand how important it is for our customers to feel confident in their investment and that’s why we offer competitive financing options through our partners at Sunrun and Sunpower. With these programs you can get started with a low down payment and then pay off your system over time while still enjoying substantial savings on your utility bills each month.
We are proud of the work we do at Green Home Systems and we strive to ensure that every customer is satisfied with their experience. It was an honor for us to work with Albert on this project in Barstow, California and we look forward to continuing to help more people make the switch to solar energy in the future!

 Interior Pros - Design Studio
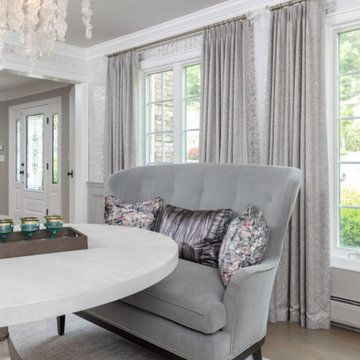
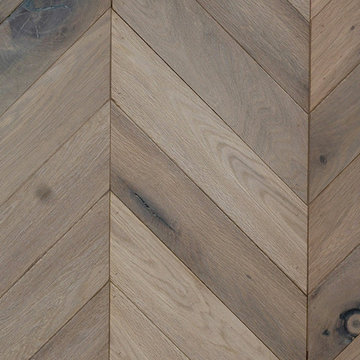
The grey trend has evolved in the last twelve months. Nowadays browns, beige and a touch of grey are in demand. Greige is the new buzzword.
Heavier hand scraped or contoured products, the rage that started around 2005 has taken a back seat in most areas, while a softer wire brushed "ceruse effect" seen mostly on White Oak has been remarkably strong showing no effects of becoming “dated” like the others mentioned.
Ceruse Color Possibilities
There are numerous color combinations to the "cerused" process with the most popular being white or off white. This design trend in hardwood flooring can have darker gray white oak with a mild ceruse off white effect.
There are limitless possibilities in either a prefinished hardwood floor or with what we can create for you in a custom on-site finished hardwood floor.
If something suits your fancy, contact us and we can work on creating just the look and sense of style you are looking for.

 julianhardacre
Top Tips for Selling a Home in 2016
Want to sell your house in 2016? It’s a great year to sell your home and if you go about it the right way you’ll get what it’s worth and maybe more.
Now I could write this post and do the usual “do this, “do that” type stuff but I wouldn’t be doing you any favors. Because unless you know your numbers and the value of your home, you could wind up leaving money on the table or even losing it.
So here you go.
If you want tips for selling your house in 2016, listen to me - a guy who has bought and sold hundreds of properties as a full-time professional Real Estate Investor. Before you repair anything or call a real estate agent…
...you have to know your numbers.
Tip #1: Know the After Repair Value (ARV) of Your Home
If you’re going to get the right amount of money for your house, you have to know the After Repair Value (ARV). Essentially this means that you should know what your home can sell for after it’s is 100% rehabbed.
If you have a house that you can sell for $120,000, you need to know that. If it will sell for $350,000, you need to know what you need to do to your house to get it there. At the same time, you don’t want to overdo it.
If you have a house that’s currently worth $100,000 as is and it can sell for $115,000 when it’s all fixed up, you may or may not want to put the money into a rehab job. If you put $10,000 in just to make an extra $5,000, it might not be worth the hassle.
So whatever you do, know what it’s worth now (as -is) and know what it’ll sell for afterward. If you want to find out how much your house is worth, there are plenty of agents out there who will give you comps (Comps is a term that is short for “Comparisons” that lets you determine an appraisal value for your home by comparing it to recently sold homes in your area that are similar to yours) or advice for free, so ask them.
So don’t over do it, but don’t be hesitant to put money into your house if it’ll yield a big payoff when you sell it.
TIP #2: Make Your Agent Work For You
After you determine your ARV and enlist a good agent to help you sell your home, It might be worthwhile to hop in their Escalade to drive around town and look at some high end houses in your area to see what kind of upgrades they have. And when you see a common theme, you’ll have a good idea as to what kind of upgrades you might want to do to be able to sell your house.
Granite? Concrete? Tile? Carpet? Wood floors?
It depends.
I don’t know your area or market so you have to do the research, ask your agent questions, and exercise wisdom. Every market is different and you don’t want to put money into an upgrade or rehab if it’s not the type of thing people in your area are looking for.
So talk to a competent agent, and even offer to pay them a bit more in commissions if they can sell your home for a higher price.
This is not a waste of money.
A good agent with a proven track record is worth every penny because they know exactly what needs to be done to sell your home for the most money.
Tip #3: Interior Improvements
So once you have an idea about what your home is worth, have a good agent, and have toured homes in your area to see what kind of upgrades homes in your area typically have, it's time to look at your interior to decide what you should and shouldn’t do to sell your house in 2016.
No matter what you do, you need to be wise about it. Maybe you live in non-traditional or funky house. That’s fine. Just go through 2 or 3 times with a notepad, write down the frustrations you have with it, and do what you need to do to make it functional, warm, beautiful, and inviting.
Interior must-haves:
1. Make sure your kitchen is functional.
2. Always have (or add) a 2nd bathroom: If you don’t have a second bathroom, build one. Sure it could cost you $5-$6k, but it could net you an additional $20k when you sell. No matter what you do, make sure there is a second bathroom. It’s a must.
1. Open floor plans are huge in 2016: If you don’t have one, first- make sure it’s right for your area, and if it is, create one. This might mean building or breaking down a wall, but it’ll pay off in the end.
2. Stage your house: Just do it. Staging your home means that you hire a home stager and/or an interior design consultant (like the lady on Love It or List It) to set up your home in the most inviting way possible and tell you everything you need to do to make it sell. You’ll pay some cash up front but staged homes are shown to sell for 6% to 10% higher according to realtor.org.
Tip #4: Exterior Improvements
Just like the interior, you have to make sure the exterior of your house looks appealing if you want to get the most value of your house in 2016.
Exterior must haves:
1. Add curb appeal: When people pull up to your house, most won’t even want to go inside or look at it unless it looks good from the curb. So make sure it looks gorgeous. Rake the leaves, plant some flowers, mow the lawn - make it inviting.
2. Make sure the picture on the MLS listing matches what your house currently looks like: People don’t want to look at a picture and pull up to your house, only to be disappointed.
3. Hire a professional photographer: This is crucial. It could mean the difference between someone viewing your house, or someone skipping it because the pictures look like a child took them. Hire a pro - it’s worth it. Ask me how I know.
4. Don’t paint your house diarrhea green or brown: This is just common sense. If you’re going to paint, use a neutral color. You don’t want to make your house unsellable because you chose an odd color or made a bad decision elsewhere.
Tip #5: Common Sense, Common Sense, Common Sense
No matter what you do or do not do, don’t make any hasty decisions. Ask your agent questions, look around, be observant, and don't do anything extreme. If you need to fix up your house to see a big profit, do it. If you have a modest budget and improvements won’t raise the value or your house (the ARV) anyways, don’t go crazy.
2016 is a great year to sell your house.
Do it right and do it wisely.
Cheers,
Nate
---
Nate Pyles is a long term Real Estate Investor who made it through the crash in 2008 and spends his week buying and selling houses for profit in the Boise, ID area. He runs House Flip Mentor, has 4 kids, a gorgeous wife, loves to fly, and even built his own Irish pub on his property.

 Village Home Stores
Full-overlay Rustic Beech cabinets in the "Charleston" door style and "Briarwood" finish.
Village Home Stores
Example of a large mountain style kitchen design in Chicago
Example of a large mountain style kitchen design in Chicago
 User
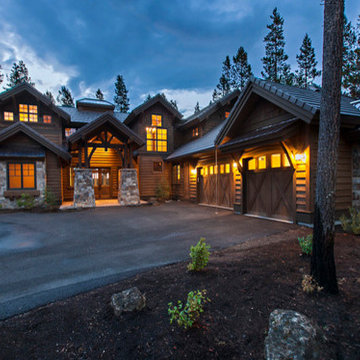
House Plan #892-3 : Houseplans.com
Questions? Call us at 1-800-913-2350
Photographs may show modified designs. All images are copyrighted.
Plan 892-3
4208 sq ft
4 beds
4.50 baths
90' wide
79' deep
×
Plans
Main Floor Plan
Reverse
Upper Floor Plan
Reverse
Specifications
Plan Styles
Craftsman
Garage
Side Entry Garage
Dimension
Depth
79'
Width
90'
Height
28' 5"
Entryway
Mud Room
Bedroom Features
Split Bedrooms
Main Floor Bed Bath
Main Floor Master Bed Bath
2 Master Suites
Upstairs Bedrooms Bath
Walk In Closet
Upstairs Master Bdrm
Exterior Wall Framing
Framing
2x6
Exterior Wall Finish
Horizontal lap siding, Vertical siding, shingle siding
Kitchen Features
Nook Breakfast Area Dining
Kitchen Island
Peninsula Eating Bar
Walk In Pantry Cabinet Pantry
Roof
Roof Type
8:12
Ceiling
Main Ceiling Ft
10'
Upper Ceiling Ft
9'
Lot Characteristics
Suited For View Lot
Additional Rooms
Main Floor Laundry
Den Office Study Computer
Bonus Play Flex Room
Great Room Living Room
Area
Total Sq Ft
4208 sq ft
Upper Floor Sq Ft
1398 sq ft
Main Floor Sq Ft
2810 sq ft
Garage Sq Ft
935 sq ft
Basic Features
Garage Stalls
3
Bedrooms
4
Stories
2
Baths
4.50
Outdoor Spaces
Covered Front Porch
Pricing
Plan Set
Price
5 Copy Set
$1995.00
8 Copy Set
$2195.00
PDF Set
$2195.00
Reproducible Set
$2195.00
CAD Set
$2995.00
Foundation
Price
Crawlspace
+$0.00
Additional Construction Sets
$75.00/each
Right-Reading Reverse
$195.00
Plan Content
All plans are drawn at ¼” scale or larger and include :
Foundation Plan: Drawn to 1/4" scale, this page shows all necessary notations and dimensions including support columns, walls and excavated and unexcavated areas. Most of our plans show a basement and alternate crawl space or slab plan.
Exterior Elevations: A blueprint picture of all four sides showing exterior materials and measurements.
Floor Plan(s): Detailed plans, drawn to 1/4" scale for each level showing room dimensions, wall partitions, windows, etc. as well as the location of electrical outlets and switches.
Cro

Sponsored
Sunbury, OH

J.Holderby - Renovations
Franklin County's Leading General Contractors - 2X Best of Houzz!
 SUPERIOR CHIMNEY SERVICES CORPORATION
A friend noticed a damp, musty smell coming from her living room fireplace the week after a February thaw. When she called a masonry technician from Superior Chimney, to take a look, and found that water had been working its way behind the bricks for years. What started as a small crack now meant her chimney needed structural repairs before she could safely use it again.
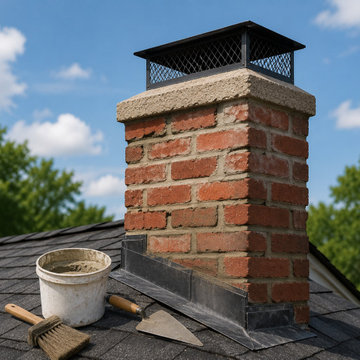
Chimney repairs are any work done to restore the structural and weatherproof condition of a chimney. This can include mortar joint repair, brick replacement, crown repair, flue repair, and cap or flashing replacement. Most Chicagoland homeowners discover the need for chimney repairs often times after winter, when the freeze and thaw cycles have already done its damage. Uncovering the symptoms early is the best way to keep chimney repairs down. Let’s discuss how that can be done.
Why Chicagoland Weather Is Especially Hard on Chimneys
Chicagoland has some of the most polarized weather. One day it’s a blizzard and the next week hot, humid and 100 degrees. That swing in weather conditions and temperatures are the real reasons why chimney repairs are needed.
When moisture from humid and rainy days’ soak into brick and mortar and then freezes, it expands. As it begins to thaw, the materials contract. Repeat that cycle dozens of times in a single Illinois winter and even solid masonry in the chimney starts to crack, spall, and separate from the joints holding it together. This is called the freeze thaw cycle. We’ve talked about it many times over the years, and it continues to be the single biggest reason homes need chimney repairs more often than homes in milder climates.
The Chimney Safety Institute of America (CSIA), the leading nonprofit certifying body for chimney professionals in the United States, notes that water intrusion is one of the most damaging and most preventable problems. If the problem is left to mature, it affects more than the appearance. It compromises the structure itself.
What Do Chimney Repairs Involve?
Not every chimney problem requires the same fix. Chimney repairs generally fall into a few categories. Understanding the difference, helps homeowners have a more informed conversation with the expert technician.
Mortar joint repair or tuckpointing. This involves removing deteriorated mortar between bricks and replacing it with fresh mortar, matched to the original color and texture as closely as possible.
Brick replacement. When individual bricks have spalled, meaning the face has cracked or popped off from trapped moisture, those bricks are removed and replaced.
Crown and cap repair. The crown is the concrete slab at the very top of the chimney. Cracks both big and small let water directly into the chimney flue. Chimney crown repair is often one of the most urgent forms of chimney repairs.
Flashing repair. Flashing is the barrier where the chimney meets the roofline. Loose, damaged or poorly installed flashing is a common source for water leaks. The roof gets the blame as it is the largest piece that covers the house. However, it certainly can be the overlooked chimney.
Flue and liner repair. Cracked flue tiles or damaged liners affect how safely a chimney vents smoke and combustion gases.
When to Know a Chimney Needs Repair
Most chimney damage shows up as small, easy to dismiss way. Let’s take a look at the following list. Be sure to print this out and keep it handy so if/when something happens, you know what to look for.
• Water stains near the fireplace or on the ceiling
• A brownish stain on the wall around your fireplace, or a stain on the ceiling near an exterior chimney. This means water is getting in somewhere it should not.
• Crumbling or missing mortar
• If you can see gaps between bricks, or mortar that flakes off when you touch it
• A leaning or visibly shifting chimney
• A chimney that appears to pull away from the house, even slightly, could indicate a structural issue
• White staining on the brick (efflorescence)
• Chalky white residue left behind as water evaporates out of the masonry. It is a visible sign that moisture is moving through brick
• Rusted damper or firebox components
• Metal parts inside a fireplace that are rusting are a strong indicator that moisture is present
• Debris in the fireplace
• Small chunks of brick, mortar, or tile landing in the firebox
What are the Various Types of Chimney Repair?
This is a compiled list of chimney repairs so you can be aware of what to look for. If you have any questions, contact us directly at 877-244-6349.
Homeowners who schedule chimney repairs at the first sign of trouble typically spend far less than those who wait until water damage reaches the interior of the home. This is a great reason to contact Superior Chimney at 877-244-6349.
Why an Annual Inspection Matters More Than People Think
The CSIA and the National Fire Protection Association both recommend that chimneys, fireplaces, and vents be inspected at least once a year, whether or not the fireplace gets used. This recommendation exists because damage does not take a break just because a chimney sits without any use.
According to data stated by the CSIA, chimney related fires still contribute to tens of thousands of residential fires across the United States each year, and a large share of those incidents can be traced back to deferred maintenance. An annual chimney inspection is what catches the small mortar crack or the hairline crown crack before it turns into a repair bill.
Hiring the Right Company for Chimney Repairs
Not every company who offers chimney repair work has the certified training to diagnose a problem correctly. CSIA certification is the most widely recognized credential in the industry, and it requires technicians to study chimney physics, venting systems, and fire codes. After the studies, the new technician needs to pass an exam and agree to a professional code of ethics.
When you call, be sure to ask:
Are your technicians CSIA certified, and can I verify that certification?
Will you show me photos or video of the damage before starting work?
Does the estimate distinguish between cosmetic repair and structural repair?
At Superior Chimney, we welcome these and other of your questions.
How Chimney Repairs Affect Insurance and Resale
A chimney in poor condition can complicate a home sale or an insurance claim. Home inspectors routinely report on visible mortar loss, leaning chimneys, or missing chimney caps. Some insurers will request proof of repair before renewing a policy on an older home. Addressing chimney repairs proactively protects more than curb appeal. It protects the sale timeline and the claims history associated to the property.
Frequently Asked Questions
How often should a Chicago area chimney be inspected? At least once a year, per CSIA and NFPA guidance, regardless of how often the fireplace is used.
Can chimney repairs be done in winter? Some interior repairs can happen in cold weather, but most masonry repair requires temperatures consistently above freezing. Spring and fall are the most common repair times in the Chicago area.
Is tuckpointing the same thing as chimney repair? Tuckpointing is one type of chimney repair, focused on replacing deteriorated mortar joints.
Does homeowners insurance cover chimney repairs? It depends. Sudden damage from a storm may be covered, while gradual deterioration from lack of maintenance typically is not.
So Finally…
Taking care of your home includes a chimney. Just because you don’t see it every day, doesn’t mean things aren’t happening. Be sure to get a chimney inspection done once per year by a certified and credible company such as Superior Chimney to take care of the issues. Contact us today by calling 877-244-6349.
 Bhupinder Singh
Elevate Your Bathing Experience with Kohler Shower Accessories
Showerheads and Rain Showers
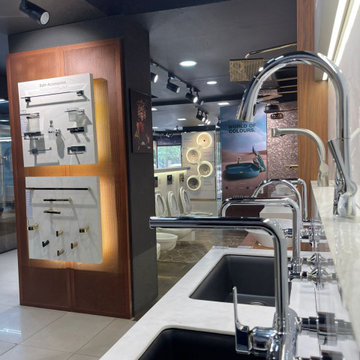
BRAQ brings you “Kohler's Shower accessories designed” to turn your bathroom into a spa-like retreat. From rainfall showerheads to body jets, the options are endless.
Features of Kohler Shower Accessories:
Multiple spray settings
Thermostatic temperature control
Easy-clean nozzles
Chrome, matte black, and gold finishes
Whether it’s a luxury suite or a compact space, BRAQ helps you configure your Shower accessories for the ultimate relaxation.
Hand Showers and Slide Bars
Adjustable and ergonomic, Kohler’s hand showers with slide bars are ideal for family use. They are:
Easy to install
Water-efficient
Sleek in design
Complementary to various décor themes
Why BRAQ by BRCeramics Is the Best Tile Shop and Tiles Showroom
BRAQ isn’t just a destination for bath fittings. As a “premium Tile Store”, we house an expansive collection of floor tiles, wall tiles, and designer tiles that perfectly complement Kohler’s bathware. Our displays help you visualize the full setup – from Toilet Sets and Vanities to Tiles and Faucets – all in one place.
Benefits of visiting our Tile Shop:
One-stop-shop for complete bathroom solutions
Expert assistance on product combinations
Interactive displays with real-life mockups
Access to exclusive Kohler designs
Tiles and Bathroom Aesthetics – Harmonizing Space
BRAQ goes beyond being a Tiles Showroom. We believe in curating spaces that are both functional and artistic. Our tile collection is chosen to match Kohler’s elite fittings in color, design, and texture.
Tiles available at BRAQ include:
Matte and glossy ceramic tiles
Large-format vitrified tiles
Anti-skid bathroom floor tiles
Decorative wall cladding
By visiting our “Tile Store”, you can see how Kohler fittings blend seamlessly with our tile solutions for a completely styled bathroom.
Client Experience at BRAQ BRCeramics
At BRAQ, we prioritize customer satisfaction and experience. Our trained staff takes the time to understand your needs, preferences, and design goals.
Our Process:
Consultation and product education
On-site demo and layout planning
Finalization of fittings and tiles
Delivery and installation coordination
Post-installation service support
We ensure that you leave with not just products but with complete peace of mind.
Sustainability and Innovation
Kohler is globally recognized for sustainable practices. All Kohler bath fittings available at BRAQ are engineered for:
Reduced water consumption
Long lifecycle
Minimal maintenance
Recyclable packaging
Choose “eco-friendly Toilet Sets” and Water Sense-certified Faucets without compromising on style or performance.
Project Applications – From Homes to Hotels
BRAQ supplies Kohler fittings and tiles for:
Residential apartments
Bungalows and villas
Boutique hotels
Corporate offices
Hospitality spaces
Our Tile Showroom features actual-size mockups, allowing builders and architects to make confident choices for large-scale projects.
Visit BRAQ Today – The Best Tiles Shop in Delhi NCR
Looking for the “best bath fittings” and “designer tiles in Delhi NCR”? BRAQ by BRCeramics is your ultimate destination. From premium Kohler Toilet Sets to eye-catching Vessel Wash Basins and Mirrors, we offer the full spectrum of products under one roof.
Find us easily by searching "Tile Shop near me" or "Tiles showroom Delhi NCR" and explore why BRAQ is the most trusted name in the business.
Frequently Asked Questions (FAQs)
Q1: Are Kohler bath fittings at BRAQ covered under warranty?
Yes, all Kohler products sold at BRAQ come with official manufacturer warranties and service support.
Q2: Can I see full bathroom setups at the Tiles Showroom?
Absolutely. BRAQ features real-size mockups that showcase Kohler Toilet Sets, Vanities, Faucets, and Tiles in functional layouts.
Q3: Do you offer home delivery and installation?
Yes, we offer both delivery and installation support across Delhi NCR.
Q4: What makes Kohler Faucets better than others?
Kohler Faucets are known for superior build quality, water efficiency, and design innovation.
Q5: Can I consult with a designer at BRAQ?
Yes, we offer in-store and virtual consultation with our design experts to help you plan your bathroom.
Visit BRAQ by BRCeramics Today
Explore the best of Kohler bath fittings—from “Toilet Sets” to Shower accessories—and transform your bathroom into a luxury space. BRAQ’s Tile Shop and Tiles Showroom in Delhi NCR is ready to welcome you with expert guidance, premium products, and an unparalleled experience.
Come visit BRAQ BRCeramics — Your “Luxury Bathroom Destination in Delhi NCR”.
Contact us for personalized consultations or to schedule a showroom tour!
Let me know if you'd like this content in a downloadable format or want to include images or product links.
Visiting our website and Showroom : - https://brceramics.com/braq | https://g.co/kgs/zmGNejy
#Besttoiletforbathroomindelhi | #Tileshowroominrajourigarden | #Tilesshopindelhi | #Tilesshopinrajagarden | #bestvanitiesforbathroomsindelhi | #bestwashbasinforbathroomindelhi | #bestmirrorforbathroomindelhi | #Bestwashbasinsforbathroomindelhi | #Bestvesselswashbasinindelhi | #Bestfaucetforbathroomsindelhi | #Bestparallelbathroomindelhi | #Bestvivetallbasinfaucetforbathroomindelhi | #Bestbathtubforbathroomindelhi | #Bestbathfillersforbathroomindelhi | #Bestshowerforbathroomindelhi | #bestshowerheadforbathroomindelhi |
 Lemon Remodeling & Services
Planning a Modern Kitchen Remodel
Every successful kitchen remodeling project begins with careful planning. Before construction starts, it is important to evaluate the existing layout, cabinet storage, lighting conditions, appliance placement, and how the kitchen connects to surrounding living spaces.
For this project, the primary design goals included:
Creating a brighter open concept kitchen
Improving functionality and circulation
Increasing pantry and cabinet storage
Maximizing natural light with skylight integration
Creating a clean and timeless design aesthetic
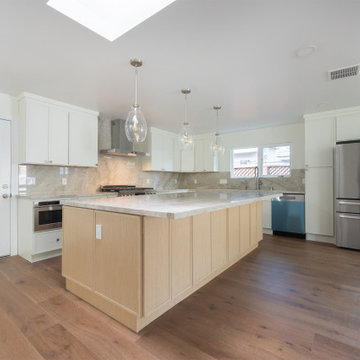
The final layout centered around a large kitchen island that functions as both a workspace and gathering area. Open concept kitchens remain highly desirable because they improve communication between living areas while helping the home feel larger and more connected.
Importance of Natural Light
Natural lighting plays a major role in modern kitchen remodeling. In this renovation, the skylight significantly improved brightness throughout the space and helped create a softer, more inviting atmosphere during the day.
Combined with recessed lighting and pendant fixtures above the island, the layered lighting design provides both functional task lighting and balanced ambient illumination.
Construction and Material Selection
Kitchen remodeling projects require coordination between multiple construction trades including demolition, framing, electrical, plumbing, drywall, flooring, cabinetry, countertops, and finish carpentry.
Bi-Color Kitchen Remodel Design
One of the standout features of this project is the bi-color kitchen remodel design. The warm natural wood island creates contrast against the surrounding white cabinetry while maintaining a clean and balanced appearance.
This approach helps:
Add visual depth to the kitchen
Create separation between functional zones
Prevent the space from feeling overly monochromatic
Introduce warmth into modern kitchen designs
The oversized island also provides additional storage, countertop workspace, and seating opportunities for everyday use and entertaining.
Countertops, Cabinetry, and Finishes
The kitchen includes:
Quartz countertops with waterfall-style edges
Custom shaker-style cabinetry
Stainless steel appliances
Modern pendant lighting
Wide plank engineered hardwood flooring
Full-height backsplash surfaces
The neutral color palette was selected to create a timeless appearance while allowing flexibility for future décor and furniture changes.
Pantry Kitchen Renovation
Storage planning is one of the most important aspects of kitchen remodeling. The pantry kitchen renovation focused on improving organization and accessibility while maximizing usable storage space.
Modern pantry systems help homeowners:
Reduce countertop clutter
Improve kitchen organization
Store small appliances more efficiently
Increase long-term functionality
Thoughtful storage design can significantly improve the daily usability of a kitchen without increasing square footage.
Real Estate Value and Long-Term Benefits
Kitchen remodeling remains one of the highest-value residential renovation projects in the Bay Area real estate market. A professionally designed open concept kitchen can improve buyer perception, increase property appeal, and modernize outdated layouts.
Features such as large islands, skylights, pantry storage, and bi-color cabinetry continue to remain highly desirable among homeowners and future buyers alike.
Common Kitchen Remodeling Mistakes
Some common mistakes homeowners should avoid include:
Insufficient lighting design
Poor circulation planning
Limited storage solutions
Choosing low-durability materials
Overcrowded layouts
Inadequate electrical preparation
Working with experienced remodeling professionals can help avoid costly design and construction issues later in the process.
Common Questions
How long does a kitchen remodel usually take?
Most kitchen remodeling projects take approximately 6–12 weeks depending on the project scope, inspections, material lead times, and structural modifications.
Do kitchen remodels require permits?
Permits are often required when plumbing, electrical, structural, or layout changes are involved. Requirements vary depending on the city and scope of work.
What is a bi-color kitchen remodel?
A bi-color kitchen remodel uses two cabinet finishes or tones to create visual contrast and a more customized design appearance.
Does an open concept kitchen increase home value?
Open concept kitchens are highly desirable because they improve functionality, natural lighting, and overall flow throughout the home.
Conclusion
A well-planned kitchen remodeling project combines thoughtful design, quality craftsmanship, and durable materials to create a space that is both functional and visually appealing. Features such as skylight integration, open concept layouts, pantry kitchen renovations, and bi-color cabinetry continue to remain popular among Bay Area homeowners seeking timeless and practical kitchen designs.
Careful planning, professional coordination, and attention to detail are essential for creating a kitchen that performs well aesthetically and functionally for many years.
------->
If you’re planning a kitchen remodeling project, consulting with an experienced contractor can help simplify the design and construction process while avoiding costly mistakes.
Book a consultation:
calendly.com/lemonremodeling


Sponsored
Sunbury, OH
J.Holderby - Renovations
Franklin County's Leading General Contractors - 2X Best of Houzz!
 Top Price Buyers
What Do I Need To Do To Sell My House In Laveen Arizona
September 20, 2019
By brianpascal
You want to sell your Laveen house, and you want to get top dollar.
Excellent!
But “What do I need to do to sell my house in Laveen“?
Woman holding tablet pc with question marks hiding her face
Here are some tips on how to get your home ready to sell if you’re looking for top dollar that the market will bear:
*NOTE: These instructions are if you’re looking to get full retail value for your house sale. However, if you don’t want to do the things below… or don’t have the time or money to do the things below… you can still sell your Laveen house fast for a fair value in a win-win sale that’ll save you time and expense.
What Do I Need To Do To Sell My House In Laveen Arizona - Cleaning the Floor
2) Cultivate a cohesive, neutral style. You don’t have to paint everything off-white. In fact, some subtle colors can really help change the perception of spaces – for example, a soft yellow will help brighten up a dark kitchen, while a deep dark blue or green will help a bright bedroom to feel like a calm place to sleep (but be careful, dark colors will also make rooms feel small).
Spend the money to get high-quality paint and professional help. Subconsciously people will pay more money for a property with just the right colors and very neat lines – it makes the home feel better built, even though it’s just paint.
Optical illusions are real, and psychologists study this stuff. Don’t believe me?
Look it up. And don’t neglect the outside and just do the inside, or anything else that’s unbalanced.
3) Fix or replace anything that’s broken. Yeah, it might feel like a waste of money to spend an extra couple hundred bucks on a dishwasher that someone else might just pull out and replace again. But really, quite a few buyers will get a home inspection and use the opportunity to negotiate with you. As the seller, you’ll often end up paying more if you try to hide neglected maintenance from the purchaser – and of course you don’t want to be guilty of fraud.
Make sure you stay in compliance with all the laws.
It’s often a good use of money to hire a home inspector to come through before you put the property on the market. If you ask in advance, they’ll often charge you a tiny rate to come back after you’ve done a bunch of minor repairs and deliver you a clean bill of health. Prospective buyers love to see an independent report on the condition of the house – it makes them feel very comfortable with the purchase.
4) Make only the necessary improvements. The biggest mistake people make when getting their house ready to sell is over-improving. They often spend too much money on customized frills that can’t be recovered in the sale.
Paint is about the only safe investment – it’s easy to overspend on almost everything else, and it’s easy to get ripped off by unscrupulous contractors.
It’s important to know what improvements will produce a return on investment to avoid wasting money.
5) Get expert opinions. You should definitely find at least a few decent real estate brokers who will help you price your property, but be honest with them. If you’re going to market the property on your own, don’t make enemies by lying about your intentions. Great brokers are rare, but they make more money for their clients than they earn.
6) Have a really great marketing plan. Again, great brokers earn their value by doing this work and spreading the advertising expenses across many clients. It’s pretty expensive and time-consuming to start from scratch on your own, but if you’re already a marketing expert you’re ahead of the pack.
If you’re not, spend the time listening to what the best brokers do to sell houses in Laveen – just to educate yourself on the options.
What Do I Need To Do To Sell My House In Laveen Arizona - Cash Offer7) Get a cash offer. We buy houses all over the Laveen area, and we do all the work so you don’t have to deal with any of this stuff.
——————————————-
Don’t Want To Do The Things Above Yourself? But Still Want To Sell Your Laveen Arizona House Fast?
While everyone wants to get as much as they possibly can from their house sale… not everyone can do the things or wants to do the things required to sell it at full retail value to an end buyer.
Doing the repairs, cleaning the property up, upgrading the property, marketing the property… those all take money and can take lots of time.
If you have the funds to do these things... AND you can wait the 3-9 months it takes to sell houses in this market… then you’ll be better off financially to do those things then list it on the MLS (the main property listing service that real estate agents use).
If you don’t have the funds to do these things... AND can’t wait months to sell your house… then you may be a perfect fit for our local Laveen house buying service. You’ll submit basic info about your house over here on our website, we’ll evaluate your house, we’ll make you a fair all-cash offer on your house, and you can decide if it’s a fit for you.
What Do I Need To Do To Sell My House In Laveen Arizona Exterior House Arizona Photo
Then we can close FAST (often times within 7 days) if you need us to.
Take a look at what we’ll pay you not to do anything versus the time, expense and hassle involved with doing it on your own.
So if you’re still asking “what do I need to do to sell my house in Laveen“… now you have 2 solid options.
Either…
Fix the property up and get it all nice and ready with the steps above to sell it at top dollar
Let us do all of the work and we’ll make you a cash offer on your house in AS-IS condition. This saves you time, money, and gets the hassle off of your hands.
If you need to sell a property near Laveen, we can help you.
We buy properties like yours from people who need to sell fast.
We’d like to make you a fair offer on your Laveen house
Give us a call anytime at (602) 560-9260 or
fill out the form on this website today!
 Talie Jane Interiors & Construction
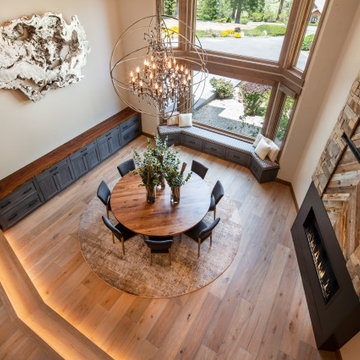
Dining room: new engineered wood floor, lighting detail on stairs, semi-custom buffet with custom live edge black walnut top, semi-custom window bench seat with upholstered cushion and pillows, two-story fireplace with metal, stone and chevron wood facade, one-of-a-kind sculpture and oversized orb chandelier
 safe ZOnea
Ask a kitchen designer in Chicago which countertop question comes up most and you will hear the same answer: white or off-white quartz, and which shade. Homeowners walk into showrooms with a photo saved on their phone, usually a bright, veined slab from a magazine spread, and leave an hour later realizing there are a dozen versions of that same look. The confusion is not about taste. It is about the fact that "white quartz" covers a huge range of patterns, undertones, and price points, and nobody explains the differences before the sale.
Older bungalows and newer builds alike are getting stripped of their dated laminate and butcher block in favor of quartz, and the reasons are practical rather than trendy. Quartz does not need sealing, resists the kind of staining that granite can suffer over decades, and holds up to the freeze-thaw humidity swings that Chicago basements and kitchens go through every year. Once a homeowner commits to quartz, though, the real decision starts: which white, and does the pattern justify the difference in cost.
This piece walks through three specific slabs that keep showing up in Chicago renovation projects, why designers reach for them in different rooms, and what actually separates a flat white surface from one with real depth. None of this requires a design background to follow. It is mostly about paying attention to how a slab behaves under kitchen lighting, how busy the vending gets, and how it photographs versus how it looks in person.
Why White Quartz Took Over Chicago Kitchens
Ten years ago, granite dominated Chicago kitchen remodels almost by default. It was durable, it looked expensive, and every fabricator in the metro area carried a wide range of colors. Quartz has since taken over that position, and the shift happened faster than most contractors expected. Engineered stone gave homeowners a more predictable surface, since natural granite varies slab to slab while quartz is manufactured to a consistent pattern batch after batch.
The other driver is light. Chicago winters are long and gray, and a lot of kitchens, especially in older two-flats and courtyard buildings, do not get much direct sun. A dark granite countertop in a dim kitchen can make the whole room feel smaller. White and light-toned quartz reflects what little natural light comes through the windows, and it makes a galley kitchen or a north-facing space feel noticeably brighter without touching the cabinetry or the layout.
There is also a resale argument that local real estate agents bring up constantly. White quartz photographs well for listings, reads as updated and low-maintenance to buyers touring in person, and does not compete visually with whatever cabinet color the next owner might prefer. It is a safer bet than a bold veined marble look or a colored quartz that might feel dated in five years.
Arctic White and the Cost Question
Among the flatter, more uniform whites, arctic white quartz price comes up constantly in budget conversations because the slab sits at a more approachable point than the heavily veined Italian-marble-inspired patterns. It reads as clean and bright without the busy movement that some homeowners find overwhelming in a small kitchen. Fabricators in the Chicago area tend to keep it in stock precisely because demand stays steady across both new construction and remodel projects.
Part of what keeps this slab affordable relative to its heavily patterned cousins comes down to manufacturing complexity. A quartz surface with minimal veining and a consistent white base is simpler to produce at scale than one that mimics the irregular, high-contrast movement of natural Calacatta marble. That production difference shows up directly in what a homeowner pays per square foot, and it is worth asking a fabricator to walk through that pricing before assuming every white quartz costs the same.
Homeowners planning a full kitchen, including an island, backsplash, and perimeter counters, often use a flatter white like this specifically because it lets other elements carry the visual interest. A patterned tile backsplash or a bold cabinet color reads more clearly against a calm countertop than against one already fighting for attention with heavy veining. Designers frequently pair simpler whites with statement lighting fixtures for exactly this reason.
What Makes Calacatta Patterns Different
Calacatta refers to a family of marble originally quarried in Italy, known for a bright white background broken up by bold, often gold-toned veining that moves in thick, dramatic streaks rather than thin gray lines. Natural Calacatta marble is soft, porous, and expensive to maintain, which is exactly why quartz manufacturers spent years developing engineered versions that replicate the look without the upkeep headaches.
The challenge with any Calacatta-style quartz is getting the veining to look organic instead of printed. Early generations of engineered stone struggled with repetitive patterns that gave away the fact the slab was manufactured rather than cut from actual marble. Modern digital printing and layering techniques have closed that gap considerably, and the better Calacatta-inspired quartz lines now vary the veining across each slab batch so two counters in the same kitchen do not look identical.
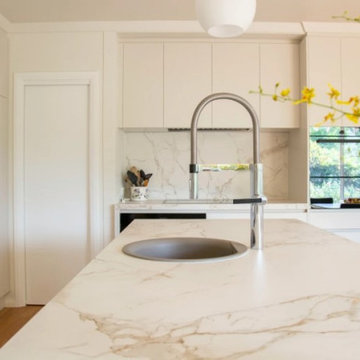
Chicago designers gravitate toward Calacatta patterns for kitchens that function as the visual centerpiece of an open floor plan, which describes a large share of the gut renovations happening in neighborhoods like Lincoln Park, Roscoe Village, and the North Shore suburbs. When the kitchen island is visible from the living room and dining area, a dramatic veined surface becomes part of the home's overall design language rather than a purely functional work surface.
Calacatta Arno Under Kitchen Lighting
One of the more popular options in this category, calacatta arno quartz, balances a warm white base with soft gray and gold veining that avoids looking too stark under the cooler LED lighting common in newer Chicago builds. Homeowners touring showrooms sometimes make the mistake of judging a slab entirely under warm incandescent lighting, then get surprised when the same surface looks slightly different once installed under their kitchen's actual fixtures.
What separates this particular pattern from flatter competitors is how the veining clusters rather than spreading evenly across the slab. That clustering mimics the way real quarried marble forms, with denser mineral deposits in some sections and cleaner stretches in others. Fabricators cutting a large island slab from a single piece will often orient the pattern intentionally so the busiest veining lands somewhere visually interesting rather than getting cut off at an edge.
Because the background reads warmer than a stark white, this pattern tends to pair well with brass or matte gold hardware, a combination that has been showing up repeatedly in Chicago kitchen remodels over the past few renovation seasons. Cabinet painters report a similar trend, with more clients requesting warm white or greige cabinet colors specifically because they complement this kind of veined quartz better than a cooler, blue-toned white would.
Silestone's Version of the Calacatta Look
Manufacturers compete directly in this Calacatta-inspired category, and silestone eternal calacatta gold represents one brand's specific take on the pattern, distinguished by richer gold veining set against a brighter white base than some competing slabs in the same family. Silestone has built a reputation around anti-bacterial surface treatments in addition to the standard quartz durability, a detail some homeowners specifically ask about for kitchens used heavily by families with young children.
The veining in this particular slab tends to run in longer, more continuous lines compared to the clustered pattern found in some other Calacatta-style options, which gives large island surfaces a sense of visual flow from one end to the other. Fabricators working with bigger islands, the kind increasingly common in open-concept Chicago remodels, often favor patterns like this because there is less need to worry about seams interrupting a busy, disconnected pattern.
Price positioning for this slab tends to sit toward the upper end of the engineered quartz category, reflecting both the brand's manufacturing process and the complexity of replicating that continuous gold veining consistently across production batches. Homeowners weighing this option against other Calacatta-style quartz should ask their fabricator directly about batch availability, since premium patterns sometimes have longer lead times than standard stock colors.
Living With Quartz Day to Day
Beyond how a slab looks in a showroom or a listing photo, the daily experience of owning quartz countertops matters more once the renovation dust settles. Quartz resists scratching far better than laminate and holds up to the acidic spills, hot pans, and general abuse of an active kitchen without the sealing maintenance that natural stone requires every year or two. That low-maintenance reputation is a large part of why quartz overtook granite in the first place.
Heat resistance is a detail that gets less attention than it should. While quartz handles moderate heat well, manufacturers generally recommend using a trivet or pad for very hot pots straight off the stove, since sudden temperature shock can occasionally cause stress marks in the resin binder that holds the engineered stone together. This is a minor precaution rather than a major limitation, but it is worth mentioning to anyone assuming quartz is entirely indestructible.
Cleaning routines stay simple across almost every pattern in this category. A damp cloth and mild soap handle daily messes, and the nonporous surface means wine, coffee, and tomato-based sauces do not soak in the way they can with unsealed granite or marble. Homeowners moving from an older stone counter often mention how much less they worry about everyday spills once quartz is installed, which is a quality-of-life change that rarely makes it into the initial design conversation.
Choosing Between the Three
There is no single correct answer among these three slabs, and that is exactly why they keep coming up together in the same design conversations across Chicago renovation projects. A flatter white with minimal veining suits kitchens where other elements need to carry the visual interest, while a bolder Calacatta-inspired pattern makes sense when the countertop itself is meant to be the centerpiece of an open floor plan.
Budget matters too, and it is worth having a direct conversation with a fabricator about where each option lands before falling in love with a specific slab in a showroom. Lighting, cabinet color, and how the kitchen connects to the rest of the home all play into which pattern will actually look right once installation is finished rather than just in a photo.
Whatever direction a homeowner leans, seeing a full slab in person under actual kitchen lighting remains the single most useful step before signing off. Photos only go so far once the countertop is sitting in the room it will live in for years.
43