
Search results for "Reduce enhancing" in Home Design Ideas

 Jack Calderone
This bedroom and full bathroom are part of an adventuresome project my wife and I embarked upon to create a complete apartment in the basement of our townhouse. We designed a floor plan that creatively and efficiently used all of the 385-square-foot-space, without sacrificing beauty, comfort or function – and all without breaking the bank! To maximize our budget, we did the work ourselves and added everything from thrift store finds to DIY wall art to bring it all together.
A partial double closet bar adds a little extra space while still leaving room for longer hanging clothes.

 Industrial Projects
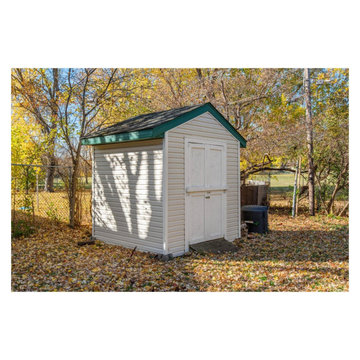
Creating a comfortable outdoor living space is a priority for many homeowners and DIY enthusiasts. With rising summer temperatures, installing a shade tarp in your backyard offers an affordable and effective solution for sun protection. We’ve developed this detailed, step-by-step guide to help you confidently install a shade tarp that not only shields you from the sun but also adds aesthetic appeal to your outdoor area.
Benefits of Installing a Backyard Shade Tarp
Before diving into the installation process, let’s explore the key benefits of having a backyard shade tarp:
Provides UV Protection: Keeps your family and guests safe from harmful sun exposure.
Reduces Outdoor Temperatures: Creates a cooler, more enjoyable outdoor space.
Protects Outdoor Furniture: Extends the life of patio furniture by reducing sun damage.
Enhances Outdoor Aesthetics: Adds a modern, stylish look to your yard.
Budget-Friendly: More affordable compared to permanent structures like pergolas.
Materials and Tools You’ll Need
To begin your DIY backyard shade project, gather the following materials and tools:
Materials:
Shade tarp (UV-resistant and breathable)
Sturdy posts or existing structures (trees, fences, walls)
Mounting hardware (eye bolts, D-rings, turnbuckles, snap hooks)
Nylon or polyester rope, or stainless-steel wire
Concrete (if installing new posts)
Tools:
Power drill
Measuring tape
Level
Ladder
Wrench or adjustable spanner
Post hole digger (if installing new posts)
Step 1: Plan Your Shade Tarp Layout
The first step in installing your backyard shade tarp is careful planning. Take time to assess your outdoor area and answer these key questions:
Where is the sun’s path throughout the day?
What size and shape of tarp best suits your space?
Will you anchor the tarp to existing structures or install new posts?
What height do you want the tarp to sit at for maximum shade and airflow?
Pro Tip: Use string or garden hoses to visualize the tarp layout on the ground before making permanent decisions.
Step 2: Measure and Mark Anchor Points
Once you’ve determined the tarp’s location and orientation:
Measure the tarp dimensions.
Mark the exact points where each corner of the tarp will be anchored.
Ensure that the anchor points are at least 5–10% longer than the tarp size to allow for tensioning and slight adjustments.
Consider slope angles for water runoff. Aim for at least a 20-degree angle to prevent water pooling on the tarp.
Step 3: Install Support Posts (If Necessary)
If your backyard lacks existing anchor points like trees or fences, you’ll need to install sturdy support posts:
Dig post holes at least 24 inches deep and 8-12 inches wide for stability.
Set posts in concrete, making sure they remain plumb and level.
Allow the concrete to cure for at least 24–48 hours before applying tension from the tarp.
We recommend using pressure-treated wood, galvanized steel poles, or aluminum posts for longevity and strength.
Step 4: Install Mounting Hardware
With your anchor points ready, it’s time to install the necessary hardware:
Attach eye bolts or pad eyes securely into walls, posts, or other fixed structures.
For added flexibility and adjustability, install turnbuckles or tensioners to fine-tune the tarp’s tightness.
Connect snap hooks, D-rings, or carabiners to make assembly and disassembly easier.
Make sure all hardware is rated for outdoor use to prevent rust and corrosion.
Step 5: Attach and Tension the Shade Tarp
Now it’s time for the most satisfying part—mounting the shade tarp:
Begin by attaching one corner of the tarp to an anchor point.
Gradually attach the remaining corners, moving diagonally for even tension.
Adjust each connection point using your turnbuckles, ropes, or cables.
Pull the tarp tight enough to avoid sagging, but not so tight that it risks tearing.
Check that the tarp maintains the desired slope for rainwater runoff and adjust tension as needed.
Step 6: Final Adjustments and Safety Check
Before enjoying your new shaded area:
Inspect all anchor points and hardware for stability.
Test the tarp’s tension and make adjustments for even distribution.
Ensure that no sharp edges or loose connections remain that could damage the tarp or pose a safety hazard.
Confirm that the tarp is secure in windy conditions by giving it a gentle tug.
If you live in an area with frequent high winds, consider removing the tarp during storms to prevent damage.
Step 7: Enjoy Your Shaded Backyard Oasis
Once installed, your backyard shade tarp provides a comfortable and protective space for outdoor gatherings, relaxation, or family activities. You can decorate underneath with outdoor furniture, string lights, or potted plants to create a personalized outdoor retreat.
Maintenance Tips for Long-Lasting Shade Tarp Performance
To extend the life of your shade tarp, follow these maintenance guidelines:
Regularly check for wear and tear, especially around anchor points and seams.
Clean the tarp periodically with mild soap and water to prevent mildew buildup.
Store the tarp indoors during harsh weather seasons if it's not designed for year-round use.
Tighten hardware as needed to maintain proper tension and avoid sagging.
By following these simple care steps, your shade tarp will continue to deliver years of sun protection and outdoor comfort.
Conclusion: Upgrade Your Outdoor Space with a DIY Shade Tarp
Installing a shade tarp in your backyard is a cost-effective and rewarding DIY project. With careful planning, quality materials, and proper installation techniques, you’ll enjoy cool, shaded outdoor living all season long. This step-by-step guide ensures your project goes smoothly from start to finish.
 kmjee
Pepper plants are a delightful addition to any garden, offering a vibrant burst of color and spice to your culinary creations. However, even experienced gardeners can encounter challenges when growing pepper plants. In this blog, we'll explore some common issues you might face and provide practical solutions to help your pepper plants thrive.
1. Slow or Stunted Growth
Issue: Slow or stunted growth in pepper plants can be discouraging, but there are specific steps you can take to address this issue effectively.
Solution:
a. Soil Health:
- Well-Draining Soil: Ensure your pepper plants are in well-draining soil to prevent waterlogged roots, which can inhibit growth.
- Organic Matter: Incorporate plenty of organic matter, such as compost or well-rotted manure, into the soil to improve its texture and nutrient content.
- pH Level: Test the soil pH and adjust it to the ideal range between 6.0 and 6.8 using lime or sulfur as needed.
b. Fertilization:
- Balanced Fertilizer: Use a balanced, slow-release fertilizer designed for vegetables to provide essential nutrients steadily throughout the growing season.
- Compost: Amend the soil with compost to enhance nutrient availability and soil structure. This can promote healthier growth.
c. Watering:
- Consistent Moisture: Maintain consistent soil moisture levels by watering your pepper plants regularly but avoid waterlogging. Aim for 1-2 inches of water per week, adjusting based on your local climate and weather conditions.
- Mulching: Apply mulch around the base of the plants to retain soil moisture and regulate temperature.
2. Yellowing Leaves
Issue: Yellowing leaves can be a sign of various underlying problems, but addressing them promptly can restore the vibrancy of your pepper plants.
Solution:
a. Nutrient Deficiencies:
- Balanced Fertilization: Use a well-balanced fertilizer that includes micronutrients to address nutrient deficiencies.
- Specific Nutrients: If you suspect a particular deficiency, such as magnesium, iron, or nitrogen, apply the appropriate nutrient supplement following package instructions.
b. Pest and Disease Control:
- Pest Inspection: Regularly inspect the leaves and stems for common pests like aphids and mites. Remove affected leaves and treat with organic pesticides if necessary.
- Disease Management: Look out for signs of diseases like bacterial leaf spot or fungal issues. Apply organic fungicides or bactericides as recommended.
3. Blossom Drop
Issue: When pepper plants drop their blossoms prematurely, it can hinder fruit development and lead to disappointment.
Solution:
a. Temperature Control:
- Stable Temperatures: Ensure your pepper plants are exposed to consistent temperatures between 70°F and 80°F (21°C to 27°C) during flowering. Avoid sudden temperature fluctuations by providing shelter or using row covers.
b. Pollination:
- Assist with Pollination: If growing peppers indoors or in a greenhouse, help with pollination by gently shaking the plants or using a small brush to transfer pollen between flowers. Outdoor pepper plants are usually pollinated by insects.
4. Wilting Plants
Issue: Wilting or drooping pepper plants can be a sign of various problems, but proper care can revive them.
Solution:
a. Watering:
- Consistent Moisture: Adjust your watering routine to keep the soil consistently moist but not waterlogged. Water early in the day to prevent fungal issues.
- Drainage: Ensure proper soil drainage by amending the soil or using raised beds to prevent waterlogged roots.
b. Pest Control:
- Pest Inspection: Examine the undersides of leaves for signs of pests like aphids, spider mites, or whiteflies. Treat infestations promptly with biological insecticides.
5. Curling Leaves
Issue: Curling or misshapen leaves indicate stress in pepper plants, which can be caused by various factors.
Solution:
a. Environmental Stress:
- Stable Conditions: Ensure your pepper plants are in an environment with stable humidity, temperature, and adequate air circulation. Avoid sudden changes in conditions.
- Proper Ventilation: Adequate air circulation can reduce humidity and prevent fungal issues.
b. Pest and Disease Management:
- Pest Inspection: Regularly inspect your plants for pests and diseases, addressing them promptly with organic remedies as needed.
6. Sunscald
Issue: Sunscald can lead to discolored, leathery patches on pepper fruits when exposed to intense sunlight.
Solution:
a. Shade Cloth:
- Sun Protection: Shield your pepper plants from harsh sunlight during the hottest part of the day using shade cloth or by planting them where they receive some filtered sunlight.
b. Pruning:
- Fruit Shading: Prune excess foliage to allow better fruit shading, reducing the risk of sunscald. Ensure that there's a balance between foliage and fruit.
7. Pepper Plant Pests and Diseases
Issue: Aphids, mites, whiteflies, and various diseases can affect pepper plants, but you can manage them effectively.
Solution:
a. Regular Inspection:
- Vigilant Monitoring: Regularly inspect your pepper plants for signs of pests or diseases, paying close attention to the undersides of leaves and stems.
b. Organic Remedies:
- Pest Control: Use organic remedies like neem oil, insecticidal soap, or diatomaceous earth for pest control.
- Disease Management: Apply organic fungicides or bactericides as recommended to manage diseases like powdery mildew or bacterial spot.
While growing pepper plants can present various challenges, these common issues are manageable with the right knowledge and care. Regular monitoring, proper soil preparation, and timely intervention can help you enjoy a bountiful harvest of vibrant, spicy peppers. Remember that gardening is a learning experience, and each challenge you face is an opportunity to improve your skills and enjoy the rewards of homegrown peppers in your favorite dishes.
Find the right local pro for your project

 Simple Steps
This modern bathroom wall is a very dark grey tile made from recycled stone dust. Its color is PB 3106 Dark Grey and is in the brushed texture.
Example of a mid-sized minimalist master gray tile and stone tile bathroom design in Miami with gray walls
Example of a mid-sized minimalist master gray tile and stone tile bathroom design in Miami with gray walls
 Thyme & Place Design LLC
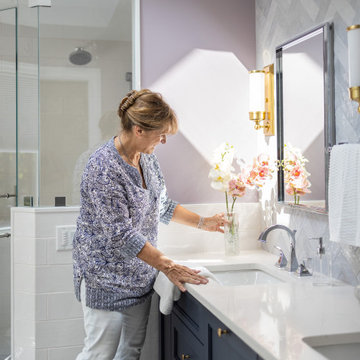
This medium sized bathroom had ample space to create a luxurious bathroom for this young professional couple with 3 young children. My clients really wanted a place to unplug and relax where they could retreat and recharge.
New cabinets were a must with customized interiors to reduce cluttered counter tops and make morning routines easier and more organized. We selected Hale Navy for the painted finish with an upscale recessed panel door. Honey bronze hardware is a nice contrast to the navy paint instead of an expected brushed silver. For storage, a grooming center to organize hair dryer, curling iron and brushes keeps everything in place for morning routines. On the opposite, a pull-out organizer outfitted with trays for smaller personal items keeps everything at the fingertips. I included a pull-out hamper to keep laundry and towels off the floor. Another design detail I like to include is drawers in the sink cabinets. It is much better to have drawers notched for the plumbing when organizing bathroom products instead of filling up a large base cabinet.
The room already had beautiful windows and was bathed in naturel light from an existing skylight. I enhanced the natural lighting with some recessed can lights, a light in the shower as well as sconces around the mirrored medicine cabinets. The best thing about the medicine cabinets is not only the additional storage but when both doors are opened you can see the back of your head. The inside of the cabinet doors are mirrored. Honey Bronze sconces are perfect lighting at the vanity for makeup and shaving.
A larger shower for my very tall client with a built-in bench was a priority for this bathroom. I recommend stream showers whenever designing a bathroom and my client loved the idea of that feature as a surprise for his wife. Steam adds to the wellness and health aspect of any good bathroom design. We were able to access a small closet space just behind the shower a perfect spot for the steam unit. In addition to the steam, a handheld shower is another “standard” item in our shower designs. I like to locate these near a bench so you can sit while you target sore shoulder and back muscles. Another benefit is cleanability of the shower walls and being able to take a quick shower without getting your hair wet. The slide bar is just the thing to accommodate different heights.
For Mrs. a tub for soaking and relaxing were the main ingredients required for this remodel. Here I specified a Bain Ultra freestanding tub complete with air massage, chromatherapy and a heated back rest. The tub filer is floor mounted and adds another element of elegance to the bath. I located the tub in a bay window so the bather can enjoy the beautiful view out of the window. It is also a great way to relax after a round of golf. Either way, both of my clients can enjoy the benefits of this tub.
The tiles selected for the shower and the lower walls of the bathroom are a slightly oversized subway tile in a clean and bright white. The floors are a 12x24 porcelain marble. The shower floor features a flat cut marble pebble tile. Behind the vanity the wall is tiled with Zellage tile in a herringbone pattern. The colors of the tile connect all the colors used in the bath.
The final touches of elegance and luxury to complete our design, the soft lilac paint on the walls, the mix of metal materials on the faucets, cabinet hardware, lighting and yes, an oversized heated towel warmer complete with robe hooks.
This truly is a space for rejuvenation and wellness.


 Allreno
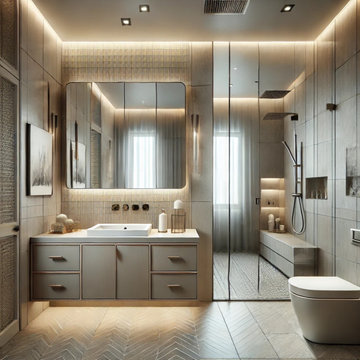
A 5x10 bathroom is one of the most common bathroom sizes, offering enough space for a full bath setup while maintaining efficiency. Whether you’re planning a simple refresh or a complete renovation, understanding the cost breakdown is essential to staying within budget.
Average Cost of a 5x10 Bathroom Remodel
The cost of remodeling a 5x10 bathroom can range between $6,000 and $25,000, depending on the level of renovation, materials, and labor costs in your area. Here’s a quick breakdown of what you can expect:
• Basic Remodel ($6,000 - $10,000) – Cosmetic updates such as painting, new fixtures, and budget-friendly materials.
• Mid-Range Remodel ($10,000 - $18,000) – Upgrading vanities, flooring, and fixtures with higher-quality materials.
• Luxury Remodel ($18,000 - $25,000+) – Premium materials, custom cabinetry, high-end tile work, and luxury fixtures.
Cost Breakdown by Component
Remodel Component Estimated Cost Range
Demolition $500 - $1,500
Plumbing & Fixtures $1,500 - $5,000
Flooring $800 - $3,000
Shower/Tub Installation $2,000 - $7,000
Vanity & Countertops $1,500 - $5,000
Lighting & Electrical $500 - $2,000
Painting & Finishing $300 - $1,500
Permits & Labor $2,000 - $6,000
Factors That Affect the Cost
1. Material Choices – Higher-end materials like marble or custom cabinetry will drive costs up.
2. Labor Costs – Hiring professional contractors, plumbers, and electricians can significantly impact the budget.
3. Plumbing Relocation – Moving pipes or installing a new shower layout can add $2,000 - $5,000 to the total cost.
4. Tile Work Complexity – Intricate tile patterns and premium materials will increase labor and material expenses.
5. Customization – Custom bathroom vanities, glass enclosures, and luxury fixtures will elevate the budget.
How to Save Money on Your 5x10 Bathroom Remodel
• Choose Cost-Effective Materials – Consider porcelain tiles instead of marble and pre-made bathroom vanities instead of custom builds.
• Refinish Instead of Replace – Refinishing a bathtub or vanity can save thousands compared to buying new ones.
• DIY Where Possible – Simple tasks like painting or installing new fixtures yourself can cut labor costs.
• Get Multiple Quotes – Comparing contractor estimates helps ensure you get the best price.
• Use an AI-Powered Renovation Tool – Platforms like Allreno Design App can streamline planning, offer cost-saving design suggestions, and connect you with budget-friendly materials and contractors.
The Role of AI and Proptech in Bathroom Renovation
With advancements in Bathroom Renovation AI and proptech, homeowners and professionals can now utilize technology to enhance efficiency and accuracy in remodeling projects. AI-powered tools help generate instant layouts, optimize material selection, and reduce unexpected costs, making bathroom renovation easier than ever before.
Final Thoughts
A 5x10 bathroom remodel can vary widely in cost depending on the scope of work and materials used. Whether you’re going for a simple refresh or a high-end renovation, planning and using smart budgeting strategies can help you achieve the bathroom of your dreams within your price range.
Ready to start your remodel? Use Allreno Design App’s AI-powered platform to get instant design ideas, cost estimates, and connections to top-rated contractors—saving you time and money in your bathroom renovation.
 Allreno
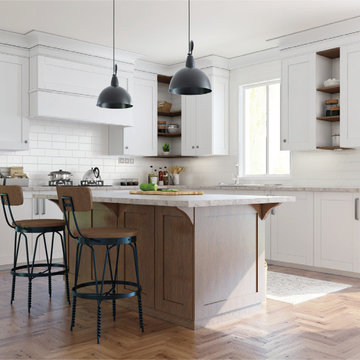
A kitchen renovation is one of the most impactful ways to enhance a home’s value, functionality, and aesthetics. Whether in New York’s compact urban apartments or New Jersey’s spacious suburban homes, homeowners are constantly seeking innovative solutions to optimize their kitchen spaces. The key elements in any renovation are kitchen cabinets, layout efficiency, and design aesthetics. With advancements in technology, artificial intelligence is revolutionizing the industry, making the renovation process faster, smarter, and more cost-effective.
The Role of Kitchen Cabinets in Renovation
Kitchen cabinets serve as the foundation of any kitchen design. They not only provide storage but also define the overall look and feel of the space. From traditional wood finishes to sleek, modern designs, selecting the right cabinets is crucial to achieving both form and function.
In New York, where space is often limited, custom cabinetry solutions that maximize storage without compromising aesthetics are in high demand. Conversely, in New Jersey’s larger homes, homeowners have the flexibility to explore spacious layouts with expansive cabinetry options. The emergence of high-quality, customizable kitchen cabinetry has allowed homeowners to create tailored solutions that fit their lifestyles and design preferences.
Kitchen Design Trends and Innovation
Modern kitchen design is driven by a combination of style, efficiency, and sustainability. Open-concept layouts, handle-free cabinets, and smart storage solutions are gaining popularity among homeowners. Additionally, materials such as quartz countertops, high-gloss finishes, and natural wood elements continue to be top choices for a contemporary aesthetic.
With an increasing focus on sustainability, many homeowners are opting for eco-friendly materials and energy-efficient appliances. Smart kitchens, equipped with IoT-enabled appliances, voice-controlled lighting, and automated temperature control, are also becoming a standard in high-end renovations.
Revolutionizing Kitchen Renovation with AI
AI-powered design solutions are transforming how homeowners plan and execute kitchen renovations. Allreno, a cutting-edge AI-driven renovation platform, is leading the charge in making kitchen remodels more efficient and accessible. With Allreno’s AI design technology, homeowners can visualize their dream kitchens instantly, experiment with different layouts, and receive cost-effective recommendations without the traditional back-and-forth with designers.
This AI-driven approach drastically reduces the time required for planning, ensuring a seamless renovation experience. Homeowners can explore various cabinet styles, finishes, and configurations tailored to their space and budget, ultimately streamlining the decision-making process.
New York and New Jersey: The Perfect Markets for AI-Powered Renovation
New York and New Jersey offer a diverse range of homes, from historic brownstones and luxury penthouses to sprawling suburban residences. Each renovation project comes with its unique challenges, whether it's maximizing storage in a Manhattan apartment or designing a spacious, chef-friendly kitchen in a New Jersey home.
Allreno’s AI technology is particularly beneficial in these markets, where efficiency, precision, and customization are essential. By integrating AI into the renovation process, homeowners can make data-driven decisions, ensuring their new kitchens are not only stylish but also highly functional.
The Future of Kitchen Renovation
As technology continues to evolve, AI-driven platforms like Allreno will play an increasingly significant role in home renovations. By simplifying the design process, offering real-time visualizations, and providing cost-effective solutions, AI is making high-quality kitchen renovations more accessible than ever.
For homeowners in New York and New Jersey looking to renovate their kitchens, embracing AI-driven solutions can lead to a faster, smarter, and more personalized experience. Whether upgrading kitchen cabinets, optimizing layouts, or selecting the perfect design elements, the future of kitchen renovation is here—and it’s powered by AI.
Tags: ai design, bathroom renovation, renovation, bathroom design, interior design
www.allreno.co
 Futuro Futuro Kitchen Range Hoods
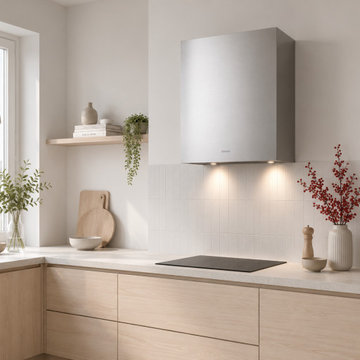
Futuro Futuro 36-Inch Amalfi Wall Range Hood – Modern Italian Design with Powerful Ventilation
The Futuro Futuro 36-Inch Amalfi Wall Range Hood combines contemporary Italian design, premium materials, and advanced ventilation technology to create a statement piece for modern kitchens. Featuring a sleek cubist-inspired design, this luxury wall-mounted range hood delivers both exceptional performance and timeless style.
Premium Italian Craftsmanship and Durable Stainless Steel Construction
Designed and handcrafted in Italy, the Amalfi Series is built with high-quality AISI 304 stainless steel, a material known for its outstanding resistance to rust, corrosion, and everyday wear. This durable construction ensures long-lasting performance while maintaining its elegant appearance for years to come.
The Amalfi’s refined geometric design adds a sophisticated modern touch to any kitchen while providing the reliability expected from premium Italian craftsmanship.
Powerful and Quiet 940 CFM Ventilation System
The Futuro Futuro Amalfi Wall Range Hood features a high-performance 940 CFM internal Whisper tangential blower designed to efficiently remove smoke, grease, steam, and cooking odors from your kitchen.
Despite its powerful airflow, the hood operates quietly thanks to an advanced multi-layer sound-absorbing system. This innovative technology helps reduce operating noise, allowing you to enjoy a cleaner, fresher kitchen environment without unnecessary distractions.
Advanced Perimeter Suction Filtration Technology
The Amalfi Series uses a perimeter suction filtration system that creates an air curtain around your cooktop. This design improves capture efficiency by directing smoke, grease, and odors toward the edges of the hood for more effective filtration.
The hidden metal mesh grease filters maintain the hood’s clean, minimalist appearance while providing reliable grease collection. The filters are easy to remove and dishwasher safe for convenient maintenance.
Smart Controls and Energy-Efficient LED Lighting
The illuminated electronic control panel makes operating the Amalfi Wall Range Hood simple and intuitive. With the push of a button, you can adjust ventilation settings and access built-in features.
A convenient filter-cleaning reminder helps ensure your hood continues performing at its best. Two energy-efficient LED lights provide bright, focused illumination over your cooktop while enhancing visibility during food preparation.
Why Choose the Futuro Futuro Amalfi 36-Inch Wall Range Hood?
36-inch modern wall-mounted range hood design
Premium Italian craftsmanship
Durable AISI 304 stainless steel construction
Powerful 940 CFM internal blower
Quiet operation with advanced sound absorption technology
Perimeter suction filtration system for improved smoke and odor capture
Dishwasher-safe metal mesh grease filters
Energy-efficient LED cooktop lighting
Sleek cubist design for contemporary kitchens
What makes the Futuro Futuro Amalfi range hood different?
The Amalfi stands out with its combination of Italian craftsmanship, premium stainless steel construction, powerful ventilation, quiet operation, and modern architectural design.
How powerful is the Amalfi 36-Inch range hood?
This model features a 940 CFM internal blower designed to handle heavy cooking, smoke, grease, and odors effectively.
Is the Amalfi range hood easy to maintain?
Yes. The removable metal mesh grease filters are dishwasher safe, and the electronic controls include a cleaning reminder for easier upkeep.
What kitchen styles work best with the Amalfi Wall Range Hood?
Its sleek cubist design complements contemporary, modern, minimalist, and luxury kitchen designs.
 Free Lancing
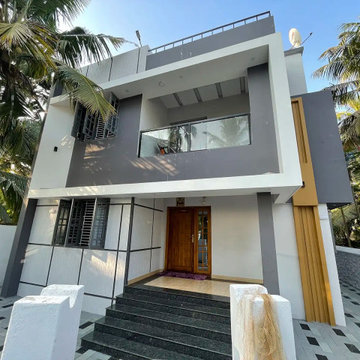
Effective residential construction project management is crucial in today’s fast-moving building industry. It means overseeing every step of building a home, from planning to finishing, to ensure projects are completed time, within budget, and with high quality. Unlike commercial projects, residential projects require special attention to meet homeowners' unique needs and wishes, requiring a customized approach from the beginning to the end.
In 2025, the construction sector will use advanced technologies like AI and integrated project delivery (IPD) to streamline processes and improve stakeholder collaboration. However, project managers face significant challenges, including managing risks, maintaining quality control, and ensuring effective communication among team members.
A WIP Report (Work-in-Progress Report) is a key tool that helps track a project's budget, progress, and resource use. It provides clear insights, making managing costs easier, avoiding delays, and making informed decisions.
By adopting best practices and using modern construction management tools, project managers can overcome these challenges and deliver successful residential construction projects that meet client expectations and contribute to a sustainable future.
This article provides a brief overview of residential construction project management, highlights its importance, and touches on the challenges faced by project managers while incorporating the latest trends and technologies in the field.
Types of Residential Construction Management
Here are the different types of Residential Construction Management:
Single-Family Homes: These are standalone houses built for individual families. Managing these projects involves overseeing construction from planning to completion, ensuring that the home meets the owner's preferences and budget.
Multi-Family Housing: This includes apartments, condominiums, and townhouses. Projects of this type require managing multiple units, often with shared facilities, and ensuring compliance with local building codes.
Custom Home Building: This involves constructing homes tailored to specific client needs. Close collaboration with architects and designers is required to ensure the house reflects the owner's personality and preferences.
Home Renovation and Remodeling: These projects focus on updating or expanding existing homes. They often involve working with subcontractors for specialized tasks like electrical or plumbing work.
Components of Residential Construction Project Management
Managing a residential construction project requires carefully coordinating people, materials, and timelines. A well-structured approach ensures efficiency, cost control, and high-quality results.
Roles and Responsibilities
A project manager plays a vital role in residential construction. They oversee every step from planning to completion and ensure the project stays on schedule, within budget, and meets quality standards.
Project Manager’s Role in Home Construction
The project manager is responsible for organizing tasks, managing resources, and solving problems that arise during construction. They coordinate between different teams, track progress, and ensure safety regulations are followed.
Collaboration with Contractors, Architects, and Stakeholders
Successful residential construction requires teamwork. Project managers work closely with architects to bring designs to new heights, coordinate with contractors to manage labor and materials, and keep stakeholders (such as homeowners and investors) informed about project updates.
Client Communication and Expectations Management
Clear communication with clients is essential. The project manager keeps homeowners updated on timelines, changes, and challenges. Setting realistic expectations and providing regular updates, they help avoid misunderstandings and keep the project running smoothly.
Project Scope & Planning
Practical project planning sets the foundation for a successful residential construction project. It ensures clear goals, minimizes risks, and keeps the project on track.
Defining Project Objectives and Deliverables:
Clearly outlining what needs to be done and what the final result should look like is essential. This involves setting specific, measurable goals that align with the homeowner's vision and budget.
Managing Homeowner Expectations and Scope Creep:
Homeowners often have changing needs or ideas. Effective project managers must manage these expectations to prevent "scope creep," which can delay projects and increase costs. This involves open communication and setting clear boundaries.
Ensuring Compliance with Zoning Laws and Permits:
Before construction begins, it's crucial to ensure that all necessary permits are obtained and that the project complies with local zoning laws. This step avoids costly fines and delays, ensuring the project moves forward smoothly.
Budgeting & Cost Control
Proper budgeting is essential for keeping residential construction projects financially viable. Effective cost management prevents overspending and ensures profitability.
Accurate Cost Estimation for Residential Projects
A precise cost estimate considers labor, materials, permits, and unexpected expenses. Using historical data and Sage 300 CRE for financial management improves accuracy and helps set realistic budgets.
Budget Allocation and Tracking
Allocating funds efficiently ensures that each phase of the project receives the necessary resources. Tracking expenses through Construction & Financial Dashboards allows for real-time monitoring and early detection of budget deviations.
Preventing Budget Overruns
Uncontrolled costs can derail a project. Regular financial reviews, automated alerts for overspending, and contingency planning help keep expenses in check and prevent financial strain.
Scheduling & Timeline Management
Timely project completion is crucial in residential construction. Effective scheduling minimizes delays and ensures a smooth workflow.
Creating Detailed Project Schedules
A structured schedule outlines all tasks, deadlines, and dependencies. Breaking down the project into phases, planning, execution, and finishing, helps maintain order and clarity.
Preventing Delays & Meeting Deadlines
Delays can result from labor shortages, weather conditions, or supply chain issues. To avoid problems, it’s good to check for risks ahead of time, add extra time to schedules, and keep everyone on the same page.
Using Gantt Charts and Critical Path Methods
CPM for Construction helps identify critical activities that directly impact project completion, while Gantt charts provide a visual timeline of tasks. Both tools optimize scheduling and improve efficiency.
Residential Construction Project Management Phases
Managing a residential construction project effectively requires a structured approach through various phases. Each phase plays a critical role in ensuring the project's success, from initial planning to completion.
Pre-Construction Phase
The pre-construction phase sets the foundation for a smooth and efficient building process. Proper planning at this stage helps prevent costly changes and delays later.
Site Analysis & Approvals: A thorough site analysis assesses soil conditions, topography, and environmental factors. Feasibility studies evaluate project viability, including costs and regulatory compliance. Obtaining zoning approvals, permits, and other legal clearances is crucial before breaking ground.
Selecting Materials and Procurement Strategies: Choosing the right materials impacts durability, sustainability, and cost efficiency. A well-planned procurement strategy, including bulk purchasing and reliable supplier partnerships, ensures timely delivery and cost savings. Using Sage 300 CRE for procurement management helps streamline material sourcing and financial planning.
Construction Phase
The construction phase transforms plans into reality. Effective coordination and strict quality control ensure a successful build.
Resource Allocation and Workflow Coordination: Efficiently managing labor, equipment, and materials is key to maintaining progress. Using CPM for Construction, project managers can allocate resources strategically, prevent bottlenecks, and optimize workflows for timely completion.
Quality Control and Ensuring Compliance with Safety Regulations: Strict adherence to building codes and safety standards is non-negotiable. Regular inspections, worker training, and real-time quality monitoring ensure a structurally sound and legally compliant project. Proactive safety measures prevent accidents and project disruptions.
Project Closeout & Handover
The final phase of residential construction project management is crucial for ensuring a smooth transition from construction to occupancy. Proper closeout procedures guarantee quality, client satisfaction, and long-term project success.
Final Inspections and Quality Assurance: Before finishing the project, a final inspection checks that everything meets safety rules and quality standards. Any problems need to be fixed quickly. Using Procore helps make inspections and tracking issues easier, ensuring a high-quality final product.
Client Walkthrough and Support: A final check helps homeowners see the finished work, ask questions, and make sure it meets their expectations. This is also a chance to explain important home features and maintenance tips. Good communication here builds trust and strengthens relationships.
Warranty Management and Feedback: Efficient warranty management ensures clients get quick help for any issues after construction. A clear process for tracking requests and keeping in touch with homeowners boosts satisfaction. Collecting feedback helps improve future projects. Using S-Curve Forecasting tracks performance trends and refines management strategies.
Software for Residential Construction Project Management
The integration of technology in residential construction project management has revolutionized the way projects are planned, executed, and monitored. Digital tools streamline operations, reduce costs, and improve communication, making them essential for modern construction firms.
Importance of Digital Tools
Investing in digital tools is crucial for construction firms as it transforms the industry by enhancing efficiency, accuracy, and collaboration across the entire project lifecycle. They also improve project management by streamlining processes, automating tasks, and facilitating real-time stakeholder communication.
Top Construction Management Software for Residential Projects
Several software solutions are available for managing residential construction projects:
Procore: Known for its comprehensive project management features, including document management and collaboration tools.
Sage 300 CRE: Offers robust accounting and financial management capabilities, ideal for large-scale construction projects.
Buildertrend: Specializes in residential construction, providing tools for project scheduling, budgeting, and client communication.
CoConstruct: Focuses on custom home building and remodeling, offering features for estimating, scheduling, and project management.
WIP Reports: Useful for tracking work-in-progress and managing project finances effectively.
Features Comparison and Best Use Cases:
Procore: Best for large projects requiring extensive collaboration and document management.
Sage 300 CRE: Ideal for firms needing robust financial management.
Buildertrend: Suitable for residential builders focusing on client communication and project scheduling.
CoConstruct: Perfect for custom home builders who need detailed estimating and scheduling tools.
WIP Reports: Useful for firms needing to track project finances closely.
How Software Improves Project Efficiency
Construction management software significantly enhances project efficiency in several ways:
Automating Accounting and Job Costing: Software like Sage 300 CRE automates financial tasks, reducing manual errors and improving budget tracking.
Streamlining Document Management and Communication: Tools like Procore centralize documents and facilitate real-time communication among team members, reducing misunderstandings and delays.
Mobile-Friendly Solutions for Real-Time Tracking: Mobile apps from platforms like Buildertrend allow for on-site access to project data, enabling real-time tracking and decision-making.
These digital tools and software solutions are essential for modern residential construction project management, offering benefits such as improved efficiency, enhanced collaboration, and better financial control.
Challenges in Residential Construction Project Management
Residential construction projects face a variety of challenges that can impact their success. Here are some of the key issues project managers encounter:
Managing Subcontractors and Labor Shortages
One of the biggest challenges in residential construction is managing subcontractors and dealing with labor shortages. Subcontractors often have their own schedules and priorities, which can lead to delays if not coordinated properly. Additionally, labor shortages can slow down projects and increase costs due to the need for overtime or hiring temporary workers.
Budget Overruns and Unexpected Costs
Budget overruns are common in residential construction due to factors like material price fluctuations, unexpected site conditions, or changes in project scope. Effective budget management involves regularly monitoring expenses and having contingency plans for unexpected costs.
Changing Construction and Eco Rules
Construction and Eco Rules are always changing, so project managers need to keep up with the latest regulations. This involves following guidelines for saving energy, protecting the environment, and ensuring safety. Ignoring these rules can lead to fines, delays, or even stopping the project.
Best Practices
To ensure your residential construction projects run smoothly and successfully, follow these essential best practices:
Setting Clear Project Goals and Milestones
Clearly defining what you want to achieve is the first step to success. Set specific, measurable, achievable, relevant, and time-bound (SMART) goals. This helps everyone involved understand what needs to be done and by when. For example, instead of saying "build a house," say "build a house with three bedrooms and two bathrooms within the next nine months."
Stakeholder Collaboration
Good communication is key to keeping everyone on the same page. Regular meetings with contractors, suppliers, and homeowners help prevent misunderstandings and ensure that everyone knows what's happening and what's next. This open dialogue also helps resolve issues quickly, preventing small problems from becoming big delays.
Using Data-Driven Insights for Decision-Making
Making decisions based on facts rather than guesses is crucial. Use data and analytics to understand project progress, identify potential issues early, and make informed decisions. For instance, if data shows that a particular material is consistently causing delays, you can plan ahead to avoid those delays in the future.
Proactive Risk Management Strategies
Things don't always go as planned, so being prepared is essential. Identify potential risks early and have a plan to manage them. This might include having backup suppliers, planning for weather conditions, or setting aside extra funds for unexpected expenses. Being proactive can prevent small issues from turning into major problems.
Conclusion
Effective residential construction project management requires careful planning, clear communication, and the right digital tools. From single-family homes to multi-family housing and custom projects, managing timelines, budgets, and quality is essential for success.
By following best practices, using project management software, and staying ahead of industry trends, project managers can ensure smooth execution and client satisfaction despite challenges like labor shortages, budget overruns, and regulatory compliance; modern technology and strategic planning help mitigate risks.
Construction firms can improve efficiency, enhance collaboration, and maintain financial control by adopting advanced tools like Procore, Sage 300 CRE, and Buildertrend. A well-managed project delivers a quality home and builds trust and long-term success in the industry.
FAQs
What is residential construction project management?
It involves overseeing all aspects of building residential properties, from initial planning and design to construction and completion, ensuring projects are completed on time, within budget, and to the desired quality standards.
How can I prevent budget overruns in my construction project?
Accurate cost estimation, continuous budget tracking, and having contingency plans for unexpected expenses are key strategies to prevent budget overruns.
What are the main stages of a residential construction project?
The primary stages include design, pre-construction, procurement, and construction.
How does construction management software improve project efficiency?
It streamlines processes like scheduling, budgeting, and communication, providing real-time data access and collaboration among stakeholders, which enhances overall project efficiency.
How can I ensure my project complies with local building codes and regulations?
Engage professionals familiar with local laws, obtain all necessary permits before starting, and conduct regular inspections to ensure adherence to building codes and regulations.
 THE Remodel Group
When these longtime clients traded the bustle of Portland for a quieter neighborhood in Lake Oswego, they found a home they loved almost immediately. But while the rest of the house reflected the warm, welcoming environment they envisioned for this next chapter, one space remained firmly rooted in another era: the primary bathroom.
Dark tile, a cramped shower, and a dated tub deck left the room feeling heavy and disconnected from the calming retreat the homeowners hoped to create. Their vision was simple but meaningful: a bright, spa-inspired bathroom designed for comfort, relaxation, and sharing the space together.
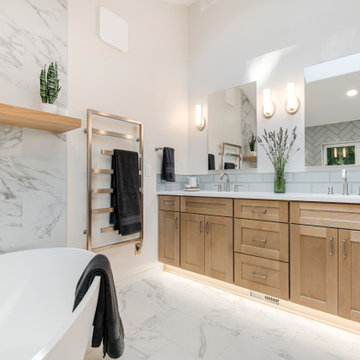
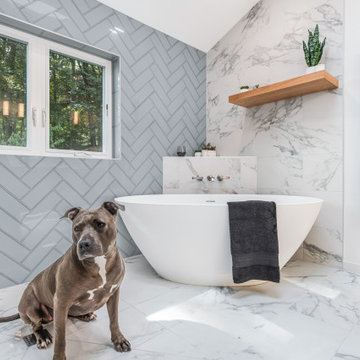
At the heart of the transformation is a thoughtfully designed wet room that combines the shower and soaking tub into one seamless experience. By removing the enclosed shower and replacing it with clear sightlines and an open, curbless design, the room immediately feels larger, brighter, and more connected to the natural light streaming through the window. The result is a space that balances luxury and accessibility while creating the serene atmosphere the homeowners were seeking.
The project's greatest design challenge arrived before construction even began. The homeowners dreamed of a soaking tub large enough for two, but a winding staircase with tight corners made transporting a traditional oversized tub nearly impossible. Through careful planning and product selection, the team identified an elegant oval soaking tub that delivered the depth and comfort they wanted while successfully navigating the home's challenging access conditions.
What makes this wet room particularly special is the attention given to how the homeowners actually use the space. The freestanding tub is positioned beneath a custom ledge featuring a wall-mounted tub filler, creating a convenient surface for candles, beverages, books, or a laptop for movie nights. The faucet placement was carefully considered to keep the interior of the tub open and comfortable, allowing the homeowners to sit face-to-face and enjoy the experience together.
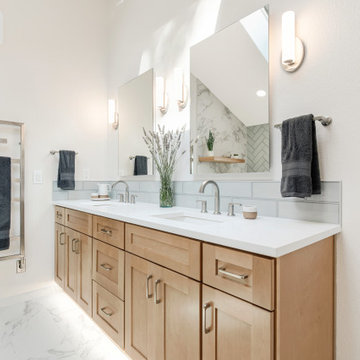
Throughout the space, material selections were chosen to amplify light and create a timeless sense of calm. Large-format porcelain tile with soft gray marble veining wraps the floors and shower walls, while a custom blue herringbone feature wall introduces subtle color and texture without overwhelming the room's airy aesthetic. Chrome plumbing fixtures reflect natural light throughout the space, enhancing the clean, spa-like atmosphere.
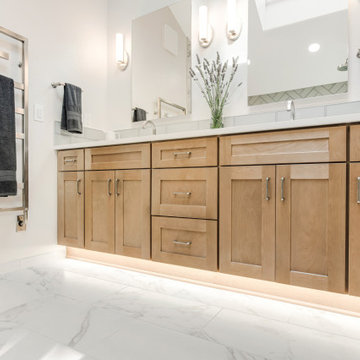
Custom cabinetry allowed every inch of the vanity to work harder. In addition to generous storage and double sinks, a specialized vanity organizer was incorporated to store a hair dryer and styling tools out of sight while keeping them plugged in and ready to use. It's a small detail that streamlines everyday routines while reducing countertop clutter. Quartz countertops provide a durable, low-maintenance surface, while integrated toe-kick lighting creates a soft nighttime glow that serves as both an accent feature and practical nightlight.
Comfort was a major priority throughout the design process. Heated tile floors and heated towel bars transform everyday routines into small moments of luxury, while a bidet toilet seat adds a layer of convenience and comfort the homeowners now consider indispensable.
Beyond aesthetics, the bathroom was designed with long-term usability in mind. The curbless shower improves accessibility while preserving the sophisticated visual flow of the wet room. A hand shower mounted on a slide bar doubles as a grab bar, providing future aging-in-place benefits without compromising the room's refined appearance. It has also become one of the homeowners' favorite features for an entirely different reason: a remarkably convenient dog-washing station.
Preserving natural light was equally important. The original wood window was replaced with a moisture-resistant vinyl casement window, ensuring long-term durability while maintaining the bright connection to the outdoors that helps define the room's character. Combined with the open shower design, the window allows daylight to travel throughout the entire space, making the bathroom feel both expansive and inviting.
Perhaps the greatest testament to the success of the project came from the homeowners themselves:
"I didn't have the skills to dream up this design. You did. Thank you."


 Save home
A clean, white, and fresh look never cease to accentuate your kitchen’s interior.
Whether you have a small kitchen or a large one, it is highly unlikely to make a wrong decision with the white color. A white kitchen is a timeless addition to your entire décor, which always radiates more light, a bright look, and an aesthetically soothing aura.
However, although the color white has the power to uplift the look of your kitchen, it is not enough to just paint the walls white. You need to strike a chord between various textures and colors along with kitchen elements, like shaker kitchen cabinets, countertop, etc.
In the following section, we have compiled a list of modern kitchen cabinets ideas. Read on see some of the best white kitchen cabinet styles for your kitchen.
Top 10 Modern White Kitchen Ideas
There’s no doubt in the fact that a white kitchen and RTA cabinets can form the perfect base for your kitchen’s interior. You can add some plants, a pinch of gold, and or a simple black countertop for a different yet appealing look. Below we have discussed some of these ideas. Read on:
1. Airy and Light
The simplest way to design your modern white kitchen is to use a white and timber combination. This can include white cabinets, timber doors, and white wall tiles. Or you can choose timber RTA cabinets paired with white tiles, flooring, and countertop.
2. Sophisticated
Another way is to sophisticatedly turn around your white choices. Here’s an example:
Use white cabinets, steel fittings, and accessories paired with textured white tiles and marble countertop. The flooring can also be white, similar to the countertop. This would give a nice, clean, and refreshing look to your modern white kitchen
.
3. Stone Look
The stone look is always best paired with white cabinets. So, if you utilize shaker kitchen cabinets, which are white, and pair it with everything white stone-like look, then your kitchen would look mesmerizing. This means using marble countertop, marble flooring, and stone-looking back tiles.
4. Monochrome
Black and white appeals to a lot of homeowners. It is the best combination that is unlikely to go wrong. In fact, it helps you move ahead of the ordinary kitchen interior.
You can set your monochrome modern white kitchen in two ways:
Firstly, you have white cabinets paired with black countertop and black fittings. Too much black would reduce lighting and make your kitchen look smaller. So, add white flooring and white back tiles.
Secondly, you can keep the lower RTA cabinets black, and rest everything white, such as textured back tiles, white knobs, etc. You can also pair it with timber upper cabinets.
5. Grey Shade
Similar to monochrome, grey is also amazing. It looks much more sophisticated than monochrome, but a little less bold. So, you can keep your modern white kitchen in these two shades. For example, grey cabinets and white countertop, tiles, and flooring. Here, glossy back tiles can accentuate the look.
6. Brass Touch
Brass touch can literally light up any dull space. If you just add a brass lamp to your living room or kitchen, it can drastically enhance the look. You can use brass in the form of brass windows and lamps. You can also add copper stools and upper cabinets for the same effect.
7. White Countertop
One thing that can make your modern white kitchen look extremely beautiful is the attention to detail. This includes adding a white countertop that really improves the look. A lot of people add a white countertop but making it complement your cabinets can improve the interior a lot.
For example, marble countertop, wooden flooring, white cabinets, and copper knobs.
8. Wood Shelves
The color of wood and timber automatically adds a sense of warmth to your kitchen. So, you can also use either upper or lower timber cabinets. If you are using timber or wood for the upper cabinet and RTA cabinets for the lower cabinets, then you can keep upper cabinets as open shelves. This can also be a bar wood shelf.
9. White Tiles
Basic, old-school white tiles are also great. Earlier, we had small white tiles that used to go with everything. These tiles still complement your kitchen. Use white RTA cabinets, black countertop, and white tiles for a perfect contrast.
10. Light and Bright
Another amazing way to install shaker kitchen cabinets in a modern white kitchen is to keep everything white but add colorful chairs to your dining table. This will add life to your kitchen.
Conclusion
If you are redesigning your kitchen or re-structuring it, modern white kitchen themes are the best option. Simply take inspiration from the above examples and choose a versatile approach for remodeling your kitchen. There’s no shortage of options that you can choose from, such as monochrome, black cabinets, etc. Just remember to check the kitchen size, your budget, and lighting in your kitchen to ensure that you are moving in the right direction.
Whether you have a small kitchen or a large one, it is highly unlikely to make a wrong decision with the white color. A white kitchen is a timeless addition to your entire décor, which always radiates more light, a bright look, and an aesthetically soothing aura.
However, although the color white has the power to uplift the look of your kitchen, it is not enough to just paint the walls white. You need to strike a chord between various textures and colors along with kitchen elements, like shaker kitchen cabinets, countertop, etc.
In the following section, we have compiled a list of modern kitchen cabinets ideas. Read on see some of the best white kitchen cabinet styles for your kitchen.
Top 10 Modern White Kitchen Ideas
There’s no doubt in the fact that a white kitchen and RTA cabinets can form the perfect base for your kitchen’s interior. You can add some plants, a pinch of gold, and or a simple black countertop for a different yet appealing look. Below we have discussed some of these ideas. Read on:
1. Airy and Light
The simplest way to design your modern white kitchen is to use a white and timber combination. This can include white cabinets, timber doors, and white wall tiles. Or you can choose timber RTA cabinets paired with white tiles, flooring, and countertop.
2. Sophisticated
Another way is to sophisticatedly turn around your white choices. Here’s an example:
Use white cabinets, steel fittings, and accessories paired with textured white tiles and marble countertop. The flooring can also be white, similar to the countertop. This would give a nice, clean, and refreshing look to your modern white kitchen
.
3. Stone Look
The stone look is always best paired with white cabinets. So, if you utilize shaker kitchen cabinets, which are white, and pair it with everything white stone-like look, then your kitchen would look mesmerizing. This means using marble countertop, marble flooring, and stone-looking back tiles.
4. Monochrome
Black and white appeals to a lot of homeowners. It is the best combination that is unlikely to go wrong. In fact, it helps you move ahead of the ordinary kitchen interior.
You can set your monochrome modern white kitchen in two ways:
Firstly, you have white cabinets paired with black countertop and black fittings. Too much black would reduce lighting and make your kitchen look smaller. So, add white flooring and white back tiles.
Secondly, you can keep the lower RTA cabinets black, and rest everything white, such as textured back tiles, white knobs, etc. You can also pair it with timber upper cabinets.
5. Grey Shade
Similar to monochrome, grey is also amazing. It looks much more sophisticated than monochrome, but a little less bold. So, you can keep your modern white kitchen in these two shades. For example, grey cabinets and white countertop, tiles, and flooring. Here, glossy back tiles can accentuate the look.
6. Brass Touch
Brass touch can literally light up any dull space. If you just add a brass lamp to your living room or kitchen, it can drastically enhance the look. You can use brass in the form of brass windows and lamps. You can also add copper stools and upper cabinets for the same effect.
7. White Countertop
One thing that can make your modern white kitchen look extremely beautiful is the attention to detail. This includes adding a white countertop that really improves the look. A lot of people add a white countertop but making it complement your cabinets can improve the interior a lot.
For example, marble countertop, wooden flooring, white cabinets, and copper knobs.
8. Wood Shelves
The color of wood and timber automatically adds a sense of warmth to your kitchen. So, you can also use either upper or lower timber cabinets. If you are using timber or wood for the upper cabinet and RTA cabinets for the lower cabinets, then you can keep upper cabinets as open shelves. This can also be a bar wood shelf.
9. White Tiles
Basic, old-school white tiles are also great. Earlier, we had small white tiles that used to go with everything. These tiles still complement your kitchen. Use white RTA cabinets, black countertop, and white tiles for a perfect contrast.
10. Light and Bright
Another amazing way to install shaker kitchen cabinets in a modern white kitchen is to keep everything white but add colorful chairs to your dining table. This will add life to your kitchen.
Conclusion
If you are redesigning your kitchen or re-structuring it, modern white kitchen themes are the best option. Simply take inspiration from the above examples and choose a versatile approach for remodeling your kitchen. There’s no shortage of options that you can choose from, such as monochrome, black cabinets, etc. Just remember to check the kitchen size, your budget, and lighting in your kitchen to ensure that you are moving in the right direction.

 Outwater Industries Inc
Encompassing a range of baluster rails, newel posts and complementary decorative accessories, Outwater's new, maintenance free Cast Stone Balustrade System is manufactured utilizing a unique process that combines a mixture of resins with crushed limestone and impregnated fade resistant textured colors to create balustrades that look and feel just like authentic limestone balusters at less than half of their cost and weight.
Intended for indoor or outdoor applications, which can be assembled by laypeople using traditional carpentry tools without the need for masonry, Outwater's Cast Stone Balustrade System meets the 4-inch sphere code when properly set up, and can be placed on sized dimensional lumber without the need for steel supports.
Moreover, unlike lesser quality balustrade systems, which use regular screws to attach their components, also taking into account that the screws' imminent corrosion renders them as an unsafe means by which to attach baluster rails, Outwater's Cast Stone Balustrade System employs a unique incorporated pipe system, connector pins and spacers to increase the Balustrade System's stability while allowing for a more secure and professional installation with barely perceptible seams.
Offered in 34-in. and 48-in. overall heights with a nominal 7-in rail width, baluster rails are sold by the foot up to 16-ft. long to accommodate most any installation.
100% mold resistant, non-porous and unaffected by the harshest elements, Outwater's Cast Stone Balustrade System does not require priming, painting or even occasional touch ups, further enhancing its appeal.
Product Features:
• Create balustrades that look and feel just like authentic stone balusters at less than half of their cost and weight
• Intended for indoor or outdoor use
• Can be installed by laypeople using traditional carpentry tools without the need for masonry
• Meets the 4-inch sphere code when properly set up, and can be placed on sized dimensional lumber without the need for steel supports
• Employs a unique incorporated pipe system, connector pins and spacers to increase stability while allowing for a more secure and professional installation
• Offered in 34-in. and 48-in. overall heights with a nominal 7-in rail width, baluster rails are sold by the foot up to 16-ft. long
• 100% mold resistant, non-porous and unaffected by the harshest elements. Does not require priming, painting or even occasional touch ups
Contact:
Architectural Products by Outwater
Sales & Product Information (USA & Canada):
1-800-631-8375 / 1-201-498-8750
Fax (USA & Canada): 1-800-888-3315 / 1-201-498-8751
Sales & Product Information (Outside of the USA & Canada):
1-201-498-8750
Fax (Outside of the USA & Canada): 1-201-498-8751
Email: info@outwaterplastics.com
Web: www.outwater.com
Visit us!
East Coast:
24 River Road
Bogota, NJ 07603
1-201-498-8750
West Coast:
4720 West Van Buren
Phoenix, AZ 85043
1-602-447-0936
About Architectural Products by Outwater:
It really is easy to shop with us!
Relied upon by more than 1,000,000 builders, renovators, architects designers, woodworkers, cabinet and furniture manufacturers, OEM's and retail consumers since 1972, Architectural Products by Outwater is an international manufacturer and distributor of more than 65,000 innovative and traditional Decorative Building Products that you possibly never knew existed or for which you simply could not find a reliable source. This is where Outwater truly shines!
“Now you can design, buy, build and dream like the Pros…”
Outwater’s products are, to say the least, very competitively priced and include interior and exterior architectural mouldings and millwork; columns and capitals; LED lighting and lighting accessories; balustrading; faux stone panels; faux wood beams; genuine stone tiles; decorative wood carvings; wrought iron components; stamped steel and polymer ceiling panels and backsplashes; wainscoting; wall coverings; fireplace surrounds and mantels; plastic "glass" block; period and contemporary hardware; home organization systems; kitchen and bath accessories; kitchen and bath cabinetry; bath vanities; furniture & cabinet components; knobs & pulls; casters; laminates; brass tubing & fittings; surfacing materials… and so much more!
In addition, with warehouse and distribution facilities in New Jersey and Arizona totaling over 300,000 square feet, Outwater facilitates purchases with reduced lead times and shipping costs, enabling us to fulfill and ship over 98% of our orders from stock within one to two business days!
At a time when many companies appear to have rapidly transitioned away from personalized customer service, having replaced their knowledgeable and immensely valuable human sales representatives with inanimate online marketing channels, which can be helpful to you if you were to know exactly what you might need and were not to encounter difficulties in placing your order, here at Outwater, we still believe that human interaction with a live, well versed, non-commissioned sales representative will undoubtedly better serve your needs in the long run. Even though you can always shop with us at www.outwater.com, you can also always deal directly with our extremely well versed and friendly sales and customer service representatives for their unparalleled support and assistance, most of whom have worked at Outwater for more than 15 years.
Whether you have been one of our loyal customers over the years or this is your first time in doing business with us, we would like to thank you for your expressed interest in our company and the products that we carry.
Please feel free to contact us with any questions at 1-800-631-8375 or visit us online at www.outwater.com
We look forward to serving you in the near future.
 THE Remodel Group
When these longtime clients traded the bustle of Portland for a quieter neighborhood in Lake Oswego, they found a home they loved almost immediately. But while the rest of the house reflected the warm, welcoming environment they envisioned for this next chapter, one space remained firmly rooted in another era: the primary bathroom.
Dark tile, a cramped shower, and a dated tub deck left the room feeling heavy and disconnected from the calming retreat the homeowners hoped to create. Their vision was simple but meaningful: a bright, spa-inspired bathroom designed for comfort, relaxation, and sharing the space together.
At the heart of the transformation is a thoughtfully designed wet room that combines the shower and soaking tub into one seamless experience. By removing the enclosed shower and replacing it with clear sightlines and an open, curbless design, the room immediately feels larger, brighter, and more connected to the natural light streaming through the window. The result is a space that balances luxury and accessibility while creating the serene atmosphere the homeowners were seeking.
The project's greatest design challenge arrived before construction even began. The homeowners dreamed of a soaking tub large enough for two, but a winding staircase with tight corners made transporting a traditional oversized tub nearly impossible. Through careful planning and product selection, the team identified an elegant oval soaking tub that delivered the depth and comfort they wanted while successfully navigating the home's challenging access conditions.
What makes this wet room particularly special is the attention given to how the homeowners actually use the space. The freestanding tub is positioned beneath a custom ledge featuring a wall-mounted tub filler, creating a convenient surface for candles, beverages, books, or a laptop for movie nights. The faucet placement was carefully considered to keep the interior of the tub open and comfortable, allowing the homeowners to sit face-to-face and enjoy the experience together.
Throughout the space, material selections were chosen to amplify light and create a timeless sense of calm. Large-format porcelain tile with soft gray marble veining wraps the floors and shower walls, while a custom blue herringbone feature wall introduces subtle color and texture without overwhelming the room's airy aesthetic. Chrome plumbing fixtures reflect natural light throughout the space, enhancing the clean, spa-like atmosphere.
Custom cabinetry allowed every inch of the vanity to work harder. In addition to generous storage and double sinks, a specialized vanity organizer was incorporated to store a hair dryer and styling tools out of sight while keeping them plugged in and ready to use. It's a small detail that streamlines everyday routines while reducing countertop clutter. Quartz countertops provide a durable, low-maintenance surface, while integrated toe-kick lighting creates a soft nighttime glow that serves as both an accent feature and practical nightlight.
Comfort was a major priority throughout the design process. Heated tile floors and heated towel bars transform everyday routines into small moments of luxury, while a bidet toilet seat adds a layer of convenience and comfort the homeowners now consider indispensable.
Beyond aesthetics, the bathroom was designed with long-term usability in mind. The curbless shower improves accessibility while preserving the sophisticated visual flow of the wet room. A hand shower mounted on a slide bar doubles as a grab bar, providing future aging-in-place benefits without compromising the room's refined appearance. It has also become one of the homeowners' favorite features for an entirely different reason: a remarkably convenient dog-washing station.
Preserving natural light was equally important. The original wood window was replaced with a moisture-resistant vinyl casement window, ensuring long-term durability while maintaining the bright connection to the outdoors that helps define the room's character. Combined with the open shower design, the window allows daylight to travel throughout the entire space, making the bathroom feel both expansive and inviting.
Perhaps the greatest testament to the success of the project came from the homeowners themselves:
"I didn't have the skills to dream up this design. You did. Thank you."

 Village Home Stores
Full-overlay Rustic Beech cabinets in the "Charleston" door style and "Briarwood" finish.
Village Home Stores
Example of a large mountain style kitchen design in Chicago
Example of a large mountain style kitchen design in Chicago
 THE Remodel Group
When these longtime clients traded the bustle of Portland for a quieter neighborhood in Lake Oswego, they found a home they loved almost immediately. But while the rest of the house reflected the warm, welcoming environment they envisioned for this next chapter, one space remained firmly rooted in another era: the primary bathroom.
Dark tile, a cramped shower, and a dated tub deck left the room feeling heavy and disconnected from the calming retreat the homeowners hoped to create. Their vision was simple but meaningful: a bright, spa-inspired bathroom designed for comfort, relaxation, and sharing the space together.
At the heart of the transformation is a thoughtfully designed wet room that combines the shower and soaking tub into one seamless experience. By removing the enclosed shower and replacing it with clear sightlines and an open, curbless design, the room immediately feels larger, brighter, and more connected to the natural light streaming through the window. The result is a space that balances luxury and accessibility while creating the serene atmosphere the homeowners were seeking.
The project's greatest design challenge arrived before construction even began. The homeowners dreamed of a soaking tub large enough for two, but a winding staircase with tight corners made transporting a traditional oversized tub nearly impossible. Through careful planning and product selection, the team identified an elegant oval soaking tub that delivered the depth and comfort they wanted while successfully navigating the home's challenging access conditions.
What makes this wet room particularly special is the attention given to how the homeowners actually use the space. The freestanding tub is positioned beneath a custom ledge featuring a wall-mounted tub filler, creating a convenient surface for candles, beverages, books, or a laptop for movie nights. The faucet placement was carefully considered to keep the interior of the tub open and comfortable, allowing the homeowners to sit face-to-face and enjoy the experience together.
Throughout the space, material selections were chosen to amplify light and create a timeless sense of calm. Large-format porcelain tile with soft gray marble veining wraps the floors and shower walls, while a custom blue herringbone feature wall introduces subtle color and texture without overwhelming the room's airy aesthetic. Chrome plumbing fixtures reflect natural light throughout the space, enhancing the clean, spa-like atmosphere.
Custom cabinetry allowed every inch of the vanity to work harder. In addition to generous storage and double sinks, a specialized vanity organizer was incorporated to store a hair dryer and styling tools out of sight while keeping them plugged in and ready to use. It's a small detail that streamlines everyday routines while reducing countertop clutter. Quartz countertops provide a durable, low-maintenance surface, while integrated toe-kick lighting creates a soft nighttime glow that serves as both an accent feature and practical nightlight.
Comfort was a major priority throughout the design process. Heated tile floors and heated towel bars transform everyday routines into small moments of luxury, while a bidet toilet seat adds a layer of convenience and comfort the homeowners now consider indispensable.
Beyond aesthetics, the bathroom was designed with long-term usability in mind. The curbless shower improves accessibility while preserving the sophisticated visual flow of the wet room. A hand shower mounted on a slide bar doubles as a grab bar, providing future aging-in-place benefits without compromising the room's refined appearance. It has also become one of the homeowners' favorite features for an entirely different reason: a remarkably convenient dog-washing station.
Preserving natural light was equally important. The original wood window was replaced with a moisture-resistant vinyl casement window, ensuring long-term durability while maintaining the bright connection to the outdoors that helps define the room's character. Combined with the open shower design, the window allows daylight to travel throughout the entire space, making the bathroom feel both expansive and inviting.
Perhaps the greatest testament to the success of the project came from the homeowners themselves:
"I didn't have the skills to dream up this design. You did. Thank you."
 THE Remodel Group
When these longtime clients traded the bustle of Portland for a quieter neighborhood in Lake Oswego, they found a home they loved almost immediately. But while the rest of the house reflected the warm, welcoming environment they envisioned for this next chapter, one space remained firmly rooted in another era: the primary bathroom.
Dark tile, a cramped shower, and a dated tub deck left the room feeling heavy and disconnected from the calming retreat the homeowners hoped to create. Their vision was simple but meaningful: a bright, spa-inspired bathroom designed for comfort, relaxation, and sharing the space together.
At the heart of the transformation is a thoughtfully designed wet room that combines the shower and soaking tub into one seamless experience. By removing the enclosed shower and replacing it with clear sightlines and an open, curbless design, the room immediately feels larger, brighter, and more connected to the natural light streaming through the window. The result is a space that balances luxury and accessibility while creating the serene atmosphere the homeowners were seeking.
The project's greatest design challenge arrived before construction even began. The homeowners dreamed of a soaking tub large enough for two, but a winding staircase with tight corners made transporting a traditional oversized tub nearly impossible. Through careful planning and product selection, the team identified an elegant oval soaking tub that delivered the depth and comfort they wanted while successfully navigating the home's challenging access conditions.
What makes this wet room particularly special is the attention given to how the homeowners actually use the space. The freestanding tub is positioned beneath a custom ledge featuring a wall-mounted tub filler, creating a convenient surface for candles, beverages, books, or a laptop for movie nights. The faucet placement was carefully considered to keep the interior of the tub open and comfortable, allowing the homeowners to sit face-to-face and enjoy the experience together.
Throughout the space, material selections were chosen to amplify light and create a timeless sense of calm. Large-format porcelain tile with soft gray marble veining wraps the floors and shower walls, while a custom blue herringbone feature wall introduces subtle color and texture without overwhelming the room's airy aesthetic. Chrome plumbing fixtures reflect natural light throughout the space, enhancing the clean, spa-like atmosphere.
Custom cabinetry allowed every inch of the vanity to work harder. In addition to generous storage and double sinks, a specialized vanity organizer was incorporated to store a hair dryer and styling tools out of sight while keeping them plugged in and ready to use. It's a small detail that streamlines everyday routines while reducing countertop clutter. Quartz countertops provide a durable, low-maintenance surface, while integrated toe-kick lighting creates a soft nighttime glow that serves as both an accent feature and practical nightlight.
Comfort was a major priority throughout the design process. Heated tile floors and heated towel bars transform everyday routines into small moments of luxury, while a bidet toilet seat adds a layer of convenience and comfort the homeowners now consider indispensable.
Beyond aesthetics, the bathroom was designed with long-term usability in mind. The curbless shower improves accessibility while preserving the sophisticated visual flow of the wet room. A hand shower mounted on a slide bar doubles as a grab bar, providing future aging-in-place benefits without compromising the room's refined appearance. It has also become one of the homeowners' favorite features for an entirely different reason: a remarkably convenient dog-washing station.
Preserving natural light was equally important. The original wood window was replaced with a moisture-resistant vinyl casement window, ensuring long-term durability while maintaining the bright connection to the outdoors that helps define the room's character. Combined with the open shower design, the window allows daylight to travel throughout the entire space, making the bathroom feel both expansive and inviting.
Perhaps the greatest testament to the success of the project came from the homeowners themselves:
"I didn't have the skills to dream up this design. You did. Thank you."
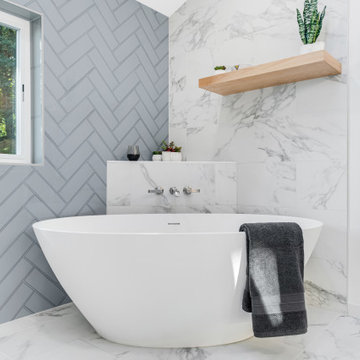 THE Remodel Group
When these longtime clients traded the bustle of Portland for a quieter neighborhood in Lake Oswego, they found a home they loved almost immediately. But while the rest of the house reflected the warm, welcoming environment they envisioned for this next chapter, one space remained firmly rooted in another era: the primary bathroom.
Dark tile, a cramped shower, and a dated tub deck left the room feeling heavy and disconnected from the calming retreat the homeowners hoped to create. Their vision was simple but meaningful: a bright, spa-inspired bathroom designed for comfort, relaxation, and sharing the space together.
At the heart of the transformation is a thoughtfully designed wet room that combines the shower and soaking tub into one seamless experience. By removing the enclosed shower and replacing it with clear sightlines and an open, curbless design, the room immediately feels larger, brighter, and more connected to the natural light streaming through the window. The result is a space that balances luxury and accessibility while creating the serene atmosphere the homeowners were seeking.
The project's greatest design challenge arrived before construction even began. The homeowners dreamed of a soaking tub large enough for two, but a winding staircase with tight corners made transporting a traditional oversized tub nearly impossible. Through careful planning and product selection, the team identified an elegant oval soaking tub that delivered the depth and comfort they wanted while successfully navigating the home's challenging access conditions.
What makes this wet room particularly special is the attention given to how the homeowners actually use the space. The freestanding tub is positioned beneath a custom ledge featuring a wall-mounted tub filler, creating a convenient surface for candles, beverages, books, or a laptop for movie nights. The faucet placement was carefully considered to keep the interior of the tub open and comfortable, allowing the homeowners to sit face-to-face and enjoy the experience together.
Throughout the space, material selections were chosen to amplify light and create a timeless sense of calm. Large-format porcelain tile with soft gray marble veining wraps the floors and shower walls, while a custom blue herringbone feature wall introduces subtle color and texture without overwhelming the room's airy aesthetic. Chrome plumbing fixtures reflect natural light throughout the space, enhancing the clean, spa-like atmosphere.
Custom cabinetry allowed every inch of the vanity to work harder. In addition to generous storage and double sinks, a specialized vanity organizer was incorporated to store a hair dryer and styling tools out of sight while keeping them plugged in and ready to use. It's a small detail that streamlines everyday routines while reducing countertop clutter. Quartz countertops provide a durable, low-maintenance surface, while integrated toe-kick lighting creates a soft nighttime glow that serves as both an accent feature and practical nightlight.
Comfort was a major priority throughout the design process. Heated tile floors and heated towel bars transform everyday routines into small moments of luxury, while a bidet toilet seat adds a layer of convenience and comfort the homeowners now consider indispensable.
Beyond aesthetics, the bathroom was designed with long-term usability in mind. The curbless shower improves accessibility while preserving the sophisticated visual flow of the wet room. A hand shower mounted on a slide bar doubles as a grab bar, providing future aging-in-place benefits without compromising the room's refined appearance. It has also become one of the homeowners' favorite features for an entirely different reason: a remarkably convenient dog-washing station.
Preserving natural light was equally important. The original wood window was replaced with a moisture-resistant vinyl casement window, ensuring long-term durability while maintaining the bright connection to the outdoors that helps define the room's character. Combined with the open shower design, the window allows daylight to travel throughout the entire space, making the bathroom feel both expansive and inviting.
Perhaps the greatest testament to the success of the project came from the homeowners themselves:
"I didn't have the skills to dream up this design. You did. Thank you."
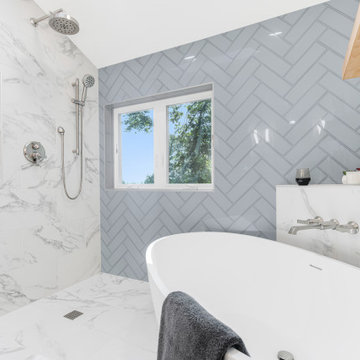 THE Remodel Group
When these longtime clients traded the bustle of Portland for a quieter neighborhood in Lake Oswego, they found a home they loved almost immediately. But while the rest of the house reflected the warm, welcoming environment they envisioned for this next chapter, one space remained firmly rooted in another era: the primary bathroom.
Dark tile, a cramped shower, and a dated tub deck left the room feeling heavy and disconnected from the calming retreat the homeowners hoped to create. Their vision was simple but meaningful: a bright, spa-inspired bathroom designed for comfort, relaxation, and sharing the space together.
At the heart of the transformation is a thoughtfully designed wet room that combines the shower and soaking tub into one seamless experience. By removing the enclosed shower and replacing it with clear sightlines and an open, curbless design, the room immediately feels larger, brighter, and more connected to the natural light streaming through the window. The result is a space that balances luxury and accessibility while creating the serene atmosphere the homeowners were seeking.
The project's greatest design challenge arrived before construction even began. The homeowners dreamed of a soaking tub large enough for two, but a winding staircase with tight corners made transporting a traditional oversized tub nearly impossible. Through careful planning and product selection, the team identified an elegant oval soaking tub that delivered the depth and comfort they wanted while successfully navigating the home's challenging access conditions.
What makes this wet room particularly special is the attention given to how the homeowners actually use the space. The freestanding tub is positioned beneath a custom ledge featuring a wall-mounted tub filler, creating a convenient surface for candles, beverages, books, or a laptop for movie nights. The faucet placement was carefully considered to keep the interior of the tub open and comfortable, allowing the homeowners to sit face-to-face and enjoy the experience together.
Throughout the space, material selections were chosen to amplify light and create a timeless sense of calm. Large-format porcelain tile with soft gray marble veining wraps the floors and shower walls, while a custom blue herringbone feature wall introduces subtle color and texture without overwhelming the room's airy aesthetic. Chrome plumbing fixtures reflect natural light throughout the space, enhancing the clean, spa-like atmosphere.
Custom cabinetry allowed every inch of the vanity to work harder. In addition to generous storage and double sinks, a specialized vanity organizer was incorporated to store a hair dryer and styling tools out of sight while keeping them plugged in and ready to use. It's a small detail that streamlines everyday routines while reducing countertop clutter. Quartz countertops provide a durable, low-maintenance surface, while integrated toe-kick lighting creates a soft nighttime glow that serves as both an accent feature and practical nightlight.
Comfort was a major priority throughout the design process. Heated tile floors and heated towel bars transform everyday routines into small moments of luxury, while a bidet toilet seat adds a layer of convenience and comfort the homeowners now consider indispensable.
Beyond aesthetics, the bathroom was designed with long-term usability in mind. The curbless shower improves accessibility while preserving the sophisticated visual flow of the wet room. A hand shower mounted on a slide bar doubles as a grab bar, providing future aging-in-place benefits without compromising the room's refined appearance. It has also become one of the homeowners' favorite features for an entirely different reason: a remarkably convenient dog-washing station.
Preserving natural light was equally important. The original wood window was replaced with a moisture-resistant vinyl casement window, ensuring long-term durability while maintaining the bright connection to the outdoors that helps define the room's character. Combined with the open shower design, the window allows daylight to travel throughout the entire space, making the bathroom feel both expansive and inviting.
Perhaps the greatest testament to the success of the project came from the homeowners themselves:
"I didn't have the skills to dream up this design. You did. Thank you."
56