
Search results for "Reduce evaluating" in Home Design Ideas
 Drury Design
THE SETUP
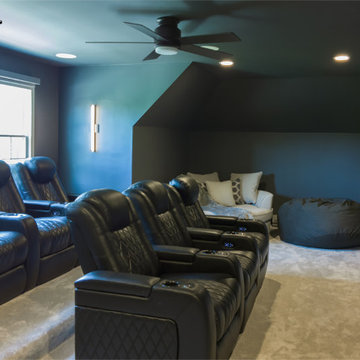
This remodeling project transformed a catchall room into a cinema-style theater designed for family entertainment and relaxation. The original space, which housed a small TV, older furniture, and various children’s toys, was reimagined to create a sophisticated, adult-friendly home theater with ample seating and modern amenities.
Design Objectives:
Create a Dark Theater Space: Ensure the room mimics a traditional movie theater environment.
Provide Comfortable Theater Seating: Include enough seating for the family and guests.
Integrate a Dry Bar Area: Include a space for snacks and drinks.
Optimize Space Utilization: Maintain an open area for additional activities.
Design Challenges:
Natural light: The room was too bright for a theater setting.
Seating: Accommodating six theater seats without obstructing views.
Lighting: Ensuring the lighting does not interfere with the viewing experience.
AV: Finding a clutter-free solution for AV equipment.
Dry Bar: Incorporating a dry bar area without overcrowding the space.
Viewing: Ensuring the TV placement allows for comfortable, optimized viewing.
THE RENEWED SPACE
Design Solutions:
Natural Light Control: Installed blackout remote shades on the back window and painted the walls dark charcoal to reduce natural light infiltration.
Seating Arrangement: Built a second level for the back row of seating to ensure unobstructed views for all movie watchers.
Lighting Design: Installed sconces on either side of the window that shine from the sides (to avoid interfering with the viewing experience).
AV Equipment Storage: Utilized existing recess areas with custom shelves matching the cabinetry and concealed cables using a PVC pipe system.
Dry Bar Integration: Created a dry bar area on the back wall with a refrigerator, candy storage, and a small counter space for a popcorn machine and ice maker, with locked drawers to prevent unsupervised access.
Optimal Viewing Distance: Evaluated multiple floor plans and placed the TV on the most suitable wall to ensure optimal viewing and comfortable reclined seating.
Final Thoughts:
The completed home theater has been a resounding success, providing a versatile space for the entire family. The thoughtful design and meticulous attention to detail have created a functional and enjoyable home theater that meets diverse needs, from watching movies and playing video games to relaxing and reading. The areas to the sides of the theater seats can accommodate spillover seating or activity zones. The area housing the AV equipment also includes extra shelves for storing snuggle-grade movie viewing blankets. This theater space has become a favorite hangout spot, offering comfort and entertainment for everyone.
This view shows the dual level theater seating, bean bags, open AV shelving on the right to tuck the cables which our installers ran behind the TV with PVC piping.


 Drury Design
THE SETUP
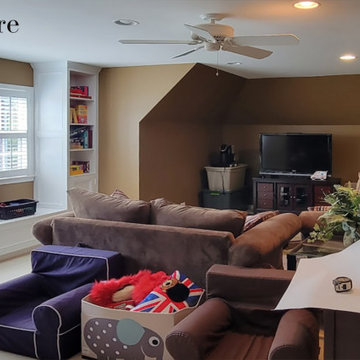
This remodeling project transformed a catchall room into a cinema-style theater designed for family entertainment and relaxation. The original space, which housed a small TV, older furniture, and various children’s toys, was reimagined to create a sophisticated, adult-friendly home theater with ample seating and modern amenities.
Design Objectives:
Create a Dark Theater Space: Ensure the room mimics a traditional movie theater environment.
Provide Comfortable Theater Seating: Include enough seating for the family and guests.
Integrate a Dry Bar Area: Include a space for snacks and drinks.
Optimize Space Utilization: Maintain an open area for additional activities.
Design Challenges:
Natural light: The room was too bright for a theater setting.
Seating: Accommodating six theater seats without obstructing views.
Lighting: Ensuring the lighting does not interfere with the viewing experience.
AV: Finding a clutter-free solution for AV equipment.
Dry Bar: Incorporating a dry bar area without overcrowding the space.
Viewing: Ensuring the TV placement allows for comfortable, optimized viewing.
THE RENEWED SPACE
Design Solutions:
Natural Light Control: Installed blackout remote shades on the back window and painted the walls dark charcoal to reduce natural light infiltration.
Seating Arrangement: Built a second level for the back row of seating to ensure unobstructed views for all movie watchers.
Lighting Design: Installed sconces on either side of the window that shine from the sides (to avoid interfering with the viewing experience).
AV Equipment Storage: Utilized existing recess areas with custom shelves matching the cabinetry and concealed cables using a PVC pipe system.
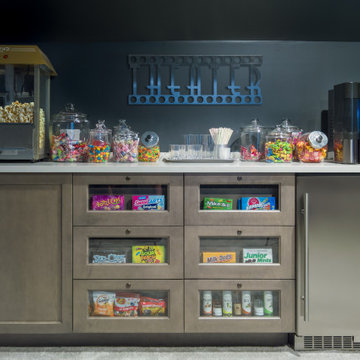
Dry Bar Integration: Created a dry bar area on the back wall with a refrigerator, candy storage, and a small counter space for a popcorn machine and ice maker, with locked drawers to prevent unsupervised access.
Optimal Viewing Distance: Evaluated multiple floor plans and placed the TV on the most suitable wall to ensure optimal viewing and comfortable reclined seating.
Final Thoughts:
The completed home theater has been a resounding success, providing a versatile space for the entire family. The thoughtful design and meticulous attention to detail have created a functional and enjoyable home theater that meets diverse needs, from watching movies and playing video games to relaxing and reading. The areas to the sides of the theater seats can accommodate spillover seating or activity zones. The area housing the AV equipment also includes extra shelves for storing snuggle-grade movie viewing blankets. This theater space has become a favorite hangout spot, offering comfort and entertainment for everyone.
This is what the room looked like prior to the theater remodel. It was a catch all bonus room very centered around the kids, and not the entire family.
Find the right local pro for your project
 Drury Design
THE SETUP
This remodeling project transformed a catchall room into a cinema-style theater designed for family entertainment and relaxation. The original space, which housed a small TV, older furniture, and various children’s toys, was reimagined to create a sophisticated, adult-friendly home theater with ample seating and modern amenities.
Design Objectives:
Create a Dark Theater Space: Ensure the room mimics a traditional movie theater environment.
Provide Comfortable Theater Seating: Include enough seating for the family and guests.
Integrate a Dry Bar Area: Include a space for snacks and drinks.
Optimize Space Utilization: Maintain an open area for additional activities.
Design Challenges:
Natural light: The room was too bright for a theater setting.
Seating: Accommodating six theater seats without obstructing views.
Lighting: Ensuring the lighting does not interfere with the viewing experience.
AV: Finding a clutter-free solution for AV equipment.
Dry Bar: Incorporating a dry bar area without overcrowding the space.
Viewing: Ensuring the TV placement allows for comfortable, optimized viewing.
THE RENEWED SPACE
Design Solutions:
Natural Light Control: Installed blackout remote shades on the back window and painted the walls dark charcoal to reduce natural light infiltration.
Seating Arrangement: Built a second level for the back row of seating to ensure unobstructed views for all movie watchers.
Lighting Design: Installed sconces on either side of the window that shine from the sides (to avoid interfering with the viewing experience).
AV Equipment Storage: Utilized existing recess areas with custom shelves matching the cabinetry and concealed cables using a PVC pipe system.
Dry Bar Integration: Created a dry bar area on the back wall with a refrigerator, candy storage, and a small counter space for a popcorn machine and ice maker, with locked drawers to prevent unsupervised access.
Optimal Viewing Distance: Evaluated multiple floor plans and placed the TV on the most suitable wall to ensure optimal viewing and comfortable reclined seating.
Final Thoughts:
The completed home theater has been a resounding success, providing a versatile space for the entire family. The thoughtful design and meticulous attention to detail have created a functional and enjoyable home theater that meets diverse needs, from watching movies and playing video games to relaxing and reading. The areas to the sides of the theater seats can accommodate spillover seating or activity zones. The area housing the AV equipment also includes extra shelves for storing snuggle-grade movie viewing blankets. This theater space has become a favorite hangout spot, offering comfort and entertainment for everyone.
This is the kid and parent friendly candy-liquor dry bar. It is the home to a mini fridge, ice machine, and popcorn machine. The inspiration behind the custom drawers was the feeling you get walking inot a real theater and seeing all the candy in the glass. Yes, all the drawers actually do lock so the kids can't get into the candy for a midnight snack.

 Jack Edward
In the world of property management, fostering positive relationships with tenants, prospects, and landlords is key to ensuring a thriving rental community. One of the most fundamental aspects of tenant satisfaction is ensuring that their living spaces are equipped with functional appliances. Imagine the frustration of a tenant with a malfunctioning refrigerator or a broken washing machine. It's in such moments that the role of property managers becomes crucial. By offering fast and timely appliance repair and maintenance services, property managers can not only address the immediate needs of their tenants but also build lasting trust and loyalty. In this blog, we will explore the importance of reliable appliance repair services for property managers and how they can strengthen their bonds with tenants, prospects, and landlords.
Understanding the Tenant's Perspective:
For tenants, a well-maintained and fully functional home is not just a luxury but a necessity. Appliances like refrigerators, ovens, washing machines, and HVAC systems are integral to their daily lives. When these appliances break down, it can disrupt their routine and cause significant inconvenience. Tenants appreciate property managers who promptly address these issues, demonstrating a commitment to their comfort and well-being.
Meeting Prospective Tenants' Expectations:
When prospects are searching for a new rental property, they evaluate not only the space and location but also the level of service provided. A property managed by professionals who offer reliable appliance repair services stands out in the competitive rental market. Prospective tenants are more likely to choose a property where their potential issues, including appliance repairs, will be promptly resolved.
Earning the Trust of Landlords:
Landlords entrust property managers with their investments, expecting them to maintain the property and keep the tenants satisfied. Providing efficient appliance repair services not only ensures tenant retention but also earns the trust of landlords. A property manager who can handle repairs swiftly and cost-effectively protects the landlord's investment, leading to a positive and enduring partnership.
Benefits of Reliable Appliance Repair Services:
⦁ Tenant Satisfaction: Fast and reliable appliance repairs lead to satisfied tenants, enhancing their overall living experience.
⦁ Reduced Vacancy Rates: Properties with a reputation for excellent maintenance and quick issue resolution attract and retain tenants, minimizing vacancy periods.
⦁ Positive Word-of-Mouth: Happy tenants are more likely to recommend the property to others, increasing the likelihood of attracting new tenants through referrals.
⦁ Enhanced Property Value: Well-maintained properties retain their value and appeal, ensuring a steady stream of income for landlords.
⦁ Improved Tenant-Landlord Relations: Proactive property managers who promptly address repair issues strengthen their relationships with both tenants and landlords, creating a harmonious living environment.
In the competitive world of property management, offering reliable appliance repair services isn't just a service; it's a testament to a property manager's commitment to their tenants, prospects, and landlords. By promptly addressing repair needs and ensuring the smooth functioning of appliances, property managers not only resolve immediate problems but also lay the foundation for enduring, trust-based relationships. After all, in the eyes of tenants, prospects, and landlords, a property manager who can keep the appliances running smoothly is a valuable partner worth keeping. Building strong bonds through reliable appliance repair services isn't just a strategy – it's a pathway to long-lasting success and mutual satisfaction in the realm of property management.

 Santa Barbara Home Design
Design Consultant Jeff Doubét is the author of Creating Spanish Style Homes: Before & After – Techniques – Designs – Insights. The 240 page “Design Consultation in a Book” is now available. Please visit SantaBarbaraHomeDesigner.com for more info.
Jeff Doubét specializes in Santa Barbara style home and landscape designs. To learn more info about the variety of custom design services I offer, please visit SantaBarbaraHomeDesigner.com
Jeff Doubét is the Founder of Santa Barbara Home Design - a design studio based in Santa Barbara, California USA.

 Northern Roof Tiles
Architect: Andre Tchelistcheff Architects New York. NY
Builder: Xhema of Greenwich CT
Installer: TRM Enterprises Bridgehampton NY
Back story.
Northern has worked with both Xhema and TRM many tiles. We have worked with Andre before he branched out on his own.
Originally Xhema’s contact was to replace the roof and repair the garage, which as some point had been made into an indoor swimming pool without adequate ventilation. The budget was about $8m and there were 20 drawings.
By the time the job was 6 months old the scope of work has expanded to over $30m and over 200 drawings had been produced.
Northern was contacted to visit the site and evaluate the existing roof. Although the house had been added to over the years the same tile was used but due to the location of the house the color of the tile varied considerably from the front to the back.
Northern identified a large number of custom details which would require us to:
1) Match the existing Field tile in size, thickness (it was actually thicker at the butt and reduced to ½” where the tile is overlapped) , surface texture and the color.
2) Make tiles that are curved in their length to suit the curved rafter on the gabled dormers.
3) Make the curved tiles to suit the low slope octagonal tower.
4) Make the curved tiles and Arris style hips to suit the hipped dormers with the curved rafters.
5) Make the segmented tiles to suit the round turret.
6) Make the custom arris style hip tiles for the octagonal tower.
7) Make the custom Arris style hip to suit the different roof pitches as well as the varying splays at the eaves.
8) Make the custom pieces to suit the swept valleys
Simon broke down each section of the roof. He indented all items for each section and agreed the measure etc with the installers. This ‘Project Bible’ became an invaluable tool for the installer, our tile makers and us.
We shipped some samples from the original roof to Sahtas who replicated tall the details. I was visiting factory and delayed my return to the Saturday so that the tiles coming out of the kiln late Friday night could be wrapped and packed into newly purchase suit cases. I arrived home late Saturday evening and Simon picked me up Sunday afternoon and drove us down to Greenwich for an 8 am meeting with the clients. When we unpacked the tiles they were still warm and Hilfiger signed off on the color, although his wife suggested we make them a bit darker a ‘as he has a dreadful sense of color!’
We took Vincent Liot, owner of TRM to the factory twice so that he could oversee the prototyping of all the myriad custom pieces. This was an invaluable move as he pre-approved all the pieces before they were shipped.
The installation was completed and everyone was very pleased with the final outcome.
The Hilfiger’s estate manager told me that a group of friends who were staying the weekend after all the work was completed were heard to ask Mr. Hilfiger ‘I thought you were having a new roof’…to which he responded ‘we did but you can’t tell, which as the plan” …perfect!
In refection this is probably the most complicated roof Northern has ever had the pleasure to supply. We learned a lot of very valuable lessons but in future when we are asked how did we do it we will answer ‘that is for us to know and for you to pay for!’

 Lisa Tharp Design
Governor's House Entry by Lisa Tharp. 2019 Bulfinch Award - Interior Design. Photo by Michael J. Lee
Transitional painted wood floor foyer photo with white walls and a black front door
Transitional painted wood floor foyer photo with white walls and a black front door

 KINGDOM WOODWORKS
Collaboration with Canonbury Homes and Frank Neely Design Associates.
Inspiration for a timeless open concept kitchen remodel in Atlanta with beaded inset cabinets and two islands
Inspiration for a timeless open concept kitchen remodel in Atlanta with beaded inset cabinets and two islands

 McCullough's Flooring
Gorgeous master bath finished with Dal-Tile's Fabrique porcelain tile in the color Noir Linen polished. Tile size is 12"x24" installed in a brick joint pattern. The floor boasts underfloor heating on a timed thermostat.


 CairnsCraft Design & Remodel
Great spacious bathroom with lot of amenities.
Photographer: Jon Upson
Large elegant master beige tile and porcelain tile drop-in bathtub photo in San Diego with an undermount sink, raised-panel cabinets, medium tone wood cabinets, granite countertops, beige walls and a two-piece toilet
Large elegant master beige tile and porcelain tile drop-in bathtub photo in San Diego with an undermount sink, raised-panel cabinets, medium tone wood cabinets, granite countertops, beige walls and a two-piece toilet

 safe ZOnea
Staging a home for sale or for a major transition is a strange in-between state. You are still living in the space, but you are also preparing it to impress strangers, support showings, and remain functional until the final move-out day. That tension between “home” and “product” is where storage quietly becomes one of your smartest tools. Used well, storage lets you reduce clutter, protect important items, and create the kind of rooms that photograph beautifully and feel calm when buyers walk through the door.
A staged move is rarely just about shifting boxes from one address to another. It is about managing timing, presentation, and stress at the same time. When storage is built into the plan from day one, the entire process feels less rushed and more strategic. Rooms open up gradually, essentials stay accessible, and you never feel like you are drowning in half-packed chaos. Understanding how to use storage as a staging partner, not just a place to dump excess stuff, is what turns a messy transition into a controlled, professional-looking move.
Why Storage Is the Backbone of Every Staged Move
Visual space is emotional space. When every surface is covered, and every corner is full, buyers feel crowded before they have even evaluated the layout. Storage gives you a way to pull back without making drastic decisions about what to keep or donate. Seasonal décor, bulky furniture, duplicate items, archives, and personal collections can be moved out early, so the home reads cleaner and more open while still feeling lived-in. That balance between warmth and simplicity is exactly what good staging tries to achieve.
In more complex situations, such as live-work properties or home offices, storage becomes even more important. You may need to keep a business running while also presenting a polished environment to viewers. Partnering with local movers in Boston makes it easier to shift equipment, files, and nonessential pieces into storage in phases, so work can continue while the visible areas of the property stay controlled and presentable.
How Staging and Storage Work Together to Control Visual Impact
Staging works best when every object in a room has a clear purpose. A sofa frames a conversation. A table suggests gathering. A lamp softens the mood. Everything else that is not essential to that story competes for attention. Storage supports staging by giving you a clean staging bench off-site, where nonessential items can wait without being constantly shuffled between rooms or piled into overstuffed closets.
The art lies in deciding what stays and what goes. Family photos, extensive collections, excess seating, and rarely used appliances often move into storage first. What remains should be enough to show scale, comfort, and function without revealing the full weight of daily life. Commercial properties go through a similar filtering process. Extra desks, surplus equipment, outdated signage, and inactive files often move out early so the active workspace feels lean, efficient, and future-ready before a relocation supported by commercial movers takes place.
Strategic Timing of Storage before the Actual Move
The worst time to think about storage is when boxes are already stacked in the hallway. In a staged move, storage decisions ideally begin as soon as you know the property will be listed or the space will be transitioned. That might be a month or more before the main moving date. Starting early gives you time to sort, label, and prioritize instead of throwing things together in a panic.
An early storage phase also helps you test how the home feels with less in it. You may discover that removing a few large pieces transforms a cramped room into an open, inviting space. For commercial spaces, early storage lets operations continue with fewer interruptions. Departments can send nonessential items out in waves. When the main relocation comes, much of the excess is already safely stored, and what remains is easier for a commercial movers Boston team to handle with speed and care.
The Emotional Psychology behind Letting Storage Hold Your Belongings
Letting belongings leave the house ahead of you can feel unsettling. There is always a quiet fear that once something is out of sight, it will be forgotten, damaged, or harder to reclaim. That is why some people resist using storage even when they know it would make the staging process easier. Acknowledging that emotion instead of dismissing it helps you plan more honestly and avoids last-minute regret.
The reality is that good storage is not a black hole; it is a temporary pause. When items are packed thoughtfully, labeled clearly, and placed in an environment you trust, they become easier to manage than when they are tucked into random cupboards or stacked in spare rooms. For many people, living with fewer visible possessions during staging actually reduces tension. The home feels lighter and easier to maintain. Businesses notice the same effect when storage removes outdated equipment and clutter from the floor. The workspace looks more focused, and staff can concentrate on current tasks instead of navigating around accumulated history.
Protecting Assets While They Live in Storage
Sending belongings into storage is only a good idea if they come back in the same or better condition. That is where quality control matters. Furniture, textiles, electronics, files, and artwork each have different vulnerabilities. Moisture, temperature swings, dust, and rough handling can all damage them in ways that only become obvious later. Choosing the right type of storage and packing accordingly is central to the genius of using storage as part of a staged move rather than as a desperate overflow container.
Climate-controlled units, padded wrapping, elevated pallets, careful stacking, and clearly marked boxes all reduce risk. The goal is to handle items fewer times, not more. When storage is integrated into the move plan, belongings can travel directly from the home to storage and later from storage to the new address with minimal extra movement. Many owners coordinate those transfers through a well trusted movers in Boston, so the same team that moves items out early also manages their final delivery, preserving continuity and accountability.
How Storage Reduces Risk during Multi-Phase Moves
Few staged moves happen in a single clean step. There are often gaps between listing and selling, between selling and closing, between closing and final move-out. If renovations, inspections, or office reconfigurations are involved, the timeline becomes even more layered. Storage absorbs those gaps, so you are not forced to live among towers of boxes or stack equipment in hallways waiting for the next phase.
By treating storage as a flexible middle ground, you can move things out gradually while still having access when needed. For example, archived files can go first, followed by seasonal décor, then surplus furniture. As each stage ends, fewer items remain to be shifted on the final date. This phased approach reduces the risk of rushed, late-night packing sessions, careless stacking, and damaged items. It also makes it easier for commercial moving crews to work efficiently because they are handling a manageable volume of goods at each phase rather than everything at once.
Using Storage to Maintain Clean Show-Ready Conditions
One of the hardest parts of staging is keeping the property consistently show-ready. Every viewing becomes its own small event. Floors need to be cleared, surfaces wiped, and personal items tucked away. When too many belongings remain in the home, each showing takes a heavy amount of effort. Storage cuts that workload dramatically by taking nonessentials completely off the stage.
With fewer items to move and hide, maintaining a neutral, inviting look becomes much more realistic. You are not scrambling to stuff things into closets or push items under the bed. Instead, the home sits closer to show condition all the time, and the final touches before a viewing are minimal. In commercial environments, using storage helps maintain a professional appearance for clients and staff, even while the space is being prepared for a larger transition. Active tools and furniture stay in play, while inactive pieces quietly support the future from storage.
Storage as a Strategic Tool in Business Relocation Planning
For businesses, storage is more than a convenience; it is part of risk management. Office relocations and staged commercial moves have to juggle lease deadlines, equipment deliveries, IT cutovers, and staffing realities. Trying to shift everything in one move often results in downtime, lost files, and strained teams. Storage turns the move into a series of controlled steps instead of a single disruptive jump.
Unused furniture, archived documents, and non-critical inventory can be moved into storage weeks ahead of the main relocation. As the new space becomes ready, items can move out of storage and directly into position. This reduces double-handling and keeps the old and new locations from filling with half-unpacked material. A business that coordinates these flows with professional commercial movers in Boston usually experiences smoother transitions, because storage is treated as a working part of the operational plan rather than a leftover problem.
The Hidden Cost Benefits of Proper Storage Planning
On paper, storage looks like an extra expense. In reality, poorly managed moves cost far more. When everything is rushed into boxes at the last minute, items are damaged, misplaced, or transported multiple times. Extra labor hours, emergency packing supplies, replacement furniture, and extended timelines quickly outweigh the cost of well-used storage. Staging without storage also tends to keep homes and offices crowded longer, which can hurt impressions and, in the case of a sale, influence offers.
When storage is integrated from the beginning, you minimize waste. You handle items fewer times, you know where things are, and you avoid paying people to shift the same objects repeatedly. Staged homes that look better often sell faster or draw stronger interest, which helps recover investment on the back end. Businesses benefit from less downtime, safer handling of equipment, and predictable work schedules. Those gains are why many clients prefer partnering with a commercial moving company in Boston that understands storage as a cost-control tool, not just a place to park overflow.
Conclusion
The true genius of using storage during a staged home move is that it quietly rewrites the rules of transition. Instead of treating space as something that must absorb every box and belonging until the last possible moment, you treat storage as a flexible extension of the home or office. This shift in thinking opens rooms, clears sightlines, and makes every phase of the move more intentional. Staging becomes easier, maintenance becomes lighter, and the stress of living in a half-moved environment drops noticeably. When storage is chosen carefully, used early, and coordinated with the overall moving plan, it protects both physical assets and emotional energy. Buyers and visitors see a calm, collected space. You experience a less chaotic path from “here” to “there.” Whether you are selling a home, repositioning a business, or managing a complex phased relocation, storage can turn a disruptive event into a managed, almost elegant process.
For people who want that level of control and care during a staged move, Stairhopper movers have built a strong reputation by treating storage, timing, and transport as parts of one connected strategy. Their team is known for listening closely, planning around real-life constraints, and moving both residential and commercial clients through transitions with calm, steady execution. They approach every project as a partnership, aligning storage use, staging needs, and final delivery so that what matters most arrives safely, on schedule, and with as little disruption as possible.
Frequently Asked Questions
Q1. When should I arrange storage for a staged home move?
Ideally, four to six weeks before listing or transition, so clearing, packing, and staging can happen gradually without rushed decisions or last-minute stress.
Q2. Is climate-controlled storage necessary for staged moves?
It is highly recommended for wood furniture, electronics, artwork, and documents, since temperature and humidity swings can quietly damage materials over time.
Q3. How does storage help keep a home show-ready?
By moving nonessential items off-site, daily tidying becomes simpler, and each room can stay closer to a staged condition between viewings or inspections.
Q4. Can storage reduce the length of the final moving day?
Yes. When many items are moved into storage in advance, the final moving day focuses on essentials, which shortens timelines and reduces physical and mental strain.
Q5. Is storage useful for short-term business relocations?
Even in short relocations, storage helps prevent overcrowded offices and allows departments to move in phases without interrupting everyday operations.
Q6. How do I decide what should go into storage first?
Start with rarely used items, seasonal décor, surplus furniture, and archived materials, then work toward pieces that are visually distracting or make rooms feel cramped.
Q7. Will using storage make it harder to find things later?
Not if packing and labeling are done carefully. Clear categories, room-based labels, and simple inventories make stored items easier to locate than when scattered at home.
Q8. Does storage still make sense if my move happens in one day?
Yes, because staging and preparation begin well before that day. Storage keeps the home functional and attractive during the weeks leading up to the final move.

 GS Construction
Example of a small classic 3/4 white tile and stone tile mosaic tile floor alcove shower design in Chicago with an undermount sink, recessed-panel cabinets, black cabinets, quartzite countertops, a two-piece toilet and gray walls

 Amy Martin Landscape Design
www.jfaynovakphotography.com
This is an example of a large modern partial sun side yard concrete paver formal garden in Boston for fall.
This is an example of a large modern partial sun side yard concrete paver formal garden in Boston for fall.

 Landwell Design + Build Co.
photography by Joslyn Amato
Example of a large minimalist backyard concrete patio kitchen design in San Luis Obispo with a pergola
Example of a large minimalist backyard concrete patio kitchen design in San Luis Obispo with a pergola
3