
Search results for "Reduce projects" in Home Design Ideas
 F9 Productions Inc.
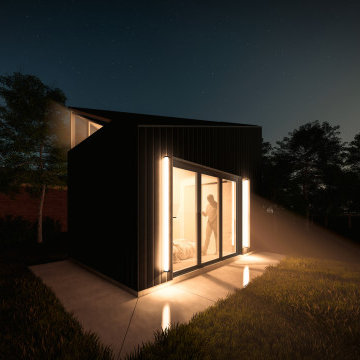
In an era when housing is becoming increasingly scarce, small structures are making a big difference. The Crystal ADU is one of them — a compact, beautifully detailed dwelling designed by F9 Productions to deliver both function and artistry within just 160 square feet.
The Idea
The client came to F9 with their own sketches — early ideas drawn from the fractured symmetry of natural crystals. They envisioned a minimalist refuge that was as expressive as it was efficient.
We took that spark and shaped it into a refined architectural statement: a simple rectangle capped by a striking, asymmetrical roof that catches the light like a cut gem.
Design and Craft
The defining detail — a roof so thin it appears almost weightless — demanded careful problem-solving. Standard framing would have compromised the delicate profile. Instead, our team engineered a custom edge detail that maintains the sleek form while ensuring structural integrity and energy performance.
This kind of precision is what transforms a small project into a showcase of design craft.
Inside the Space
Step inside, and the attention to detail continues.
Every square inch is intentional. Built-in cabinetry wraps the walls, and a fold-down Murphy bed disappears to reveal open living space. In the bathroom, clever storage niches and a tankless water heater make the most of every inch. A skylight above the shower floods the space with natural light — warm, private, and bright.
Efficiency in Every Sense
Compact living comes with natural advantages. The small volume of the Crystal ADU reduces energy use, while a ductless mini-split system maintains comfort year-round.
This simplicity makes the building both efficient and elegant — a perfect reflection of F9’s design philosophy: functional minimalism with a human touch.
The Result
The Crystal ADU shows that size doesn’t define quality — design does.
It’s a small footprint with a big message: that thoughtful architecture can solve real housing challenges while creating spaces people love to inhabit.
The future of housing may be smaller, but with projects like this, it’s infinitely brighter.

 ZeroEnergy Design
This LEED Platinum certified house reflects the homeowner's desire for an exceptionally healthy and comfortable living environment, within a traditional neighborhood.
INFILL SITE. The family, who moved from another area of Wellesley, sought out this property to be within walking distance of the high school and downtown area. An existing structure on the tight lot was removed to make way for the new home. 84% of the construction waste, from both the previous structure and the new home, was diverted from a landfill. ZED designed to preserve the existing mature trees on the perimeter of the property to minimize site impacts, and to maintain the character of the neighborhood as well as privacy on the site.
EXTERIOR EXPRESSION. The street facade of the home relates to the local New England vernacular. The rear uses contemporary language, a nod to the family’s Californian roots, to incorporate a roof deck, solar panels, outdoor living space, and the backyard swimming pool. ZED’s careful planning avoided to the need to face the garage doors towards the street, a common syndrome of a narrow lot.
THOUGHTFUL SPACE. Homes with dual entries can often result in duplicate and unused spaces. In this home, the everyday and formal entry areas are one and the same; the front and garage doors share the entry program of coat closets, mudroom storage with bench for removing your shoes, and a laundry room with generous closets for the children's sporting equipment. The entry area leads directly to the living space, encompassing the kitchen, dining and sitting area areas in an L-shaped open plan arrangement. The kitchen is placed at the south-west corner of the space to allow for a strong connection to the dining, sitting and outdoor living spaces. A fire pit on the deck satisfies the family’s desire for an open flame while a sealed gas fireplace is used indoors - ZED’s preference after omitting gas burning appliances completely from an airtight home. A small study, with a window seat, is conveniently located just off of the living space. A first floor guest bedroom includes an accessible bathroom for aging visitors and can be used as a master suite to accommodate aging in place.
HEALTHY LIVING. The client requested a home that was easy to clean and would provide a respite from seasonal allergies and common contaminants that are found in many indoor spaces. ZED selected easy to clean solid surface flooring throughout, provided ample space for cleaning supplies on each floor, and designed a mechanical system with ventilation that provides a constant supply of fresh outdoor air. ZED selected durable materials, finishes, cabinetry, and casework with low or no volatile organic compounds (VOCs) and no added urea formaldehyde.
YEAR-ROUND COMFORT. The home is super insulated and air-tight, paired with high performance triple-paned windows, to ensure it is draft-free throughout the winter (even when in front of the large windows and doors). ZED designed a right-sized heating and cooling system to pair with the thermally improved building enclosure to ensure year-round comfort. The glazing on the home maximizes passive solar gains, and facilitates cross ventilation and daylighting.
ENERGY EFFICIENT. As one of the most energy efficient houses built to date in Wellesley, the home highlights a practical solution for Massachusetts. First, the building enclosure reduces the largest energy requirement for typical houses (heating). Super-insulation, exceptional air sealing, a thermally broken wall assembly, triple pane windows, and passive solar gain combine for a sizable heating load reduction. Second, within the house only efficient systems consume energy. These include an air source heat pump for heating & cooling, a heat pump hot water heater, LED lighting, energy recovery ventilation, and high efficiency appliances. Lastly, photovoltaics provide renewable energy help offset energy consumption. The result is an 89% reduction in energy use compared to a similar brand new home built to code requirements.
RESILIENT. The home will fare well in extreme weather events. During a winter power outage, heat loss will be very slow due to the super-insulated and airtight envelope– taking multiple days to drop to 60 degrees even with no heat source. An engineered drainage system, paired with careful the detailing of the foundation, will help to keep the finished basement dry. A generator will provide full operation of the all-electric house during a power outage.
OVERALL. The home is a reflection of the family goals and an expression of their values, beautifully enabling health, comfort, safety, resilience, and utility, all while respecting the planet.
ZED - Architect & Mechanical Designer
Bevilacqua Builders Inc - Contractor
Creative Land & Water Engineering - Civil Engineering
Barbara Peterson Landscape - Landscape Design
Nest & Company - Interior Furnishings
Eric Roth Photography - Photography

 Dianne Davant and Associates
Master Bedroom with Red Bed Frame and custom drapery and bedding.
Bedroom - traditional master light wood floor bedroom idea in Charlotte
Bedroom - traditional master light wood floor bedroom idea in Charlotte
Find the right local pro for your project

 Xtreme Renovations, LLC
Xtreme Renovations has completed a 4000 square foot Home Renovation Project for our clients in Wortham/NW Harris County. Our clients desired to transform an early 1990’s constructed Traditional Home to that of an Updated Traditional Style with ‘clean lines’ and many functional features that they could enjoy in their home.
The Renovation included demolition of the existing Kitchen from floor to ceiling. All new Custom Built ‘Raised Panel Style’ cabinetry was crafted and installed by our Xtreme Renovations, LLC Team. Many functional features were added such as Spice Rack sliding doors, Lazy Susan, wide drawers and reducing the fur down above the sink area to provide for taller Cabinetry. All doors were installed with soft closing European Hinges. All drawers have Full Extension Soft Closing Drawer Glides. The Island cook top was enlarged and converted from electric to Natural Gas to provide efficiency. Above Island fluorescent lighting was removed and all new energy efficient LED recessed lighting on dimmers were added as well as under cabinet LED lighting. Chandelier Lighting was added above the Island to add a touch of class for this cooks kitchen. New Harlequin Granite with White Marble Tile Backsplashes provided the “Wow Factor” our clients desired and Xtreme Renovations is known for. All Cabinetry was painted adding a touch of class to the New Kitchen. New Tile flooring was installed in the Kitchen, Laundry area and Powder Room. Many electrical and plumbing upgrades were made throughout the home as well as drywall work, painting of all wall and ceilings. The renovation included removing the existing hardwood flooring and installing new Anderson Southern Vista Sand Dune (Cabiaba) Spanish Hickory throughout the downstairs areas. Also included in this renovation was the installation of 15 Double Pain Argon Filled Replacement Windows.

 ARCLIGHT INTERNATIONAL
A glowing villa would set the tone for what is housed within. The entire project was illuminated with a single custom uplight from Hydrel. Each uplight was manufactured with the junction box on the bottom so not add any additional visual clutter to the floor. They were recessed into a floor covered in 1/2"x1/2" taupe colored tile.
The cover plate was cast aluminum 12"x12" in a square with an eight inch diameter opening to coddle a heavy molded piece of borosilicate made to fit flush with plate and floor tile. The glass was selected for its excellent thermal properties and extremely low expansion. It also has exceptional crystal clear clarity.
The fixtures housed a krypton gas filled PAR 38 SPOT from GE Lamps on an adjustable swing arm. GE Lamps were chosen because of the single rolled bullnose edge design the lens has were it connects to the parabolic glass sides. Others fix the lens to the edge creating two rolled edges and a crease. These edges capture and project the light and create more than one artifact prarabola caused by the lens edge and the way it is attached. This creates distracting and multiple visual parabolas being projected on the the walls and ceilings. A single one is problematic, having multiple ones with so many fixture being used becomes overwhelmingly distracting.
The fixture housing was also designed to be 12" deep keeping the top of the lamp recess 4" below the glass. The swing arm also contained a custom gimbal ring that allowed for both a lens and an internal louver to be mounted just above the lamp face. The louver was a custom black color in a custom large cell egg crate design of 1/2"x1/2"x1/2" size. The entire interior of this uplight was custom painted so that all parts were powder coated with Paxton Matte Black, named for the client who helped perfect the exact black color.
The color was tested and fabricated multiple times before the results were finally achieved. It was to be an exceptionally matte black that did not reflect in the slightst way any light or light source. It was supposed to be void of reflectance. The larger size of the uplight was selected over other choices because the lighting designer wanted to illuminate the 24" wide columns and pilasters through out the project. Smaller lamps and fixtures came out of the floor with a steep reverse parabola grazing the architecture. The depth of the custom fixture was dictated by the desire to have the narrow portion of the parabola effect occur inside the fixture before it even was viewable. The beam emitted from the fixture came out almost as fat as the columns were wide. The fixture was positioned a half inch from the vertical walls to keep the center beam six inches away. This helped perfectly graze the wall surface as well as control up light glare. The louvers were exactly the size of the floor tile so there was a consistency to the floor grid even within the light fixtures.
The position of the lamp and the 45° cutoff of the louver kept the visual cutoff at around 20° where people would be standing. You really have to hold your head near the wall and look down into the fixtures in order to see the source.
Everything was also dimmed with multiple presets for the clients command and a preprogrammed fade that started at dusk and continually reduced itself as the night progressed into early morning. The entire building would be bathed in a soft candle like glow of 10% from 2 am until sunrise with on the hour 2 minute fades from 80% brightness.
Photo: Robert Cook

 Techo-Bloc
This backyard patio design is inspired by our Travertina Raw patio slab. The Travertina Raw patio slab mimics the texture of natural travertine in a concrete material; making it a more durable option in harsher freeze-thaw climates. Pave luxurious poolsides, patios, walkways and backyards with this travertine stone alternative. This product line has enjoyed huge success and has now been improved with an ultra robust mix design, making it far more durable than the natural travertine stone alternative. Techo-Bloc has now extended the collection to a double-sided, structural retaining wall system, two wall caps and pool coping in order to fulfill customer demand for this luxurious product. https://www.techo-bloc.com/shop/slabs/travertina-raw-slab/

 Pool & Hot Tub Alliance
This project was exceedingly challenging because of several factors. For starters, the lot itself, and all access points, were very small and cramped, requiring close management of in and out with equipment, materials, etc. Next it was also challenging because our customer wanted a very clean, classy look with many extras and details but also had only a very modest budget to work with. Finally, however, the greatest challenge was that over 80% of the space dedicated for the pool was only air. The customer literally wanted the pool situated over a cliff. Indeed, they even had another person from a different pool company tell them this couldnt be done in this part of the country; People only do this stuff in California! To overcome these obstacles, we made three very important decisions. We worked with a local engineer to design a poured-concrete wall system that would be both secure and able to become a portion of the pool wall; this then allowed us to put the wall right at the lot set-back line, which maximized every bit of available space. Next we chose to construct the remainder of the pool walls, steps, bench seat and tanning ledge with steel, and finish with a vinyl liner, in order to reduce overall costs and stay within their budget. Finally, a vanishing edge would have been ideal for this site, but again spatial and budget constraints made this a non-option. However, to try to create a strong focal point at the far corner of the pool we dropped the wall (tricky with vinyl!) and used glass block (with a Bright-white sanded grout joint) as coping material. The fountain at the end of the pool was custom-built on site with Basalt stone from the state of Washington and is completely self-contained. The fire feature on the far side completed the work of leading ones eye truly off into the sunset. Our customers were quite pleased with the result. They were able to accomplish practically everything they had wanted to do from the beginning, they were able to stay within their budget, and they were able to do all this right here in the hills of Pennsylvania.
Sponsored
Delaware, OH

Buckeye Basements, Inc.
Central Ohio's Basement Finishing ExpertsBest Of Houzz '13-'21
 Bloomin Blinds of North Charlotte
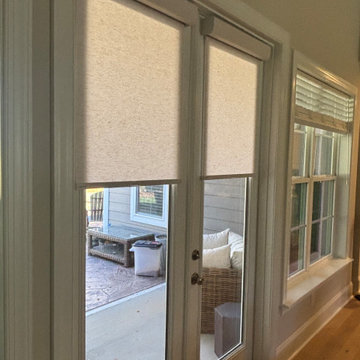
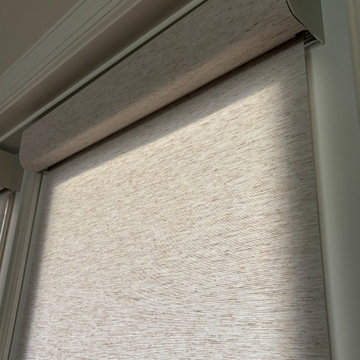
Custom light-filtering roller shades installed on glass-panel French patio doors in a home in the Country Club Hills neighborhood of Salisbury, North Carolina. This installation demonstrates how to cover glass doors with custom roller shades while maintaining convenient door access, adjustable privacy, and natural daylight.
The two doors feature individual roller shades with neutral textured light-filtering fabric and coordinating cassette-style headrails. Each shade can be raised or lowered independently, allowing the homeowner to adjust privacy and sunlight without using full-length curtains or drapery across the doorway.
For homeowners researching the best blinds or shades for French doors, patio doors, or glass entry doors, custom roller shades offer a clean, low-profile window covering. Proper measurements, mounting placement, and clearance around door handles are important considerations when selecting shades for doors that open and close regularly.
Light-filtering roller shades help soften incoming sunlight and reduce glare while maintaining a bright interior. Unlike blackout shades, light-filtering fabrics allow some daylight through the material. Privacy performance depends on the fabric selection and lighting conditions.
This Salisbury, NC installation was completed by Bloomin' Blinds of North Charlotte, a locally owned father-and-son business specializing in custom roller shades, blinds for French doors, patio door window treatments, cellular shades, Roman shades, shutters, drapery, and motorized window coverings.
Bloomin' Blinds provides free in-home consultations, professional measurements, and custom installation throughout its service area, including Lake Norman, Mooresville, Cornelius, Davidson, Huntersville, and surrounding North Charlotte communities.
Project location: Country Club Hills, Salisbury, NC. Product: Custom light-filtering roller shades for glass-panel French patio doors. Installation: Bloomin' Blinds of North Charlotte.
 Xtreme Renovations, LLC
Xtreme Renovations has completed a 4000 square foot Home Renovation Project for our clients in Wortham/NW Harris County. Our clients desired to transform an early 1990’s constructed Traditional Home to that of an Updated Traditional Style with ‘clean lines’ and many functional features that they could enjoy in their home.
The Renovation included demolition of the existing Kitchen from floor to ceiling. All new Custom Built ‘Raised Panel Style’ cabinetry was crafted and installed by our Xtreme Renovations, LLC Team. Many functional features were added such as Spice Rack sliding doors, Lazy Susan, wide drawers and reducing the fur down above the sink area to provide for taller Cabinetry. All doors were installed with soft closing European Hinges. All drawers have Full Extension Soft Closing Drawer Glides. The Island cook top was enlarged and converted from electric to Natural Gas to provide efficiency. Above Island fluorescent lighting was removed and all new energy efficient LED recessed lighting on dimmers were added as well as under cabinet LED lighting. Chandelier Lighting was added above the Island to add a touch of class for this cooks kitchen. New Harlequin Granite with White Marble Tile Backsplashes provided the “Wow Factor” our clients desired and Xtreme Renovations is known for. All Cabinetry was painted adding a touch of class to the New Kitchen. New Tile flooring was installed in the Kitchen, Laundry area and Powder Room. Many electrical and plumbing upgrades were made throughout the home as well as drywall work, painting of all wall and ceilings. The renovation included removing the existing hardwood flooring and installing new Anderson Southern Vista Sand Dune (Cabiaba) Spanish Hickory throughout the downstairs areas. Also included in this renovation was the installation of 15 Double Pain Argon Filled Replacement Windows.
 Xtreme Renovations, LLC
Xtreme Renovations has completed a 4000 square foot Home Renovation Project for our clients in Wortham/NW Harris County. Our clients desired to transform an early 1990’s constructed Traditional Home to that of an Updated Traditional Style with ‘clean lines’ and many functional features that they could enjoy in their home.
The Renovation included demolition of the existing Kitchen from floor to ceiling. All new Custom Built ‘Raised Panel Style’ cabinetry was crafted and installed by our Xtreme Renovations, LLC Team. Many functional features were added such as Spice Rack sliding doors, Lazy Susan, wide drawers and reducing the fur down above the sink area to provide for taller Cabinetry. All doors were installed with soft closing European Hinges. All drawers have Full Extension Soft Closing Drawer Glides. The Island cook top was enlarged and converted from electric to Natural Gas to provide efficiency. Above Island fluorescent lighting was removed and all new energy efficient LED recessed lighting on dimmers were added as well as under cabinet LED lighting. Chandelier Lighting was added above the Island to add a touch of class for this cooks kitchen. New Harlequin Granite with White Marble Tile Backsplashes provided the “Wow Factor” our clients desired and Xtreme Renovations is known for. All Cabinetry was painted adding a touch of class to the New Kitchen. New Tile flooring was installed in the Kitchen, Laundry area and Powder Room. Many electrical and plumbing upgrades were made throughout the home as well as drywall work, painting of all wall and ceilings. The renovation included removing the existing hardwood flooring and installing new Anderson Southern Vista Sand Dune (Cabiaba) Spanish Hickory throughout the downstairs areas. Also included in this renovation was the installation of 15 Double Pain Argon Filled Replacement Windows.

 Industrial Projects
Creating a comfortable outdoor living space is a priority for many homeowners and DIY enthusiasts. With rising summer temperatures, installing a shade tarp in your backyard offers an affordable and effective solution for sun protection. We’ve developed this detailed, step-by-step guide to help you confidently install a shade tarp that not only shields you from the sun but also adds aesthetic appeal to your outdoor area.
Benefits of Installing a Backyard Shade Tarp
Before diving into the installation process, let’s explore the key benefits of having a backyard shade tarp:
Provides UV Protection: Keeps your family and guests safe from harmful sun exposure.
Reduces Outdoor Temperatures: Creates a cooler, more enjoyable outdoor space.
Protects Outdoor Furniture: Extends the life of patio furniture by reducing sun damage.
Enhances Outdoor Aesthetics: Adds a modern, stylish look to your yard.
Budget-Friendly: More affordable compared to permanent structures like pergolas.
Materials and Tools You’ll Need
To begin your DIY backyard shade project, gather the following materials and tools:
Materials:
Shade tarp (UV-resistant and breathable)
Sturdy posts or existing structures (trees, fences, walls)
Mounting hardware (eye bolts, D-rings, turnbuckles, snap hooks)
Nylon or polyester rope, or stainless-steel wire
Concrete (if installing new posts)
Tools:
Power drill
Measuring tape
Level
Ladder
Wrench or adjustable spanner
Post hole digger (if installing new posts)
Step 1: Plan Your Shade Tarp Layout
The first step in installing your backyard shade tarp is careful planning. Take time to assess your outdoor area and answer these key questions:
Where is the sun’s path throughout the day?
What size and shape of tarp best suits your space?
Will you anchor the tarp to existing structures or install new posts?
What height do you want the tarp to sit at for maximum shade and airflow?
Pro Tip: Use string or garden hoses to visualize the tarp layout on the ground before making permanent decisions.
Step 2: Measure and Mark Anchor Points
Once you’ve determined the tarp’s location and orientation:
Measure the tarp dimensions.
Mark the exact points where each corner of the tarp will be anchored.
Ensure that the anchor points are at least 5–10% longer than the tarp size to allow for tensioning and slight adjustments.
Consider slope angles for water runoff. Aim for at least a 20-degree angle to prevent water pooling on the tarp.
Step 3: Install Support Posts (If Necessary)
If your backyard lacks existing anchor points like trees or fences, you’ll need to install sturdy support posts:
Dig post holes at least 24 inches deep and 8-12 inches wide for stability.
Set posts in concrete, making sure they remain plumb and level.
Allow the concrete to cure for at least 24–48 hours before applying tension from the tarp.
We recommend using pressure-treated wood, galvanized steel poles, or aluminum posts for longevity and strength.
Step 4: Install Mounting Hardware
With your anchor points ready, it’s time to install the necessary hardware:
Attach eye bolts or pad eyes securely into walls, posts, or other fixed structures.
For added flexibility and adjustability, install turnbuckles or tensioners to fine-tune the tarp’s tightness.
Connect snap hooks, D-rings, or carabiners to make assembly and disassembly easier.
Make sure all hardware is rated for outdoor use to prevent rust and corrosion.
Step 5: Attach and Tension the Shade Tarp
Now it’s time for the most satisfying part—mounting the shade tarp:
Begin by attaching one corner of the tarp to an anchor point.
Gradually attach the remaining corners, moving diagonally for even tension.
Adjust each connection point using your turnbuckles, ropes, or cables.
Pull the tarp tight enough to avoid sagging, but not so tight that it risks tearing.
Check that the tarp maintains the desired slope for rainwater runoff and adjust tension as needed.
Step 6: Final Adjustments and Safety Check
Before enjoying your new shaded area:
Inspect all anchor points and hardware for stability.
Test the tarp’s tension and make adjustments for even distribution.
Ensure that no sharp edges or loose connections remain that could damage the tarp or pose a safety hazard.
Confirm that the tarp is secure in windy conditions by giving it a gentle tug.
If you live in an area with frequent high winds, consider removing the tarp during storms to prevent damage.
Step 7: Enjoy Your Shaded Backyard Oasis
Once installed, your backyard shade tarp provides a comfortable and protective space for outdoor gatherings, relaxation, or family activities. You can decorate underneath with outdoor furniture, string lights, or potted plants to create a personalized outdoor retreat.
Maintenance Tips for Long-Lasting Shade Tarp Performance
To extend the life of your shade tarp, follow these maintenance guidelines:
Regularly check for wear and tear, especially around anchor points and seams.
Clean the tarp periodically with mild soap and water to prevent mildew buildup.
Store the tarp indoors during harsh weather seasons if it's not designed for year-round use.
Tighten hardware as needed to maintain proper tension and avoid sagging.
By following these simple care steps, your shade tarp will continue to deliver years of sun protection and outdoor comfort.
Conclusion: Upgrade Your Outdoor Space with a DIY Shade Tarp
Installing a shade tarp in your backyard is a cost-effective and rewarding DIY project. With careful planning, quality materials, and proper installation techniques, you’ll enjoy cool, shaded outdoor living all season long. This step-by-step guide ensures your project goes smoothly from start to finish.
 Bloomin Blinds of North Charlotte
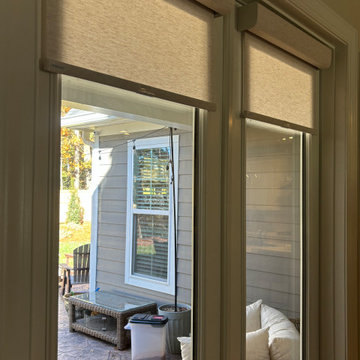
Custom light-filtering roller shades installed on glass-panel French patio doors in a home in the Country Club Hills neighborhood of Salisbury, North Carolina. This installation demonstrates how to cover glass doors with custom roller shades while maintaining convenient door access, adjustable privacy, and natural daylight.
The two doors feature individual roller shades with neutral textured light-filtering fabric and coordinating cassette-style headrails. Each shade can be raised or lowered independently, allowing the homeowner to adjust privacy and sunlight without using full-length curtains or drapery across the doorway.
For homeowners researching the best blinds or shades for French doors, patio doors, or glass entry doors, custom roller shades offer a clean, low-profile window covering. Proper measurements, mounting placement, and clearance around door handles are important considerations when selecting shades for doors that open and close regularly.
Light-filtering roller shades help soften incoming sunlight and reduce glare while maintaining a bright interior. Unlike blackout shades, light-filtering fabrics allow some daylight through the material. Privacy performance depends on the fabric selection and lighting conditions.
This Salisbury, NC installation was completed by Bloomin' Blinds of North Charlotte, a locally owned father-and-son business specializing in custom roller shades, blinds for French doors, patio door window treatments, cellular shades, Roman shades, shutters, drapery, and motorized window coverings.
Bloomin' Blinds provides free in-home consultations, professional measurements, and custom installation throughout its service area, including Lake Norman, Mooresville, Cornelius, Davidson, Huntersville, and surrounding North Charlotte communities.
Project location: Country Club Hills, Salisbury, NC. Product: Custom light-filtering roller shades for glass-panel French patio doors. Installation: Bloomin' Blinds of North Charlotte.
 Bloomin Blinds of North Charlotte
Custom light-filtering roller shades installed on glass-panel French patio doors in a home in the Country Club Hills neighborhood of Salisbury, North Carolina. This installation demonstrates how to cover glass doors with custom roller shades while maintaining convenient door access, adjustable privacy, and natural daylight.
The two doors feature individual roller shades with neutral textured light-filtering fabric and coordinating cassette-style headrails. Each shade can be raised or lowered independently, allowing the homeowner to adjust privacy and sunlight without using full-length curtains or drapery across the doorway.
For homeowners researching the best blinds or shades for French doors, patio doors, or glass entry doors, custom roller shades offer a clean, low-profile window covering. Proper measurements, mounting placement, and clearance around door handles are important considerations when selecting shades for doors that open and close regularly.
Light-filtering roller shades help soften incoming sunlight and reduce glare while maintaining a bright interior. Unlike blackout shades, light-filtering fabrics allow some daylight through the material. Privacy performance depends on the fabric selection and lighting conditions.
This Salisbury, NC installation was completed by Bloomin' Blinds of North Charlotte, a locally owned father-and-son business specializing in custom roller shades, blinds for French doors, patio door window treatments, cellular shades, Roman shades, shutters, drapery, and motorized window coverings.
Bloomin' Blinds provides free in-home consultations, professional measurements, and custom installation throughout its service area, including Lake Norman, Mooresville, Cornelius, Davidson, Huntersville, and surrounding North Charlotte communities.
Project location: Country Club Hills, Salisbury, NC. Product: Custom light-filtering roller shades for glass-panel French patio doors. Installation: Bloomin' Blinds of North Charlotte.
Sponsored
Columbus, OH

Snider & Metcalf Interior Design, LTD
Leading Interior Designers in Columbus, Ohio & Ponte Vedra, Florida
 Xtreme Renovations, LLC
Xtreme Renovations has completed a 4000 square foot Home Renovation Project for our clients in Wortham/NW Harris County. Our clients desired to transform an early 1990’s constructed Traditional Home to that of an Updated Traditional Style with ‘clean lines’ and many functional features that they could enjoy in their home.
The Renovation included demolition of the existing Kitchen from floor to ceiling. All new Custom Built ‘Raised Panel Style’ cabinetry was crafted and installed by our Xtreme Renovations, LLC Team. Many functional features were added such as Spice Rack sliding doors, Lazy Susan, wide drawers and reducing the fur down above the sink area to provide for taller Cabinetry. All doors were installed with soft closing European Hinges. All drawers have Full Extension Soft Closing Drawer Glides. The Island cook top was enlarged and converted from electric to Natural Gas to provide efficiency. Above Island fluorescent lighting was removed and all new energy efficient LED recessed lighting on dimmers were added as well as under cabinet LED lighting. Chandelier Lighting was added above the Island to add a touch of class for this cooks kitchen. New Harlequin Granite with White Marble Tile Backsplashes provided the “Wow Factor” our clients desired and Xtreme Renovations is known for. All Cabinetry was painted adding a touch of class to the New Kitchen. New Tile flooring was installed in the Kitchen, Laundry area and Powder Room. Many electrical and plumbing upgrades were made throughout the home as well as drywall work, painting of all wall and ceilings. The renovation included removing the existing hardwood flooring and installing new Anderson Southern Vista Sand Dune (Cabiaba) Spanish Hickory throughout the downstairs areas. Also included in this renovation was the installation of 15 Double Pain Argon Filled Replacement Windows.

 The Brooklyn Studio
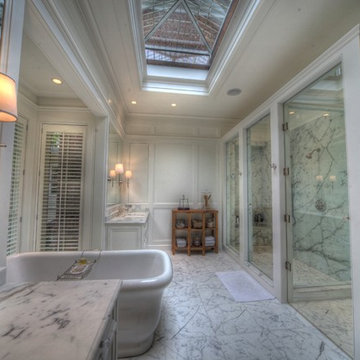
This residence was a complete gut renovation of a 4-story row house in Park Slope, and included a new rear extension and penthouse addition. The owners wished to create a warm, family home using a modern language that would act as a clean canvas to feature rich textiles and items from their world travels. As with most Brooklyn row houses, the existing house suffered from a lack of natural light and connection to exterior spaces, an issue that Principal Brendan Coburn is acutely aware of from his experience re-imagining historic structures in the New York area. The resulting architecture is designed around moments featuring natural light and views to the exterior, of both the private garden and the sky, throughout the house, and a stripped-down language of detailing and finishes allows for the concept of the modern-natural to shine.
Upon entering the home, the kitchen and dining space draw you in with views beyond through the large glazed opening at the rear of the house. An extension was built to allow for a large sunken living room that provides a family gathering space connected to the kitchen and dining room, but remains distinctly separate, with a strong visual connection to the rear garden. The open sculptural stair tower was designed to function like that of a traditional row house stair, but with a smaller footprint. By extending it up past the original roof level into the new penthouse, the stair becomes an atmospheric shaft for the spaces surrounding the core. All types of weather – sunshine, rain, lightning, can be sensed throughout the home through this unifying vertical environment. The stair space also strives to foster family communication, making open living spaces visible between floors. At the upper-most level, a free-form bench sits suspended over the stair, just by the new roof deck, which provides at-ease entertaining. Oak was used throughout the home as a unifying material element. As one travels upwards within the house, the oak finishes are bleached to further degrees as a nod to how light enters the home.
The owners worked with CWB to add their own personality to the project. The meter of a white oak and blackened steel stair screen was designed by the family to read “I love you” in Morse Code, and tile was selected throughout to reference places that hold special significance to the family. To support the owners’ comfort, the architectural design engages passive house technologies to reduce energy use, while increasing air quality within the home – a strategy which aims to respect the environment while providing a refuge from the harsh elements of urban living.
This project was published by Wendy Goodman as her Space of the Week, part of New York Magazine’s Design Hunting on The Cut.
Photography by Kevin Kunstadt
 The Brooklyn Studio
This residence was a complete gut renovation of a 4-story row house in Park Slope, and included a new rear extension and penthouse addition. The owners wished to create a warm, family home using a modern language that would act as a clean canvas to feature rich textiles and items from their world travels. As with most Brooklyn row houses, the existing house suffered from a lack of natural light and connection to exterior spaces, an issue that Principal Brendan Coburn is acutely aware of from his experience re-imagining historic structures in the New York area. The resulting architecture is designed around moments featuring natural light and views to the exterior, of both the private garden and the sky, throughout the house, and a stripped-down language of detailing and finishes allows for the concept of the modern-natural to shine.
Upon entering the home, the kitchen and dining space draw you in with views beyond through the large glazed opening at the rear of the house. An extension was built to allow for a large sunken living room that provides a family gathering space connected to the kitchen and dining room, but remains distinctly separate, with a strong visual connection to the rear garden. The open sculptural stair tower was designed to function like that of a traditional row house stair, but with a smaller footprint. By extending it up past the original roof level into the new penthouse, the stair becomes an atmospheric shaft for the spaces surrounding the core. All types of weather – sunshine, rain, lightning, can be sensed throughout the home through this unifying vertical environment. The stair space also strives to foster family communication, making open living spaces visible between floors. At the upper-most level, a free-form bench sits suspended over the stair, just by the new roof deck, which provides at-ease entertaining. Oak was used throughout the home as a unifying material element. As one travels upwards within the house, the oak finishes are bleached to further degrees as a nod to how light enters the home.
The owners worked with CWB to add their own personality to the project. The meter of a white oak and blackened steel stair screen was designed by the family to read “I love you” in Morse Code, and tile was selected throughout to reference places that hold special significance to the family. To support the owners’ comfort, the architectural design engages passive house technologies to reduce energy use, while increasing air quality within the home – a strategy which aims to respect the environment while providing a refuge from the harsh elements of urban living.
This project was published by Wendy Goodman as her Space of the Week, part of New York Magazine’s Design Hunting on The Cut.
Photography by Kevin Kunstadt
 Pennsylvania Landscape & Nursery Association
Terren Landscapes http://www.terrenlandscapes.com
2014 PLNA Awards for Landscape Excellence Winner
Category: Residential $120,000 & Over
Award Level: Silver
Project Description:
The goal of the Vaccaro project was to change the existing non-functional landscape into multiple entertainment spaces while working within the tight confines of impervious coverage requirements. The project consisted of removing, redesigning and re-installing existing hardscaping, front and rear, reconfiguring the driveway to accommodate more parking, handling storm water on-site, and increasing the aesthetic appeal of the property.
The client was remodeling the home in the theme of a rustic French country estate and in our design we endeavored to adhere to this chosen theme. The existing driveway was a circular driveway located off of the main axis of the front door. Reconfiguring the driveway improved vehicular flow, provided additional parking, and reduced impervious space. By consolidating the parking to the side of the house where the garage is located, we maintained the French theme in encouraging arriving cars to pull up closer to the home's entry. We also worked with the architect in the renovation of the home to position the garage windows so that they were placed in the voids of the arbor we constructed over the parking spaces by the garage. The rustic arbor creates a vertical element and delineates the pedestrian walkway from vehicular traffic. The main walkway spans the front of the home so that it extends down to the parking area to guide visitors to the main entrance.
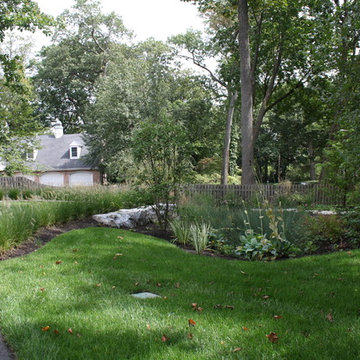
To handle the storm water generated by the driveway, we installed a rain garden, which was placed in the front right side yard. The rain garden area was excavated, the soil in the planting areas was heavily amended with compost, sand, and diatomaceous earth, and mostly native plant material was installed to help absorb excess water. In the bottom-most area of the basin filter fabric was laid to help prevent migration of the stone into the soil and decorative stone was spread to slow the flow of water. Storm water is held until it successfully infiltrates the soil, and the plant material provides a natural habitat that supports butterflies, birds, and beneficial insects.
The existing front patio was removed and the size increased to make the space more functional. To increase function and circulation we worked with the architect to create a dining room that extends to the out-of-doors by adding French doors to the front of the home, which open to the new gravel front terrace. The homeowner desired a planting scheme that would create delineation between the front yard and the gravel terrace without blocking the morning sunlight. To achieve this we chose standardized Physocarpus 'Diablo' to compliment the warm cream-colored stucco of the home and provide structure to the patio space.
In the rear of the property we removed the existing brick patio and installed a dry-laid quartzite patio that nicely compliments the cream-colored stucco. We redesigned the rear patio space using 45 degree angles to represent the old French design theory of bisecting spaces with diagonals. Utilizing this design theory created more interesting patio spaces and allowed us to soften the sharp angles by planting the negative spaces between the house and patio. Seat walls were also designed and installed to create more seating without sacrificing impervious space.
Per the homeowner's wishes, we also designed a separate area in the rear of the yard for a natural boulder fire pit, which is located along the axis of the kitchen window. Half of the ring utilizes boulders for seating for a small gathering while the other half
allowed the homeowner's addition of colorful Adirondack chairs to finish the fire circle.
Incorporating the French theme throughout, we also designed and installed a small vegetable garden in the side yard so the homeowner could grow her own vegetables and herbs.
Photo Credit:
Terren Landscapes

 TKS Design Group
Download our free ebook, Creating the Ideal Kitchen. DOWNLOAD NOW
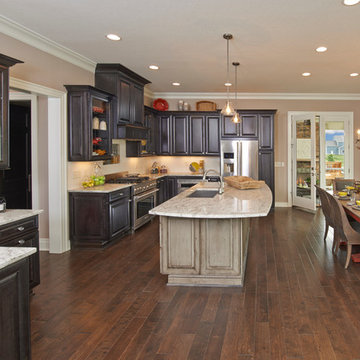
This family from Wheaton was ready to remodel their kitchen, dining room and powder room. The project didn’t call for any structural or space planning changes but the makeover still had a massive impact on their home. The homeowners wanted to change their dated 1990’s brown speckled granite and light maple kitchen. They liked the welcoming feeling they got from the wood and warm tones in their current kitchen, but this style clashed with their vision of a deVOL type kitchen, a London-based furniture company. Their inspiration came from the country homes of the UK that mix the warmth of traditional detail with clean lines and modern updates.
To create their vision, we started with all new framed cabinets with a modified overlay painted in beautiful, understated colors. Our clients were adamant about “no white cabinets.” Instead we used an oyster color for the perimeter and a custom color match to a specific shade of green chosen by the homeowner. The use of a simple color pallet reduces the visual noise and allows the space to feel open and welcoming. We also painted the trim above the cabinets the same color to make the cabinets look taller. The room trim was painted a bright clean white to match the ceiling.
In true English fashion our clients are not coffee drinkers, but they LOVE tea. We created a tea station for them where they can prepare and serve tea. We added plenty of glass to showcase their tea mugs and adapted the cabinetry below to accommodate storage for their tea items. Function is also key for the English kitchen and the homeowners. They requested a deep farmhouse sink and a cabinet devoted to their heavy mixer because they bake a lot. We then got rid of the stovetop on the island and wall oven and replaced both of them with a range located against the far wall. This gives them plenty of space on the island to roll out dough and prepare any number of baked goods. We then removed the bifold pantry doors and created custom built-ins with plenty of usable storage for all their cooking and baking needs.
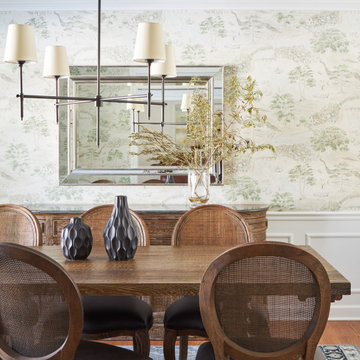
The client wanted a big change to the dining room but still wanted to use their own furniture and rug. We installed a toile-like wallpaper on the top half of the room and supported it with white wainscot paneling. We also changed out the light fixture, showing us once again that small changes can have a big impact.
As the final touch, we also re-did the powder room to be in line with the rest of the first floor. We had the new vanity painted in the same oyster color as the kitchen cabinets and then covered the walls in a whimsical patterned wallpaper. Although the homeowners like subtle neutral colors they were willing to go a bit bold in the powder room for something unexpected. For more design inspiration go to: www.kitchenstudio-ge.com
 Priority Remodeling
's Exquisite One-Bedroom ADU Project
In the world of home improvement and design, every so often, a project emerges that flawlessly marries aesthetics with functionality. The recent completion of a one-bedroom Accessory Dwelling Unit (ADU) by Priority Remodeling stands as a testament to this golden rule.
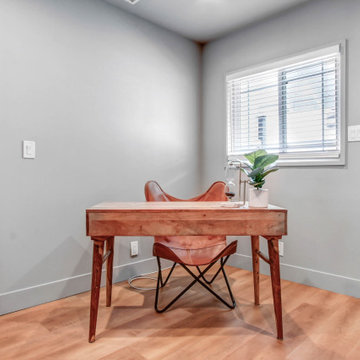
As one steps into the space, the first thing that catches the eye is the immaculate and contemporary design of the room. Muted gray walls serve as the perfect backdrop, enhancing the natural brightness of the room, thanks to the strategically positioned windows. The window blinds, neatly tucked away, provide options for privacy while allowing natural light to illuminate the space.
The minimalist office area showcases a sleek wooden desk paired with a luxurious leather chair. A simple potted plant adds a touch of organic green, giving a nod to the importance of biophilic design elements. With ample space for working or studying, it offers the perfect environment for productivity and focus.
Transitioning into the bedroom area, the understated elegance continues. The centerpiece - a comfortable bed with crisp white linens - invites rest and relaxation. The headboard's unique nailhead trim design adds a touch of sophistication without overpowering the room. Adjacent to it, a cozy sitting area with a leather lounge chair and throw pillow makes for an ideal reading or relaxation spot.
Both practical and aesthetic, the choice of wooden flooring complements the neutral color palette, warming up the space and providing continuity. The floor seamlessly ties the different areas together, creating a cohesive and harmonious environment.
In sum, Priority Remodeling's recent ADU project is a masterclass in modern interior design. Each element has been meticulously chosen and placed, ensuring both functionality and beauty. This ADU is not just a living space; it's an experience. A testament to the prowess and vision of Priority Remodeling.
---------
In recent years, Accessory Dwelling Units (ADUs) have surged in popularity among homeowners, and for a multitude of good reasons. These self-contained living spaces, often constructed in the backyard or converted from existing structures like garages, bring forth a myriad of benefits:
Additional Income Stream: One of the most immediate benefits of an ADU is the potential for rental income. Homeowners can rent out these units to tenants, providing a steady stream of revenue that can help offset mortgage payments or other expenses.
Increased Property Value: Well-designed and constructed ADUs can significantly increase a property's value. It's not just about the added square footage but also the flexibility and functionality that such a space offers.
Housing Flexibility: ADUs can serve multiple purposes over time. They can start as a home office, transition to a living space for a college-going child, and later serve as a residence for aging parents. This adaptability is invaluable in ever-changing life scenarios.
Sustainable Living: Smaller spaces typically consume fewer resources, both in their construction and daily operation. This makes ADUs an environmentally friendly choice for those keen on reducing their carbon footprint.
Community Building: ADUs can help address housing shortages in dense urban areas. By providing affordable rental options, they contribute to community diversity and vitality.
Privacy with Proximity: For families looking to support relatives (like elderly parents or adult children), an ADU offers the perfect balance. Family members live close by, fostering connection and support, yet both parties maintain their privacy.
Cost-effective Expansion: Compared to the costs associated with buying a larger home or constructing a full-fledged home addition, ADUs often present a more economical solution to gaining extra living space.
Incorporating an ADU into one's property is not just about creating additional space but about unlocking a range of benefits that enhance both the financial and functional aspects of homeownership. As seen in Priority Remodeling's recent project, an ADU can also be a pinnacle of design and comfort, proving that with the right vision, even compact spaces can offer a grand living experience.

 Hillcrest Builders
Our client wanted a SIP built home and we incorporated this and many other energy and sustainability features into this home which was in the Sheboygan County Parade of Homes.
Named "The Green Balanced Home", this project was all about creating practical and stunning living spaces that combined with sound environmental building materials and methods. By showcasing an assortment of leading-edge- green technologies, the Green Balanced Home was the talk of the Parade that year. In cooperation with our client, our methodology was:
Start with the site:
1. Protected tree lines
2. Drought resistant vegetation
3. High proportion of natural, plantings versus higher maintenance lawn
4. Optimal home placement on lot for solar exposure
5. Narrower streets
Build a high thermal envelope:
1. R-10 Gold Guard laminated EPS foam under basement, garage, and patio.
2. R-10 Gold Guard laminated EPS foam around exterior foundation walls.
3. R-10 ESP foam "shirt" around foundation
4. R-24 Structural Insulated panels (SIPs) for exterior walls, including garage
5. Sprayed foam in basement box sills and attic separation walls
6. R-15 garage door
7. R-60 blown cellulose attic insulation
Add efficient heating, cooling, ventilation, and electric utilization elements:
1. High efficiency fireplace with auxiliary ducting
2. Pull-out exterior wood-loading drawer
3. Air-to-air heat pump
4. 95% efficient, ultra-quiet variable capacity furnace
5. 19 SEER air conditioner
6. Five zones with programmable thermostats
7. Heat reclamation from hot water usage
8. LED lighting
9. Skylights
10. Energy Star appliances
11. Prep for in-floor heating system
12. Prep for photovoltaic (PV) solar
13. Prep for solar hot water
Incorporate water conservation:
1. Rain water recapture for toilet flushing and irrigation
2. Motion activated hot water circulation system
3. Power flush toilets
4. Dual flush toilets
Create high indoor air quality:
1. HEPA and UV filters
2. Air-to-air exchanger
3. Ultra-quiet bathroom fans with moisture sensor activation
Integrate sustainable, efficient materials:
* Expanded polystyrene (ESP) foam that does not emit HCFC "greenhouse" gases
* Oriented strand board (OSB) based siding, trim, and shutters
* SIPs panels that contain ESP an OSB
* Carpeting pads made from recycled materials
* Stewardship-certified cabinet manufacturing
* Job site recycling and reduce waste with SIPs
116