
Search results for "Releases" in Home Design Ideas
 Matt Fajkus Architecture
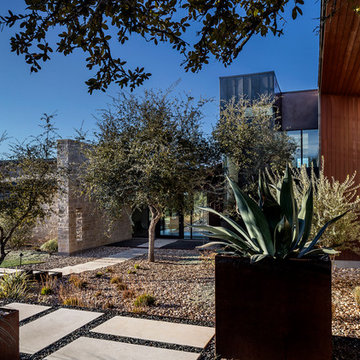
The Control/Shift House is perched on the high side of the site which takes advantage of the view to the southeast. A gradual descending path navigates the change in terrain from the street to the entry of the house. A series of low retaining walls/planter beds gather and release the earth upon the descent resulting in a fairly flat level for the house to sit on the top one third of the site. The entry axis is aligned with the celebrated stair volume and then re-centers on the actual entry axis once you approach the forecourt of the house.
The initial desire was for an “H” scheme house with common entertaining spaces bridging the gap between the more private spaces. After an investigation considering the site, program, and view, a key move was made: unfold the east wing of the “H” scheme to open all rooms to the southeast view resulting in a “T” scheme. The new derivation allows for both a swim pool which is on axis with the entry and main gathering space and a lap pool which occurs on the cross axis extending along the lengthy edge of the master suite, providing direct access for morning exercise and a view of the water throughout the day.
The Control/Shift House was derived from a clever way of following the “rules.” Strict HOA guidelines required very specific exterior massing restrictions which limits the lengths of unbroken elevations and promotes varying sizes of masses. The solution most often used in this neighborhood is one of addition - an aggregation of masses and program randomly attached to the inner core of the house which often results in a parasitic plan. The approach taken with the Control/Shift House was to push and pull program/massing to delineate and define the layout of the house. Massing is intentional and reiterated by the careful selection of materiality that tracks through the house. Voids and relief in the plan are a natural result of this method and allow for light and air to circulate throughout every space of the house, even into the most inner core.
Photography: Charles Davis Smith


 Tile Doctor Ltd
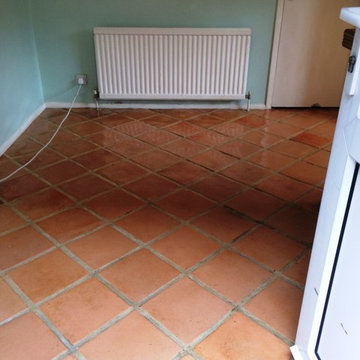
This was a rather dirty Terracotta kitchen floor located at a house in Winchmore Hill in Buckinghamshire, not to be confused with the Winchmore Hill in London. The sealer on the tiles had worn off some time ago and now the dirt was becoming trapped in the pores of the Terracotta making it impossible to clean.
Deep Cleaning Terracotta Tile
To deep clean into the pores of the Terracotta a diluted solution of Tile Doctor Pro Clean, which is a strong tile cleaner sage to use on tiled floors, was applied to kitchen floor and left to soak in for around ten minutes. Then with the aid of a commercial rotary machine the solution was scrubbed into the tiles to release the many years of accumulated ingrained soiling which was removed from the floor using a wet vacuum.
Although this deep cleaned the tile the grout lines needed further attention and were treated with Tile Doctor Grout Clean-up solution and then washed down with fresh water which was removed with a wet vacuum.
There was still evidence of sealer remaining on the floor in some areas so the next step in the process was to apply Tile Doctor Remove and Go again working it into the tile using a scrubbing pad fitted to a rotary machine. Remove and Go as its name suggests is used to remove waxes and sealants from tile and stone. It certainly did the job and once the resultant slurry was vacuumed up and the floor given a final rinse to remove any chemicals used in the process the floor was looking much cleaner and left to dry overnight ready for our return
Sealing Terracotta Tile
The next day came back to do the sealing and checked the floor first for any spots we might had missed and also to ensure it had dried sufficiently. Tile Doctor Seal and Go was then applied in coats to fully seal the floor. As well as adding protection Seal and Go adds a nice subtle satin finish to Terracotta and being water based it doesn’t give off an odour when it’s drying.
Find the right local pro for your project
 Morris Lare
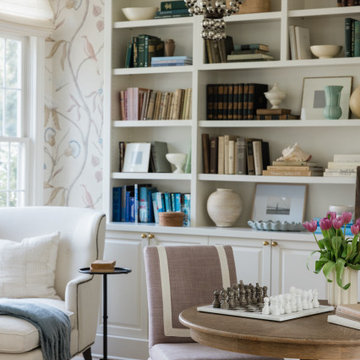
As you step into the library room of this elegant home, you're greeted by a sense of warmth and sophistication. The first thing that catches your eye is the custom-designed furniture, meticulously crafted to blend both style and comfort seamlessly. A plush reading chair sits by the window, inviting you to sink into its embrace with a good book.
The walls are adorned with intricately patterned wallpaper, adding a touch of classic charm to the room. Large windows which flood the space with natural light that dances across the room throughout the day, creating a serene atmosphere.
Along one wall, stretching from floor to ceiling, are shelves adorned with books of various sizes and colors. The collection is a mix of both new releases and vintage classics, reflecting a diverse range of interests and tastes. Each book is carefully arranged, creating an organized yet visually captivating display.
Amidst the books, you notice carefully curated accessories that add personality to the room. Antique bookends hold up prized volumes, while small sculptures and framed artwork adorn the shelves, adding visual interest to the space. A cozy reading lamp sits on a side table, providing the perfect glow for late-night reading sessions.
As you explore further, you realize that every element of this library room has been thoughtfully chosen to create a harmonious and inviting environment for relaxation and intellectual stimulation. It's a space where one can escape into the world of literature while surrounded by comfort and beauty.

 Cabinet-S-Top
This was a major remodel where the kitchen was completely gutted, flooring and soffits were removed and all the electrical in the kitchen had to be reworked and brought up to code. We used Waypoint Living Spaces for the perimeter cabinets and used a riser and crown molding to connect the cabinets to the ceiling. We chose Medallion Cabinetry for the island because the customer had her heart set on a green painted island. The hardware we used is from the Mulholland collection by Amerock. The customers have large family gathers and it was very important for them to have an island that was moveable. We used casters from Richelieu to create and island that could move easily, as well as having brakes to keep the island in place when they wanted.
Giallo Traversella granite was used on the perimeter countertops to tie together the greens and beige tones of the cabinetry and we used John Boos, walnut butcher block countertop for the island to compliment wood tones from the existing millwork in the home. The customer provided me with an inspiration picture for a backsplash, she knew she wanted a glass patterned backsplash. Ceramic Tiles International had released their Debut Petal mosaic tile and the customer loved it.
Prior to the remodel, the kitchen was very dark and very crowded, it did not function in a way that worked for my customer. We added under cabinet LED lights, one general ceiling fixture and LED Brio Disc lights with dimming capabilities so the customers could adjust the lighting to their specific needs.
Light fixtures were updated in the hallways as well as the kitchen.
My customer didn’t know exactly what they wanted as far as plumbing was concerned. They wanted products that were durable and easy to maintain. I chose the Blanco Performa undermount sink in the Truffle color due to is durability and the color complimented the other materials. We used Moen’s Arbor single handle pull down spray faucet and transitional soap dispenser due to its simplistic design, functionality and warranty. We used a ¾ horsepower Insinkerator disposal and a deluxe Steamball strainer basket.
The customer originally had Parquet flooring and they liked the look of real hardwood. Madeira 5” planks in Dark Gunstock oak was chosen for its color and durability. The flooring brought in warm neutral tones to compliment other materials. My customer wanted a larger window, but they had some safety concerns. We addressed their concerns by providing a larger Awning style window, using tempered glass and double locks.
 Matt Fajkus Architecture
The Control/Shift House is perched on the high side of the site which takes advantage of the view to the southeast. A gradual descending path navigates the change in terrain from the street to the entry of the house. A series of low retaining walls/planter beds gather and release the earth upon the descent resulting in a fairly flat level for the house to sit on the top one third of the site. The entry axis is aligned with the celebrated stair volume and then re-centers on the actual entry axis once you approach the forecourt of the house.
The initial desire was for an “H” scheme house with common entertaining spaces bridging the gap between the more private spaces. After an investigation considering the site, program, and view, a key move was made: unfold the east wing of the “H” scheme to open all rooms to the southeast view resulting in a “T” scheme. The new derivation allows for both a swim pool which is on axis with the entry and main gathering space and a lap pool which occurs on the cross axis extending along the lengthy edge of the master suite, providing direct access for morning exercise and a view of the water throughout the day.
The Control/Shift House was derived from a clever way of following the “rules.” Strict HOA guidelines required very specific exterior massing restrictions which limits the lengths of unbroken elevations and promotes varying sizes of masses. The solution most often used in this neighborhood is one of addition - an aggregation of masses and program randomly attached to the inner core of the house which often results in a parasitic plan. The approach taken with the Control/Shift House was to push and pull program/massing to delineate and define the layout of the house. Massing is intentional and reiterated by the careful selection of materiality that tracks through the house. Voids and relief in the plan are a natural result of this method and allow for light and air to circulate throughout every space of the house, even into the most inner core.
Photography: Charles Davis Smith

 Feeney Inc.
DesignRail®-Kit Railing. Installation done is association with Zen Associates, landscape architects
Credit: Erika Johnson, Barnes Custom Builders
Location: Barrington, RI
 Tile Doctor Ltd
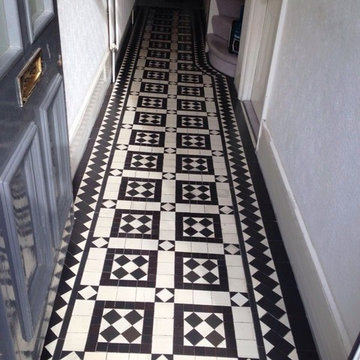
The photographs below are from a Victorian tiled hallway floor at a property in Stoke Newington in London. The floor was in need of repair with a large area very uneven and partly sunk in the middle of the pattern. The repairs were made using as many existing tiles as possible.
The first task was to set about cleaning the tiles using Tile Doctor Pro-Clean and Remove & Go on the stubborn areas. Both products were applied in the same way using black scrubbing pads to work the products into the tile to release the dirt. Hand brushes were used to clean up the grout lines and the floor was rinsed and soil removed using a wet vacuum.
At this point the large loose area of tiles were removed to be cleaned of grout/adhesive for use later and the sunken area that was revealed was levelled in line with the rest of the floor base. Once the new cement base had set and the tiles useable again they were re-laid and set in position to fit the matching pattern of the remaining floor.
Once the tile adhesive had set the last thing to do was to re-grout the repaired area making the hallway whole again and left to go off.
When we returned the whole floor was ready to be sealed and for this we used five coats of Tile Doctor Seal and Go which adds a nice shine to the floor as well as providing a surface seal that will help protect the tiles from stains going forward.
A lot of effort went into the restoration but what a transformation and well worth the work, certainly the customer was pleased and left the following testimonial.
Rob Voyce responded very quickly to my request for a quote, and was able to complete the work to a very good standard in the agreed time. The work caused minimum disruption to the household and everything was left clean and tidy at the end of each day. I would certainly recommend the services of the Tile Doctor and I am very happy with the work that has been done on old tiles in my Victorian hallway.
Nigel Voyce
North London Tile Doctor

 All Surface Restoration
Paver Gloss Sealer is a professional grade wet look exposed aggregate sealer that adds a rich, glossy appearance. It is a wet look/satin sheen acrylic sealer designed for use on all types of exterior concrete and pavers. Its pure acrylic formula allows for superior penetration and bonding. The durable finish left behind is UV stable and will not yellow. It offers superior resistance to rain, the sun, cold and hot climates, stains, and more. When applied to dull or faded exposed aggregate it will help to enhance the original coloring.
Applications: Exposed aggregate driveways, sidewalks and walkways, patios and pool decks and more.
It contains 20% acrylic solids & creates a lasting wet look. Esthetically pleasing, it beautifies and enriches the colors of the aggregate stones while protecting concrete. It forms a protective film, preventing the penetration of oil, water dirt & stains from the environment. This solvent base clear acrylic sealer penetrates to creating a lasting finish that will resist the assaults of elements such as the freeze-thaw cycles, sun, rain, and snow. It’s a great choice for high traffic area’s, which require maximum protection.
Paver Gloss Sealer can be purchased in 5 Gallon pails shipped via UPS ground to all 48 U.S. States EXCEPT Alaska & Hawaii at http://surfacerestoration.com/shop


 NanaWall
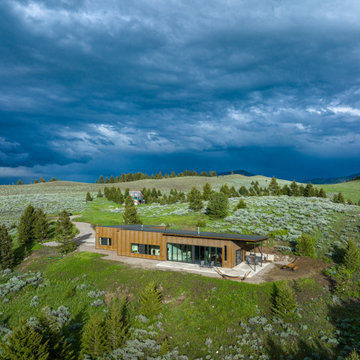
Drawn to the site’s serene location and the prospect of a quiet life after retirement, the homeowners purchased a parcel of land at the northern end of the Gallatin Range in Bozeman, Montana. After five years of engaging with the terrain and observing the local wildlife, they purchased the two adjacent parcels to preserve the optimal views of Paradise Valley and the Bridger Mountains. There, the homeowners envisioned a compact yet modern retreat with a fire-retardant building envelope and minimal disruption to the landscape and wildlife. Known for their sustainable architecture and environmentally conscious design, the homeowner entrusted Lori Ryker of studioryker and Riverbend Builders to bring his vision to life and construct a home with modern comforts and natural materials harmonizing with the land. “The owner was acutely in-tune with the landscape of the property, loving to watch wildlife, and interested in a house that sat down in the land instead of having a prominent profile in the landscape as so many “trophy” homes do,” shares Ryker.
The proximity to the forest and concern for fire led the home to be clad almost fully in steel with an apron of crushed rock on the ground surrounding the dwelling. Corten steel was selected for the building envelope for its low maintenance and ability to rust into a natural hue that blends with the surrounding landscape. Sustainability was a core principle throughout the design process. Inside, the home’s radiant-heated, polished concrete floors contribute to passive heating and cooling by absorbing heat during the day and releasing it at night. Folding glass walls enhance the home’s energy efficiency by allowing natural light and ventilation to flow freely through the interior spaces. For a cohesive appearance, all fenestration was specified in the color iron ore with triple glazing to ensure excellent thermal insulation, reducing energy consumption year-round.

 Leanne Michael L U X E lifestyle design
This coastal kitchen was designed with modern simplicity in mind to compliment my clients Baja lifestyle. The goal was to make the kitchen space feel larger for their daily use and entertaining purposes. Therefore, we designed the refrigerator to be positioned in the corner of the L shape custom cabinetry plan. Doing so opened the space up for even better interior access into the fridge as the French doors can now open fully. Within the custom cabinet plan, we specifically added a pair of hidden storage garage cubbies on both sides of the refrigerator compartment which gives my clients the ability to capture additional would-be wasted space perfect for hiding items typically left on the counters such as their toaster, coffee maker, bottles of vitamins, etc..
The duel material island with waterfall edges has even more character by adding a solid alder wood counter surface that marries into the quartz utility area surface. The island also has tons of hidden storage space on the front side hidden behind touch release cabinet doors to store items not used as often. Hanging above the island are a pair of glazed clay planters found locally that were transformed into really interesting light pendants through the assistance of our sister company, iron | clay | wood, for all things custom!
Adding a bank of custom floating shelves in the same alder wood as the island also gave continuity and balance to the space perfect for displaying my clients collection of everyday dishes and stemware found in Rosarito.
 Art Fireplace Technology Limited
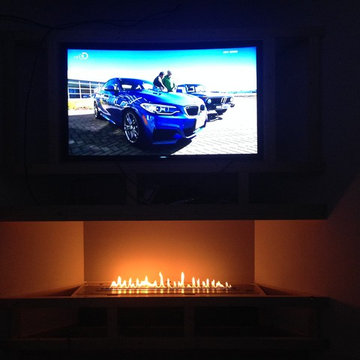
Among the bestin art fireplace design, the AF120 Remote Controlled Electronic Bio Ethanol Fireplace Insert is favored by architects, contractors and high-end designers and offers the discerning client unprecedented quality and safety. In addition to the same vent-free and clean burning flames as manual ethanol fireplace inserts, this art-Fire bio ethanol burner offers much more for both residential and commercial applications:
Remote Control Capability. Due to its electronic operation, powered by a twelve-volt power source, this ethanol fireplace insert may be ignited and extinguished through an on/off switch located on the burner itself, a one-button remote control or through your smart phone by integrating with your Smart Home System.
On-Board Safety Monitoring. The motherboard of this fireplace insert is safety-central. Constantly self-evaluating its operation, this intelligent burner reacts to any condition that appears atypical. Should it sense an excess amount of carbon dioxide emission or heat output, it will automatically cease operation, extinguish the flame and maintain the lock mechanism of the fuel chamber. Additionally, it will self-extinguish should it sense seismic motion or level of tilt making it a shock-proof device. Fuel and battery levels are also constantly evaluated for optimal performance and will give notification through the burner’s LED display, which will indicate operation times and alert you by sound and error message should an event occur.
Sturdy Construction. Constructed of Grade 304 stainless steel, the ethanol burner is corrosion resistant and exhibits excellent resistance to atmospheric, chemical and other exposures. Its top plate measures three millimeters in thickness(3/32 inches). This allows sturdiness, yet promotes a low profile. For added safety, the ethanol fireplace AF120 insert offers insulated double hearth construction.
Separate Fuel Reservoir and Burner Tray. Continuing with the unprecedented safety features of this ethanol burner, excess fuel is housed in a sealed reservoir. This not only prevents fuel evaporation and the aromatic release of the raw ethanol, but lessens the amount of “exposed” fuel at any given time. Through a medical grade fuel pump, the ethanol is delivered into the burner tray. Only allowing the burner tray to manage a few centiliters of ethanol fuel at a given time promotes additional safety and minimizes the risk of fire-related dangers.
 Cabinet-S-Top
This was a major remodel where the kitchen was completely gutted, flooring and soffits were removed and all the electrical in the kitchen had to be reworked and brought up to code. We used Waypoint Living Spaces for the perimeter cabinets and used a riser and crown molding to connect the cabinets to the ceiling. We chose Medallion Cabinetry for the island because the customer had her heart set on a green painted island. The hardware we used is from the Mulholland collection by Amerock. The customers have large family gathers and it was very important for them to have an island that was moveable. We used casters from Richelieu to create and island that could move easily, as well as having brakes to keep the island in place when they wanted.
Giallo Traversella granite was used on the perimeter countertops to tie together the greens and beige tones of the cabinetry and we used John Boos, walnut butcher block countertop for the island to compliment wood tones from the existing millwork in the home. The customer provided me with an inspiration picture for a backsplash, she knew she wanted a glass patterned backsplash. Ceramic Tiles International had released their Debut Petal mosaic tile and the customer loved it.
Prior to the remodel, the kitchen was very dark and very crowded, it did not function in a way that worked for my customer. We added under cabinet LED lights, one general ceiling fixture and LED Brio Disc lights with dimming capabilities so the customers could adjust the lighting to their specific needs.
Light fixtures were updated in the hallways as well as the kitchen.
My customer didn’t know exactly what they wanted as far as plumbing was concerned. They wanted products that were durable and easy to maintain. I chose the Blanco Performa undermount sink in the Truffle color due to is durability and the color complimented the other materials. We used Moen’s Arbor single handle pull down spray faucet and transitional soap dispenser due to its simplistic design, functionality and warranty. We used a ¾ horsepower Insinkerator disposal and a deluxe Steamball strainer basket.
The customer originally had Parquet flooring and they liked the look of real hardwood. Madeira 5” planks in Dark Gunstock oak was chosen for its color and durability. The flooring brought in warm neutral tones to compliment other materials. My customer wanted a larger window, but they had some safety concerns. We addressed their concerns by providing a larger Awning style window, using tempered glass and double locks.
 Light it Up AV & Turf
Project Description
Govee Permanent Outdoor Lights 2 Precision Home Installation
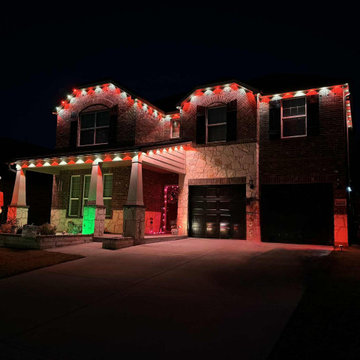
This project features the professional installation of the next-generation Govee Permanent Outdoor Lights 2 system. Known for their upgraded brightness and enhanced color rendering, these lights require a precise, calculated layout—especially since the manufacturer guidelines restrict cutting into the main line, presenting a unique installation challenge.
Key Features of This Installation:
Next-Gen Exterior Illumination: Outfitted with the newly released Govee Permanent Outdoor Lights 2, delivering brilliant architectural down-lighting, incredible holiday presets, and daily accent lighting.
Creative Technical Problem Solving: Because these specialized strands could not be cut without voiding the integrity of the system, we meticulously engineered the run layout. To achieve a perfectly flush finish at the roofline edge, we successfully executed a custom shortening and capping technique on the final strands.
Flawless Eave Integration: The lights were mounted at the optimal distance from the fascia to ensure a perfectly uniform, triangular cone wash down the home's exterior walls, eliminating hot spots and dark gaps.
Smart Ecosystem Control: Fully integrated into the homeowner's smart ecosystem, allowing for voice control, scheduled automation, and endless customization through the native app interface.
Our Specialized Lighting Expertise
Smart lighting systems require more than just hanging a strand—they require precision planning. We specialize in handling high-end retail and commercial systems, providing:
Advanced Layout Mapping: Ensuring your runs look symmetrical and perfectly tailored to your roofline before a single clip is mounted.
Out-of-the-Box Troubleshooting: Finding safe, manufacturer-approved technical workarounds for complex roof lines where standard plug-and-play methods fall short.
Clean Wire Management: Tucking and hiding all jump wires and power supplies for a seamless daytime appearance.
 Cavity Sliders
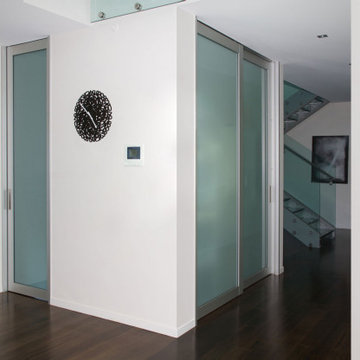
CS Cavity Sliders Pocket Door System installed in Richmond hill by Cavity Sliders Canada.
The CS Cavity Sliders Pocket Door Systems are for sliding wood doors weighing up to 500 lb (227 kg) each with options for SofStop soft-close mechanisms of up to 264 lb (120 kg) per door. Made for standard 2 x 4 wood and metal wall stud construction.
Features:
- Choose from a selection of pocket frames for door widths from 24 in (610 mm) to 48 in (1219 mm) and for door heights of up to 80 in (2030 mm) and 96 in (2438 mm)
- Pocket frames are made of sturdy double wall aluminum including the upper running track, which can be cut to size to suit custom size doors
- The frames are supplied knocked down for low-cost shipping and ease of installation
- Choose from a wide variety of carriage hardware sets with or without SofStop soft-close mechanism
- CarriSnap mounting suspension plate for the top of the door for mounting and releasing the upper trolley without tools
- SoftStop soft-close mechanisms come in single or twin action for doors weighing up to 176 lb (80 kg), and single action for doors weighing up to 264 lb (120 kg)
- Trim clips are included in the pocket frame sets for easy press-on mounting for door jamb trim
- Pivoting bottom guide to ease loading the door into the pocket frame during installation
- Large wheel trolleys with precision ground bearings for smooth running
 Matt Fajkus Architecture
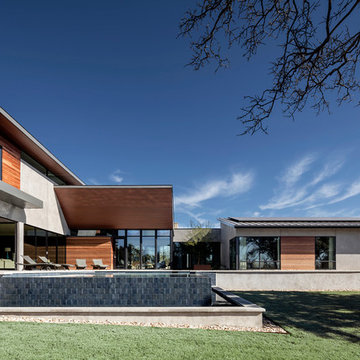
The Control/Shift House is perched on the high side of the site which takes advantage of the view to the southeast. A gradual descending path navigates the change in terrain from the street to the entry of the house. A series of low retaining walls/planter beds gather and release the earth upon the descent resulting in a fairly flat level for the house to sit on the top one third of the site. The entry axis is aligned with the celebrated stair volume and then re-centers on the actual entry axis once you approach the forecourt of the house.
The initial desire was for an “H” scheme house with common entertaining spaces bridging the gap between the more private spaces. After an investigation considering the site, program, and view, a key move was made: unfold the east wing of the “H” scheme to open all rooms to the southeast view resulting in a “T” scheme. The new derivation allows for both a swim pool which is on axis with the entry and main gathering space and a lap pool which occurs on the cross axis extending along the lengthy edge of the master suite, providing direct access for morning exercise and a view of the water throughout the day.
The Control/Shift House was derived from a clever way of following the “rules.” Strict HOA guidelines required very specific exterior massing restrictions which limits the lengths of unbroken elevations and promotes varying sizes of masses. The solution most often used in this neighborhood is one of addition - an aggregation of masses and program randomly attached to the inner core of the house which often results in a parasitic plan. The approach taken with the Control/Shift House was to push and pull program/massing to delineate and define the layout of the house. Massing is intentional and reiterated by the careful selection of materiality that tracks through the house. Voids and relief in the plan are a natural result of this method and allow for light and air to circulate throughout every space of the house, even into the most inner core.
Photography: Charles Davis Smith
 Light it Up AV & Turf
Project Description
Govee Permanent Outdoor Lights 2 Precision Home Installation
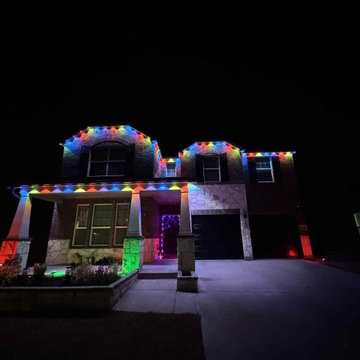
This project features the professional installation of the next-generation Govee Permanent Outdoor Lights 2 system. Known for their upgraded brightness and enhanced color rendering, these lights require a precise, calculated layout—especially since the manufacturer guidelines restrict cutting into the main line, presenting a unique installation challenge.
Key Features of This Installation:
Next-Gen Exterior Illumination: Outfitted with the newly released Govee Permanent Outdoor Lights 2, delivering brilliant architectural down-lighting, incredible holiday presets, and daily accent lighting.
Creative Technical Problem Solving: Because these specialized strands could not be cut without voiding the integrity of the system, we meticulously engineered the run layout. To achieve a perfectly flush finish at the roofline edge, we successfully executed a custom shortening and capping technique on the final strands.
Flawless Eave Integration: The lights were mounted at the optimal distance from the fascia to ensure a perfectly uniform, triangular cone wash down the home's exterior walls, eliminating hot spots and dark gaps.
Smart Ecosystem Control: Fully integrated into the homeowner's smart ecosystem, allowing for voice control, scheduled automation, and endless customization through the native app interface.
Our Specialized Lighting Expertise
Smart lighting systems require more than just hanging a strand—they require precision planning. We specialize in handling high-end retail and commercial systems, providing:
Advanced Layout Mapping: Ensuring your runs look symmetrical and perfectly tailored to your roofline before a single clip is mounted.
Out-of-the-Box Troubleshooting: Finding safe, manufacturer-approved technical workarounds for complex roof lines where standard plug-and-play methods fall short.
Clean Wire Management: Tucking and hiding all jump wires and power supplies for a seamless daytime appearance.
 Leanne Michael L U X E lifestyle design
This coastal kitchen was designed with modern simplicity in mind to compliment my clients Baja lifestyle. The goal was to make the kitchen space feel larger for their daily use and entertaining purposes. Therefore, we designed the refrigerator to be positioned in the corner of the L shape custom cabinetry plan. Doing so opened the space up for even better interior access into the fridge as the French doors can now open fully. Within the custom cabinet plan, we specifically added a pair of hidden storage garage cubbies on both sides of the refrigerator compartment which gives my clients the ability to capture additional would-be wasted space perfect for hiding items typically left on the counters such as their toaster, coffee maker, bottles of vitamins, etc..
The duel material island with waterfall edges has even more character by adding a solid alder wood counter surface that marries into the quartz utility area surface. The island also has tons of hidden storage space on the front side hidden behind touch release cabinet doors to store items not used as often. Hanging above the island are a pair of glazed clay planters found locally that were transformed into really interesting light pendants through the assistance of our sister company, iron | clay | wood, for all things custom!
Adding a bank of custom floating shelves in the same alder wood as the island also gave continuity and balance to the space perfect for displaying my clients collection of everyday dishes and stemware found in Rosarito.
 Light it Up AV & Turf
Project Description
Govee Permanent Outdoor Lights 2 Precision Home Installation
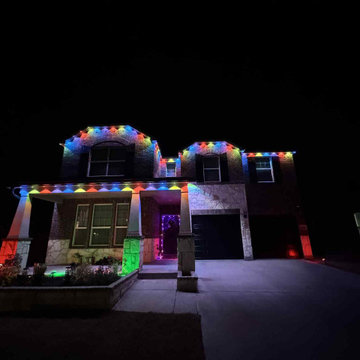
This project features the professional installation of the next-generation Govee Permanent Outdoor Lights 2 system. Known for their upgraded brightness and enhanced color rendering, these lights require a precise, calculated layout—especially since the manufacturer guidelines restrict cutting into the main line, presenting a unique installation challenge.
Key Features of This Installation:
Next-Gen Exterior Illumination: Outfitted with the newly released Govee Permanent Outdoor Lights 2, delivering brilliant architectural down-lighting, incredible holiday presets, and daily accent lighting.
Creative Technical Problem Solving: Because these specialized strands could not be cut without voiding the integrity of the system, we meticulously engineered the run layout. To achieve a perfectly flush finish at the roofline edge, we successfully executed a custom shortening and capping technique on the final strands.
Flawless Eave Integration: The lights were mounted at the optimal distance from the fascia to ensure a perfectly uniform, triangular cone wash down the home's exterior walls, eliminating hot spots and dark gaps.
Smart Ecosystem Control: Fully integrated into the homeowner's smart ecosystem, allowing for voice control, scheduled automation, and endless customization through the native app interface.
Our Specialized Lighting Expertise
Smart lighting systems require more than just hanging a strand—they require precision planning. We specialize in handling high-end retail and commercial systems, providing:
Advanced Layout Mapping: Ensuring your runs look symmetrical and perfectly tailored to your roofline before a single clip is mounted.
Out-of-the-Box Troubleshooting: Finding safe, manufacturer-approved technical workarounds for complex roof lines where standard plug-and-play methods fall short.
Clean Wire Management: Tucking and hiding all jump wires and power supplies for a seamless daytime appearance.
67