
Search results for "Relieved" in Home Design Ideas
 Horizon Interior Design
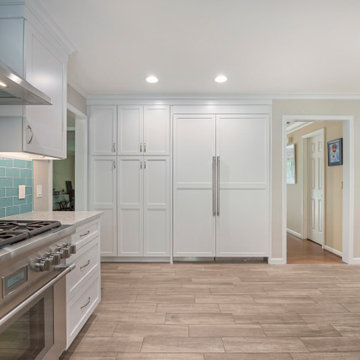
Rob and Danielle have three children and wanted a kitchen redesign that would function better for their active household. Their kitchen contained tight spaces with a narrow island that blocked flow through the room. Two cooks in the kitchen were one too many as the space wasn’t conducive for it. For entertaining, the island proved to be too small to set out all their food and have room around it for guests to congregate. The only way to walk to the great room, which was where the family hung out most often, was to go through the kitchen and dining area, proving to again congest the area. They are avid sailors, and wanted to bring in the color of the sea into their contemporary design.
I added a separate entry point directly from the kitchen to the great room, and created a work triangle in a separate area to relieve the congestion from people passing through the room. The island shape and size were uniquely designed to allow the person at the sink to be able to look directly into the great room, and provide ample space to spread out food for entertaining. A bookcase was integrated into the island to display cookbooks, and the paneled refrigerator made for a seamless wall of beautiful cabinetry. The entry into the formal dining was relocated to remove the necessity of having corner cabinetry. A separate bar area allows family and guests to make their drinks without needing to go into the chef’s space. The glass backsplash tile was selected to reflect the sea colors they love, with crystal pendants to add bling similar to the light that reflects off the water.
 Horizon Interior Design
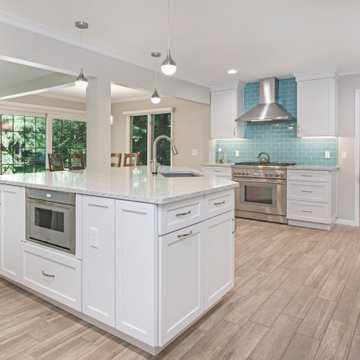
Rob and Danielle have three children and wanted a kitchen redesign that would function better for their active household. Their kitchen contained tight spaces with a narrow island that blocked flow through the room. Two cooks in the kitchen were one too many as the space wasn’t conducive for it. For entertaining, the island proved to be too small to set out all their food and have room around it for guests to congregate. The only way to walk to the great room, which was where the family hung out most often, was to go through the kitchen and dining area, proving to again congest the area. They are avid sailors, and wanted to bring in the color of the sea into their contemporary design.
I added a separate entry point directly from the kitchen to the great room, and created a work triangle in a separate area to relieve the congestion from people passing through the room. The island shape and size were uniquely designed to allow the person at the sink to be able to look directly into the great room, and provide ample space to spread out food for entertaining. A bookcase was integrated into the island to display cookbooks, and the paneled refrigerator made for a seamless wall of beautiful cabinetry. The entry into the formal dining was relocated to remove the necessity of having corner cabinetry. A separate bar area allows family and guests to make their drinks without needing to go into the chef’s space. The glass backsplash tile was selected to reflect the sea colors they love, with crystal pendants to add bling similar to the light that reflects off the water.

 Reflections Water Gardens
After two years of fighting with a failing pond liner, the resident decided to replace the liner in the pond. This 150’ x 115’pond sat above and flowed into a larger pond which was lined with PVC liner. We were replacing this with a 45 mil epdm fishsafe rubber liner. This presented a problem: there is no way to adhere the new rubber liner to the existing PVC liner in the lower pond. The solution was to pour a cement 18” wide x 2’ deep footing next to the wier damn between the two ponds in order to connect the two liners together. The old liner was placed on the top of the footing and a water-block sealant was used. The new rubber liner was placed on top and another layer of sealant along with stainless steel bars were laid atop the two materials in order to press them together to maintain a water-tight junction. A drain tile system was installed beneath the liner to relieve ground water pressure and vent off any gasses. Water tight seals also had to be provided for multiple plumbing penetrations through the liner. Non-woven geotextile planting media bags were used to prevent erosion around the perimeter of the pond. As the pond was landscaped with lawn and perennials, these had to be removed and preserved and maintained throughout the project in order to return them upon completion of the lining. All trenching work and removal of plant material was done by hand in order to maintain the surrounding landscape; great care was taken throughout the project in order to protect existing hard and softscape, so that upon completion, the area appeared almost exactly as it had been before work began.
Photo by Larry Carnes
Find the right local pro for your project
 Reflections Water Gardens
After two years of fighting with a failing pond liner, the resident decided to replace the liner in the pond. This 150’ x 115’pond sat above and flowed into a larger pond which was lined with PVC liner. We were replacing this with a 45 mil epdm fishsafe rubber liner. This presented a problem: there is no way to adhere the new rubber liner to the existing PVC liner in the lower pond. The solution was to pour a cement 18” wide x 2’ deep footing next to the wier damn between the two ponds in order to connect the two liners together. The old liner was placed on the top of the footing and a water-block sealant was used. The new rubber liner was placed on top and another layer of sealant along with stainless steel bars were laid atop the two materials in order to press them together to maintain a water-tight junction. A drain tile system was installed beneath the liner to relieve ground water pressure and vent off any gasses. Water tight seals also had to be provided for multiple plumbing penetrations through the liner. Non-woven geotextile planting media bags were used to prevent erosion around the perimeter of the pond. As the pond was landscaped with lawn and perennials, these had to be removed and preserved and maintained throughout the project in order to return them upon completion of the lining. All trenching work and removal of plant material was done by hand in order to maintain the surrounding landscape; great care was taken throughout the project in order to protect existing hard and softscape, so that upon completion, the area appeared almost exactly as it had been before work began.
Photo by Larry Carnes

 Sunset Western Garden Collection
Tropical Gardenia fragrance on a cold hardy, easy care plant. Jubilation flowers from spring through fall with masses of white blooms. Plant near patios, porches, decks, and other outdoor living areas where the fragrance can be enjoyed.
Features
Feature/Bloom White flowers in spring, reblooming summer to fall
Evergreen or Deciduous evergreen
USDA Zones Hardy to 0°F USDA 7, 8, 9, 10, 11
Sunset Zones 7-9, 12-16, 18-24
Special Features Fall blooming, reblooming, dwarf, attracts birds/butterflies, aromatic
Landscape Use Accent, container, mass planting, slope, hedge
Exposure Full sun to part shade
Bloom Season Spring, summer, fall
Dimension 3-4 ft H x 3-4 ft W
Growth Rate Moderate to fast
Plant Type evergreen
About the Collection
Brought to you by the authority on Western gardening, the Sunset Western Garden Collection is an exclusive plant collection of top performing plants for the Western Gardener.
 Reflections Water Gardens
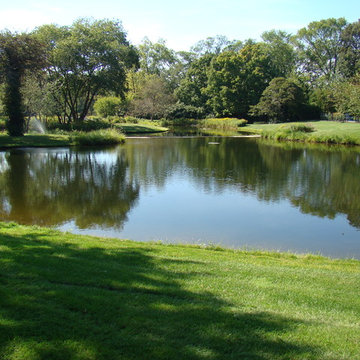
After two years of fighting with a failing pond liner, the resident decided to replace the liner in the pond. This 150’ x 115’pond sat above and flowed into a larger pond which was lined with PVC liner. We were replacing this with a 45 mil epdm fishsafe rubber liner. This presented a problem: there is no way to adhere the new rubber liner to the existing PVC liner in the lower pond. The solution was to pour a cement 18” wide x 2’ deep footing next to the wier damn between the two ponds in order to connect the two liners together. The old liner was placed on the top of the footing and a water-block sealant was used. The new rubber liner was placed on top and another layer of sealant along with stainless steel bars were laid atop the two materials in order to press them together to maintain a water-tight junction. A drain tile system was installed beneath the liner to relieve ground water pressure and vent off any gasses. Water tight seals also had to be provided for multiple plumbing penetrations through the liner. Non-woven geotextile planting media bags were used to prevent erosion around the perimeter of the pond. As the pond was landscaped with lawn and perennials, these had to be removed and preserved and maintained throughout the project in order to return them upon completion of the lining. All trenching work and removal of plant material was done by hand in order to maintain the surrounding landscape; great care was taken throughout the project in order to protect existing hard and softscape, so that upon completion, the area appeared almost exactly as it had been before work began.
Photo by Larry Carnes
 Reflections Water Gardens
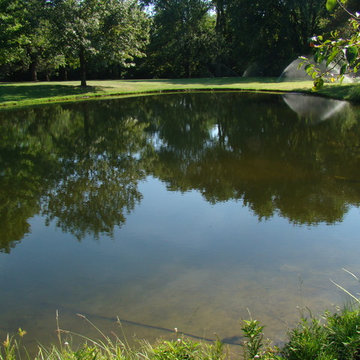
After two years of fighting with a failing pond liner, the resident decided to replace the liner in the pond. This 150’ x 115’pond sat above and flowed into a larger pond which was lined with PVC liner. We were replacing this with a 45 mil epdm fishsafe rubber liner. This presented a problem: there is no way to adhere the new rubber liner to the existing PVC liner in the lower pond. The solution was to pour a cement 18” wide x 2’ deep footing next to the wier damn between the two ponds in order to connect the two liners together. The old liner was placed on the top of the footing and a water-block sealant was used. The new rubber liner was placed on top and another layer of sealant along with stainless steel bars were laid atop the two materials in order to press them together to maintain a water-tight junction. A drain tile system was installed beneath the liner to relieve ground water pressure and vent off any gasses. Water tight seals also had to be provided for multiple plumbing penetrations through the liner. Non-woven geotextile planting media bags were used to prevent erosion around the perimeter of the pond. As the pond was landscaped with lawn and perennials, these had to be removed and preserved and maintained throughout the project in order to return them upon completion of the lining. All trenching work and removal of plant material was done by hand in order to maintain the surrounding landscape; great care was taken throughout the project in order to protect existing hard and softscape, so that upon completion, the area appeared almost exactly as it had been before work began.
Photo by Larry Carnes
 Katie Hutchison Studio
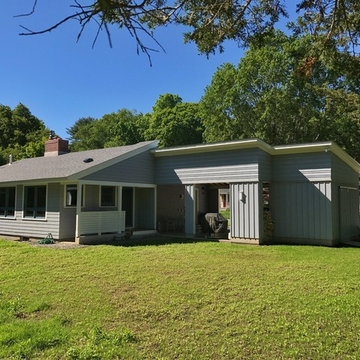
Constructed in two phases, this renovation, with a few small additions, touched nearly every room in this late ‘50’s ranch house. The owners raised their family within the original walls and love the house’s location, which is not far from town and also borders conservation land. But they didn’t love how chopped up the house was and the lack of exposure to natural daylight and views of the lush rear woods. Plus, they were ready to de-clutter for a more stream-lined look. As a result, KHS collaborated with them to create a quiet, clean design to support the lifestyle they aspire to in retirement.
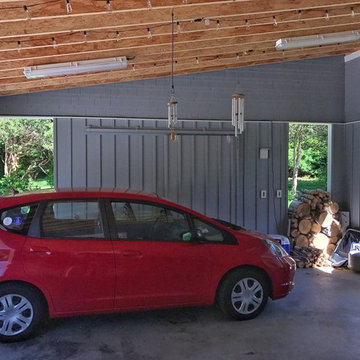
To transform the original ranch house, KHS proposed several significant changes that would make way for a number of related improvements. Proposed changes included the removal of the attached enclosed breezeway (which had included a stair to the basement living space) and the two-car garage it partially wrapped, which had blocked vital eastern daylight from accessing the interior. Together the breezeway and garage had also contributed to a long, flush front façade. In its stead, KHS proposed a new two-car carport, attached storage shed, and exterior basement stair in a new location. The carport is bumped closer to the street to relieve the flush front facade and to allow access behind it to eastern daylight in a relocated rear kitchen. KHS also proposed a new, single, more prominent front entry, closer to the driveway to replace the former secondary entrance into the dark breezeway and a more formal main entrance that had been located much farther down the facade and curiously bordered the bedroom wing.
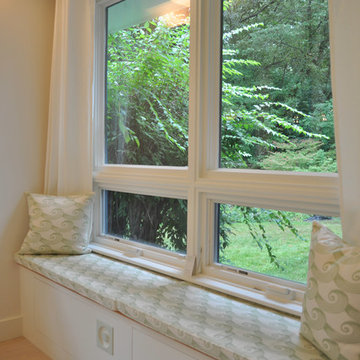
Inside, low ceilings and soffits in the primary family common areas were removed to create a cathedral ceiling (with rod ties) over a reconfigured semi-open living, dining, and kitchen space. A new gas fireplace serving the relocated dining area -- defined by a new built-in banquette in a new bay window -- was designed to back up on the existing wood-burning fireplace that continues to serve the living area. A shared full bath, serving two guest bedrooms on the main level, was reconfigured, and additional square footage was captured for a reconfigured master bathroom off the existing master bedroom. A new whole-house color palette, including new finishes and new cabinetry, complete the transformation. Today, the owners enjoy a fresh and airy re-imagining of their familiar ranch house.
Photos by Katie Hutchison
 Horizon Interior Design
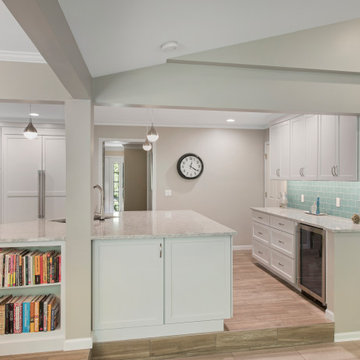
Rob and Danielle have three children and wanted a kitchen redesign that would function better for their active household. Their kitchen contained tight spaces with a narrow island that blocked flow through the room. Two cooks in the kitchen were one too many as the space wasn’t conducive for it. For entertaining, the island proved to be too small to set out all their food and have room around it for guests to congregate. The only way to walk to the great room, which was where the family hung out most often, was to go through the kitchen and dining area, proving to again congest the area. They are avid sailors, and wanted to bring in the color of the sea into their contemporary design.
I added a separate entry point directly from the kitchen to the great room, and created a work triangle in a separate area to relieve the congestion from people passing through the room. The island shape and size were uniquely designed to allow the person at the sink to be able to look directly into the great room, and provide ample space to spread out food for entertaining. A bookcase was integrated into the island to display cookbooks, and the paneled refrigerator made for a seamless wall of beautiful cabinetry. The entry into the formal dining was relocated to remove the necessity of having corner cabinetry. A separate bar area allows family and guests to make their drinks without needing to go into the chef’s space. The glass backsplash tile was selected to reflect the sea colors they love, with crystal pendants to add bling similar to the light that reflects off the water.
 Horizon Interior Design
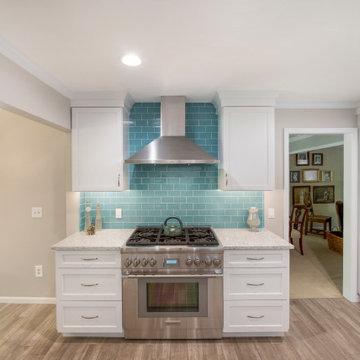
Rob and Danielle have three children and wanted a kitchen redesign that would function better for their active household. Their kitchen contained tight spaces with a narrow island that blocked flow through the room. Two cooks in the kitchen were one too many as the space wasn’t conducive for it. For entertaining, the island proved to be too small to set out all their food and have room around it for guests to congregate. The only way to walk to the great room, which was where the family hung out most often, was to go through the kitchen and dining area, proving to again congest the area. They are avid sailors, and wanted to bring in the color of the sea into their contemporary design.
I added a separate entry point directly from the kitchen to the great room, and created a work triangle in a separate area to relieve the congestion from people passing through the room. The island shape and size were uniquely designed to allow the person at the sink to be able to look directly into the great room, and provide ample space to spread out food for entertaining. A bookcase was integrated into the island to display cookbooks, and the paneled refrigerator made for a seamless wall of beautiful cabinetry. The entry into the formal dining was relocated to remove the necessity of having corner cabinetry. A separate bar area allows family and guests to make their drinks without needing to go into the chef’s space. The glass backsplash tile was selected to reflect the sea colors they love, with crystal pendants to add bling similar to the light that reflects off the water.
 Reflections Water Gardens
After two years of fighting with a failing pond liner, the resident decided to replace the liner in the pond. This 150’ x 115’pond sat above and flowed into a larger pond which was lined with PVC liner. We were replacing this with a 45 mil epdm fishsafe rubber liner. This presented a problem: there is no way to adhere the new rubber liner to the existing PVC liner in the lower pond. The solution was to pour a cement 18” wide x 2’ deep footing next to the wier damn between the two ponds in order to connect the two liners together. The old liner was placed on the top of the footing and a water-block sealant was used. The new rubber liner was placed on top and another layer of sealant along with stainless steel bars were laid atop the two materials in order to press them together to maintain a water-tight junction. A drain tile system was installed beneath the liner to relieve ground water pressure and vent off any gasses. Water tight seals also had to be provided for multiple plumbing penetrations through the liner. Non-woven geotextile planting media bags were used to prevent erosion around the perimeter of the pond. As the pond was landscaped with lawn and perennials, these had to be removed and preserved and maintained throughout the project in order to return them upon completion of the lining. All trenching work and removal of plant material was done by hand in order to maintain the surrounding landscape; great care was taken throughout the project in order to protect existing hard and softscape, so that upon completion, the area appeared almost exactly as it had been before work began.
Photo by Larry Carnes
 Horizon Interior Design
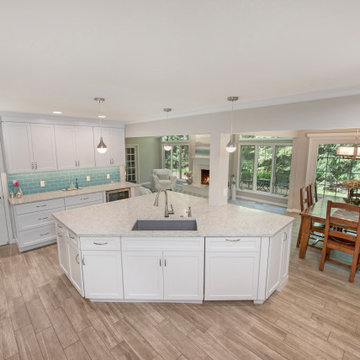
Rob and Danielle have three children and wanted a kitchen redesign that would function better for their active household. Their kitchen contained tight spaces with a narrow island that blocked flow through the room. Two cooks in the kitchen were one too many as the space wasn’t conducive for it. For entertaining, the island proved to be too small to set out all their food and have room around it for guests to congregate. The only way to walk to the great room, which was where the family hung out most often, was to go through the kitchen and dining area, proving to again congest the area. They are avid sailors, and wanted to bring in the color of the sea into their contemporary design.
I added a separate entry point directly from the kitchen to the great room, and created a work triangle in a separate area to relieve the congestion from people passing through the room. The island shape and size were uniquely designed to allow the person at the sink to be able to look directly into the great room, and provide ample space to spread out food for entertaining. A bookcase was integrated into the island to display cookbooks, and the paneled refrigerator made for a seamless wall of beautiful cabinetry. The entry into the formal dining was relocated to remove the necessity of having corner cabinetry. A separate bar area allows family and guests to make their drinks without needing to go into the chef’s space. The glass backsplash tile was selected to reflect the sea colors they love, with crystal pendants to add bling similar to the light that reflects off the water.
 Horizon Interior Design
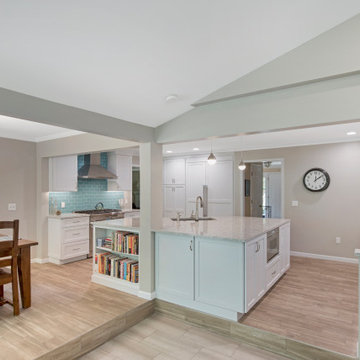
Rob and Danielle have three children and wanted a kitchen redesign that would function better for their active household. Their kitchen contained tight spaces with a narrow island that blocked flow through the room. Two cooks in the kitchen were one too many as the space wasn’t conducive for it. For entertaining, the island proved to be too small to set out all their food and have room around it for guests to congregate. The only way to walk to the great room, which was where the family hung out most often, was to go through the kitchen and dining area, proving to again congest the area. They are avid sailors, and wanted to bring in the color of the sea into their contemporary design.
I added a separate entry point directly from the kitchen to the great room, and created a work triangle in a separate area to relieve the congestion from people passing through the room. The island shape and size were uniquely designed to allow the person at the sink to be able to look directly into the great room, and provide ample space to spread out food for entertaining. A bookcase was integrated into the island to display cookbooks, and the paneled refrigerator made for a seamless wall of beautiful cabinetry. The entry into the formal dining was relocated to remove the necessity of having corner cabinetry. A separate bar area allows family and guests to make their drinks without needing to go into the chef’s space. The glass backsplash tile was selected to reflect the sea colors they love, with crystal pendants to add bling similar to the light that reflects off the water.
 Horizon Interior Design
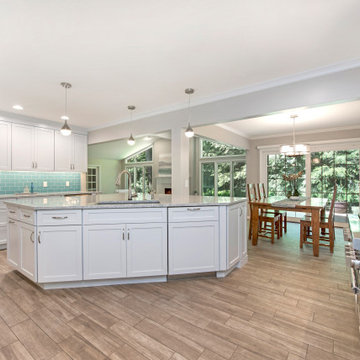
Rob and Danielle have three children and wanted a kitchen redesign that would function better for their active household. Their kitchen contained tight spaces with a narrow island that blocked flow through the room. Two cooks in the kitchen were one too many as the space wasn’t conducive for it. For entertaining, the island proved to be too small to set out all their food and have room around it for guests to congregate. The only way to walk to the great room, which was where the family hung out most often, was to go through the kitchen and dining area, proving to again congest the area. They are avid sailors, and wanted to bring in the color of the sea into their contemporary design.
I added a separate entry point directly from the kitchen to the great room, and created a work triangle in a separate area to relieve the congestion from people passing through the room. The island shape and size were uniquely designed to allow the person at the sink to be able to look directly into the great room, and provide ample space to spread out food for entertaining. A bookcase was integrated into the island to display cookbooks, and the paneled refrigerator made for a seamless wall of beautiful cabinetry. The entry into the formal dining was relocated to remove the necessity of having corner cabinetry. A separate bar area allows family and guests to make their drinks without needing to go into the chef’s space. The glass backsplash tile was selected to reflect the sea colors they love, with crystal pendants to add bling similar to the light that reflects off the water.
 Reflections Water Gardens
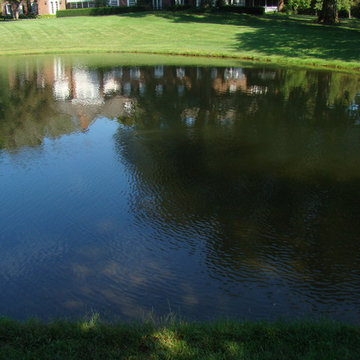
After two years of fighting with a failing pond liner, the resident decided to replace the liner in the pond. This 150’ x 115’pond sat above and flowed into a larger pond which was lined with PVC liner. We were replacing this with a 45 mil epdm fishsafe rubber liner. This presented a problem: there is no way to adhere the new rubber liner to the existing PVC liner in the lower pond. The solution was to pour a cement 18” wide x 2’ deep footing next to the wier damn between the two ponds in order to connect the two liners together. The old liner was placed on the top of the footing and a water-block sealant was used. The new rubber liner was placed on top and another layer of sealant along with stainless steel bars were laid atop the two materials in order to press them together to maintain a water-tight junction. A drain tile system was installed beneath the liner to relieve ground water pressure and vent off any gasses. Water tight seals also had to be provided for multiple plumbing penetrations through the liner. Non-woven geotextile planting media bags were used to prevent erosion around the perimeter of the pond. As the pond was landscaped with lawn and perennials, these had to be removed and preserved and maintained throughout the project in order to return them upon completion of the lining. All trenching work and removal of plant material was done by hand in order to maintain the surrounding landscape; great care was taken throughout the project in order to protect existing hard and softscape, so that upon completion, the area appeared almost exactly as it had been before work began.
Photo by Larry Carnes
 Tile Doctor Ltd
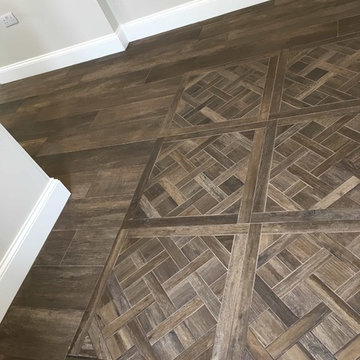
Grout haze or grout smears as it is often called can be a huge problem when laying tiles. Grout haze is basically grout that has been left to dry on the surface of the tile after installation. It’s a common problem which is exacerbated by the use of quick drying products. Take for example this interesting Wood Effect Ceramic Tile installation at a house in Guildford following installation by a builder.
I was a bit slow in following up on the initial enquiry as we had been very busy so by the time, I got in touch I was told they had employed someone else to carry out the work. I apologised for my late response and said to call me if he needed help in the future. Three days later I got a call so we arranged a visit so that I could carry out a test and quote a price.
As it turns out the builder had returned and failed to remove the grout haze and so had a rival firm that seemed more interested in selling unnecessary sealer than fixing the problem. I was astonished to see what a state the builder had left his floor. Grout was all over the floor with footprints walked across thresholds and more. I could understand it if there was some grout was missed after installation but not to this level!
I carried out a successful test and confirmed to the customer that there was absolutely no need to rip and replace his £2k floor. We agreed a date to resolve the problem and to say he was relieved was an understatement!
The builders had used Mapei grout which contains polymers. Polymers offer better flexibility and adhesion, however in order to remove the grout haze we would first need to break down the polymers in the grout first and this is why the rival firm failed.
With that in mind, my first action was to apply Tile Doctor Remove and Go to the floor and leave it to dwell for five to ten minutes. I then worked it into the tile using a scrubbing pad fitted to a rotary machine.
After washing the soil away with warm water and extracting with a wet vacuum I applied Tile Doctor Grout Clean-up to treat the grout. Grout Clean-up is an acid-based product that breaks down the grout so it can be rinsed away and extracted as before. Afterwards I rinsed the floor with warm water and extracted again to remove any trace of product and neutralise the floor. After removing as much moisture as possible with the wet vacuum I speed dried the tiles with a blower.
Ceramic tiles won’t accept a sealer so once the floor had dried the job was finished and it took less than a day.
The customer was over the moon with the difference. While his floor was in such a state, he has been unable to bring in new furniture as the serious possibility of removing the tiles was hanging over him.
Relieved that the problem was now resolved he kindly left the following review:
“I had a floor that had just been laid with very heavy grout haze. I had already had advice from two other professional floor cleaners who had advised me that the floor was irreparable and would need to be pulled up. As soon as I spoke with Rupert, it was clear he was extremely knowledgeable. He asked questions none of the other companies had. By understanding the specific nature of the problem, he was able to solve it by first removing the grout polymers and then applying an acid wash. The floor came up brilliantly. Rupert was the only person I spoke to that could fix this, everyone else told me I needed to replace my floor! Superbly knowledgeable, professional and did an excellent job. Don’t bother speaking to anyone else, just call Rupert! “
Rupert Mcleod
West Surrey Tile Doctor
 Katie Hutchison Studio
Constructed in two phases, this renovation, with a few small additions, touched nearly every room in this late ‘50’s ranch house. The owners raised their family within the original walls and love the house’s location, which is not far from town and also borders conservation land. But they didn’t love how chopped up the house was and the lack of exposure to natural daylight and views of the lush rear woods. Plus, they were ready to de-clutter for a more stream-lined look. As a result, KHS collaborated with them to create a quiet, clean design to support the lifestyle they aspire to in retirement.
To transform the original ranch house, KHS proposed several significant changes that would make way for a number of related improvements. Proposed changes included the removal of the attached enclosed breezeway (which had included a stair to the basement living space) and the two-car garage it partially wrapped, which had blocked vital eastern daylight from accessing the interior. Together the breezeway and garage had also contributed to a long, flush front façade. In its stead, KHS proposed a new two-car carport, attached storage shed, and exterior basement stair in a new location. The carport is bumped closer to the street to relieve the flush front facade and to allow access behind it to eastern daylight in a relocated rear kitchen. KHS also proposed a new, single, more prominent front entry, closer to the driveway to replace the former secondary entrance into the dark breezeway and a more formal main entrance that had been located much farther down the facade and curiously bordered the bedroom wing.
Inside, low ceilings and soffits in the primary family common areas were removed to create a cathedral ceiling (with rod ties) over a reconfigured semi-open living, dining, and kitchen space. A new gas fireplace serving the relocated dining area -- defined by a new built-in banquette in a new bay window -- was designed to back up on the existing wood-burning fireplace that continues to serve the living area. A shared full bath, serving two guest bedrooms on the main level, was reconfigured, and additional square footage was captured for a reconfigured master bathroom off the existing master bedroom. A new whole-house color palette, including new finishes and new cabinetry, complete the transformation. Today, the owners enjoy a fresh and airy re-imagining of their familiar ranch house.
Photos by Katie Hutchison
 Bontina
DeWils Custom Cabinetry Line
Photo Credits: Mark E Owen
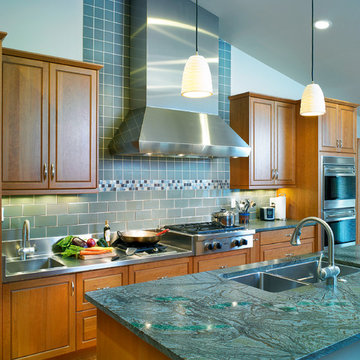
Inspiration for a transitional kitchen remodel in Albuquerque with an undermount sink, raised-panel cabinets, medium tone wood cabinets, soapstone countertops, blue backsplash, ceramic backsplash and stainless steel appliances
Inspiration for a transitional kitchen remodel in Albuquerque with an undermount sink, raised-panel cabinets, medium tone wood cabinets, soapstone countertops, blue backsplash, ceramic backsplash and stainless steel appliances
 Katie Hutchison Studio
Constructed in two phases, this renovation, with a few small additions, touched nearly every room in this late ‘50’s ranch house. The owners raised their family within the original walls and love the house’s location, which is not far from town and also borders conservation land. But they didn’t love how chopped up the house was and the lack of exposure to natural daylight and views of the lush rear woods. Plus, they were ready to de-clutter for a more stream-lined look. As a result, KHS collaborated with them to create a quiet, clean design to support the lifestyle they aspire to in retirement.
To transform the original ranch house, KHS proposed several significant changes that would make way for a number of related improvements. Proposed changes included the removal of the attached enclosed breezeway (which had included a stair to the basement living space) and the two-car garage it partially wrapped, which had blocked vital eastern daylight from accessing the interior. Together the breezeway and garage had also contributed to a long, flush front façade. In its stead, KHS proposed a new two-car carport, attached storage shed, and exterior basement stair in a new location. The carport is bumped closer to the street to relieve the flush front facade and to allow access behind it to eastern daylight in a relocated rear kitchen. KHS also proposed a new, single, more prominent front entry, closer to the driveway to replace the former secondary entrance into the dark breezeway and a more formal main entrance that had been located much farther down the facade and curiously bordered the bedroom wing.
Inside, low ceilings and soffits in the primary family common areas were removed to create a cathedral ceiling (with rod ties) over a reconfigured semi-open living, dining, and kitchen space. A new gas fireplace serving the relocated dining area -- defined by a new built-in banquette in a new bay window -- was designed to back up on the existing wood-burning fireplace that continues to serve the living area. A shared full bath, serving two guest bedrooms on the main level, was reconfigured, and additional square footage was captured for a reconfigured master bathroom off the existing master bedroom. A new whole-house color palette, including new finishes and new cabinetry, complete the transformation. Today, the owners enjoy a fresh and airy re-imagining of their familiar ranch house.
Photos by Katie Hutchison
 User
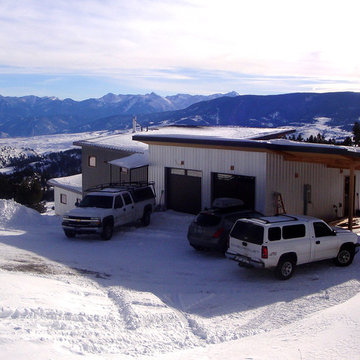
UserView from the Northwest. This home is built with high performance walls and roofs, resulting in a very well insulated and tightly sealed home. We implemented a combined heating approach of passive solar and radiant hydronic floor heating, which we call “Sun Smart Radiant Heating.” This system sensibly captures the sun’s energy on sunny days and has two added benefits. The radiant system distributes the sun’s heat uniformly throughout the home and also produces heat during long stretches of cloudy days or extreme cold. This dual heating method is not only incredibly energy efficient, it relieves any worries homeowners may have about living in a home that is heated with passive solar alone.
During the warmer months, the Quinn Creek Home is designed to benefit from passive cooling, a free home air-conditioning strategy. Also, carefully designed roof overhangs and awnings prevent unwanted solar heat gain in the summer.
The windows used for both passive solar heating and passive cooling, provide beautiful views and connect the inhabits to the ephemeral qualities of the outdoors. The experience of living in a passive solar home changes from day to day, season to season. The windows also provide ample natural day lighting, even on cloudy days, which significantly reduces electric lighting costs and reduces the occurrence of falls and depression within the home.
The surrounding mountain and hillside slopes of the Quinn Creek Home were carefully analyzed and integrated into the design and roof pitches. Even though this photo is in color, winter light conditions often create a black-and-white-like effect. The darker and lighter colored metal siding and roofing colors were purposefully chosen to help the home blend with the environment during the changing seasons.
Greenovision Home Design
23