
Search results for "Removable" in Home Design Ideas
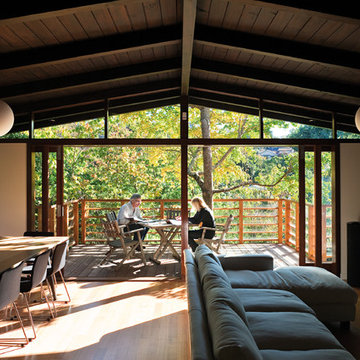


 User
UserAndrea Pietrangeli http://andrea.media/
Example of a small beach style galley light wood floor and beige floor kitchen pantry design in Providence with a single-bowl sink, recessed-panel cabinets, white cabinets, granite countertops, white backsplash, ceramic backsplash, stainless steel appliances, no island and white countertops
Example of a small beach style galley light wood floor and beige floor kitchen pantry design in Providence with a single-bowl sink, recessed-panel cabinets, white cabinets, granite countertops, white backsplash, ceramic backsplash, stainless steel appliances, no island and white countertops

 Crisp Architects
Rob Karosis
Mid-sized farmhouse screened-in back porch photo in New York with a roof extension
Mid-sized farmhouse screened-in back porch photo in New York with a roof extension
Find the right local pro for your project

 Urbafloria
This backyard used to be just plain, boring grass. Now it's a beautiful, low water garden with a space for night time entertaining around an eco-friendly fire pit. The fire pit runs on bio-ethanol which is very clean burning. Plants attract butterflies and hummingbirds. This photo is just a couple of months after planting, all from 1 gallon size plants or smaller. Photo by Jacky Surber.
 Headings Brothers, Inc
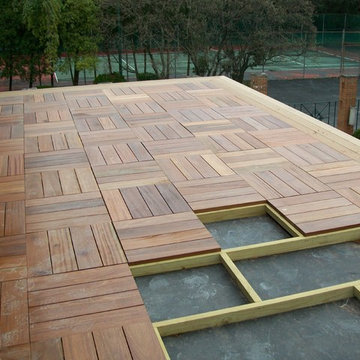
This deck was build above a rubber roof. The framing is only attached to the house so not to put any holes in the roof. Therefore we call it a floating deck. The deck floor panels are removable.
 Ben Herzog
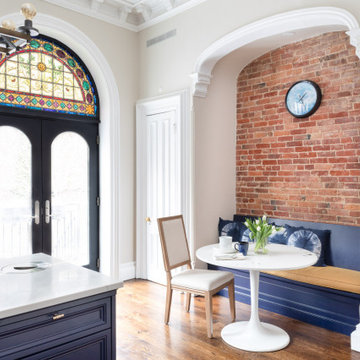
Example of a large transitional l-shaped dark wood floor and brown floor kitchen design with an undermount sink, recessed-panel cabinets, blue cabinets, quartzite countertops, multicolored backsplash, mosaic tile backsplash, paneled appliances, an island and white countertops
 Alair Homes Plano
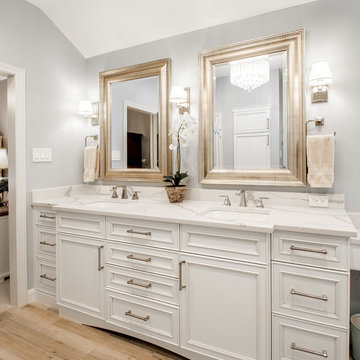
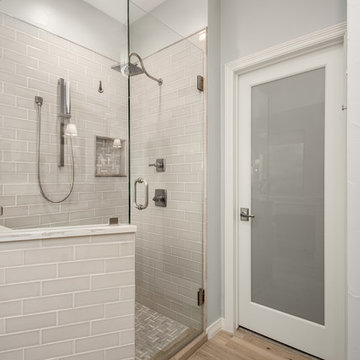
Our clients called us wanting to not only update their master bathroom but to specifically make it more functional. She had just had knee surgery, so taking a shower wasn’t easy. They wanted to remove the tub and enlarge the shower, as much as possible, and add a bench. She really wanted a seated makeup vanity area, too. They wanted to replace all vanity cabinets making them one height, and possibly add tower storage. With the current layout, they felt that there were too many doors, so we discussed possibly using a barn door to the bedroom.
We removed the large oval bathtub and expanded the shower, with an added bench. She got her seated makeup vanity and it’s placed between the shower and the window, right where she wanted it by the natural light. A tilting oval mirror sits above the makeup vanity flanked with Pottery Barn “Hayden” brushed nickel vanity lights. A lit swing arm makeup mirror was installed, making for a perfect makeup vanity! New taller Shiloh “Eclipse” bathroom cabinets painted in Polar with Slate highlights were installed (all at one height), with Kohler “Caxton” square double sinks. Two large beautiful mirrors are hung above each sink, again, flanked with Pottery Barn “Hayden” brushed nickel vanity lights on either side. Beautiful Quartzmasters Polished Calacutta Borghini countertops were installed on both vanities, as well as the shower bench top and shower wall cap.
Carrara Valentino basketweave mosaic marble tiles was installed on the shower floor and the back of the niches, while Heirloom Clay 3x9 tile was installed on the shower walls. A Delta Shower System was installed with both a hand held shower and a rainshower. The linen closet that used to have a standard door opening into the middle of the bathroom is now storage cabinets, with the classic Restoration Hardware “Campaign” pulls on the drawers and doors. A beautiful Birch forest gray 6”x 36” floor tile, laid in a random offset pattern was installed for an updated look on the floor. New glass paneled doors were installed to the closet and the water closet, matching the barn door. A gorgeous Shades of Light 20” “Pyramid Crystals” chandelier was hung in the center of the bathroom to top it all off!
The bedroom was painted a soothing Magnetic Gray and a classic updated Capital Lighting “Harlow” Chandelier was hung for an updated look.
We were able to meet all of our clients needs by removing the tub, enlarging the shower, installing the seated makeup vanity, by the natural light, right were she wanted it and by installing a beautiful barn door between the bathroom from the bedroom! Not only is it beautiful, but it’s more functional for them now and they love it!
Design/Remodel by Hatfield Builders & Remodelers | Photography by Versatile Imaging


 Alair Homes Plano
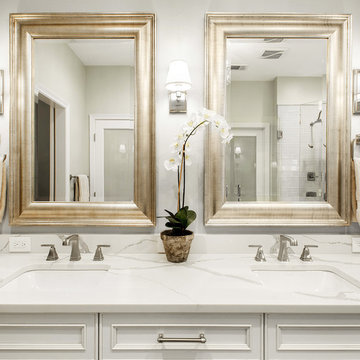
Our clients called us wanting to not only update their master bathroom but to specifically make it more functional. She had just had knee surgery, so taking a shower wasn’t easy. They wanted to remove the tub and enlarge the shower, as much as possible, and add a bench. She really wanted a seated makeup vanity area, too. They wanted to replace all vanity cabinets making them one height, and possibly add tower storage. With the current layout, they felt that there were too many doors, so we discussed possibly using a barn door to the bedroom.
We removed the large oval bathtub and expanded the shower, with an added bench. She got her seated makeup vanity and it’s placed between the shower and the window, right where she wanted it by the natural light. A tilting oval mirror sits above the makeup vanity flanked with Pottery Barn “Hayden” brushed nickel vanity lights. A lit swing arm makeup mirror was installed, making for a perfect makeup vanity! New taller Shiloh “Eclipse” bathroom cabinets painted in Polar with Slate highlights were installed (all at one height), with Kohler “Caxton” square double sinks. Two large beautiful mirrors are hung above each sink, again, flanked with Pottery Barn “Hayden” brushed nickel vanity lights on either side. Beautiful Quartzmasters Polished Calacutta Borghini countertops were installed on both vanities, as well as the shower bench top and shower wall cap.
Carrara Valentino basketweave mosaic marble tiles was installed on the shower floor and the back of the niches, while Heirloom Clay 3x9 tile was installed on the shower walls. A Delta Shower System was installed with both a hand held shower and a rainshower. The linen closet that used to have a standard door opening into the middle of the bathroom is now storage cabinets, with the classic Restoration Hardware “Campaign” pulls on the drawers and doors. A beautiful Birch forest gray 6”x 36” floor tile, laid in a random offset pattern was installed for an updated look on the floor. New glass paneled doors were installed to the closet and the water closet, matching the barn door. A gorgeous Shades of Light 20” “Pyramid Crystals” chandelier was hung in the center of the bathroom to top it all off!
The bedroom was painted a soothing Magnetic Gray and a classic updated Capital Lighting “Harlow” Chandelier was hung for an updated look.
We were able to meet all of our clients needs by removing the tub, enlarging the shower, installing the seated makeup vanity, by the natural light, right were she wanted it and by installing a beautiful barn door between the bathroom from the bedroom! Not only is it beautiful, but it’s more functional for them now and they love it!
Design/Remodel by Hatfield Builders & Remodelers | Photography by Versatile Imaging
 Alair Homes Plano
Our clients called us wanting to not only update their master bathroom but to specifically make it more functional. She had just had knee surgery, so taking a shower wasn’t easy. They wanted to remove the tub and enlarge the shower, as much as possible, and add a bench. She really wanted a seated makeup vanity area, too. They wanted to replace all vanity cabinets making them one height, and possibly add tower storage. With the current layout, they felt that there were too many doors, so we discussed possibly using a barn door to the bedroom.
We removed the large oval bathtub and expanded the shower, with an added bench. She got her seated makeup vanity and it’s placed between the shower and the window, right where she wanted it by the natural light. A tilting oval mirror sits above the makeup vanity flanked with Pottery Barn “Hayden” brushed nickel vanity lights. A lit swing arm makeup mirror was installed, making for a perfect makeup vanity! New taller Shiloh “Eclipse” bathroom cabinets painted in Polar with Slate highlights were installed (all at one height), with Kohler “Caxton” square double sinks. Two large beautiful mirrors are hung above each sink, again, flanked with Pottery Barn “Hayden” brushed nickel vanity lights on either side. Beautiful Quartzmasters Polished Calacutta Borghini countertops were installed on both vanities, as well as the shower bench top and shower wall cap.
Carrara Valentino basketweave mosaic marble tiles was installed on the shower floor and the back of the niches, while Heirloom Clay 3x9 tile was installed on the shower walls. A Delta Shower System was installed with both a hand held shower and a rainshower. The linen closet that used to have a standard door opening into the middle of the bathroom is now storage cabinets, with the classic Restoration Hardware “Campaign” pulls on the drawers and doors. A beautiful Birch forest gray 6”x 36” floor tile, laid in a random offset pattern was installed for an updated look on the floor. New glass paneled doors were installed to the closet and the water closet, matching the barn door. A gorgeous Shades of Light 20” “Pyramid Crystals” chandelier was hung in the center of the bathroom to top it all off!
The bedroom was painted a soothing Magnetic Gray and a classic updated Capital Lighting “Harlow” Chandelier was hung for an updated look.
We were able to meet all of our clients needs by removing the tub, enlarging the shower, installing the seated makeup vanity, by the natural light, right were she wanted it and by installing a beautiful barn door between the bathroom from the bedroom! Not only is it beautiful, but it’s more functional for them now and they love it!
Design/Remodel by Hatfield Builders & Remodelers | Photography by Versatile Imaging

 The Container Store Custom Closets
This gorgeous walk-in master in Pure White is the perfect backdrop for displaying your wardrobe. You'll feel like you in a high-end boutique every time you walk in!

 Preservation Tree Services
Recently, Certified Arborist and Urban Forester, Micah Pace, was called upon to assess and remove three trees that a home was built around 35 years ago. The family fell in love with this McKinney, Texas property because of the large cedar elms that filled the neighborhood. Instead of removing the trees to make room for the home, the family hired an architect to build the home around the trees (THAT's dedication!). They knew they’d eventually have to remove the trees due to construction and environmental damage, but they just couldn’t bear to part with them at the time of the home build.
First, we began with the removal of the large cedar elm in the center of the home. The tree’s canopy was sectioned out making the pre-selected picks accounting for weight and balance. The material was then lifted and placed in the street next to the chipper where crew members were ready to cut and chip the small diameter material. Large diameter branch and trunk material were lifted and placed onto a trailer stationed directly by the crane. This process was then continued for each of the three remaining trees.

 All Surface Restoration
Deck Stripper quickly removes deteriorated semi-transparent oil-based stains and sealers. Deck Stripper will also remove damaged and discolored wood fiber from all exterior wood surfaces including decks, wood siding and log homes. Deck Stripper restore wood to its natural color and prepare surface for re-coating. Deck Stripper also removes gray weathered wood, water stains, mold, mildew and tannin bleeding. Safe for use around surrounding vegetation if pre-wetted prior to application
Restores the natural beauty of wood. Deck stripper is water based & biodegradable & easy to use .
Available in 5 gallon size with concentrated formula.
For Use On All Types Of Exterior Wood Surfaces:
Wood Decks
Fences
Railings
Siding
Log homes
Cedar shakes
Gazebos
Pergolas
Apply liberally with a low pressure sprayer mixed 1:1 with water. Wait approximately 5 to 45 minutes for Deck Stripper to soften the coating. The coating should easily rinse off when ready. Rinse in direction of wood grain with a garden hose or pressure washer at low setting (500-1200 PSI). Coverage is 50 to 150 sq.ft. per US gallon.
Deck stripper will strip most semi-transparent oil based wood-stains.
Wood rich in tannin may darken during restoration. Always apply Deck Brightening Agent after final rinse of Deck stripper to lighten wood & restore the natural ph balance.
Deck stripper can be purchased & shipped via UPS Ground to all 48 U.S. States except Alaska & Hawaii at:
www.surfacerestoration.com/shop

 Affordable Landscaping & Tree Service LLC
As a resident of Connecticut, the experience of recent years of frigid temperatures and heavy snowfall are fresh in your mind. The relentless snow storms and ice accumulation have brought on unsafe and often unbearable conditions. To make life much more comfortable and convenient for yourself this winter, you should consider contacting the residential and commercial snow removal experts at Affordable Landscape and Tree Service. We have been providing snow clearing and ice removal services for commercial properties and homeowners for over 20 years. We have the experience and equipment to remove snow and ice from any size driveway, walkway, or parking lot as well as apply sand and salt to ensure that your property is safe.

 Tile Doctor Ltd
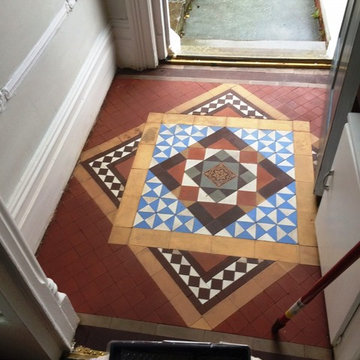
I was asked to take a look at restoring a Victorian Tiled Floor in the Cumbrian town of Barrow in Furness where the floor had been covered in black bitumen; the bitumen was so thick it was difficult to gauge the condition of the floor underneath. I did a test clean which came out well but I had to explain there could be tile damage and other hidden problems so very difficult to quote for however we agreed a date and price and I came back a couple of weeks later to do the job.
Removing Bitumen form Victorian Tiles
Removing the bitumen from the floor without damaging the tiles underneath was a slow process involving spraying on a strong solution of Tile Doctor Remove and Go, letting it soak in, applying steam and then carefully scraping off the bitumen. The floor was treated in this manner a small area at a time and a wet vacuum was used to rinse and remove the resulting slurry. This process took up the whole day and was completely successful at removing the bitumen, before finishing I gave the floor a thorough rinse with clean water and used the wet vacuum to dry the floor was much as possible before leaving.
Sealing a Victorian Tiled Floor
I had used a lot of water cleaning the floor so I agreed with the owner to leave the floor for a few days before sealing it so it could thoroughly dry out. When I did return I used Tile Doctor Colour Grow to seal the tiles, the customer had wanted a satin finish but having weighed up the options including the fact that there was a damp problem in the house I felt Colour Grow which is a penetrating and breathable sealer would have the best longevity.
The customers were very happy with the results and before leaving we discussed aftercare cleaning, with sealed surfaces you have to be careful not to use acidic products as this can reduce the life of the sealer.
 Arani Construction
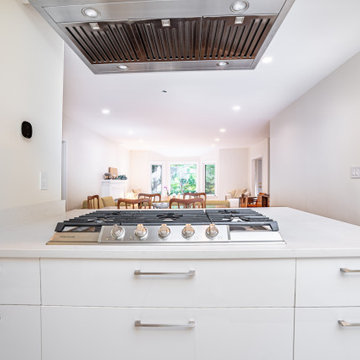
This image highlights the open concept layout achieved during a full house renovation in the Kerrisdale neighbourhood of Vancouver, completed by Arani Construction Inc. The kitchen island with integrated gas cooktop now faces the expanded living and dining area, creating a continuous and highly functional main floor layout.
As part of the structural renovation, multiple interior walls were removed to transform the previously segmented floor plan into a large open space. In addition to removing the wall between the kitchen and dining area, another wall separating the dining room from the living room was also removed. Structural beams were installed to properly support the load while allowing the entire main level to remain open.
This transformation created a long, uninterrupted sightline from one exterior window to another across the house, allowing natural light to travel through the entire space. The new layout significantly improves circulation, visibility, and interaction between the kitchen, dining, and living areas while maintaining the modern functionality of the kitchen island workspace.

 Reaching Higher LLC
This was a mid-sized tree trimming and removal project, where we removed eight trees from the property, and trimmed four others, followed by removal of the stumps and cleanup of the property.
 Tile Doctor Ltd
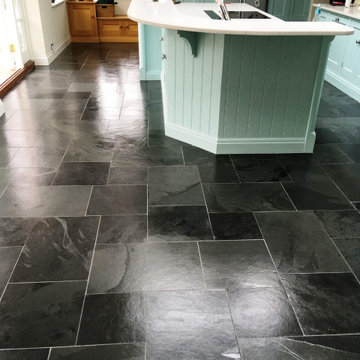
Our client had previously employed another company to tackle this large Slate floor in Walton on Thames but they hadn’t managed to remove the old sealer due to it being an old varnish seal. Varnish was used as a traditional way of sealing stone but can be damaged by scratching and it does little to improve the look of the stone. Varnish is also very difficult to break down which is a problem as it’s important to remove the old sealant before applying new, applying a new sealer onto Varnish simply wouldn’t work.
I visited the property to survey the floor and work out which combination of products and methods would work best and after some testing and I was able to confirm that not only could the old varnish be removed but once re-sealed with a modern sealer the slate would be transformed.
The client was over the moon to hear this news as they had thought there was nothing, they could do to improve the floor.
With a price and schedule agreed I returned to the property at a later date and started by tackling the varnish. The method I used was to apply Tile Doctor Remove and Go, let it soak into the floor for ten minutes and then work it in with a heavy rotary scrubbing machine fitted with a black pad. The soil was then rinsed with water and extracted off the floor with a wet vacuum.
The floor was then inspected, and each tile checked to ensure the varnish was completely gone, any stubborn areas were then spot treated and scrubbed by hand. Once I was satisfied, I set about giving the stone a deep clean by repeating the same process with Tile Doctor Pro-Clean. As before all the soil and cleaning products were then low pressure rinsed off the stone and vacuumed away. The floor was then left to dry overnight.
I returned the following day to apply a new modern sealer. First, I tested the floor was dry using the moisture meter. It was in the acceptable readings range, so I was able to start applying the sealer straight away.
For this floor I chose to apply Tile Doctor Seal and Go, it works really well on Slate tiles and as you can see from the photographs it completely transformed the appearance of the stone. Seal and Go is a water-based blend of acrylic polymers that provides both a stain resistant surface seal and a durable low-sheen finish, being water based it has the added advantage of not giving off any odour as it dries. The client had specified earlier that they didn’t want the floor to look shiny to the resultant silky appearance was the perfect solution. Thee coats were applied, and my client was very pleased with the finish.
Jonathan Oldham
South Middlesex Tile Doctor
 Tile Doctor Ltd
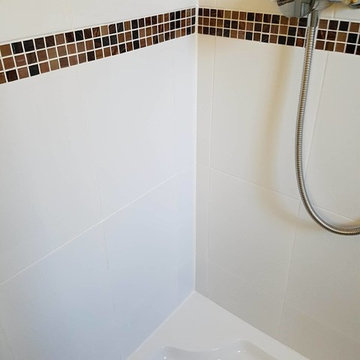
The photographs below are from the bathroom of a house in the Moston area of Manchester which is primarily residential and only 3 miles away from the city centre. My customer had been primarily concerned with the removal of unsightly mould but was also keen to have the grout in the ceramic tiled shower cubicle given a good deep clean.
To clean the Shower Cubicle, I used a strong dilution of Tile Doctor Pro Clean which is a strong alkaline cleaner that works really well on grout. The Pro-Clean solution was decanted into a spray bottle and then sprayed onto the grout lines and left it to dwell. The air in the solution makes it lighter and easier for it to stick to vertical surfaces.
After a few minutes the Pro-Clean was scrubbed in using a stiff grout brush. The tiles were then rinsed with water to remove the soiled solution from the tiles and the process repeated where required.
Although cleaning process was a success there were still a few mould marks left so to tackle these I used Tile Doctor Mould Away spray using the same process of scrubbing and rinsing. The Mould Away spray did the trick for me and I moved on to remove the silicone around the shower cubicle. When removing silicone, you must make sure you get all mouldy silicone out otherwise it can spread from the old to the new.
After I had finished removing the silicone I tidied the shower cubicle and used a bit of gentle heat from my heat gun to dry the grout lines and edges where silicone used to be.
I used my damp tester to make ensure there was no dampness anywhere around the working area and then moved on to colouring the grout which would give the whole shower a fresh and consistent appearance. On this occasion, I used a White colour from the Tile Doctor range of Grout Colourant’s, it’s an epoxy based colourant that protects and rejuvenate the grout lines.
I had to use 2 coats of colourant to get the best result and then moved on to putting new silicone around the shower base with a high-quality mould resistant silicone. When finished adding fresh silicone I tidied up again and the job was complete.
I think you can’t argue the shower cubicle was transformed and customer even said it looks better then when it was new; we also fixed few chips for her whilst there and stripped and replaced the silicone around the sink as a bonus.
Tony Olmet
Greater Manchester Tile Doctor
 Affordable Landscaping & Tree Service LLC
As a resident of Connecticut, the experience of recent years of frigid temperatures and heavy snowfall are fresh in your mind. The relentless snow storms and ice accumulation have brought on unsafe and often unbearable conditions. To make life much more comfortable and convenient for yourself this winter, you should consider contacting the residential and commercial snow removal experts at Affordable Landscape and Tree Service. We have been providing snow clearing and ice removal services for commercial properties and homeowners for over 20 years. We have the experience and equipment to remove snow and ice from any size driveway, walkway, or parking lot as well as apply sand and salt to ensure that your property is safe.
 Windy City Painters
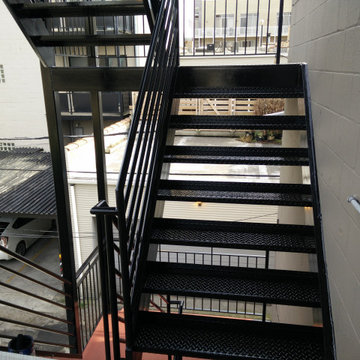
Iron Fence Painting Lincoln Park Chicago - Professional Metal Refinishing
Windy City Painters completed this comprehensive iron fence painting project for a beautiful Lincoln Park greystone property. Lincoln Park's historic architecture demands careful attention to detail, and furthermore, Chicago's harsh weather conditions require professional-grade materials and techniques for lasting protection.
We utilized premium Sherwin-Williams rust inhibiting primer and Benjamin Moore exterior metal paint for maximum durability. Additionally, our team employed specialized rust removal tools and surface preparation equipment to ensure optimal adhesion and longevity.
Our four-step process included complete rust removal and surface cleaning, minor repairs to damaged sections, premium primer application with proper curing time, and final topcoat application using spray and brush techniques for even coverage.
Chicago's unique challenges include extreme temperature fluctuations, salt exposure from winter treatments, and moisture from Lake Michigan. Moreover, older properties often have multiple paint layers requiring careful removal. Therefore, professional expertise ensures proper preparation and material selection.
The results exceeded client expectations with a smooth, durable finish that enhances the property's curb appeal. Subsequently, the fence now provides years of protection while complementing the neighborhood's architectural character perfectly.
Before starting similar projects, homeowners should understand that proper surface preparation accounts for 80% of project success. Additionally, weather conditions significantly impact application timing and results.
See more work and request free estimate at windypainters.com.
Frequently Asked Questions:
Q: How much does iron fence painting cost in Lincoln Park Chicago?
A: Iron fence painting costs vary based on fence size, existing condition, rust damage extent, and preparation requirements needed.
Q: What preparation is required for successful iron fence painting projects?
A: Iron fence painting requires thorough rust removal, surface cleaning, minor repairs, primer application, and proper weather conditions.
Q: How long does professional iron fence painting last in Chicago weather?
A: Professional iron fence painting typically lasts 8-12 years with quality materials, proper preparation, and regular maintenance.
Q: When is the best season for iron fence painting in Chicago?
A: Spring through early fall provides optimal conditions for iron fence painting with appropriate temperature and humidity levels.
Q: Can you match existing colors for iron fence painting restoration projects?
A: Yes, we provide custom color matching services for iron fence painting to complement existing architectural elements perfectly.
Q: Do you warranty iron fence painting work in Lincoln Park?
A: Windy City Painters provides comprehensive warranties on all iron fence painting projects ensuring quality and customer satisfaction.
Q: What makes professional iron fence painting worth the investment cost?
A: Professional iron fence painting ensures proper preparation, quality materials, expert application techniques, and significantly extended fence lifespan.
Q: How do you prevent rust from returning after iron fence painting?
A: Our iron fence painting process includes rust inhibiting primer, quality topcoats, and proper surface preparation for maximum protection.
Q: Can iron fence painting increase Lincoln Park property values significantly?
A: Professional iron fence painting enhances curb appeal, property aesthetics, and market value in desirable Lincoln Park neighborhood.
Q: What safety precautions are necessary during iron fence painting projects?
A: Iron fence painting requires proper ventilation, protective equipment, lead paint testing, and professional safety protocols throughout.
50