
Search results for "Removable" in Home Design Ideas
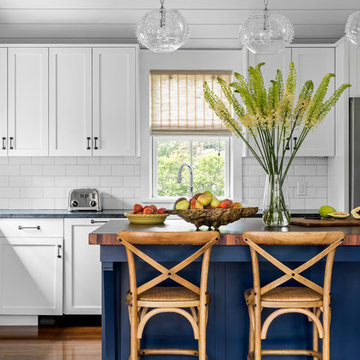
 LDa Architecture & Interiors
TEAM
Architect: LDa Architecture & Interiors
Builder: 41 Degrees North Construction, Inc.
Landscape Architect: Wild Violets (Landscape and Garden Design on Martha's Vineyard)
Photographer: Sean Litchfield Photography
 Urbanology Designs
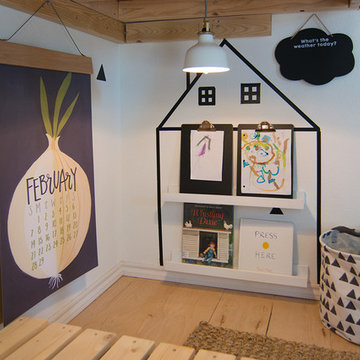
Maximizing space never looked so good! A creative little kids nook under the loft bed does double duty. A reading light and book ledge make this the perfect spot to let the imagination wander.
 Scot Eckley, Inc.
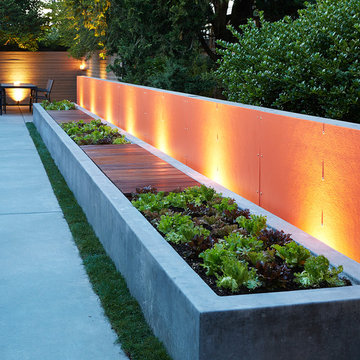
Illuminated colorful accent wall is a backdrop to a concrete planter and bench.
Design ideas for a mid-century modern backyard landscaping in Seattle.
Design ideas for a mid-century modern backyard landscaping in Seattle.
Find the right local pro for your project
 hajottamolla.blogspot.my
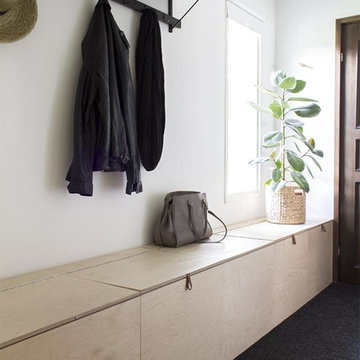
Inspiration for a scandinavian carpeted mudroom remodel in London with white walls
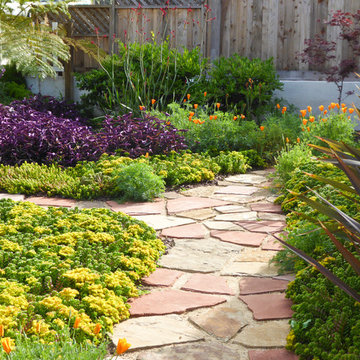
 Billy Goodnick Garden Design
Just to shake things up, Purple Wandering Jew (Tradescantia pallida 'Purple Heart') provides a strong contrast to the warm colors. A small redleaf Japanese Maple that was struggling in the back yard will eventually soften the view of the raised wood fence.
photo by Billy Goodnick
 TVL Creative Ltd.
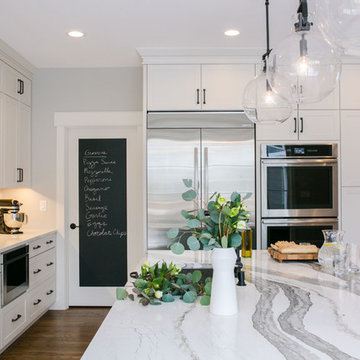
Our clients had just recently closed on their new house in Stapleton and were excited to transform it into their perfect forever home. They wanted to remodel the entire first floor to create a more open floor plan and develop a smoother flow through the house that better fit the needs of their family. The original layout consisted of several small rooms that just weren’t very functional, so we decided to remove the walls that were breaking up the space and restructure the first floor to create a wonderfully open feel.
After removing the existing walls, we rearranged their spaces to give them an office at the front of the house, a large living room, and a large dining room that connects seamlessly with the kitchen. We also wanted to center the foyer in the home and allow more light to travel through the first floor, so we replaced their existing doors with beautiful custom sliding doors to the back yard and a gorgeous walnut door with side lights to greet guests at the front of their home.
Living Room
Our clients wanted a living room that could accommodate an inviting sectional, a baby grand piano, and plenty of space for family game nights. So, we transformed what had been a small office and sitting room into a large open living room with custom wood columns. We wanted to avoid making the home feel too vast and monumental, so we designed custom beams and columns to define spaces and to make the house feel like a home. Aesthetically we wanted their home to be soft and inviting, so we utilized a neutral color palette with occasional accents of muted blues and greens.
Dining Room
Our clients were also looking for a large dining room that was open to the rest of the home and perfect for big family gatherings. So, we removed what had been a small family room and eat-in dining area to create a spacious dining room with a fireplace and bar. We added custom cabinetry to the bar area with open shelving for displaying and designed a custom surround for their fireplace that ties in with the wood work we designed for their living room. We brought in the tones and materiality from the kitchen to unite the spaces and added a mixed metal light fixture to bring the space together
Kitchen
We wanted the kitchen to be a real show stopper and carry through the calm muted tones we were utilizing throughout their home. We reoriented the kitchen to allow for a big beautiful custom island and to give us the opportunity for a focal wall with cooktop and range hood. Their custom island was perfectly complimented with a dramatic quartz counter top and oversized pendants making it the real center of their home. Since they enter the kitchen first when coming from their detached garage, we included a small mud-room area right by the back door to catch everyone’s coats and shoes as they come in. We also created a new walk-in pantry with plenty of open storage and a fun chalkboard door for writing notes, recipes, and grocery lists.
Office
We transformed the original dining room into a handsome office at the front of the house. We designed custom walnut built-ins to house all of their books, and added glass french doors to give them a bit of privacy without making the space too closed off. We painted the room a deep muted blue to create a glimpse of rich color through the french doors
Powder Room
The powder room is a wonderful play on textures. We used a neutral palette with contrasting tones to create dramatic moments in this little space with accents of brushed gold.
Master Bathroom
The existing master bathroom had an awkward layout and outdated finishes, so we redesigned the space to create a clean layout with a dream worthy shower. We continued to use neutral tones that tie in with the rest of the home, but had fun playing with tile textures and patterns to create an eye-catching vanity. The wood-look tile planks along the floor provide a soft backdrop for their new free-standing bathtub and contrast beautifully with the deep ash finish on the cabinetry.



 Alair Homes Plano
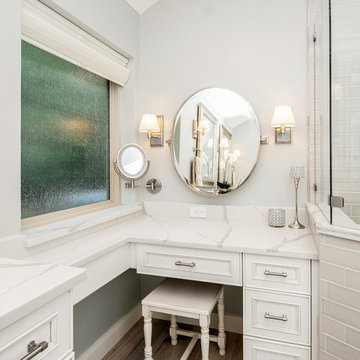
Our clients called us wanting to not only update their master bathroom but to specifically make it more functional. She had just had knee surgery, so taking a shower wasn’t easy. They wanted to remove the tub and enlarge the shower, as much as possible, and add a bench. She really wanted a seated makeup vanity area, too. They wanted to replace all vanity cabinets making them one height, and possibly add tower storage. With the current layout, they felt that there were too many doors, so we discussed possibly using a barn door to the bedroom.
We removed the large oval bathtub and expanded the shower, with an added bench. She got her seated makeup vanity and it’s placed between the shower and the window, right where she wanted it by the natural light. A tilting oval mirror sits above the makeup vanity flanked with Pottery Barn “Hayden” brushed nickel vanity lights. A lit swing arm makeup mirror was installed, making for a perfect makeup vanity! New taller Shiloh “Eclipse” bathroom cabinets painted in Polar with Slate highlights were installed (all at one height), with Kohler “Caxton” square double sinks. Two large beautiful mirrors are hung above each sink, again, flanked with Pottery Barn “Hayden” brushed nickel vanity lights on either side. Beautiful Quartzmasters Polished Calacutta Borghini countertops were installed on both vanities, as well as the shower bench top and shower wall cap.
Carrara Valentino basketweave mosaic marble tiles was installed on the shower floor and the back of the niches, while Heirloom Clay 3x9 tile was installed on the shower walls. A Delta Shower System was installed with both a hand held shower and a rainshower. The linen closet that used to have a standard door opening into the middle of the bathroom is now storage cabinets, with the classic Restoration Hardware “Campaign” pulls on the drawers and doors. A beautiful Birch forest gray 6”x 36” floor tile, laid in a random offset pattern was installed for an updated look on the floor. New glass paneled doors were installed to the closet and the water closet, matching the barn door. A gorgeous Shades of Light 20” “Pyramid Crystals” chandelier was hung in the center of the bathroom to top it all off!
The bedroom was painted a soothing Magnetic Gray and a classic updated Capital Lighting “Harlow” Chandelier was hung for an updated look.
We were able to meet all of our clients needs by removing the tub, enlarging the shower, installing the seated makeup vanity, by the natural light, right were she wanted it and by installing a beautiful barn door between the bathroom from the bedroom! Not only is it beautiful, but it’s more functional for them now and they love it!
Design/Remodel by Hatfield Builders & Remodelers | Photography by Versatile Imaging
 Lori Ramsay Design
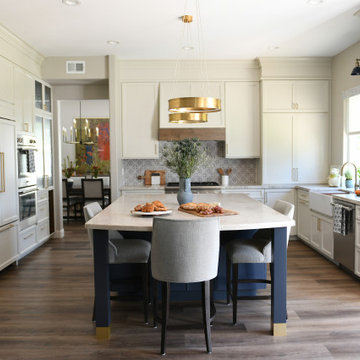
The large island in this kitchen serves as a gathering and dining space for family and friends. Ample storage and work surface provide the home owners a highly functioning kitchen.
The tall crown molding is beautiful and functional with HVAC tucked inside and pendant lights by Visual Comfort add a touch of modern luxury to this traditionally based kitchen.

 transFORM Home
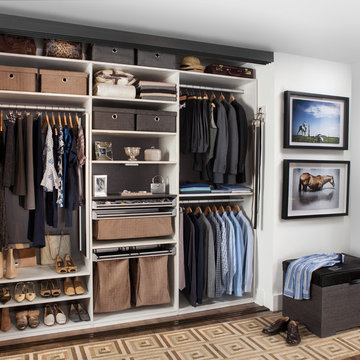
This floor based reach-in-closet featured in white veneer and brushed aluminum hardware, provides plenty of storage space. Our sectional aluminum sliding doors in charcoal with smoked frosted glass are a sleek and functional way to access your belongings. Even compact spaces can have a modern and stylish look. Attractive lighting brightens up your closet helping you see and match the color of clothes better. Top shelves are great for storing rarely used or seasonal items while matching storage boxes are useful for keeping more delicate items neat. With tons of hanging space you can easily hang a long skirt and still have room to store your handbags underneath. Adjustable hanging rods make it simple to sort by color and fit more hanging space into your closet. Fixed belt hooks and shoe cubbies allow you to conveniently and quickly match the perfect accessory to any outfit. Removable hampers are a stress-free way to carry and sort laundry. This design also includes plenty of drawer space. At transFORM we specialize in custom designed closets that allow you to showcase your wardrobe while staying beautifully organized.
 Melissa Miranda Interior Design
Sam Balukonis
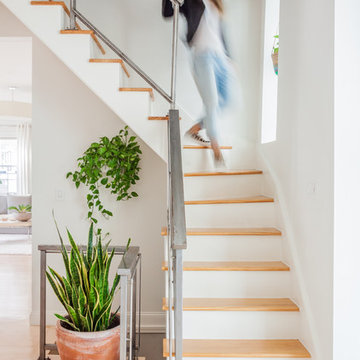
Inspiration for a transitional wooden glass railing staircase remodel in Boston with painted risers
Inspiration for a transitional wooden glass railing staircase remodel in Boston with painted risers

 Tile Doctor Ltd
Roundhay is an affluent area of North Leeds which is well-known for the fantastic Roundhay Park. The park is large enough to contain two lakes, extensive woodland, formal gardens and even golf courses! It’s the premier attraction for anyone fortunate enough to live in the area, or anyone visiting from nearby.
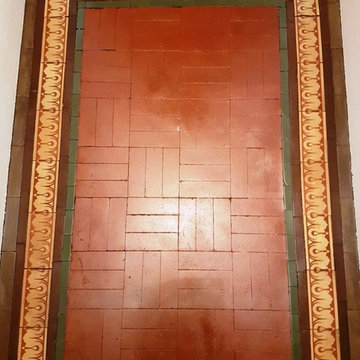
I recently visited a customer who lives in Roundhay and was looking for help in restoring the small Victorian tiled entranceway at the front of her house. The tiles were in a shocking state, but it’s not hard to imagine why – the entrance to a house receives a lot of foot traffic and is not typically taken care of regularly. These tiles were also marked with paint splashes left over from decoration work, making them look even worse.
The appearance of the entranceway did not set the right standard for the rest of the house, so the property owner was keen to have it restored professionally.
The appearance of the entranceway did not set the right standard for the rest of the house, so the property owner was keen to have it restored professionally.
The appearance of the entranceway did not set the right standard for the rest of the house, so the property owner was keen to have it restored professionally.
The appearance of the entranceway did not set the right standard for the rest of the house, so the property owner was keen to have it restored professionally.
I informed the customer that I could have the tiles rejuvenated within a day’s work. To begin, I used a scrapper and wire wool brush to manually remove some of the most stubborn paint marks.
Following this, I applied a strong solution of Tile Doctor Remove and Go, before leaving the product to dwell for about an hour. Remove and Go is multi-purpose stripping agent that can remove any adhesive and paint deposits, as well as many types of old coatings and sealers.
To work the product deep into the tiles, I agitated with an abrasive cleaning pad and then rinsed the area with fresh water. This had the desired affect and all the unsightly paint marks were removed.
Next, I gave the floor another thorough clean to remove any general muck and ingrained dirt. This was done using our high-alkaline cleaner, which we typically use on Victorian tiles, known as Tile Doctor Pro-Clean. In fact, Pro-Clean is a very reliable cleaner for all types of tile and grout including natural stone, Limestone, Slate and Travertine, amongst others.
Since I told the customer I would able to finish the job within a day, I dried the floor quickly using a heat gun so it could be sealed there and then. To seal the floor, I applied four coats of Tile Doctor Seal and Go, which is a topical sealer formulated to provide maximum protection along with a high-quality, low sheen finish.
As you can see from the photos above, the entranceway was absolutely transformed. These tiles are now a true asset to the rest of the property, rather than looking out of place! I’m please to say my customer was amazed by how quickly such a big difference could be made and left the following glowing feedback.
I can’t believe the before and after pictures. The restoration of the tiles is top quality, they are so much brighter and richer in colour – especially without the garage paint hiding the detail! Nigel did an amazing job, even better than I could have hoped for, and is a lovely guy as well. Would definitely recommend.
Nigel Stoker
North West Yorkshire Tile Doctor
 Five Star Tree Care
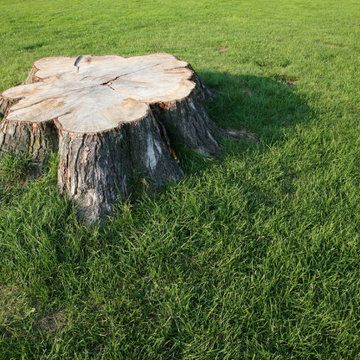
Tree stumps can make your property look unkempt and uncared for. Abandoned stumps can also become a breeding ground for pests and weeds. In some cases, they can even present a health hazard if you have children or pets that may stumble over them. Here at Five Star Tree Services we suggest stump grinding as the best way to handle rouge stumps if removal is not an option. Here are five of the main reasons we suggest grinding your tree stumps instead of leaving them unattended.
Read More: https://www.fivestartreecare.ca/blog/5-reasons-to-grind-your-tree-stumps/
 EMBASSY CONSTRUCTION, LLC
MAJOR REPAIRS AND EXTERIOR MAKEOVER
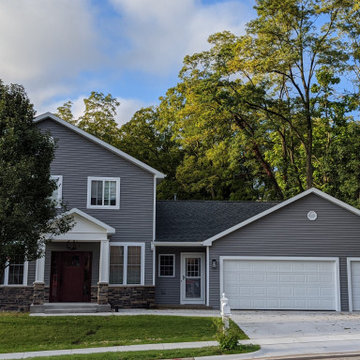
This classic colonial was constructed in 1990 and purchased by our customer in 2014. We were retained to restore, repair, and update the exterior of this property, with all parties anticipating that we were likely to uncover a variety of hidden issues. During the course of this undertaking, we replaced 17 windows. In a number of cases, we rebuilt sills and frames to the floor. All window replacements required new drywall and/or patching with new trim and painting.
Additional work was required to replace the sill across the front of the house and utilize jack studs to support the upper level while working.
The original plan included stripping off the old siding and installing new vinyl siding. We discovered that most exterior walls had never been sheathed with plywood. We sheathed all exterior walls and wrapped them with Tyvek.
As per the plan, we removed the door from the smaller upper deck above the primary deck, replaced rotted rim board and sill, and installed a new 48x48’ window to replace the doorway after resizing the former doorway. Insulating, patching of drywall, and the addition of new trim followed.
Reframed the opening from the kitchen to deck to receive a new 8’ x 6.75’ door and finished the jambs and casing to match existing trim in the rest of the house.
Removed and reconstructed front entry portico and replaced front entry door with sidelights and finished interior jambs and casing to match.
Removed garage door and framed in the opening with plywood and installed new siding over to match. Removed soffit and facia and replaced with new white vented panels and white facia—added stone to front portico with custom columns.
Removed old roof shingles and re-shingle all roofing on the garage and home with 30-year architectural shingles. Added ridge vent to allow the roof to breath better, replaced all flashing, and added lateral bracing to gable ends not previously tied in.
Installed new seamless gutters @ 6 inches (with covers over top) and 5 INCH downspouts to address water drainage. Extended all gable ends to standard 12-inch overhang.
The result is a beautifully restored and properly constructed 4 bedroom/4 bathroom home with an attached car garage.
 Tile Doctor Ltd
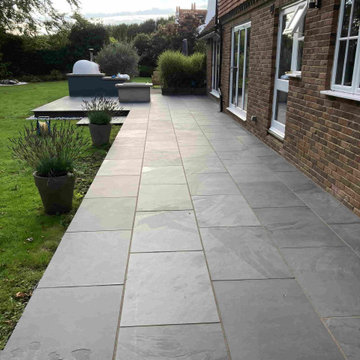
Our client in the villager of Pembury was feeling really deflated after having a Slate Patio laid adjacent to the full length of her house, however the builder had not applied the sealer correctly creating a mess which ruined the appearance of the stone.
Unfortunately, it is not that unusual to be contacted about this sort of situation, applying a sealer is not as easy as manufactures make out. There are lots of factors to consider, choosing the right sealer, is the stone damp, how do you know if you have applied too much, and it often catches tradesmen out. I was able to reassure them that with the right combination of products and equipment the problem could be rectified.
The first job was to strip off the old sealer which was done using a product called Tile Doctor Remove and Go. The name of this product pretty much says it all and once applied to the stone it is left to soak in for ten to twenty minutes before being scrubbed in with a rotary machine fitted with an abrasive burnishing pad.
Tile Doctor Remove and Go is a multi-purpose stripper which will remove most coatings and sealers, including epoxy grout haze which is another common problem we encounter when tradesmen have not cleaned up properly after grouting. It is also good for removing heavy build ups of grease. I used several burnishing pads of different grits going from coarse to smooth on this patio, rinsing and extracting the soil after each pad.
It was a large area, so this process took up most of the day on its own, fortunately I use a van mounted high pressure cleaning and extraction system to remove the soil which is very efficient and leaves the stone bright clean and reasonably dry afterwards. This ensures the process can be carried out with minimal mess.
It was a nice warm summers day and although cloudy we didn’t get any rain overnight, so after checking the forecast I was able to return the next day and apply a fresh sealer to the Slate.
My client wanted a natural look, so I used Tile Doctor Ultra Seal. This product is a no-sheen, natural-look, impregnating sealer which is formulated to provide maximum stain protection. These impregnating sealers work by penetrating the stone, occupying its pores, and thus preventing dirt from residing there.
The client was so happy and relieved to see the results on what a very expensive patio and commented she was eager to get the first barbecue of the season underway.
We recommended that a regular with the jet wash should keep the patio in good condition and in a few years time we could return to reapply the sealer for them.
Michael Conlon
South Kent Tile Doctor
 Tracstar Tree Experts
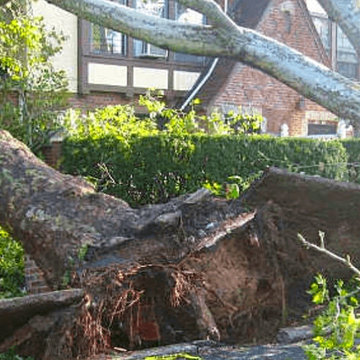
24/7 EMERGENCY STORM DAMAGE VIRGINIA BEACH
When you do you’ll be connected with the most highly skilled and promptly responsive arborists on the market today who are available 24/7 to provide emergency tree services in Virginia Beach, such as emergency tree removal in Virginia Beach. Experts quickly, affordably, and safely for all the people and property in the affected area.
Here at Tracstar Tree Experts, our tree service Virginia Beach professionals are serious about making your trees and your home safe no matter what emergency situations arise. It’s why our professionals are trained in quick responses and quick solutions to reduce the damage which can be inflicted by a diseased, fallen, or otherwise severely compromised tree and get you back to a state of safety and satisfaction with your home. If you find yourself with a sudden need for emergency tree services in Virginia Beach then you should absolutely not hesitate to contact the reliable and knowledgeable tree care Virginia Beach specialists at Tracstar Tree Experts. Call (757) 515-6933 as soon as you have a need for emergency tree services in Virginia Beach to receive a free estimate and the Virginia Beach tree care solutions you need to return to your life.
 Tile Doctor Ltd
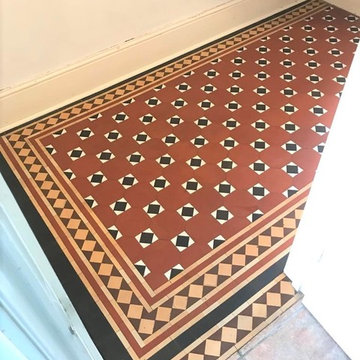
Our client had recently moved to a property in Newport, Gwent and when removing the carpet in the hallway she discovered this beautiful Victorian Tiled floor. The property had numerous period features and realising the value that the floor could add to the property she was keen to have it restored and so contacted Tile Doctor for help.
We popped round to survey the floor and except for a couple of broken tiles it had preserved well under the carpet. It was a shame the previous owner had covered the floor over but I was confident we could source some matching tiles to replace the broken ones and then restore the overall appearance. We gave the client a quote for the work which would take a couple of days. Pleased to hear that the floor could be restored and that it could soon be on show the quote was accepted and a date set to do the work.
We returned later the same month to renovate the floor and started by removing the broken tiles, cleaning out the old grout and adhesive and then relaying matching replacements. There are several specialist suppliers that can supply Victorian tiles so we can usually source reclaimed or reproduction tiles.
Some of the grout lines had dropped so as well as grouting around the replacement tiles more renovation work was needed to ensure the grout was level. We used quick setting products for this work, so I was able to move on to cleaning the floor later that afternoon.
To restore the appearance of the Victorian Tiles I used a strong dilution of Tile Doctor Pro-Clean combined with Tile Doctor Remove and Go which was left to soak in for ten minutes before being scrubbed into the tiles. This created a powerful cleaner/stripper cocktail which gets to work at removing dirt, grime and breaking down old sealers paint splashes.
After extracting the soil using a wet vacuum the floor was inspected. There were a few stubborn areas which were treated to a repeat clean and a wire brush to get the floor as clean as possible.
The floor was rinsed with water to remove any trace of cleaning products and then as much moisture as possible was extracted using a wet vacuum. The floor was left to dry off overnight and we arranged to return the next day to apply a sealer.
The following morning, we checked the floor was dry using a damp meter and this confirmed we were good to apply the sealer. The floor was sealed with Tile Doctor Colour Grow which is an impregnating sealer that protects the floor and enhances the beautiful colours in the tile. Three coats of the sealer were applied allowing each coat to dry before applying the next.
The client was very happy with the result and how beautiful the floor looked as you can see from the picture.
Paul Wales
Monmouthshire Tile Doctor
 Tracstar Tree Experts
24/7 EMERGENCY STORM DAMAGE VIRGINIA BEACH
When you do you’ll be connected with the most highly skilled and promptly responsive arborists on the market today who are available 24/7 to provide emergency tree services in Virginia Beach, such as emergency tree removal in Virginia Beach. Experts quickly, affordably, and safely for all the people and property in the affected area.
Here at Tracstar Tree Experts, our tree service Virginia Beach professionals are serious about making your trees and your home safe no matter what emergency situations arise. It’s why our professionals are trained in quick responses and quick solutions to reduce the damage which can be inflicted by a diseased, fallen, or otherwise severely compromised tree and get you back to a state of safety and satisfaction with your home. If you find yourself with a sudden need for emergency tree services in Virginia Beach then you should absolutely not hesitate to contact the reliable and knowledgeable tree care Virginia Beach specialists at Tracstar Tree Experts. Call (757) 515-6933 as soon as you have a need for emergency tree services in Virginia Beach to receive a free estimate and the Virginia Beach tree care solutions you need to return to your life.
47