
Search results for "Remove popular" in Home Design Ideas
 Metropolis Drafting and Construction Inc
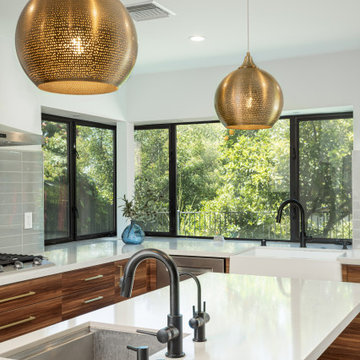
The European kitchen "slab" cabinets or in their more common name the flat panel cabinets became popular more than 3-4 decades ago across the European continent and in the past decade or so started to show in the US as well. The owners of this kitchen were looking to create a semi-open kitchen and Livingroom design with a clean and sunbathed kitchen space.
To create an open concept but still divided space we utilized the ceiling instead of the walls.
All the walls were removed but the ceiling of the kitchen remained at normal height while the Livingroom boosted vaulted ceilings, this way the two spaces were separately defined.
The 2 large corner windows were preserved, and the sink was relocated to that corner of the kitchen and to add additional light we framed a new entry door made by Rustica. This door is all glass with a thin frame of steel gave another much needed light penetration to the kitchen space.
The island design includes waterfall panels made from the same cabinet material instead of the countertop stone.
The upper cabinets color matches the wall paint thus making them almost invisible in the space.
 Metropolis Drafting and Construction Inc
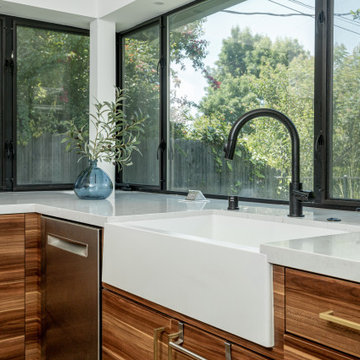
The European kitchen "slab" cabinets or in their more common name the flat panel cabinets became popular more than 3-4 decades ago across the European continent and in the past decade or so started to show in the US as well. The owners of this kitchen were looking to create a semi-open kitchen and Livingroom design with a clean and sunbathed kitchen space.
To create an open concept but still divided space we utilized the ceiling instead of the walls.
All the walls were removed but the ceiling of the kitchen remained at normal height while the Livingroom boosted vaulted ceilings, this way the two spaces were separately defined.
The 2 large corner windows were preserved, and the sink was relocated to that corner of the kitchen and to add additional light we framed a new entry door made by Rustica. This door is all glass with a thin frame of steel gave another much needed light penetration to the kitchen space.
The island design includes waterfall panels made from the same cabinet material instead of the countertop stone.
The upper cabinets color matches the wall paint thus making them almost invisible in the space.
 Kitchens of Diablo
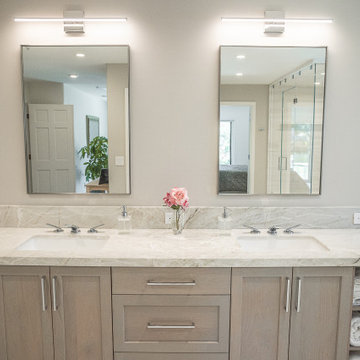
Amazing transformation for the outdated bathroom that needed a huge face-lift. The old bathroom had many walls, a large outdated tub, and glass cube shower walls. It was removing walls and expanding slightly into the bedroom allowed for the expansive steam shower and show stopper free-standing tub by Victoria & Albert. The continued use of white natural stone tile and countertop (bianco dolomiti - all natural stone, la blanc quartzite countertop). The polished nickel plumbing fixtures brings the glam to this luxury master bathroom. The large curbless steam shower is another show stopper in this bathroom, floor to ceiling glass and a beautiful mosaic tile flooring and the faint horizontal lines of the wall tile bring much-needed relaxation to this shower. The final touch is the expansive double vanity from Signature Custom Cabinetry in beautiful alder wood in a light brown stain - driftwood. These items create the luxurious open bathroom that this client had always dreamed of.
Find the right local pro for your project
 Vinyl Wallpaper Sexton
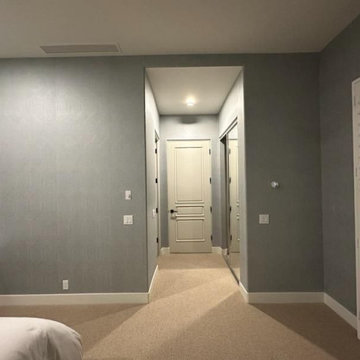
Transform your bedroom into a stylish retreat with custom wallpaper installation from Sherwood’s most trusted wallcovering professionals. We specialize in creating beautiful, durable designs that reflect your unique personality and enhance your home’s comfort.
Premium Bedroom Wallpaper Services
✔ Custom Feature Walls – create a stunning headboard backdrop
✔ Southern-Ready Materials – withstands humidity and seasonal changes
✔ Noise-Reducing Textures – grasscloth and fabric options for added tranquility
✔ Peel-and-Stick Designs – perfect for quick updates or rentals
✔ Local-Inspired Patterns – nature and rustic themes available
Why Sherwood Homeowners Choose Us
✅ 20+ Years Serving Central Arkansas
✅ Precision Installation – flawless pattern matching and alignment
✅ Respect for Your Home – clean, efficient, and professional service
✅ 1-Day Transformations – minimal disruption to your routine
✅ Free In-Home Consultations – see samples in your space
Popular Sherwood Bedroom Styles
• Nature-inspired woodland and floral prints
• Classic Southern traditional damasks
• Modern farmhouse shiplap-look wallpapers
• Custom Razorback-themed designs
Serving All of Sherwood – From Gravel Ridge to Sylvan Hills
 Orange Wallpaper Hanger
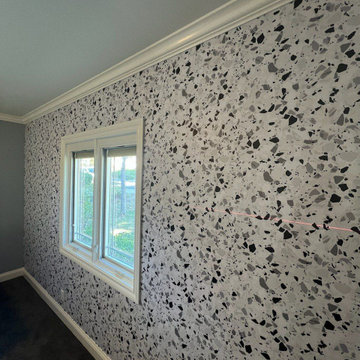
Wallpaper Installation – Guest Room in Casselberry
Elevate your guest experience with professional wallpaper installation in Casselberry. As your local wallpaper specialist, I create welcoming retreats that combine comfort and style with Central Florida flair.
✔ Guest Room-Specific Features
Durable scrubbable vinyl for high-use spaces
Peel-and-stick options for easy seasonal refreshes
Humidity-resistant materials (ideal for Florida seasons)
✔ Casselberry-Adapted Solutions
Fade-proof prints for sunny rooms
Mold/mildew resistant coatings
Sound-dampening textures for privacy
✔ Complete Services
Accent walls behind beds or seating areas
Ceiling treatments for added dimension
Wallpaper repair for existing installations
Why Casselberry Homeowners Choose Us:
✔ 1-Day Refresh – Ready before guests arrive
✔ Free Design Consultations – Local style expertise
✔ Senior & Military Discounts
✔ Pet-Friendly Materials
Popular Casselberry Styles:
• Florida Casual – Palm motifs & coastal colors
• Modern Botanical – Oversized tropical leaves
• Lakeside Retreat – Water-inspired blues/greens
• Timeless Neutrals – Versatile for all guests
Serving All Casselberry – From Secret Lake to Red Bug Lake areas.
 Kitchens of Diablo
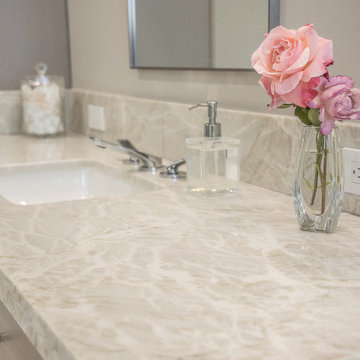
Amazing transformation for the outdated bathroom that needed a huge face-lift. The old bathroom had many walls, a large outdated tub, and glass cube shower walls. It was removing walls and expanding slightly into the bedroom allowed for the expansive steam shower and show stopper free-standing tub by Victoria & Albert. The continued use of white natural stone tile and countertop (bianco dolomiti - all natural stone, la blanc quartzite countertop). The polished nickel plumbing fixtures brings the glam to this luxury master bathroom. The large curbless steam shower is another show stopper in this bathroom, floor to ceiling glass and a beautiful mosaic tile flooring and the faint horizontal lines of the wall tile bring much-needed relaxation to this shower. The final touch is the expansive double vanity from Signature Custom Cabinetry in beautiful alder wood in a light brown stain - driftwood. These items create the luxurious open bathroom that this client had always dreamed of.
 Orange Wallpaper Hanger
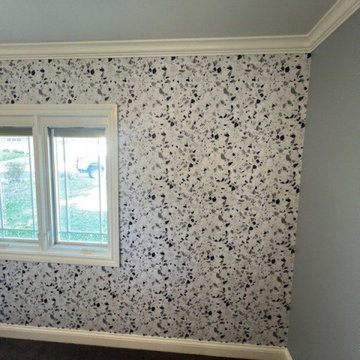
Wallpaper Installation – Guest Room in Casselberry
Elevate your guest experience with professional wallpaper installation in Casselberry. As your local wallpaper specialist, I create welcoming retreats that combine comfort and style with Central Florida flair.
✔ Guest Room-Specific Features
Durable scrubbable vinyl for high-use spaces
Peel-and-stick options for easy seasonal refreshes
Humidity-resistant materials (ideal for Florida seasons)
✔ Casselberry-Adapted Solutions
Fade-proof prints for sunny rooms
Mold/mildew resistant coatings
Sound-dampening textures for privacy
✔ Complete Services
Accent walls behind beds or seating areas
Ceiling treatments for added dimension
Wallpaper repair for existing installations
Why Casselberry Homeowners Choose Us:
✔ 1-Day Refresh – Ready before guests arrive
✔ Free Design Consultations – Local style expertise
✔ Senior & Military Discounts
✔ Pet-Friendly Materials
Popular Casselberry Styles:
• Florida Casual – Palm motifs & coastal colors
• Modern Botanical – Oversized tropical leaves
• Lakeside Retreat – Water-inspired blues/greens
• Timeless Neutrals – Versatile for all guests
Serving All Casselberry – From Secret Lake to Red Bug Lake areas.
Sponsored
Fredericksburg, OH

High Point Cabinets
Columbus' Experienced Custom Cabinet Builder | 4x Best of Houzz Winner
 Kitchens of Diablo
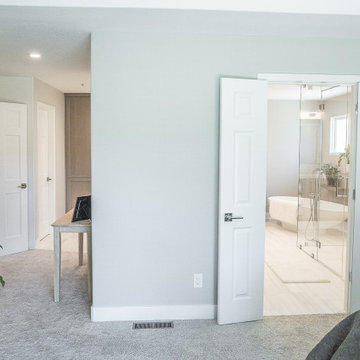
Amazing transformation for the outdated bathroom that needed a huge face-lift. The old bathroom had many walls, a large outdated tub, and glass cube shower walls. It was removing walls and expanding slightly into the bedroom allowed for the expansive steam shower and show stopper free-standing tub by Victoria & Albert. The continued use of white natural stone tile and countertop (bianco dolomiti - all natural stone, la blanc quartzite countertop). The polished nickel plumbing fixtures brings the glam to this luxury master bathroom. The large curbless steam shower is another show stopper in this bathroom, floor to ceiling glass and a beautiful mosaic tile flooring and the faint horizontal lines of the wall tile bring much-needed relaxation to this shower. The final touch is the expansive double vanity from Signature Custom Cabinetry in beautiful alder wood in a light brown stain - driftwood. These items create the luxurious open bathroom that this client had always dreamed of.
 Kitchens of Diablo
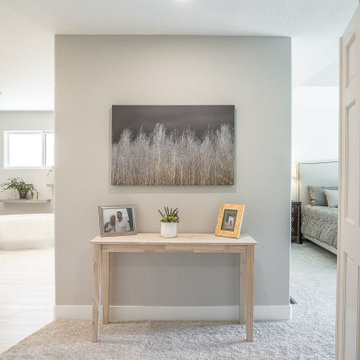
Amazing transformation for the outdated bathroom that needed a huge face-lift. The old bathroom had many walls, a large outdated tub, and glass cube shower walls. It was removing walls and expanding slightly into the bedroom allowed for the expansive steam shower and show stopper free-standing tub by Victoria & Albert. The continued use of white natural stone tile and countertop (bianco dolomiti - all natural stone, la blanc quartzite countertop). The polished nickel plumbing fixtures brings the glam to this luxury master bathroom. The large curbless steam shower is another show stopper in this bathroom, floor to ceiling glass and a beautiful mosaic tile flooring and the faint horizontal lines of the wall tile bring much-needed relaxation to this shower. The final touch is the expansive double vanity from Signature Custom Cabinetry in beautiful alder wood in a light brown stain - driftwood. These items create the luxurious open bathroom that this client had always dreamed of.


 Kitchen Design Concepts
It’s amazing how new countertops, backsplash, appliances and a fresh coat of paint on the walls can change the look of an entire kitchen. With a kitchen that already had good bones, it’s a true case of what we like to call “lipstick and makeup.” The kitchen cabinetry was already white so we left the color as is, but even so, the space resulted in an even brighter environment. The main goals for the space was to improve the kitchen design aesthetically and also improve it’s functionality. We went out with the old and in with the new all while keeping the cabinetry! Want to see how we gave this space a makeover? Read on below!
But first, check out the space before the remodel
Cabinets
As mentioned above, we maintained the white cabinets but we also removed the black painted cabinets by the wall oven and replaced it with a new microwave and oven. This resulted in a more seamless look by removing the random black cabinets. Also, already having white cabinets gave us a taste of what the space was going to become.
Countertops
Replacing the countertops probably had the biggest impact on the space. Overall, it enhanced the space and also gave the kitchen a brighter quality. The new countertops are a 3cm Caesarstone London Grey. This a popular option because it has a marble-like look, but is much stronger than marble. The countertops really tied the whole space together!
Backsplash
Previously, the kitchen only had a 4” splashlette matching the countertop, so incorporating a tile backsplash was a major requirement for our clients and overall an upgrade to the space. The featured tiles are a 3×6 Desert Grey tiles from Daltile installed in a bricklay to the left and right of the sink, and and by the opening into the family room. The grey tone on the backsplash is a wonderful accent to the space!
Fixtures and Fittings
Lastly, it wouldn’t be complete without new fixtures and fittings! With new stainless steel appliances, the sink and faucet follow suit and match the finish. All from Blanco, we have a Stellar Super Single Bowl sink in a stainless steel refined brush finish, and a Grace II Pull-down faucet in a satin nickel finish.

 Michael Nash Design, Build & Homes
Built in the early 1950s, this small urban townhouse is located in North Old Town Alexandria in an area currently undergoing major redevelopment. The neighborhood is popular with, and affordable for, young people and families, and very convenient to Washington, DC.
In its heyday, the townhouse touted a stately brick exterior, plaster walls, tongue and groove wood flooring and beautiful wooden staircase. Sixty years later, however, the homeowners were faced with crumbling masonry, sagging floors, a double layer of wallpaper over the plaster walls, a crumbling staircase, a dysfunctional kitchen and small, dark second floor rooms. Additionally, the basement had a low ceiling, moldy and cinder block walls, no plumbing and a large boiler taking up most of the space.
The homeowners’ goal was to restore the exterior’s historic look while creating an interior up-to-date for the 21st Century. To turn their vision into reality, they turned to Michael Nash Design, Build & Homes.
Design Solutions
To maintain the townhome’s historic exterior, the Michael Nash team carefully removed, salvaged, restored and reused existing brick masonry. Matching fascia boards and windows were combined with existing windows to complete the exterior renovation.
All interior walls were gutted and reframed. New electrical work, new insulation and new drywall were installed. Much of the home’s original trim was salvaged and reused, as was a piece of art glass, all to keep a bit of the past in the renovation.
The sagging subfloors were fixed, new hard wood floors were installed and a new staircase and railing were designed in a style similar to the original.
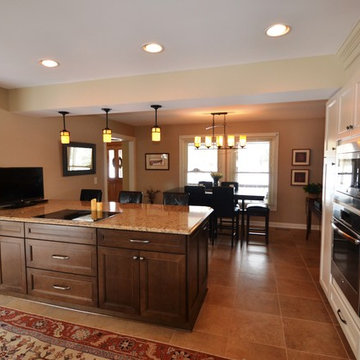
The solid wall between the kitchen and the dining room was removed, plumbing was relocated for a new sink location and the kitchen got expanded with an island into the dining room. Closet and plumbing stacks were relocated to allow a new space for fridge. Stainless steel appliances, granite countertops and custom cabinetry highlight the new modern kitchen.
The plan called for redesigning the three bedrooms on the second floor to allow a larger bathroom, walk-in closet and wider hallways. In addition to new roofing, a large skylight was installed to allow natural light into the bathroom and the upper hallway.
The basement was totally revamped. New plumbing was put in place for a full bathroom, laundry room and a den. New e-grass window was installed in the basement to bring this basement up to current building codes.
This homeowners love the neighborhood and now their home gives them the opportunity to stay in the same location.
 Tile Doctor Ltd
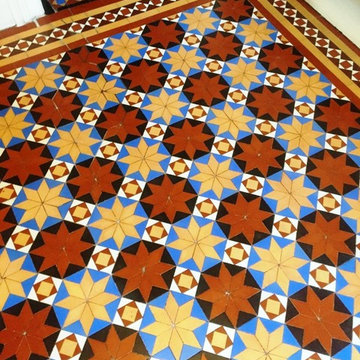
Victorian tiled floors are known for their interesting and unique mosaic patterns – and this one was no different. It was installed at a house in the historic West Midlands town of Stourbridge (famous for its glass industry). Unfortunately it was now looking worse for wear and was in dire need of not just cleaning and sealing, but also some minor repairs and the owner was keen to have it restored back to its former glory.
This particular Victorian tiled floor had been arranged in a fantastic pattern comprising tiles in shades of yellow, blue, red and white. There were, however, some missing tiles but fortunately I know a number of specialist suppliers where I can source replacements. I spent the first day making minor repairs and replacing the missing tiles, including the grouting, and then left the treated areas to set overnight.
On the second day I returned to the house to complete the cleaning process starting with a combination of Tile Doctor Remove & Go – a powerful sealer stripper – and Tile Doctor NanoTech HBU cleaner to lift out ingrained dirt and break down old layers of sealer. NanoTech HBU is particularly effective as it utilises tiny nano sized particles to penetrate deep into the stone and lift out the dirt. The resultant slurry was rinsed off the floor and removed using a wet vacuum.
The next step was to give the floor an acid wash using Tile Doctor Acid Gel, this product can remove old grout haze and other mineral deposits, additionally being in a gel form makes it easy to control and although primarily designed for use on walls it works really well on floors as well. Following this I gave the floor a thorough rinse, dried as much as possible with a wet vacuum and left it to dry overnight, ready to be sealed the next day.
Upon my return to the house on the third day I set about sealing the floor, checking first that the area was completely dried by running damp tests with damp meter, all was well so I able to start applying the sealer. The sealer chosen for this floor was Tile Doctor Seal and Go which is a water based product which is a popular choice as it gives the floor a nice sheen and doesn’t leave the smell that the solvent based sealers do; three thin coats were applied to provide a robust surface seal and to achieve a semi-shine finish, as per the client’s requested.
My client was extremely pleased with the results, with a lot achieved over the space of roughly two and a half days. They left the following feedback:
“Mick did a fantastic job. He was polite and friendly and kept us informed at every stage of the work. He is extremely professional and it is obvious that he takes a great deal of pride in his work. We are thrilled with our ‘new’ floor.”
Michael Leonard
Worcestershire Tile Doctor
Sponsored
Fredericksburg, OH
High Point Cabinets
Columbus' Experienced Custom Cabinet Builder | 4x Best of Houzz Winner
 Michael Nash Design, Build & Homes
Built in the early 1950s, this small urban townhouse is located in North Old Town Alexandria in an area currently undergoing major redevelopment. The neighborhood is popular with, and affordable for, young people and families, and very convenient to Washington, DC.
In its heyday, the townhouse touted a stately brick exterior, plaster walls, tongue and groove wood flooring and beautiful wooden staircase. Sixty years later, however, the homeowners were faced with crumbling masonry, sagging floors, a double layer of wallpaper over the plaster walls, a crumbling staircase, a dysfunctional kitchen and small, dark second floor rooms. Additionally, the basement had a low ceiling, moldy and cinder block walls, no plumbing and a large boiler taking up most of the space.
The homeowners’ goal was to restore the exterior’s historic look while creating an interior up-to-date for the 21st Century. To turn their vision into reality, they turned to Michael Nash Design, Build & Homes.
Design Solutions
To maintain the townhome’s historic exterior, the Michael Nash team carefully removed, salvaged, restored and reused existing brick masonry. Matching fascia boards and windows were combined with existing windows to complete the exterior renovation.
All interior walls were gutted and reframed. New electrical work, new insulation and new drywall were installed. Much of the home’s original trim was salvaged and reused, as was a piece of art glass, all to keep a bit of the past in the renovation.
The sagging subfloors were fixed, new hard wood floors were installed and a new staircase and railing were designed in a style similar to the original.
The solid wall between the kitchen and the dining room was removed, plumbing was relocated for a new sink location and the kitchen got expanded with an island into the dining room. Closet and plumbing stacks were relocated to allow a new space for fridge. Stainless steel appliances, granite countertops and custom cabinetry highlight the new modern kitchen.
The plan called for redesigning the three bedrooms on the second floor to allow a larger bathroom, walk-in closet and wider hallways. In addition to new roofing, a large skylight was installed to allow natural light into the bathroom and the upper hallway.
The basement was totally revamped. New plumbing was put in place for a full bathroom, laundry room and a den. New e-grass window was installed in the basement to bring this basement up to current building codes.
This homeowners love the neighborhood and now their home gives them the opportunity to stay in the same location.
 Michael Nash Design, Build & Homes
Built in the early 1950s, this small urban townhouse is located in North Old Town Alexandria in an area currently undergoing major redevelopment. The neighborhood is popular with, and affordable for, young people and families, and very convenient to Washington, DC.
In its heyday, the townhouse touted a stately brick exterior, plaster walls, tongue and groove wood flooring and beautiful wooden staircase. Sixty years later, however, the homeowners were faced with crumbling masonry, sagging floors, a double layer of wallpaper over the plaster walls, a crumbling staircase, a dysfunctional kitchen and small, dark second floor rooms. Additionally, the basement had a low ceiling, moldy and cinder block walls, no plumbing and a large boiler taking up most of the space.
The homeowners’ goal was to restore the exterior’s historic look while creating an interior up-to-date for the 21st Century. To turn their vision into reality, they turned to Michael Nash Design, Build & Homes.
Design Solutions
To maintain the townhome’s historic exterior, the Michael Nash team carefully removed, salvaged, restored and reused existing brick masonry. Matching fascia boards and windows were combined with existing windows to complete the exterior renovation.
All interior walls were gutted and reframed. New electrical work, new insulation and new drywall were installed. Much of the home’s original trim was salvaged and reused, as was a piece of art glass, all to keep a bit of the past in the renovation.
The sagging subfloors were fixed, new hard wood floors were installed and a new staircase and railing were designed in a style similar to the original.
The solid wall between the kitchen and the dining room was removed, plumbing was relocated for new sink location and the kitchen got expanded with an eating island into the dining room. Closet and plumbing stacked were relocated to allow a new space for fridge. Stainless steel appliances, granite countertops and custom cabinetry highlight the new modern kitchen.
The plan called for redesigning the three bedrooms on the second floor to allow a larger bathroom, walk in closet and wider hallways. In addition to new roofing, a large skylight was installed to allow natural light into the bathroom and the upper hallway.
The basement was totally revamped. New plumbing was put in place for full bathroom, laundry room and a den. New e-grass window was installed in the basement to bring this basement up to current building codes.
This homeowners love the neighborhood and now their home gives them the opportunity to stay in the same location.
 Michael Nash Design, Build & Homes
Built in the early 1950s, this small urban townhouse is located in North Old Town Alexandria in an area currently undergoing major redevelopment. The neighborhood is popular with, and affordable for, young people and families, and very convenient to Washington, DC.
In its heyday, the townhouse touted a stately brick exterior, plaster walls, tongue and groove wood flooring and beautiful wooden staircase. Sixty years later, however, the homeowners were faced with crumbling masonry, sagging floors, a double layer of wallpaper over the plaster walls, a crumbling staircase, a dysfunctional kitchen and small, dark second floor rooms. Additionally, the basement had a low ceiling, moldy and cinder block walls, no plumbing and a large boiler taking up most of the space.
The homeowners’ goal was to restore the exterior’s historic look while creating an interior up-to-date for the 21st Century. To turn their vision into reality, they turned to Michael Nash Design, Build & Homes.
Design Solutions
To maintain the townhome’s historic exterior, the Michael Nash team carefully removed, salvaged, restored and reused existing brick masonry. Matching fascia boards and windows were combined with existing windows to complete the exterior renovation.
All interior walls were gutted and reframed. New electrical work, new insulation and new drywall were installed. Much of the home’s original trim was salvaged and reused, as was a piece of art glass, all to keep a bit of the past in the renovation.
The sagging subfloors were fixed, new hard wood floors were installed and a new staircase and railing were designed in a style similar to the original.
The solid wall between the kitchen and the dining room was removed, plumbing was relocated for a new sink location and the kitchen got expanded with an island into the dining room. Closet and plumbing stacks were relocated to allow a new space for fridge. Stainless steel appliances, granite countertops and custom cabinetry highlight the new modern kitchen.
The plan called for redesigning the three bedrooms on the second floor to allow a larger bathroom, walk-in closet and wider hallways. In addition to new roofing, a large skylight was installed to allow natural light into the bathroom and the upper hallway.
The basement was totally revamped. New plumbing was put in place for a full bathroom, laundry room and a den. New e-grass window was installed in the basement to bring this basement up to current building codes.
This homeowners love the neighborhood and now their home gives them the opportunity to stay in the same location.
 Kitchen Design Concepts
It’s amazing how new countertops, backsplash, appliances and a fresh coat of paint on the walls can change the look of an entire kitchen. With a kitchen that already had good bones, it’s a true case of what we like to call “lipstick and makeup.” The kitchen cabinetry was already white so we left the color as is, but even so, the space resulted in an even brighter environment. The main goals for the space was to improve the kitchen design aesthetically and also improve it’s functionality. We went out with the old and in with the new all while keeping the cabinetry! Want to see how we gave this space a makeover? Read on below!
But first, check out the space before the remodel
Cabinets
As mentioned above, we maintained the white cabinets but we also removed the black painted cabinets by the wall oven and replaced it with a new microwave and oven. This resulted in a more seamless look by removing the random black cabinets. Also, already having white cabinets gave us a taste of what the space was going to become.
Countertops
Replacing the countertops probably had the biggest impact on the space. Overall, it enhanced the space and also gave the kitchen a brighter quality. The new countertops are a 3cm Caesarstone London Grey. This a popular option because it has a marble-like look, but is much stronger than marble. The countertops really tied the whole space together!
Backsplash
Previously, the kitchen only had a 4” splashlette matching the countertop, so incorporating a tile backsplash was a major requirement for our clients and overall an upgrade to the space. The featured tiles are a 3×6 Desert Grey tiles from Daltile installed in a bricklay to the left and right of the sink, and and by the opening into the family room. The grey tone on the backsplash is a wonderful accent to the space!
Fixtures and Fittings
Lastly, it wouldn’t be complete without new fixtures and fittings! With new stainless steel appliances, the sink and faucet follow suit and match the finish. All from Blanco, we have a Stellar Super Single Bowl sink in a stainless steel refined brush finish, and a Grace II Pull-down faucet in a satin nickel finish.

 Michael Nash Design, Build & Homes
Built in the early 1950s, this small urban townhouse is located in North Old Town Alexandria in an area currently undergoing major redevelopment. The neighborhood is popular with, and affordable for, young people and families, and very convenient to Washington, DC.
In its heyday, the townhouse touted a stately brick exterior, plaster walls, tongue and groove wood flooring and beautiful wooden staircase. Sixty years later, however, the homeowners were faced with crumbling masonry, sagging floors, a double layer of wallpaper over the plaster walls, a crumbling staircase, a dysfunctional kitchen and small, dark second floor rooms. Additionally, the basement had a low ceiling, moldy and cinder block walls, no plumbing and a large boiler taking up most of the space.
The homeowners’ goal was to restore the exterior’s historic look while creating an interior up-to-date for the 21st Century. To turn their vision into reality, they turned to Michael Nash Design, Build & Homes.
Design Solutions
To maintain the townhome’s historic exterior, the Michael Nash team carefully removed, salvaged, restored and reused existing brick masonry. Matching fascia boards and windows were combined with existing windows to complete the exterior renovation.
All interior walls were gutted and reframed. New electrical work, new insulation and new drywall were installed. Much of the home’s original trim was salvaged and reused, as was a piece of art glass, all to keep a bit of the past in the renovation.
The sagging subfloors were fixed, new hard wood floors were installed and a new staircase and railing were designed in a style similar to the original.
The solid wall between the kitchen and the dining room was removed, plumbing was relocated for a new sink location and the kitchen got expanded with an island into the dining room. Closet and plumbing stacks were relocated to allow a new space for fridge. Stainless steel appliances, granite countertops and custom cabinetry highlight the new modern kitchen.
The plan called for redesigning the three bedrooms on the second floor to allow a larger bathroom, walk-in closet and wider hallways. In addition to new roofing, a large skylight was installed to allow natural light into the bathroom and the upper hallway.
The basement was totally revamped. New plumbing was put in place for a full bathroom, laundry room and a den. New e-grass window was installed in the basement to bring this basement up to current building codes.
This homeowners love the neighborhood and now their home gives them the opportunity to stay in the same location.
 Tile Doctor Ltd
Sandstone is a particularly popular choice for kitchen and hallway floors amongst home owners in the UK. It not only possesses beautiful natural shades and features, but it is also typically hard wearing, making it an ideal stone for tiled flooring in high traffic areas of a house and can often be found laid as large riven flagstones in pubs and other commercial premises.
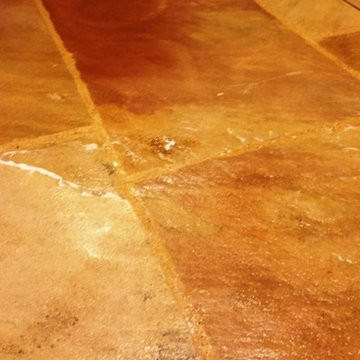
Naturally, just like any other type of tiled floor, Sandstone needs to be maintained using appropriate products and methods. A lack of adequate surface sealer in particular leaves Sandstone susceptible to ingrained dirt, and can leave distinct, unsightly patches such as those in the photograph below.
In this instance, I visited a client in the old Essex town of Thaxted, who believed that her four square meter Sandstone tiled floor might be suffering from damp issues after lifting up the mats covering the area.
However, when I arrived at the property and ran damp tests, I found the issue to be superficial. The Sandstone floor however did require attention in the form of a deep clean and a fresh seal to tackle the white patches and prevent further discolouration.
To begin the cleaning process I spread Tile Doctor Remove & Go evenly across the floor. It was left to dwell for approximately 15 minutes, during which time it worked to break down the old sealer remaining on the tiles. I then agitated the area twice over with both a black scrubbing pad fitted to a rotation machine lift away any dirt.
The resultant slurry was removed using a wet vacuum and the floor was then rinsed with water and then mixed a strong solution of one part Tile Doctor Pro Clean to three parts water which was used to give the floor a final clean and scrub the grout clean before using the wet vacuum again and giving the floor a final rinse with water.
After completing the cleaning process I left the floor to dry over the weekend. Upon my return to the house I proceeded to seal the tiles with three coats of Tile Doctor Colour Grow which is an impregnating sealer that soaks into the pores of the stone and provide durable surface protection going forward. Colour Grow is also specially designed to let the floor breathe and enhance the natural colours in the stone and, in this case, really helped to intensify the natural sand-coloured shades in the tiles.
The difference made to these Sandstone tiles was really noticeable, with the white patches completely removed and the surface more generally back to looking like new, needless to say, my client was very happy with the results.
Nick Murphy
South Essex Tile Doctor
 Story Homes
Jacuzzis were popular when this two-story 4-bedroom home was built in 1983. The owner was an architect who helped design this handicapped-accessible home with beautiful backyard views. But it was time for a master bath update. There were already beautiful skylights and big windows, but the shower was cramped and the Jacuzzi with its raised floor just wasn’t working.
The project began with the removal of the Jacuzzi, the raised floor, and all the associated plumbing. Next, the old shower, vanity, and everything else was stripped right down to the studs.
The before-during-after photos show how a deep built-in cabinet was created by “borrowing” some space from the master bedroom. A wide glass pocket door is installed in the adjacent wall.
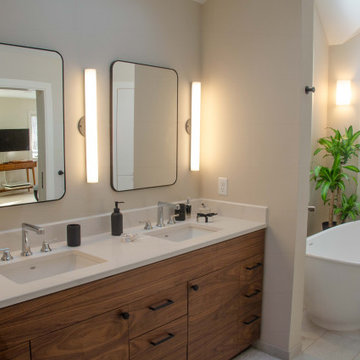
Without the Jacuzzi this space has become a large, bright, warm place for long baths. Tall ceilings and skylights make this room big and bright. The floor features 12” x 24” stone tile and in-floor heating, with complimentary 2” X 2” tiles for the shower.
The white free-standing tub looks great with polished chrome floor-mounted tub filler and hand shower. With several live plants, this room is often used as a comfortable space for relaxing soaks on cold winter days. (Photos taken on Dec. 22)
On the other side of the room is a large walk-in shower. Additional shower space was gained by removing a built-in cabinet and relocating the plumbing. Glass doors and panels enclose the new shower, and white subway wall tile is the perfect choice.
But the bath’s centerpiece could arguably be the beautifully crafted vanity. Solid walnut doors and drawers are constructed so that the grain matches and flows, like a work of art or piece of furniture.
The vanity is finished with a white quartz countertop and two under-mounted sinks with polished chrome fixtures. Two big mirrors with three tall warm-colored lights make this both a functional and beautiful room.
The result is amazing. A great combination of good ideas and thoughtful construction.
26