
Search results for "Remove soil" in Home Design Ideas
 C.E. Pontz Sons
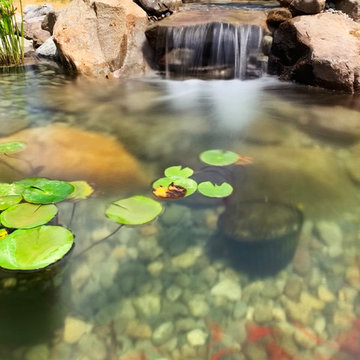
This Project included bringing an 18 year old pond back to life. We began this project by dismantling the existing pond and removing all rocks, gravel, liner and catching the fish and frogs and stored them in a safe aeration tank during the construction of the new pond. We ran into a ton of cement blocks from the existing pond which were a nightmare to remove, but none the less we prevailed. After everything was removed we shaped up the the soil for the new pond installation. A fabric underlayment is first installed beneath the liner to protect it. A new 45 mil fish safe epdm liner was installed on top and we then began to rock in the pond using larger rocks so that kids can enter safely and access for pond plant maintenance. Shelves were installed at different elevations for aquatic plants. The skimmer installation makes for easier pond maintenance and to keep the pond pump free from pond debris. An overflow was plumbed from the skimmer to the downspout to allow the pond to take on rain water and dewater more cleanly. A biofalls filtration unit was installed on the top pond to filter the system and is also the upper waterfall area that aims towards the dining room window for viewing from inside the home and upper patio area. What an amazing transformation.
 Tile Doctor Ltd
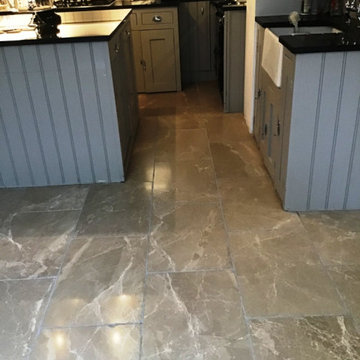
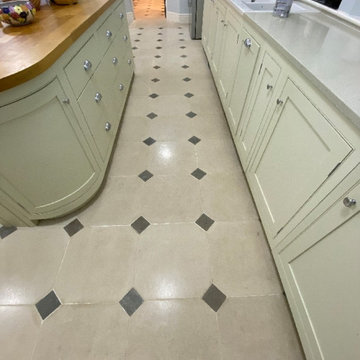
This Limestone tiled floor installed in a kitchen and family room at a property in Wellingborough is a great example of how this material can lose its appearance without a regular maintenance plan in place.
The customer called me as not only was she concerned that the floor had lost its lustre the grey grout had become very stained and almost black in heavy traffic areas, in fact my customer had originally asked about re-grouting but I was confident it could be cleaned.
I provided a quote which they were happy to accept.
The area was a nice wide 6 metre by 5 metre space and except for a few items of furniture that would need moving around there were relatively few obstacles. I reasoned the most efficient way to restore the polished appearance of the Limestone would be to use a set of diamond encrusted Burnishing Pads. These are fitted to a rotary machine and applied to the stone in sequence from coarse to smooth. It’s an effective process that cuts back the layer of dirt on the floor and then we build back up the polish.
We started burnishing the Limestone with a coarse 400-grit pad fitted to a rotary machine and applied with a little water for lubrication. The coarse pad is very good at removing dirt and old sealers from stone and once completed the resultant surface water and loose dirt is removed using a wet vacuum.
At this point I turned my attention to the badly stained grout lines, and applied a strong solution of Tile Doctor Pro-Clean which was scrubbed in along the grout lines using a stiff grout brush, this is necessary as the recessed nature of the grout makes it difficult for the rotary pads to reach it.
I then repeated the burnishing process with the medium 800-grit pad and fine 1500-grit pad, the 800-grit pad removes any small surface scratches and the 1500-grit further refines the look of the Limestone slowly restoring its polished appearance.
After the whole floor had been burnished in this way it was given a further rinse with water and the soil extracted as before. I then inspected the floor to see if more work would be needed.
I was not fully happy with how some of the grout lines had responded, some were still slightly stained, and some marks were visible in the high traffic areas. I had already discussed on my initial visit with the client that this might be the case and it was agreed between us that should this be the case I would apply a Tile Doctor Grout Colourant in Light Grey to recolour all the grout lines and achieve a uniform finish.
The stone and grout was still damp from cleaning and polishing, so I decided to leave the grout colouring until the following day.
On day two I started by grout recolouring all the grout lines, it’s a straight forward process but can be a little tedious where there is a lot of grout to cover. Once complete I allowed the grout colour to dry for a couple of hours before moving onto the next step.
The last pad to be applied in the stone burnishing process is the very fine 3000-grit polishing pad which is applied dry to the tiles using a small amount of water sprayed onto the floor and leaves the stone dry and with a polished silk finish.
The floor was then sealed using two coats of Tile Doctor Ultra Seal Sealant allowing the first coat to dry before applying the second. Ultra-Seal is an impregnating sealer that works by occupying the pores in the stone thereby preventing dirt from becoming ingrained there. It’s also a natural look sealer that doesn’t affect the appearance of the stone.
My customer was very happy with the transformation of her floor and provided the feedback copies below. In-fact she was so impressed with the results that she also used our services to restore the grout and silicon in one of her bathrooms.
“Phil was on time & easy to deal with and did an amazing job on my kitchen and bathroom floors and the carpets & sofa. No fuss, just a great job. Liz O.”
Phil Vissian
Northamptonshire Tile Doctor
 Tile Doctor Ltd
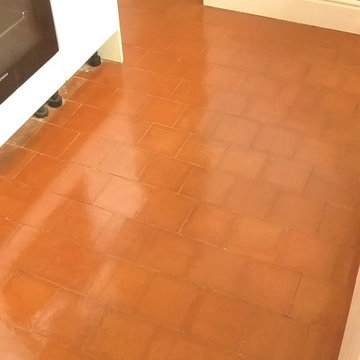
Here’s a job I recently completed in the heartland of the English pottery industry, Stoke-on-Trent. In this particular instance I was commissioned by my client to restore the appearance of the Quarry tiled floor in her kitchen which as you can see from the photo below was far from looking it’s best. Quarry tiles are typically a very hard wearing stone, but in high traffic areas like a kitchen, even this type of tile will require regular maintenance.
My first task, before beginning the restoration, was to remove the kickboards from around the bottom of the kitchen units, to prevent them from being damaged during the process. The next step was to acid wash the tiles using Tile Doctor Grout Clean-Up which was scrubbed into the tiles to remove old grout and plaster that had become stuck to the surface of the tiles at some point in the past. Once this had done its job I rinsed the entire floor with water washing away the excess soiled residue and any trace of acid.
The next step was to give the tiles a good clean using Tile Doctor Pro Clean, which is a high alkaline cleaner suitable for use on a range of natural stone floors. This was left to dwell on the tiles for ten minutes, allowing it time to seep into the stone to get underneath – and lift out – the ingrained dirt. I then agitated the solution with a scrubbing brush to remove the muck from the surface of the tiles. The floor was then given another rinse with water, and this was extracted using a wet vacuum.
I left the floor to dry after cleaning for more than 24 hours, making sure that it would be ready for sealing the next day. Upon my return to the house I checked the floor was dry and then sealed the floor using four coats of Tile Doctor Seal & Go, which provides a robust surface seal and a durable low-sheen finish. The product is suitable for use on internal, unsealed, porous surfaces.
The photographs above bears witness to the massive improvement which has been made to the quarry tiles, which has not only completely transformed the look of the tiles but also the appearance of the kitchen.
Trevor Preece
Staffordshire Tile Doctor
Find the right local pro for your project
 Tile Doctor Ltd
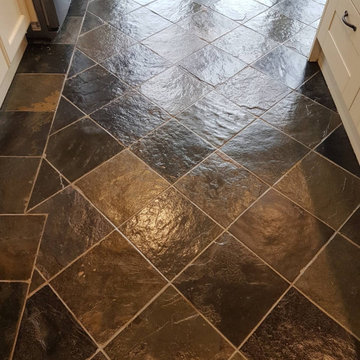
Pictured below is a Slate tiled kitchen floor that had been installed in the kitchen of a property in Harrogate around fifteen years prior. I discovered that the tiles had never been cleaned and resealed since installation and this explained why they were now looking dull and un-interesting. They had lost all character and it wasn’t until I started cleaning them that I realised the must be of the multicoloured Brazilian Slate variety.
As well as looking dull and unattractive, there was also some water damage to some tiles caused by a leak, this had resulted in some shaling and efflorescence staining. This had occurred some time ago and the floor had now dried out fully, so I was not expecting any further efflorescence issues going forward.
Brazil, I understand is the world’s 2nd biggest producer of Slate, it is also exceptionally durable and reasonably priced so its not surprising you see a lot of it over in the UK. Like any natural stone however it is porous and without a sealer to protect it and bring out those natural colours it soon ends up like the example on this pad.
I cleaned the floor with a strong dilution of Tile Doctor Pro-Clean using my usual method of spraying the cleaning solution onto the Slate and grout and then leaving it for a ten minutes to soak in and get to work breaking down the dirt and old sealers. Although I doubted there was much sealer left on the floor after all this time you need to be sure to remove all of it to get the best result. The floor was then scrubbed with a rotary floor buffer fitted with a black scrubbing pad, then after rinsing with water and extracting the soil I inspected the floor.
I detected there was still some sort of sealer present in some of less used parts of the floor, it was proving stubborn to remove so I suspect it may have been an old fashioned wax based product that was used. Not a problem though we Tile Doctors have a solution to every problem, so I spot treated the stubborn areas with Tile Doctor Wax Away to see if I was right. After scrubbing that in followed by another rinse and extraction with the wet vacuum I was pleased to see I was right and was happy all the old seal had now been removed. I gave the floor another rinse at the end of the day and dried it as much as possible with the wet vacuum, then left it to dry off fully overnight.
I came back the next day and checked the floor was dry with a damp meter. The readings were good, so I was able to crack on and seal the tiles using several coats of Tile Doctor Seal and Go. Each coat was applied leaving time to dry between each layer. This gave the floor a uniform appearance which disguised the damaged tiles. It will also help to stop more cracking and reduce the appearance of the efflorescence. The sealer really brought out the natural colours in the Brazilian Slate and the floor looked transformed.
I’m sure you will agree it was a vast improvement, certainly my client was very happy and couldn’t believe the difference I had managed to achieve. Before leaving I recommended, they should invest in some Tile Doctor Neutral Tile Cleaner which would ensure the newly applied seal was prematurely eroded away which is a problem with many of the stronger products you find in supermarkets.
Nigel Stoker
North West Yorkshire Tile Doctor
 Tile Doctor Ltd
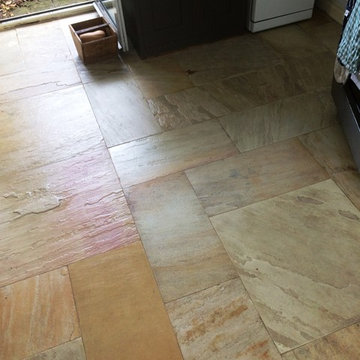
I was recently contacted by a client who had just moved into a house in Crowborough, a town in East Sussex which by the way was once home to Sir Arthur Conan Doyle, the author of the Sherlock Holmes novels and short stories. The riven Slate tiled floor in the kitchen had trapped bits of dirt and also food which had become ingrained in the tile. Needless to say, the new homeowner wanted to give the kitchen floor a thorough clean. However, she had tried every cleaning product she could find in the supermarket, but to no avail. Struggling to find a solution she sought out professional assistance and naturally I was happy to help.
My first task was to mix up a strong solution of Tile Doctor Pro-Clean. The product was only slightly diluted with water, since the floor was quite heavily soiled and a higher concentration of Pro-Clean was needed to help remove several layers of dirt and food waste. Once applied to the floor, the solution was left to dwell for roughly five minutes before I began to work it into the stone with a deck brush. I did the best I could here to clean the floor without using my buffing machine as, since the floor was riven, my black buffing pad would have been ruined by the ridges.
Making up for the lack of a buffing machine, I made sure to scrub the floor with Pro-Clean for several hours to remove as much grime as possible. One the cleaning was finally completed I rinsed the floor several times with clean, hot water. I then used a wet-dry vac machine to remove any excess moisture to clear the floor for sealing when I returned 48 hours later. Upon leaving, I left my client with instructions to avoid spilling anything on the floor as, again, any liquid left on the surface might affect the performance of the sealer.
After a period of two days, I returned to commence the sealing. My choice of sealer was Tile Doctor Seal & Go, which is suitable for use on internal, unsealed surfaces such as Slate, textured Quarry, Victorian tile, and others. Seal and Go is also a water based sealer so you there’s very little smell given off whilst it dries compares to solvent based sealers. In this case, the client did not want the surface of the floor to be too shiny, so I only used two coatings of Seal & Go, whereas for a shinier result I would have used a few more.
My client was exceptionally pleased with the results, which had not only cleaned the floor but brought out the beautiful colours in the stone that had once been hidden under several layers of muck.
 C.E. Pontz Sons
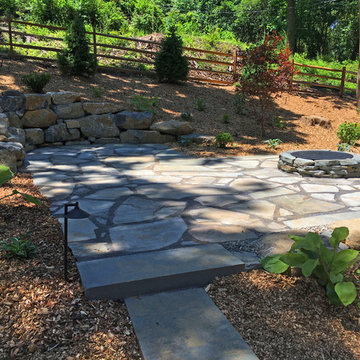
This Wooded Retreat project started with the removal of a large area of bamboo roots, re-grading the area after, and installing bamboo containment barrier. All root materials were be excavated and disposed of off site. We then graded the side yard to eliminate mounds and low areas, removed rocks and boulders which were be used on front bank. Grading was also done in preparation for fence installation. Bamboo containment barrier was installed from street down to back of property.
2 truckloads of top soil was hauled in to fill areas where bamboo roots were excavated. The newly installed topsoil was fine graded to prep for the fence and plantings.
Tree work including tree trimming and tree removal throughout the site was done by Arborist Enterprises.
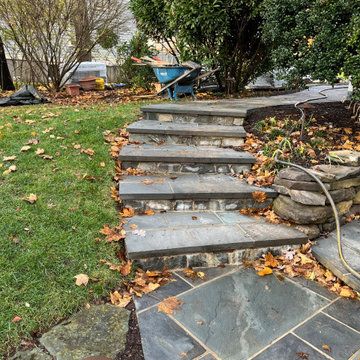
This luxurious portion of this project included a complete landscape design featuring Trees and shrub installation with all disturbed ground covered with natural wood chips. Natural stone steps along driveway were installed using local gray/earth tone treads. The patio surface was installed using natural irregular flagstone, natural stone treads for steps, and PA Limestone boulders to retain grade around patio. The fire pit consisted of a natural stacked stone ring and ‘Zentro’ Smokeless Fire Pit insert. Natural stone paths were installed using natural large irregular flagstone slabs. All landscape lighting installed was Kichler LED light fixtures.
 C.E. Pontz Sons
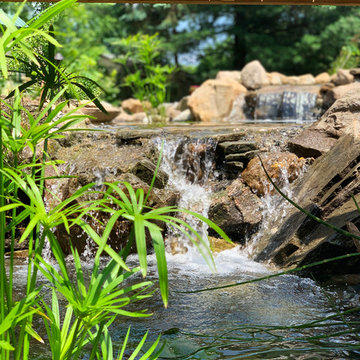
This Project included bringing an 18 year old pond back to life. We began this project by dismantling the existing pond and removing all rocks, gravel, liner and catching the fish and frogs and stored them in a safe aeration tank during the construction of the new pond. We ran into a ton of cement blocks from the existing pond which were a nightmare to remove, but none the less we prevailed. After everything was removed we shaped up the the soil for the new pond installation. A fabric underlayment is first installed beneath the liner to protect it. A new 45 mil fish safe epdm liner was installed on top and we then began to rock in the pond using larger rocks so that kids can enter safely and access for pond plant maintenance. Shelves were installed at different elevations for aquatic plants. The skimmer installation makes for easier pond maintenance and to keep the pond pump free from pond debris. An overflow was plumbed from the skimmer to the downspout to allow the pond to take on rain water and dewater more cleanly. A biofalls filtration unit was installed on the top pond to filter the system and is also the upper waterfall area that aims towards the dining room window for viewing from inside the home and upper patio area. What an amazing transformation.


 C.E. Pontz Sons
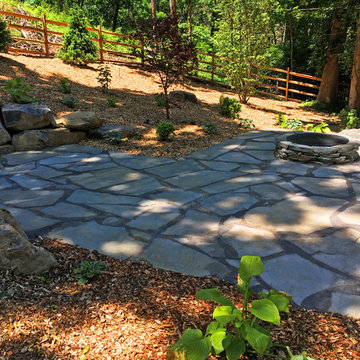
This Wooded Retreat project started with the removal of a large area of bamboo roots, re-grading the area after, and installing bamboo containment barrier. All root materials were be excavated and disposed of off site. We then graded the side yard to eliminate mounds and low areas, removed rocks and boulders which were be used on front bank. Grading was also done in preparation for fence installation. Bamboo containment barrier was installed from street down to back of property.
2 truckloads of top soil was hauled in to fill areas where bamboo roots were excavated. The newly installed topsoil was fine graded to prep for the fence and plantings.
Tree work including tree trimming and tree removal throughout the site was done by Arborist Enterprises.
This luxurious portion of this project included a complete landscape design featuring Trees and shrub installation with all disturbed ground covered with natural wood chips. Natural stone steps along driveway were installed using local gray/earth tone treads. The patio surface was installed using natural irregular flagstone, natural stone treads for steps, and PA Limestone boulders to retain grade around patio. The fire pit consisted of a natural stacked stone ring and ‘Zentro’ Smokeless Fire Pit insert. Natural stone paths were installed using natural large irregular flagstone slabs. All landscape lighting installed was Kichler LED light fixtures.
 Great American Landscapes
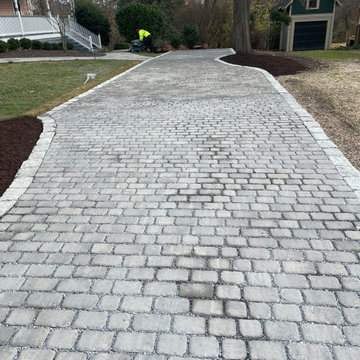
Over a span of two years we completed several projects at this Tokoma Park, Maryland property. We cleaned up the backyard, renovated an existing swale, and installed water loving plants. The following year, we replaced the old pea gravel driveway with a permeable paver driveway. While doing the driveway we encountered spongey clay that was saturated from a leaking water line. We had to install concrete piers down to virgin soil to bear the weight of the walkway. The driveway excavation had to take into account the root zones of large trees. To avoid the surface roots we used a minimal excavation design.
Our ultimate goal with this project was to ensure that the new walkways provided a safe and comfortable path for the homeowners and guest to get from their cars to porch whether parked along the street or in the driveway. To provide an extra layer of security, we added low-voltage lighting to accent trees and light the walkway, which were programmed to come on at dusk and turn off automatically at dawn.
The new plantings are native species including River Birch, Swamp Hibiscus, Blue Flag Iris, and Common Rush, that are adapted to growing in wet soils. The permeable paver driveway will reduce runoff by storing rain in gravel base while allowing it to be absorbed into the soil below. The paver surface eliminates the tracking of pea gravel into the house while allowing heels to walk on it without sinking in. The swale handles runoff from all the uphill properties and the gravel keeps it from becoming a soggy mess.
During seasonal months, snow and leaf removal are greatly eased by having a hard surface to shovel or rake. The permeable pavers used are Techo-Bloc Villagio in Shale Grey and we installed a granite Belgian block border. We replaced existing broken concrete walkway with new curving flagstone walkway and connected the front steps to the driveway and side steps. All projects were consulted with the City of Takoma Park’s Urban Forest Manager, and the Montgomery County Historical Preservation Commission.
 Tile Doctor Ltd
If you want a polished stone floor to keep its appearance, then it will need a regular maintenance plan in place, without it the stone will lose its polish and start to look dull and un-inviting which was the story with this Travertine tiled floor installed throughout much of the grout floor of this house in the village of Great Wilbraham near Cambridge.
I was able to find out from the owner that the floor was last treated six years ago with Lithofin Stain Stop which is a solvent based impregnating sealer which like all sealers will wear off after a few years. Naturally this depends on the amount of wear the floor receives and what tends to happen is this process occurs more rapidly in the high traffic areas leading to an uneven appearance.
The best course of action now would be to remove what was left of the sealer and re-polish and seal the floor.
During my inspection of the floor I had noticed a number of irregular holes in one of the Travertine tiles which needed filling with a colour matching filler; this worked out quite well and as you can see from the photographs below the result looked entirely natural.
After protecting the clients skirting boards with protective film we proceeded to burnish the floor through with a set of Tile Doctor Diamond encrusted honing pads.
During the application of the first coarse pad we also added a strong dilution of Tile Doctor Pro-Clean combined with NanoTech Ultra-Clean to aid the removal of sealer residues from the pores of the Travertine. The floor was then rinsed and the soiled solution extracted using a wet vacuum.
With the sealer remove we were now able to concentrate on building up the polish on the stone by applying the remaining pads from Medium, Fine through to Very Fine, each lubricated with a little water and ensuring to rinse in-between the application of each pad.
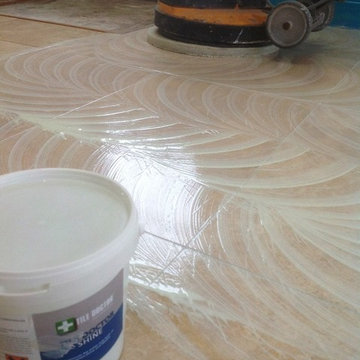
With the floor now clean and the polish restored the last step was to protect it so it would keep its appearance for as long as possible. There are a number of solutions for this but for a long durable shine I opted to work Tile Doctor Shine Powder into the Travertine.
The powder is applied liberally to the floor and then ground in using a slow speed floor rotary machine fitted with a white or tan buffing pad lubricated with water.
The shine on the floor has now been restored and the client has a beautiful and durable finish to their Travertine tiles.
Mick Conlon
Cambridge Tile Doctor
 Great American Landscapes
Over a span of two years we completed several projects at this Tokoma Park, Maryland property. We cleaned up the backyard, renovated an existing swale, and installed water loving plants. The following year, we replaced the old pea gravel driveway with a permeable paver driveway. While doing the driveway we encountered spongey clay that was saturated from a leaking water line. We had to install concrete piers down to virgin soil to bear the weight of the walkway. The driveway excavation had to take into account the root zones of large trees. To avoid the surface roots we used a minimal excavation design.
Our ultimate goal with this project was to ensure that the new walkways provided a safe and comfortable path for the homeowners and guest to get from their cars to porch whether parked along the street or in the driveway. To provide an extra layer of security, we added low-voltage lighting to accent trees and light the walkway, which were programmed to come on at dusk and turn off automatically at dawn.
The new plantings are native species including River Birch, Swamp Hibiscus, Blue Flag Iris, and Common Rush, that are adapted to growing in wet soils. The permeable paver driveway will reduce runoff by storing rain in gravel base while allowing it to be absorbed into the soil below. The paver surface eliminates the tracking of pea gravel into the house while allowing heels to walk on it without sinking in. The swale handles runoff from all the uphill properties and the gravel keeps it from becoming a soggy mess.
During seasonal months, snow and leaf removal are greatly eased by having a hard surface to shovel or rake. The permeable pavers used are Techo-Bloc Villagio in Shale Grey and we installed a granite Belgian block border. We replaced existing broken concrete walkway with new curving flagstone walkway and connected the front steps to the driveway and side steps. All projects were consulted with the City of Takoma Park’s Urban Forest Manager, and the Montgomery County Historical Preservation Commission.
 Ecology Artisans
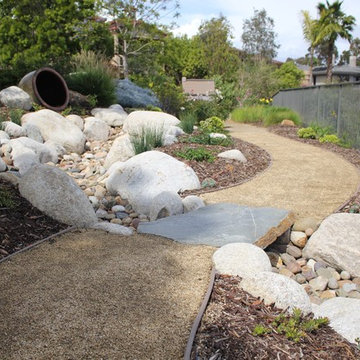
Dry creek crossing under the stone bridge on a dg pathway. Water flows off the roof and trickles through the streambed to allow for more soil infiltration and less run off. ©Ecology Artisans

 Tile Doctor Ltd
The pictures showed are of an Encaustic Cement tiled floor that had been installed in the bathroom of a property in Twickenham. At the time the tiles were installed, they did not seal them and had since accumulated dirt, especially in the grout lines.
Encaustic cement tiles have become extremely popular in the last few years with many beautiful artistic often geometric patterns available to choose from. The very nature of the cement-based tile however does make it slightly porous, and if left unsealed dirt will become ingrained in the tile making it difficult to remove and keep clean. Like grout they do therefore need to be sealed in order to keep them looking at their best for longer.
Now we normally recommend using diamond encrusted burnishing pads when renovating Encaustic Cement tiles however in this case the face of the tiles were not too bad and it was really the grout that needed the most attention. So, to cut the cost for customer, I advised a straightforward alkaline scrub clean and seal.
To clean the tile and grout I sprayed the floor with a strong dilution of Tile Doctor Pro-Clean and left it to soak into the dirt for ten minutes. Space in the bathroom was quite tight so instead of using a mechanical floor scrubber I scrubbed the tile and grout by hand working the alkaline cleaning solution into the pores to release the grout in dirt.
After scrubbing the floor was rinsed with a little water and the soil removed with a wet vacuum. Afterwards the floor was inspected, and any stubborn areas retreated with repeat of the process. After a final rinse, the floor was dried as much as possible with the wet vacuum.
Fortunately, the weather has been amazing of late and so it did not take long for the floor to dry, being a small space and a little encouragement from a heat gun always helps. Removing excess moisture before sealing is essential as even a small amount can cloud the sealer resulting in an uneven appearance.
Once satisfied that the floor was dry, I proceeded to seal it by applying a couple two coats of Tile Doctor Colour Grow across the Encaustic tile and grout. As an impregnating sealer Colour Grow penetrates the pores of the cement occupying the space and thus prevent any dirt from becoming ingrained there. Colour Grow’s colour intensifying properties also helped to deepen the black colour of the tile enhancing the contrast between the tiles and grout.
Now the floor has been properly sealed it will be far easier for the customer to keep them clean in future. For maximum longevity of the sealer I recommend maintenance cleaning with Tile Doctor Neutral Cleaner. Don’t be tempted to use supermarket cleaning products without reading the label first, many are simply too strong for cleaning sealed surfaces and will strip off the sealer prematurely leaving the tiles unprotected.
Jonathan Oldham
South Middlesex Tile Doctor
 Great American Landscapes
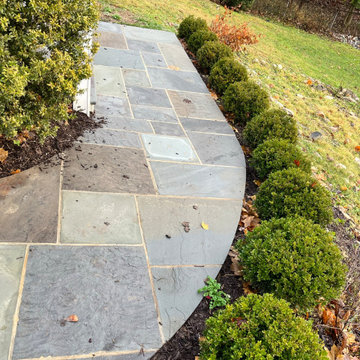
Over a span of two years we completed several projects at this Tokoma Park, Maryland property. We cleaned up the backyard, renovated an existing swale, and installed water loving plants. The following year, we replaced the old pea gravel driveway with a permeable paver driveway. While doing the driveway we encountered spongey clay that was saturated from a leaking water line. We had to install concrete piers down to virgin soil to bear the weight of the walkway. The driveway excavation had to take into account the root zones of large trees. To avoid the surface roots we used a minimal excavation design.
Our ultimate goal with this project was to ensure that the new walkways provided a safe and comfortable path for the homeowners and guest to get from their cars to porch whether parked along the street or in the driveway. To provide an extra layer of security, we added low-voltage lighting to accent trees and light the walkway, which were programmed to come on at dusk and turn off automatically at dawn.
The new plantings are native species including River Birch, Swamp Hibiscus, Blue Flag Iris, and Common Rush, that are adapted to growing in wet soils. The permeable paver driveway will reduce runoff by storing rain in gravel base while allowing it to be absorbed into the soil below. The paver surface eliminates the tracking of pea gravel into the house while allowing heels to walk on it without sinking in. The swale handles runoff from all the uphill properties and the gravel keeps it from becoming a soggy mess.
During seasonal months, snow and leaf removal are greatly eased by having a hard surface to shovel or rake. The permeable pavers used are Techo-Bloc Villagio in Shale Grey and we installed a granite Belgian block border. We replaced existing broken concrete walkway with new curving flagstone walkway and connected the front steps to the driveway and side steps. All projects were consulted with the City of Takoma Park’s Urban Forest Manager, and the Montgomery County Historical Preservation Commission.
 C.E. Pontz Sons
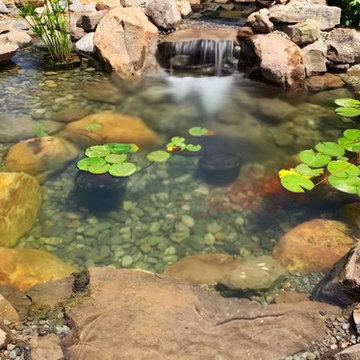
This Project included bringing an 18 year old pond back to life. We began this project by dismantling the existing pond and removing all rocks, gravel, liner and catching the fish and frogs and stored them in a safe aeration tank during the construction of the new pond. We ran into a ton of cement blocks from the existing pond which were a nightmare to remove, but none the less we prevailed. After everything was removed we shaped up the the soil for the new pond installation. A fabric underlayment is first installed beneath the liner to protect it. A new 45 mil fish safe epdm liner was installed on top and we then began to rock in the pond using larger rocks so that kids can enter safely and access for pond plant maintenance. Shelves were installed at different elevations for aquatic plants. The skimmer installation makes for easier pond maintenance and to keep the pond pump free from pond debris. An overflow was plumbed from the skimmer to the downspout to allow the pond to take on rain water and dewater more cleanly. A biofalls filtration unit was installed on the top pond to filter the system and is also the upper waterfall area that aims towards the dining room window for viewing from inside the home and upper patio area. What an amazing transformation.
 Ecology Artisans
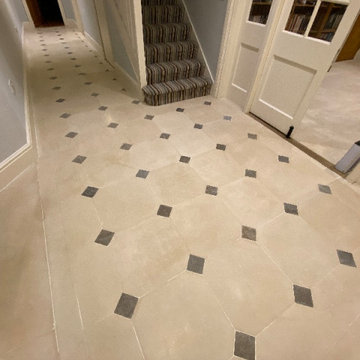
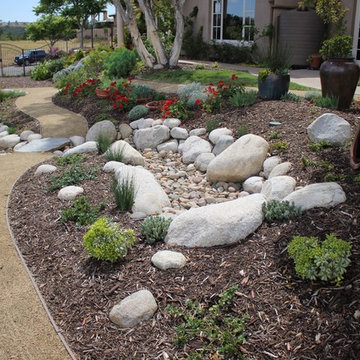
Water harvesting dry streambed. This area was a bland, dying turf area that we integrated into the existing landscape. We piped roof rainwater via an existing downspout into this streambed of cobble to allow it to infiltrate during rain events to help hydrate the soil and prevent more water from reaching the ocean without infiltration. ©Ecology Artisans
 C.E. Pontz Sons
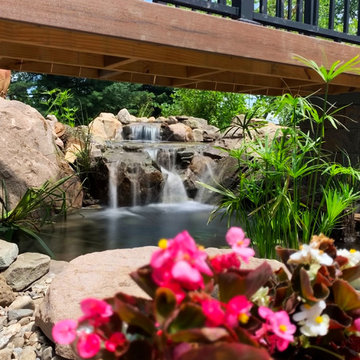
This Project included bringing an 18 year old pond back to life. We began this project by dismantling the existing pond and removing all rocks, gravel, liner and catching the fish and frogs and stored them in a safe aeration tank during the construction of the new pond. We ran into a ton of cement blocks from the existing pond which were a nightmare to remove, but none the less we prevailed. After everything was removed we shaped up the the soil for the new pond installation. A fabric underlayment is first installed beneath the liner to protect it. A new 45 mil fish safe epdm liner was installed on top and we then began to rock in the pond using larger rocks so that kids can enter safely and access for pond plant maintenance. Shelves were installed at different elevations for aquatic plants. The skimmer installation makes for easier pond maintenance and to keep the pond pump free from pond debris. An overflow was plumbed from the skimmer to the downspout to allow the pond to take on rain water and dewater more cleanly. A biofalls filtration unit was installed on the top pond to filter the system and is also the upper waterfall area that aims towards the dining room window for viewing from inside the home and upper patio area. What an amazing transformation.
 Great American Landscapes
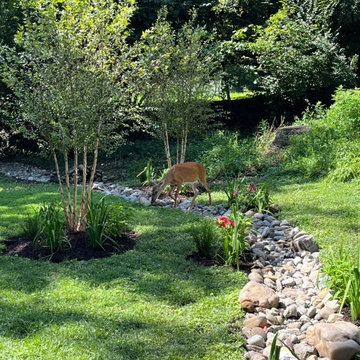
Over a span of two years we completed several projects at this Tokoma Park, Maryland property. We cleaned up the backyard, renovated an existing swale, and installed water loving plants. The following year, we replaced the old pea gravel driveway with a permeable paver driveway. While doing the driveway we encountered spongey clay that was saturated from a leaking water line. We had to install concrete piers down to virgin soil to bear the weight of the walkway. The driveway excavation had to take into account the root zones of large trees. To avoid the surface roots we used a minimal excavation design.
Our ultimate goal with this project was to ensure that the new walkways provided a safe and comfortable path for the homeowners and guest to get from their cars to porch whether parked along the street or in the driveway. To provide an extra layer of security, we added low-voltage lighting to accent trees and light the walkway, which were programmed to come on at dusk and turn off automatically at dawn.
The new plantings are native species including River Birch, Swamp Hibiscus, Blue Flag Iris, and Common Rush, that are adapted to growing in wet soils. The permeable paver driveway will reduce runoff by storing rain in gravel base while allowing it to be absorbed into the soil below. The paver surface eliminates the tracking of pea gravel into the house while allowing heels to walk on it without sinking in. The swale handles runoff from all the uphill properties and the gravel keeps it from becoming a soggy mess.
During seasonal months, snow and leaf removal are greatly eased by having a hard surface to shovel or rake. The permeable pavers used are Techo-Bloc Villagio in Shale Grey and we installed a granite Belgian block border. We replaced existing broken concrete walkway with new curving flagstone walkway and connected the front steps to the driveway and side steps. All projects were consulted with the City of Takoma Park’s Urban Forest Manager, and the Montgomery County Historical Preservation Commission.
18