
Search results for "Remove soil" in Home Design Ideas
 Colorworks Landscape Design
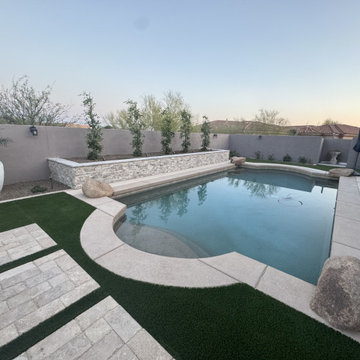
This Scottsdale property got a full design refresh — blending form, function, and serious style. Here’s a look at what went into this elevated outdoor space:
- Removed existing turf, patios, concrete, and old seat walls
- Built a custom 24” planter wall with stone veneer + bullnose travertine cap
- Installed a 6’ fire pit with travertine trim and 150 lbs of fire glass — featuring a custom fire bar
- Laid over 1,000 SF of premium 80oz artificial turf with a travertine border (pet-friendly, too!)
- Planted citrus, palms, ficus, and lush accents with drip irrigation
- Added boulders, rip rap, granite, and soil sculpting for depth & contrast
- Integrated low-voltage LED lighting
- Grading, gas lines, drip zones, and a full CAD plan completed the vision
 Tile Doctor Ltd
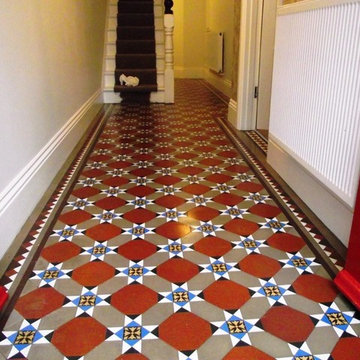
These Victorian hallway tiles were cleaned at a residence in the historic town of Bideford. As you can see from the photograph below the tiles were dull and had lost their vitality due to ingrained dirt, clearly it had been some time since they were given a good deep clean.
Cleaning a Victorian Floor
The first job was to protect the skirting with tape and then vacuum to remove any loose debris and grit. The next step was to cover the entire floor with a strong dilution of Tile Doctor Remove and Go which is a powerful cleaning and coating remover that is safe to use on tile and stone. It was left to dwell on the floor for twenty minutes so it could soak into the tile and make the job of removing any remaining sealer and ingrained dirt easier.
The solution was scrubbed into the tile using a black scrubbing pad fitted to a rotary machine and then the soiled cleaning solution rinsed off using a wet vacuum. This process was repeated a number of times until I was satisfied with the condition of the floor and followed with a final rinse with clean water to remove any trace of cleaning product. The water was extracted with the wet vacuum to get the floor as dry as possible before leaving for the day.
Sealing a Victorian Floor Sealing
The tiles were left to dry for 24 hours and I came back to seal the tiles using eight to nine coats of Tile Doctor Seal and Go which is an ideal sealer for Victorian Tiles as it leaves a nice sheen and provides excellent stain protection.
I think you will agree the hallway floor came up really well and now been given a new lease of life.

 Deck and Patio Company "Outdoor Living Experts"
For this same project, Marc Wiener also incorporated creeping evergreen ground covers that cascade and wind over and between the rocks we used. His expert selection of plants provides color from April through October; the whole design flows beautifully into the back property.
www.deckandpatio.com
Find the right local pro for your project

 Linda Estrin Garden Design
MEDITERRANEAN, TRADITIONAL, CALIFORNIA, LOS ANGELES, MALIBU, CALABASAS, SANTA MONICA, THOUSAND OAKS, SHERMAN OAKS, WEST HILLS, PACIFIC PALISADES, NORTH RANCH, AGOURA, AGOURA HILLS, SOUTHERN CALIFORNIA, SUCCULENTS, ECLECTIC, OAK PARK, DECOMPOSED GRANITE, AUSTRALIAN PLANTS, CALIFORNIA NATIVE, CALIFORNIA NATIVE PLANTS, SUSTAINABLE, RAIN CAPTURE, SOIL HEALTH, RUSTIC, ENGLISH GARDEN, DROUGHT TOLERANT, DROUGHT RESISTANT, LAWN REMOVAL, WATER CONSERVATION, WATER CONSERVING, WATERWISE, LOW MAINTENANCE, CLIMATE, FRONT YARD, BACK YARD, BACKYARD, PATIO, POOL, SOUTHWESTERN, ASIAN, WALKWAY, SUCCULENT POTS, GRAVEL, EDIBLE, LANDSCAPE, POOL, GARDEN, GARDEN DESIGN, SUCCULENT GARDEN, SUCCULENT POTS, REBATE, SUCCULENT WALL, LIVING WALL, DRAFTING, HARDSCAPE, HARDSCAPING, LIGHTING, FOUNTAIN, WATER FEATURE, LOW WATER, DRIP IRRIGATION, FIRE PIT, SANTA BARBARA, OXNARD, VENTURA,
 C.E. Pontz Sons
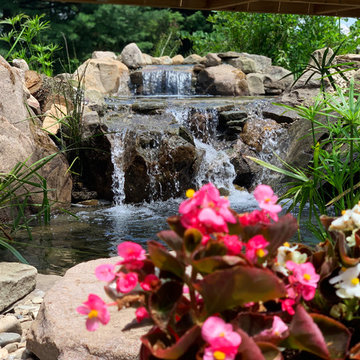
This Project included bringing an 18 year old pond back to life. We began this project by dismantling the existing pond and removing all rocks, gravel, liner and catching the fish and frogs and stored them in a safe aeration tank during the construction of the new pond. We ran into a ton of cement blocks from the existing pond which were a nightmare to remove, but none the less we prevailed. After everything was removed we shaped up the the soil for the new pond installation. A fabric underlayment is first installed beneath the liner to protect it. A new 45 mil fish safe epdm liner was installed on top and we then began to rock in the pond using larger rocks so that kids can enter safely and access for pond plant maintenance. Shelves were installed at different elevations for aquatic plants. The skimmer installation makes for easier pond maintenance and to keep the pond pump free from pond debris. An overflow was plumbed from the skimmer to the downspout to allow the pond to take on rain water and dewater more cleanly. A biofalls filtration unit was installed on the top pond to filter the system and is also the upper waterfall area that aims towards the dining room window for viewing from inside the home and upper patio area. What an amazing transformation.
 C.E. Pontz Sons
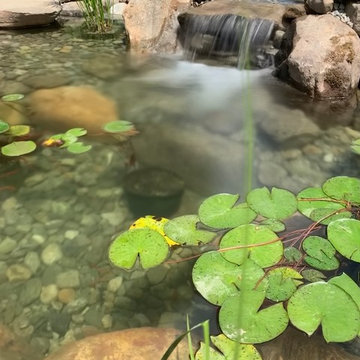
This Project included bringing an 18 year old pond back to life. We began this project by dismantling the existing pond and removing all rocks, gravel, liner and catching the fish and frogs and stored them in a safe aeration tank during the construction of the new pond. We ran into a ton of cement blocks from the existing pond which were a nightmare to remove, but none the less we prevailed. After everything was removed we shaped up the the soil for the new pond installation. A fabric underlayment is first installed beneath the liner to protect it. A new 45 mil fish safe epdm liner was installed on top and we then began to rock in the pond using larger rocks so that kids can enter safely and access for pond plant maintenance. Shelves were installed at different elevations for aquatic plants. The skimmer installation makes for easier pond maintenance and to keep the pond pump free from pond debris. An overflow was plumbed from the skimmer to the downspout to allow the pond to take on rain water and dewater more cleanly. A biofalls filtration unit was installed on the top pond to filter the system and is also the upper waterfall area that aims towards the dining room window for viewing from inside the home and upper patio area. What an amazing transformation.
 Linda Estrin Garden Design
MEDITERRANEAN, TRADITIONAL, CALIFORNIA, LOS ANGELES, MALIBU, CALABASAS, SANTA MONICA, THOUSAND OAKS, SHERMAN OAKS, WEST HILLS, PACIFIC PALISADES, NORTH RANCH, AGOURA, AGOURA HILLS, SOUTHERN CALIFORNIA, SUCCULENTS, ECLECTIC, OAK PARK, DECOMPOSED GRANITE, AUSTRALIAN PLANTS, CALIFORNIA NATIVE, CALIFORNIA NATIVE PLANTS, SUSTAINABLE, RAIN CAPTURE, SOIL HEALTH, RUSTIC, ENGLISH GARDEN, DROUGHT TOLERANT, DROUGHT RESISTANT, LAWN REMOVAL, WATER CONSERVATION, WATER CONSERVING, WATERWISE, LOW MAINTENANCE, CLIMATE, FRONT YARD, BACK YARD, BACKYARD, PATIO, POOL, SOUTHWESTERN, ASIAN, WALKWAY, SUCCULENT POTS, GRAVEL, EDIBLE, LANDSCAPE, POOL, GARDEN, GARDEN DESIGN, SUCCULENT GARDEN, SUCCULENT POTS, REBATE, SUCCULENT WALL, LIVING WALL, DRAFTING, HARDSCAPE, HARDSCAPING, LIGHTING, FOUNTAIN, WATER FEATURE, LOW WATER, DRIP IRRIGATION, FIRE PIT, SANTA BARBARA, OXNARD, VENTURA,



 GARY DUFF DESIGNS,LTD
This beautiful landscape design was a unique project. When presented with a very steep incline, a large hill and only approximately 30' of level space, the Gary Duff Designs team got down to work, chopping down trees, and removing barrels of soil. After flattening out the space, this experienced team was able to implement each desired feature, from pool and play area to patio and privacy. This complete re-design and demolition resulted in an intimate, yet open, backyard living space.
 Jocelyn Newell
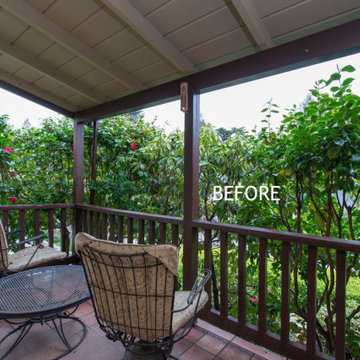
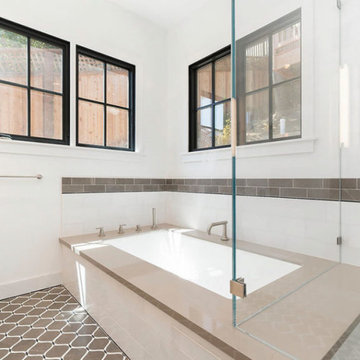
This Rockridge home received not just a remodel, but a transformation. The house was built on a hillside, so we completed major excavation and soil removal, along with piers and a concrete retaining wall, to prevent a potential mudslide. The two-bedroom, one-bath home increased its square footage by 963 sq ft, adding a master suite, another bathroom and two walk-in closets. Both bathrooms now have new tile floors; the spacious master bathroom has beautiful new walnut cabinets. W.A. Rose moved the laundry room from its old location under the house to its more convenient home at the end of a hallway. The owner’s new wine storage room is accessible through a handsome barn door. The result? Light, bright, safer, more accessible. A very livable new space!
 RECO ROBERTS ELECTRIC
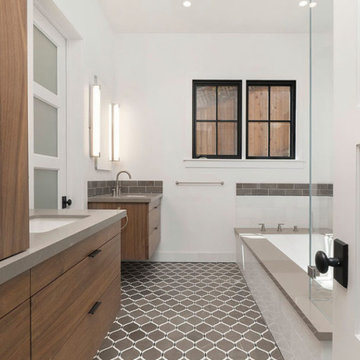
This Rockridge home received not just a remodel, but a transformation. The house was built on a hillside, so it required major excavation and soil removal, along with piers and a concrete retaining wall, to prevent a potential mudslide. The two-bedroom, one-bath home increased its square footage by 963 sq ft, adding a master suite, another bathroom and two walk-in closets. RECO worked closely with the contractor on this project. We installed overhead lighting throughout the living areas of the home that is controlled by a remote lighting control system.
The results of this transformation: A home that’s lighter, brighter, safer and more accessible. The owners are delighted with their more livable new space.
 RECO ROBERTS ELECTRIC
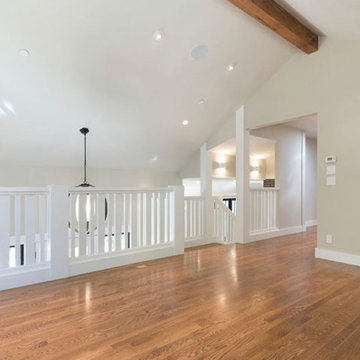
This Rockridge home received not just a remodel, but a transformation. The house was built on a hillside, so it required major excavation and soil removal, along with piers and a concrete retaining wall, to prevent a potential mudslide. The two-bedroom, one-bath home increased its square footage by 963 sq ft, adding a master suite, another bathroom and two walk-in closets. RECO worked closely with the contractor on this project. We installed overhead lighting throughout the living areas of the home that is controlled by a remote lighting control system.
The results of this transformation: A home that’s lighter, brighter, safer and more accessible. The owners are delighted with their more livable new space.
 C.E. Pontz Sons
This Project included bringing an 18 year old pond back to life. We began this project by dismantling the existing pond and removing all rocks, gravel, liner and catching the fish and frogs and stored them in a safe aeration tank during the construction of the new pond. We ran into a ton of cement blocks from the existing pond which were a nightmare to remove, but none the less we prevailed. After everything was removed we shaped up the the soil for the new pond installation. A fabric underlayment is first installed beneath the liner to protect it. A new 45 mil fish safe epdm liner was installed on top and we then began to rock in the pond using larger rocks so that kids can enter safely and access for pond plant maintenance. Shelves were installed at different elevations for aquatic plants. The skimmer installation makes for easier pond maintenance and to keep the pond pump free from pond debris. An overflow was plumbed from the skimmer to the downspout to allow the pond to take on rain water and dewater more cleanly. A biofalls filtration unit was installed on the top pond to filter the system and is also the upper waterfall area that aims towards the dining room window for viewing from inside the home and upper patio area. What an amazing transformation.
 RECO ROBERTS ELECTRIC
This Rockridge home received not just a remodel, but a transformation. The house was built on a hillside, so it required major excavation and soil removal, along with piers and a concrete retaining wall, to prevent a potential mudslide. The two-bedroom, one-bath home increased its square footage by 963 sq ft, adding a master suite, another bathroom and two walk-in closets. RECO worked closely with the contractor on this project. We installed overhead lighting throughout the living areas of the home that is controlled by a remote lighting control system.
The results of this transformation: A home that’s lighter, brighter, safer and more accessible. The owners are delighted with their more livable new space.

 C.E. Pontz Sons
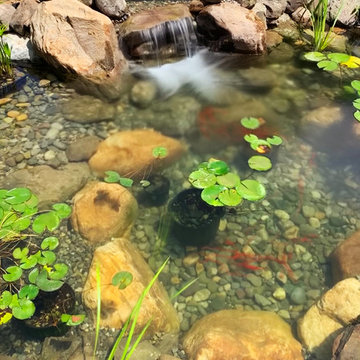
This Project included bringing an 18 year old pond back to life. We began this project by dismantling the existing pond and removing all rocks, gravel, liner and catching the fish and frogs and stored them in a safe aeration tank during the construction of the new pond. We ran into a ton of cement blocks from the existing pond which were a nightmare to remove, but none the less we prevailed. After everything was removed we shaped up the the soil for the new pond installation. A fabric underlayment is first installed beneath the liner to protect it. A new 45 mil fish safe epdm liner was installed on top and we then began to rock in the pond using larger rocks so that kids can enter safely and access for pond plant maintenance. Shelves were installed at different elevations for aquatic plants. The skimmer installation makes for easier pond maintenance and to keep the pond pump free from pond debris. An overflow was plumbed from the skimmer to the downspout to allow the pond to take on rain water and dewater more cleanly. A biofalls filtration unit was installed on the top pond to filter the system and is also the upper waterfall area that aims towards the dining room window for viewing from inside the home and upper patio area. What an amazing transformation.
 C.E. Pontz Sons
This Project included bringing an 18 year old pond back to life. We began this project by dismantling the existing pond and removing all rocks, gravel, liner and catching the fish and frogs and stored them in a safe aeration tank during the construction of the new pond. We ran into a ton of cement blocks from the existing pond which were a nightmare to remove, but none the less we prevailed. After everything was removed we shaped up the the soil for the new pond installation. A fabric underlayment is first installed beneath the liner to protect it. A new 45 mil fish safe epdm liner was installed on top and we then began to rock in the pond using larger rocks so that kids can enter safely and access for pond plant maintenance. Shelves were installed at different elevations for aquatic plants. The skimmer installation makes for easier pond maintenance and to keep the pond pump free from pond debris. An overflow was plumbed from the skimmer to the downspout to allow the pond to take on rain water and dewater more cleanly. A biofalls filtration unit was installed on the top pond to filter the system and is also the upper waterfall area that aims towards the dining room window for viewing from inside the home and upper patio area. What an amazing transformation.
 C.E. Pontz Sons
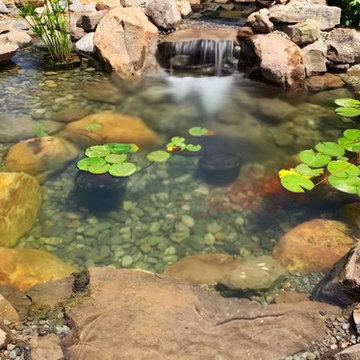
This Project included bringing an 18 year old pond back to life. We began this project by dismantling the existing pond and removing all rocks, gravel, liner and catching the fish and frogs and stored them in a safe aeration tank during the construction of the new pond. We ran into a ton of cement blocks from the existing pond which were a nightmare to remove, but none the less we prevailed. After everything was removed we shaped up the the soil for the new pond installation. A fabric underlayment is first installed beneath the liner to protect it. A new 45 mil fish safe epdm liner was installed on top and we then began to rock in the pond using larger rocks so that kids can enter safely and access for pond plant maintenance. Shelves were installed at different elevations for aquatic plants. The skimmer installation makes for easier pond maintenance and to keep the pond pump free from pond debris. An overflow was plumbed from the skimmer to the downspout to allow the pond to take on rain water and dewater more cleanly. A biofalls filtration unit was installed on the top pond to filter the system and is also the upper waterfall area that aims towards the dining room window for viewing from inside the home and upper patio area. What an amazing transformation.

 User
UserWe encountered two design challenges in this original 1916 Oakland bungalow. Existing concrete walls and all the topsoil had been removed, creating a very steep slope. Our job was to bring the space back to the architectural jewel it could be. We added terraced moss rock walls that enabled us to rebuild soil and create more visual depth in this small space. Paint color from the Sherwin-Williams historical pallet complements plant choices, including yellow climbing Roses, warm rusty red Smoke Bush, and trailing Manzanita. (Installed by Andrew Packer, Acorn Landscaping acorn-landscaping.com)
 Linda Estrin Garden Design
MEDITERRANEAN, TRADITIONAL, CALIFORNIA, LOS ANGELES, MALIBU, CALABASAS, SANTA MONICA, THOUSAND OAKS, SHERMAN OAKS, WEST HILLS, PACIFIC PALISADES, NORTH RANCH, AGOURA, AGOURA HILLS, SOUTHERN CALIFORNIA, SUCCULENTS, ECLECTIC, OAK PARK, DECOMPOSED GRANITE, AUSTRALIAN PLANTS, CALIFORNIA NATIVE, CALIFORNIA NATIVE PLANTS, SUSTAINABLE, RAIN CAPTURE, SOIL HEALTH, RUSTIC, ENGLISH GARDEN, DROUGHT TOLERANT, DROUGHT RESISTANT, LAWN REMOVAL, WATER CONSERVATION, WATER CONSERVING, WATERWISE, LOW MAINTENANCE, CLIMATE, FRONT YARD, BACK YARD, BACKYARD, PATIO, POOL, SOUTHWESTERN, ASIAN, WALKWAY, SUCCULENT POTS, GRAVEL, EDIBLE, LANDSCAPE, POOL, GARDEN, GARDEN DESIGN, SUCCULENT GARDEN, SUCCULENT POTS, REBATE, SUCCULENT WALL, LIVING WALL, DRAFTING, HARDSCAPE, HARDSCAPING, LIGHTING, FOUNTAIN, WATER FEATURE, LOW WATER, DRIP IRRIGATION, FIRE PIT, SANTA BARBARA, OXNARD, VENTURA,
 GARY DUFF DESIGNS,LTD
This beautiful landscape design was a unique project. When presented with a very steep incline, a large hill and only approximately 30' of level space, the Gary Duff Designs team got down to work, chopping down trees, and removing barrels of soil. After flattening out the space, this experienced team was able to implement each desired feature, from pool and play area to patio and privacy. This complete re-design and demolition resulted in an intimate, yet open, backyard living space.
 GARY DUFF DESIGNS,LTD
This beautiful landscape design was a unique project. When presented with a very steep incline, a large hill and only approximately 30' of level space, the Gary Duff Designs team got down to work, chopping down trees, and removing barrels of soil. After flattening out the space, this experienced team was able to implement each desired feature, from pool and play area to patio and privacy. This complete re-design and demolition resulted in an intimate, yet open, backyard living space.
17