
Search results for "Replacement methods" in Home Design Ideas

 Business_Name_Placeholder
?? 24/7 Support
⭐️ Top-Rated Service
? Fast Response
? Premium Quality
✈️◆► Telegram: @Pvatopzone
?◆► WhatsApp: +1 (579) 550-8030
?◆► Discord: accountservice
✈️◆► https://t.me/Pvatopzone
?◆► Email: Pvatopzone@gmail.com
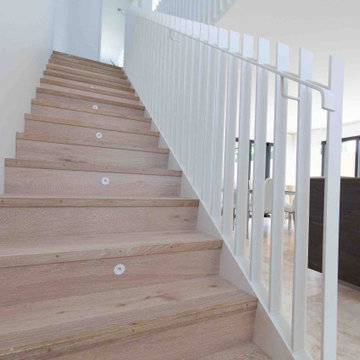
 Stairworks
This project is a great example of how the addition of a well-designed and considered balustrade can vastly improve an existing staircase and landing, without the need to replace or damage any of the already in-situ finishes.
The clients already had a firm idea of the aesthetic they wanted and engaged us to come up with a method to achieve it without creating any disruption to an already finished and painted staircase.
After a detailed survey and studying the structural plans of the building, we were able to fully manufacture and powder-coat everything off-site, and simply bolt on to the existing staircase and landing structure in a single visit. This managed to leave no damage or disruption to the property, meaning no remedial work for our clients after we had finished.
The balustrade itself was manufactured from a mild steel flat bar and welded to a steel channel, which we bolted to the staircase, and a steel angle bracket, which we fixed to the landing. It was all tied together with a continuous thin round steel bar that was drilled through the top of each upright for rigidity, as well as a flat steel handrail to match the uprights. It was then powder-coated matte white to help it blend in with the walls and ceilings.
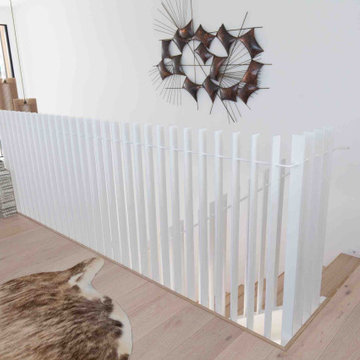 Stairworks
This project is a great example of how the addition of a well-designed and considered balustrade can vastly improve an existing staircase and landing, without the need to replace or damage any of the already in-situ finishes.
The clients already had a firm idea of the aesthetic they wanted and engaged us to come up with a method to achieve it without creating any disruption to an already finished and painted staircase.
After a detailed survey and studying the structural plans of the building, we were able to fully manufacture and powder-coat everything off-site, and simply bolt on to the existing staircase and landing structure in a single visit. This managed to leave no damage or disruption to the property, meaning no remedial work for our clients after we had finished.
The balustrade itself was manufactured from a mild steel flat bar and welded to a steel channel, which we bolted to the staircase, and a steel angle bracket, which we fixed to the landing. It was all tied together with a continuous thin round steel bar that was drilled through the top of each upright for rigidity, as well as a flat steel handrail to match the uprights. It was then powder-coated matte white to help it blend in with the walls and ceilings.
Find the right local pro for your project
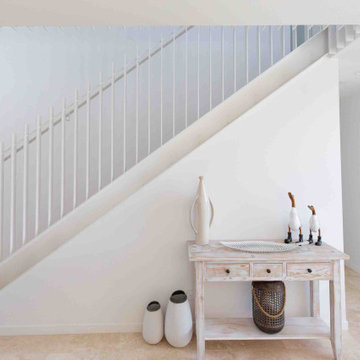 Stairworks
This project is a great example of how the addition of a well-designed and considered balustrade can vastly improve an existing staircase and landing, without the need to replace or damage any of the already in-situ finishes.
The clients already had a firm idea of the aesthetic they wanted and engaged us to come up with a method to achieve it without creating any disruption to an already finished and painted staircase.
After a detailed survey and studying the structural plans of the building, we were able to fully manufacture and powder-coat everything off-site, and simply bolt on to the existing staircase and landing structure in a single visit. This managed to leave no damage or disruption to the property, meaning no remedial work for our clients after we had finished.
The balustrade itself was manufactured from a mild steel flat bar and welded to a steel channel, which we bolted to the staircase, and a steel angle bracket, which we fixed to the landing. It was all tied together with a continuous thin round steel bar that was drilled through the top of each upright for rigidity, as well as a flat steel handrail to match the uprights. It was then powder-coated matte white to help it blend in with the walls and ceilings.
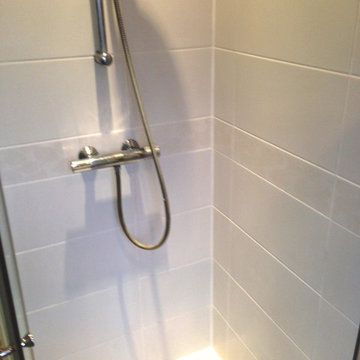
 Tile Doctor Ltd
Shower cubicles can be the most difficult of tiled features to keep clean. Most are exposed to various acid-based soaps and shampoos on a daily basis, allowing mould and general muck to quickly build up along the grout lines and silicone. This leaves the entire area looking quite unappealing. In some cases, the grout lines become stained beyond a point where they can be restored to their original condition, so property owners will typically request to have the grout cut out and replaced however a faster and cheaper method is to have the grout completely recoloured.
Such was the case with this Ceramic tiled shower cubicle at a house in Wigan. It would take a lot to get the cubicle looking great again, having not been cleaned properly for a long time. The property owner decided to contact me for a professional refresh, including cleaning, new silicone sealer and recolouring of the grout.
I started the refresh by applying Tile Doctor Mould Away spray to the tiles and grout, and leaving it to dwell for an hour. As the name of the product suggests, Mould Away is a fast and effective cleaner for the removal of mould from silicone and grout, making it ideal for use on shower cubicles similar to this one. I then rinsed the entire area down with water before scrubbing the grout lines and tiles with a stiff grout brush to remove any remaining mould and lime scale, leaving them looking a lot cleaner.
The cleaning process made a big improvement however the grout was still too stained so after removing the silicone strip from around the base of the shower I proceeded to recolour with our white Grout Colourant. The colourant is painted onto the grout and any excess is wiped of the tile before it dries which both improves the appearance of the grout and seals it in to protect it from further staining. The last step was to apply fresh white silicone along the base of the shower.
The customer was very pleased with the refreshed appearance of their shower and you must admit it looks much more inviting now.
Steve Keary
Greater Manchester Tile Doctor
 Stairworks
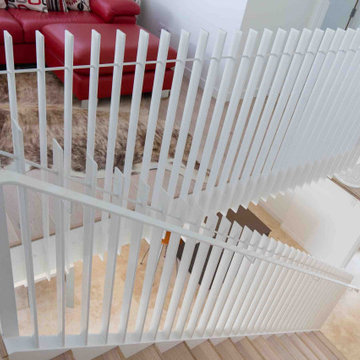
This project is a great example of how the addition of a well-designed and considered balustrade can vastly improve an existing staircase and landing, without the need to replace or damage any of the already in-situ finishes.
The clients already had a firm idea of the aesthetic they wanted and engaged us to come up with a method to achieve it without creating any disruption to an already finished and painted staircase.
After a detailed survey and studying the structural plans of the building, we were able to fully manufacture and powder-coat everything off-site, and simply bolt on to the existing staircase and landing structure in a single visit. This managed to leave no damage or disruption to the property, meaning no remedial work for our clients after we had finished.
The balustrade itself was manufactured from a mild steel flat bar and welded to a steel channel, which we bolted to the staircase, and a steel angle bracket, which we fixed to the landing. It was all tied together with a continuous thin round steel bar that was drilled through the top of each upright for rigidity, as well as a flat steel handrail to match the uprights. It was then powder-coated matte white to help it blend in with the walls and ceilings.
 Stairworks
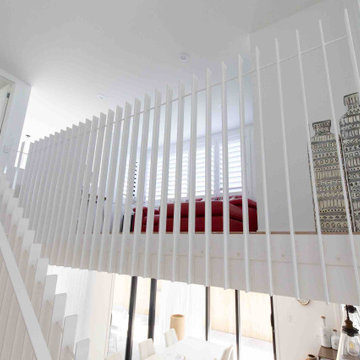
This project is a great example of how the addition of a well-designed and considered balustrade can vastly improve an existing staircase and landing, without the need to replace or damage any of the already in-situ finishes.
The clients already had a firm idea of the aesthetic they wanted and engaged us to come up with a method to achieve it without creating any disruption to an already finished and painted staircase.
After a detailed survey and studying the structural plans of the building, we were able to fully manufacture and powder-coat everything off-site, and simply bolt on to the existing staircase and landing structure in a single visit. This managed to leave no damage or disruption to the property, meaning no remedial work for our clients after we had finished.
The balustrade itself was manufactured from a mild steel flat bar and welded to a steel channel, which we bolted to the staircase, and a steel angle bracket, which we fixed to the landing. It was all tied together with a continuous thin round steel bar that was drilled through the top of each upright for rigidity, as well as a flat steel handrail to match the uprights. It was then powder-coated matte white to help it blend in with the walls and ceilings.
Sponsored
Plain City, OH

Kuhns Contracting, Inc.
Central Ohio's Trusted Home Remodeler Specializing in Kitchens & Baths
 Stairworks
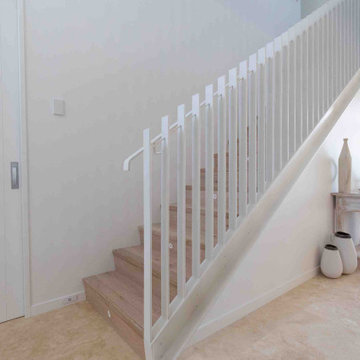
This project is a great example of how the addition of a well-designed and considered balustrade can vastly improve an existing staircase and landing, without the need to replace or damage any of the already in-situ finishes.
The clients already had a firm idea of the aesthetic they wanted and engaged us to come up with a method to achieve it without creating any disruption to an already finished and painted staircase.
After a detailed survey and studying the structural plans of the building, we were able to fully manufacture and powder-coat everything off-site, and simply bolt on to the existing staircase and landing structure in a single visit. This managed to leave no damage or disruption to the property, meaning no remedial work for our clients after we had finished.
The balustrade itself was manufactured from a mild steel flat bar and welded to a steel channel, which we bolted to the staircase, and a steel angle bracket, which we fixed to the landing. It was all tied together with a continuous thin round steel bar that was drilled through the top of each upright for rigidity, as well as a flat steel handrail to match the uprights. It was then powder-coated matte white to help it blend in with the walls and ceilings.
 Tile Doctor Ltd
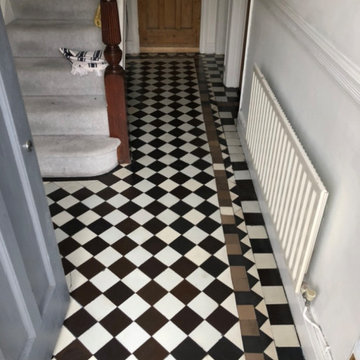
This job was carried out in a terraced property in Llanelli which had a Victorian Tiled Hallway laid in a diamond pattern that looking worse for wear and in need of some attention. The clients were a young couple who had moved in two years previously and had only recently decided they wanted the floor renovated. This was earlier in the year, so I was able to pop over to the property and take a detailed look at the floor before recommending a course of action to renovate the tiles.
Upon arrival the first thing we noticed was that the border had been laid with an inconsistent pattern, non- matching tiles had been patched in essentially filling voids as you can see in the images. The floor wasn’t terribly dirty however it wasn’t very clean either.
I discussed with the client replacing the non-matching tiles, so the floor pattern was uniform however they decided against it and were happy to just to have it cleaned and sealed. We can usually source either reclaimed original tiles or some great reproduction ones, so most floors can be restored if needed. I worked out a quote for the work and they were happy to go ahead.
If you have never been you should know that Llanelli is the largest town in the county of Carmarthenshire and famous for Rugby and the production of Tin. It is located on the Loughor Estuary, some 10 miles from Swansea and 12 miles from Carmarthen.
With no tiling to do the first job was to protect the woodwork such as skirting and staircase with tape. Once done the process of cleaning began with the application of a 400-grit burnishing pad fitted to a buffing machine. The process is lubricated with water and the pad run over the whole floor two to three times to remove dirt and refine the appearance of the tile. Even after the first application of the pad we could see a massive improvement to the appearance of the tiles. To get right into the edges of the tiled floor we use a 400-grit handheld diamond block, this proved especially useful under the stairs where our buffer machine could not reach.
During this process, the water turns into a fine slurry which is rinsed off with more water and extracted with a wet vacuum. On this occasion the floor was not dirty enough to require any chemicals, the use of water and the machine was enough to get the floor cleaned up.
This job was very straight forward, and we did not run into any problems at all. After allowing the floor to dry out for 24 hours we returned to seal the tiles checking first that the floor was sufficiently dry first using a damp meter. Fortunately, the burnishing method uses a lot less water than a chemical clean, so I was able to get straight on with sealing.
The client wanted a satin sheen finish, so I applied four coats of Tile Doctors Seal and Go which works well on Victorian tiles. The sealer really put the life back into the tiles and will protect them from staining going forward. It will also make the floor much easier to maintain and keep it looking good for much longer.
I’m pleased to say the owners were very happy with the floor and recommended us to one of their friends who we also did some work for. For aftercare I recommended the use of Tile Doctor Neutral Tile Cleaner. This is an everyday tile cleaning product that is sealer friendly and not prematurely reduce the life of the sealer which can happen with many household cleaning products which are simply too strong.
Adrian Iacono
Swansea Tile Doctor
 Tile Doctor Ltd
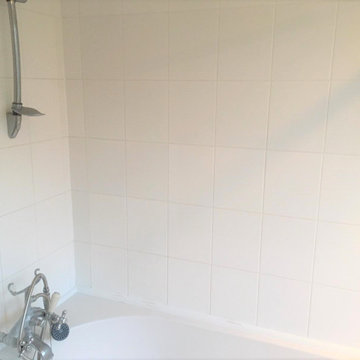
I was called to this property in Bow East London, because the grout around the shower had become dirty and had gone a yellowy/orange colour over time. This is quite a common problem with shower tiles due to the dyes you find in most shampoo and shower gel products. There was also some mould that needed removing. The ceramic tiles themselves were glazed ceramic which are very easy to clean but as usual the grout was bringing the appearance of the bathroom down.
The client was keen to see if the grout could be restored and had considered removing the grout and replacing it, but this takes time and I felt it would not be necessary. There are a number of Tile Doctor grout cleaning products I could have used to remedy these issues. I discussed the options with the client, and we agreed a price to complete the work.
Given the appearance of mould I decided to go with Tile Doctor Duo Clean which is designed for cleaning bathroom tiles and grout.
Bow is an area in the London Borough of Tower Hamlets in East End of London. It is mostly a residential area which is around 5 miles east of Charing Cross. It became part of the County of London following the passing of the Local Government Act 1888. “Bow” is an abbreviation of the medieval name Stratford-at-Bow, in which “Bow” refers to the bowed bridge built here in the early 12th century.
Working in small sections from top to bottom the method I used to renovate the tile and grout was to spray the tiles and especially the grout with Tile Doctor Duo Clean. This product is designed for bathroom tile cleaning and comes with a spray head attachment, so it is ready to use. I then left the product to soak in for about ten minutes before scrubbing it in with a brush and then rinsed it off with water. It is always easier to clean tiles in this situation as the water can just drain away. In other areas we would need to use the wet vacuum to remove the soiled waste.
After repeating this process for the whole of the shower wall I then retreated any areas which needed more work until I was happy all the staining and mould was gone.
The area was then dried and the only job remaining was the seal the grout which will prevent the grout staining going forward. To do this I spayed on Tile Doctor Wall Grout Sealer which comes in an aerosol and is very easy to apply.
The client was very happy with the work, the bathroom was restored and looked much more appealing.
Jackson Davis
East London Tile Doctor
 Stairworks
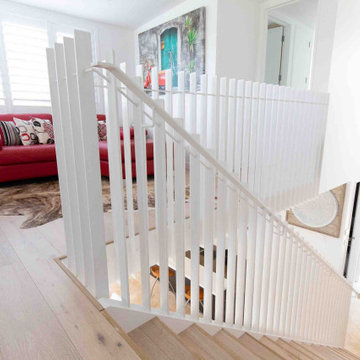
This project is a great example of how the addition of a well-designed and considered balustrade can vastly improve an existing staircase and landing, without the need to replace or damage any of the already in-situ finishes.
The clients already had a firm idea of the aesthetic they wanted and engaged us to come up with a method to achieve it without creating any disruption to an already finished and painted staircase.
After a detailed survey and studying the structural plans of the building, we were able to fully manufacture and powder-coat everything off-site, and simply bolt on to the existing staircase and landing structure in a single visit. This managed to leave no damage or disruption to the property, meaning no remedial work for our clients after we had finished.
The balustrade itself was manufactured from a mild steel flat bar and welded to a steel channel, which we bolted to the staircase, and a steel angle bracket, which we fixed to the landing. It was all tied together with a continuous thin round steel bar that was drilled through the top of each upright for rigidity, as well as a flat steel handrail to match the uprights. It was then powder-coated matte white to help it blend in with the walls and ceilings.
 Tile Doctor Ltd
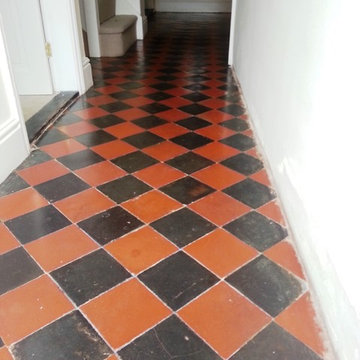
Details below of a restorative clean and seal that I recently completed on a Quarry tiled hallway at a house in the small village of Riseley, North Bedfordshire.
The floor was a mix of fantastic black and red tiles; however, it had lost its character after a long period without professional maintenance. My client commissioned me to strip off the old sealer from the floor and replace it, but not before providing a thorough clean, including tackling some adhesive staining and inherent grout haze.
The first task involved mixing our high alkaline cleaner, known as Tile Doctor Pro-Clean, with water to form a strong solution. The solution was applied to the tiled floor and left to dwell for a short period. This dwelling time allows for the Pro-Clean to seep into the stone to get underneath the ingrained dirt and lift it out. Pro-Clean also contains stripping properties, and thus helped to break down the old (and now ineffectual) sealer.
After completing this initial clean I rinsed the floor using a standard mop and bucket method. With the old sealer removed, it became evident that there was also plaster residue marking the tiles, as well as inherent grout haze on the surface of the tile probably from the original installation. To tack these problems I used Tile Doctor Grout Clean-Up, which is an acid-based cleaner that dissolves the adhesive and the grout. Being an acid you have to be careful and ensure the floor is rinsed thoroughly after use and if you’re considering using this product yourself read the label and make sure you use the right protective equipment.
After the floor was thoroughly rinsed with water it was dried as much as possible using a wet vacuum which literally sucks the water off the floor. The floor was then left to dry for four days, with the help of several air movers. By the time I returned to the house, the floor was completely dry and ready to take the seal.
I opted to use a combination of sealers, including one coat of our colour enhancing, impregnating sealer, known as Colour Grow, followed by three coats of Tile Doctor Seal & Go to provide a truly robust and aesthetically pleasing surface seal.
The photographs demonstrate the finished results better than words can and I think you will agree the floor is quite transformed.
Andrew Evans
Bedfordshire Tile Doctor
 Tile Doctor Ltd
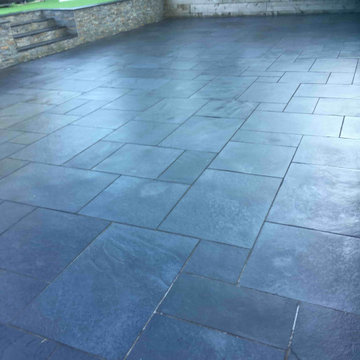
The photographs below are of an 80m2 Black Limestone Patio that was laid in rear garden of a property in Sandbach. All was going well until the installer decided to clean up the stone and remove the excess grout (aka grout haze) using brick acid. This is common practice in the trade after laying a patio however what they failed to realise is that Limestone can be marked by acids and in fact can be dissolved over time. This left the patio looking drained and in quite a state as you can imagine.
In an attempt to restore the black colour of the stone, the tiler painted on a restoration product however with the grout haze still present on the stone all this did was to add to the problems. Frustrated the customer decided to call Tile Doctor and so I went over to see what could be done.
I quickly deducted that the brick acid will have damaged the surface of the stone so to restore it I ran some tests on a small part of the patio that I been badly affected using a series of diamond encrusted burnishing pads of different grits. The pads successfully demonstrated that the appearance could be restored and impressed with the difference I was given the job of renovating all 80m2.
Being outside weather was an issue and I had to reschedule until a dry weather window appeared. Cleaning during damp weather isn’t a problem, it’s the sealer which needs to be applied when the sone is dry to get the right result.
Made with industrial diamonds and available in different sizes and grits, burnishing pads are ideal for restoring the appearance of polished stone floors. The first step was to work on the most badly damaged tiles with a coarse 100 and then 200-grit diamond milling pad fitted to a weighted rotary machine and lubricated with water. This took off the ruined top layer of the limestone bringing up the virgin stone underneath.
Next the patio was worked on with a 400-grit diamond burnishing pad, followed by 800-grit, and then 1500-grit pad. Each pad further renovates the appearance of the stone (Honing) and had to be rinsed after each pad to remove the slurry that is generated.
With 80m2 of Limestone paving to cover it took four days to completely restore all the stone using this method. It was tough work, but it made an incredible difference and naturally was far more cost effective than replacing the patio.
With the stone cleaned up the last step was to restore the natural black colour in the Limestone with an application of Tile Doctor Stone-Oil which restores the deep black colour and adds texture to the stone, it’s also an impregnating sealer in its own right that adds protection and improves mechanical strength once cured.
I allowed this to dry overnight then returned the next day to finish the patio restoration with a further coat of Tile Doctor Ultra-Seal, a no-sheen natural-looking sealer formulated to provide maximum stain protection without altering the colour of the stone.
The customer was delighted with the transformation, what was one an uninviting ugly area now looks fantastic and welcoming. Impressed with the result they left the following glowing feedback:
“Kamila is A M A Z I N G! From discussing our issue over the phone to meeting her in person, her advice and professionalism was second to none. She worked hard to repair our outdoor patio and we are thrilled with her results! We would happily recommend Kamila and wish her every success with her business in the future! Thank you Kamila! X
Kamila Logonzy
East Cheshire Tile Doctor

 Tile Doctor Ltd
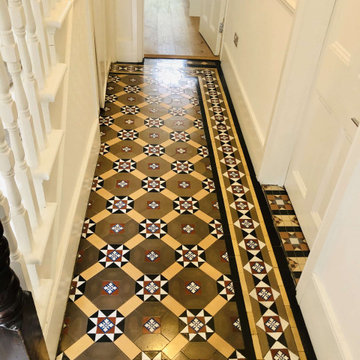
This customer had just moved into a property in Chesham around eighteen months ago. During that time, they had completely renovated the property and in the process had pulled up the hallway carpet to discover a lovely Victorian tiled floor which appeared to be in good condition but very dirty. Period features like these can add a lot of value to a house these days and so they decided to investigate having it professionally cleaned and contacted me for a quote.
Although I can give some indication of price over the phone you never know exactly what to expect so my preference is to visit the property a conduct a test clean. It’s a little trickier to do this now due to COVID-19 but using a combination of PPE, maximum ventilation and social distancing measures I was able to work on the floor. The tiles were in good order with no replacements needed so my focus would be removing carpet adhesive and ingrained dirt. The test went well, and I followed up with a quotation which was accepted, and a date arranged to do the work.
I had worked out previously that the quickest was to deep clean the floor and remove the glue and any old seal was to apply Tile Doctor Remove and Go which as its name suggests is a coatings removed designed for Tiled floors. My method was to spray strong a dilution of Remove and Go onto the Victorian tiles and leave it to soak in for fifteen minutes. Then it was scrubbed in with a black scrubbing pad fitted to a rotary machine. The soil was rinsed off using a minimal of water and extracted with a wet vacuum.
Once the floor had dried, I inspected the tiles and could see more work would be needed to get the white tiles really sparkling. For this I went over the floor using a 200-grit resurfacing pad using water to lubricate the process, I also used handheld burnishing blocks of different grits to do the edges. With this extra effort and another rinse with water to remove the soil the floor looked great, and so I left for the day so it could dry out ready for sealing.
I came back the next day and started by taking moisture readings with a damp meter to ensure the tiles were dry and ready for sealing. This is important as you don’t want to apply sealer to a damp tile and old floors can suffer from damp issues due to the lack of a damp proof membrane.
All was well with the floor, so I was able to move straight onto sealing which started with the application of a single coat of Tile Doctor Colour Grow. This is an impregnating sealer that soaks into the pores of the tile enhancing colour and adding protection. Once this had dried, I followed up with another seven coats of Tile Doctor Seal and Go which adds further protection and leaves a nice subtle sheen to the tiles. This product works really well on old Victorian Tiles like these and being water based it doesn’t leave a smell as it dries.
Andrew Newstead
South Buckinghamshire Tile Doctor

 Buzdar
In recent years, the way people watch television has changed dramatically. Traditional cable and satellite subscriptions are gradually being replaced by modern streaming technologies that offer greater flexibility, more content, and better accessibility. Among the growing number of IPTV solutions available today, Hakuna TV, also known as Hakuna IPTV, is becoming a popular choice for users looking for a premium streaming experience at home.
With the rapid development of smart TVs, high-speed internet connections, and streaming devices, IPTV services have become an essential part of modern home entertainment systems. Hakuna TV provides access to thousands of international channels, live sports events, movies, and on-demand content — all through a simple internet connection.
This new generation of television allows viewers to enjoy content anytime, anywhere, without the limitations of traditional broadcasting.
What Is IPTV and How Does It Work?
IPTV stands for Internet Protocol Television, a technology that delivers television content over the internet instead of through satellite signals or cable networks.
Unlike traditional television services, IPTV streams content directly to devices such as:
- Smart TVs
- Streaming boxes
- Smartphones
- Tablets
- Computers
Services like Hakuna IPTV make it possible to centralize all entertainment in one place, offering a wide range of international channels and media libraries.
Why Modern Homes Are Switching to IPTV
As homes become increasingly connected and digital, many families are upgrading their entertainment systems to include smart TVs and streaming platforms. IPTV fits perfectly into this modern ecosystem.
There are several reasons why IPTV services such as Hakuna TV are gaining popularity among viewers worldwide:
1. Unlimited Content Variety
Traditional cable television often limits viewers to a fixed selection of channels. IPTV services, however, provide access to thousands of international channels from different countries.
With Hakuna IPTV, users can explore content from across the globe including:
- International television channels
- Sports broadcasts
- Movies and series
- News and documentaries
- Entertainment channels
2. Perfect for Sports and Football Fans
Sports are among the most watched television programs worldwide, and football remains the most popular sport in Europe and many other regions.
Many IPTV users choose services like Hakuna TV specifically for sports coverage. With the right IPTV setup, viewers can watch major sporting events, international leagues, and tournaments in high-quality streaming.
Football fans especially appreciate having access to a wide range of sports channels that broadcast games from different competitions.
With a reliable IPTV provider, fans no longer have to miss important matches.
3. Seamless Integration with Smart TVs
One of the biggest advantages of IPTV services is compatibility with modern smart TVs and streaming devices.
Hakuna IPTV works with many popular platforms including:
- Samsung Smart TVs
- LG Smart TVs
- Android TV devices
- Amazon Fire Stick
- Android smartphones and tablets
Instead of installing complex satellite equipment, viewers simply install an IPTV player and enter their account credentials.
Within minutes, the entire entertainment library becomes available.
A New Era of Home Entertainment
Modern living spaces increasingly revolve around digital technology and connected devices. From smart lighting systems to intelligent speakers and streaming platforms, homes today are designed to offer convenience and entertainment.
In this environment, IPTV services like Hakuna TV play an important role by simplifying how people access television content.
Rather than relying on traditional broadcast infrastructure, IPTV allows viewers to enjoy their favorite shows and sports events with just an internet connection.
This technology also allows for:
- faster channel switching
- improved streaming quality
- greater flexibility for viewers
Easy Setup and Installation
Another advantage of IPTV services is their simplicity.
Setting up Hakuna TV typically requires only a few steps:
- Install an IPTV player on the device
- Enter the account credentials
- Start streaming immediately
This ease of installation makes IPTV accessible to a wide range of users.
High-Quality Streaming Experience
 HERR window & door
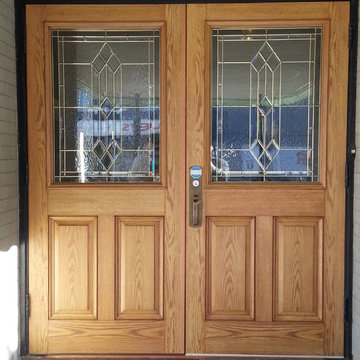
We completed this double door replacement on a Funeral home in Central Edmonton. We feel incredibly pleased with how these fiberglass doors came together. Using our special staining method we were colour match the oak stain to the existing oak already present in the interior of the building.

 Automotive Locksmith
Our 24 Hour Lock & Key Services
Our 247 local locksmiths cater to all clients from both commercial and residential sectors, even automotive clients with only top quality locksmith products and services. We can work on any locksmith need from duplicating room keys to complex installation of high security systems in large industrial property. Also, all of the products we utilized and offer to clients are supplied by trusted manufacturing companies in the industry.
Whatever trouble you are dealing with your locks or keys, we have got you covered! All you need to do is make contact with us.
We offer you the following services:
Installation of Brand New Locks
Rekey Locks
Emergency Lockout Services
Home Locksmith Services
Automotive Locksmith Services
Commercial Locksmith Services
Lock Replacement Service
Key Duplication Service
Ignition Key Replacement
Reprogram Transponder Keys
Installation of High Security Systems
Our Locksmith Experts
Our crew delivers the highest industry standards and best practices when dealing with your lock or key problems within your home or office premise. We're experienced in different installation and repair methods for your basic to advanced locks, gates, safes, doors, window, garage doors as well as any personalized system.
Our Products
We also offer the best locksmith products because we work together with the leading suppliers and manufacturers of locksmith products. Our competent technicians continuously go through trainings to keep up with the changes in the locksmithing industry.
Call Us: (855) 658-6691
Visit Us: http://lockskeysnmore.com/ct/fairfield
Sponsored
Plain City, OH
Kuhns Contracting, Inc.
Central Ohio's Trusted Home Remodeler Specializing in Kitchens & Baths
 AMLD INTERIOR INC
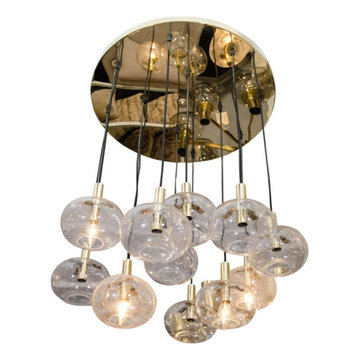
KA1872 SUSPENDED GLOBES
DESCRIPTION:
The pleasant light it spreads is very atmospheric. Completed with the structured glass and brass details, this chandelier will contribute to a luxurious character of the interior. He nicely brass frame of this chandelier is very elegant; the combination of the glass bulbs makes a gorgeous eyecatcher. We really like to play with light and shadow to create an atmosphere within an interior space. Because our lighting is made by a workforce that still relies on traditional working methods, each product is unique and carries with it the sensitivity of the artisan. These unique shapes and colors can be only created using traditional hand-blown glass techniques.
SPECIFICATIONS:
Collection: Vintage
Size: 24” Length x 24” Width x 32” Height (Custom sizes also available)
Extension: Adjustable rod comes in connectable segments customizable up to 12 ft
Shape: Pendant
Frame Finish: Polished Gold (Different options available at no additional cost)
Materials: Brass, Glass
Weight: 25 lbs
Bulbs: 120V UL, cUL Certified
Assembly: Partly assembled
Dimmer Switch Compatible: Optional
Shipping: LTL
Rush Order: 4-6 Weeks; 15% added to the total
Regular Lead Time: 6-10 Weeks
Warranty: 5 Years Full Coverage (includes replacement parts)
SIZE OPTIONS:
Size: Price:
17” Length x 17” Width x 22” Height $1,980.00
20” Length x 20” Width x 27” Height $2,748.00
24” Length x 24” Width x 32” Height (as shown) $3,915.00
28” Length x 28” Width x 37” Height $5,340.00
31” Length x 31” Width x 42” Height $7,570.00
Custom Sizes, Finishes, Colors Available Upon Request

 safe ZOnea
Maintaining a pest-free home requires attention throughout the year. Seasonal changes affect pest behavior, and understanding these patterns can save homeowners from costly damage and health hazards. In this guide, we will explore practical strategies for spring pest prevention tips, ensuring your property stays protected through every season. From spotting early signs to implementing proactive measures, these steps empower homeowners to take control before infestations occur.
Understanding Seasonal Pest Patterns
Pests adapt to changing weather, and knowing their patterns helps prevent infestations effectively.
Spring: Awakening Pests
Spring signals the end of winter dormancy for many pests. Rodents, ants, and termites start seeking food and warmth. Effective spring pest prevention tips include:
● Cleaning gutters and removing debris
● Sealing cracks and gaps in exterior walls
● Inspecting wood piles and compost areas
● Monitoring early signs of termite activity
Pro Tip: Conduct a termite inspection or a professional evaluation to catch infestations early before they spread.
Summer: Peak Pest Season
Warm temperatures accelerate pest breeding cycles. For a comprehensive summer pest prevention guide:
● Maintain lawns and trim vegetation away from homes
● Check window and door screens for tears
● Store food in sealed containers
● Inspect water sources that attract mosquitoes
Do You Know? Mosquitoes can lay eggs in a teaspoon of water. Eliminating stagnant water is crucial to reducing their population.
Fall: Preparing for Winter
As temperatures drop, pests search for warm indoor spaces. Key actions include:
● Inspecting for winter rodent entry points
● Sealing attic vents, crawl spaces, and foundation gaps
● Cleaning storage areas to minimize hiding spots
● Checking chimney and fireplace openings
Quick Fact: Rodents can enter homes through openings as small as ¼ inch.
Seasonal Pest Checklist for Homeowners
Creating a structured seasonal pest checklist simplifies preventive measures and ensures nothing is overlooked.
Season
Key Actions
Spring
Inspect for termites, seal exterior gaps, clean gutters, and check compost
Summer
Repair screens, trim vegetation, remove standing water, and secure food
Fall
Seal entry points, inspect attic/crawlspace, clear debris, and prepare storage
Winter
Monitor indoor activity, keep firewood away from walls, and maintain traps
Inspection & Maintenance Tips
● Schedule annual pest inspections by professional Virginia pest control consultation to detect hidden problems
● Keep a log of pest sightings and treatment dates
● Regularly replace weather stripping and caulk cracks
Note: Even small preventive steps, when consistently applied, drastically reduce infestations.
Common Pests and Their Seasonal Behaviors
Understanding how different pests behave each season helps homeowners take timely action to protect their property.
● Ants and Termites: Ants emerge in spring seeking food, while termites become active and can damage wood unnoticed. Early detection is critical.
● Rodents and Mice: Fall and winter increase rodent intrusions. Block all entry points and keep food sealed.
● Mosquitoes and Flies: Summer creates the ideal breeding environment for mosquitoes. Eliminate standing water and use physical barriers like nets.
● Spiders and Other Insects: Seasonal shifts cause spiders to move indoors. Regular vacuuming and decluttering reduce hiding spots.
Eco-Friendly Prevention Methods
● Use natural repellents like peppermint oil or diatomaceous earth
● Encourage beneficial insects, such as ladybugs, to reduce pest populations
● Plant pest-deterring plants near home boundaries, like marigolds or lavender
Integrated Pest Management (IPM)
Adopt an IPM approach by combining physical barriers, monitoring, and environmentally safe treatments. This minimizes chemical use while maintaining a pest-free home.
Quote: “Prevention is the most effective form of pest control.” – National Pest Management Association
Seasonal Pest Prevention Tools
● Snap traps and humane rodent traps
● Sticky traps for insects
● Outdoor perimeter sprays (eco-friendly)
● Moisture meters to detect early termite or mold problems
Pro Tip: Keep tools organized and accessible to act quickly when pest activity is noticed.
Planning: Annual Pest Calendar
Month
Recommended Action
March-April
Spring pest prevention tips: Inspect, seal, clean gutters
June-July
Summer pest prevention guide: Screens, standing water, food storage
September
Seasonal pest checklist: Seal entries, declutter, prep storage
November
Winter rodent entry points: Monitor indoors, maintain traps
Key Takeaways
● Seasonal awareness prevents infestations and property damage
● Consistent inspections and maintenance are essential
● Simple eco-friendly measures can significantly reduce pests
● Use a structured checklist and calendar for effective prevention
Conclusion
Homeowners who stay proactive and follow spring pest prevention tips, along with year-round monitoring, ensure their properties remain safe and comfortable. Using a summer pest prevention guide, checking winter rodent entry points, and maintaining a seasonal pest checklist ensure your home remains safe and comfortable. Remember to combine inspections, physical barriers, and environmentally friendly methods for the best results.
FAQs
Q1: How often should I perform a termite inspection?
A1: Conduct inspections annually, especially in spring, to detect early signs of termite activity and prevent extensive damage.
Q2: Can pests enter my home during winter?
A2: Yes, rodents and insects seek warmth and shelter indoors. Sealing entry points and monitoring for activity is crucial.
Q3: What is the most effective eco-friendly method for pest prevention?
A3: Using natural repellents, encouraging beneficial insects, and eliminating water sources effectively reduces pest populations without chemicals.
Ensure your home is ready for every season. Schedule a professional Virginia pest control consultation or a termite inspection in Suffolk, VA, today and stay ahead of potential infestations.
 Hyland Fisher - Architect
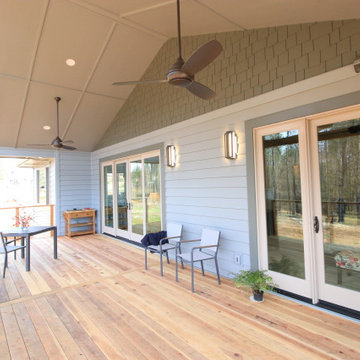
This new 1,560 square foot, three bedroom, two bath residence replaces a Paradise, CA home destroyed in the 2018 Camp Fire. The owners wanted an attractive and modest house to live in while they built their dream home on an adjacent lot. The house will later be used as rental income and provide much needed housing in Paradise.
The back of the house faces west towards an excellent view of a stand of oaks that survived the fire. The large rear porch roof provides protection from unwanted glare and the setting summer sun, so the house does not overheat in the summer. The porch also extends the living space and provides excellent year round indoor/outdoor living. It is open framed with rafters so there is an expansive view to the forest and ample diffused daylight throughout the year. It also protects the home from prevailing weather patterns.
The open floor plan provides an outstanding space for entertaining guests with large windows bringing in the outdoors.
Even though the house is built on a sloped lot it is fully barrier free and employs universal design principles throughout including a curbless shower in the Primary Bath.
Several energy efficient materials and methods were used while staying within a modest construction budget. The roof uses a 12” energy heel to allow a consistent insulation blanket in the attic and blown-in blanket (BIB) insulation was used in the walls to provide an R-23 wall assembly, much better than code requirement and better than standard construction. A cool roof, foil backed roof sheathing, heat pump HVAC system, heat pump water heater, and a whole house fan round out the energy efficiency measures of this house.
8