
Search results for "Replacing damaged" in Home Design Ideas
 Achilles Roofing & Exterior
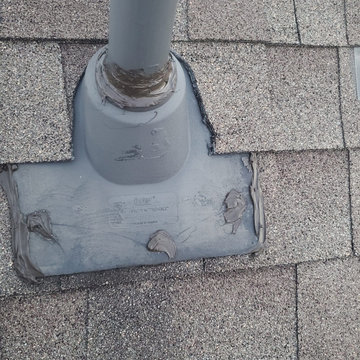
A leak on a back porch roof, traced to the eave. Finished in Cypress.
Client: Diego
Location: Cypress
Scope of Work: Localized roof leak repair, back porch section
Diego’s leak was on the back porch, and the damage had collected where it usually does: along the gutter edge, where water sits longest.
We stripped the shingles off the affected section and found the decking at the eave had gone soft. Four sheets of plywood out and replaced, then new underlayment and new shingles over the repair.
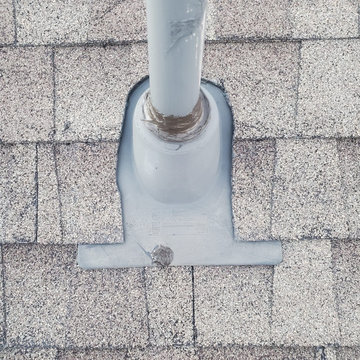
While we were in there, we inspected every pipe boot and roof vent in the work area and sealed around the penetrations and flashing. The chimney flashing was lifting and separating, so we repaired and re-secured it.
One more thing, and it is the part that keeps this from coming back: the downspout above the porch was dumping water against the wall. We extended it about two feet to carry it clear. Fixing the roof without fixing what is soaking it is how a repair fails twice.
Debris cleared, work area left clean.
Worth being straight about scope: this was a localized repair, not a roof restoration. The new shingles are matched as closely as the product allows, and on a weathered roof an exact color match is never guaranteed. We say that before we start.
Diego, thank you for letting us chase the cause and not just the symptom.
Leak in one spot? Achilles Roofing & Exterior, a Houston roofing company serving Cypress and greater Houston.
 H2D Architecture + Design
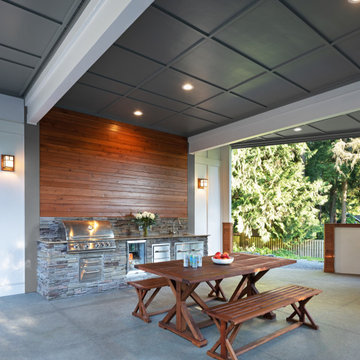
This Lake Forest Park project transformed a former 1960s indoor swimming pool cabana into a contemporary PNW-inspired outdoor living space with a covered entertaining area and enclosed workshop. The existing pool enclosure featured a dramatic glass ceiling, expansive window walls, and a full brick fireplace, but extensive water damage required the space to be stripped back to its structural framing. The pool was infilled and the existing roof replaced, creating a new, more functional configuration centered around outdoor living. A custom outdoor kitchen anchors the space, incorporating a distinctive transition from natural rock to wood paneling, while integrated lighting, a custom fire pit, and finished sealed-concrete flooring establish a warm, durable material palette. The result is a flexible entertaining space is designed for year-round gathering and entertaining.
+ Architecture and Design: H2D Architecture + Design
www.h2darchitects.com
+ Builder:Northlight Custom Builders
+ Photography: Cleary O’Farrell Photography
 EA Home Builders
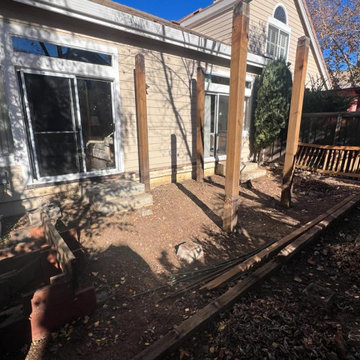
The client's original wooden deck, along with its aging patio cover, had deteriorated and was in need of replacement. The client's objective was to have a low-maintenance deck without a cover while retaining the existing railing.
To begin, we carefully dismantled the old deck and patio cover, clearing the way for the upcoming construction. Following this, we proceeded to install sturdy cement footings to establish a reliable base for the new deck.
The framework for the deck was meticulously crafted using robust 4x6 pressure-treated lumber, ensuring durability and stability. Subsequently, we laid down 2x6 joists on top of this framework, providing essential support for the upcoming decking material.
To safeguard against moisture and enhance the longevity of the deck, we meticulously applied rubber flashing atop the joists. This protective layer serves to prevent water damage and reinforce the structural integrity of the deck.
For the decking itself, we selected and expertly installed Trex, a top-quality composite decking material known for its low maintenance and long-lasting performance. Additionally, the existing railing was carefully refurbished and reinstalled, seamlessly integrating it with the new deck.
Finally, we completed the project by installing the fascia, which not only enhances the aesthetic appeal of the deck but also conceals the ends of the deck boards and joists, contributing to a polished and finished look.
Throughout the entire process, we diligently adhered to local building codes and regulations, ensuring that the final result met the client's desires while delivering a high standard of construction and craftsmanship.
Find the right local pro for your project

 Design Vision Studio
Erik Grammer Photography -
I recently came across a post on Facebook with a photo of an elderly couple with a quote saying "We were born in a time when if something was broken we would fix it, not throw it away..." This quote resonated with me. I found myself thinking of it while working on the same house - for the fourth time. I affectionately call this beautiful Southern California beach house the Humpty Dumpty home.
I started a wonderful business relationship with one of my favorite clients back in 2003. Initially, I was called in to "fix" and finish what another designer started. Once completed and with everything just so, the couple unfortunately divorced and amicably divided the art, rugs and furnishings. I was hired for a second time to recreate each room as close as possible to replace all items that were missing.
The house was happily restored back to the original design and all was well for a few years. My client relocated to the East Coast for a temporary job assignment and the house was rented to a person (whose name I can't say) from a famous all-girl band. During this time there was a problem with the upstairs laundry room and water damage occurred. I was hired for the third time to help repair and update (ever so slightly) some areas in the house. My client requested to keep the design and feeling of the house intact because he loved it so much.
A few years passed before a pipe broke in the master bathroom while the new renter was out of town on vacation. Unfortunately, things like this do happen - and if not attended to quickly, major damage can occur. In this case, nearly the entire house was flooded requiring it to be completely gutted and stripped down to the floorboards and studs. In January of this year, I was hired to help the client, the insurance company, and the contractor put the house back together again. But unlike the Humpty Dumpty story, this house has actually been put back together again - several times over.
Although, this house and client have experienced some challenges, I say this is a perfect example of design success. My client has had many opportunities to change and create something new in his environment with every mis-adventure. Instead, he realizes his home is exactly the way he likes it. It has been such an honor to work with this man who is definitive, trusting, and confident enough to create (or re-create) the perfect home that "fits" his personality and lifestyle.
Although this Humpty Dumpty home has been good for my business, I hope the next project with this client is to decorate another property - perhaps a New York City Apartment!

 TOC design & construction inc.
Sometimes a large rectangular space can be challenging, especially when you need to use oversized existing pieces of furniture. But there is no such thing as a challenge in TOC design’s mind, only solutions.
I took advantage of the grand space with its natural light by blending the old with some new contemporary pieces and making it feel more coherent.
In this large formal living space, we removed the old damage wood floors and replaces with 3/4" thick red oak 3 1/2" plank wood in a Java color by Mercier. The room was painted 6206-21 Sketch paper and tone on tone with a slight rose gold wall paper was used at the fireplace wall. The existing fireplace mill work also got a facelift with ultra white semi gloss paint. The space got all new moldings and trims. I kept the clients existing couches and oversized rug and added a large coffee and end tables as well as a console and 2 book cases in mat gold with glass shelving, this gives the space depth without it feeling too heavy.
 Achilles Roofing & Exterior
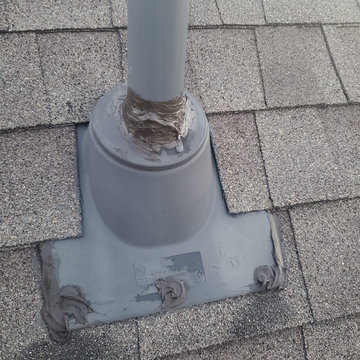
A leak on a back porch roof, traced to the eave. Finished in Cypress.
Client: Diego
Location: Cypress
Scope of Work: Localized roof leak repair, back porch section
Diego’s leak was on the back porch, and the damage had collected where it usually does: along the gutter edge, where water sits longest.
We stripped the shingles off the affected section and found the decking at the eave had gone soft. Four sheets of plywood out and replaced, then new underlayment and new shingles over the repair.
While we were in there, we inspected every pipe boot and roof vent in the work area and sealed around the penetrations and flashing. The chimney flashing was lifting and separating, so we repaired and re-secured it.
One more thing, and it is the part that keeps this from coming back: the downspout above the porch was dumping water against the wall. We extended it about two feet to carry it clear. Fixing the roof without fixing what is soaking it is how a repair fails twice.
Debris cleared, work area left clean.
Worth being straight about scope: this was a localized repair, not a roof restoration. The new shingles are matched as closely as the product allows, and on a weathered roof an exact color match is never guaranteed. We say that before we start.
Diego, thank you for letting us chase the cause and not just the symptom.
Leak in one spot? Achilles Roofing & Exterior, a Houston roofing company serving Cypress and greater Houston.
 Achilles Roofing & Exterior
A leak on a back porch roof, traced to the eave. Finished in Cypress.
Client: Diego
Location: Cypress
Scope of Work: Localized roof leak repair, back porch section
Diego’s leak was on the back porch, and the damage had collected where it usually does: along the gutter edge, where water sits longest.
We stripped the shingles off the affected section and found the decking at the eave had gone soft. Four sheets of plywood out and replaced, then new underlayment and new shingles over the repair.
While we were in there, we inspected every pipe boot and roof vent in the work area and sealed around the penetrations and flashing. The chimney flashing was lifting and separating, so we repaired and re-secured it.
One more thing, and it is the part that keeps this from coming back: the downspout above the porch was dumping water against the wall. We extended it about two feet to carry it clear. Fixing the roof without fixing what is soaking it is how a repair fails twice.
Debris cleared, work area left clean.
Worth being straight about scope: this was a localized repair, not a roof restoration. The new shingles are matched as closely as the product allows, and on a weathered roof an exact color match is never guaranteed. We say that before we start.
Diego, thank you for letting us chase the cause and not just the symptom.
Leak in one spot? Achilles Roofing & Exterior, a Houston roofing company serving Cypress and greater Houston.
Sponsored
Plain City, OH

Kuhns Contracting, Inc.
Central Ohio's Trusted Home Remodeler Specializing in Kitchens & Baths
 Studio Van Herik
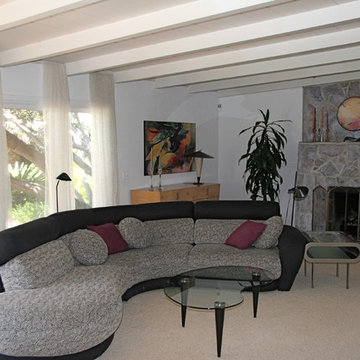
If you look at the original photo of this living room, you can easily tell what a challenge I was facing in needing to make this an appealing space for the next few years.
Prior to renovation, I needed to make this room and home satisfactory to the owner's contemporary and Modernist style sensibilities. They had a close eye on budget and didn't want to pay to have the ceiling re-painted since it was in fairly good shape. Given that the rest of walls were all darkly paneled (and the owner's wanted architectural white to show off artwork), I needed to find a way to integrate the beige-ish ceiling color with that crisp white and their furniture colors
The floors were also very old, damaged, dark oak and while they'd be eventually replaced with bamboo during renovation, I needed to figure out how integrate them into the overal color scheme of the room and home.
My final choices were to let some of the brown/grey show thru the fireplace re-paint, put in a light beige carpet to coordinate the fireplace, beige ceiling and the slight beige in the sofa.
Since I had a bit left in the budget to work with window treatments and the owner's didn't want to block the view to the gorgeous outside views, I got lucky and found an exotic fabric store with the lovely, (slightly beige) sheer fabric. We had the many yards of that fabric hemmed and then simply doubled it over simple tension rods placed in between the ceiling beams. The overall effect was to raise the window height visually, soften the "feel" of the room while still keeping to the owners need for a minimalist, light and contemporary space.

 Kari P
When I bought my house in May 2014, there was one thing I really didn’t like about it – the 1950s bathroom complete with pink tile and mismatched gaudy fixtures was absolutely hideous. I knew redoing the bathroom would be a big, expensive project, so I vowed to just live with it while I fixed up parts of the house that were easier to update, such as putting a fresh coat of paint on the walls and updating the curtains (which I still haven’t done, by the way). Well my first winter in the new house turned out to be a bad one, and in February 2015, I noticed water stains on the walls and ceiling of the second bedroom that only got worse and worse each day. The water damage quickly spread to other rooms, and when contractors came to the house to access and fix the damage, they discovered moisture behind the pink tiled walls of my bathroom. And so started the bathroom remodel.
Start to finish, this project took close to six months, due to going back and forth with insurance and difficulty finding a contractor I liked. I lived without a shower for at least four of those months, showering at the gym where I worked or in a pop-up tent in my backyard once it was warm enough out. My friend Eric and I demoed the bathroom and for the remodel, I picked out all of the design components and had a local contractor, Fred Haas do the work. I kept the original layout – as my bathroom was small to begin with and it was both impractical and expensive to start moving things around – but just about everything else about the bathroom is new, except for maybe the window and door. New tub, sink, and toilet, new tile floor and shower surround, new walls and ceiling, fresh paint, new fixtures and mirror, updated lighting, and a better ventilation system were all added.
Tub – Sterling Vikrell
Toilet – Kohler Wellworth® two-piece round-front dual-flush toilet
Sink – Kohler Veer™ 21" pedestal bathroom sink
Fixtures – Kohler Alteo® line
Tile floor and shower surround – American Olean Laurel Heights ceramic tile in Summit Gray
Lighting – I don't remember... will have to see if I can find it
Ventilation system – NuTone
Mirror – Ikea
Paint – Behr
Shower Curtain – eBay
Here are photos of my project from start to finish. As you can see, I probably still need a thing or two (a toilet paper holder, mini storage shelf, and some art wouldn’t hurt, nor would replacing the door or painting it white), but overall I’m really happy with how my new bathroom came out. I LOVE it, which is the exact opposite of how I felt about the original bathroom.
Photos © Kari Post

 Kimberley Bryan
Photo: Kimberley Bryan © 2016 Houzz
Inspiration for a 1950s kitchen remodel in Seattle
Inspiration for a 1950s kitchen remodel in Seattle

 Houseplay Renovations LLC
It is a truth universally acknowledged that a homeowner in possession of a leaking roof must be in want of repairs.
And though it makes for a fun Jane Austen allusion, an unreliable roof is a serious problem. Water can cause a great deal of damage in a short time, so this homeowner wisely called us in to help.
The roof of this custom-designed home was leaking in myriad locations, so our team removed the existing roof decks to access and repair the exterior trouble spots.
The new deck was constructed atop a Bison pedestal system; in fact, we custom-designed the deck in panels that can be lifted for seasonal roof sweeping and simpler maintenance.
The various roof decks were rebuilt with both reclaimed decking and new ipe decking. Our team also removed several faulty parapet walls and replaced them with a mixture of stainless steel cables and ipe railings.
Finally, we took steps to prevent future drainage problems by applying a sealcoat to the exterior stucco and creating a copper drip-edge too.
Leaking roofs are no laughing matter, but thanks to Houseplay, this story — like Austen’s Pride and Prejudice — had a happy ending.
Photo Credit: Anne Ruthmann Photography
 Kari P
When I bought my house in May 2014, there was one thing I really didn’t like about it – the 1950s bathroom complete with pink tile and mismatched gaudy fixtures was absolutely hideous. I knew redoing the bathroom would be a big, expensive project, so I vowed to just live with it while I fixed up parts of the house that were easier to update, such as putting a fresh coat of paint on the walls and updating the curtains (which I still haven’t done, by the way). Well my first winter in the new house turned out to be a bad one, and in February 2015, I noticed water stains on the walls and ceiling of the second bedroom that only got worse and worse each day. The water damage quickly spread to other rooms, and when contractors came to the house to access and fix the damage, they discovered moisture behind the pink tiled walls of my bathroom. And so started the bathroom remodel.
Start to finish, this project took close to six months, due to going back and forth with insurance and difficulty finding a contractor I liked. I lived without a shower for at least four of those months, showering at the gym where I worked or in a pop-up tent in my backyard once it was warm enough out. My friend Eric and I demoed the bathroom and for the remodel, I picked out all of the design components and had a local contractor, Fred Haas do the work. I kept the original layout – as my bathroom was small to begin with and it was both impractical and expensive to start moving things around – but just about everything else about the bathroom is new, except for maybe the window and door. New tub, sink, and toilet, new tile floor and shower surround, new walls and ceiling, fresh paint, new fixtures and mirror, updated lighting, and a better ventilation system were all added.
Tub – Sterling Vikrell
Toilet – Kohler Wellworth® two-piece round-front dual-flush toilet
Sink – Kohler Veer™ 21" pedestal bathroom sink
Fixtures – Kohler Alteo® line
Tile floor and shower surround – American Olean Laurel Heights ceramic tile in Summit Gray
Lighting – I don't remember... will have to see if I can find it
Ventilation system – NuTone
Mirror – Ikea
Paint – Behr
Shower Curtain – eBay
Here are photos of my project from start to finish. As you can see, I probably still need a thing or two (a toilet paper holder, mini storage shelf, and some art wouldn’t hurt, nor would replacing the door or painting it white), but overall I’m really happy with how my new bathroom came out. I LOVE it, which is the exact opposite of how I felt about the original bathroom.
Photos © Kari Post

 Flooret
Nordic simplicity. White floors can be challenging to use, but when pulled off correctly are extremely rewarding. An instant statement-maker, they often present the challenge of maintenance. For Nordland, we specifically created a slightly weathered pattern with darker knots, so that they do not reveal dirt as quickly.
The most important specification for determining the durability of vinyl flooring is the thickness of the wear-layer. The best wear-layers are made of thick, clear virgin PVC, which covers the paper print-film that gives the floor its unique appearance. Once the wear-layer wears through, the paper is damaged and the floor will need replacement.
Most vinyl floors come with a 8-12 mil wear-layer (0.2-3 mm). The top commercial specs in the industry are higher, at 20-22 mil (0.5 mm). A select few manufacturers offer a “super” commercial spec of 28 mil (0.7 mm).
For Modin, we decided to set a new standard: 40 mil (1.0 mm) of premium virgin PVC. This allows us to offer an industry-leading 20 year Commercial Warranty (Lifetime Residential), compared to nearly all other commercial vinyl floors’ 10 year Commercial Warranty.
Beyond our superior wear-layer, we also use a patented click mechanism for superior hold, and a ceramic-bead coating.
SIZE MATTERS
Wider and longer planks create a sense of space and luxury. Most vinyl floors come in 6” or 7” widths, and 36” or 48” lengths.
For Modin, we designed our planks to be 9” wide, and 60” long. This extra large size allows our gorgeous designs to be fully expressed.
DETAILS THAT COUNT
We made sure to get all the details right. Real texture, to create the feel of wire-brushed wood. Low sheen level, to ensure a natural look that wears well over time. 4-sided bevels, to more accurately emulate the look of real planks. When added together they help create the unique look that is Modin.
DESIGNS THAT INSPIRE
We spent nearly a year just focusing on our designs, to ensure they provide the right mix of color and depth. Focusing on timeless wire-brush and European Oak styles, as well as more contemporary modern washes, our collection offers truly beautiful design that is both functional and inspiring.
Sponsored
Plain City, OH
Kuhns Contracting, Inc.
Central Ohio's Trusted Home Remodeler Specializing in Kitchens & Baths
 Dimensions in Wood Inc
This client’s vision for their kitchen/hearth room remodel was to create a harmonious space for gathering and socializing with family and friends. Without the before and after photos, you would scarcely believe this was the same home.
This huge home renovation perfectly illustrates that Dimensions In Wood’s expert team can handle every aspect of your remodeling project. Plumbing, flooring, electrical wiring, custom cabinets, structural engineering, appliances, windows, interior and exterior doors, entertainment and more. Contact us today to discuss Translating Your Visions into Reality
The client was interested in new appliance technology, cabinetry to the ceiling, and an Island large enough to seat 3. They also wanted a built-in breakfast nook, improved pantry space, more functional storage on either side of their fireplace, and a built-in appearance for the TV above the mantel. The original built-in desk was not used, and they preferred for that space to serve as a small bar area with refrigeration and a place to store their printer. We designed several plans for the space before selecting the final layout.
The new design required the removal of the soffit over the old sink, as well as a small wall beside the old refrigerator. The wall beside the stairwell had to be shortened 13 inches and a new beam installed to carry the load of the home’s 2nd story to gain enough space for the large central island. The existing closet pantry walls were also reconfigured as per the new plan.
This serves as a great reminder that Dimensions In Wood is much more than just custom cabinets.
Central to the entire custom kitchen is an 8-foot Walnut island. The huge island, which comfortably seats three, is topped with Essenza Blue quartzite. The stone’s natural striations are beautiful. Quartzite is harder than granite, and less likely to stain than other stones because of its density. The couple had to look through multiple slabs to find a piece they LOVED. The island’s custom Walnut cabinetry, built to resemble a piece of custom furniture, was stained Bronzed Walnut by Sherwin Williams.
The 4-foot Galley Workstation in the island, handles all the kitchen’s prep, serving, and cleanup needs. The Galley’s culinary tools include an upper tier cutting board, upper tier drying rack, 2 lower tier platforms, 11″ colander with non-slip handles, and 11” mixing bowl with lid and non-slip bottom. Learn more about the amazing Galley Workstation here. A Waterstone gantry faucet in a pewter finish combines a pull-down sprayer for maximum mobility and a articulated swivel spout. A water tap with reverse osmosis filter provides the highest quality drinking water. To keep a clean and sleek counter we installed a raised air switch for the garbage disposal and integrated soap dispenser. The island also houses the Thermador Sapphire 7-Program Dishwasher with a hidden touch control panel and a custom Walnut wood front. The cabinetry under the Galley Workstation features a trash roll out, as well as storage for the culinary tools.
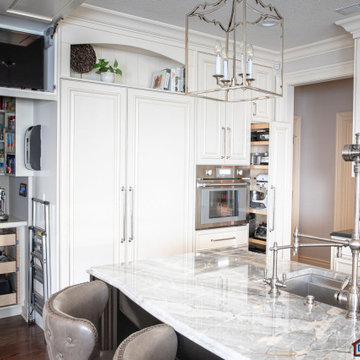
Shortening the stairwell wall, and reframing around the stairs, which included shortening the handrail, also made room for a bi-fold door walk-in pantry with extra roll out storage and space for a small microwave. Above the panty doors is a remote controlled, electric motor powered, lift up cabinet door which hides a flat screen TV, used while the family is cooking.
To the right of the walk-in pantry is cold food storage. The Thermador, 30-inch Freedom Collection refrigerator and 24-inch built-in freezer column with internal ice maker are covered with matching cabinetry fronts. An open display space was designed above the units, creating an aesthetically beautiful wall. To the right of the refrigerator & freezer columns is a tall cabinet designed for the built-in Thermador steam and convection oven. The convention steam oven is a relatively new technology for homes, but its versatility and food quality is amazing. To the right of this is a pull-out appliance pantry which provides easy access and storage for a stand mixer, blender, and any other appliance you do not want to clutter the counter.
The most visible wall of the kitchen features the 36-inch Thermador Professional Series Harmony Gas Range with Griddle. Between the range and custom designed wood hood, a framed mosaic tile accent in the backsplash, creates a focal point. To clear the air, the Professional Series Thermador 42-inch ventilation insert provides excellent exhaust capabilities, as well as providing multi-level, vivid LED lights for beautiful illumination.
The wall cabinetry symmetrically flanks the custom hood, utilizing deeper wall cabinetry on each end, allowing for storage of oversized dishware. The base cabinetry on this wall is made up of drawers, except for the corner, which is a Kesseböhmer LeMans II. This specially designed shelf system allows ease of access in underutilized blind corners. The dual action articulation system with soft close mechanism ensures a smooth open and close.
Rounding the corner to the outside wall, the base cabinetry was built to a narrower depth, providing additional space for the island, as well as easier access to the new larger pass-thru window which serves the screen porch. The client selected Black Vermont granite countertops with an ogee edge to contrast the Linen White painted cabinetry.
The door to the screen porch was replaced with a Marvin Exterior Door with a raised panel at the bottom of the 3⁄4 glass door.
Marvin Windows replaced the other windows in the space increasing the energy efficiency and value of the home. To establish the breakfast nook, a bench with drawers and an upholstered seat was built into the bay area of the room.
Custom bookshelves were built with open shelves, cabinet doors, and drawers on either side of the fireplace. A new stone hearth and fireplace surround were installed. Above the existing mantel we built a recessed space for the flat screen television hiding all wiring inside the walls for a completely clean look.
The space that was once a desk was transformed into a bar area. The glass shelves and glass cabinet front liquor cabinet stand out. But this bar area has hidden secrets. Tucked beneath the black granite is a Thermador under-counter double drawer refrigerator with matching wood front panels. They blend in perfectly with the cabinets. A wireless printer is easily accessed on a slide out drawer. Plus, what looks like merely wooden panels on the wall are concealing recessed storage for more bottles and glasses!
Overhead recessed lighting and speaker system provide illumination and entertainment through the entire space.
This luxury home had original, solid oak flooring through most of the first floor which the homeowner obviously wanted to keep but were in desperate need of repair and refinishing. Our master craftsmen wove in new wood flooring to match the old where needed, particularly where walls had been changed and where the floor was damaged. We sanded the floors, smoothing away years of wear and tear. The entire wood floor was then uniformly stained, making it impossible to differentiate where any repairs were made.
If this renovation has inspired you, then contact us today! There is no limit to our Dimensions.

 Christopher Simmonds Architect
A long relationship with Paris led our clients to recreate a piece of the city they love here in Ottawa. This renovation revitalized a fire-damaged, turn-of-the-century house into a timeless and sophisticated residence for a well-travelled couple.
The gracefully composed façade, featuring round arch windows and wrought-iron balustrades, hints at the Parisian-inspired spaces inside. The clients wanted the dark interior transformed into a bright, elegant and comfortable space, suited to house their collection of art and antiques.
The home exudes a calm elegance; subtle paint colours and white oak flooring create a tranquil atmosphere, while trims and plaster mouldings are used to highlight and define openings. French doors link the traditionally defined spaces and frame carefully composed views from room to room.
A dilapidated addition at the rear of the home was removed and replaced while increasing the floor area. This made it possible to add bedrooms that overlook the quiet park and pond, adjacent to the property.
The new kitchen features a bay window and sitting area which also has views to the park. A sleek black and stainless faucet and dramatic chandelier create contrast in the all-white kitchen. Caesarstone countertops, glass cabinet doors, and crown mouldings tie into the home’s restrained palette.
The formal dining room is linked to the kitchen through two doorways allowing a symmetrical composition, and opens up to the back terrace through a wall of French doors and windows. The re-built terrace leads down to a stone patio and lush yard.
Additionally, the home was designed for aging in place, with an elevator rough-in and an accessible side entrance.
Photography: Adrien Williams

 TaylorPro Design and Remodeling, Inc.
"Kerry was invited to our house to bid on our kitchen remodel in August 2012. We were impressed with his courtesy and professionalism from the start. His estimates were prompt and changes to the scope of work were ready the next day. After we went on vacation for a month, we started work in October. The scope of work included: he removed the counter tops, sink, plumbing, all base and wall cabinets, appliances, french doors and backsplashes. He replaced all switches and outlets, and stops on the water supply. He repaired some damaged drywall. Kerry helped us with our cabinet and granite countertop selection and oversaw their installation within the existing footprint. He installed a stainless undermount sink, garbage disposal, faucet, drain plumbing, and airgap. Our experience with Kerry and his crew was positive from start to finish. Everyone was courteous, prompt, and professional. The work was completed in a timely manner and right on the original estimate. Most importantly, the kitchen is absolutely beautiful. Everytime someone comes over they just say "wow, what a great kitchen!" We highly recommend TaylorPro for anyone looking for an excellent, quality kitchen remodel.
~John & Ann S, Clients
Kitchen remodeling inspirations come from a variety of sources including cultural backgrounds, idealistic ideas, up and coming trends, and personal needs. This kitchen remodel was inspired by a faulty microwave. So the start of the journey was not as elegant as the final destination, but it makes for a great story. Oh, and the final destination included 3 bath remodels too! LOL
Photo By: Kerry W. Taylor

 emily lauderback stewart design and renovation
Mid-sized craftsman yellow two-story wood exterior home idea in Seattle


 Vintage Cellars - Luxury Custom Wine Cellars LA
We created a stellar custom small wine cellar design for a couple who had lost their home and wine collection in the wildfires in Rancho Bernardo in North County San Diego, California in 2007. We encountered some challenges in this project.
The room where the client wanted to build the wine cellar was relatively small, and we needed to hide a beam that runs through the left wall. We provided a wine storage solution that solved the construction issues and met our client's requirements.
This glass enclosed, contemporary yet rustic small wine room features magnum storage, individual bottle redwood wine racking, diamond bins, wine case storage, horizontal displays, as well as a section in the wall for liquor storage. Wine Cellar Builders at Vintage Cellars were able to construct this wine room after bumping out a wall in the client's kitchen for additional storage space. This added 80 square feet more to the tiny room on the second floor.
We framed the small wine closet before installing the racking for the Rancho Bernardo San Diego California wine cellar. We also installed the proper insulation and vapor barrier to protect our client's wine from damage, and to prevent wine cooling system or wine cooling unit breakdowns.
Vintage Cellars has built gorgeous custom wine cellars and wine storage rooms across the United States and World for over 25 years. We are your go-to business for anything wine cellar and wine storage related! Whether you're interested in a wine closet, wine racking, custom wine racks, a custom wine cellar door, or a cooling system for your existing space, Vintage Cellars has you covered!
We carry all kinds of wine cellar cooling and refrigeration systems, incuding: Breezaire, CellarCool, WhisperKool, Wine Guardian, CellarPro and Commercial systems.
We also carry many types of Wine Refrigerators, Wine Cabinets, and wine racking types, including La Cache, Marvel, N'Finity, Transtherm, Vinotheque, Vintage Series, Credenza, Walk in wine rooms, Climadiff, Riedel, Fontenay, and VintageView.
Vintage Cellars also does work in many styles, including Contemporary and Modern, Rustic, Farmhouse, Traditional, Craftsman, Industrial, Mediterranean, Mid-Century, Industrial and Eclectic.
Some locations we cover often include: San Diego, Rancho Santa Fe, Corona Del Mar, Del Mar, La Jolla, Newport Beach, Newport Coast, Huntington Beach, Del Mar, Solana Beach, Carlsbad, Orange County, Beverly Hills, Malibu, Pacific Palisades, Santa Monica, Bel Air, Los Angeles, Encinitas, Cardiff, Coronado, Manhattan Beach, Palos Verdes, San Marino, Ladera Heights, Santa Monica, Brentwood, Westwood, Hancock Park, Laguna Beach, Crystal Cove, Laguna Niguel, Torrey Pines, Thousand Oaks, Coto De Caza, Coronado Island, San Francisco, Danville, Walnut Creek, Marin, Tiburon, Hillsborough, Berkeley, Oakland, Napa, Sonoma, Agoura Hills, Hollywood Hills, Laurel Canyon, Sausalito, Mill Valley, San Rafael, Piedmont, Paso Robles, Carmel, Pebble Beach
Contact Vintage Cellars today with any of your Wine Cellar needs!
(800) 876-8789
Vintage Cellars
904 Rancheros Drive
San Marcos, California 92069
(800) 876-8789

 Five Star Tree Care
It’s important to make sure that all trees on your property are healthy and in good condition. This means hiring professional tree trimming services to maintain your trees yearly in order to keep them looking beautiful and healthy. In late winter or early spring is the best time to trim your trees. Doing so will help to improve the new growth that happens later in the spring. But fruit bearing trees and damaged trees can benefit from careful pruning in the summer. It takes an expert to skillfully trim trees during the summer without damaging them or causing harm and our team at Five Star Tree Services is just a call away to help you with your tree trimming needs!
Why Trim Your Trees?
By trimming your trees annually, this will not only open up your landscaping, which allows more sunlight to get to your property, but there are many other benefits.
These can include:
-Keep Trees Healthy and Promote Growth
When you trim your trees in the spring, before they start producing buds, this helps to stimulate more new growth, which helps to keep trees in excellent condition. This can be especially important for saplings as it encourages them to fill out nicely and in a controlled and structurally sound way. If you are not maintaining your trees properly, they can become too dense, which causes a bunch of problems. One being that it restricts the amount of sunlight getting to all the leaves and it reduces the amount of nutrient circulation needed to support the tree.
Professional tree pruning properly aids in tree growth and its overall aesthetic. Cutting off unneeded or unwanted branches allows other parts of the tree to grow easier. Ridding the tree of these extra branches also stimulates more leaf and fruit production.
-Increased Safety
Your landscape is affected when you neglect to take care of your trees, along with everything else on your property. If you have any dead trees remaining on your property, not only are you putting yourself at risk of injury, but you are putting your family, neighbours, pedestrians, and guests at risk as well. Dead or damaged branches can also be a hazard as they could fall at any time and impact with anyone standing too close to it, or it can fall on your house, which is another issue altogether, if it causes damage. Luckily, you are able to avoid all of this by simply having regular trimmings that will keep your trees healthy. You also need to make sure that all branches close to power lines are cut. This especially, should only be done by a trained professional in order to avoid potential electrocution.
-Increase Production of Fruit
If you are lucky enough to have a fruit bearing tree, it is especially important to have it professionally trimmed before and after it fruits. Doing so helps to improve its overall health and ability to bear fruit by getting rid of unhealthy branches. New fruit also develops and spurs for bearing fruit for the following year.
-Manage Spreading Diseases
Tree branches that are damaged tend to be prone to diseases which are able to spread to other plants and trees in your yard. Branches that are dead also have the potential to easily fall with any wind and especially during a storm. Severely damaged branches can even fall without reason. When you get your trees trimmed and pruned regularly, this prevents these things from happening. It also prevents spreading disease to other trees. Any disease branches should especially be trimmed if they are close to where kids play, people walk, or by doors.
-Increase the Value of Your Property and Overall Appearance
Continuous maintenance and trilling will improve the aesthetic of your property. It controls clutter and opens up the space of the landscaping. Meaning that the curbside appeal to your property increases. This is especially important if you are planning to sell your house, which will actually raise the value of your property. The first step in enhancing the appearance of your property is properly taking care of your trees. The first thing people see when they pull up to or go past your house is the trees. By simply pruning your trees you can make a good impression on potential buyers and your neighbours as well.
-Safeguarding Your Property
Owning a house is the biggest investment you will probably ever make. Making the effort to maintain and increase its value by keeping it in good condition should be your first priority. By trimming your trees regularly, you will be protecting your investment. Not to mention this also allows you to enjoy a nicely manicured property.
Why Professionals Are Essential
Professionals help to improve the health and overall condition of your trees. Trying to trim or prune your trees when you don’t know how can be detrimental. This is why hiring a professional, who has the right knowledge and tools, is better than trying to do it yourself.
-Cost-Effective
Think of it as a short-term expense for a long-term return on your investment. Allowing professional arborists to do your tree maintenance can potentially help to negate the costs of injuries attained from DIY home improvements related to trees, replacements and repairs.
-Skilled and Experienced
Real tools required for trimming a tree need to be handled properly and by the appropriate people. If a regular person were to try and use these tools, the end result could be injury and property damage. This is especially true for any trimming required around power lines. All professionals will have the right experience and skills required to wield these tools in a safe way. This minimizes the likelihood of hazards, injuries, and life-threatening incidents.
-Proper Tools
Heavy-duty chainsaws, ladders, and protective gear are all needed to safely and properly trim a tree. When you hire a professional, they have all the required tools and more. Meaning that you won’t have to go out and buy these tools yourself. As a professional, they also make sure that their tools are reliable and well-maintained in order to efficiently get the job done well.
-Insured
Professionals are also always insured with liability insurance when doing jobs to cover any damages or injuries attained while working. They are able to also provide a guarantee for the safety of your property and belongings while they are doing a job for you.
How Five Star Tree Services Can Help
Although trimming your tree might seem like an easy job, it’s always best to trust the professionals. Proper execution of the task requires the right skills, experience, and knowledge. Our team at Five Star Tree Services have all of this and more! Give us a call at (416) 990-3355 to enlist us for all your Toronto Tree Trimming needs!
 Houseplay Renovations LLC
It is a truth universally acknowledged that a homeowner in possession of a leaking roof must be in want of repairs.
And though it makes for a fun Jane Austen allusion, an unreliable roof is a serious problem. Water can cause a great deal of damage in a short time, so this homeowner wisely called us in to help.
The roof of this custom-designed home was leaking in myriad locations, so our team removed the existing roof decks to access and repair the exterior trouble spots.
The new deck was constructed atop a Bison pedestal system; in fact, we custom-designed the deck in panels that can be lifted for seasonal roof sweeping and simpler maintenance.
The various roof decks were rebuilt with both reclaimed decking and new ipe decking. Our team also removed several faulty parapet walls and replaced them with a mixture of stainless steel cables and ipe railings.
Finally, we took steps to prevent future drainage problems by applying a sealcoat to the exterior stucco and creating a copper drip-edge too.
Leaking roofs are no laughing matter, but thanks to Houseplay, this story — like Austen’s Pride and Prejudice — had a happy ending.
Photo Credit: Anne Ruthmann Photography
129