
Search results for "Restore normal" in Home Design Ideas
 Tile Doctor Ltd
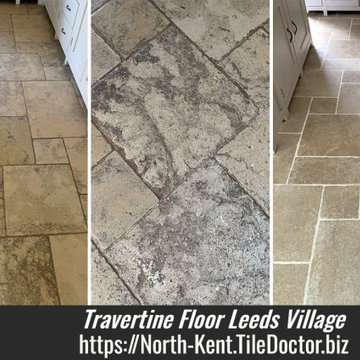
I was contacted about a Georgian property in the Kent village of Leeds , to see if I could do anything to improve a Travertine tiled floor. The use of Travertine was extensive and had been installed throughout the ground floor including the kitchen, dining room, utility and bathroom WC. Travertine is probably my favourite stone, but it is acid sensitive and attracts dirt easily, due to its ‘holey’ composition.
Initially we discussed the floor over the phone where I got to know about the issues they were experiencing, and I detailed the renovation process I normally use to restore it including the products and timelines. Naturally they wanted to me to provide a quote for the work however its tricky to do that accurately without seeing the floor, so I arranged a date to pop over.
Upon arriving I could see the tiles and the wide grout joints had extensive, ingrained dirt indicating the previous sealer had long since worn away. This is a common issue with stone floors, and to re-assure myself and the client it could be resolved I cleaned a small area in the utility room with pleasing results!
This test clean helped me to understand which products and methods would work best on the floor and later that day I emailed over a detailed quote for the renovation. Happy with the quote I received a reply the same day asking when I could start.
My colleague and I arrived on the agreed date and work started with adding protection to all areas that required it. We use a lot of water during the cleaning process and some materials such as MDF can become damaged with water ingress, so it makes sense to do this.
To get the floor clean, a coarse Carbide Brush fitted to a rotary machine was run over the Travertine tiles to scrub in a strong solution of Tile Doctor Pro-Clean. This process generates a lot of slurry as the dirt was washed out of the stone and grout which is extracted with a wet vacuum as we progressed.
Next it was on hands and knees with more Tile Doctor Pro-Clean and handheld brushes run over stubborn areas and along the grout lines to take them from 80% up to 100%.
Happy with the results, the next step was to renovate the stone using a series of diamond encrusted burnishing pads. Using only water for lubrication this process starts with the application of a coarse 400-grit burnishing pad attached to the floor buffer. This produces a lot of slurry which again was removed with a wet vacuum.
This left the Travertine clean, but the pores of the stone had been opened giving the floor a matt finish and more absorbent than it was originally. To further refine the appearance of the stone the next two burnishing pads were applied which are 800 and 1500-grit. These pads polish the stone and close the pores, restoring the natural sheen in the process. After each pad was applied the slurry was rinsed off the floor with water and extracted with the wet vacuum. Once complete the floor was left to dry off fully overnight.
I arrived the next day and took several moisture readings from the floor to check that it had dried off sufficiently overnight. The results were good, so work moved onto sealing the Travertine with two coats of Tile Doctor Ultra Seal which is a natural look impregnating sealer. It works by soaking into the stone, occupying the pores and thereby preventing dirt from becoming ingrained there. This ensures dirt remains on the surface where it is easily cleaned away.
The final step in the floor’s renovation was to apply the last of the diamond polishing pads which is a very fine 3000-grit. This pad further improves the polished appearance of the stone resulting in a satisfying sheen.
The work made a massive difference to the floor, and I received an email the next day from one of the owners who was really pleased with the transformation:
”Floors look brilliant. Very pleased.”
For the care and maintenance of polished sealed floors I recommend the use of Tile Doctor’s Stone Soap which is a gentle but effective cleaning product that won’t impact the sealer and contains a patina enhancer. When it comes to sealed floors my mantra is:
“If you look after the sealer, the sealer will look after the floor!”
Graham Davis
North Kent Tile Doctor

 User
Detail of Iridescent Venetian plaster finish on all walls in Living Room by Christianson Lee Studios
Example of a transitional home design design in New York
Example of a transitional home design design in New York
 Mkw Surfaces LTD
MKW Surfaces
Home design - large traditional galley home design idea in London with a farmhouse sink, shaker cabinets, gray cabinets, quartz countertops, gray backsplash and an island
Home design - large traditional galley home design idea in London with a farmhouse sink, shaker cabinets, gray cabinets, quartz countertops, gray backsplash and an island
Find the right local pro for your project
 User
Inspiration for a large timeless carpeted curved staircase remodel in Chicago with carpeted risers
 Alexandra Crafton
Photo: Alexandra Crafton © 2016 Houzz
Home design - eclectic home design idea in Boston
Home design - eclectic home design idea in Boston

 Windy City Painters
This West Town porch had suffered years of Chicago's harshest conditions. Road salt from winter streets, freeze-thaw cycles that crack metal bonds, and Lake Michigan humidity had transformed the iron railings into a rust catastrophe. The homeowner called Windy City Painters because they knew surface-level repainting wouldn't hold. We delivered a complete restoration using industrial-grade products and techniques that Chicago demands. The transformation took precision, the right chemistry, and an understanding of how brutal our climate actually is.
MATERIALS AND PRODUCTS
Windy City Painters selected RustDestroyer rust-converting primer as the foundation. This product chemically bonds to rust particles, converting them into a stable surface rather than simply covering them. The topcoat is Sherwin-Williams Corothane Aliphatic Urethane, specifically chosen because aliphatic urethanes resist yellowing, maintain flexibility in Chicago's temperature extremes, and provide superior weather resistance. We use 220-grit sandpaper between coats, stainless steel wire wheels for rust removal, and two full coats of finish. No shortcuts. No budget brands that fail in freeze-thaw cycles.
THE PROCESS
Step 1: Wire Wheel to Bare Metal (45 words)
We attached a stainless steel wire wheel to our equipment and removed every flake of loose rust and paint. This isn't cosmetic—it eliminates the corrosion source entirely. Rust spreads beneath paint. By going to bare metal, we stopped the problem at its root. Chicago's salt exposure demands this aggressive approach.
Step 2: Apply RustDestroyer Rust-Converting Primer (48 words)
After the surface was clean, we applied RustDestroyer according to spec. This primer chemically converts remaining rust particles into a protective layer, then bonds everything together. It's the critical bridge between corroded metal and lasting finish. One coat of RustDestroyer on bare metal creates the stable foundation that allows Corothane to perform properly throughout Chicago's cycles.
Step 3: Sand and Inspect Between Coats (42 words)
Once the primer cured, we lightly sanded with 220-grit paper. This step seems small but matters enormously—it removes dust, smooths any drips, and ensures perfect adhesion for the topcoat. We inspected every inch for missed spots. Chicago's humidity can trap moisture under topcoat if prep is rushed.
Step 4: Apply Two Coats of Corothane Topcoat (50 words)
We applied the first coat of Sherwin-Williams Corothane Aliphatic Urethane evenly, let it cure fully, then applied the second coat. Two coats guarantee coverage and durability. One coat thins under Chicago's sun and freeze-thaw stress. Corothane's flexibility is crucial—it moves with the metal as temperatures swing 50+ degrees in a single day.
CHICAGO-SPECIFIC CHALLENGES
West Town sits blocks from Lake Michigan. Humidity here is relentless. Winter brings road salt that penetrates every micro-gap in paint. Spring freeze-thaw cycles expand and contract iron, cracking weak coatings. Summer sun accelerates UV breakdown. Fall brings moisture creep before freezing begins again. Generic paints fail fast. Windy City Painters uses products engineered for this exact climate. RustDestroyer stops the chemical source of rust. Corothane's aliphatic formula resists yellowing under UV while maintaining the flexibility that stops cracking. The two-coat system ensures thickness that protects through all four seasons.
WHAT TO EXPECT LONG-TERM
With proper application and two coats of Corothane, this porch should remain rust-free and attractive for 7-10 years. This assumes normal Chicago weather exposure and no damage from impact or intentional scratching. Homeowners should rinse salt off railings after heavy winter storms and inspect annually for any paint cracks. Windy City Painters stands behind our work. If you see rust appearing in year 3 or 4, something failed—and we'll address it. This level of confidence comes from using the right products and proper technique.
PRO TIPS
1. Never paint over rust. If your railing shows orange or flaking, wire-wheel it first. Windy City Painters refuses shortcuts that fail.
2. Timing matters. Paint in spring or early fall when humidity is lower and temperatures are stable. Avoid summer heat and winter moisture.
3. Inspect annually. Catch paint cracks before rust starts underneath. A small touch-up now prevents a full restoration later.
Contact Windy City Painters at windypainters.com or 773-818-6331 for your free estimate.
FAQS
Q: Why is Corothane better than cheaper urethanes? A: Aliphatic urethanes resist UV yellowing and maintain flexibility in extreme temperature swings. Chicago needs flexible protection, not brittle coatings that crack.
Q: How do I know if my railing needs wire-wheeling? A: If you see rust flakes, discoloration, or pitting, wire-wheeling is essential. Windy City Painters inspects free and explains exactly what's needed.
Q: Can you paint over old paint if it's not rusted? A: Sometimes, but we always inspect. If the old paint is loose or the metal beneath shows any corrosion, we start over with wire-wheeling.
Q: What's the cost difference between one coat and two? A: Two coats cost more upfront but last 7-10 years versus 3-4 years with one coat. Windy City Painters recommends the investment.
Q: How do I protect my railing between professional paintings? A: Rinse salt off after winter storms, keep paint clean, and report any cracks immediately. Prevention beats restoration.
Q: Does RustDestroyer work on all metal? A: It works on iron, steel, and rust-prone alloys. Windy City Painters uses it exclusively for rust conversion because it's proven.
Q: Why do West Town homes rust faster than other neighborhoods? A: Proximity to Lake Michigan increases humidity. Combined with road salt, the freeze-thaw cycles hit West Town and River West harder than inland areas.
Q: Can I apply Corothane myself? A: Technically yes, but surface prep (wire-wheeling and RustDestroyer application) is where most DIYers fail. Windy City Painters handles this correctly.
Q: How often should I repaint my porch? A: Every 7-10 years with proper two-coat application. If you see rust sooner, the original prep was insufficient.
Q: What neighborhoods does Windy City Painters serve? A: We serve West Town, River West, and all of Chicago. Call 773-818-6331 for your area.

 threshold interiors
Location: New York, NY, United States
This Loft was tastefully renovated back in the '90s, but was due for an update and an expansion of the kitchen and dining areas to accommodate the client's cooking skills and entertaining needs. EnlargIing the island and adding cabinetry to delineate the office, bar and dining areas was a priority. The bathroom was updated to feel like a tranquil spa with beautiful new tile, plumbing fixtures and cabinets. Our biggest challenge was coordinating the entire renovation while our client was out of town for the Summer!
Photographed by: James Salomon
Sponsored
Columbus, OH

Hope Restoration & General Contracting
Columbus Design-Build, Kitchen & Bath Remodeling, Historic Renovations
 User
DECO Window Fashions
Sheer pleated custom made drapes, ceiling mount metal rod.
Trendy bedroom photo in Austin
Trendy bedroom photo in Austin


 MARGARITA BRAVO
The bathrooms in this Golden, Colorado, home are a mix of rustic and refined design — such as this copper vessel sink set against a wood shiplap wall, neutral color palettes, and bronze hardware:
Project designed by Denver, Colorado interior designer Margarita Bravo. She serves Denver as well as surrounding areas such as Cherry Hills Village, Englewood, Greenwood Village, and Bow Mar.
For more about MARGARITA BRAVO, click here: https://www.margaritabravo.com/
To learn more about this project, click here:
https://www.margaritabravo.com/portfolio/modern-rustic-bathrooms-colorado/

 Build It Right Remodeling
Tile is 6" x 24" Running Bond Lay
Berkshire Hickory with Summer Wheat Grout Color
Inspiration for a mid-sized coastal bathroom remodel in Milwaukee
Inspiration for a mid-sized coastal bathroom remodel in Milwaukee
 Tile Doctor Ltd
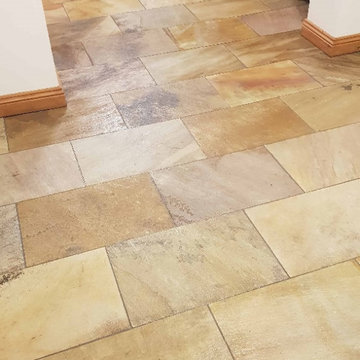
The photos on this page are of a Sandstone Kitchen floor at a house in the High Green suburb of Sheffield. The Sandstone tiles looked grubby and needed some love and attention. Our client was getting fed up trying to keep the stone clean, particularly around the kitchen area where cleaning didn’t seem to make much. You can see how dirty it had become on the before picture below, this is stark contrast to the middle of the of the kitchen where the portable kitchen island normally sits.
I went to the property to get a better look at the problem floor and carried out a small test clean to see which products and methods would have the best impact. The patch came up really clean without much difficulty, so I was confident on being able to restore its appearance.
It was clear to me the original protective sealer had worn off and dirt had become ingrained in the pores of the stone where it was proving difficult to remove. My client was very encouraged by the test clean initial result and agreed to go ahead with the quote. We arranged a suitable time to carry out the work on a day when the family would be out of the way.
I started by taping up the area to make sure the skirting and woodwork were protected from splashing. Once done a strong dilution of Tile Doctor Pro-Clean was sprayed onto Sandstone tile and grout. It was left to dwell for approximately ten minutes to help break down all the grime and dirt and was then worked into the stone using a rotary floor machine fitted with a stiff bristled brush.
This method totally transformed the dull sandstone, the stunning sandstone colours started to leap out and I could see the stone was well on its way to being transformed. The floor was then rinsed several times with water and the now soiled cleaning solution carefully removed with an industrial wet vacuum.
With the floor clean I inspected all the tiles and repeated the process until I was happy the floor was total clean. I should mention It’s not always this easy to clean a stone floor and quite often I find myself having to utilise all sorts of products and methods before I’m totally satisfied it’s as clean as it could possibly be.
With the cleaning done I left the floor to dry out overnight aided with heaters and air blowers.
I returned to seal the floor the next day checking first that the stone was dry with a damp meter. Leaving the blowers on overnight had helped and the readings I took from the floor confirmed it was now ready for sealing.
Earlier I had discussed the different types of sealer available with my clients and they had chosen to have the floor sealed with Tile Doctor Seal & Go. This works really well on Sandstone, enhancing its appearance, improving colour and of course adding protection to the stone to prevent grime and dirt stuck in the pores of the stone. Several coats were applied until I could see if was fully sealed and the right level of finish had been achieved. Sealing a floor can take some time as you need to allow each coat to dry before applying the next.
Once done the floor looked meticulously clean and the new sealer had added a lovely subtle sheen to the stone. My client was very please with the transformation and left the following feedback.
‘Very professional approach, friendly, and offered great advice throughout the job. Very pleased with the finish Cheers Matt we will see you again’
One of the problems we find with many homeowners is that for cleaning they use strong bleach-based cleaning product on their sealed tiles, and this actually strips off the sealer leaving the stone vulnerable to ingrained dirt. As a result, Tile Doctor has developed Tile Doctor Neutral Tile Cleaner, it is pH neutral and gentle enough for everyday use without affecting the sealer.
Matthew Lovett
South Yorkshire Tile Doctor
Sponsored
Columbus, OH
Hope Restoration & General Contracting
Columbus Design-Build, Kitchen & Bath Remodeling, Historic Renovations


 Rockefeller Partners Architects
Eric Staudenmaier
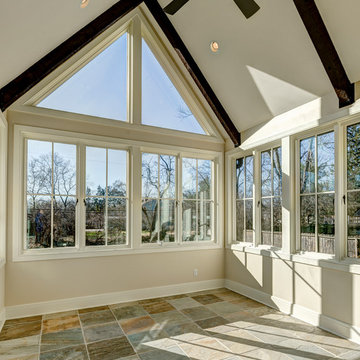
Inspiration for a large country single-wall slate floor and brown floor open concept kitchen remodel with an undermount sink, louvered cabinets, white cabinets, wood countertops, stainless steel appliances and an island
Inspiration for a large country single-wall slate floor and brown floor open concept kitchen remodel with an undermount sink, louvered cabinets, white cabinets, wood countertops, stainless steel appliances and an island
 Debbie Constangy
Foothills Fotoworks
Large elegant master black and white tile and stone tile marble floor drop-in bathtub photo in Charlotte with louvered cabinets, white cabinets, a two-piece toilet, gray walls, an undermount sink and marble countertops
Large elegant master black and white tile and stone tile marble floor drop-in bathtub photo in Charlotte with louvered cabinets, white cabinets, a two-piece toilet, gray walls, an undermount sink and marble countertops

 Tile Trends, Inc.
Subway Tile-Herringbone
Inspiration for a mid-sized rustic l-shaped dark wood floor and brown floor eat-in kitchen remodel with a farmhouse sink, raised-panel cabinets, dark wood cabinets, quartz countertops, white backsplash, subway tile backsplash, stainless steel appliances, an island and beige countertops
Inspiration for a mid-sized rustic l-shaped dark wood floor and brown floor eat-in kitchen remodel with a farmhouse sink, raised-panel cabinets, dark wood cabinets, quartz countertops, white backsplash, subway tile backsplash, stainless steel appliances, an island and beige countertops
Sponsored
Columbus, OH
Hope Restoration & General Contracting
Columbus Design-Build, Kitchen & Bath Remodeling, Historic Renovations




 Story Barns
Inspiration for a mid-sized rustic carpeted straight cable railing staircase remodel in Denver with carpeted risers
7