
Search results for "Restore normal" in Home Design Ideas

 Kathy Henry Exterior Design
Carlsbad new construction; spanish courtyard and edible garden.
Design ideas for a mediterranean courtyard concrete paver landscaping in San Diego.
Design ideas for a mediterranean courtyard concrete paver landscaping in San Diego.
 VISTA TILES
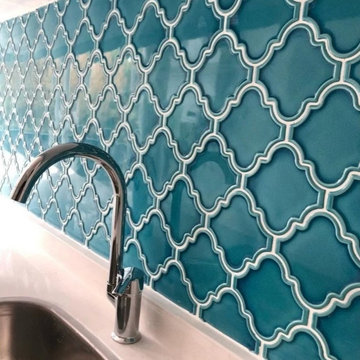
Since Ottoman Arabesque Tile Tiles are produced by hand, it is normal to have color tones in the products.
. The back side of the tiles is serrated with a matte ceramic base, the front side is glazed and glossy polished.
. The infrastructure of our product in the picture is a mixture of ceramic tiles, and the upper structure is made with tile paint.
. Arabesk Ceramic-based tile glazed tile preserves its appearance for many years. No loss of color and pattern
. Handmade tiles are fired (baked) at 1050 degrees. Therefore, the sun, wind, etc. weather resistant.
. The product surface is resistant to water and moisture thanks to its glossy polished finish. Therefore, it does not hold water on its surface and prevents the formation of bacteria and mold.
. The upper structure of our product, which carries the colors of Iznik and Kütahya rumi tiles, is covered with a special tile glazed crackle and its surface is cracked. These cracks remain secret.
. Our tile products are preferred in your interior and exterior architectural decoration and designs and restoration projects.
. We do not recommend using Ottoman Arabesk tiles directly in water.
. You can easily use the products produced with special glaze crackle in wet places.
. In front of the bar, Spa decoration, behind the Turkish bath basin, tile panel or above the basin, as a decor in the bathroom shower cabin, Kitchen countertop and countertop, etc. used in the fields.
. Since the ceramic-based tile surface is relief (embossed), it cannot be laid on the floor as a floor tile.
. Width : 12 cm
. Height : 12 cm
. Thickness : 0.7 cm
. 1 m2 Weight: 15,50 kg.
. 1 m2 Quantity: 105 pcs.
 Tile Doctor Ltd
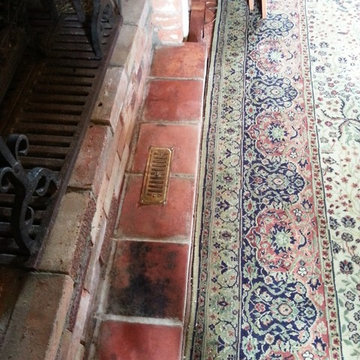
The oldest properties often have the most interesting tiled features and this Quarry Tiled Fireplace was a fine example. The customer lived in a quaint old cottage just outside the main town centre of Bedford and contacted us about restoring their fantastic Quarry tiled fireplace. While the customer knew that the cottage itself was over 200 years old, they had no idea whether or not the fireplace is an original feature.
However, it’s safe to say that the fireplace is very old in its own right, and that it had been a long time since it had experienced any kind of professional maintenance. It goes without saying that as any kind of tiles get older they will need more frequent care to keep them looking at their best. Here, the Quarry tiles desperately needed cleaning up as they were covered in old candle wax and what looked to be several years’ worth of general dirt. This had significant dulled the natural shades in the stone, leaving it looking lifeless and unappealing. The tiles would also require a fresh seal to ensure protection against muck in the future, and to help restore the colour to the stone.
Firstly, I applied Tile Doctor Oxy-Gel tile cleaner, which is particularly effective on tricky areas as being in a gel form it adheres better to non-horizontal areas. It was left it to dwell on the tiles for around twenty minutes so it could penetrate into the pores and get to work lifting out and dissolving the dirt that had been trapped in there over the years . Oxy-Gel is suitable for use on a wide range of natural stone tiles, including Quarry, Travertine and Slate. In this situation it cut through and removed most of the candlewax quite easily, and softened the stubborn residue to a point where I could easily remove the rest manually with handheld scrappers.
I then left area it to dry, with an air mover installed to reduce drying time. The advantage of using a gel product is that uses a smaller amount of moisture than a standard liquid cleaner, and therefore allows the tile to dry – and to be sealed – quicker; and in this case we were able to seal the same day where-as normally we would have to wait until the next day.
Once the tiles were completely dry, I sealed the fireplace with Tile Doctor Colour Grow which is an impregnating sealer that fills the pores of the stone to prevent dirt and general muck from becoming ingrained, making the tiles much easier to keep clean in the long-term.
The added benefit of Colour Grow is that – as its name suggests – it emphasises the natural colours in the stone. This was something that the Quarry fireplace was desperately in need of, and the Colour a Grow quickly got the job done!
The customer was very pleased with the finished results. The clean removed years’ worth of muck, while the fresh seal brought out the natural beauty in the Quarry tiles and, at the same time, will protect the tiles on future candle-lit evenings.
Andrew Evans
Bedfordshire Tile Doctor
Find the right local pro for your project
 Tile Doctor Ltd
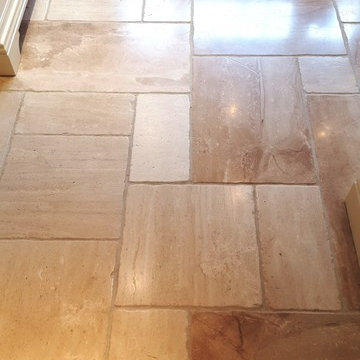
I was recently at a property in the North Yorkshire town of Harrogate, undertaking what I initially thought would be the cleaning and polishing of a Cream Limestone tiled kitchen. However, as I began the cleaning process I quickly discovered that under the dirty grout lines someone had taken a lot of effort to paint with a small brush directly onto the grout using varnish!
In a normal situation, I would have covered the whole floor with Tile Doctor Remove & Go to solve the problem, however compared to, say, adhesive or paint staining, varnish is very difficult to remove. So instead I opted for the long, yet necessary process of cleaning the grout manually with several thin wire brushes. Over the course of two days I managed to remove approximately 90% of the stubborn varnish – and could finally move onto cleaning and polishing the Limestone as originally planned.
The polish had been lost from the Limestone kitchen tiles over time, so I set about restoring it using a type of polishing known as burnishing. This involves the application of diamond encrusted pads of varying grit to the floor to gradually buff the stone and achieve an aesthetic and durable shine. Burnishing is most commonly used on high-end stone such as Marble, Travertine and, of course, Limestone.
At Tile Doctor, our burnishing system comprises four burnishing pads, ranging from a Coarse grit to a Very Fine grit. After applying the first three pads (Coarse, Medium and Fine), I gave the tiles a further clean with Tile a Doctor Pro Clean, which is our alkaline cleaner, to remove any residue from the burnishing process. I then rinsed the floor with clean water and soaked up the residue with a wet vacuum, before leaving it to dry.
The floor was then polished to a satin finish using the fourth and final Extra Fine burnishing pad. I sealed it using a couple of coats of Tile Doctor Ultra-Seal, an impregnating sealer designed to provide maximum protection against dirt and stains.
The combination of burnishing and sealing always makes a huge difference to Limestone tiles. Here, the finished result was almost like a new floor! The customer was both amazed and very pleased with the transformation.
Nigel Stoker
North West Yorkshire Tile Doctor


 Elegant Hardwood Floors
maple hardwood floor, water-popped, and stained with 50% rosewood and 50% neutral stains.
Inspiration for a timeless medium tone wood floor living room remodel in Salt Lake City
Inspiration for a timeless medium tone wood floor living room remodel in Salt Lake City
 Tile Doctor Ltd
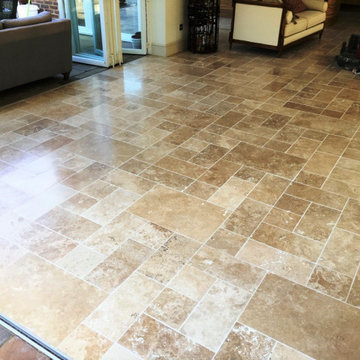
This property in Godalming had the whole downstairs floor tiled with Fired Earth Limestone tiles nine years prior and had never had it cleaned or maintained professionally. The once beautiful stone was now looking dull and the grout had turned black with dirt leaving the floor looking uninviting.
This is quite normal for stone floors as it is the sealer that protects the stone from dirt and enhances its look. Most sealers wear off after three to four years sealer and in this case after nine years it was well overdue a deep clean and reseal.
I visited the property to survey the floor. It was indeed looking in need of some attention and the kitchen was particularly bad. To restore the appearance of the Limestone tile and grout the floor would need to be stripped of what remains of the old sealer, then deep cleaned with attention to the grout, polished with burnishing pads and then finally resealed. I was confident I could get it restored to a nearly new finish and to prove it I completed a small demonstration clean which the homeowner was very happy with. They agreed to my quote and we scheduled in a couple of days to carry out the work.
On day one I started by cleaning the grout using a strong dilution of Tile Doctor Pro-Clean. its run along the grout line and then left to soak in for about ten minutes so it can get to work breaking down dirt and old sealer. The grout is then scrubbed using a grout brush which is then scrubbed backwards and forwards along the grout line until clean. The area is then rinsed with water and all the waste removed with a wet vacuum cleaner.
Next, I turned my attention to the Limestone tiles which needed stripping of any remaining sealer, cleaned and polished. I find the best way to do this is by apply a set of diamond encrusted Burnishing pads in sequence starting with a coarse 400-grit followed by 800, 1500 and finally finishing with an extra fine 3000 grit. Water is used to lubricate the burnishing process and the slurry is rinsed and extracted off the floor between pads. Each pad is run over the tiles three times, and it was a large floor so as you can imagine this process took most of the day.
I left the floor to dry out overnight and returned the next day to seal the Limestone. Before doing that, I reviewed my previous day’s work and I cleaned up any areas that needed further attention. Next step was to ensure the floor was dry as I don’t recommend applying a sealer to damp tile as you won’t get an even appearance, so before sealing a floor I tested for moisture using a damp meter.
To seal the floor, I applied two coats of Tile Doctor Ultra Seal which is an impregnating sealer that works by occupying the small pores in the stone to prevent dirt becoming ingrained there. Limestone is a light stone and most customers like that appearance so I find it best not to use a colour enhancing sealer as it can darken the stone. Ultra-Seal doesn’t contain any colour enhancer and leaves the floor with a natural finish whilst allowing the stone variations and patterns to show through.
Once the sealer was dry, I gave it a further polish with the 3000-grit pad which further brought out the natural beauty of the stone. My client was very happy with the floor, it really lifted the who area and the Kitchen in particular.
Rupert Mcleod
West Surrey Tile Doctor

Sponsored
Columbus, OH

Hope Restoration & General Contracting
Columbus Design-Build, Kitchen & Bath Remodeling, Historic Renovations


 Closet Factory (Fort Lauderdale)
Our daily routine begins and ends in the closet, so we believe it should be a place of peace, organization and beauty. When it comes to the custom design of one of the most personal rooms in your home, we want to transform your closet and make space for everything. With an inspired closet design you are able to easily find what you need, take charge of your morning routine, and discover a feeling of harmony to carry you throughout your day.
 Tile Doctor Ltd
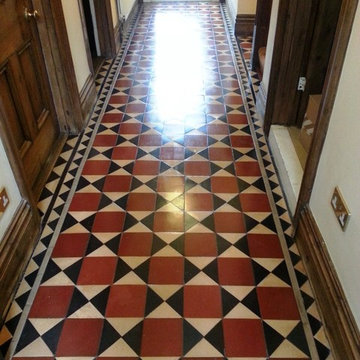
Recently I was contacted by a man in the town of Bedford who was worried that he had damaged his Victorian tiled hallway as a result of dragging a piano across the floor. I went round to the property to get a better look at the problem and, on closer inspection, realised that the tiles were actually fine; however, the piano had torn through the old surface seal.
The 150-year old tiles, dating back – as the name suggests – to the reign of Queen Victoria, had been poorly sealed and additionally had not been maintained correctly with the appropriate cleaning products. I was commissioned to remove the old sealer, clean and re-seal in order to restore this fantastic floor to its former glory.
My first task was to mix a solution of Tile Doctor Pro-Clean and water, which was then spread across the floor. Pro-Clean is a high alkaline cleaner which also contains stripping properties and this helped to break down the old, damaged sealer. The solution was left to dwell for approximately 20 minutes, giving it time to seep into the stone to get underneath, and lift out, any ingrained dirt. Pro-Clean was worked into the tiles using a heavy low speed rotary machine fitted with a black pad.
Once cleaned and stripped, we rinsed the floor using plain, clean water to neutralise the high alkaline Pro-Clean and the removed the resulting slurry using a wet-vac machine.
At this point I noticed that the white/magnolia tiles were particularly well worn and still very dirty and in need of further cleaning. Around this time Tile Doctor had also been discussing the successful use of Burnishing Pads (normally used on polished stone) on Victorian Tiles so I hand burnished the most stained tiles with a small 6 inch diamond encrusted burnishing pad with a little water to help lubricate the process. Following this, I rinsed the entire floor once again.
After leaving the floor to dry for four days, I returned to the house to seal the tiles opting to apply a single coat of Tile Doctor Colour Grow impregnating sealer first followed up with four coats of Tile Doctor Seal & Go. This combination of sealers provides a durable internal and surface stain protection whilst lifting the colours and adding a nice subtle sheen finish.
Once dried and cured, the floor was buffed using micro-fibre clothes to further enhance the appearance of the tiles further. My client was very pleased with the results, and couldn’t believe it was possible to get a floor that was so old appear brand new! The floor will dull with wear so I advised my client on the benefits of a regular maintenance plan going forward to ensure this great flooring feature remains in top condition.
Andrew Evans
Bedfordshire Tile Doctor
 Tile Doctor Ltd
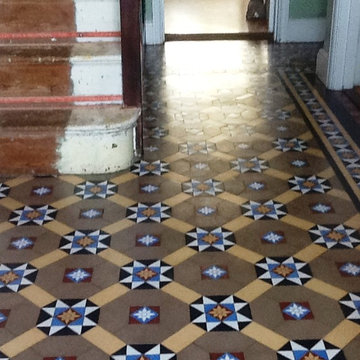
I was recently called down to a client’s house in the market town of Wellingborough, situated approximately 11 miles from Northampton. My client’s situation was an interesting one, as she had an old gas pipe sticking out of her Victorian tiled floor, very close to a doorway. Not only was this a bit of an eyesore, it was also significant trip hazard. The floor had been previously covered by carpet, so it is understandable that my client would have been initially unaware of the obstructive gas pipe.
Rather than risking an accident in the future, she asked me to see what I could do to rectify the issue. At the same time, I was commissioned to give the floor a much needed clean and re-seal.
My first priority was, of course, to deal with the exposed gas pipe. I was unsure whether the pipe was live or not, so I carefully removed the surrounding tiles, allowing a certified engineer access to it. He ensured that the pipe was capped below the tile line, allowing me to safely proceed with my repairs.
I returned a few days later, rescreened the area, and began to refit the tiles, carefully hand painting some of the black tiles to hide the damage and cracks. I also applied new grout to fix all of the replaced tiles into position, and this was left to set overnight.
Returning to the house the next day, I set about treating the floor to a normal strip, clean and re-seal of the entire floor. There was very little old sealer still remaining on the tiles, so I mixed a solution of Tile Doctor Pro Clean and water, before applying this to the floor. Pro Clean is a strong alkaline cleaner which also contains stripping properties, allowing it to both clean and break down any old sealer. The solution was worked into the tiles using a black scrubbing pad, and any excess residue was quickly absorbed using a wet-vac machine.
With older floors you never can tell if a damp proof membrane was installed and it can be troublesome applying a sealant to a damp floor so I left the whole floor to dry for seven days, giving it more than sufficient time to dry completely before the re-seal. To seal the tiles I used five coats of Tile Doctor Seal & Go Extra, which provides both a robust surface seal and the pleasing sheen finish requested by my client; Seal and Go Extra is especially suitable for exterior applications or damp floors due to its increased breathability.
My client was very glad to see the back of the gas pipe and pleased with the overall results of the clean and seal, as it had given this Victorian tiled floor – once hidden under carpet – new life and character. Additionally I’m sure that restoring such an original feature for the property has increased its value.
Phil Vissian
Northamptonshire Tile Doctor

 RJ Construction
Drop-in bathtub - mid-sized rustic master brown tile and ceramic tile ceramic tile drop-in bathtub idea in Dallas with an undermount sink, raised-panel cabinets, white cabinets, granite countertops, a one-piece toilet and blue walls

 Bella Tile and Stone
Mid-sized transitional enclosed light wood floor and beige floor family room photo with white walls, a standard fireplace, a tile fireplace and no tv

Sponsored
Columbus, OH
Hope Restoration & General Contracting
Columbus Design-Build, Kitchen & Bath Remodeling, Historic Renovations

 Plaistow Cabinet
Shiloh Cabinetry. Polar White, Inset
Kitchen - transitional kitchen idea in Manchester with white cabinets, beaded inset cabinets, marble countertops, white backsplash, marble backsplash and stainless steel appliances
Kitchen - transitional kitchen idea in Manchester with white cabinets, beaded inset cabinets, marble countertops, white backsplash, marble backsplash and stainless steel appliances

 Ehrlich Yanai Rhee Chaney Architects
The ground floor volumes wrapped in an elongated hand-fired brick, emphasizing the horizontality of the architecture that lays solidly on the land.
(Photography by: Matthew Millman)
 Riddle Construction & Design
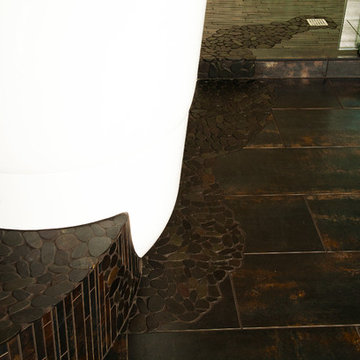
close up of pebble tile design around soaking tub.
Inspiration for a large asian master white tile and porcelain tile porcelain tile home design remodel in Seattle with a vessel sink, flat-panel cabinets, medium tone wood cabinets, quartz countertops, a two-piece toilet and beige walls
Inspiration for a large asian master white tile and porcelain tile porcelain tile home design remodel in Seattle with a vessel sink, flat-panel cabinets, medium tone wood cabinets, quartz countertops, a two-piece toilet and beige walls


Sponsored
Columbus, OH
Hope Restoration & General Contracting
Columbus Design-Build, Kitchen & Bath Remodeling, Historic Renovations


 T.A. French - Custom Builder
Example of a mid-sized transitional dark wood floor and brown floor double front door design in Austin with gray walls and a black front door
 Tile Doctor Ltd
I was contacted about a Georgian property in the Kent village of Leeds , to see if I could do anything to improve a Travertine tiled floor. The use of Travertine was extensive and had been installed throughout the ground floor including the kitchen, dining room, utility and bathroom WC. Travertine is probably my favourite stone, but it is acid sensitive and attracts dirt easily, due to its ‘holey’ composition.
Initially we discussed the floor over the phone where I got to know about the issues they were experiencing, and I detailed the renovation process I normally use to restore it including the products and timelines. Naturally they wanted to me to provide a quote for the work however its tricky to do that accurately without seeing the floor, so I arranged a date to pop over.
Upon arriving I could see the tiles and the wide grout joints had extensive, ingrained dirt indicating the previous sealer had long since worn away. This is a common issue with stone floors, and to re-assure myself and the client it could be resolved I cleaned a small area in the utility room with pleasing results!
This test clean helped me to understand which products and methods would work best on the floor and later that day I emailed over a detailed quote for the renovation. Happy with the quote I received a reply the same day asking when I could start.
My colleague and I arrived on the agreed date and work started with adding protection to all areas that required it. We use a lot of water during the cleaning process and some materials such as MDF can become damaged with water ingress, so it makes sense to do this.
To get the floor clean, a coarse Carbide Brush fitted to a rotary machine was run over the Travertine tiles to scrub in a strong solution of Tile Doctor Pro-Clean. This process generates a lot of slurry as the dirt was washed out of the stone and grout which is extracted with a wet vacuum as we progressed.
Next it was on hands and knees with more Tile Doctor Pro-Clean and handheld brushes run over stubborn areas and along the grout lines to take them from 80% up to 100%.
Happy with the results, the next step was to renovate the stone using a series of diamond encrusted burnishing pads. Using only water for lubrication this process starts with the application of a coarse 400-grit burnishing pad attached to the floor buffer. This produces a lot of slurry which again was removed with a wet vacuum.
This left the Travertine clean, but the pores of the stone had been opened giving the floor a matt finish and more absorbent than it was originally. To further refine the appearance of the stone the next two burnishing pads were applied which are 800 and 1500-grit. These pads polish the stone and close the pores, restoring the natural sheen in the process. After each pad was applied the slurry was rinsed off the floor with water and extracted with the wet vacuum. Once complete the floor was left to dry off fully overnight.
I arrived the next day and took several moisture readings from the floor to check that it had dried off sufficiently overnight. The results were good, so work moved onto sealing the Travertine with two coats of Tile Doctor Ultra Seal which is a natural look impregnating sealer. It works by soaking into the stone, occupying the pores and thereby preventing dirt from becoming ingrained there. This ensures dirt remains on the surface where it is easily cleaned away.
The final step in the floor’s renovation was to apply the last of the diamond polishing pads which is a very fine 3000-grit. This pad further improves the polished appearance of the stone resulting in a satisfying sheen.
The work made a massive difference to the floor, and I received an email the next day from one of the owners who was really pleased with the transformation:
”Floors look brilliant. Very pleased.”
For the care and maintenance of polished sealed floors I recommend the use of Tile Doctor’s Stone Soap which is a gentle but effective cleaning product that won’t impact the sealer and contains a patina enhancer. When it comes to sealed floors my mantra is:
“If you look after the sealer, the sealer will look after the floor!”
Graham Davis
North Kent Tile Doctor
6