
Search results for "Return plan" in Home Design Ideas
 Fabco Sanctuary
The architect and designer Guy Derwent was approached by his client with a clear and compelling brief: to completely transform a grand Victorian terrace house they were planning to renovate. The client envisioned something far beyond a standard renovation – this was to be a bold and dramatic reimagining of a family home that could grow with them over time.
With the property having remained largely untouched for more than fifty years, the architects saw an opportunity to unlock its potential and deliver a contemporary design that would contrast beautifully with its Victorian heritage.
The existing layout consisted of a series of small, disconnected rooms to the rear of the house. To respond to the client’s need for openness and flexibility, the architect proposed a radical restructuring of the ground floor:
The rear rooms were completely removed
Suspended timber floors were lowered by up to two metres to align with the garden
Two bold extensions were added
The first extension filled in the side return with a London stock brick facade and a glazed roof, while the second – a striking black steel and glass pavilion was glazed on three sides and placed along the garden elevation.
This new pavilion redefined the building’s relationship with the garden. Its steel-framed glazing created a seamless dialogue between interior and exterior, offering a sense of immersion in the surrounding landscape.
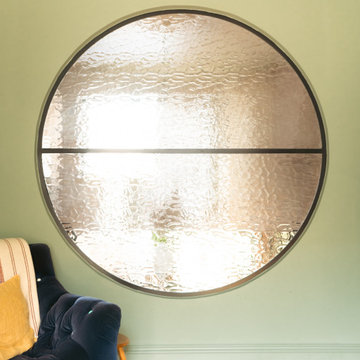
At the heart of the plan sits a dramatic, five-metre-tall dining space that acts as a transition from the original entrance hall into the new addition. A large, circular cast-glass window, framed in steel, provides a visual and spatial link between old and new, allowing light and movement to travel through the depth of the home.
Throughout the project, a series of black metal elements were introduced as sculptural interventions – each marking moments of transformation within the house. These included the bespoke steel framed circular window, a custom metal staircase, a cylindrical support column, and the striking steel and glass garden pavilion. Together, they formed a coherent architectural language that underscored the project’s bold intent.
Our steel windows and doors played a vital role in delivering the project’s vision. The architects chose steel for its refined sight lines and distinctive material character, which helped bridge the gap between the historical context of the building and the bold new additions.
The black steel frames provided a crisp contrast to the pale London stock brick and added definition to the glazed pavilion, reinforcing the sense of architectural precision. In particular, the fine steel profiles of the garden room allowed the extension to feel both lightweight and immersive, blurring the boundary between the house and its garden.
The architect drew inspiration from the Bauhaus Movement, particularly the work of Walter Gropius, whose approach to functional beauty and industrial materials informed the design of the garden pavilion.
Here, our glazing system was used not just for transparency, but as an expressive architectural element. The carefully proportioned panels help to conceal the roof thickness and reinforce the pavilion’s industrial yet abstract character – a deliberate nod to product design and modernist detailing.
Sustainability was an important factor in the selection of materials. Our steel systems, made from 99% recycled content and 100% recyclable, aligned with the project’s broader environmental goals.
The architects noted that this commitment to material longevity and circularity was central to their decision to use steel. The durability and recyclability of the windows and doors ensured the project met both aesthetic and ethical criteria.
This London terrace house now stands as a celebration of contrast – between heritage and innovation, solidity and transparency, tradition and transformation. Our steel windows and doors were not simply components; they were essential tools in crafting a home that is as bold and expressive as it is functional.
The result is a home designed for modern family life, where light, space, and materiality come together in perfect harmony.
 Jorge E. Jimenez-Marcos
Home
About
Work
Contact
919 saint elmos court - fort bend, texas
Where Mexico Hacienda meets Texas Hill Country
description
exterior views
interior views
elevations and floor plans
specs
Bedrooms 6
Bathrooms 5
Garage Attached
Stories 2
Building (Sq.Ft.) 7,016
Lot (Sq.Ft.) 98,663
Exterior Construction Stucco
Lot Description Subdivision
Roof Tile
Foundation Concrete
location
virtual tour
Visit this property's Virtual Tour (external link - via Circlepix).
return home
Design and function flow in concert with the natural beauty of the
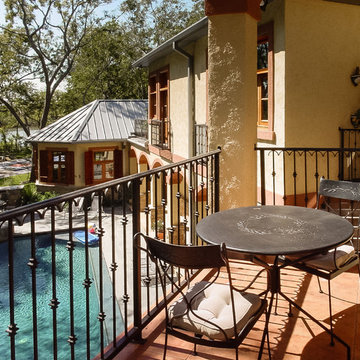
surrounding trees and lake. The architectural vision for this house was to have an hacienda feeling with Texas flavor. The smart floor plan possesses an incredible indoor-outdoor flow, allowing for entertaining , yet has intimate spaces for family living with unmatched beauty and tranquility.
Copyright © Jorge E. Jimenez-Marcos
 Progressive Design Build
Challenge
As part-time residents of this Bonita Springs home, our clients were looking to update their outdoor entertainment area. They also planned to be away for the summer during the remodel and needed their renovation project to be finished prior to their return for the winter.
Their needs included:
Changing the color pallet to a monochromatic scheme, removing the yellow brick pavers, adding an outdoor kitchen area, adding an outdoor fireplace, resurfacing the pool and updating the tile, installing a new screen enclosure, and creating privacy from the neighbors, particularly the main sitting areas, pool and outdoor kitchen.
Although there was already a 1,221 sq. ft. lanai under the roof, it lacked functionality needed by the homeowners. Most of its amenities were located at one end of the lanai, and lacked privacy that the homeowners valued.
Solution
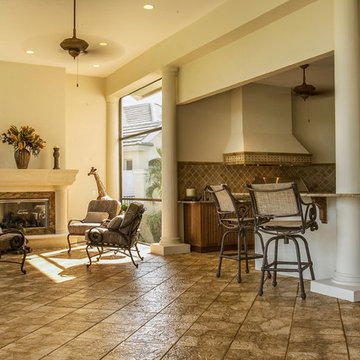
The final project design required two additions to the lanai area adding an accumulative 265 sq. ft. to the existing space expanding their sitting area and accommodating a much-needed outdoor kitchen. The new additions also needed to blend with the home’s existing style.
Addition #1—Sitting Area:
The first addition added approximately 145 sq. ft. to the end of the lanai. This allowed Progressive Design Build to tie into the existing gable room for the new space and create privacy from the neighbors.
Addition #2—Outdoor Kitchen:
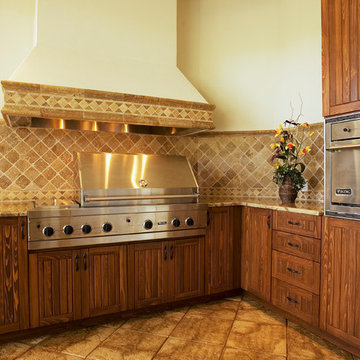
The second addition was a bump out that added approximately 120 sq. ft. to the end of the house close to the interior kitchen. This allowed the client to add an outdoor over and 52” Viking grill (with a side burner) to their outdoor living space. Other amenities included a new sink and under counter fridge, granite countertops, tumbled stone stile and Cypress cabinetry, custom-fabricated with marine grade plywood boxes and marine grade finishes to withstand moisture, common in the Bonita Bay community.
Special attention was given to the preparation area on either side of the stove, the landing area next to the oven and the serving counter behind the bar. Bar seating was added to the outdoor kitchen, allowing guests to visit with the cook comfortably and easily.
Brick Pavers
During the design phase, we discovered that the original brick pavers were set in sand, with no concrete pad below. Consequently, the retaining wall and several pavers were starting to fail, caused by the shifting sands. To remedy the problem, we installed a new concrete deck and laid new nonslip pavers on top of the deck—ideal for wet area applications.
Pool Renovations
To dramatically improve the enjoyment and ambiance of their pool, Progressive Design Build completely re-plumbed it, putting in additional lighting and new water features. New decorative pool tile, coping, and a paver deck were also installed around the pool. The pool finish chosen by our clients was a nice tropical blue color.
Screen Enclosure
A new screen enclosure was installed in compliance with new local building codes, making it more stable and solid than the existing one. The color change from white to bronze coordinated well with the homeowners’ new color scheme; and the location of the service door and stairs provided convenient access to the new pool equipment.
Results
This project was completed on time and within budget before these homeowners returned for their winter holiday. They were thrilled with the weekly communication, which included two-way phone calls and email photo sharing. They always knew where their project was in the construction process and what was happening at all times—providing security and peace of mind.
Find the right local pro for your project
 Denise Butchko/Butchko and Company
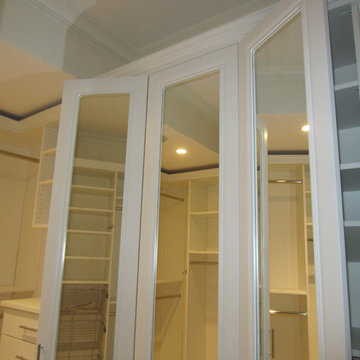
This walk in closet looks simple, but is demanding in its' return on space. We used a white melamine with thermofoil fronts.
We added crown molding and left a shadow line because there were different ceiling heights and clearances that we needed to be sure not to interfere with.
There are baskets behind the mirrored doors and they are hinged to function as a three-way mirror.
We measured hanging needs as well as how much space we needed for folded items. We also incorporated the clients preferences for baskets, jewelry storage, a safe, and easily changing from winter to summer wardrobe all within one closet space.
 DNB Renovations
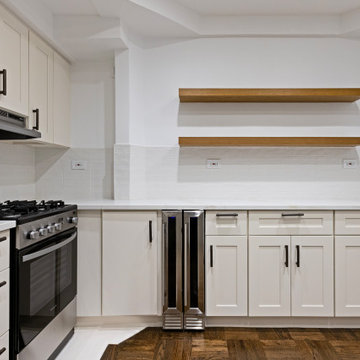
The finished kitchen feels elevated but inviting, perfect for returning home after travel and just as comfortable for quiet evenings as it is for entertaining. The upgraded layout, increased storage, and refined material choices create a kitchen that functions beautifully and looks effortlessly polished.
 Tile Doctor Ltd
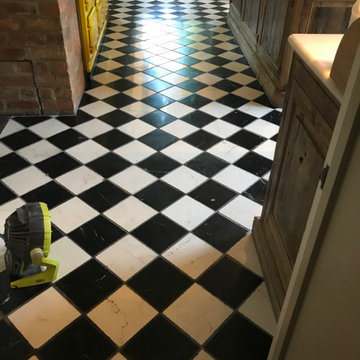
The tiles shown in the photographs below are classic distressed Black and White Italian Marble installed in the kitchen of a property in Bamber Bridge which is South of Preston. Some of the tiles had an issue with loose grout which I suspect was due to the suspended wooden floor and a small amount of movement had resulted in the grout cracking.
Ideally more support would be needed under the floor to prevent this, in the meantime however I recommended removing the grout and replacing with a flexible grout product that could cope with the movement. The tiles also needed a clean, polish and reseal so it made sense to address the issue with the grout as part of the work.
Working as a two-man team we started by cleaning the floor with a set of diamond burnishing pads starting with a coarse 400-grit, followed by 800 and 1500 grit. Water was used to lubricate the process and the floor was rinsed with water between pads with the fine slurry generated by the process extracted using a wet vacuum. These pads remove ingrained dirt and then slowly refine the appearance of the Marble building up its polished appearance in the process.
The next step was to rake out all the grout which as discussed was compromised and needed replacing. We had to be very careful when removing the grout due to the electric heating mat under the floor, any damage to that would require ripping the floor up. With the old grout removed and the floor cleaned the floor was then grouted using Mapei Ultra-colour which is a flexible and fully waterproof grout more than suitable for this situation.
Between us we managed to pack a lot into day one which was tough, however with the hardest tasks out of the way day two should be a lot easier.
Day two started with an initial clean making sure to remove any excess grout smeared on the surface that can affect the look of the tile if not removed. This was followed by the application of the last of the set of burnishing pads which is a 3,000-grit pad that really brings up the polish on the marble. You only need a small amount of water sprayed onto the floor when applying this last pad so by late morning the floor was dry and ready for sealing. The customer wanted a better sheen appearance than they previously had, fortunately we find the Diamond burnishing pads do this well, they also tighten up the pores of the stone as well which means less sealer is needed.
The floor was then sealed with Tile Doctor Colour Grow which is an impregnating sealer that improves colour and soaks into the stone occupying the pores and thereby preventing dirt from becoming ingrained. Once complete the floor looked great and the client was very happy.
Sealers and Polish do wear down with use over time so before leaving I discussed our annual maintenance plan option which will ensure the appearance of the Marble floor always looks good. The plan involves returning once a year to further polish the floor with a high-grade burnishing pad and to add more sealer if required. We also discussed the use of Tile Doctor Stone Soap for regular cleaning, it is a pH neutral cleaner which is ideal for stone floors like Marble which are acid sensitive.
Russell Taylor
Lancashire Tile Doctor
 DNB Renovations
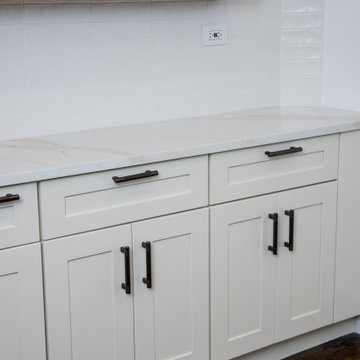
The finished kitchen feels elevated but inviting, perfect for returning home after travel and just as comfortable for quiet evenings as it is for entertaining. The upgraded layout, increased storage, and refined material choices create a kitchen that functions beautifully and looks effortlessly polished.

 Sosna Inc
After us completing a beautiful Basement renovation for them a few years ago, our returning clients approached us again. This time, to renovate their dated 70’s Bathroom to maximize functionality, and to meet their personal needs.
Through careful planning, we were able to create and rework the Bathroom floor plan to create a spacious and comfortable space.
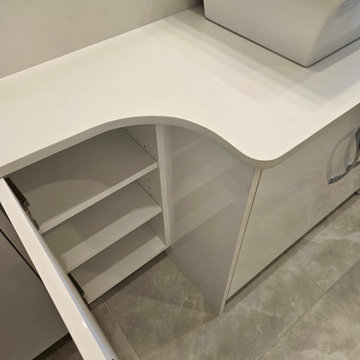
To create extra storage space, a vanity with recessed tall cabinets was custom-built. Existing load-bearing walls did not allow for a barn door. Instead, a swing shaker-style door was installed, and a curved countertop was used on the vanity to ensure easy entrance into the room. The vanity doors were finished in white, which perfectly complimented the white quartz countertop to provide a clean and modern look. The chrome faucet of the vessel sink matches the chrome outline of the medicine cabinet nicely.
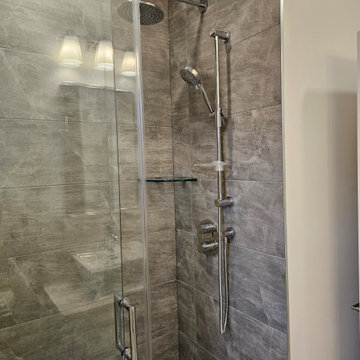
The shower with a glass enclosure features a luxurious rain head shower, and grab bars on each wall provide comfort and support. Marbled tile flooring and shower walls provide a seamless look.
Overall, these personalized updates have increased functionality, safety, and comfort for our clients, creating a home that is unmistakably theirs.
 Sosna Inc
After us completing a beautiful Basement renovation for them a few years ago, our returning clients approached us again. This time, to renovate their dated 70’s Bathroom to maximize functionality, and to meet their personal needs.
Through careful planning, we were able to create and rework the Bathroom floor plan to create a spacious and comfortable space.
To create extra storage space, a vanity with recessed tall cabinets was custom-built. Existing load-bearing walls did not allow for a barn door. Instead, a swing shaker-style door was installed, and a curved countertop was used on the vanity to ensure easy entrance into the room. The vanity doors were finished in white, which perfectly complimented the white quartz countertop to provide a clean and modern look. The chrome faucet of the vessel sink matches the chrome outline of the medicine cabinet nicely.
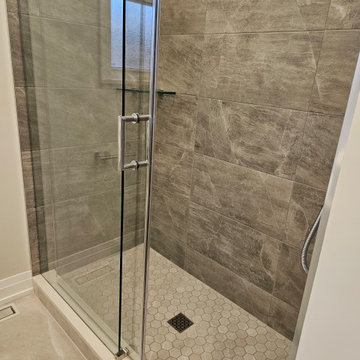
The shower with a glass enclosure features a luxurious rain head shower, and grab bars on each wall provide comfort and support. Marbled tile flooring and shower walls provide a seamless look.
Overall, these personalized updates have increased functionality, safety, and comfort for our clients, creating a home that is unmistakably theirs.
 Sosna Inc
After us completing a beautiful Basement renovation for them a few years ago, our returning clients approached us again. This time, to renovate their dated 70’s Bathroom to maximize functionality, and to meet their personal needs.
Through careful planning, we were able to create and rework the Bathroom floor plan to create a spacious and comfortable space.
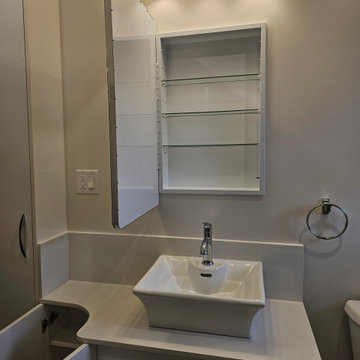
To create extra storage space, a vanity with recessed tall cabinets was custom-built. Existing load-bearing walls did not allow for a barn door. Instead, a swing shaker-style door was installed, and a curved countertop was used on the vanity to ensure easy entrance into the room. The vanity doors were finished in white, which perfectly complimented the white quartz countertop to provide a clean and modern look. The chrome faucet of the vessel sink matches the chrome outline of the medicine cabinet nicely.
The shower with a glass enclosure features a luxurious rain head shower, and grab bars on each wall provide comfort and support. Marbled tile flooring and shower walls provide a seamless look.
Overall, these personalized updates have increased functionality, safety, and comfort for our clients, creating a home that is unmistakably theirs.
 DNB Renovations
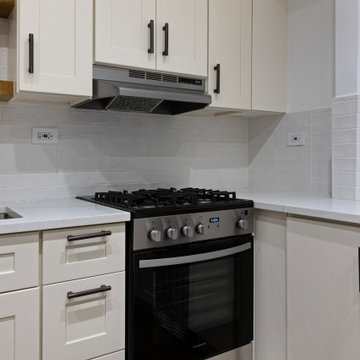
The finished kitchen feels elevated but inviting, perfect for returning home after travel and just as comfortable for quiet evenings as it is for entertaining. The upgraded layout, increased storage, and refined material choices create a kitchen that functions beautifully and looks effortlessly polished.
 Sosna Inc
After us completing a beautiful Basement renovation for them a few years ago, our returning clients approached us again. This time, to renovate their dated 70’s Bathroom to maximize functionality, and to meet their personal needs.
Through careful planning, we were able to create and rework the Bathroom floor plan to create a spacious and comfortable space.
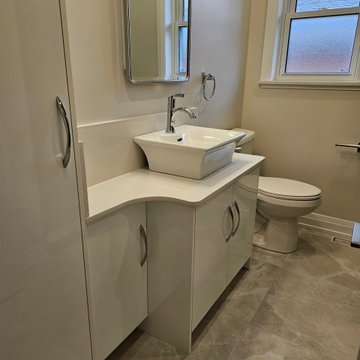
To create extra storage space, a vanity with recessed tall cabinets was custom-built. Existing load-bearing walls did not allow for a barn door. Instead, a swing shaker-style door was installed, and a curved countertop was used on the vanity to ensure easy entrance into the room. The vanity doors were finished in white, which perfectly complimented the white quartz countertop to provide a clean and modern look. The chrome faucet of the vessel sink matches the chrome outline of the medicine cabinet nicely.
The shower with a glass enclosure features a luxurious rain head shower, and grab bars on each wall provide comfort and support. Marbled tile flooring and shower walls provide a seamless look.
Overall, these personalized updates have increased functionality, safety, and comfort for our clients, creating a home that is unmistakably theirs.
 Progressive Design Build
Challenge
As part-time residents of this Bonita Springs home, our clients were looking to update their outdoor entertainment area. They also planned to be away for the summer during the remodel and needed their renovation project to be finished prior to their return for the winter.
Their needs included:
Changing the color pallet to a monochromatic scheme, removing the yellow brick pavers, adding an outdoor kitchen area, adding an outdoor fireplace, resurfacing the pool and updating the tile, installing a new screen enclosure, and creating privacy from the neighbors, particularly the main sitting areas, pool and outdoor kitchen.
Although there was already a 1,221 sq. ft. lanai under the roof, it lacked functionality needed by the homeowners. Most of its amenities were located at one end of the lanai, and lacked privacy that the homeowners valued.
Solution
The final project design required two additions to the lanai area adding an accumulative 265 sq. ft. to the existing space expanding their sitting area and accommodating a much-needed outdoor kitchen. The new additions also needed to blend with the home’s existing style.
Addition #1—Sitting Area:
The first addition added approximately 145 sq. ft. to the end of the lanai. This allowed Progressive Design Build to tie into the existing gable room for the new space and create privacy from the neighbors.
Addition #2—Outdoor Kitchen:
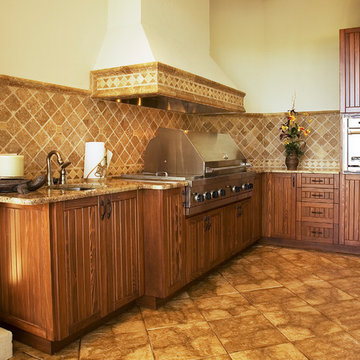
The second addition was a bump out that added approximately 120 sq. ft. to the end of the house close to the interior kitchen. This allowed the client to add an outdoor over and 52” Viking grill (with a side burner) to their outdoor living space. Other amenities included a new sink and under counter fridge, granite countertops, tumbled stone stile and Cypress cabinetry, custom-fabricated with marine grade plywood boxes and marine grade finishes to withstand moisture, common in the Bonita Bay community.
Special attention was given to the preparation area on either side of the stove, the landing area next to the oven and the serving counter behind the bar. Bar seating was added to the outdoor kitchen, allowing guests to visit with the cook comfortably and easily.
Brick Pavers
During the design phase, we discovered that the original brick pavers were set in sand, with no concrete pad below. Consequently, the retaining wall and several pavers were starting to fail, caused by the shifting sands. To remedy the problem, we installed a new concrete deck and laid new nonslip pavers on top of the deck—ideal for wet area applications.
Pool Renovations
To dramatically improve the enjoyment and ambiance of their pool, Progressive Design Build completely re-plumbed it, putting in additional lighting and new water features. New decorative pool tile, coping, and a paver deck were also installed around the pool. The pool finish chosen by our clients was a nice tropical blue color.
Screen Enclosure
A new screen enclosure was installed in compliance with new local building codes, making it more stable and solid than the existing one. The color change from white to bronze coordinated well with the homeowners’ new color scheme; and the location of the service door and stairs provided convenient access to the new pool equipment.
Results
This project was completed on time and within budget before these homeowners returned for their winter holiday. They were thrilled with the weekly communication, which included two-way phone calls and email photo sharing. They always knew where their project was in the construction process and what was happening at all times—providing security and peace of mind.
 Jorge E. Jimenez-Marcos
Home
About
Work
Contact
919 saint elmos court - fort bend, texas
Where Mexico Hacienda meets Texas Hill Country
description
exterior views
interior views
elevations and floor plans
specs
Bedrooms 6
Bathrooms 5
Garage Attached
Stories 2
Building (Sq.Ft.) 7,016
Lot (Sq.Ft.) 98,663
Exterior Construction Stucco
Lot Description Subdivision
Roof Tile
Foundation Concrete
location
virtual tour
Visit this property's Virtual Tour (external link - via Circlepix).
return home
Design and function flow in concert with the natural beauty of the
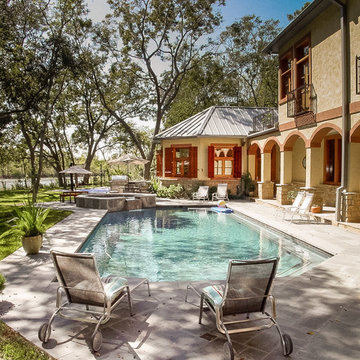
surrounding trees and lake. The architectural vision for this house was to have an hacienda feeling with Texas flavor. The smart floor plan possesses an incredible indoor-outdoor flow, allowing for entertaining , yet has intimate spaces for family living with unmatched beauty and tranquility.
Copyright © Jorge E. Jimenez-Marcos
 Progressive Design Build
Challenge
As part-time residents of this Bonita Springs home, our clients were looking to update their outdoor entertainment area. They also planned to be away for the summer during the remodel and needed their renovation project to be finished prior to their return for the winter.
Their needs included:
Changing the color pallet to a monochromatic scheme, removing the yellow brick pavers, adding an outdoor kitchen area, adding an outdoor fireplace, resurfacing the pool and updating the tile, installing a new screen enclosure, and creating privacy from the neighbors, particularly the main sitting areas, pool and outdoor kitchen.
Although there was already a 1,221 sq. ft. lanai under the roof, it lacked functionality needed by the homeowners. Most of its amenities were located at one end of the lanai, and lacked privacy that the homeowners valued.
Solution
The final project design required two additions to the lanai area adding an accumulative 265 sq. ft. to the existing space expanding their sitting area and accommodating a much-needed outdoor kitchen. The new additions also needed to blend with the home’s existing style.
Addition #1—Sitting Area:
The first addition added approximately 145 sq. ft. to the end of the lanai. This allowed Progressive Design Build to tie into the existing gable room for the new space and create privacy from the neighbors.
Addition #2—Outdoor Kitchen:
The second addition was a bump out that added approximately 120 sq. ft. to the end of the house close to the interior kitchen. This allowed the client to add an outdoor over and 52” Viking grill (with a side burner) to their outdoor living space. Other amenities included a new sink and under counter fridge, granite countertops, tumbled stone stile and Cypress cabinetry, custom-fabricated with marine grade plywood boxes and marine grade finishes to withstand moisture, common in the Bonita Bay community.
Special attention was given to the preparation area on either side of the stove, the landing area next to the oven and the serving counter behind the bar. Bar seating was added to the outdoor kitchen, allowing guests to visit with the cook comfortably and easily.
Brick Pavers
During the design phase, we discovered that the original brick pavers were set in sand, with no concrete pad below. Consequently, the retaining wall and several pavers were starting to fail, caused by the shifting sands. To remedy the problem, we installed a new concrete deck and laid new nonslip pavers on top of the deck—ideal for wet area applications.
Pool Renovations
To dramatically improve the enjoyment and ambiance of their pool, Progressive Design Build completely re-plumbed it, putting in additional lighting and new water features. New decorative pool tile, coping, and a paver deck were also installed around the pool. The pool finish chosen by our clients was a nice tropical blue color.
Screen Enclosure
A new screen enclosure was installed in compliance with new local building codes, making it more stable and solid than the existing one. The color change from white to bronze coordinated well with the homeowners’ new color scheme; and the location of the service door and stairs provided convenient access to the new pool equipment.
Results
This project was completed on time and within budget before these homeowners returned for their winter holiday. They were thrilled with the weekly communication, which included two-way phone calls and email photo sharing. They always knew where their project was in the construction process and what was happening at all times—providing security and peace of mind.
 Sosna Inc
After us completing a beautiful Basement renovation for them a few years ago, our returning clients approached us again. This time, to renovate their dated 70’s Bathroom to maximize functionality, and to meet their personal needs.
Through careful planning, we were able to create and rework the Bathroom floor plan to create a spacious and comfortable space.
To create extra storage space, a vanity with recessed tall cabinets was custom-built. Existing load-bearing walls did not allow for a barn door. Instead, a swing shaker-style door was installed, and a curved countertop was used on the vanity to ensure easy entrance into the room. The vanity doors were finished in white, which perfectly complimented the white quartz countertop to provide a clean and modern look. The chrome faucet of the vessel sink matches the chrome outline of the medicine cabinet nicely.
The shower with a glass enclosure features a luxurious rain head shower, and grab bars on each wall provide comfort and support. Marbled tile flooring and shower walls provide a seamless look.
Overall, these personalized updates have increased functionality, safety, and comfort for our clients, creating a home that is unmistakably theirs.
 Jorge E. Jimenez-Marcos
Home
About
Work
Contact
919 saint elmos court - fort bend, texas
Where Mexico Hacienda meets Texas Hill Country
description
exterior views
interior views
elevations and floor plans
specs
Bedrooms 6
Bathrooms 5
Garage Attached
Stories 2
Building (Sq.Ft.) 7,016
Lot (Sq.Ft.) 98,663
Exterior Construction Stucco
Lot Description Subdivision
Roof Tile
Foundation Concrete
location
virtual tour
Visit this property's Virtual Tour (external link - via Circlepix).
return home
Design and function flow in concert with the natural beauty of the
surrounding trees and lake. The architectural vision for this house was to have an hacienda feeling with Texas flavor. The smart floor plan possesses an incredible indoor-outdoor flow, allowing for entertaining , yet has intimate spaces for family living with unmatched beauty and tranquility.
Copyright © Jorge E. Jimenez-Marcos
Sponsored
Sunbury, OH

J.Holderby - Renovations
Franklin County's Leading General Contractors - 2X Best of Houzz!
 Jorge E. Jimenez-Marcos
Home
About
Work
Contact
919 saint elmos court - fort bend, texas
Where Mexico Hacienda meets Texas Hill Country
description
exterior views
interior views
elevations and floor plans
specs
Bedrooms 6
Bathrooms 5
Garage Attached
Stories 2
Building (Sq.Ft.) 7,016
Lot (Sq.Ft.) 98,663
Exterior Construction Stucco
Lot Description Subdivision
Roof Tile
Foundation Concrete
location
virtual tour
Visit this property's Virtual Tour (external link - via Circlepix).
return home
Design and function flow in concert with the natural beauty of the
surrounding trees and lake. The architectural vision for this house was to have an hacienda feeling with Texas flavor. The smart floor plan possesses an incredible indoor-outdoor flow, allowing for entertaining , yet has intimate spaces for family living with unmatched beauty and tranquility.
Copyright © Jorge E. Jimenez-Marcos
 Advance Design Studio, Ltd.
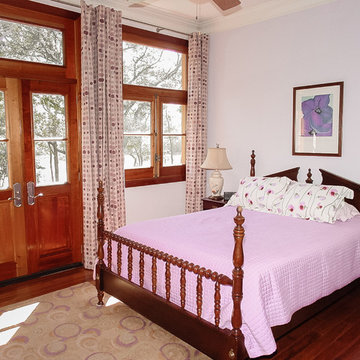
Scott and Janet of Elgin have had four design to build renovations with Advance Design over the last decade. We got the chance to sit down and talk with Janet about her experience working with Advance Design on so many different areas of her home. Starting with her kitchen in 2009, Janet proclaimed, “The reason we kept coming back is because our first [renovation] went so extremely well, exceeding all of my expectations.”
Since their kitchen renovation with Advance Design ten years ago, Scott and Janet have also worked with Advance to remodel their master bedroom, their power room, a wet bar, and most recently their master bath. Having renovated practically every major room in the house with the team, we asked Janet what made her experience with Advance Design so special. “We went with Advance Design because we trusted them so much more, their experience, and everything that they brought. We were confident they were giving us what we wanted for the money we were spending.”
For their most recent renovation, Scott and Janet clearly knew what to expect going into their master bath renovation. They were familiar with Advance’s step by step design process that epitomizes the “Common Sense Remodeling” philosophy applied in every project Advance creates. After once again experiencing the careful budgeting analysis, the pointed design meetings, and the clear documentation that leads up the a thoroughly managed installation, Janet’s simple summary of their experience is this; “The word I would use to describe the process is – collaboration!”
Working closely with Advance Design kitchen designer Michelle Lecinski, together they were able to develop a new master bath design that not only worked with their investment goal, but also made sense for their lifestyle. “Oh Michelle, my designer! I connected with her immediately. She spent time getting to know us, our lifestyle, even the setting of our house.” The threesome had a great experience designing and producing yet another successful project together.
When it came to their new project plans, Scott and Janet were interested in creating a relaxing “spa-like” experience in their master bath. One of the many ideas Michelle introduced during the design process was installing a Kohler Alteo series showerhead for a rain-like shower experience. This designer showerhead, mixed with the warm ambiance of the lighting and pebble accent running throughout the shower make for what Janet calls a “luxury spa essence”. From the oversized glass sliding door to the recessed niche for accessories, each special detail was considered and implemented intentionally so as to create the maximumly optimized use of the compact space. Not only was this transformation one of beauty and luxury, but special attention was given to every way possible to provide additional storage to maximize the functionality of the bath area as a whole.
Once design was complete and the bath construction project began in their home, making sure everything happened efficiently and on schedule became new priority number one. “Having a project manager made an enormous difference,” Janet said, “It was so worth it to hire professionals that knew exactly what they were doing. Even after all of these years, I wouldn’t change a thing.”
“It was a pleasure working together with Janet and Scott to create this beautiful space that will enhance their lives for many years,” says Michelle. “It is so much fun to get to do this job every day, I love that I can have this sort of impact on their lives by doing something for them [Janet & Scott] that comes so naturally to me!”
After reviewing the long-term relationship with clients like Scott and Janet, owner Todd Jurs had this to say, “Clients returning and asking us to transform that next area of their home really warms my heart. It reaffirms that every decision to please clients no matter what is always the right choice, and that our honesty and integrity along with the immense collective talent of this team is recognized and appreciated by those who continue to return to us year after year.” He continued to say, “I always say how blessed we truly are to be able to do what we do, and experiences like this one put a smile on my face every time.”
 Progressive Design Build
Challenge
As part-time residents of this Bonita Springs home, our clients were looking to update their outdoor entertainment area. They also planned to be away for the summer during the remodel and needed their renovation project to be finished prior to their return for the winter.
Their needs included:
Changing the color pallet to a monochromatic scheme, removing the yellow brick pavers, adding an outdoor kitchen area, adding an outdoor fireplace, resurfacing the pool and updating the tile, installing a new screen enclosure, and creating privacy from the neighbors, particularly the main sitting areas, pool and outdoor kitchen.
Although there was already a 1,221 sq. ft. lanai under the roof, it lacked functionality needed by the homeowners. Most of its amenities were located at one end of the lanai, and lacked privacy that the homeowners valued.
Solution
The final project design required two additions to the lanai area adding an accumulative 265 sq. ft. to the existing space expanding their sitting area and accommodating a much-needed outdoor kitchen. The new additions also needed to blend with the home’s existing style.
Addition #1—Sitting Area:
The first addition added approximately 145 sq. ft. to the end of the lanai. This allowed Progressive Design Build to tie into the existing gable room for the new space and create privacy from the neighbors.
Addition #2—Outdoor Kitchen:
The second addition was a bump out that added approximately 120 sq. ft. to the end of the house close to the interior kitchen. This allowed the client to add an outdoor over and 52” Viking grill (with a side burner) to their outdoor living space. Other amenities included a new sink and under counter fridge, granite countertops, tumbled stone stile and Cypress cabinetry, custom-fabricated with marine grade plywood boxes and marine grade finishes to withstand moisture, common in the Bonita Bay community.
Special attention was given to the preparation area on either side of the stove, the landing area next to the oven and the serving counter behind the bar. Bar seating was added to the outdoor kitchen, allowing guests to visit with the cook comfortably and easily.
Brick Pavers
During the design phase, we discovered that the original brick pavers were set in sand, with no concrete pad below. Consequently, the retaining wall and several pavers were starting to fail, caused by the shifting sands. To remedy the problem, we installed a new concrete deck and laid new nonslip pavers on top of the deck—ideal for wet area applications.
Pool Renovations
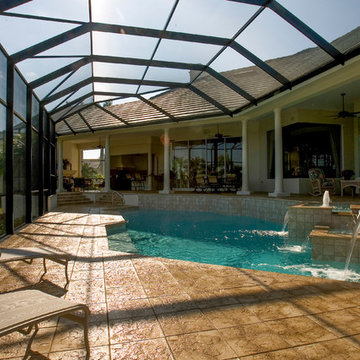
To dramatically improve the enjoyment and ambiance of their pool, Progressive Design Build completely re-plumbed it, putting in additional lighting and new water features. New decorative pool tile, coping, and a paver deck were also installed around the pool. The pool finish chosen by our clients was a nice tropical blue color.
Screen Enclosure
A new screen enclosure was installed in compliance with new local building codes, making it more stable and solid than the existing one. The color change from white to bronze coordinated well with the homeowners’ new color scheme; and the location of the service door and stairs provided convenient access to the new pool equipment.
Results
This project was completed on time and within budget before these homeowners returned for their winter holiday. They were thrilled with the weekly communication, which included two-way phone calls and email photo sharing. They always knew where their project was in the construction process and what was happening at all times—providing security and peace of mind.
26