
Search results for "Sealed" in Home Design Ideas

 Plain & Posh
This large kitchen was desperately needing a refresh. It was far to traditional for the homeowners taste. Additionally, there was no direct path to the dining room as you needed to enter through a butlers pantry. I opened up two doorways into the kitchen from the dining room, which allowed natural light to flow in. The former butlers pantry was then sealed up and became part of the formerly to small pantry. The homeowners now have a 13' long walk through pantry, accessible from both the new bar area and the kitchen.

 John Kraemer & Sons
Builder: John Kraemer & Sons | Building Architecture: Charlie & Co. Design | Interiors: Martha O'Hara Interiors | Photography: Landmark Photography
Double shower - mid-sized transitional master marble floor and white floor double shower idea in Minneapolis with white cabinets, gray walls, quartz countertops, a hinged shower door, recessed-panel cabinets, an undermount sink and white countertops
Double shower - mid-sized transitional master marble floor and white floor double shower idea in Minneapolis with white cabinets, gray walls, quartz countertops, a hinged shower door, recessed-panel cabinets, an undermount sink and white countertops

 Zelaya Properties LLC
We used: Custom cherry cabinetry in Arts & Crafts Shaker style by Kabinart in Boulder and Espresso stains. Liberty Hardware Venetian bronze 1-1/2" cabinet knobs. KitchenAid Architect II Series 22 CF counter-depth French door refrigerator. KitchenAid Architect Series II 27" convection single wall oven. KitchenAid 36" 6-burner dual fuel freestanding commercial-style range. KitchenAid Architect II Series 24" dishwasher. Sharp Insight Pro Series 24" built-in microwave drawer (Model #KB6524PS). Crystorama Solaris 12" wide pendant lights in English bronze. Granite countertops in Brown Fantasy. 3"x6" polished marble backsplash.
Paint colors:
Walls: Glidden Silver Cloud 30YY 63/024
Ceilings/Trims/Doors: Glidden Swan White GLC23
Robert B. Narod Photography
Find the right local pro for your project

 All Surface Restoration
 specializes in brick paver cleaning, washing, stripping, polymeric sand installation & sealing. To request a free estimate visit: http://surfacerestoration.com/services/brick-paver-restoration/
or call 248-475-0004


 All Surface Restoration
Brick paver pool patio AFTER pressure washing, installation of tan polymeric sand & sealing with Paver Gloss Sealer.
This is an example of a large backyard brick landscaping in Detroit.
This is an example of a large backyard brick landscaping in Detroit.
Sponsored
Delaware, OH

Buckeye Basements, Inc.
Central Ohio's Basement Finishing ExpertsBest Of Houzz '13-'21

 SurfaceLogix
Cobble Loc is the newest technology in waterborne protection for brick pavers, concrete, stamped concrete, roofs, and our TD One Step. It allows the applicator to clean and seal pavers on the same day. Unlike other clear finishes, Cobble Loc has excellent resistance to brake fluid, gasoline, bleach, and acids.
Photo by: Work Starz

 Whites Painting and Power Washing GA
Before apply detergent and power washing wood deck in Atlanta to prepare for new stain
Elegant backyard deck photo in Atlanta
Elegant backyard deck photo in Atlanta

 Margot Hartford Photography
Photo: Margot Hartford © 2014 Houzz
Eclectic medium tone wood floor living room photo in San Francisco with brown walls
Eclectic medium tone wood floor living room photo in San Francisco with brown walls

 Gappsi
Nicolock oyster blend rustico pavers being sealed in Huntington NY 11743. The sealing process begins with pressure washing the entire patio, removing all dirt/debris from the stone surface and in between the joints. Next, Nexgel Techniseal synthetic sand is applied in between the pavers joints and vibrated with a mechanical plate compactor. The plate compactor has rubber rollers to prevent the stones from cracking or scratching. This vibrating process allows the sand to fall in between the joints and density. Then, we clean the pavers with brooms and landscape blowers, to clean the excess sand from the pavers surface and to evenly spread the sand in between the pavers joints. The next step is to wash the pavers by misting water to penetrate the synthetic sand into the paver joints all the way down below the pavers. The sand and water activate a chemical reaction of the pollen that’s in the sand to cause the sand to harden. Finally, the application of the sealer, two parts components urethane dealer, specially formulated for Gappsi, is applied to the pavers surface and the sand joints to prevent stones from staining, extend their life cycle and further enhance their texture, color, and surface. Call Gappsi at 631-543-1177 for any cleaning, sealing, paver driveways/patio restoration and repairs in Huntington Bay NY.
 All Surface Restoration
Brick paver pool patio AFTER pressure washing, installation of tan polymeric sand & sealing with Paver Gloss Sealer.
This is an example of a large backyard brick landscaping in Detroit.
This is an example of a large backyard brick landscaping in Detroit.

 Builder Boy
Here's a housing unit in Seal Beach, California with a fresh coat of stucco. On this job, we applied a white 16/20 sand finish stucco coat to give this building a more natural and crisp look. All stucco work done by Stucco Boy, a division under Builder Boy.
 Scottsdale Travertine Polish
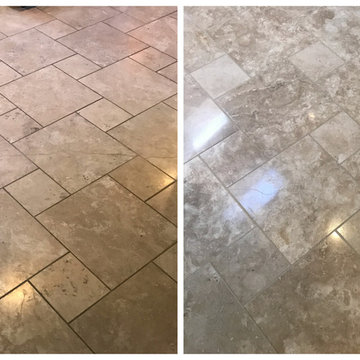
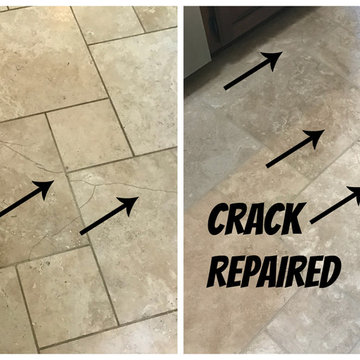
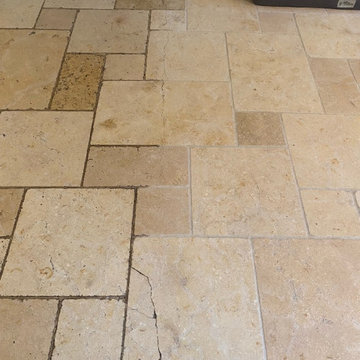
Do you have cracked travertine tiles? Don't replace them, repair them. Let the experts at Scottsdale Travertine Polishing show you how we can minimize and disguise your cracked tiles today!
 All Surface Restoration
Exposed Aggregate Concrete Pool Patio Sealed With Paver Gloss Clear Acrylic Sealer
Patio - large backyard patio idea in Detroit
Patio - large backyard patio idea in Detroit
 Scottsdale Travertine Polish
Do you have cracked travertine tiles? Don't replace them, repair them. Let the experts at Scottsdale Travertine Polishing show you how we can minimize and disguise your cracked tiles today!

 User
Rustic meets industrial in this custom built home by DW3 Construction in Wisconsin. Designed and built to ensure the homeowners feel like they are part nature wherever they are in their home. Biophilic design done right!
The homeowners choose Diamond Kote siding in French Gray and paired it with Seal trim.
 Tile Doctor Ltd
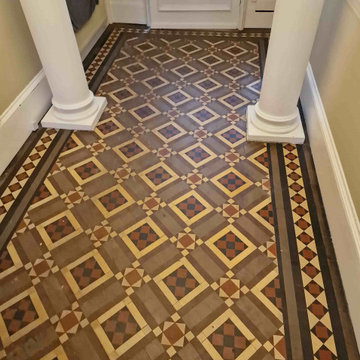
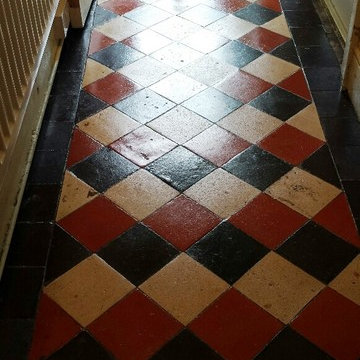
The pictures below were taken at a house in the town of Merthyr Tydfil, which is located not too far north of Cardiff. My client was keen to keep her very old Quarry tiled floor – which dated back to 1905 – intact. The floor had understandably seen a large amount of traffic in its lifetime, and was now in dire need of a professional restoration, including a thorough clean and seal.
First, I completed a survey of the area and provided my client with a quote. After completing many similar jobs in the past, I generally have a good idea of what the final result will look like. I passed on some images of a final result to my client, who was happy for me to begin my work.
On the first day, my first task was to take run some damp tests which were fine; it’s always good to know up front if there are likely to be any damp issues. Next I covered the floor with water to take the surface suction out and waited fifteen minutes before applying a cocktail of Tile Doctor NanoTech Heavy Build-Up cleaner mixed with Pro-Clean and Grout clean-up covering the whole floor. I then immediately starting to work the solution into the floor with a rotary machine fitted with a coarse black pad. The solution was then rinsed off with water which was then extracted with a wet vacuum as I worked. For stubborn areas I applied more of the previously mixed solution scrubbed into the floor with coarse wire wool by hand followed by further rinsing with water.
Each of the products used serves a particular purpose. Pro-Clean is a strong high-alkaline cleaner for natural stone, while NanoTech HBU is a particularly powerful cleaner that uses nano-sized particles to penetrate deep into the stone to get underneath and lift out ingrained dirt and stains. Grout Clean-Up, as the name implies, is a product for resolving grout related problems such as removing grout smears from tile surfaces aka grout haze.
After completing the clean I left the house for 48 hours, to leave enough time for the floor to dry completely in preparation for sealing. Upon my arrival back at the house I conducted some more damp tests to check that the floor was dry enough to seal using the previous readings as a benchmark. The results indicated that I was fine to proceed with the seal, so I applied a total of eight coats of Tile Doctor Seal & Go for durable protection. This was the product I recommended to my client as she wanted a nice, soft shine for her surface seal.
As you can see from the photos, the desired result was achieved to a high standard and needless to say my client was delighted with the transformation.
Julian Iancono
South East Wales
 Tile Doctor Ltd
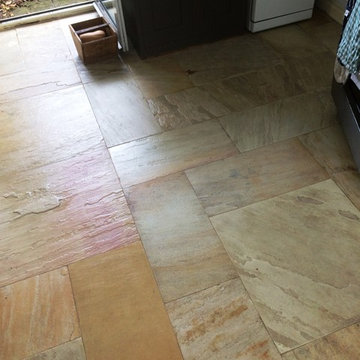
I was recently contacted by a client who had just moved into a house in Crowborough, a town in East Sussex which by the way was once home to Sir Arthur Conan Doyle, the author of the Sherlock Holmes novels and short stories. The riven Slate tiled floor in the kitchen had trapped bits of dirt and also food which had become ingrained in the tile. Needless to say, the new homeowner wanted to give the kitchen floor a thorough clean. However, she had tried every cleaning product she could find in the supermarket, but to no avail. Struggling to find a solution she sought out professional assistance and naturally I was happy to help.
My first task was to mix up a strong solution of Tile Doctor Pro-Clean. The product was only slightly diluted with water, since the floor was quite heavily soiled and a higher concentration of Pro-Clean was needed to help remove several layers of dirt and food waste. Once applied to the floor, the solution was left to dwell for roughly five minutes before I began to work it into the stone with a deck brush. I did the best I could here to clean the floor without using my buffing machine as, since the floor was riven, my black buffing pad would have been ruined by the ridges.
Making up for the lack of a buffing machine, I made sure to scrub the floor with Pro-Clean for several hours to remove as much grime as possible. One the cleaning was finally completed I rinsed the floor several times with clean, hot water. I then used a wet-dry vac machine to remove any excess moisture to clear the floor for sealing when I returned 48 hours later. Upon leaving, I left my client with instructions to avoid spilling anything on the floor as, again, any liquid left on the surface might affect the performance of the sealer.
After a period of two days, I returned to commence the sealing. My choice of sealer was Tile Doctor Seal & Go, which is suitable for use on internal, unsealed surfaces such as Slate, textured Quarry, Victorian tile, and others. Seal and Go is also a water based sealer so you there’s very little smell given off whilst it dries compares to solvent based sealers. In this case, the client did not want the surface of the floor to be too shiny, so I only used two coatings of Seal & Go, whereas for a shinier result I would have used a few more.
My client was exceptionally pleased with the results, which had not only cleaned the floor but brought out the beautiful colours in the stone that had once been hidden under several layers of muck.
33