
Search results for "Sealed" in Home Design Ideas
 DLC Builders Inc
Inspiration for a modern double-sink walk-in shower remodel in Orange County with a wall-mount toilet, an undermount sink and a floating vanity

 Moderne Builders
Gorgeous master bath with dramatic retro "wave" tile. Peak Photography
Example of a 1950s bathroom design in Los Angeles
Example of a 1950s bathroom design in Los Angeles

 Victor M Samuel Photography
Example of a trendy metal tile and metal doorless shower design in San Francisco with a vessel sink, flat-panel cabinets and medium tone wood cabinets
Find the right local pro for your project
 Tile Doctor Ltd
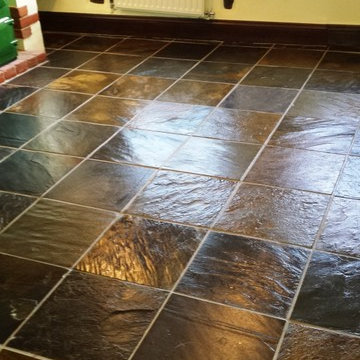
I recently made a trip down to South Molton, a small town which sits on the River Mole. The river, actually a tributary of the River Taw, gets its name from the two small towns it runs by, North Molton and South Molton. Anyway I digress, my client asked me to take a look at a Chinese Slate floor in her house, as it was in dire need of a good clean due to the original sealer having worn off over time allowing the dirt to become ingrained in the tile.
As this particular type of floor is naturally quite rough, I advised my client to have the Slate milled flat. This would not only make the floor easier to clean on a regular basis, but also it would reduce the hazard of people tripping over the exposed edges. However, the milling procedure is expensive due to the need to use a special grinding disc formed of diamond segments, which is then attached to a rotary machine and used on the stone. My client decided against this, instead opting for a thorough clean and seal. This would be the first time the floor had ever received a proper clean – it had not even been cleaned when the tilers first fitted it!
My choice of product for the cleaning was Tile Doctor Pro-Clean, a high alkaline cleaner which, along with Slate, is suitable for use on other natural stone floors such as Limestone, Granite and Travertine. The product, diluted with clean water, was applied evenly to the floor using a Polybrush, as well as a rotary machine fitted with a buffing pad. This also helped to remove any remaining old sealer although, as aforementioned, the vast majority of the old sealer had already worn away.
Following this, I cleaned the grout using Tile Doctor Grout Clean-Up and a long-handled stiff grout brush. Grout Clean-Up penetrates below the surface of the grout to lift out grout haze and general dirt. After completing the cleaning I rinsed the floor several times with clean water to remove any trace of cleaning product. The floor was then left to dry completely before sealing, as any moisture left over on the floor could have impacted on the sealer.
When I returned to seal the floor I opted to use Tile Doctor High Shine Sealer, which is suitable for use on textured natural stone floors, as well as textured ceramic, textured porcelain, and a range of others. Five coats of High Shine Sealer were applied, providing the floor with durable surface protection and a nice high-sheen finish. This dramatically improved the appearance of the floor to the point that it is hard to believe this is the first time it has been treated to a proper clean and seal!
Both myself and my client were very pleased with the results. Chinese Slate is one of the most beautiful and characterful types of stone for tiled floors, so it was very rewarding to be able to make such a difference here.
 Tile Doctor Ltd
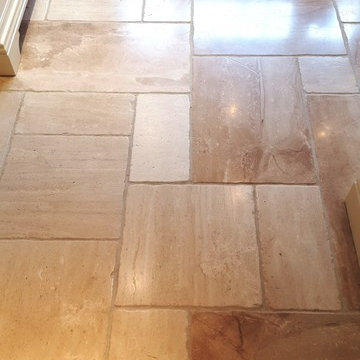
I was recently at a property in the North Yorkshire town of Harrogate, undertaking what I initially thought would be the cleaning and polishing of a Cream Limestone tiled kitchen. However, as I began the cleaning process I quickly discovered that under the dirty grout lines someone had taken a lot of effort to paint with a small brush directly onto the grout using varnish!
In a normal situation, I would have covered the whole floor with Tile Doctor Remove & Go to solve the problem, however compared to, say, adhesive or paint staining, varnish is very difficult to remove. So instead I opted for the long, yet necessary process of cleaning the grout manually with several thin wire brushes. Over the course of two days I managed to remove approximately 90% of the stubborn varnish – and could finally move onto cleaning and polishing the Limestone as originally planned.
The polish had been lost from the Limestone kitchen tiles over time, so I set about restoring it using a type of polishing known as burnishing. This involves the application of diamond encrusted pads of varying grit to the floor to gradually buff the stone and achieve an aesthetic and durable shine. Burnishing is most commonly used on high-end stone such as Marble, Travertine and, of course, Limestone.
At Tile Doctor, our burnishing system comprises four burnishing pads, ranging from a Coarse grit to a Very Fine grit. After applying the first three pads (Coarse, Medium and Fine), I gave the tiles a further clean with Tile a Doctor Pro Clean, which is our alkaline cleaner, to remove any residue from the burnishing process. I then rinsed the floor with clean water and soaked up the residue with a wet vacuum, before leaving it to dry.
The floor was then polished to a satin finish using the fourth and final Extra Fine burnishing pad. I sealed it using a couple of coats of Tile Doctor Ultra-Seal, an impregnating sealer designed to provide maximum protection against dirt and stains.
The combination of burnishing and sealing always makes a huge difference to Limestone tiles. Here, the finished result was almost like a new floor! The customer was both amazed and very pleased with the transformation.
Nigel Stoker
North West Yorkshire Tile Doctor


 All Surface Restoration
 specializes in cleaning, stripping, polymeric sand installation & sealing of brick pavers. To request a free estimate: http://surfacerestoration.com/services/brick-paver-restoration/
or call 248-475-0004
Sponsored
Delaware, OH

Buckeye Basements, Inc.
Central Ohio's Basement Finishing ExpertsBest Of Houzz '13-'21

 Wamhoff Design | Build
Elegant u-shaped ceramic tile and beige floor kitchen photo in Houston with an undermount sink, granite countertops, paneled appliances, beaded inset cabinets, beige backsplash, ceramic backsplash, an island, multicolored countertops and white cabinets

 Homeject
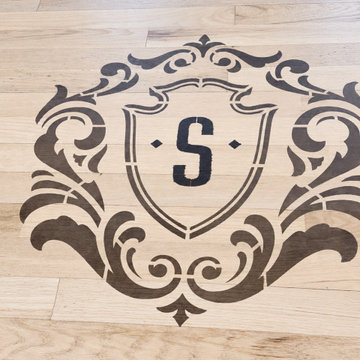
A 22-inch family crest stained into raw oak with a vinyl stencil and Minwax Ebony, then sealed with Bona Mega Satin. Six years of traffic and a sheepdog, still crisp. How I did it: homeject.com/how-to-stencil-hardwood-floors

 Moss Yaw Design studio
Engineered cedar siding creates beautiful gray-blue tones at the exterior of the home, while adding a textural element to activate the simple exterior design.

 faizafatima
Silvano Salvatici - Cleaned, Stained and Sealed the small back patio, cooking area, side patio and front patio in 2 colors (Cola and Green) (Approx. 327 sq ft)
 Tile Doctor Ltd
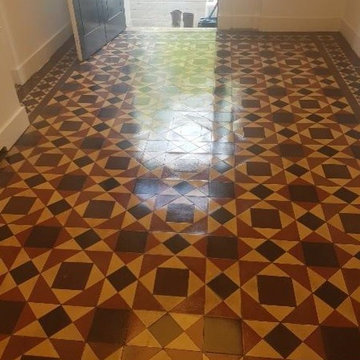
These are photos of a Victorian tiled floor we renovated at the new Scottish head office of the Peoples Postcode Lottery in the centre of Edinburgh City where the building was going through a multi million pound refurbishment. Edinburgh has a lot of Georgian and Victorian architecture, much of which is listed and as a result many still have original Victorian tiled flooring.
I’ve not really looked at the Postcode Lottery until now but put simply you give the lottery £10 a month and your postcode is your winning ticket number, there are prize draws every day and if your postcode comes up every one in the system with that postcode wins; they also give 31% to charity which is impressive.
You can see from the photograph that the floor was in good physical condition but was looking tired and dull. This is not unusual for Victorian tiles as once the sealer wears down dirt can penetrate into the pores of the tile causing it to lose its appearance.
On the first day we set about stripping the floor of what remained of the old sealant using a strong dilution of Tile Doctor Pro-Clean which is an industrial strength alkaline tile and grout cleaning product that is safe to use on Tile and Stone. The product is applied to the floor, left to soak in for ten minutes and the scrubbed into the tile using a black scrubbing pad fitted to a rotary bonnet machine. The floor was then rinsed and the now soiled cleaning solution extracted using a wet vacuum.
The process was repeated several times until we were happy the floor was clean and free of sealer and then given a final rinse with water. Before leaving for the day the floor was dried as much as possible using the wet vacuum to extract as much moisture as possible.
On the second day our first task was to check the floor with a damp meter in several places to ensure the tiles had dried off overnight. All was well and we began the process of sealing the floor with a Tile Doctor Seal and Go. This is a topical sealer which provides a high-quality low-sheen finish and protection against ingrained dirt and stains.
Victorian tiles are quite porous and five coats were needed to fully seal the floor. This took some time to complete as you have to wait until the first coat is dry before applying the next however it was well worth the effort as the floor looked fantastic afterwards.
Thomas Wilson
Edinburgh Tile Doctor
 Tile Doctor Ltd
Not too long ago, I was called up to the harbour town and seaside resort of Ilfracombe, situated on the North Devon coast. Ilfracombe is a historic area within Devon, with the Celts having first settled on its hilly plains during the Iron Age.
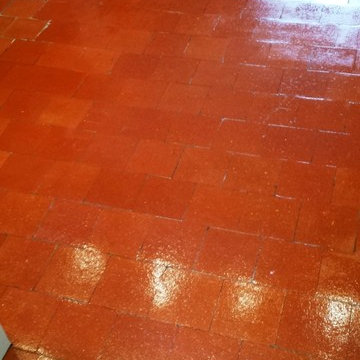
My client asked me to take a look at a Quarry tiled floor which was in need of a serious amount of cleaning. This largely due to the fact that there were dozens of layers of old sealer on the floor which had been left untouched from many years previously, as well as a significant build-up of general dirt and muck.
In order to give this floor a thorough cleaning, I needed to use a strong combination of products, namely NanoTech HBU Remover mixed with Tile Doctor Remove & Go. Nanotech HBU is a heavy build-up remover which uses nano-sized particles to penetrate below tough stains, and lift them out of the stone, whilst Remove & Go is a multi-purpose stripper that provided additional help in removing the many layers of sealer left on the floor. I applied the solution to the floor and left it to dwell for 40 minutes, before using a Polybrush to work it into the Quarry tiles.
Since the floor really was in dire need of a deep clean after years of neglect, I also used a black buffing pad attached to a buffing machine, as well as a steam machine to make sure I removed as much of the old sealer and dirt as possible. This was slow and painstaking work, but it was worth it to get the Quarry tiles back to looking their best again. Once this was complete, I rinsed the floor several times before leaving it for a few days to dry before sealing.
On my return visit, the floor was dry enough to commence sealing. It was important that the floor was dry and any excess moisture had evaporated because it has the potential to compromise the sealer as it cures leading to unexpected results. My sealer of choice was Tile Doctor Seal & Go, a sealer which is suitable for use on internal unsealed, porous surfaces including textured Quarry, Slate, Victorian tile and several others. I carefully applied several coats allowing each coat to dry before applying the next to provide a subtle low-sheen finish that will help protect the surface from stains in the future.
The results were excellent, especially considering that the floor had evidently not been treated to a proper clean for many years.
 Ke Design Collective Inc.
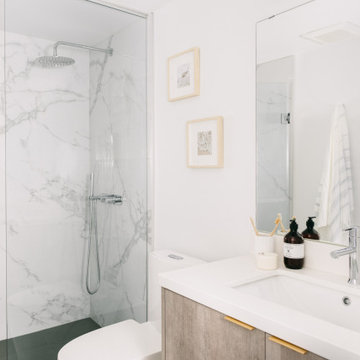
Inspiration for a small modern 3/4 multicolored tile and porcelain tile porcelain tile and gray floor alcove shower remodel in Toronto with flat-panel cabinets, light wood cabinets, a one-piece toilet, white walls, an undermount sink, quartz countertops, a hinged shower door, white countertops and a built-in vanity

 Robert Elliott Custom Homes
Nathan Schroder Photography
BK Design Studio
Robert Elliott Custom Homes
Example of a transitional beige two-story stucco exterior home design in Dallas with a shingle roof and a gray roof
Example of a transitional beige two-story stucco exterior home design in Dallas with a shingle roof and a gray roof

 Bauscher Construction & Remodeling, Inc.
RVP Photography
Example of a large farmhouse l-shaped dark wood floor and brown floor eat-in kitchen design in Cincinnati with white cabinets, white backsplash, stainless steel appliances, an island, a farmhouse sink, marble countertops, porcelain backsplash and shaker cabinets
Example of a large farmhouse l-shaped dark wood floor and brown floor eat-in kitchen design in Cincinnati with white cabinets, white backsplash, stainless steel appliances, an island, a farmhouse sink, marble countertops, porcelain backsplash and shaker cabinets
 All Surface Restoration
 specializes in brick paver maintenance, restoration & preservation. We offer complete brick paver cleaning, stripping, sealing services. Request a free estimate at: http://surfacerestoration.com/services/brick-paver-restoration/ or call 248-475-0004
 All Surface Restoration
Clay brick pavers AFTER cleaning, installing polymeric sand & sealing with Surface Saver Sealer.
Photo of a mid-sized front yard brick landscaping in Detroit.
Photo of a mid-sized front yard brick landscaping in Detroit.
 Tile Doctor Ltd
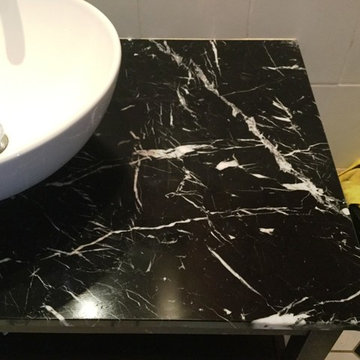
Marble is known for its premium quality, toughness and aesthetic, making it a very popular choice for bathroom countertops, such as this one at a house in Northampton. However just because it’s tough doesn’t mean that Marble can be cleaned with the usual household cleaners. Like all natural stone, Marble is acid sensitive and unsuitable products can have a very damaging effect on its appearance.
In this situation, the property owner had used a limescale remover to remove some unsightly marks from the countertop. Unfortunately, the product was acid-based and instead of making an improvement it just made it worse and caused severe etching.
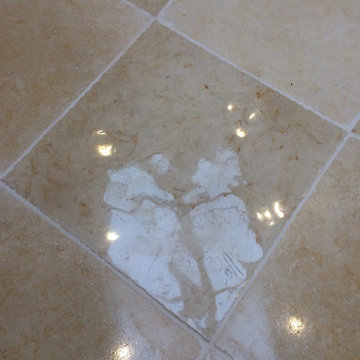
The first photo above shows the limescale marks from where toiletries have been placed on the side whilst wet. Since Northampton is a hard water area, the limescale deposits over time caused these marks to appear.
The only way to effectively remove the Limestone deposits – while at the same time rectifying the damaged caused by the botched cleaning attempt – was to use a system of hand-held diamond encrusted pads and hand help blocks of various grits to cut back the stone and re-polish it, a process we call burnishing.
Before officially beginning the burnishing process, I ran a few tests to determine the type of pad I would need to use to achieve the best results. I found that, in most areas, I would need to use the Tile Doctor 400 Grit (Coarse) pad to resurface the tile and remove the damaged layer of stone, but in some areas where the etching was worse, I would need to use the 200 Grit (Very Coarse) pad.
After burnishing the affected areas with the Coarse and Very Coarse grit pads, I started to incrementally polish the stone to achieve a high-quality shine, working my up through the Medium, Fine and Very grit pads.
No chemicals were used during this process – only water for lubrication, combined with the six-inch diamond encrusted burnishing pads fitted to a hand-held buffing machine.
The final part of the restoration was to seal the stone to maintain a long-lasting, deep polished appearance. To do this, I used Tile Doctor Shine Powder, which is a crystallising sealer in powder form. The powder is applied directly and combined with water, before being worked into the stone to seal it.
The customer was very happy with the results and the level of shine achieved. I gave the customer a complimentary bottle of Tile Doctor Stone Soap, which is our aftercare cleaner for polished natural stone, along with instructions on periodic maintenance to help maintain the finish we had achieved for as long as possible.
Phil Vissian
Northamptonshire Tile Doctor
38