
Search results for "Sealing" in Home Design Ideas


 Moss Yaw Design studio
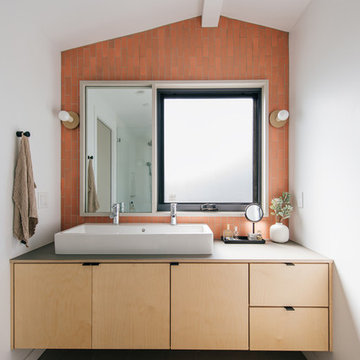
a double vessel sink, asymmetrical mirror, playful heath ceramics wall tile and plywood vanity with fenix laminate top provide for a custom solution to accommodate the existing bathroom window
 User
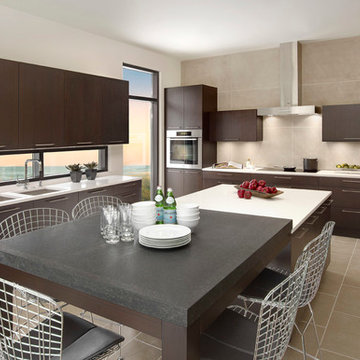
UserBringing the outdoors in and letting ample light flood the room, this window back splash was the perfect opportunity to do so. Stainless Steel undermounted sinks allow a clean look next to the white easy to clean quartz counter top. A built up flamed black absolute granite adds texture and creates an informal eat-in kitchen space.
Find the right local pro for your project

 Twist Tours Real Estate and Portfolio Marketing
Allison Cartwright
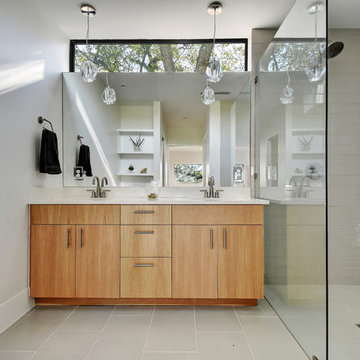
Walk-in shower - contemporary 3/4 gray tile and subway tile walk-in shower idea in Austin with flat-panel cabinets, medium tone wood cabinets and an undermount sink
Walk-in shower - contemporary 3/4 gray tile and subway tile walk-in shower idea in Austin with flat-panel cabinets, medium tone wood cabinets and an undermount sink
 31E Designs
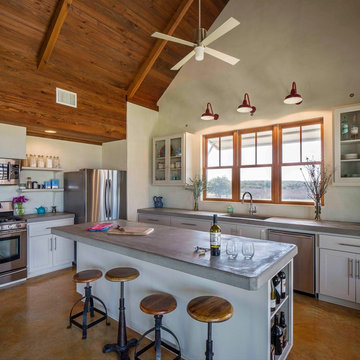
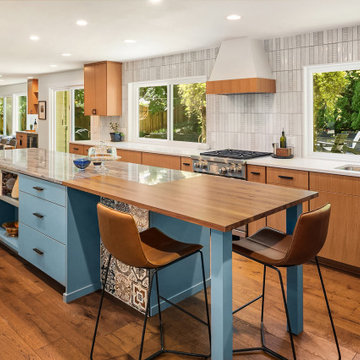
Large 1950s medium tone wood floor and brown floor open concept kitchen photo in Seattle with an undermount sink, flat-panel cabinets, medium tone wood cabinets, quartzite countertops, multicolored backsplash, porcelain backsplash, stainless steel appliances, an island and multicolored countertops

 Kingsley + Ginnodo Architects
photography by Leslie Schwartz
Inspiration for a transitional u-shaped open concept kitchen remodel in Chicago with a farmhouse sink, recessed-panel cabinets, dark wood cabinets, granite countertops, brown backsplash, glass tile backsplash and paneled appliances
Inspiration for a transitional u-shaped open concept kitchen remodel in Chicago with a farmhouse sink, recessed-panel cabinets, dark wood cabinets, granite countertops, brown backsplash, glass tile backsplash and paneled appliances

Sponsored
Delaware, OH

Buckeye Basements, Inc.
Central Ohio's Basement Finishing ExpertsBest Of Houzz '13-'21
 Tile Doctor Ltd
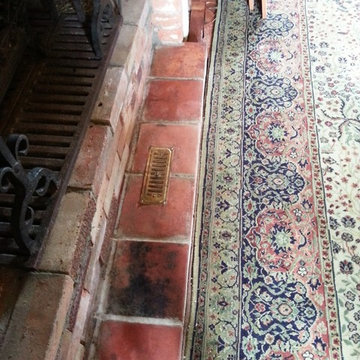
The oldest properties often have the most interesting tiled features and this Quarry Tiled Fireplace was a fine example. The customer lived in a quaint old cottage just outside the main town centre of Bedford and contacted us about restoring their fantastic Quarry tiled fireplace. While the customer knew that the cottage itself was over 200 years old, they had no idea whether or not the fireplace is an original feature.
However, it’s safe to say that the fireplace is very old in its own right, and that it had been a long time since it had experienced any kind of professional maintenance. It goes without saying that as any kind of tiles get older they will need more frequent care to keep them looking at their best. Here, the Quarry tiles desperately needed cleaning up as they were covered in old candle wax and what looked to be several years’ worth of general dirt. This had significant dulled the natural shades in the stone, leaving it looking lifeless and unappealing. The tiles would also require a fresh seal to ensure protection against muck in the future, and to help restore the colour to the stone.
Firstly, I applied Tile Doctor Oxy-Gel tile cleaner, which is particularly effective on tricky areas as being in a gel form it adheres better to non-horizontal areas. It was left it to dwell on the tiles for around twenty minutes so it could penetrate into the pores and get to work lifting out and dissolving the dirt that had been trapped in there over the years . Oxy-Gel is suitable for use on a wide range of natural stone tiles, including Quarry, Travertine and Slate. In this situation it cut through and removed most of the candlewax quite easily, and softened the stubborn residue to a point where I could easily remove the rest manually with handheld scrappers.
I then left area it to dry, with an air mover installed to reduce drying time. The advantage of using a gel product is that uses a smaller amount of moisture than a standard liquid cleaner, and therefore allows the tile to dry – and to be sealed – quicker; and in this case we were able to seal the same day where-as normally we would have to wait until the next day.
Once the tiles were completely dry, I sealed the fireplace with Tile Doctor Colour Grow which is an impregnating sealer that fills the pores of the stone to prevent dirt and general muck from becoming ingrained, making the tiles much easier to keep clean in the long-term.
The added benefit of Colour Grow is that – as its name suggests – it emphasises the natural colours in the stone. This was something that the Quarry fireplace was desperately in need of, and the Colour a Grow quickly got the job done!
The customer was very pleased with the finished results. The clean removed years’ worth of muck, while the fresh seal brought out the natural beauty in the Quarry tiles and, at the same time, will protect the tiles on future candle-lit evenings.
Andrew Evans
Bedfordshire Tile Doctor
 Tile Doctor Ltd
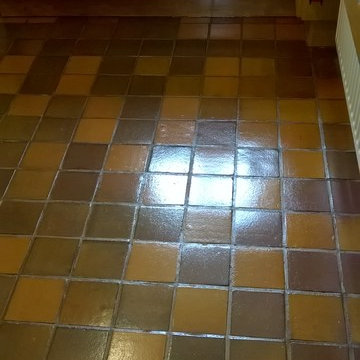
This Quarry tiled kitchen floor was in very good condition, with no cracked or broken tiles. However, my customer, who lives in the town of Tutbury, near Burton-on-Trent, was keen to boost the condition of the tiles further through professional maintenance, including a deep clean and a fresh seal to restore the sheen to the Quarry. NB, did you know it’s estimated that Tutbury has actually been inhabited for 3000 years, having once been the site of an Iron Age hill fort, this house of course was a lot more recent.
To clean the tiles, I chose to use our tried and trusted alkaline cleaner, Tile Doctor Pro Clean. We use Pro Clean on most types of natural stone floor, including Quarry, Slate, and Victorian. I applied Pro Clean liberally across the floor and left it to dwell for a short period, giving it time to seep into the tile to get underneath and lift out any ingrained dirt. The cleaner was then agitated using a scrubbing pad fitted to a rotary machine to remove the dirt and other general muck.
I then rinsed the floor with cold water and soaked up the resulting slurry with a wet-vac machine. Some areas of the floor proved to be quite stubborn to clean, so in these areas the cleaning process was repeated until satisfactory results were achieved. Finally, the floor was given another rinse and left to dry off overnight.
The next day I returned to the property and checked that the floor was ready to seal by running several damp tests, with the results indicating that was no excess moisture remaining on the tiles. We carry out these tests before sealing because moisture can cloud the sealer and prevent it from properly protecting the tiles.
My choice of sealer was Tile Doctor Seal & Go, a cost effective topical sealer that builds up a robust layer of protection on the surface of the floor and provides a durable sheen finish that, as you can see from the photographs, really lifts the appearance of the tiles.
It’s a fact that any sealed tiled floor will need to be regularly maintained as sealers do wear off over time, especially in the high traffic areas, and this is when the floor starts to lose its appearance as dirt becomes trapped in the pores of the stone. The life of the sealer can be extended however by ensuring you only clean the floor with a PH Neutral cleaner.
Trevor Preeece
 Tile Doctor Ltd
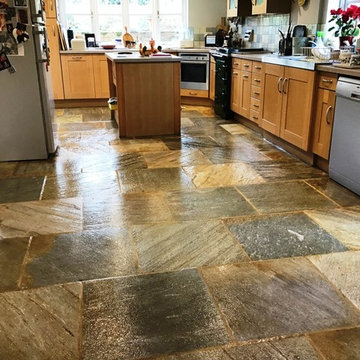
I recently visited a customer living in the village of Ravensthorpe, just outside Northampton to rejuvenate a 15-year-old multi coloured Chinese riven slate floor that needed a deep professional clean. Slate is a hard-wearing tile used for flooring high traffic areas but does need sealing to bring out its best features. In this case the sealer had long since worn off and dirt had become ingrained in the stone making it difficult to clean effectively.
We discussed the client’s requirements and the cleaning process I planned to follow to rejuvenate the floor. I had to check on availability, so I e-mailed over a quote and some dates later that day. They were happy with my proposal and agreed for the work to be done whilst the customers were on holiday.
My first task was to test a small area to determine which products would give the best results. In this case, I decided to start with a strong dilution of Tile Doctor Remove and Go which is a strong alkaline cleaner/coatings remover that’s safe to use on Tile and Stone. I spread this solution across a section of the floor and left it to seep into the pores of the stone and lift out the ingrained dirt.
After allowing the solution adequate time to dwell, I scrubbed the slate with a carbon brush fitted to a rotary machine to gradually reveal the fantastic natural colours of the Slate hidden beneath the dirt. Happy with my choice of cleaning product I repeated this process in sections until it had been carried out throughout the entire area. Following this, I rinsed the entire floor several times with clean water, before soaking up the resulting soiled residue with a wet vacuum.
The next part of the cleaning process entailed paying attention to the grout lines which were scrubbed using Tile Doctor Grout Clean-Up. The resulting residue was promptly extracted with the wet vacuum and I finished by giving the whole floor a rinse with Tile Doctor pH Neutral Tile Cleaner. This is a day to day tile cleaning product which is recommended for stone floors, many supermarket tile cleaning products are only suitable for ceramic tiles due to their acidic formula and can damage a floor over years of use so you should always read the label. However, I always leave my clients with a complimentary bottle of a suitable Tile Doctor product to maintain their floors.
The floor was left to dry off overnight and I returned on the second day to seal the floor. Before starting I checked the floor was dry using a damp meter which confirmed the Slate was dry and ready to seal. The floor must be completely dry before sealing as any excess moisture has the potential to the damage the performance of the sealer. Since my client had specifically requested a silk finish, I opted to use Tile Doctor Seal and Go which dries to leave a lovely subtle sheen that really enhances the look of the stone. Five coats were applied to ensure a good hard-wearing protection.
My client was very pleased with the results, particularly as they hadn’t realised how much colour it had lost over the years and left the following feedback on our website.
”I despaired of having a clean-looking floor again. Phil Vissian assured me that intensive deep cleaning and resealing could restore our fifteen year old, subtly coloured, Chinese riven slate kitchen floor. He has done a fantastic job. Looks like new, and I shall book Phil for an annual professional clean, so that it never gets as bad again.” Sally M, Northampton
Phil Vissian
Northamptonshire Tile Doctor
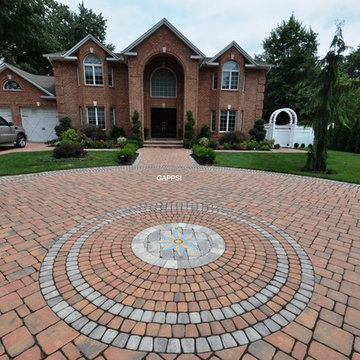
 Gappsi
Yes! Concrete pavers should be sealed. Paving stones are manufactured with the highest quality cement, but cement is a corrosive material that wears under natural elements.
The sun, rain and cold, can easily wear the surface of pavers, and a good sealing job with the right sealing product, applied by a professional technician of sealing, will create a layer of protection over the paving stones making them water repellent and weather proof. This will protect the concrete surface from corrosion.
A good sealer penetrates the paver surface and stays there for many years, even if the look of the sealer goes away, the color and texture of the pavers will stay new.
 Tile Doctor Ltd
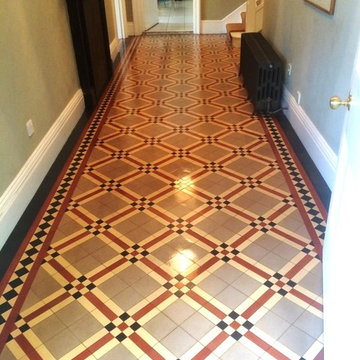
A client from the village of Heytesbury contacted me to see whether we could improve the look of her Victorian tiled hallway floor. It turns out that a competitor had previously cleaned and sealed it two years prior but she was disappointed with the result once she realised that the floor still had dirt ingrained in the tile. As per our normal practice we ran a test clean and she booked us in immediately.
We started by wetting the floor using a strong solution of Tile Doctor Pro-Clean and left it dwell for ten minutes. We then attached a black stripping pad to a rotary machine and slowly covered the whole area to remove ingrained dirt and any existing seals that may be evident. The dirty slurry was then removed with a wet vacuum and then floor rinsed with the aid of a deck brush and a wet vacuum.
Next we used a heavy duty scraper to remove paint splashes around the edges from years of decorating. Once we were satisfied we’d removed all evident dirt, seal and paint we rinsed the floor thoroughly several times to make sure all contaminants are removed again using the wet vacuum to remove the water.
We returned five days later to let the floor dry out thoroughly. Upon our return we tested with a damp meter which tested fine so we proceeded to seal the floor using six coats of Tile Doctor Seal & Go to provide protection and add a nice sheen to the floor which I think you will agree now looks amazing.
Stuart Ford
Wiltshire Tile Doctor
 Tile Doctor Ltd
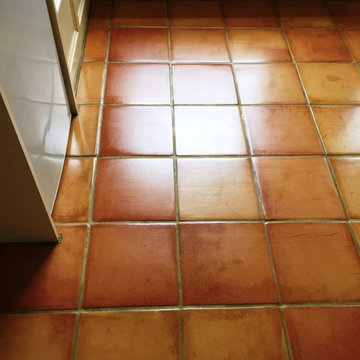
The before picture below was actually taken after another cleaning company had come in to clean these Terracotta floor tiles for a client in the city of Oxford; well what can I say except they then called Tile Doctor.
I started by doing a test on a small area and realised that I could strip the remaining sealer from the floor with a strong dilution of Tile Doctor Pro Clean which is also an effective cleaner and safe to use on stone and tiled floors. So I diluted Pro Clean with warm water and spread this on the floor leaving it to dwell for twenty minutes before scrubbing it in with a black pad fitted to my Rocky floor machine. This worked very well on the floor and the cleaning solution was soon dirty with the released soil which was removed using a wet vacuum and more water to rinse it away and dry the floor as much as possible.
Satisfied that the floor was now as clean as it could be I left for the day and returned the next day to seal the floor, first checking that the tiles were dry and ready to be sealed.
Sealing was done in two stages starting with an initial coat of Tile Doctor Colour Grow which is an impregnating sealer that adds life to the natural colours in the tiles and gives the floor a good base for the next sealer. The second stage was to apply a few coats of Tile Doctor Seal & Go which builds up a surface seal that leaves a nice sheen to the floor as requested by the customer.
 Tile Doctor Ltd
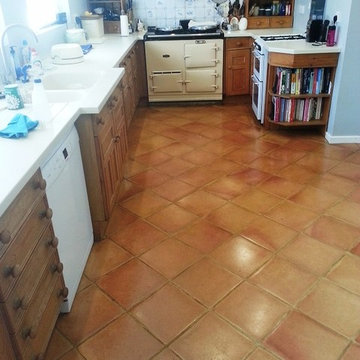
As part of our service we advise customers on best practice for maintaining the appearance of the floor and I’m happy to report this client in Ampthill who has a Terracotta tiled floor that we had fully restored a few years ago had followed to the letter.
Having two dogs and two children, the floor gets a lot of traffic and as expected over a period of time the sealer does wear thin in the busier areas. Should the sealer become too damaged dirt can get underneath and gradually the seal will deteriorate to the point where restoration will be needed again.
By keeping on top of the maintenance our client has kept a beautiful terracotta floor in great condition however as the sealer was wearing he called us back to do a maintenance clean and top up the sealer an activity which we are able to complete in one day rather than the several days needed to do a full restoration.
To maintain the floor, I applied a Tile Doctor fine diamond burnishing pad fitted to a rotary machine and with a little water sprayed onto the tiles to lubricate the process the top was burnished, this took the dirt off the top of the tiles and left a clean surface to top up the seal. The floor was then rinsed to remove the soil generated by the process.
Having removed any damaged sealer an industrial air mover was switched on to get the floor as dry as possible, we then tested the damp levels at various intervals until the floor was dry for re-sealing.
To re-seal two coats of Tile Doctor Seal and Go we applied to the floor allowing the first coat to dry before applying the second. Once the second coat had dried a white polishing pad was used to buff the tiles.
Andrew Evans
Bedfordshire Tile Doctor
 Tile Doctor Ltd
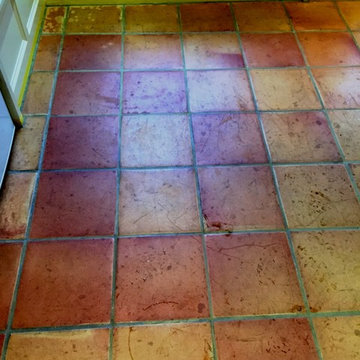
The before picture below was actually taken after another cleaning company had come in to clean these Terracotta floor tiles for a client in the city of Oxford; well what can I say except they then called Tile Doctor.
I started by doing a test on a small area and realised that I could strip the remaining sealer from the floor with a strong dilution of Tile Doctor Pro Clean which is also an effective cleaner and safe to use on stone and tiled floors. So I diluted Pro Clean with warm water and spread this on the floor leaving it to dwell for twenty minutes before scrubbing it in with a black pad fitted to my Rocky floor machine. This worked very well on the floor and the cleaning solution was soon dirty with the released soil which was removed using a wet vacuum and more water to rinse it away and dry the floor as much as possible.
Satisfied that the floor was now as clean as it could be I left for the day and returned the next day to seal the floor, first checking that the tiles were dry and ready to be sealed.
Sealing was done in two stages starting with an initial coat of Tile Doctor Colour Grow which is an impregnating sealer that adds life to the natural colours in the tiles and gives the floor a good base for the next sealer. The second stage was to apply a few coats of Tile Doctor Seal & Go which builds up a surface seal that leaves a nice sheen to the floor as requested by the customer.
 Tile Doctor Ltd
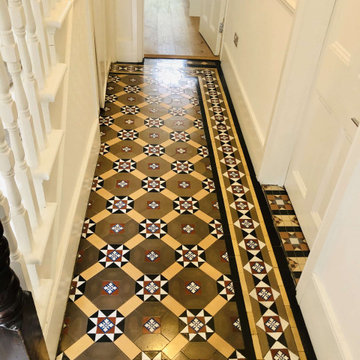
This customer had just moved into a property in Chesham around eighteen months ago. During that time, they had completely renovated the property and in the process had pulled up the hallway carpet to discover a lovely Victorian tiled floor which appeared to be in good condition but very dirty. Period features like these can add a lot of value to a house these days and so they decided to investigate having it professionally cleaned and contacted me for a quote.
Although I can give some indication of price over the phone you never know exactly what to expect so my preference is to visit the property a conduct a test clean. It’s a little trickier to do this now due to COVID-19 but using a combination of PPE, maximum ventilation and social distancing measures I was able to work on the floor. The tiles were in good order with no replacements needed so my focus would be removing carpet adhesive and ingrained dirt. The test went well, and I followed up with a quotation which was accepted, and a date arranged to do the work.
I had worked out previously that the quickest was to deep clean the floor and remove the glue and any old seal was to apply Tile Doctor Remove and Go which as its name suggests is a coatings removed designed for Tiled floors. My method was to spray strong a dilution of Remove and Go onto the Victorian tiles and leave it to soak in for fifteen minutes. Then it was scrubbed in with a black scrubbing pad fitted to a rotary machine. The soil was rinsed off using a minimal of water and extracted with a wet vacuum.
Once the floor had dried, I inspected the tiles and could see more work would be needed to get the white tiles really sparkling. For this I went over the floor using a 200-grit resurfacing pad using water to lubricate the process, I also used handheld burnishing blocks of different grits to do the edges. With this extra effort and another rinse with water to remove the soil the floor looked great, and so I left for the day so it could dry out ready for sealing.
I came back the next day and started by taking moisture readings with a damp meter to ensure the tiles were dry and ready for sealing. This is important as you don’t want to apply sealer to a damp tile and old floors can suffer from damp issues due to the lack of a damp proof membrane.
All was well with the floor, so I was able to move straight onto sealing which started with the application of a single coat of Tile Doctor Colour Grow. This is an impregnating sealer that soaks into the pores of the tile enhancing colour and adding protection. Once this had dried, I followed up with another seven coats of Tile Doctor Seal and Go which adds further protection and leaves a nice subtle sheen to the tiles. This product works really well on old Victorian Tiles like these and being water based it doesn’t leave a smell as it dries.
Andrew Newstead
South Buckinghamshire Tile Doctor
 Tile Doctor Ltd
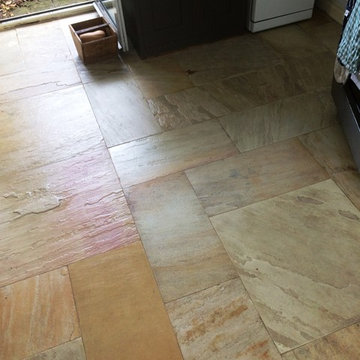
I was recently contacted by a client who had just moved into a house in Crowborough, a town in East Sussex which by the way was once home to Sir Arthur Conan Doyle, the author of the Sherlock Holmes novels and short stories. The riven Slate tiled floor in the kitchen had trapped bits of dirt and also food which had become ingrained in the tile. Needless to say, the new homeowner wanted to give the kitchen floor a thorough clean. However, she had tried every cleaning product she could find in the supermarket, but to no avail. Struggling to find a solution she sought out professional assistance and naturally I was happy to help.
My first task was to mix up a strong solution of Tile Doctor Pro-Clean. The product was only slightly diluted with water, since the floor was quite heavily soiled and a higher concentration of Pro-Clean was needed to help remove several layers of dirt and food waste. Once applied to the floor, the solution was left to dwell for roughly five minutes before I began to work it into the stone with a deck brush. I did the best I could here to clean the floor without using my buffing machine as, since the floor was riven, my black buffing pad would have been ruined by the ridges.
Making up for the lack of a buffing machine, I made sure to scrub the floor with Pro-Clean for several hours to remove as much grime as possible. One the cleaning was finally completed I rinsed the floor several times with clean, hot water. I then used a wet-dry vac machine to remove any excess moisture to clear the floor for sealing when I returned 48 hours later. Upon leaving, I left my client with instructions to avoid spilling anything on the floor as, again, any liquid left on the surface might affect the performance of the sealer.
After a period of two days, I returned to commence the sealing. My choice of sealer was Tile Doctor Seal & Go, which is suitable for use on internal, unsealed surfaces such as Slate, textured Quarry, Victorian tile, and others. Seal and Go is also a water based sealer so you there’s very little smell given off whilst it dries compares to solvent based sealers. In this case, the client did not want the surface of the floor to be too shiny, so I only used two coatings of Seal & Go, whereas for a shinier result I would have used a few more.
My client was exceptionally pleased with the results, which had not only cleaned the floor but brought out the beautiful colours in the stone that had once been hidden under several layers of muck.
 Tile Doctor Ltd
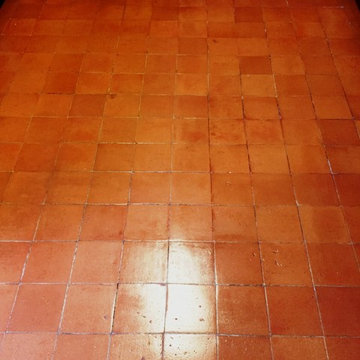
Not too long ago I visited a client who had just moved into a lovely old cottage in Milton, Oxfordshire. She wanted to restore many of the antique features of the building, including a fantastic Quarry tiled floor in the kitchen.
Quarry is typically a robust, hard wearing stone, but in a high traffic area like a kitchen, the tiles will need regular maintenance. These tiles clearly hadn’t seen a thorough clean and fresh seal in a long time, and so I was called in to provide just that.
On the first day of work, I gave the Quarry tiles a deep clean using a strong solution of Tile Doctor Pro-Clean and water. Pro-Clean is a versatile alkaline cleaner that also helps to break down any old and no longer effectual sealer remaining on the tiles.
The solution was applied evenly to the floor and left to dwell for half an hour, allowing time for it to seep into the stone to get underneath and lift out the ingrained dirt. I then removed the dirt by agitating the solution with a scrubbing pad fitted to a rotary floor scrubber. I worked in small sections at first, and gradually finished the entire floor.
After completing the initial clean, I rinsed away the soiled solution and vacuumed up the excess moisture using a wet-vac machine. I then scrubbed the floor an acid wash using a dilution of Tile Doctor Grout Clean-Up to remove grout smears and other mineral type deposits. The resulting solution was then removed in a similar fashion using a wet-vac.
The final step in the cleaning process was to rinse the floor with Tile Doctor pH Neutral Cleaner to remove any trace of product helps to tackle any remaining dirt and reset the pH balance of the tiles before sealing.
After leaving the floor to dry overnight, I returned the next day to the house to seal the floor with Tile Doctor Seal & Go, a water-based topical sealer which gives the floor an aesthetically pleasing sheen and a robust surface seal.
The photos demonstrate the results better than this short account can, needless to say the floor is now transformed.
Barry Woodward
Oxfordshire Tile Doctor
 Tile Doctor Ltd
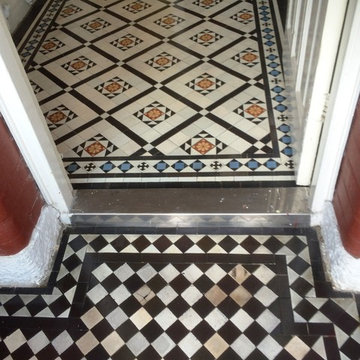
Recently I travelled down to the village of Prestwood in the Chiltern Hills of southern Buckinghamshire, to work on a Victorian tiled porch and hallway. Victorian tiles are commonly found in the entrance areas of older houses and unfortunately in this case the tiles had become heavily ingrained with dirt over time, and had suffered from additional paint and plaster spillages. The result was an unsightly mess; my client was considering covering the floor with lino after several unsuccessful attempts at cleaning it. I was called upon to provide a professional clean and seal, restoring these great Victorian tiles back to looking their best again.
On my first day at the house, I mixed up a solution of 50 per cent Tile Doctor Pro-Clean, a high alkaline cleaner, and NanoTech HBU (formerly known as Ultra Clean), which is a cleaning product that contains nano-sized abrasive particles that penetrate deep into the stone to lift ingrained dirt to the surface. This solution was worked into the tiles using abrasive scrubbing pads fitted to one of my commercial rotary machines.
The cleaning process left over a slurry of residue which I rinsed away with clean water and extracted with a wet vacuum. I was still left with the issue of stubborn paint spillages, so I applied a layer of Tile Doctor Remove & Go, a stripper with cleaning properties which is very effective at breaking down paint and adhesive stains.
Once the paint spillages had been dealt with I gave the area another rinse with clean water. I then left the house, allowing the floor enough time to dry overnight.
Upon my return the day I set about sealing the newly cleaned Victorian tiles. Before starting the sealing process I inspected the floor to check for any dampness, knowing that any excess moisture could potentially damage the performance of the sealer.
When I was satisfied that the tiles were fully dried, I applied Tile Doctor Seal & Go, a sealer which offers durable surface protection, along with an aesthetically pleasing, low-sheen finish which brings out the colour in the stone. This product can be used to seal internal, porous surfaces including Victorian, Slate, textured Quarry and Sandstone tiles.
The process made an amazing difference to the floor as you can see from the photographs; additionally the restoration of such an original feature adds a lot of value and looks so much better than lino!
Colin Ford
South Buckinghamshire Tile Doctor
 Tile Doctor Ltd
For this job, I had the pleasure of visiting the historic Salts Mill, a former textile mill turned art gallery, shopping centre, and restaurant complex near Bingley, West Yorkshire. It was built in 1853 by the famous manufacturer and philanthropist, Sir Titus Salt, and was at one point the largest industrial building in the world by total floor area.
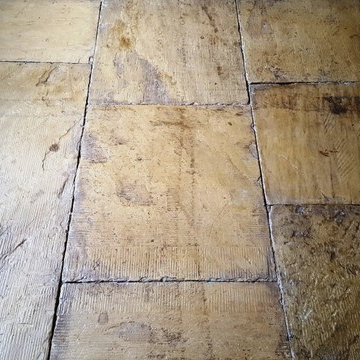
As you can imagine, a lot of the rooms at Salts Mill are over a century and a half old. Most of them also contained stone flooring made from Yorkstone – a type of Sandstone unique to Yorkshire, and easily distinguishable due to its rich, natural yellow colouring. Unfortunately, one such floor in the Salts Mill was in quite a bad state. It has completely lost its vibrance – appearing more grey than yellow – and was evidentially in need of a very deep clean and fresh seal.
I started the Yorkstone tile restoration by soaking the floor in a strong dilution of our reliable alkaline-based tile cleaner, Tile Doctor Pro Clean, and scrubbing it in using a rotary machine fitted with a scrubbing pad. This quickly removed the initial layers of muck and, in the process, revealed oil-based paint and glue stains all over the floor.
To break down the oil and paint I applied Tile Doctor Remove & Go, which is our heavy duty stripper, remover and degreaser. This quickly ate through the paint and glue, and I followed by giving the floor another thorough clean with Pro Clean. Finally, I rinsed the floor with clean water before leaving it to dry for a full two days due to the amount of chemical cleaning product and water applied.
Upon my return to the Salts Mill two days later, I ran some quick damp tests to check for any excess moisture which could’ve prevented me from sealing the floor. Thankfully, the floor was dry and ready to be sealed, but it is always recommended, especially with older floors, to be aware of damp issues as these can be very troublesome.
My choice of sealer was Tile Doctor Seal and Go, a topical sealer which provides a robust, stain resistant seal and a durable low sheen finish all in one product. Multiple coats of Seal and Go were applied, bringing the life and character back to these classic tiles.
Nigel Stoker
North West Yorkshire Tile Doctor
17