
Search results for "Setting process" in Home Design Ideas
 Stairworks
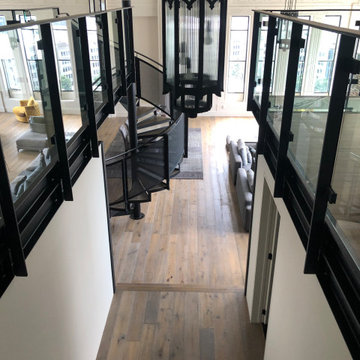
Most people who have lived in Auckland for a long time remember The Heritage Grand Tearoom, a beautiful large room with an incredible high-stud art-deco ceiling. So we were beyond honoured to be a part of this, as projects of these types don’t come around very often.
Because The Heritage Grand Tea Room is a Heritage site, nothing could be fixed into the existing structure. Therefore, everything had to be self-supporting, which is why everything was made out of steel. And that’s where the first challenge began.
The first step was getting the steel into the space. And due to the lack of access through the hotel, it had to come up through a window that was 1500x1500 with a 200 tonne mobile crane. We had to custom fabricate a 9m long cage to accommodate the steel with rollers on the bottom of it that was engineered and certified. Once it was time to start building, we had to lay out the footprints of the foundations to set out the base layer of the mezzanine. This was an important part of the process as every aspect of the build relies on this stage being perfect. Due to the restrictions of the Heritage building and load ratings on the floor, there was a lot of steel required. A large part of the challenge was to have the structural fabrication up to an architectural quality painted to a Matte Black finish.
The last big challenge was bringing both the main and spiral staircase into the space, as well as the stanchions, as they are very large structures. We brought individual pieces up in the elevator and welded on site in order to bring the design to life.
Although this was a tricky project, it was an absolute pleasure working with the owners of this incredible Heritage site and we are very proud of the final product.

 Infinite Home
Custom Home Built for Real Life
Our clients came to us with a clear vision: a home that could adapt to their lifestyle and growing family. They needed a home built with intention, designed with the future in mind, and built around the routines they loved and the people they loved more.
Open-Concept Living With Hosting in Mind
Our clients hosted often and lived actively, so the main level had to be flexible for all of life’s moments. The goal was a space that felt grand without losing its warmth.
Cooking together as a family mattered to our clients – the Wolf range, farmhouse sink, integrated appliances, and large island gave them a kitchen that flowed effortlessly while looking beautiful. This space also served as the bridge between other parts of the main level so that they would stay in view of the next. This created the perfect environment for gathering where everyone had their own spot without ever feeling apart from the whole group.
For the living room, our clients wanted space that felt open without losing its warmth. Soaring ceilings created that sense of scale, while warm tones and materials, like the wood coffered ceiling and fireplace wall, kept it grounded. That same warmth carried outside, where an outdoor lounge with a fireplace and dining area made sure guests felt welcomed the moment they stepped out.
A Backyard Built for Real Rest
Every corner of the backyard was designed with one goal: to be the ultimate outdoor retreat. The elevated, white-brick-framed pool and integrated spa hot tub gave them a place to truly exhale. As the sun set, the fire pit lounge next to the pool became the hangout spot when they hosted their youth groups and family gatherings.
Room to Grow
With kids in the house, “custom” had to also mean flexible. Our clients had 2 young sons and needed their rooms to grow with them through the years. The two bedrooms and a full bath sat beside a loft that served as both their hangout-and-homework spot. The guest suite sat on the same level where a four-poster bed, floor-to-ceiling wood-look tile, and a frameless glass shower welcomed their guests from day one.
A Retreat That’s Actually Theirs
Between hosting and raising kids, this couple needed a suite that felt like a true escape. The wood-planked tray ceiling and French doors grounded the room in warmth the moment you walked in, while the ensuite bathroom carried a spa-like feeling with a freestanding soaking tub, custom double vanity, and a glass-enclosed shower.
This Is What Approachable Luxury Looks Like
The approachable luxury experience meant starting with conversations about how they wanted their space to live with them – how they hosted, how their kids played, how they wanted to feel walking through their own front door, and how we took their goals and experience and used it as the foundation of every decision that was made from start to finish. We wanted our clients to feel taken care of through the process and, most importantly, feel heard.
 Tile Doctor Ltd
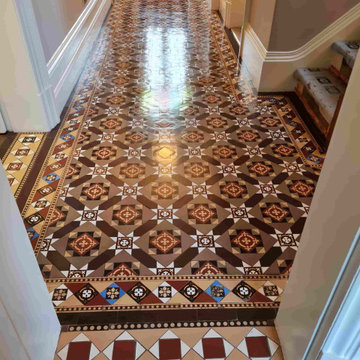
I was recently contacted by a client who had just moved into a large Victorian property in the West Cheshire village of Tarvin about renovating their Victorian tiled hallway. Apparently, the floor was in good condition, and it would just be a case of removing what was left of the old sealer, deep cleaning the tiles and then applying a fresh seal. Unless the floor has been regularly maintained with the same sealer it’s important to remove all traces of old sealers before applying fresh.
Victorian Hallway Before Cleaning Tarvin Cheshire
A lot of the work we do at Tile Doctor can be a lot more involved, often requiring the sourcing of matching replacement tiles and rebuilding large sections of tiled flooring so straight forward clean and seal job is always welcome.
To remove what was left of the sealer and the ingrained dirt from the pores of the Victorian tile I dressed the floor with a strong dilution of Tile Doctor Pro-Clean. On this occasion I used a 1:3 dilution with water and applied it to the floor with a mop. I left it to soak into the tile for fifteen minutes before scrubbing so it could get to work breaking down the old sealer.
During this time, I set up a weighted floor buffer and fitted a black buffing pad, these pads are designed for scrubbing hard floors and lifting out the dirt. I applied a little water as required during this process to ensure the pad was lubricated. Shortly the cleaning solution darkened as the old sealer and dirt was released from the tile.
The soil was rinsed away with water and then removed using a wet vacuum. Once clear the floor was inspected and the process repeated until I was satisfied it was as clean as it could be and free of sealer.
I left the floor to dry off overnight and returned the next day to apply a new sealer. Before doing so however I like to use a damp meter to take moisture readings from the floor. This is needed to ensure it is dry enough to seal which is important as any moisture in the tile can affect the sealer and lead to an inconsistent finish.
To seal I started with the application of a single coat of Tile Doctor Colour Grow which is a colour intensifying breathable impregnator that soaks into the tile improving appearance and adding protection from within. Any excess sealant was removed by wiping the floor with a microfibre cloth and then it was left to dry for an hour.
This was followed with four coats of Tile Doctor Seal and Go Extra which is an acrylic breathable sealer which adds a pleasing subtle shine to the tile. This is an important feature when choosing a sealer for old floors where moisture needs to be allowed to rise through the tile, otherwise it can become trapped under the floor and reach out to the walls causing rising damp.
The customer was very happy with the revamped hallway which made the house a lot brighter and welcoming. Before closing I should mention that for aftercare cleaning I recommend Tile Doctor Neutral cleaner which is designed for the daily cleaning for sealed tiles, this is important as most domestic supermarket cleaners are simply too strong and can prematurely erode the sealer.
Alastair Robb
West Cheshire Tile Doctor
Find the right local pro for your project


 Beall's Nursery & Landscaping
New construction and original landscaping completed in 2010. Original design had boulders between the driveway and home to minimize the stop and create curb appeal. An assortment of unusual trees (lions head maple, moon rise maple, hinokie cypress, twisted baby locus, and paper bark maple and others) were installed to compliment the home on the naturally wooded lot. Many different perennials and flowering shrubs were installed between these unique specimen trees to provide interest throughout the year.
Phase 2 was initiated by the homeowner in 2016 were we landscaped the backyard, which was overgrown with wild trees. It was cleared to create a more useable space and play area for children. Our design team created a master landscape plan and was an integral part with the approval process with the municipality. We worked in tandem with an engineering firm to design and install a bio-retention pond. The pond was designed to take all of the runoff from the newly landscaped backyard. Wet loving plants were incorporated into the pond to beautify the area and absorb the water. A custom, multi-level play set was installed over artificial turf to blend with the newly expanded lawn area. An assortment of trees, shrubs and perennial were installed on the hillside separating the upper yard and newly expanded lower area. Low voltage landscape lighting was expanded to highlight the new plantings and provide light for the children to play in the evening. Our landscape design complimented he newly installed covered outdoor living space.

 JRP Design & Remodel
Our clients are seasoned home renovators. Their Malibu oceanside property was the second project JRP had undertaken for them. After years of renting and the age of the home, it was becoming prevalent the waterfront beach house, needed a facelift. Our clients expressed their desire for a clean and contemporary aesthetic with the need for more functionality. After a thorough design process, a new spatial plan was essential to meet the couple’s request. This included developing a larger master suite, a grander kitchen with seating at an island, natural light, and a warm, comfortable feel to blend with the coastal setting.
Demolition revealed an unfortunate surprise on the second level of the home: Settlement and subpar construction had allowed the hillside to slide and cover structural framing members causing dangerous living conditions. Our design team was now faced with the challenge of creating a fix for the sagging hillside. After thorough evaluation of site conditions and careful planning, a new 10’ high retaining wall was contrived to be strategically placed into the hillside to prevent any future movements.
With the wall design and build completed — additional square footage allowed for a new laundry room, a walk-in closet at the master suite. Once small and tucked away, the kitchen now boasts a golden warmth of natural maple cabinetry complimented by a striking center island complete with white quartz countertops and stunning waterfall edge details. The open floor plan encourages entertaining with an organic flow between the kitchen, dining, and living rooms. New skylights flood the space with natural light, creating a tranquil seaside ambiance. New custom maple flooring and ceiling paneling finish out the first floor.
Downstairs, the ocean facing Master Suite is luminous with breathtaking views and an enviable bathroom oasis. The master bath is modern and serene, woodgrain tile flooring and stunning onyx mosaic tile channel the golden sandy Malibu beaches. The minimalist bathroom includes a generous walk-in closet, his & her sinks, a spacious steam shower, and a luxurious soaking tub. Defined by an airy and spacious floor plan, clean lines, natural light, and endless ocean views, this home is the perfect rendition of a contemporary coastal sanctuary.
PROJECT DETAILS:
• Style: Contemporary
• Colors: White, Beige, Yellow Hues
• Countertops: White Ceasarstone Quartz
• Cabinets: Bellmont Natural finish maple; Shaker style
• Hardware/Plumbing Fixture Finish: Polished Chrome
• Lighting Fixtures: Pendent lighting in Master bedroom, all else recessed
• Flooring:
Hardwood - Natural Maple
Tile – Ann Sacks, Porcelain in Yellow Birch
• Tile/Backsplash: Glass mosaic in kitchen
• Other Details: Bellevue Stand Alone Tub
Photographer: Andrew, Open House VC

 Tuscanbasins
The Berkeley is designed with clean and simple styling in mind and finished in an elegant mocha stain. The Berkeley makes any living room, den or man cave really stand out.
The Berkeley TV lift cabinet was inspired by the same construction and finish of the Brookside TV lift cabinet. Taking from it's subtle lines and mocha finish it has quickly become one of our most popular units. The Berkeley features interior shelf lighting and tons of room behind the cabinet doors for your component and media storage.
The Berkeley accommodates most 60" diagonal flat panel plasma and LCD TVs, measuring 55"W x 4.5"D x 35"H. Behind the front doors is ample storage space for your DVD movie & video game boxes. The cabinet is equipped with sliding rear panels for easy access to your TV connections.
Video
Product Features:
Universal Mounting System: Simple mounting kit includes all the hardware and brackets you need to hold your flat screen TV on the Touchstone lift mechanism.
Component Storage Space: The Berkeley has 8" of vertical storage height and 50" of width horizontal space for your Satellite Box, Cable Box, Recorders, Amps, Surround Sound, and Video Games.
Personal Storage Space: The Berkeley has 4 adjustable shelves for your DVD boxes, Video Game boxes and CD cases.
RF Remote Control: Includes 1 RF remote control for raising/lowering the lift mechanism without requiring line of sight.
Backup Wired Remote Control: Each unit has a backup on/off switch and set control switch inside the cabinet.
Finishing Process: Our thorough 7 step finishing process uses a combination of hand-staining and automated application tools that insures all woods and stains are applied uniformly and precisely to produce a quality cabinet that will last a lifetime.
English Dovetail Joints: A time-honored fine cabinet-making technique, Dovetail joints become self-locking even before the glue is applied, so solid overall construction can be guaranteed.
Solid Wood Tongue and Groove Corner Blocks: Incorporates the side panels of the cabinet with the foot of the cabinet, adding structural support which enhances durability.
24 point QC audit inspection of every cabinet.
Specifications
Cabinet Wood Finish: Mocha
Unit Dimensions: 59"W x 23"D x 41.5"H
Maximum Cabinet TV Size: 55"W x 4.5"D x 35"H (TV plus component height)
Unit Weight: 321 lbs.
Unit Shipping Weight:395 lbs.
Touchstone's TV Lift System
The Berkeley is ready for entertainment action with Touchstone's quiet and smooth TV lift system for your flatscreen television. The Berkeley includes a wireless RF remote control for operation of the cabinet's lift as well as a backup controller wired into the inside of the cabinet just in case you ever lose or can’t find the wireless remote.
Sponsored
Delaware, OH

Buckeye Basements, Inc.
Central Ohio's Basement Finishing ExpertsBest Of Houzz '13-'21

 Progressive Design Build
Southwest Florida’s hot summers and mild winters, along with amenity-rich communities and beautiful homes, attract retirees from around the world every year. And, it is not uncommon to see these active adults choosing to spend their summers away from Florida, only to return for the fall/winter.
For our fabulous clients, that’s exactly what they did. After spending summers in Michigan, and winters in Bonita Springs, Florida, they decided to set down some roots. They purchased a home in Bonita Bay where they had enough space to build a guest suite for an aging parent who needed around the clock care.
After interviewing three different contractors, the chose to retain Progressive Design Build’s design services.
Progressive invested a lot of time during the design process to ensure the design concept was thorough and reflected the couple’s vision. Options were presented, giving these homeowners several alternatives and good ideas on how to realize their vision, while working within their budget. Progressive Design Build guided the couple all the way—through selections and finishes, saving valuable time and money.
When all was said and done, the design plan included a completely remodeled master suite, a separate master suite for the couple’s aging parents, a new kitchen, family room entertainment area, and laundry room. The cozy home was renovated with tiled flooring throughout, with the exception of carpeting in the bedrooms. Progressive Design Build modified some interior walls, created Wainscoted panels, a new home office, and completely painted the home inside and out.
This project resulted in the first of four additional projects this homeowner would complete with Progressive Design Build over the next five years.
Kitchen: Varying heights and depths breaks up that long wall of DuraSupreme Cabinetry. Includes tumbled marble back splash and radiused island.
 Stairworks
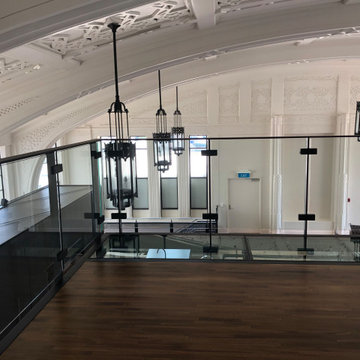
Most people who have lived in Auckland for a long time remember The Heritage Grand Tearoom, a beautiful large room with an incredible high-stud art-deco ceiling. So we were beyond honoured to be a part of this, as projects of these types don’t come around very often.
Because The Heritage Grand Tea Room is a Heritage site, nothing could be fixed into the existing structure. Therefore, everything had to be self-supporting, which is why everything was made out of steel. And that’s where the first challenge began.
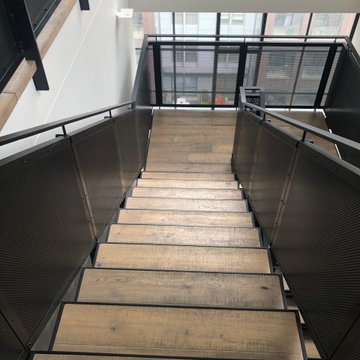
The first step was getting the steel into the space. And due to the lack of access through the hotel, it had to come up through a window that was 1500x1500 with a 200 tonne mobile crane. We had to custom fabricate a 9m long cage to accommodate the steel with rollers on the bottom of it that was engineered and certified. Once it was time to start building, we had to lay out the footprints of the foundations to set out the base layer of the mezzanine. This was an important part of the process as every aspect of the build relies on this stage being perfect. Due to the restrictions of the Heritage building and load ratings on the floor, there was a lot of steel required. A large part of the challenge was to have the structural fabrication up to an architectural quality painted to a Matte Black finish.
The last big challenge was bringing both the main and spiral staircase into the space, as well as the stanchions, as they are very large structures. We brought individual pieces up in the elevator and welded on site in order to bring the design to life.
Although this was a tricky project, it was an absolute pleasure working with the owners of this incredible Heritage site and we are very proud of the final product.
 STUDIO TASHIMA
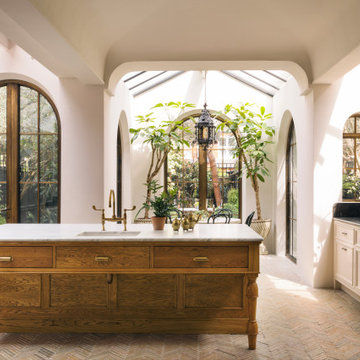
Keyes Road is a two-storey, semi-detached red brick house dating to around 1890-1910. The focus of our work was on the ground floor where we were asked to improve the layout and use of the main living areas of the house, for an active family of four. Important to the design was to maximise the quality and amount of light as well as connection to the garden and flow to the rest of the house.
Our proposal introduces three single storey extensions, comprising a central, large space that extends the main outrigger of the house. To each side are smaller volumes, affording a full width kitchen. While defining a series of discrete volumes, it was important for us to ensure that the kitchen, living, family and dining rooms that are interconnecting and continuous. The result is a big space punctuated by a series of differently sized arches, defining spaces to ensure their intimacy.
It was important for our client to have a sense of warmth and comfort - perhaps not dissimilar to the qualities of a hotel lobby. The colour scheme of the rooms are warm white painted plaster, natural wood flooring with black, bronze and brass accents. Indirect and carefully placed light fittings pulls together the atmosphere of the rooms - particularly in the evenings.
Externally, we felt it important to differentiate the extensions from the main house by using a dark, charcoal grey brick. This sets up a contrasting yet complimentary relationship to the rich red coloured brick house. The facets of the brick play with light and depth as do the graduated brick arches.
During the design process, we grappled with floor levels, the direction of sunlight, and care to not encroach on the neighbouring properties. As the house is in a conservation area, we worked closely with our trusted planning advisor. Throughout, we pursued a sensitive design strategy, using pitched roofs, matching materials and careful detailing. Internally, many of the original details are intact. This has enabled us to create an eclectic ensemble of elements, colours and materials varying in age and period.
 Stairworks
Most people who have lived in Auckland for a long time remember The Heritage Grand Tearoom, a beautiful large room with an incredible high-stud art-deco ceiling. So we were beyond honoured to be a part of this, as projects of these types don’t come around very often.
Because The Heritage Grand Tea Room is a Heritage site, nothing could be fixed into the existing structure. Therefore, everything had to be self-supporting, which is why everything was made out of steel. And that’s where the first challenge began.
The first step was getting the steel into the space. And due to the lack of access through the hotel, it had to come up through a window that was 1500x1500 with a 200 tonne mobile crane. We had to custom fabricate a 9m long cage to accommodate the steel with rollers on the bottom of it that was engineered and certified. Once it was time to start building, we had to lay out the footprints of the foundations to set out the base layer of the mezzanine. This was an important part of the process as every aspect of the build relies on this stage being perfect. Due to the restrictions of the Heritage building and load ratings on the floor, there was a lot of steel required. A large part of the challenge was to have the structural fabrication up to an architectural quality painted to a Matte Black finish.
The last big challenge was bringing both the main and spiral staircase into the space, as well as the stanchions, as they are very large structures. We brought individual pieces up in the elevator and welded on site in order to bring the design to life.
Although this was a tricky project, it was an absolute pleasure working with the owners of this incredible Heritage site and we are very proud of the final product.
 Progressive Design Build
Southwest Florida’s hot summers and mild winters, along with amenity-rich communities and beautiful homes, attract retirees from around the world every year. And, it is not uncommon to see these active adults choosing to spend their summers away from Florida, only to return for the fall/winter.
For our fabulous clients, that’s exactly what they did. After spending summers in Michigan, and winters in Bonita Springs, Florida, they decided to set down some roots. They purchased a home in Bonita Bay where they had enough space to build a guest suite for an aging parent who needed around the clock care.
After interviewing three different contractors, the chose to retain Progressive Design Build’s design services.
Progressive invested a lot of time during the design process to ensure the design concept was thorough and reflected the couple’s vision. Options were presented, giving these homeowners several alternatives and good ideas on how to realize their vision, while working within their budget. Progressive Design Build guided the couple all the way—through selections and finishes, saving valuable time and money.
When all was said and done, the design plan included a completely remodeled master suite, a separate master suite for the couple’s aging parents, a new kitchen, family room entertainment area, and laundry room. The cozy home was renovated with tiled flooring throughout, with the exception of carpeting in the bedrooms. Progressive Design Build modified some interior walls, created Wainscoted panels, a new home office, and completely painted the home inside and out.
This project resulted in the first of four additional projects this homeowner would complete with Progressive Design Build over the next five years.
Kitchen: Varying heights and depths breaks up that long wall of DuraSupreme Cabinetry. Includes tumbled marble back splash and radiused island.

 Cassoni Furniture & Accessories
- MIUR BENCH.
Wood structure covered in multi-thickness polyurethane foam. Tufted capitonnè upholstery with plain coloured buttons or Swarovski crystal buttons. The base of the sofa is edged in metal in the following finishes: bright chrome, bright black chrome, bright light gold, matt Champagne gold and matt satined bronze. The top of the backrest has an utility shelf in the following finishes: cast brass plate, covered in the same colour, metal coordinated with the ring at the base of the seat. Given the special manufacturing process, the leather and fabric upholstery is not removable.
Ø59'' x 29''1/2H.
http://ow.ly/3yCKDr
- CHARME BED.
Bed available in two versions:
- Headboard and footrest in the same concept with buttons covered in plain colour or Swarovski crystals.
- With the bed base completely upholstered without buttons. The frame is in wood covered in high density polyurethane foam. The bed has a base assembled with metal corner angles which allow easy set up and the possibility of regulating the height of the bedspring. This allows the bed to be used with any type of bedspring or mattress, and it also permits the height of the mattress level to be changed. In alternative, a practical container base is available, with two levels of opening to facilitate accessibility. The interior of the storage base is covered laterally in the same upholstery as the bed, while the bottom is a removable plain colour laminate to facilitate cleaning. The container base includes the metal frame with beech wood slats with adjustable lumbar support. Given the special manufacturing process, fabric or leather upholstery is not removable.
Bed frame with footrest with buttons:
88''5/8W x 94''1/2D x 43''5/8H.
Other widths: 80''3/4 - 65’’.
Bedframe with upholstered footrest:
88''5/8W x 91''3/4D x 43''5/8H.
Other widths: 80''3/4 - 65’’.
Mattress sizes: 78''3/4 x 78''3/4 - 78''3/4 x 70''7/8 - 78''3/4 x 55’’1/8.
http://ow.ly/3yCKcr
- PHIL NIGHSTAND.
Bedside table with 2 drawers in wood in the finishes: Glossy Ebony, Glossy Canaletto Walnut, Matt Ebony, Matte Canaletto Walnut, Matte Wengè, Glossy Lacquered Ivory. Central compartment with top covered in leather or velvet from the catalogue. Metal bases in the following finishes: Bright Light Gold, Bright Black Chrome, Matte Satin Bronze. Handles in Emperador Dark marble or hide.
21''1/4W x 15''3/4D x 20’’H.
http://ow.ly/3yvVDe
- MONSIEUR DRESSER.
Dresser in wood in the finishes: Glossy Ebony, Glossy Canaletto Walnut, Matte Ebony, Matte Canaletto Walnut, Matte Wengè, Glossy Lacquered Ivory.
The upper element with three drawers is completely covered in leather from the catalogue. The central drawer has a lock. Laser cut ground metal bases in the finishes: Bright Light Gold, Bright Black Chrome, Matte Satin Bronze. Handles in hide or Emperador Dark marble.
70''7/8W x 28''3/4D x 32''1/4H.
http://ow.ly/3yvVLD
- NARITA WALL LAMP.
Lamps in ground metal, available in the following finishes: light gold, pink gold, polished chrome, glossy black nickel, matte bronze.
Lampshade in opaline Plexiglas.
Illumination 12V with warm LED lighting.
11''3/8W x 6''5/8D x 37''3/8H.
http://ow.ly/3yCKlL
Sponsored
Columbus, OH

Hope Restoration & General Contracting
Columbus Design-Build, Kitchen & Bath Remodeling, Historic Renovations
 ALL Renovation & Design LLC
Could a dreadful dishwasher leak be a blessing in disguise?
The Redding kitchen was very odd. The house was a beautiful brick house from the early 1900’s, but the kitchen had been renovated since then with an impractical layout. It worked, but, for as much time as Mr. and Mrs. spend in the kitchen, it left much to be desired. Because they enjoy cooking so much, they dreamed of having a functional kitchen that added to the character of the home and respected the history of it.
So that’s why Mr. and Mrs. went to a Lancaster Home Show where they meet ALL Renovation & Design. They were impressed with our process which guides clients through the design phase in a unique way that guarantees a customized remodel, tailored to their dreams. We really hit it off, but, since they were still in the idea stage, the years passed quickly.
Then one morning they discovered a puddle under the dishwasher. And, as is often the case, the damage had already spread to the surrounding cabinets and a large area of the floor. And upon further inspection, it was discovered that part of the floor was made with asbestos – which would require expert remediation. This was turning into a major rehab project.
That’s when they were faced with a tough call: do they patch it up now and rip it out in a few years when they remodel the entire kitchen, or, do they remodel now? They called ALL Renovation & Design.
First we worked with the insurance company to raise the damage claim to what it would have actually cost to repair the damage done by the leak… several thousand dollars higher than what they had initially appraised it.
Then we guided Mr. and Mrs. through the design process that carefully articulated the goals and vision for the new kitchen. Functionality and complementing the home’s character were top priority. They were extremely pleased with the help we provided in guiding them through the cabinet choices, layout, and color selections.
Communication was key. Especially when we got into the demolition and construction work. One thing you can be sure of when working with older homes is that there are almost always surprises between the walls. For the Redding kitchen it took the form of a steel support beam that we discovered on the second day of demolition. Because it prevented us from opening up the doorway, we had to pivot and adjust the cabinet spacing. Electrical access was also a serious problem that required added creativity to be sure the new space would include all the functionality of a modern kitchen. But all the challenges were overcome through creativity and almost constant communication.
At last, it was complete. Together we transformed the space into a beautiful transitional kitchen that is a joy to work in.
The maple cabinets with full-overlay doors were painted in matte white with copper hardware. The countertop and backsplash were Hanstone Quartz in the Strato color. It included a 30” single-basin sink in 14-gauge hammered copper. For the floor they chose Lauzan Maple Hardwood in the Sahara finish, installed in the herringbone pattern. And to really set off the kitchen, the old appliances were replaced with new GE Café appliances in their classy matte white with brushed copper accents.

 Advance Design Studio, Ltd.
Willie & Leslie of Barrington Hills loved the location of their home. Its breathtaking views overlooked a wooded backyard and a captivating lake. They didn’t want to move, but they needed more space. But the house was missing that big family room where everyone could gather, relax and converse, and the house was completely cut off visually from the beautiful outdoor view right outside!
They knew what they wanted meant building an addition to their home. They began searching the internet and came across Advance Design Studio, and after browsing through project after project and reading one outstanding client review after another, they were sold on Advance Design. Additionally, they loved Advance Design’s “Common Sense Remodeling” process and felt confident that it would allow the Design/Build company to easily coordinate the multiple projects they wanted to complete all at one time. Willie and Leslie immediately set up a meeting with Owner Todd Jurs and Project Designer Claudia Pop. When the meeting ended, they were sure that Advance Design were the right people and the right approach for their project.
"Establishing a direction and a budget is always key in project of this size," Todd said. "This house was screaming for a family room and it didn't have one. Ultimately, it's about working together towards the same goal of a beautiful functional addition."
The project consisted of a significant family room addition with an extraordinary vaulted ceiling and floor to ceiling fireplace, a guest suite renovation with a luxury bath, a garage addition, and an adjoining outdoor patio renovation complete with a fantastic built in grilling station. The main goal was to add comfort and space to the existing home that would last their lifetime, and finally allow them to capture the amazing view of the backyard and lake that they never could really enjoy previously.
Willie, Leslie and Claudia paid special attention to designing the space to make sure that the footprint of the room did not interfere with the views. Floor to ceiling Pella windows were incorporated into a spectacular window wall to provide plenty of natural light.
Vaulted ceilings gave the room a bigger feel and the stunning floor to ceiling masonry fireplace was designed giving the room a rustic, comfortable feel of a Colorado Lodge. Barnwood doors and exposed wooden beams accentuate the crackling fireplace and family gathering space. An oversized statement chandelier bathes the space in soft light once the sun sets and compliments the exposed wood and fireplace perfectly.
“It simple elegant and beautiful,” Designer Claudia Pop said. “It is a great family room that captures the views perfectly. They love the fireplace, the barndoors and the openness of the space we designed for the whole family now to enjoy.”
And when warm weather beckons, the outdoor patio is a terrific place to spend an evening. The family now enjoys fall nights in front of their outdoor fireplace overlooking the quiet lake. Dekton Trillium Quartz counters tops adorn an amazing grilling bar. Nearly indestructible, they are the only manufactured stone product designed exclusively to withstand high heat in summer and extreme cold temperatures in winter.
The guest bath renovation makes Willie and Leslie’s friends and family feel like they are staying at a 5-star hotel. Carlisle colored Maple cabinets from Medallion make a roomy dual vanity more than adequate with plenty of space to get ready for the day after a peaceful night’s sleep. Cambria Quartz countertops are durable and elegant, while contrasting the neutral cabinets flawlessly. Heated flooring from Warmly Yours is the cherry on top for this cozy guest bath.
All the projects turned out better than they even imagined. Willie and Leslie now have a spacious family room with even better views of the lake and woods, a much larger garage, a fantastic relaxing outdoor patio, and a guest bath that makes it almost impossible to get the guest to leave after their stay.
Are you thinking about a remodeling project? Talk to the experts at Advance Design about the renovation of your dreams. Now is the perfect time to renovate. Check out other amazing projects here. With “Common Sense Remodeling”, the process of renovating your home has never been easier. Contact us today at 847-836-2600 or schedule an appointment to talk with us about your kitchen remodeling project, or any other home renovation you are planning. Our talented team can help you design and build the new space you’ve been dreaming about.
 Stairworks
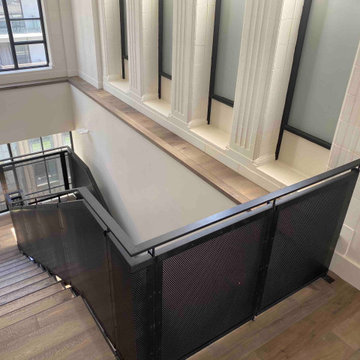
Most people who have lived in Auckland for a long time remember The Heritage Grand Tearoom, a beautiful large room with an incredible high-stud art-deco ceiling. So we were beyond honoured to be a part of this, as projects of these types don’t come around very often.
Because The Heritage Grand Tea Room is a Heritage site, nothing could be fixed into the existing structure. Therefore, everything had to be self-supporting, which is why everything was made out of steel. And that’s where the first challenge began.
The first step was getting the steel into the space. And due to the lack of access through the hotel, it had to come up through a window that was 1500x1500 with a 200 tonne mobile crane. We had to custom fabricate a 9m long cage to accommodate the steel with rollers on the bottom of it that was engineered and certified. Once it was time to start building, we had to lay out the footprints of the foundations to set out the base layer of the mezzanine. This was an important part of the process as every aspect of the build relies on this stage being perfect. Due to the restrictions of the Heritage building and load ratings on the floor, there was a lot of steel required. A large part of the challenge was to have the structural fabrication up to an architectural quality painted to a Matte Black finish.
The last big challenge was bringing both the main and spiral staircase into the space, as well as the stanchions, as they are very large structures. We brought individual pieces up in the elevator and welded on site in order to bring the design to life.
Although this was a tricky project, it was an absolute pleasure working with the owners of this incredible Heritage site and we are very proud of the final product.
 Progressive Design Build
Southwest Florida’s hot summers and mild winters, along with amenity-rich communities and beautiful homes, attract retirees from around the world every year. And, it is not uncommon to see these active adults choosing to spend their summers away from Florida, only to return for the fall/winter.
For our fabulous clients, that’s exactly what they did. After spending summers in Michigan, and winters in Bonita Springs, Florida, they decided to set down some roots. They purchased a home in Bonita Bay where they had enough space to build a guest suite for an aging parent who needed around the clock care.
After interviewing three different contractors, the chose to retain Progressive Design Build’s design services.
Progressive invested a lot of time during the design process to ensure the design concept was thorough and reflected the couple’s vision. Options were presented, giving these homeowners several alternatives and good ideas on how to realize their vision, while working within their budget. Progressive Design Build guided the couple all the way—through selections and finishes, saving valuable time and money.
When all was said and done, the design plan included a completely remodeled master suite, a separate master suite for the couple’s aging parents, a new kitchen, family room entertainment area, and laundry room. The cozy home was renovated with tiled flooring throughout, with the exception of carpeting in the bedrooms. Progressive Design Build modified some interior walls, created Wainscoted panels, a new home office, and completely painted the home inside and out.
This project resulted in the first of four additional projects this homeowner would complete with Progressive Design Build over the next five years.
Kitchen: Varying heights and depths breaks up that long wall of DuraSupreme Cabinetry. Includes tumbled marble back splash and radiused island.
Sponsored
Columbus, OH
Free consultation for landscape design!

Peabody Landscape Group
Columbus' Reliable Landscape Design & Contracting
 Advance Design Studio, Ltd.
Willie & Leslie of Barrington Hills loved the location of their home. Its breathtaking views overlooked a wooded backyard and a captivating lake. They didn’t want to move, but they needed more space. But the house was missing that big family room where everyone could gather, relax and converse, and the house was completely cut off visually from the beautiful outdoor view right outside!
They knew what they wanted meant building an addition to their home. They began searching the internet and came across Advance Design Studio, and after browsing through project after project and reading one outstanding client review after another, they were sold on Advance Design. Additionally, they loved Advance Design’s “Common Sense Remodeling” process and felt confident that it would allow the Design/Build company to easily coordinate the multiple projects they wanted to complete all at one time. Willie and Leslie immediately set up a meeting with Owner Todd Jurs and Project Designer Claudia Pop. When the meeting ended, they were sure that Advance Design were the right people and the right approach for their project.
"Establishing a direction and a budget is always key in project of this size," Todd said. "This house was screaming for a family room and it didn't have one. Ultimately, it's about working together towards the same goal of a beautiful functional addition."
The project consisted of a significant family room addition with an extraordinary vaulted ceiling and floor to ceiling fireplace, a guest suite renovation with a luxury bath, a garage addition, and an adjoining outdoor patio renovation complete with a fantastic built in grilling station. The main goal was to add comfort and space to the existing home that would last their lifetime, and finally allow them to capture the amazing view of the backyard and lake that they never could really enjoy previously.
Willie, Leslie and Claudia paid special attention to designing the space to make sure that the footprint of the room did not interfere with the views. Floor to ceiling Pella windows were incorporated into a spectacular window wall to provide plenty of natural light.
Vaulted ceilings gave the room a bigger feel and the stunning floor to ceiling masonry fireplace was designed giving the room a rustic, comfortable feel of a Colorado Lodge. Barnwood doors and exposed wooden beams accentuate the crackling fireplace and family gathering space. An oversized statement chandelier bathes the space in soft light once the sun sets and compliments the exposed wood and fireplace perfectly.
“It simple elegant and beautiful,” Designer Claudia Pop said. “It is a great family room that captures the views perfectly. They love the fireplace, the barndoors and the openness of the space we designed for the whole family now to enjoy.”
And when warm weather beckons, the outdoor patio is a terrific place to spend an evening. The family now enjoys fall nights in front of their outdoor fireplace overlooking the quiet lake. Dekton Trillium Quartz counters tops adorn an amazing grilling bar. Nearly indestructible, they are the only manufactured stone product designed exclusively to withstand high heat in summer and extreme cold temperatures in winter.
The guest bath renovation makes Willie and Leslie’s friends and family feel like they are staying at a 5-star hotel. Carlisle colored Maple cabinets from Medallion make a roomy dual vanity more than adequate with plenty of space to get ready for the day after a peaceful night’s sleep. Cambria Quartz countertops are durable and elegant, while contrasting the neutral cabinets flawlessly. Heated flooring from Warmly Yours is the cherry on top for this cozy guest bath.
All the projects turned out better than they even imagined. Willie and Leslie now have a spacious family room with even better views of the lake and woods, a much larger garage, a fantastic relaxing outdoor patio, and a guest bath that makes it almost impossible to get the guest to leave after their stay.
Are you thinking about a remodeling project? Talk to the experts at Advance Design about the renovation of your dreams. Now is the perfect time to renovate. Check out other amazing projects here. With “Common Sense Remodeling”, the process of renovating your home has never been easier. Contact us today at 847-836-2600 or schedule an appointment to talk with us about your kitchen remodeling project, or any other home renovation you are planning. Our talented team can help you design and build the new space you’ve been dreaming about.

 Guggenheim Architecture + Design Studio
Josh Partee Photography
With sweeping views of the Willamette river and Mt. Hood, this Atwater Place condo was designed with a balance of minimalism and livability in mind. A complete kitchen remodel brought a dark interior kitchen to the light and a full furnishings package welcomed Los Angeles transplants home to their new modern and bright residence. Our clients, a retired camera operator for both feature films and television and a producer/production manager on numerous television series including Weeds and The Middle, relocated from their traditionally-styled LA bungalow to Portland in the Summer of 2014. The couple sought a design departure from their long-term California residence and a fresh start for their new life in the South Waterfront.
With only two pieces of sentimental furniture and a handful of artwork included in the plan, we set out to create a comfortable and clean-lined furnishings package complimenting the broad southeast views. Organically shaped upholstery pieces juxtaposed with angular steel and wood tables create a soft balance in the open floor plan. Several custom pieces, including a dining table designed by our studio and a custom hand-blown glass chandelier crafted by Scott Schiesel with Lightlite compliment timeless pieces from Knoll, Herman Miller, and B&B Italia.
The kitchen is designed to reflect light and create brilliance in a space that is otherwise naturally dark. A material balance of stainless steel, back painted glass, quartz composite, lacquer, and mirror all play their part in creating a vibrant cooking environment. We collectively decided to forgo the traditional island pendant for a linear commercial fixture that provides tremendous light to the prep surface and creates an unexpected architectural element. The mirrored prep island creates the illusion of open space while concealing casework and wine storage on the working side of the kitchen.
It is worth noting that this project was designed and installed almost entirely while our clients were still living in LA and wrapping up professional obligations and selling their home. This afforded us the tremendous opportunity to send our clients to showrooms not available in Portland to view key pieces before final specification. Textiles and finish samples were approved via mail and communication took place over e-mail, telephone, and an occasional office visit. This unique process lead to a successful result and a beautifully balanced living environment.
 Tile Doctor Ltd
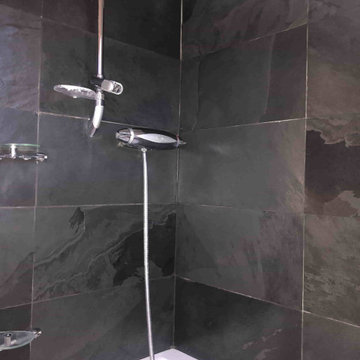
The photographs below are from a bathroom in Maida Vale W9 which had a lovely Slate tiled wall over a bath with shower. Unfortunately, the Slate tiles had been ruined by the use of harsh cleaning chemicals in an attempt to remove the limescale caused by hard water. The slate had now lost all its natural colour and looked completely washed out. The property had recently changed hands and the new owner was keen to have it renovated.
I went over to take a look and work out a solution, this in itself is a lot trickier these days with all the COVID precautions we need to take when working in someone’s house. It was clear that a strong acidic limescale remover had been used on the slate and this had etched the stone, leached all the natural oils away and generally ruined its appearance.
Fortunately, we have a solution for this (see below) and after conducting a small test I was able to confirm the problem could be resolved and gave them a quote which included a day’s labour, abrasive pads, stone oil and sealer. Our quote was gratefully accepted, and we booked a time in to carry out the work.
I returned to the property and I set about burnishing the slate wall tiles using a very coarse 200-grit six-inch burnishing pad fitted to a handheld buffing machine. This process resurfaces the stone slightly to remove the etching caused by the limescale remover. I used a medium dilution of Tile Doctor Grout Clean-up to lubricate the process and to remove the remaining limescale. Once done the slurry that is generated is rinsed off with more water. In a bathroom, it is easy the slurry can just be drained away. In other areas we would use a wet vacuum.
After the 200-grit pad the surface of the Slate was further refined using a 400-grit pad and then an 800-grit pad, this time only using water and giving the stone a thorough rinse after each pad to remove the soil.
The slate was then left to dry off over lunch and given more encouragement with a heat gun afterwards so I could move onto the next step. This involved applying a coat of Tile Doctor Stone Oil which puts back the natural oils back into the stone improving its appearance.
Once the Stone Oil had fully dried, I moved onto sealing for which I applied two coats of Tile Doctor Ultra-Seal; this is penetrating sealer that soaks into the stone to provide maximum stain protection without changing the colour of the stone. It is also an excellent grout sealer which is a bonus.
Before leaving I talked the client about how best to maintain the Slate and left them a complimentary bottle of Tile Doctor Aqua Pro tile cleaner which will help keep the limescale at bay. It is gentle enough to use every day but will help prevent the previous build-up and unlike the previous products used will not damage the newly applied sealer.
Jackson Davis
Central London Tile Cleaning
112