
Search results for "Shift schedules" in Home Design Ideas

 Windy City Painters
Ever notice how your iron fence looks more rust than paint after another brutal Chicago winter? That is usually the moment homeowners start searching for a painting contractor who actually understands metal - not just someone who will brush a coat of black paint over active corrosion and call it done. At Windy City Painters, iron fence restoration is one of our most requested services on the North Side and Near West Side, and for good reason. These fences are old, they are beautiful, and they deserve a proper finish system.
PROJECT OVERVIEW
This project involved a full ornamental iron fence on a North Side greystone property. The fence was original to the building - likely installed in the 1910s or 1920s - and had gone through multiple paint cycles without any rust conversion work. By the time Windy City Painters arrived, the horizontal rails showed active pitting, the vertical spindles had surface rust under lifting paint, and two corner posts had minor joint separation. The homeowner wanted the fence restored to a sharp satin black finish that would hold through multiple Chicago winters.
MATERIALS AND PRODUCTS
Ospho Rust Converter - phosphoric acid formula that chemically neutralizes iron oxide and converts it to iron phosphate, a stable paintable surface. Used on all pitted and actively corroded areas before primer application.
Rust-Oleum DTM Rust-Inhibitive Primer - direct-to-metal primer that bonds to both converted rust zones and bare metal, blocking moisture intrusion at the substrate level.
Sherwin-Williams DTM Acrylic Topcoat - flexible, moisture-resistant finish formulated to expand and contract with metal through temperature cycling. Applied in two finish coats in satin black.
For cases with deeper rust penetration, Corroseal Water-Based Rust Converter and Metal Primer is an alternative that combines conversion and priming in a single product, useful on complex ornamental profiles where two-product systems are harder to apply.
THE PROCESS
Step 1 - Mechanical Preparation. Windy City Painters wire-wheels all loose rust, flaking paint, and scale using angle grinders fitted with wire wheel attachments. On heavily pitted sections, needle gun descaling is used to reach rust in tight ornamental grooves. This step is non-negotiable. No coating bonds reliably to iron oxide, and skipping this step is the single most common reason iron fence paint fails within a year.
Step 2 - Rust Conversion. Ospho is brushed into all pitted and bare metal areas and allowed to fully react. The surface shifts from orange to a grayish-black iron phosphate layer. This stable base accepts primer without the risk of rust migrating upward through the paint film over time.
Step 3 - Primer Coat. Rust-Oleum DTM rust-inhibitive primer is applied full coverage over the entire fence surface, including areas that appeared clean but showed minor surface oxidation. DTM primer acts as a moisture barrier and mechanical adhesion layer for the finish coats.
Step 4 - Finish Coats. Two coats of Sherwin-Williams DTM acrylic topcoat are applied in satin black, with adequate dry time between coats. The DTM formula remains flexible after cure, allowing the iron to expand and contract through Chicago temperature swings without the topcoat cracking or peeling at joints.
CHICAGO-SPECIFIC CHALLENGES
Ornamental iron on Chicago greystones, two-flats, and Victorian brownstones was almost never hot-dip galvanized. It was painted from installation and has relied on continuous paint maintenance ever since. Chicago winters add specific stress: freeze-thaw cycles force water into any paint film crack, expanding it; road salt spray elevates corrosive chloride exposure; and humidity during spring thaw keeps metal surfaces wet for extended periods. This combination accelerates rust spread beneath paint films that appear intact on the surface.
WHAT TO EXPECT LONG-TERM
A properly prepped and primed iron fence finished with a DTM topcoat system should hold 5-8 years in Chicago conditions before any touch-up is warranted. Annual inspection of joints, welds, and areas near grade level will catch early moisture entry before it becomes a larger rust issue. Windy City Painters recommends scheduling touch-up earlier rather than waiting for full paint failure to protect the prep investment.
PRO TIPS
Tip 1 - Address joint separation before painting. If fence rails have separated at welds or mechanical joints, water will enter and rust will restart from inside the connection point regardless of the exterior coating. Flag any separated joints for welding before any paint system is applied.
Tip 2 - Never use latex house paint on iron fences. Standard exterior latex lacks the adhesion and flexibility for bare metal. Always use a product labeled DTM or specify a rust-inhibitive primer underneath any finish coat applied to iron.
Tip 3 - Paint in late spring or early fall. Iron fences exposed to full sun in peak summer heat can reach surface temperatures that cause solvent-based coatings to blister during application. Ideal application conditions are 50-85 degrees Fahrenheit with low humidity and no direct intense sun on the metal surface.
Learn more about iron fence painting cost in Chicago and schedule your free estimate at windypainters.com
FAQ
Q: What does iron fence painting cost in Chicago?
A: Windy City Painters typically prices residential iron fence painting at $8-$18 per linear foot. Variables include rust severity, spindle density, ornamental profile complexity, and whether rust conversion products like Ospho or Corroseal are required before priming.
Q: Can you paint over rust without grinding it off first?
A: No. Windy City Painters always performs mechanical prep before any coating. Wire wheel grinding removes loose scale and flaking paint. Rust converters handle residual oxidation chemically. Skipping this step means the new paint film will delaminate within one season.
Q: How do I know if my iron fence needs a welder before painting?
A: Windy City Painters inspects all joints and rail connections during the estimate. Rail separation, cracked welds, or sections that flex when pressed indicate structural issues that should be welded before any paint system is applied to avoid reopening at stress points.
Q: What is the difference between Ospho and Corroseal?
A: Both are rust converters. Ospho is a phosphoric acid solution applied as a separate step before priming, giving maximum control over conversion and primer selection. Corroseal combines conversion and primer in one product, which works well on complex ornamental profiles where a two-step system is harder to apply evenly.
Q: How long does the paint last on an iron fence in Chicago?
A: With full mechanical prep, rust conversion, DTM primer, and two DTM topcoats, Windy City Painters clients typically see 5-8 years of performance before touch-up is needed, even through Chicago freeze-thaw cycling and road salt exposure.
Q: Do you paint iron fences that are still structurally sound but heavily rusted on the surface?
A: Yes. Surface rust, even heavy pitting, does not necessarily indicate structural failure. Windy City Painters evaluates each fence individually. As long as the metal is sound under the rust, proper mechanical prep and a rust converter restore the surface to a paintable condition.
 Klopf Architecture
From Mid-Century Classic to the Present
An iconic design updated with comfort, function, and flow for today.
A Remodel That Balances Past and Present
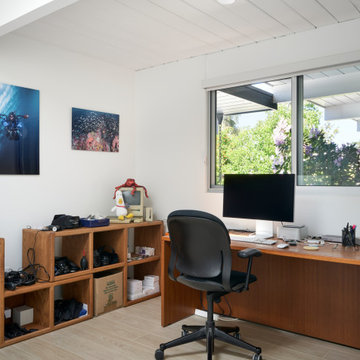
What started as a desire to update a classic Eichler soon became an exploration of how Mid-Century Modern design can successfully evolve for today. The client, a tech professional with a passion for scuba diving and underwater photography, wanted a home that would both honor its original character and feel tailored to his daily life. A lifelong technology enthusiast, he still owns the very first Mac desktop he saved up for as a teenager working at Radio Shack, a detail that underscores his appreciation for design that melds function and form.
Honoring Separation While Expanding Possibility
Unlike many contemporary remodels where walls are opened up to create expansive living spaces, this project took a more restrained approach. The client valued the defined rooms of the original plan and wanted to preserve as much wall space as possible for displaying his large-format underwater photography. The emphasis was not on dramatic spatial reinvention, but on thoughtful refinements. Klopf Architecture shaped a gallery-like backdrop while also expanding the primary suite, modernizing materials and fixtures throughout the home, and improving the functionality and layout of the kitchen. The finished home feels at once timeless and renewed, an Eichler that continues to inspire while fully supporting the lifestyle of its present-day owner.
A major turning point came mid-design. The original project brief had not included an addition, but as the reconfiguration of the primary bedroom and bath unfolded, it became clear that an expansion was the best approach to achieve the client’s vision of a more spacious suite. Fortunately, the adjustment came at a stage when revisions were still manageable and was integrated seamlessly, showing how thoughtful course corrections can strengthen a project rather than hinder it.
Navigating Challenges With Precision
The design development included multiple conceptual rounds, balancing preservation with subtle expansion. During construction, an existing post previously thought to be load-bearing turned out not to be. The structural engineer was able to pivot quickly, and both the post and the cross beam that had been intended to replace it could be omitted, allowing the original rhythm of the Eichler beam bays to be preserved.
Sustainability was not just a checklist item, but a way to align the home with the client’s values of simplicity, efficiency, and long-term functionality. R-38 roof insulation reduced energy usage, solar panels with battery storage provided independence and resilience, and passive comfort strategies eliminated the need forenergy-intensive air conditioning. An electric vehicle charger and an on-demand hot water recirculation system (with call buttons as opposed to having constant circulation) add to the home’s long-term efficiency factors. Together, these moves created a home that is quieter, more comfortable, and better equipped for the future, qualities that supported the client’s pragmatic approach to design and living lightly.
Details That Respect the Eichler DNA
The remodel carries forward the Eichler’s original spirit while introducing new layers of modern livability. Originally, the house was approached along a deep, narrow walk, with the garage on one side and the house on the other, leaving the front door tucked far back within this chasm-like space. By pulling the entry forward, the design reshaped the arrival experience, creating a clearer threshold and a natural drop-off zone for bags, shoes, and keys. This shift also made room for a custom bench at the entry that extends seamlessly through the glass sidelight. The bench and drop-off zone now work together as a single, integrated sequence that supports everyday living while offering a tactile reminder of Eichler’s philosophy of connectedness.
At the client’s request, Klopf reintroduced a classic Eichler gesture by extending the exterior siding into the entry and living room. The detail reinforces a sense of indoor/outdoor continuity while providing a subtle architectural surface that allows the client’s photography to take visual precedence.
The signature concrete masonry wall at the front was reconstructed using blocks sourced to match the originals, now strengthened with rebar for seismic resilience while maintaining a private outdoor courtyard, visually extending the kitchen outward. A decorative trellis element, a detail borrowed from a neighboring Eichler, restores a familiar mid-century modern architectural motif. At the courtyard entry door, a custom etched glass sidelight with an ocean-themed design featuring kelp and jellyfish serves as a subtle homage to the client’s passion for deep-sea diving.
Landscaping became an integral part of the overall transformation. The homeowner engaged landscape architect Randi Johnsen of Third Nature Studio to shape a series of calm, inviting outdoor rooms that read as a natural extension of the interiors. While technically outside of the core construction scope, the landscape design proved central to achieving a sense of completeness and connectedness across the property. Such whole-property considerations often emerge as design ideas take shape, underscoring the importance of flexibility in planning and budgeting, as well as close collaboration among the design team starting early in the process.
The Value of Evolving Scope
As with many custom residential projects, the scope evolved during the design process. What began as a targeted remodel grew to include a new/expanded primary suite, a rebuilt CMU patio wall for strength and longevity, and a solar panel array and battery storage for energy resilience and carbon-reduction. Each thoughtful decision represented a conscious investment in the home’s performance and character, rather than a cost overrun.
The result was a project delivered on schedule, tailored precisely to the client’s lifestyle, and positioned to add long-term value both functionally and aesthetically. By embracing scope evolution as an opportunity rather than a challenge, and relying on good design paired with transparent communication, this remodel demonstrates how Eichler homes can be adapted for contemporary living without erasing their DNA.
Klopf Architecture project team: John Klopf, AIA, and Klara Kevane, Elise Webb and Nicholas LaNasa.
Contractor: Golden Cove Construction
Landscape Design: Third Nature Studio
Structural Engineer: Daniel Bastiao Design
Photography: ©2025 Mariko Reed
Year Completed: 2024
Location: Sunnyvale, CA
 Klopf Architecture
From Mid-Century Classic to the Present
An iconic design updated with comfort, function, and flow for today.
A Remodel That Balances Past and Present
What started as a desire to update a classic Eichler soon became an exploration of how Mid-Century Modern design can successfully evolve for today. The client, a tech professional with a passion for scuba diving and underwater photography, wanted a home that would both honor its original character and feel tailored to his daily life. A lifelong technology enthusiast, he still owns the very first Mac desktop he saved up for as a teenager working at Radio Shack, a detail that underscores his appreciation for design that melds function and form.
Honoring Separation While Expanding Possibility
Unlike many contemporary remodels where walls are opened up to create expansive living spaces, this project took a more restrained approach. The client valued the defined rooms of the original plan and wanted to preserve as much wall space as possible for displaying his large-format underwater photography. The emphasis was not on dramatic spatial reinvention, but on thoughtful refinements. Klopf Architecture shaped a gallery-like backdrop while also expanding the primary suite, modernizing materials and fixtures throughout the home, and improving the functionality and layout of the kitchen. The finished home feels at once timeless and renewed, an Eichler that continues to inspire while fully supporting the lifestyle of its present-day owner.
A major turning point came mid-design. The original project brief had not included an addition, but as the reconfiguration of the primary bedroom and bath unfolded, it became clear that an expansion was the best approach to achieve the client’s vision of a more spacious suite. Fortunately, the adjustment came at a stage when revisions were still manageable and was integrated seamlessly, showing how thoughtful course corrections can strengthen a project rather than hinder it.
Navigating Challenges With Precision
The design development included multiple conceptual rounds, balancing preservation with subtle expansion. During construction, an existing post previously thought to be load-bearing turned out not to be. The structural engineer was able to pivot quickly, and both the post and the cross beam that had been intended to replace it could be omitted, allowing the original rhythm of the Eichler beam bays to be preserved.
Sustainability was not just a checklist item, but a way to align the home with the client’s values of simplicity, efficiency, and long-term functionality. R-38 roof insulation reduced energy usage, solar panels with battery storage provided independence and resilience, and passive comfort strategies eliminated the need forenergy-intensive air conditioning. An electric vehicle charger and an on-demand hot water recirculation system (with call buttons as opposed to having constant circulation) add to the home’s long-term efficiency factors. Together, these moves created a home that is quieter, more comfortable, and better equipped for the future, qualities that supported the client’s pragmatic approach to design and living lightly.
Details That Respect the Eichler DNA
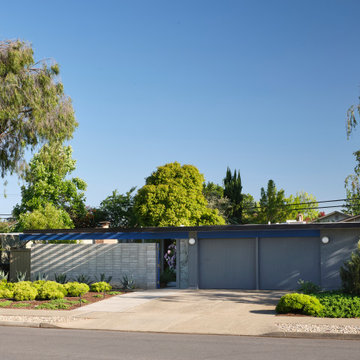
The remodel carries forward the Eichler’s original spirit while introducing new layers of modern livability. Originally, the house was approached along a deep, narrow walk, with the garage on one side and the house on the other, leaving the front door tucked far back within this chasm-like space. By pulling the entry forward, the design reshaped the arrival experience, creating a clearer threshold and a natural drop-off zone for bags, shoes, and keys. This shift also made room for a custom bench at the entry that extends seamlessly through the glass sidelight. The bench and drop-off zone now work together as a single, integrated sequence that supports everyday living while offering a tactile reminder of Eichler’s philosophy of connectedness.
At the client’s request, Klopf reintroduced a classic Eichler gesture by extending the exterior siding into the entry and living room. The detail reinforces a sense of indoor/outdoor continuity while providing a subtle architectural surface that allows the client’s photography to take visual precedence.
The signature concrete masonry wall at the front was reconstructed using blocks sourced to match the originals, now strengthened with rebar for seismic resilience while maintaining a private outdoor courtyard, visually extending the kitchen outward. A decorative trellis element, a detail borrowed from a neighboring Eichler, restores a familiar mid-century modern architectural motif. At the courtyard entry door, a custom etched glass sidelight with an ocean-themed design featuring kelp and jellyfish serves as a subtle homage to the client’s passion for deep-sea diving.
Landscaping became an integral part of the overall transformation. The homeowner engaged landscape architect Randi Johnsen of Third Nature Studio to shape a series of calm, inviting outdoor rooms that read as a natural extension of the interiors. While technically outside of the core construction scope, the landscape design proved central to achieving a sense of completeness and connectedness across the property. Such whole-property considerations often emerge as design ideas take shape, underscoring the importance of flexibility in planning and budgeting, as well as close collaboration among the design team starting early in the process.
The Value of Evolving Scope
As with many custom residential projects, the scope evolved during the design process. What began as a targeted remodel grew to include a new/expanded primary suite, a rebuilt CMU patio wall for strength and longevity, and a solar panel array and battery storage for energy resilience and carbon-reduction. Each thoughtful decision represented a conscious investment in the home’s performance and character, rather than a cost overrun.
The result was a project delivered on schedule, tailored precisely to the client’s lifestyle, and positioned to add long-term value both functionally and aesthetically. By embracing scope evolution as an opportunity rather than a challenge, and relying on good design paired with transparent communication, this remodel demonstrates how Eichler homes can be adapted for contemporary living without erasing their DNA.
Klopf Architecture project team: John Klopf, AIA, and Klara Kevane, Elise Webb and Nicholas LaNasa.
Contractor: Golden Cove Construction
Landscape Design: Third Nature Studio
Structural Engineer: Daniel Bastiao Design
Photography: ©2025 Mariko Reed
Year Completed: 2024
Location: Sunnyvale, CA
Find the right local pro for your project

 safe ZOnea
Staging a home for sale or for a major transition is a strange in-between state. You are still living in the space, but you are also preparing it to impress strangers, support showings, and remain functional until the final move-out day. That tension between “home” and “product” is where storage quietly becomes one of your smartest tools. Used well, storage lets you reduce clutter, protect important items, and create the kind of rooms that photograph beautifully and feel calm when buyers walk through the door.
A staged move is rarely just about shifting boxes from one address to another. It is about managing timing, presentation, and stress at the same time. When storage is built into the plan from day one, the entire process feels less rushed and more strategic. Rooms open up gradually, essentials stay accessible, and you never feel like you are drowning in half-packed chaos. Understanding how to use storage as a staging partner, not just a place to dump excess stuff, is what turns a messy transition into a controlled, professional-looking move.
Why Storage Is the Backbone of Every Staged Move
Visual space is emotional space. When every surface is covered, and every corner is full, buyers feel crowded before they have even evaluated the layout. Storage gives you a way to pull back without making drastic decisions about what to keep or donate. Seasonal décor, bulky furniture, duplicate items, archives, and personal collections can be moved out early, so the home reads cleaner and more open while still feeling lived-in. That balance between warmth and simplicity is exactly what good staging tries to achieve.
In more complex situations, such as live-work properties or home offices, storage becomes even more important. You may need to keep a business running while also presenting a polished environment to viewers. Partnering with local movers in Boston makes it easier to shift equipment, files, and nonessential pieces into storage in phases, so work can continue while the visible areas of the property stay controlled and presentable.
How Staging and Storage Work Together to Control Visual Impact
Staging works best when every object in a room has a clear purpose. A sofa frames a conversation. A table suggests gathering. A lamp softens the mood. Everything else that is not essential to that story competes for attention. Storage supports staging by giving you a clean staging bench off-site, where nonessential items can wait without being constantly shuffled between rooms or piled into overstuffed closets.
The art lies in deciding what stays and what goes. Family photos, extensive collections, excess seating, and rarely used appliances often move into storage first. What remains should be enough to show scale, comfort, and function without revealing the full weight of daily life. Commercial properties go through a similar filtering process. Extra desks, surplus equipment, outdated signage, and inactive files often move out early so the active workspace feels lean, efficient, and future-ready before a relocation supported by commercial movers takes place.
Strategic Timing of Storage before the Actual Move
The worst time to think about storage is when boxes are already stacked in the hallway. In a staged move, storage decisions ideally begin as soon as you know the property will be listed or the space will be transitioned. That might be a month or more before the main moving date. Starting early gives you time to sort, label, and prioritize instead of throwing things together in a panic.
An early storage phase also helps you test how the home feels with less in it. You may discover that removing a few large pieces transforms a cramped room into an open, inviting space. For commercial spaces, early storage lets operations continue with fewer interruptions. Departments can send nonessential items out in waves. When the main relocation comes, much of the excess is already safely stored, and what remains is easier for a commercial movers Boston team to handle with speed and care.
The Emotional Psychology behind Letting Storage Hold Your Belongings
Letting belongings leave the house ahead of you can feel unsettling. There is always a quiet fear that once something is out of sight, it will be forgotten, damaged, or harder to reclaim. That is why some people resist using storage even when they know it would make the staging process easier. Acknowledging that emotion instead of dismissing it helps you plan more honestly and avoids last-minute regret.
The reality is that good storage is not a black hole; it is a temporary pause. When items are packed thoughtfully, labeled clearly, and placed in an environment you trust, they become easier to manage than when they are tucked into random cupboards or stacked in spare rooms. For many people, living with fewer visible possessions during staging actually reduces tension. The home feels lighter and easier to maintain. Businesses notice the same effect when storage removes outdated equipment and clutter from the floor. The workspace looks more focused, and staff can concentrate on current tasks instead of navigating around accumulated history.
Protecting Assets While They Live in Storage
Sending belongings into storage is only a good idea if they come back in the same or better condition. That is where quality control matters. Furniture, textiles, electronics, files, and artwork each have different vulnerabilities. Moisture, temperature swings, dust, and rough handling can all damage them in ways that only become obvious later. Choosing the right type of storage and packing accordingly is central to the genius of using storage as part of a staged move rather than as a desperate overflow container.
Climate-controlled units, padded wrapping, elevated pallets, careful stacking, and clearly marked boxes all reduce risk. The goal is to handle items fewer times, not more. When storage is integrated into the move plan, belongings can travel directly from the home to storage and later from storage to the new address with minimal extra movement. Many owners coordinate those transfers through a well trusted movers in Boston, so the same team that moves items out early also manages their final delivery, preserving continuity and accountability.
How Storage Reduces Risk during Multi-Phase Moves
Few staged moves happen in a single clean step. There are often gaps between listing and selling, between selling and closing, between closing and final move-out. If renovations, inspections, or office reconfigurations are involved, the timeline becomes even more layered. Storage absorbs those gaps, so you are not forced to live among towers of boxes or stack equipment in hallways waiting for the next phase.
By treating storage as a flexible middle ground, you can move things out gradually while still having access when needed. For example, archived files can go first, followed by seasonal décor, then surplus furniture. As each stage ends, fewer items remain to be shifted on the final date. This phased approach reduces the risk of rushed, late-night packing sessions, careless stacking, and damaged items. It also makes it easier for commercial moving crews to work efficiently because they are handling a manageable volume of goods at each phase rather than everything at once.
Using Storage to Maintain Clean Show-Ready Conditions
One of the hardest parts of staging is keeping the property consistently show-ready. Every viewing becomes its own small event. Floors need to be cleared, surfaces wiped, and personal items tucked away. When too many belongings remain in the home, each showing takes a heavy amount of effort. Storage cuts that workload dramatically by taking nonessentials completely off the stage.
With fewer items to move and hide, maintaining a neutral, inviting look becomes much more realistic. You are not scrambling to stuff things into closets or push items under the bed. Instead, the home sits closer to show condition all the time, and the final touches before a viewing are minimal. In commercial environments, using storage helps maintain a professional appearance for clients and staff, even while the space is being prepared for a larger transition. Active tools and furniture stay in play, while inactive pieces quietly support the future from storage.
Storage as a Strategic Tool in Business Relocation Planning
For businesses, storage is more than a convenience; it is part of risk management. Office relocations and staged commercial moves have to juggle lease deadlines, equipment deliveries, IT cutovers, and staffing realities. Trying to shift everything in one move often results in downtime, lost files, and strained teams. Storage turns the move into a series of controlled steps instead of a single disruptive jump.
Unused furniture, archived documents, and non-critical inventory can be moved into storage weeks ahead of the main relocation. As the new space becomes ready, items can move out of storage and directly into position. This reduces double-handling and keeps the old and new locations from filling with half-unpacked material. A business that coordinates these flows with professional commercial movers in Boston usually experiences smoother transitions, because storage is treated as a working part of the operational plan rather than a leftover problem.
The Hidden Cost Benefits of Proper Storage Planning
On paper, storage looks like an extra expense. In reality, poorly managed moves cost far more. When everything is rushed into boxes at the last minute, items are damaged, misplaced, or transported multiple times. Extra labor hours, emergency packing supplies, replacement furniture, and extended timelines quickly outweigh the cost of well-used storage. Staging without storage also tends to keep homes and offices crowded longer, which can hurt impressions and, in the case of a sale, influence offers.
When storage is integrated from the beginning, you minimize waste. You handle items fewer times, you know where things are, and you avoid paying people to shift the same objects repeatedly. Staged homes that look better often sell faster or draw stronger interest, which helps recover investment on the back end. Businesses benefit from less downtime, safer handling of equipment, and predictable work schedules. Those gains are why many clients prefer partnering with a commercial moving company in Boston that understands storage as a cost-control tool, not just a place to park overflow.
Conclusion
The true genius of using storage during a staged home move is that it quietly rewrites the rules of transition. Instead of treating space as something that must absorb every box and belonging until the last possible moment, you treat storage as a flexible extension of the home or office. This shift in thinking opens rooms, clears sightlines, and makes every phase of the move more intentional. Staging becomes easier, maintenance becomes lighter, and the stress of living in a half-moved environment drops noticeably. When storage is chosen carefully, used early, and coordinated with the overall moving plan, it protects both physical assets and emotional energy. Buyers and visitors see a calm, collected space. You experience a less chaotic path from “here” to “there.” Whether you are selling a home, repositioning a business, or managing a complex phased relocation, storage can turn a disruptive event into a managed, almost elegant process.
For people who want that level of control and care during a staged move, Stairhopper movers have built a strong reputation by treating storage, timing, and transport as parts of one connected strategy. Their team is known for listening closely, planning around real-life constraints, and moving both residential and commercial clients through transitions with calm, steady execution. They approach every project as a partnership, aligning storage use, staging needs, and final delivery so that what matters most arrives safely, on schedule, and with as little disruption as possible.
Frequently Asked Questions
Q1. When should I arrange storage for a staged home move?
Ideally, four to six weeks before listing or transition, so clearing, packing, and staging can happen gradually without rushed decisions or last-minute stress.
Q2. Is climate-controlled storage necessary for staged moves?
It is highly recommended for wood furniture, electronics, artwork, and documents, since temperature and humidity swings can quietly damage materials over time.
Q3. How does storage help keep a home show-ready?
By moving nonessential items off-site, daily tidying becomes simpler, and each room can stay closer to a staged condition between viewings or inspections.
Q4. Can storage reduce the length of the final moving day?
Yes. When many items are moved into storage in advance, the final moving day focuses on essentials, which shortens timelines and reduces physical and mental strain.
Q5. Is storage useful for short-term business relocations?
Even in short relocations, storage helps prevent overcrowded offices and allows departments to move in phases without interrupting everyday operations.
Q6. How do I decide what should go into storage first?
Start with rarely used items, seasonal décor, surplus furniture, and archived materials, then work toward pieces that are visually distracting or make rooms feel cramped.
Q7. Will using storage make it harder to find things later?
Not if packing and labeling are done carefully. Clear categories, room-based labels, and simple inventories make stored items easier to locate than when scattered at home.
Q8. Does storage still make sense if my move happens in one day?
Yes, because staging and preparation begin well before that day. Storage keeps the home functional and attractive during the weeks leading up to the final move.
 Klopf Architecture
From Mid-Century Classic to the Present
An iconic design updated with comfort, function, and flow for today.
A Remodel That Balances Past and Present
What started as a desire to update a classic Eichler soon became an exploration of how Mid-Century Modern design can successfully evolve for today. The client, a tech professional with a passion for scuba diving and underwater photography, wanted a home that would both honor its original character and feel tailored to his daily life. A lifelong technology enthusiast, he still owns the very first Mac desktop he saved up for as a teenager working at Radio Shack, a detail that underscores his appreciation for design that melds function and form.
Honoring Separation While Expanding Possibility
Unlike many contemporary remodels where walls are opened up to create expansive living spaces, this project took a more restrained approach. The client valued the defined rooms of the original plan and wanted to preserve as much wall space as possible for displaying his large-format underwater photography. The emphasis was not on dramatic spatial reinvention, but on thoughtful refinements. Klopf Architecture shaped a gallery-like backdrop while also expanding the primary suite, modernizing materials and fixtures throughout the home, and improving the functionality and layout of the kitchen. The finished home feels at once timeless and renewed, an Eichler that continues to inspire while fully supporting the lifestyle of its present-day owner.
A major turning point came mid-design. The original project brief had not included an addition, but as the reconfiguration of the primary bedroom and bath unfolded, it became clear that an expansion was the best approach to achieve the client’s vision of a more spacious suite. Fortunately, the adjustment came at a stage when revisions were still manageable and was integrated seamlessly, showing how thoughtful course corrections can strengthen a project rather than hinder it.
Navigating Challenges With Precision
The design development included multiple conceptual rounds, balancing preservation with subtle expansion. During construction, an existing post previously thought to be load-bearing turned out not to be. The structural engineer was able to pivot quickly, and both the post and the cross beam that had been intended to replace it could be omitted, allowing the original rhythm of the Eichler beam bays to be preserved.
Sustainability was not just a checklist item, but a way to align the home with the client’s values of simplicity, efficiency, and long-term functionality. R-38 roof insulation reduced energy usage, solar panels with battery storage provided independence and resilience, and passive comfort strategies eliminated the need forenergy-intensive air conditioning. An electric vehicle charger and an on-demand hot water recirculation system (with call buttons as opposed to having constant circulation) add to the home’s long-term efficiency factors. Together, these moves created a home that is quieter, more comfortable, and better equipped for the future, qualities that supported the client’s pragmatic approach to design and living lightly.
Details That Respect the Eichler DNA
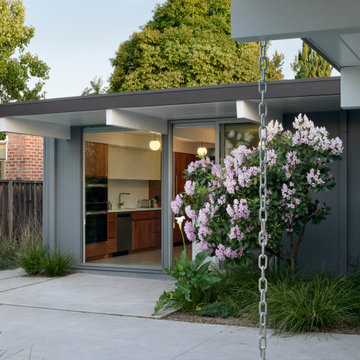
The remodel carries forward the Eichler’s original spirit while introducing new layers of modern livability. Originally, the house was approached along a deep, narrow walk, with the garage on one side and the house on the other, leaving the front door tucked far back within this chasm-like space. By pulling the entry forward, the design reshaped the arrival experience, creating a clearer threshold and a natural drop-off zone for bags, shoes, and keys. This shift also made room for a custom bench at the entry that extends seamlessly through the glass sidelight. The bench and drop-off zone now work together as a single, integrated sequence that supports everyday living while offering a tactile reminder of Eichler’s philosophy of connectedness.
At the client’s request, Klopf reintroduced a classic Eichler gesture by extending the exterior siding into the entry and living room. The detail reinforces a sense of indoor/outdoor continuity while providing a subtle architectural surface that allows the client’s photography to take visual precedence.
The signature concrete masonry wall at the front was reconstructed using blocks sourced to match the originals, now strengthened with rebar for seismic resilience while maintaining a private outdoor courtyard, visually extending the kitchen outward. A decorative trellis element, a detail borrowed from a neighboring Eichler, restores a familiar mid-century modern architectural motif. At the courtyard entry door, a custom etched glass sidelight with an ocean-themed design featuring kelp and jellyfish serves as a subtle homage to the client’s passion for deep-sea diving.
Landscaping became an integral part of the overall transformation. The homeowner engaged landscape architect Randi Johnsen of Third Nature Studio to shape a series of calm, inviting outdoor rooms that read as a natural extension of the interiors. While technically outside of the core construction scope, the landscape design proved central to achieving a sense of completeness and connectedness across the property. Such whole-property considerations often emerge as design ideas take shape, underscoring the importance of flexibility in planning and budgeting, as well as close collaboration among the design team starting early in the process.
The Value of Evolving Scope
As with many custom residential projects, the scope evolved during the design process. What began as a targeted remodel grew to include a new/expanded primary suite, a rebuilt CMU patio wall for strength and longevity, and a solar panel array and battery storage for energy resilience and carbon-reduction. Each thoughtful decision represented a conscious investment in the home’s performance and character, rather than a cost overrun.
The result was a project delivered on schedule, tailored precisely to the client’s lifestyle, and positioned to add long-term value both functionally and aesthetically. By embracing scope evolution as an opportunity rather than a challenge, and relying on good design paired with transparent communication, this remodel demonstrates how Eichler homes can be adapted for contemporary living without erasing their DNA.
Klopf Architecture project team: John Klopf, AIA, and Klara Kevane, Elise Webb and Nicholas LaNasa.
Contractor: Golden Cove Construction
Landscape Design: Third Nature Studio
Structural Engineer: Daniel Bastiao Design
Photography: ©2025 Mariko Reed
Year Completed: 2024
Location: Sunnyvale, CA
 SabaRehman Abdulrehman
Phoenix's food scene is vibrant and thriving, but also one of the most closely watched in the country. Health inspectors in Maricopa County are strict, and customers expect spotless dining spaces.
To stay competitive, restaurant owners and food vendors must stay on top of evolving health codes, sanitation protocols, and food safety benchmarks. That starts with a firm grip on restaurant cleaning safety standards. Ignoring sanitation rules risks more than bad reviews. It invites citations, customer complaints, and operational shutdowns.
Whether you're operating a food truck or a restaurant, following these Phoenix cleaning standards helps you stay compliant, pass health inspections, and build customer trust.
Importance of a Clean Phoenix Restaurant that Follows Food Health and Safety Standards
The restaurant industry in Phoenix operates under strict oversight. The Maricopa County Environmental Services Department conducts regular inspections, and violations can result in fines or closures. In this climate, restaurant cleaning is not just a hygiene standard. It is a business-critical measure.
Proper food handling and establishment cleaning protocols reduce the risk of foodborne illnesses, control pests, protect equipment, and keep your staff safe. Inconsistent practices, on the other hand, can quickly become liabilities.
Start With the Food Code
Phoenix food vendors must comply with the 2017 FDA Food Code as adopted by Maricopa County. This includes rules on:
- Sanitizing food-contact surfaces after each use
- Maintaining proper water temperatures for dishwashing
- Cleaning restrooms frequently and keeping them stocked
- Storing cleaning chemicals away from prep areas
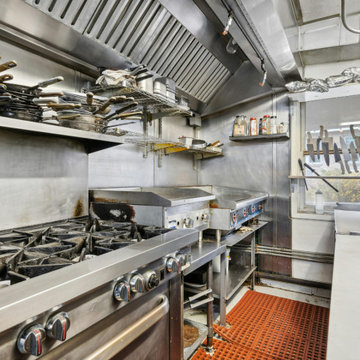
- Daily: Wipe prep tables, mop floors, clean grills, sanitize cutting boards
- Weekly: Deep clean kitchen hoods, polish cooking equipment, disinfect drains
- Monthly: Check pest control measures, clean freezer coils, and inspect HVAC filters
- Using the right sanitizers and PPE
- Logging cleaning times and who performed the task
- Identifying signs of mold, grease buildup, or rodent activity
- Conducting thorough surface cleaning to ensure all food-contact surfaces are sanitized regularly
- Food-safe and non-corrosive
- Effective against norovirus, salmonella, and E. coli
- Clearly labeled and stored in original containers
- Seal gaps around doors and pipes
- Store dry goods in sealed, elevated containers
- Keep outdoor waste bins locked and distanced from entry points
- Record cleaning completion in real time
- Alert managers when tasks are missed
- Keep a historical record for inspections
- Is certified and understands the Arizona food codes
- Provides documented service reports
- Offers customized cleaning plans
- Offers flexible scheduling around your operating hours
- Cross-contamination prevention: Regularly clean food prep surfaces and tools, and use separate equipment for raw meats, vegetables, and ready-to-eat foods. Proper cleaning prevents any contact with food that could lead to cross-contamination and affects food quality.
- Temperature monitoring: While not directly related to cleaning, maintaining proper food temperature is essential. Hot foods should be stored above 140°F, and cold foods below 40°F. Regularly monitor temperatures and clean temperature gauges to ensure accuracy.
- Proper storage: Use clean storage containers and shelving for food storage, keeping items off the floor. Ensure all food is sealed and labeled to avoid contamination risks and comply with food safety standards.
 SELECT KITCHEN & BATH
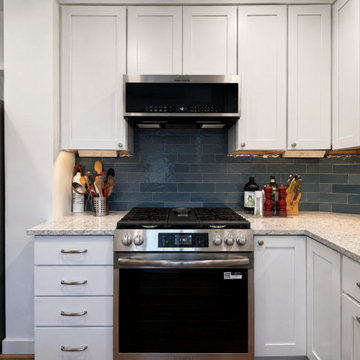
Our lead designer, Derek, helped this Alexandria homeowner to create more storage, update the look and make it more functional for everyday use. At their initial free consultation meeting how to maximize storage in such a small space was the key issue with limited cabinetry space. Our team helped her create her vision of creating more storage and a better flow for the kitchen, as well as updating the look.
This project included removing the old cabinetry, countertops, appliances and flooring. We moved her range to a new wall opening up more countertop space for prep work. With this we also improved the storage space by taking the cabinetry to the ceiling, adding under cabinetry lighting and shifting the oven and microwave to create more storage in the kitchen for the homeowner. If you look at the first photo you will see we used under cabinet outlets due the backsplash walls not able to accept outlets. Derek worked with the homeowner to bring together an open feeling, transitional look with the new color scheme and stainless steel appliances. They also added a nice blue accent with the subway tile backsplash to contrast against the lighter cabinetry and countertop.
Some features to mention in this kitchen remodel include expanded storage, stainless steel appliances, a gas cooktop, more cabinetry drawers, and under cabinetry lighting.
The cabinets are from Crystal, they are MDF with the color "Perfect Beige". The door style used is the "Stirling" door. The counters are "Portico Quartz" from MSI and installed by Ashburn Granite and Quartz. We used a porcelain interpretation of hand-crafted bricks to give this home a classic feel The backsplash tile is 2" x 10" elongated subway tile, called "Brown London Rondine" from Conestoga Tile.
Select Kitchen & Bath would love to help you with your next home remodel project. Call or email us to schedule a free consultation with one of our designers!
703-866-4224
info@selectkitchenandbath.com.
 Tile Doctor Ltd
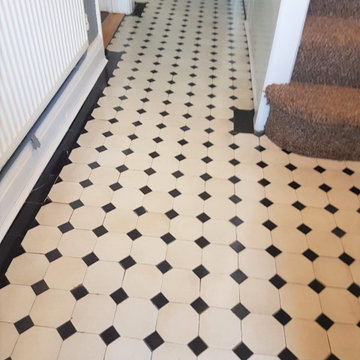
This enquiry from Neath came from an elderly gentleman who was moving into a care home in the near future and wanted his Victorian tiled hallway renovated before the property went on the market. He mentioned he didn’t think it was that dirty however it could do with a clean and reseal.
We arranged to call in one morning and take a look at the tiles and whilst there we completed a test clean so we could provide an accurate price for renovating the floor. For the clean I applied Tile Doctor Pro-Clean, the purpose of this was to see whether and how fast the dirt would shift and also to get an idea of the condition of the floor beneath the layer of dirt.
The test clean went well and the owner was happy to accept our price and suggested that as we had already made a start we might as well continue. Fortunately, there were two of us that day and I only had a couple of other quotes in the area, so I was able to crack on. I should mention this work was done at the beginning of 2020 before the COVID-19 lockdown.
All sorts of detritus gets walked into hallways so we began by using a hand held scraper to take off any anything that sat upon/above the floors surface. This also makes the cleaning process that little bit easier for us. The earlier test clean had enabled us to establish which cleaning methods and products would work best on the floor so it was just a question of putting the plan into action.
The process involved applying a strong dilution of Tile Doctor Pro-Clean to the floor, leaving it to soak in for ten minutes and then working it with a coarse 400-grit diamond pad fitted to a rotary buffer. More water was applied for lubrication where required and the soil produced afterwards was rinsed off and extracted with a wet vacuum. The pad is encrusted with industrial diamonds and cuts into the tile and removes a very thin layer leaving the tile very clean.
After extracting the soil, the floor was inspected, and we noticed that there were a few tiles throughout the floor that needed more work. To deal with these we used hand-held diamond blocks of varying grits to remove the ingrained dirt and bring the tiles back to life.
The client was over the moon with the results of the cleaning and we scheduled a date of the following week to come back and seal the tiles. We also discussed sealers and he had asked if we could leave the floor with a shiny finish. With that in mind we recommended Tile Doctors Seal and Go which works really well on Victorian tiles. It is also water based and so doesn’t produce a smell as it dries.
On our return the floor was given a quick wipe down and once dry sealed with four coats of Tile Doctor Seal and Go which will add protection and make them easy to keep clean.
Once complete the floor looked great and very welcoming, just what you need when selling a property as initial impressions always count.
Adrian Iacono
Swansea Tile Doctor

 SUPERIOR CHIMNEY SERVICES CORPORATION
A friend noticed a damp, musty smell coming from her living room fireplace the week after a February thaw. When she called a masonry technician from Superior Chimney, to take a look, and found that water had been working its way behind the bricks for years. What started as a small crack now meant her chimney needed structural repairs before she could safely use it again.
Chimney repairs are any work done to restore the structural and weatherproof condition of a chimney. This can include mortar joint repair, brick replacement, crown repair, flue repair, and cap or flashing replacement. Most Chicagoland homeowners discover the need for chimney repairs often times after winter, when the freeze and thaw cycles have already done its damage. Uncovering the symptoms early is the best way to keep chimney repairs down. Let’s discuss how that can be done.
Why Chicagoland Weather Is Especially Hard on Chimneys
Chicagoland has some of the most polarized weather. One day it’s a blizzard and the next week hot, humid and 100 degrees. That swing in weather conditions and temperatures are the real reasons why chimney repairs are needed.
When moisture from humid and rainy days’ soak into brick and mortar and then freezes, it expands. As it begins to thaw, the materials contract. Repeat that cycle dozens of times in a single Illinois winter and even solid masonry in the chimney starts to crack, spall, and separate from the joints holding it together. This is called the freeze thaw cycle. We’ve talked about it many times over the years, and it continues to be the single biggest reason homes need chimney repairs more often than homes in milder climates.
The Chimney Safety Institute of America (CSIA), the leading nonprofit certifying body for chimney professionals in the United States, notes that water intrusion is one of the most damaging and most preventable problems. If the problem is left to mature, it affects more than the appearance. It compromises the structure itself.
What Do Chimney Repairs Involve?
Not every chimney problem requires the same fix. Chimney repairs generally fall into a few categories. Understanding the difference, helps homeowners have a more informed conversation with the expert technician.
Mortar joint repair or tuckpointing. This involves removing deteriorated mortar between bricks and replacing it with fresh mortar, matched to the original color and texture as closely as possible.
Brick replacement. When individual bricks have spalled, meaning the face has cracked or popped off from trapped moisture, those bricks are removed and replaced.
Crown and cap repair. The crown is the concrete slab at the very top of the chimney. Cracks both big and small let water directly into the chimney flue. Chimney crown repair is often one of the most urgent forms of chimney repairs.
Flashing repair. Flashing is the barrier where the chimney meets the roofline. Loose, damaged or poorly installed flashing is a common source for water leaks. The roof gets the blame as it is the largest piece that covers the house. However, it certainly can be the overlooked chimney.
Flue and liner repair. Cracked flue tiles or damaged liners affect how safely a chimney vents smoke and combustion gases.
When to Know a Chimney Needs Repair
Most chimney damage shows up as small, easy to dismiss way. Let’s take a look at the following list. Be sure to print this out and keep it handy so if/when something happens, you know what to look for.
• Water stains near the fireplace or on the ceiling
• A brownish stain on the wall around your fireplace, or a stain on the ceiling near an exterior chimney. This means water is getting in somewhere it should not.
• Crumbling or missing mortar
• If you can see gaps between bricks, or mortar that flakes off when you touch it
• A leaning or visibly shifting chimney
• A chimney that appears to pull away from the house, even slightly, could indicate a structural issue
• White staining on the brick (efflorescence)
• Chalky white residue left behind as water evaporates out of the masonry. It is a visible sign that moisture is moving through brick
• Rusted damper or firebox components
• Metal parts inside a fireplace that are rusting are a strong indicator that moisture is present
• Debris in the fireplace
• Small chunks of brick, mortar, or tile landing in the firebox
What are the Various Types of Chimney Repair?
This is a compiled list of chimney repairs so you can be aware of what to look for. If you have any questions, contact us directly at 877-244-6349.
Homeowners who schedule chimney repairs at the first sign of trouble typically spend far less than those who wait until water damage reaches the interior of the home. This is a great reason to contact Superior Chimney at 877-244-6349.
Why an Annual Inspection Matters More Than People Think
The CSIA and the National Fire Protection Association both recommend that chimneys, fireplaces, and vents be inspected at least once a year, whether or not the fireplace gets used. This recommendation exists because damage does not take a break just because a chimney sits without any use.
According to data stated by the CSIA, chimney related fires still contribute to tens of thousands of residential fires across the United States each year, and a large share of those incidents can be traced back to deferred maintenance. An annual chimney inspection is what catches the small mortar crack or the hairline crown crack before it turns into a repair bill.
Hiring the Right Company for Chimney Repairs
Not every company who offers chimney repair work has the certified training to diagnose a problem correctly. CSIA certification is the most widely recognized credential in the industry, and it requires technicians to study chimney physics, venting systems, and fire codes. After the studies, the new technician needs to pass an exam and agree to a professional code of ethics.
When you call, be sure to ask:
Are your technicians CSIA certified, and can I verify that certification?
Will you show me photos or video of the damage before starting work?
Does the estimate distinguish between cosmetic repair and structural repair?
At Superior Chimney, we welcome these and other of your questions.
How Chimney Repairs Affect Insurance and Resale
A chimney in poor condition can complicate a home sale or an insurance claim. Home inspectors routinely report on visible mortar loss, leaning chimneys, or missing chimney caps. Some insurers will request proof of repair before renewing a policy on an older home. Addressing chimney repairs proactively protects more than curb appeal. It protects the sale timeline and the claims history associated to the property.
Frequently Asked Questions
How often should a Chicago area chimney be inspected? At least once a year, per CSIA and NFPA guidance, regardless of how often the fireplace is used.
Can chimney repairs be done in winter? Some interior repairs can happen in cold weather, but most masonry repair requires temperatures consistently above freezing. Spring and fall are the most common repair times in the Chicago area.
Is tuckpointing the same thing as chimney repair? Tuckpointing is one type of chimney repair, focused on replacing deteriorated mortar joints.
Does homeowners insurance cover chimney repairs? It depends. Sudden damage from a storm may be covered, while gradual deterioration from lack of maintenance typically is not.
So Finally…
Taking care of your home includes a chimney. Just because you don’t see it every day, doesn’t mean things aren’t happening. Be sure to get a chimney inspection done once per year by a certified and credible company such as Superior Chimney to take care of the issues. Contact us today by calling 877-244-6349.
 safe ZOnea
Maintaining a pest-free home requires attention throughout the year. Seasonal changes affect pest behavior, and understanding these patterns can save homeowners from costly damage and health hazards. In this guide, we will explore practical strategies for spring pest prevention tips, ensuring your property stays protected through every season. From spotting early signs to implementing proactive measures, these steps empower homeowners to take control before infestations occur.
Understanding Seasonal Pest Patterns
Pests adapt to changing weather, and knowing their patterns helps prevent infestations effectively.
Spring: Awakening Pests
Spring signals the end of winter dormancy for many pests. Rodents, ants, and termites start seeking food and warmth. Effective spring pest prevention tips include:
● Cleaning gutters and removing debris
● Sealing cracks and gaps in exterior walls
● Inspecting wood piles and compost areas
● Monitoring early signs of termite activity
Pro Tip: Conduct a termite inspection or a professional evaluation to catch infestations early before they spread.
Summer: Peak Pest Season
Warm temperatures accelerate pest breeding cycles. For a comprehensive summer pest prevention guide:
● Maintain lawns and trim vegetation away from homes
● Check window and door screens for tears
● Store food in sealed containers
● Inspect water sources that attract mosquitoes
Do You Know? Mosquitoes can lay eggs in a teaspoon of water. Eliminating stagnant water is crucial to reducing their population.
Fall: Preparing for Winter
As temperatures drop, pests search for warm indoor spaces. Key actions include:
● Inspecting for winter rodent entry points
● Sealing attic vents, crawl spaces, and foundation gaps
● Cleaning storage areas to minimize hiding spots
● Checking chimney and fireplace openings
Quick Fact: Rodents can enter homes through openings as small as ¼ inch.
Seasonal Pest Checklist for Homeowners
Creating a structured seasonal pest checklist simplifies preventive measures and ensures nothing is overlooked.
Season
Key Actions
Spring
Inspect for termites, seal exterior gaps, clean gutters, and check compost
Summer
Repair screens, trim vegetation, remove standing water, and secure food
Fall
Seal entry points, inspect attic/crawlspace, clear debris, and prepare storage
Winter
Monitor indoor activity, keep firewood away from walls, and maintain traps
Inspection & Maintenance Tips
● Schedule annual pest inspections by professional Virginia pest control consultation to detect hidden problems
● Keep a log of pest sightings and treatment dates
● Regularly replace weather stripping and caulk cracks
Note: Even small preventive steps, when consistently applied, drastically reduce infestations.
Common Pests and Their Seasonal Behaviors
Understanding how different pests behave each season helps homeowners take timely action to protect their property.
● Ants and Termites: Ants emerge in spring seeking food, while termites become active and can damage wood unnoticed. Early detection is critical.
● Rodents and Mice: Fall and winter increase rodent intrusions. Block all entry points and keep food sealed.
● Mosquitoes and Flies: Summer creates the ideal breeding environment for mosquitoes. Eliminate standing water and use physical barriers like nets.
● Spiders and Other Insects: Seasonal shifts cause spiders to move indoors. Regular vacuuming and decluttering reduce hiding spots.
Eco-Friendly Prevention Methods
● Use natural repellents like peppermint oil or diatomaceous earth
● Encourage beneficial insects, such as ladybugs, to reduce pest populations
● Plant pest-deterring plants near home boundaries, like marigolds or lavender
Integrated Pest Management (IPM)
Adopt an IPM approach by combining physical barriers, monitoring, and environmentally safe treatments. This minimizes chemical use while maintaining a pest-free home.
Quote: “Prevention is the most effective form of pest control.” – National Pest Management Association
Seasonal Pest Prevention Tools
● Snap traps and humane rodent traps
● Sticky traps for insects
● Outdoor perimeter sprays (eco-friendly)
● Moisture meters to detect early termite or mold problems
Pro Tip: Keep tools organized and accessible to act quickly when pest activity is noticed.
Planning: Annual Pest Calendar
Month
Recommended Action
March-April
Spring pest prevention tips: Inspect, seal, clean gutters
June-July
Summer pest prevention guide: Screens, standing water, food storage
September
Seasonal pest checklist: Seal entries, declutter, prep storage
November
Winter rodent entry points: Monitor indoors, maintain traps
Key Takeaways
● Seasonal awareness prevents infestations and property damage
● Consistent inspections and maintenance are essential
● Simple eco-friendly measures can significantly reduce pests
● Use a structured checklist and calendar for effective prevention
Conclusion
Homeowners who stay proactive and follow spring pest prevention tips, along with year-round monitoring, ensure their properties remain safe and comfortable. Using a summer pest prevention guide, checking winter rodent entry points, and maintaining a seasonal pest checklist ensure your home remains safe and comfortable. Remember to combine inspections, physical barriers, and environmentally friendly methods for the best results.
FAQs
Q1: How often should I perform a termite inspection?
A1: Conduct inspections annually, especially in spring, to detect early signs of termite activity and prevent extensive damage.
Q2: Can pests enter my home during winter?
A2: Yes, rodents and insects seek warmth and shelter indoors. Sealing entry points and monitoring for activity is crucial.
Q3: What is the most effective eco-friendly method for pest prevention?
A3: Using natural repellents, encouraging beneficial insects, and eliminating water sources effectively reduces pest populations without chemicals.
Ensure your home is ready for every season. Schedule a professional Virginia pest control consultation or a termite inspection in Suffolk, VA, today and stay ahead of potential infestations.
 Windy City Painters
If you’ve been walking around Lincoln Park lately, you might have spotted our crews hard at work. We just wrapped up a project on a gorgeous local two-flat, and we wanted to share a quick look at the transformation!
The homeowner needed a dependable team to handle a mix of detailed interior work and exterior trim maintenance before the Chicago humidity catches up with us. Since vintage homes around here have aging plaster walls, we spent extra time patching cracks and sanding everything down to a factory-smooth finish.
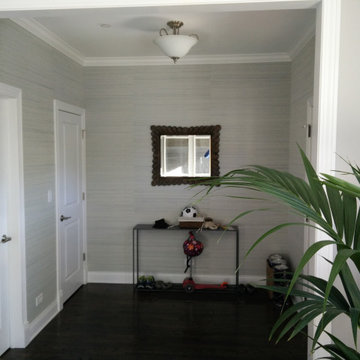
The highlight? We installed custom wallpaper in the entry foyer (take a look at the photo!) to give the home a stunning, welcoming first impression the second you step through the front door.
We know how stressful it can be to find a local "painter near me" who you can actually trust to show up on time, respect your property, and do a clean job. As a fully licensed and insured Chicago contractor, Windy City Painters handles all the masking, heavy drop cloths, and deep cleaning so you don't have to lift a finger.
We handle everything from drywall and plaster repair to exterior trim, cabinets, and specialized metal railing refinishing.
If your home needs a fresh look or some structural prep before the season shifts, we'd love to help! We always offer free, detailed estimates so you know exactly what to expect.
Drop a comment below, send a message, or check us out at www.windypainters.com to get your home on our schedule.
Stay neighborly, Lincoln Park!
 Ultimate Outdoor Design
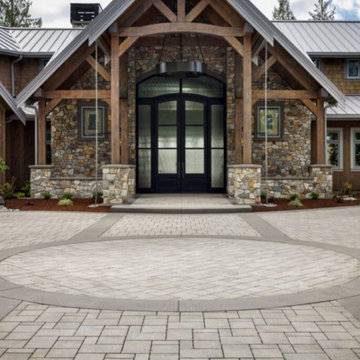
Every detail of a luxury driveway should feel like it belongs. This entrance combines the strength of Belgard Dimensions™, the natural texture of Origins™ 12, and the clean elegance of Lafitt® Grana Slab to create an architectural statement of balance and intent.
Dimensions™ provides the structural core. Tight joints, straight lines, and large-format geometry ideal for grand surface coverage.
Origins™ 12 softens the layout with a textured flagstone finish that creates visual depth and organic contrast.
Lafitt® Grana Slab, or its smooth equivalent, serves as a border, guiding the eye and framing the experience with sophistication.
Now imagine your guests arriving. The vehicle glides along an orderly path. The pattern shifts subtly as they approach the home. A round detail invites pause and attention. The entire layout feels curated. Not just paved. But designed to reflect the strength and story of the home itself.
This is not just a driveway. It is a front-of-house masterpiece.
Let’s explore how this material combination can bring your outdoor story to life.
Schedule your consultation today: 516-522-8249
 DLUX Design & Co.
A timelessly designed home full of classic elements and modern touches. Design & Build by DLUX Design & Co.
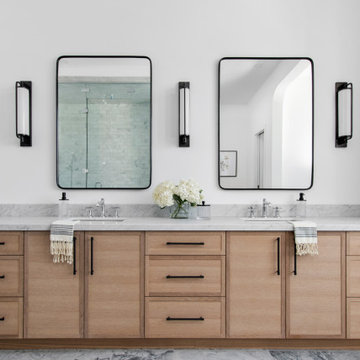
Freestanding bathtub - transitional marble floor, gray floor and double-sink freestanding bathtub idea in Other with shaker cabinets, black cabinets, a one-piece toilet, an undermount sink, marble countertops, a hinged shower door, white countertops and a built-in vanity
Freestanding bathtub - transitional marble floor, gray floor and double-sink freestanding bathtub idea in Other with shaker cabinets, black cabinets, a one-piece toilet, an undermount sink, marble countertops, a hinged shower door, white countertops and a built-in vanity

 Lisa Batson Goldberg Design
Betty Wang
Example of a mid-sized trendy freestanding desk study room design in Toronto with multicolored walls
Example of a mid-sized trendy freestanding desk study room design in Toronto with multicolored walls
 harry schott
Running a small restaurant is a high-wire act - delicious plates on one end, razor-thin margins on the other. With food costs averaging 28-35 percent of revenue and labor at 30 percent, every dollar counts. The good news? Targeted tweaks can shave 10-20 percent off your bottom line without sacrificing quality. From smarter sourcing to streamlined waste handling, these strategies empower independents to thrive. One underrated gem: Efficient waste management via roll-off dumpster rentals, which can slash disposal fees by up to 40 percent. Let's break it down.
Optimize Inventory: Waste Less, Save More
Overstocked pantries are profit killers - U.S. restaurants toss $25 billion in food yearly. Audit weekly. Track sales data to forecast demand, using apps like Toast or MarketMan for real-time insights. Trim your menu to 12-15 core items, focusing on seasonal, high-margin stars like farm-fresh salads over imported proteins. Portion control is key - pre-weighed scoops cut overuse by 15 percent.
Repurpose scraps creatively. Veggie peels into stocks, bread ends for croutons. Donate extras to food banks via apps like Too Good To Go, earning tax deductions up to $5,000 annually. These habits reclaim 5-10 percent of food budgets, freeing cash for upgrades. Additionally, consider using citrus rinds for infused oils or desserts, and coffee grounds for compost to support local gardens. Engaging staff in sustainability efforts also builds morale and can be highlighted in marketing materials to attract eco-conscious diners.
Trim Energy and Utilities: Go Green for Greenbacks
Utilities gobble 4-10 percent of expenses. Swap to LED bulbs and energy-star appliances - upfront costs pay back in 6-12 months via 20-30 percent bill drops. Install low-flow faucets and programmable thermostats; during off-hours, dial down to 55°F to save $200/month on HVAC.
Use induction cooktops for precise heat, reducing gas by 15 percent. Train staff on "last out" protocols - unplugging idle equipment. Solar panels? For rooftops under 1,000 sq ft, incentives cover 30 percent installation, yielding ROI in 5 years.
Master Waste Management: Dumpsters as Cost Commanders
Trash isn't just garbage - it's a budget black hole, with disposal eating 2-5 percent of revenues. Small spots generate 1-2 tons monthly from food scraps, packaging, and grease. Ditch overflowing bins and irregular hauls for roll-off dumpster rentals. A 10-15 yard unit centralizes waste, handling bulk like fryer oil drums or produce crates without daily pickups.
Efficiency Over Headcount
Labor's your biggest line item - cross-train staff for multi-roles, like servers prepping during lulls, trimming overtime 10-15 percent. Shift scheduling software optimizes based on reservations, avoiding idle payroll.
Negotiate bulk buys with local suppliers for 5-10 percent discounts; loyalty programs from Sysco yield free deliveries. Go digital - QR menus cut printing costs, speed table turnover, and allow menu updates in real time without waste. Loyalty apps boost repeat visits without increasing your advertising budget, making it easier to track customer preferences and send targeted promotions. Consider bundling purchases with other area restaurants to unlock deeper discounts and leverage supplier relationships for exclusive seasonal specials. These strategies can reduce overhead, improve customer retention, and keep operations flexible as trends shift.
4